1
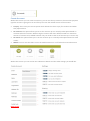
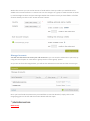
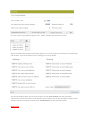
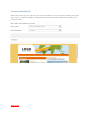
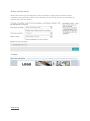
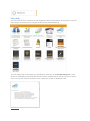
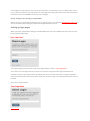
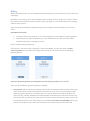
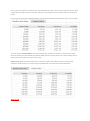
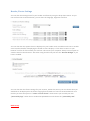
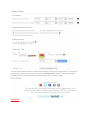
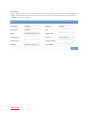
Agency Clients Section To view a section click on any header below: Clients Section......................................................................................................................................... 3 ................................................................................................... 4 .................................................................................................... 6 Create Account.................................................................................................................................... 6 Manage Accounts ............................................................................................................................... 7 Credit Allocations .............................................................................................................................. 10 Buy Credits ........................................................................................................................................ 11 Buy Mobile Credits ............................................................................................................................ 12 Account Communication .................................................................................................................. 13 .................................................................................................. 14 Copy Client Emails ............................................................................................................................. 14 Preview Client Emails ........................................................................................................................ 15 Delete clients email........................................................................................................................... 16 .................................................................................................. 17 Credit Allocation ............................................................................................................................... 17 .................................................................................................. 18 Sales Aids .......................................................................................................................................... 18 Integrations ....................................................................................................................................... 19 .................................................................................................. 20 Branding ............................................................................................................................................ 20 Billing................................................................................................................................................. 22 Header/Footer Settings .................................................................................................................... 28 Account ............................................................................................................................................. 30 Advanced .......................................................................................................................................... 31 Clients Section Our new client section has a lot of new features which will help you manage your current subaccounts and help you promote yourself to attract new ones. Some of the main new features are as follows: You can now post alerts in all or just some sub-accounts You can now promote the List Clean Up tool and resell the credits at a price you see fit. You can easily send messages to all or specific sub-accounts via mobile or email. You can preview, send and delete sub-account emails directly from your main account. You can gather a report on send credit allocation to find out who your most active users are. You can now include monthly subscriptions both per contact and per sends. Please continue through this user-manual as it will explain how the new ‘Clients’ section works. Within the Home section of ‘Clients’ you will see we now have some more detailed statistics for you to immediately view. We have displayed 4 sections on this page which have all been explained below: News and Activities: Within this section you will see all activity from your account; this will include the creation of new accounts including any trial accounts if you are using the Reseller Assistant. My Account Stats: This section gives you a breakdown of your subaccounts and all send credits you have so you can make sure you are always aware of when you are running low. Back To Top Post Alert: This section allows you to post an alert which will be added to the top of your client’s account. You can easily select which subaccount or group you would like the alert on, what you would like the alert to say and how long you would like the alert to be displayed within the account. An example is shown below: Top Sends: This section will allow you to keep track of your subaccount holders that are purchasing the most credits, we also allow you to view ‘Top Spenders’ and ‘Top Mobile Sends’. Back To Top Create Account Within this section you can create an account, you can use the top section to choose what payment type the account is going to be on and if they can view the mobile section of the account. Pre-pay: This is a Pay-As-You-Go option which allows the client to pay for credits as and when they require them. Per Contact: This option allows you to set the account up as a monthly subscription based on contacts within the account. While using this account the client will be limited to a maximum amount of contacts to be added however they can send to that list of contacts up to once a day. Per Send: This option allows you to set the account up as a monthly subscription based on send credits. Mobile: You can use the slider to turn the mobile section on or off within the new subaccount Within this section you can set the new subaccount details and also what settings you would like. Back To Top Within this section you can set the amount of send and list clean up credits you would like to be added to the account before it is created. You can also assign it to a group to make it easier to locate it, send messages to them and post messages within their account. Once you have filled in all of the account details just click on the “Create Account” button. Manage Accounts You will use this section to access your sub-accounts as you can view the subaccounts you have, by using the search option or view them in groups via the “select group” option. As you can see from the image below, you will see the subaccount username and the account type. Once you have found the subaccount you would like to view the details of, simply click on the magnifying glass on the left and the account details will then open. Back To Top Once you have clicked on the magnifying glass for a particular subaccount you can then view the details of that subaccount as shown below. Within this section you have the option to change the following: Non expiring email send credits remaining – You can use the “Non-expiring email send credits remaining” section to move send credits back and forth from your main account to the subaccount. Mailing Lists Remaining – You can move mailing lists to and from you main account. List Cleanup Credits – You can move sift credits to and from the subaccount, the list cleanup credits are used to allow your client to clean up their mailing list. You will also notice some new options under settings and sharing which are explained below: Settings: Display Settings Menu – This will display the Setup & Options menu in the subaccount Use Main Footer – This will allow you to assign the subaccount to use the main account footer. Can view email addresses – This will allow the user to view the email addresses within the account. Limit account access to Reports – This will prevent the user from accessing the Reports. Can access templates – This will allow the user to access over 80 responsive templates. Enable SMS in sub-account – This will enable the SMS tab so the user can send text messages and create mobile sites. Use main account API IPs – This will assign the subaccount with the main accounts IP addresses. Sharing: Share main account templates – If selected the user will have access to all newsletters/templates that are in the main account’s “templates folder”. Share main account mailing lists – This will allow the user to share the main account’s mailing lists. Share main account datasets – This will allow the user to share the main account’s datasets. Share main account blocklist – This will allow the subaccount to share the main account blocklist. Share main account images – This will allow the user to view and use the images within your main account. Back To Top You can use the cog symbol to login as user, admin or delete the account as shown: We have ordered the settings and sharing options so you can easily amend them for that particular sub-account. Just use the sliders to turn settings on or off as shown: The sharing facilities allow you to share sections of your main account with that particular subaccount. You will also notice at the bottom of this section you can also change the export email address and the new option to generate a “Credit Report” for that particular client. Back To Top Credit Allocations Within this section you can search for the subaccount you would like to add credits to by using a number of different options such as sort by Group, Username or Account. You also have the search bar at the top right which will allow you to start the search. Once you have done that you will see a number of subaccounts displayed such as below: Once you have the subaccount you would like you can select the magnifying glass to view further information and allocate credits. Once you have done the above, you will have the account details in front of you as shown below: Within this section you can move credits from and to the main account using the drop down menu as shown below: Back To Top Buy Credits You can use this option to purchase credits for your main account, of course these credits can easily be moved into the subaccounts as shown in the Credit Allocations section above. You can also purchase additional services by simply ticking the option you would like to include. Once you have selected the send credits or additional services you would like you can then click on the “make payment” button to continue. Back To Top Buy Mobile Credits Within this section of your account you can purchase mobile credits, they come at a standard price of 5p per mobile credit so you can purchase as many as you would like using the option below: Back To Top Account Communication You can now send emails directly from your Reseller Account to your mailing list or more importantly your subaccounts via the “Send an email” option. To save time you can also save messages that you will send to your clients as you can then just select the saved message from the option on the right. Alternatively if you would prefer to send a text message then you can use the “Send a SMS” option which allows you to send to your mobile list or a once off quick send. Back To Top Copy Client Emails Within this section you can copy a newsletter or even a whole folder from your main account and copy it into sub-accounts. Once you have selected the newsletter or folder, choose ‘all sub-accounts’ or alternatively just tick the specific sub-account you would like it to be added into and click copy. The newsletter(s) will then be added into your sub-account(s) and ready for use. Back To Top Preview Client Emails Within this section you can view all of your clients newsletters, once you select the folder you would like to look in, it will then display all newsletters that your sub-account holders have stored in that particular folder. Back To Top Delete clients email Within this section you can delete your clients newsletter, simply select the folder and the newsletter you would like to delete. Once selected, just tick the sub-account you would like to delete it from and click ‘Delete’. Back To Top Credit Allocation Within this section you can generate an overall credit allocation reports, as shown below you can choose what credits you would like to include in the report. You can choose all credits, extra credits, mobile only or monthly only. You can also easily set the ‘from’ and ‘to’ dates using the drop down calendar making it easy for you to generate specific credit reports. Back To Top Sales Aids You now have all of our resources at your fingertips, these include guides, best practices, tips and white papers to make sure you can get the best out of Email Marketing. You can simply click on the option you would like to view such as “Email Marketing Tips”. Once clicked, it will display a popup window which will have multiple links to articles for you to choose from. You can then click on the links to view a particular article or download a PDF. Back To Top Integrations We have numerous email integrations which your clients can have access to, or of course you can integrate their account for them. You can click on any of the integrations shown above, once clicked more information about the one you haven chosen will appear below such as “Sales Force Plugin v1.0 beta”: Back To Top Branding As a reseller you can rebrand the GraphicMail application to look like your own, this section allows you to do that. You can rebrand the application, the forward to a friend page and the abuse pages that are associated with your clients accounts. Once you click on “Set Up” it will allow you to upload your own company logo, provide a logout URL which will be used when your clients log out of their accounts and you can provide a support email address so your clients can email you directly. You can also edit the Forward to a friend page which will be used for your client accounts. Back To Top As well as the Forward to a friend page you can edit the “Report Abuse” page which will be used when your clients subscribers decide to make a complaint against the email they received. You can edit the styling options for each of the pages using the tools below: Once you have made your changes you can “Preview” them and if you are happy then just click on the “Save” option to keep your changes. Back To Top Mask the Graphicmail.co.uk URL with your own As an Agency Reseller you can mask the www.graphicmail.co.uk URL, so that your client sees only your website address. To do this you (or your DNS administrator) needs to create a sub-domain on your existing domain (e.g. http://newsletters.yourdomain.com). To do this you need to create a CNAME record in the DNS entry for your domain. Once you have done that point this CNAME record to resellers.graphicmail.co.uk Setting up a CNAME Step 1: Finding your DNS management area Your registrar's documentation should explain how to manage and modify DNS records including the CNAME record, or you may be able to get this information by sending them an email. If you're not sure, look for something similar to: • Advanced DNS • Custom DNS • DNS Management • Host Management Step 2: Finding the CNAME records Some registrars have different areas for different types of DNS records so that each can be modified separately. In this case, look for the area called something like: • CNAME Records • Aliases • Host Aliases Other registrars have a single area for managing DNS records. Here, you will typically need to select the type of record from a drop-down menu and you will want to make sure to select CNAME as the type. Step 3: Setting up your CNAME record for domain mapping There will usually be two fields where you can enter information for the CNAME record. These may be called: • Alias and Points to or Other Host • Host Name and URL • Name and Value You should enter resellers for the first field (Alias, Host Name, Name, etc). Also be alert for any special instructions that your registrar may have for this field. For the second field (Points to, Other Host, URL, Value, etc) enter our domain in the form: resellers.graphicmail.co.uk Do not include http:// at the beginning or any folder name at the end. Back To Top Some registrars may require you to enter the domain in a certain way, such as adding a dot at the end, so look carefully for any instructions on the page about doing this. After you have entered the information for your CNAME record save your changes. Step 4: Configure the settings in GraphicMail When you have completed the above process, please inform us by emailing [email protected] so we can complete the masking by update the GraphicMail web server. Setting up login pages When you have completed masking the GraphicMail URL with your CNAME the URL will now point to this generic login page: Your logo will be presented above the Client login where it states “Your Logo Here”. Your clients can now login directly to their own account using their own login username and password. If your client forgets their password then they can click on the link “Forgot Password?” and it will then allow them to enter their username and click Login, their password will then be sent to them. This form is shown below: Back To Top Customized login page You also have the option to design your own custom login page or even place the login into one of your existing web pages or on your home page. To do that you only need to place the Java Script code below into your website. You can then alter the code to customize it to your look and feel. HTML login form code When copying and pasting this code into the appropriate part of the HTML code you’re using for your sub-account login page, replace the generic newsletters.yourdomain.com with the masking URL you set up. <script> function CheckFields(){ var Error = false if(!document.inputForm.Email1.value>""){ alert("You have to enter 1 email address.") document.inputForm.Email1.focus() Error = true return false } if(!Error){ document.inputForm.Mode.value='Send' document.inputForm.submit() } } </script> </head> <table width="300" align=center cellpadding="7" cellspacing="0" bgcolor="EDEDED"> <form method="post" name="InputForm" action="http://newsletters.yourdomain.com/login/default.asp"> <input type="hidden" name="Mode" value="Login"> <tr><td colspan=2 align=center><font face='Verdana, Arial, Helvetica, sans-serif' size='1'><font size=3><b>Login</td></tr> <tr><td colspan=2 align=center><font face='Verdana, Arial, Helvetica, sans-serif' size='1'>To check your email campaign reports and statistics please enter your username and password into the appropriate area below</td></tr> <tr><td><font face='Verdana, Arial, Helvetica, sans-serif' size='1'>Username</td><td><input type="text" name="Username" size="20"></td><tr> <tr><td><font face='Verdana, Arial, Helvetica, sans-serif' size='1'>Password</td><td><input type="password" name="Password" size="20"></td><tr> <tr><td colspan=2 align=center><a href="default.asp?Mode=Forgot"><font face='Verdana, Arial, Helvetica, sans-serif' size='1'><font color=black>Forgot password?</a></td><tr> <tr><td colspan="2" align="center"><input type="image" name="Submit" SRC="http://newsletters.yourdomain.com/rwcode/webadmin/images/yellowlogin.gif" BORDER="0" ALT="Login" WIDTH="49" HEIGHT="18"></td></tr> </form> </table> </td></tr></table> Back To Top Billing Within the billing section you can enable the payment gateway so your clients can pay for their own campaigns. By default, you will pre-pay for the campaign sends and other account usage of your clients. When the client has used all their sends they must contact you again, so you can allocate more campaign sends to their account. There are alternative different billing methods you can enable to make reselling to your client’s easier. Quick Reference Guide To allow a client to pay directly or on a recurring basis you can enable a payment gateway. Depending on the payment gateway you have enabled you can offer your clients both monthly and 'pay per campaign' accounts. How to enable a payment gateway: Click “Clients” (tab at the top) >> Settings >> then select Billing, you can then select “enable payment gateway” at the top of your page. Once turned on you will then have the following gateway options: Select the payment gateway you would like to use by using the slider to turn it “On”. There are three different payment gateways available: 1. Our gateway which uses SecureTrading to process Visa and MasterCard transactions from your client. Each month we will credit amounts received from your clients to your PayPal account. With our payment gateway, you will be able to set your mark-up and resell all the plans we offer: pre-pay, monthly send plans and unlimited plans. We email your clients an invoice each time they make a purchase, your client will have access to these invoice from their account. All invoices generated for your client will be non-branded (no mention of GraphicMail). They only include a reminder for your client that interinbox.com will show up on their credit card. Back To Top 2. Your Gateway lets you integrate your own gateway for collecting payments. Integrating your gateway requires using our API for allocating updating your client accounts and allocating send credits to them. With your gateway, you’ve got the most flexibility. But you’ll need to do a lot of work to set this up and you’ll need programming skills or have a programmer who can do it for you. To learn more and see the API documentation click here. By default, our payment gateway will be selected with a commission of 20%. If you select, your own or our gateway, you can then set the mark-up and the price that your clients will pay for the plans. If you selected the Reseller Assistant gateway the plans are set-up within the Reseller Assistant. When you've finished adjusting the mark-up for pricing click save. Do I have to give the client account access if I want them to pay? No. If you don't want to provide any level of account access to the client, you can create an account for them and manage all sends from that account. How do I set-up an account? Go to the Create account menu and select type of account that you want to create for that account. What if I don’t know what plan, my client wants and only want to give them access? If you don’t know what account they want you can set them up as pre-pay initially and the client can then sign-up for the account they want when they are ready. Within the billing section you can select the commission you would like to have from the send credits that are purchased. You can use the drop down menu to select what percentage you would like to make, once you have done that simply click “save”. Back To Top Once you have chosen the commission you would like to make, you can then view the cost for send credits which include the price you pay, the price you sell them to your clients and the money you make. As you can see from the screenshot below you can toggle between the monthly plans you can offer: You can choose “Contact Plans” which is based on the amount of contacts in the account rather than the amount of send credits purchased. While on the Contact plans your clients will be able to send to their full contact list up to once a day. Please note: While on the Contact Plans, your clients will not be able to remove active email addresses however they can remove any hard bounced or unsubscribed email addresses. Back To Top Header/Footer Settings You can alter the settings used for your header and footer by using the drop down menus. As you can see from the screenshot below, you can alter the language, alignment and font. You can also alter the options that are displayed in your header such as enable social icons or enable vcard. Another benefit of displaying the header is that it displays a “click here to view it in your browser” link for all of the emails you send out. This means your recipients always have an option to view the email in their browser. Also when using that link they will see the “Browser Widget” if you have it enabled. You can also alter the footer settings for your account, within this section you can choose what you would like to be displayed in the footer ranging from forward to a friend to social media links. As a reseller you have the option to “create a custom footer” which means you can add your own “powered by logo” rather than a standard GraphicMail one and choose the “powered by URL”. Back To Top You can also preview the footer to make sure it displays exactly how you would like. If you change the settings in your footer then you can use the “refresh preview” button to see those changes, alternatively if you are happy with the footer settings you can click on “save”. Back To Top Account As you can see from the screenshot below, within this section you can change the details displayed within your main Reseller account. Once you have amended your account details just click on the “update” button to continue. Back To Top Advanced Within this section you have access to all of the advanced settings for your main Reseller account. You can enable API access using the slider, however if you use this then you will need to enter the IP address you will be using and contact GraphicMail support to add an API password. You can contact us by sending an email to [email protected] or contact us via the Live Chat. Once they have been set you will be ready to use the API, you can view the API documentation by clicking here. You can also contact support to change your download email address which will be used when you export any data from your account. If you would like to create your own dataset to store your subscribers data in then you will need to select “Multiple” in the Address Book Settings. You can also use this Authentication section to create SPF and DKIM records: Back To Top