1
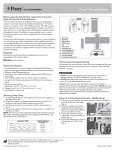
Page1
CLC PRO
Electronic Wireless Measuring System
User Manual
Revision 1.1
Chassis Liner Corporation
4571 Valley Industrial Blvd. South
Shakopee, MN 55379
Phone 1-800-242-2448
Page2
Table of Contents
Page#
Setting up the System………………………………………………. 3
Basic Description of Tools & Adapters…………………………….. 4
Basic Description of the CLC PRO………………………………... 5
Basic Terms used with the CLC PRO……………………………… 6
Getting Started………………………………………………………. 7
Selecting the Datum Points…………………………………………. 8
Selecting the Reference Points……………………………………... 9
Setting up the CLC PRO……………………………………………. 10
Creating the Datum…………………………………………………. 11-14
Measuring to Reference Points…………………………………….. 15-18
Measuring the Upper Body & Comparative………………………. 19-20
Saving & Opening Job Files………………………………………… 21
Printing Job Files……………………………………………………. 22
CLC Warranty………………………………………………………. 23
CLC Warranty Registration Form………………………………… 24
Page3
SETTING UP THE SYSTEM
Basic Setup
Once you have unpacked all of the components, start plugging in all connections to the computer such as:
• Monitor, Mouse, Keyboard
• Power Supply to the Computer & Monitor
4.5V Power
• Plug the Wireless Transmitter into the computer’s serial port.
supply
• Plug the 4.5V power supply to the transmitter.
Wireless
• Printer (instructions provided with the printer).
Computer
Transmitter
•
•
Computer Cabinet Assembly
Attach the Top and Bottom mounting brackets to the side of the cabinet with
the 1/4-20 bolts provided.
Place the CLC PRO and the horizontal tram bars in these mounting brackets for
storage.
CLC PRO and the
horizontal tram bars
Top & Bottom mounting brackets
Installing the Mitchell software
The Mitchell Software & the Printer are the only programs you will
need to load. All other programs are pre-loaded.
Have the computer turned on.
1.) Place the Mitchell CRS disk into the computer.
*Do Not Load the Mitchell CRS Program*
2.) Double click on the CLC PRO icon on the desktop.
3.) Close the vehicle selection screen.
4.) Click on the “Help” tab at the top of the screen.
5.) Click on “Register Mitchell Data”.
6.) Call the 1-800 number on the screen and a Mitchell representative
will give you the Registration Code.
7.) Click “Register”.
The CRS must be left in the computer to operate the CLC PRO.
Setting up your Shop Information
This will create your shop information for all printouts.
1.) If the CLC PRO program is not running, double click on
the CLC PRO icon on the desktop.
2.) Close the vehicle selection screen.
3.) Click on the “Settings” tab at the top of the screen.
4.) Click on “Shop Information”.
6.) Enter all fields you would like shown on your customer
printouts.
Do not install the Mitchell CRS
program!
Page4
Basic Description of Tools & Adapters
MAGNETIC ADAPTERS
These adapters are used to locate and to support the Stationary End of the tram.
Magnetic Hole Adapter
Used in holes or slots at the
Stationary Points.
Magnetic Bolt Adapter
Used at bolts & studs at the Stationary Points.
Magnetic Bolt Adapter
with the Stationary
Height Rod w/ Steel
Cone.
90 Degree Magnetic Adapter
Used with the Magnetic Bolt &
Hole adapters that are placed on
the side of the frame.
HEIGHT ROD ATTACHMNENTS
These attachments are used on the Height Rod (gold colored).
Placing a tool on the
Height Rod.
Large Cone
Used to measure to the
center of holes & slots.
Cup
Used to measure to the
center of bolts &
studs.
90 Degree Adapter
Shown with a cone connected to it. Used to measure to 90 degree locations.
Page5
Basic Description of the CLC PRO
A.) On/Off Button- To turn the tram on press this button. To turn
the tram off press and hold this button for 2 seconds.
B.) Scroll Button Reference Points– This button scrolls up or down
through all of the different measuring points you have selected.
C.) Side Scroll Button– This button scrolls through the different
kinds of measurements such as Height, Length, Width, & Diagonal
measurements.
D.) Enter Button- This button will transmit the measurement reading to the computer, where the measurement will then be recorded.
A
B
C
B
D
Sleep Mode: The CLC PRO has a sleep mode timer set for 15 minutes. If a button on the unit has not been
pressed in a 15 minute timeframe, the CLC PRO will go into sleep mode. To awake the unit, press any
Button.
Automatic Shut Off: The CLC PRO has an automatic shut off timer set for 1 hour. If a button on the unit
has not been pressed in 1 hour, the CLC PRO will shut itself down.
Small Cone
Steel Cone
Horizontal Locking Screw
Stationary Height Rod
(Black colored)
Small Horizontal
Tram Bar
Stationary Height Rod
Locking Screw
Height Rod
(Gold colored)
Vertical Locking
Screw
CLC PRO
Large Horizontal
Tram Bar
9 volt Rechargeable
Battery
To lengthen the Tram Bar, pull the Large Horizontal
Bar away from the Stationary end of the tram.
LCD Display
Height Rod Extension
(Gold colored)
Page6
Basic Terms used with the CLC PRO
The CLC PRO uses a handful of abbreviated words. Below is a description of these words.
(Examples of the CLC PRO display)
Datum
Mnft: 478
Actl: 478
Diff: 0
* Width
Stat Pt I PS
13mm Hole
Hole Attachm
Datum
Mnft: 1191
Actl: 1190
Diff: -1
* Diagonal
Base G DS
19mm Hole
Small Cone
Ref. D
Mnft: 1966
Actl: 1955
Diff: -11
* Length
Ref Pt B DS
13mm Bolt
16mm Cup
Driver Side = DS
Passenger Side = PS
Stat. Pt. I PS = Stationary Point “I” Passenger Side
Base G DS = Base Point “G” Driver Side
Ref. Pt. B DS = Reference Point “B” Driver Side
The Datum Plane
The Datum Plan is an imaginary line parallel to the vehicle from which all Height measurements are based from.
Example setup for the CLC PRO.
Stationary Points
Reference Points
Base Points
Passenger Side = PS
The Stationary & Base points make up the four undamaged points needed to create a Datum Plane.
The Reference Points are the locations in the damaged area of the vehicle that need to be repaired.
Driver Side = DS
Page7
GETTING STARTED
•
•
•
Make sure that the Mitchell Vehicle Dimensional CD is in the computers CD-ROM Drive, double click
on the “CLC PRO” icon on the computers Desktop.
Select the Year, Make, & Model of the vehicle.
Select the Model Type from the drop down box located in the upper right hand corner of the program.
Helpful Hint: Use the “Zoom”, “Zoom Window”, and “Pan” buttons located at the top of the vehicles
graphic to help locate and verify certain portion of the vehicle’s frame. Sometimes printing the vehicles
graphic can also help.
Page8
Selecting the Datum Points
STEP 1 (Establishing four Control Points to create the Datum Plane.)
The CLC PRO needs four undamaged points on the vehicles frame to establish and accurate Datum Plane!
A.) Click on the “Under Body” tab.
B.) Click on the “Stationary Point” button.
C.) Select two stationary points that are located in an undamaged section of the vehicle. The program will specify what type of magnetic adapter that should be placed at these locations on the vehicle.
D.) Click OK.
E.) Place the specified magnetic adapters on the vehicle.
STEP 2
A.) Click on the “Base Point” button.
B.) Select two base points that are located in an undamaged section of the vehicle. The program
will specify what type of tool (cups & cones) should be used at these locations on the vehicle.
C.) Click OK.
This completes the four undamaged points needed to complete the Datum setup.
Page9
Selecting the Reference Points
STEP 3
A.) Click on the “Height Rod” button and select which size height rod you will be using on the stationary end of the tram. Then click OK.
STEP 4
A.) Click on the “Reference Points” button.
B.) Select the reference points located in the damaged area of the vehicle that you would like to
measure. The program will specify what type of tool (cups & cones) should be used when measuring to
these locations on the vehicle.
C.) Click OK.
D.) Click the “Damaged” button.
This completes the initial setup procedures on the computer.
Page10
Setting up the CLC PRO
STEP 5
A.) Place the correct Stationary Height Rod (black colored), that you selected in STEP #3, in the
stationary end of the tram. Tighten the locking screw.
B.) Thread the Steel Cone Assembly into the Stationary Height Rod.
C.) Place a Height Rod Assembly (gold colored) in the top of the CLC PRO. Make sure that the
timing belt lines up with the pulley located inside of CLC PRO.
D.) Place a Small Cone on top of the Height Rod Assembly.
E.) Turn on the CLC PRO (make sure to use a fully charged battery). The screen will display that
the CLC is “Searching For Host”. (It may take 10 to 30 seconds to connect)
STEP 5A & B
STEP 5C & D
STEP 5E
STEP 6 (Home Position)
After the CLC PRO connects with the Host (computer).
A.) Retract the black box until it touches the Stationary End.
B.) Retract the vertical Height Rod Assembly until it bottoms out on top of the CLC PRO.
C.) Press the enter button on the CLC PRO to record the “Home Position”.
STEP 6B
Stationary End
STEP 6A
Vertical Height Rod
Page11
Creating the Datum
After the “Home Position” has been entered the display should change to the Datum mode.
(Example of the CLC PRO display)
Datum Mode
Manufactured Specification
Actually what the tram is reading
Difference between the manufactured spec and what the tram is
actually reading.
Datum
Mnft: 200
Actl: 177
Diff: -23
Height
Stat Pt I PS
13mm Hole
Hole Attachm
Displays what type of measurement
you are taking.
Height, Length, Width, & Diagonal.
This section displays:
-The point you are measuring to.
-Brief description of the location.
-What attachment should be used
at this location
STEP 7 (Measuring Height at the Stationary Point)
Make sure the Height for “Stationary Point PS” that you selected in STEP 1 is displayed on the CLC PRO.
A.) Move the height rod up until a difference of Zero is displayed.
B.) Lock the vertical height rod locking lever.
C.) Position the “Stationary Height Rod” at the magnetic adapter on the “DS” driver side.
D.) Position the CLC PRO “Height Rod” centered at the opposite magnetic adapter located at “PS”
passenger side.
E.) Press Enter.
Important: Hold the CLC PRO steady for 4 seconds before pressing enter.
When the Enter button is pressed
an “*” asterisk will appear to verify that the measurement has been
transmitted to the computer.
STEP 7D
STEP 7A & B
Datum
Mnft: 200
Actl: 200
Diff: 0
* Height
Stat Pt I PS
13mm Hole
Hole Attachm
STEP 7E
STEP 8 (Measuring Width to the Stationary Point)
A.) Press the “Side Scroll” button to display
Width for the “Stationary Point PS”.
B.) Press Enter.
* Width
Stat Pt I PS
13mm Hole
Hole Attachm
Stationary
Points
Datum
Mnft: 478
Actl: 478
Diff: 0
Passenger Side = PS
Driver Side = DS
Page12
Creating the Datum
After the Height and Width at the “Stationary Points” have been entered the display will change to
measure Height at the “Base Point DS”.
STEP 9 (Measuring Height at the “Base Point DS”)
Verify that Height for the “Base Point DS” that you selected in STEP 2 is displayed on the CLC PRO.
A.) Move the height rod up or down until a difference of Zero is displayed.
B.) Lock the vertical height rod locking lever.
C.) Position the “Stationary Height Rod” at the magnetic adapter on the “DS” driver side.
D.) Position the CLC PRO “Height Rod” centered in the hole at the“Base Point DS” .
E.) Press Enter.
Important: Hold the CLC PRO for 4 seconds before pressing enter.
Stationary
Point
STEP 9A & B
Base
Point
STEP 9
Driver Side = DS
STEP 10 (Measuring Length at the “Base Point DS”)
A.) Press the “Side Scroll” button to display Length for the “Base Point DS”.
B.) With the CLC PRO in position at the “Base Point DS” press Enter.
STEP 10A
STEP 9E
Passenger Side = PS
STEP 10B
Driver Side = DS
Page13
Creating the Datum
Base
Point
Stationary
Point
STEP 11 (Measuring Diagonal at the “Base Point DS”)
A.) Remove the stationary end of the tram from the “Stationary Point DS”
and move it to the “Stationary Point PS”.
B.) Press the “Side Scroll” button to display Diagonal for the “Base Point
DS”.
C.) Position the CLC PRO “Height Rod” centered in the hole at “Base
Point DS” .
D.) Press Enter.
Datum
Mnft: 1191
Actl: 1190
Diff: -1
* Diagonal
Base G DS
19mm Hole
Small Cone
STEP 11D
Passenger Side = PS
Driver Side = DS
STEP 12 - 14 (Repeat procedures in STEPS 9 through 11 only now measuring to the “Base Point PS”)
12.) Measure Height to the “Base Point PS”. (Make sure to hold steady for 4 seconds)
13.) Measure Length to the “Base Point PS”.
14.) Measure Diagonal to the “Base Point PS”.
STEP 13
Passenger Side = PS
STEP 14
Passenger Side = PS
STEP 12
Make sure to hold steady for 4 seconds when taking
height measurements to establish the Datum.
Driver Side = DS
After all of the “Stationary Points” and “Base Points” have been
measured, the “DATUM HAS NOW BEEN COMPLETED” screen
will be displayed.
Press enter to measure your “Reference Points”.
Page14
Creating the Datum
Below is an example of the information from STEPS 7 through 14 that was transmitted from the CLC PRO to the computer.
After the “Stationary Points” and
“Base Points” have been measured.
Their values are recorded here.
Use this scroll bar to view all of
the Stationary & Base Point
measurements.
THIS COMPLETES THE PROCESS OF MEASURING THE FOUR UNDAMAGED POINTS
NEEDED TO CREATE THE DATUM.
Page15
Measuring to Reference Points
After the “Datum” has been created the display should change to the “Reference” mode.
(Example of the CLC PRO display)
Displays what type of measurement you
are taking. Height, Length, Diagonal.
Reference Mode Damaged
Manufactured Specification
This section displays:
-The point you are measuring to.
-Brief description of the location.
-What tool (cup or cone) should be used
at this location
Actually what the tram is reading
Difference between the manufactured spec and what the tram is
actually reading.
Digital Level
STEP 15 (Measuring Height at the “Reference Point DS”)
Make sure the Height for the “Reference Point” you selected in STEP 4 is displayed on the CLC PRO.
A.) Position the “Stationary Height Rod” at the magnetic adapter on the “DS” side.
B.) Position the height rod with the correct tool (cup or cone) at the “Reference Point DS”.
C.) Move the height rod up or down until the “Digital Level” is centered between the two lines on
the CLC PRO display.
D.) Press Enter.
E.) Lock the vertical height rod locking lever.
Ref. R
* Height
Mnft: 250 Ref Pt A DS
Actl: 234 13mm Bolt
Diff: -16 16mm Cup
STEP 15D
Measuring Height on the Driver Side
STEP 15E
STEP 16 (Measuring Length at the “Reference Point DS”)
A.) Press the “Side Scroll” button to display Length for the “Reference Point DS”.
B.) With the CLC PRO already in position at the “Reference Point DS” press Enter.
Passenger Side = PS
Ref. D
Mnft: 1966
Actl: 1955
Diff: -11
* Length
Ref Pt A DS
13mm Bolt
16mm Cup
STEP 16B
Driver Side = DS
Page16
Measuring to Reference Points
STEP 17 (Measuring Diagonal at the “Reference Point DS”)
A.) Remove the stationary end of the tram from the “Stationary Point DS” and move it to the
“Stationary Point PS”.
B.) Press the “Side Scroll” button to display Diagonal for the “Reference Point DS”.
C.) Position the CLC PRO “Height Rod” centered in the bolt at “Reference Point DS” .
D.) Press Enter.
Passenger Side = PS
Ref. D
Mnft: 2203
Actl: 2189
Diff: -14
* Diagonal
Ref Pt A DS
13mm Bolt
16mm Cup
STEP 17D
Driver Side = DS
Stationary
Point
STEP 18 - 20 (Repeat procedures in STEPS 15 through 17 only now measuring to the “Ref. Point PS”)
18.) Measure Height to the “Reference Point PS”.
19.) Measure Length to the “Reference Point PS”.
20.) Measure Diagonal to the “Reference Point PS”.
STEP 19
Passenger Side = PS
STEP 18
STEP 20
Stationary
Point
Measuring Height on the Passenger Side
Driver Side = DS
REPEAT STEPS 15 through 20 WHEN MEASURING TO OTHER REFERENCE POINTS OR AS NEEDED!
Page17
Measuring to Reference Points
Below is an example of the information from STEPS 15 through 20 that was transmitted from the CLC PRO to the computer.
This column displays the
manufactured specification
for the “DS” driver side.
This column displays the Damaged
measurement for the “DS” driver
side.
This column displays the Damaged
measurement for the “PS” passenger
side.
This column displays the
manufactured specification
for the “PS” Passenger side.
The highlighted columns in the example above represent the “Reference Point” “A”
for the Driver Side and Passenger Side.
Page18
Measuring to Repaired Reference Points
STEP 21
A.) Click on the “Repaired” button in the Reference Options box.
Notice that the “Mode” changes when the “Repaired” button is clicked
(Example of the CLC PRO display)
Datum
Mode
Reference Mode
Repaired
Manufactured Specification
Actually what the tram is reading
Difference between the manufactured spec and what the tram is
actually reading.
Ref. R
Mnft: 200
Actl: 200
Diff: 0
Height
Ref Pt A DS
13mm Bolt
16mm Cup
Displays what type of measurement
you are taking.
Height, Length, Width, & Diagonal.
This section displays:
-The point you are measuring to.
-Brief description of the location.
-What attachment should be used
at this location
During the repair process repeat STEPS 15 through 20 to monitor your repairs. Once you have pulled the
vehicle back to the manufacturer’s specifications, press enter on the CLC PRO to record the “Reference
Point” measurements in the “Repaired” columns.
This column displays the Repaired
measurement for the “DS” driver
side.
This column displays the Repaired
measurement for the “PS” passenger
side.
The highlighted columns in the example above represent the “Reference Point” “A”
for the Driver Side and Passenger Side.
Page19
Measuring the Upper Body & Comparative
With the CLC PRO calibrated in its “Home Position” and the CLC program open.
STEP 1
A.) Click on the “Upper Body” tab located at the top of the screen.
B.) Click on the “Damaged” button.
STEP 2
A.) Click on the “Upper Body 1” button located at the side of the screen.
B.) Select an upper body description from the “Upper Body Selection” window.
C.) Click “OK”
STEP 2B & C
STEP 2A
STEP 3
A.) Manually enter the manufactured specifications that you are interested in measuring.
B.) Click “OK”
Reminder: If you want to measure to more that one upper body location, click on “Upper Body
2,3,4, or 5”, select the appropriate description and repeat procedures shown in STEPS 2 & 3.
Helpful Hint: Use the “Zoom Window”, and “Pan” buttons to help locate and verify the vehicle’s frame.
Sometimes printing the vehicles graphic can also help.
Page20
Measuring the Upper Body & Comparative
STEP 4
A.) Set the height rod so that it equals the height of the stationary end. This will create equal length
pointers for measuring Upper Body and Comparative measuring.
B.) Lock the vertical height rod locking lever.
Set equal to the stationary end
Displays the description of the
Upper Body measurement. Use
the UP & DOWN scroll buttons
to view more selections.
Manufactured Specification
Actually what the tram is reading
Difference between the manufactured spec and what the tram is
actually reading.
(Example of the CLC PRO display)
Engine Compartment
Mnft: 884
Damaged
Actl: 870
Width
Diff: -14
STEP 5
A.) Measure to the upper body locations that were chosen.
B.) Press enter to record the measurements.
C.) Repeat these measuring procedures for the “Repair” process.
Damaged
column
Repaired
column
This section displays either the
Damaged or Repaired mode for
upper body.
Displays what type of measurement
you are taking.
Height, Length, Width, & Diagonal.
Use the side Scroll button to view the
different measurements.
Page21
SAVING & OPENING JOB FILES
SAVING JOBS
A.) Click on “File” and then “Save” from the tool
bar. The “Job Data” window will appear.
B.) Enter a “Job Number” that corresponds with
how your shop records customers and repairs. Such as a
RO# or start a new filing system. It is entirely up to you.
Just remember, what ever you choose should be consistently used in the future. This will help in retrieving and
opening already saved jobs.
C.) Continue entering all of the (*)Required
Fields, and any other information you would like saved
with your Job#.
D.) When finished click “OK” to save.
OPENING JOBS
A.) Click on “File” and then “Open” from the tool bar. The “Data
Lookup” window will appear.
B.) Enter a “Job Number” that you want to retrieve.
C.) Click “OK” and wait for the job to open.
LOOKING UP JOBS
If a certain Job# has been misplaced or forgotten, there
is an alternative method for “Looking Up” jobs by
searching through the “Job Numbers” or by the
“Customers Name”.
A.) Click on “File” and then “Open” from the
tool bar. The “Data Lookup” window will appear.
B.) Enter a “Job Number” that already exists.
C.) Click “OK” and wait for the job to open.
D.) Click on the “Look Up” button under Job
Information to search Job#’s, or click on the “Look
Up” button under Customer Information to search by
last or first name.
Page22
PRINTING JOB FILES
PRINTING JOBS
A.) Click on “File” and then “Print” from the tool bar. The “Print” window will appear.
B.) Click “OK” to print. (Make sure printer is turned on)
Below is an example of an Under Body printout
Shop Information
Explains which Stationary
Height rod was used.
Explains what location was
used for the Stationary Point.
“DS” = Driver Side
“PS” = Passenger Side
Reference Point Column
Damaged
Repaired
Manufacturers vehicle data
In the above example Reference Point “A” for
both Driver side and Passenger side is shown
Page23
CHASSIS LINER CORP (CLC) COMPUTER AND WIRELESS AUTO MEASURING LIMITED
WARRANTY
CUST__335
•
Chassis Liner Corp warrants its manufactured products to be free from defects in material and workmanship for
a period of two (2) years to the original buyer of the product. Products not manufactured by Chassis Liner
Corp are not warranted by Chassis Liner Corp. Any warranties on products distributed by Chassis Liner Corp,
which are not manufactured by Chassis Liner Corp, are those offered by the product manufacturer. Any alleged defective product must be returned to Chassis Liner Corp freight prepaid. In the event a product is found
defective, Chassis Liner Corp will, at its option, repair or replace the defective product at its expense or refund
the amount of the purchase price. If the product is repaired, it will be returned freight prepaid by Chassis Liner
Corp.
•
The above warranty is the warranty made by Chassis Liner Corp and is lieu of any other warranty. All other
warranties, expressed or implied, including, but not limited to the implied warranties of merchantability and
fitness for a particular purpose, are disclaimed. Agents of Chassis Liner Corp have no authority to make representations of any sort beyond those contained herein and any representations or promises inconsistent with or in
addition with or in addition to this warranty are unauthorized and shall not be binding upon Chassis Liner Corp.
•
The warranty does not extend to any product that was subjected, in Chassis Liner Corp judgment, to misuse,
alteration, neglect, accident, or repair by others when the product has been altered or defaced.
•
Chassis Liner Corp’s liability whether in contact, in tort, under any contract provision, warranty, in negligence
or otherwise shall not exceed the return of the amount of the purchase price paid by purchaser and under no
circumstances shall Chassis Liner Corp be liable for special, indirect, incidental or consequential damages. The
buyer expressly agrees that the remedies of repair, replacement or refund of purchase price are the buyer’s sole
remedy.
•
Chassis Liner Corp reserves the right to alter product specifications and components without notice.
•
Persons who have been trained on its safe and proper use must only operate Chassis Liner Corp products.
•
Please contact your Regional Manager or our Quality Manager for additional information.
TO VALIDATE THIS WARRANTY, THE CHASSIS LINER CORP WARRANTY REGISTRATION FORM MUST BE
COMPLETED AND RETURNED TO THE ADDRESS SHOWN BELOW:
Chassis Liner Corporation
4571 Valley Industrial Blvd. S.
Shakopee, MN 55379
Office: 1-800-242-2448
Fax: 1-952-229-8288
Page24
CLC WARRANTY REGISTRATION FORM CUST__340
CLC WARRANTY
REGISTRATION FORM
(Name of purchaser)
(Phone Number)
(Address)
(Fax Number)
(City, State & Zip Code)
(E-mail)
TYPE OF UNIT PURCHASED: ______________________________
___________________________________________________
(Give complete description – i.e. Twinn Lift, Revolution, length, number of towers, etc.)
DATE OF PURCHASE:
____________/________/__________
MONTH
UNIT SERIAL NUMBER:
DAY
YEAR
____________________________
(Please write legibly)
AUTHORIZED SIGNATURE:
_______________________________
(Owner or Authorized Representative)
This form must be filled out completely, mailed, received and filed at the Plant for this warranty to be valid.
Mail to: Chassis Liner Corp.
ATTN: Quality Manager
4571 Valley Industrial Blvd. South
Shakopee, MN 55379