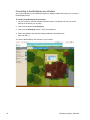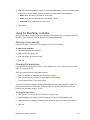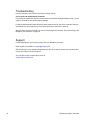
1
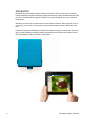
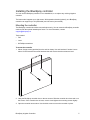
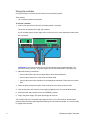
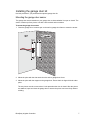
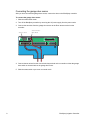
BlueSpray Irrigation Controller
Installation & Usage
www.bluespray.net
Copyright 2014 Avidz LLC. All rights reserved.
This document contains information protected by
copyright. No part of this document may be
reproduced in any form without written consent
from Avidz.
The information in this document is provided “as is”
and is subject to change without notice. Avidz is
not liable for errors or omissions in this document.
Microsoft Windows is a registered trademark of
Microsoft Corporation in the United States and/or
other countries.
Avidz has made every effort to identify
trademarked properties and owners. All brands
and product names used in this document are for
identification purposes only and may be
trademarks or registered trademarks of their
respective companies.
The warranties for Avidz products are set forth in
the express limited warranty statements
accompanying such products. Nothing in this
document constitutes an additional warranty.
Contents
Introduction . . . . . . . . . . . . . . . . . . . . . . . . . . . . . . . . . . . . . . . . . . . . . . . . . . . . .4
Installing the BlueSpray controller. . . . . . . . . . . . . . . . . . . . . . . . . . . . . . . . . . .5
Mounting the controller. . . . . . . . . . . . . . . . . . . . . . . . . . . . . . . . . . . . . . . . . . . . . . . . . 5
Wiring the controller . . . . . . . . . . . . . . . . . . . . . . . . . . . . . . . . . . . . . . . . . . . . . . . . . . . 6
Installing the garage door kit . . . . . . . . . . . . . . . . . . . . . . . . . . . . . . . . . . . . . . .7
Mounting the garage door sensor . . . . . . . . . . . . . . . . . . . . . . . . . . . . . . . . . . . . . . . . 7
Connecting the garage door sensor. . . . . . . . . . . . . . . . . . . . . . . . . . . . . . . . . . . . . . . 8
Getting started . . . . . . . . . . . . . . . . . . . . . . . . . . . . . . . . . . . . . . . . . . . . . . . . . . .9
Status lights . . . . . . . . . . . . . . . . . . . . . . . . . . . . . . . . . . . . . . . . . . . . . . . . . . . . . . . . . 9
Status switch . . . . . . . . . . . . . . . . . . . . . . . . . . . . . . . . . . . . . . . . . . . . . . . . . . . . . . . . 9
Connecting to the BlueSpray user interface. . . . . . . . . . . . . . . . . . . . . . . . . . . . . . . . 10
Status panel . . . . . . . . . . . . . . . . . . . . . . . . . . . . . . . . . . . . . . . . . . . . . . . . . . . . . . . . 11
Configuring Bluespray . . . . . . . . . . . . . . . . . . . . . . . . . . . . . . . . . . . . . . . . . . .12
Setting up zones . . . . . . . . . . . . . . . . . . . . . . . . . . . . . . . . . . . . . . . . . . . . . . . . . . . . 12
Setting up programs. . . . . . . . . . . . . . . . . . . . . . . . . . . . . . . . . . . . . . . . . . . . . . . . . . 13
Setting up seasons. . . . . . . . . . . . . . . . . . . . . . . . . . . . . . . . . . . . . . . . . . . . . . . . . . . 14
Setting up schedules . . . . . . . . . . . . . . . . . . . . . . . . . . . . . . . . . . . . . . . . . . . . . . . . . 15
Setting up sensors . . . . . . . . . . . . . . . . . . . . . . . . . . . . . . . . . . . . . . . . . . . . . . . . . . . 16
Setting up operations . . . . . . . . . . . . . . . . . . . . . . . . . . . . . . . . . . . . . . . . . . . . . . . . . 16
Setting up weather options. . . . . . . . . . . . . . . . . . . . . . . . . . . . . . . . . . . . . . . . . . . . . 17
Setting up system information . . . . . . . . . . . . . . . . . . . . . . . . . . . . . . . . . . . . . . . . . . 17
Standalone mode and Internet mode. . . . . . . . . . . . . . . . . . . . . . . . . . . . . . . . . . . . . 18
Updating firmware . . . . . . . . . . . . . . . . . . . . . . . . . . . . . . . . . . . . . . . . . . . . . . . . . . . 19
Restarting the controller . . . . . . . . . . . . . . . . . . . . . . . . . . . . . . . . . . . . . . . . . . . . . . . 19
Using the Calendar view . . . . . . . . . . . . . . . . . . . . . . . . . . . . . . . . . . . . . . . . . . . . . . 19
Viewing the history report. . . . . . . . . . . . . . . . . . . . . . . . . . . . . . . . . . . . . . . . . . . . . . 20
Registering the BlueSpray controller . . . . . . . . . . . . . . . . . . . . . . . . . . . . . . . . . . . . . 20
Using the BlueSpray controller . . . . . . . . . . . . . . . . . . . . . . . . . . . . . . . . . . . .21
Watering a zone manually . . . . . . . . . . . . . . . . . . . . . . . . . . . . . . . . . . . . . . . . . . . . . 21
Changing the lawn picture . . . . . . . . . . . . . . . . . . . . . . . . . . . . . . . . . . . . . . . . . . . . . 21
Troubleshooting. . . . . . . . . . . . . . . . . . . . . . . . . . . . . . . . . . . . . . . . . . . . . . . . .22
Support . . . . . . . . . . . . . . . . . . . . . . . . . . . . . . . . . . . . . . . . . . . . . . . . . . . . . . . .22
BlueSpray Irrigation Controller
3
Introduction
BlueSpray is a web-enabled irrigation controller. It has built-in Wi-Fi, an intuitive user interface,
flexible scheduling, and offers unlimited programs and start times. Unlike the dials and buttons that
you use to control traditional irrigation controllers, you control BlueSpray from your computer or
smart phone.
BlueSpray can also adjust to seasonal and current weather conditions. When used with a rain or
soil sensor, you can save as much water as you do with any Smart controller without any extra
fees.
Control and access your BlueSpray controller from anywhere using your web browser—there is no
app to install. BlueSpray's extremely flexible programming and innovative user interface make it
the most advanced irrigation controller on the market.
4
BlueSpray Irrigation Controller
Installing the BlueSpray controller
You can use the BlueSpray controller in new installations, or to replace any existing irrigation
controller.
The base model supports up to eight zones. With expansion boards (optional), one BlueSpray
controller can support up to 24 (residential) and 128 zones (commercial).
Mounting the controller
The BlueSpray controller should be mounted indoors only. You can mount the BlueSpray controller
outdoors with the optional weatherproof case. For more information, contact
[email protected].
Tools needed
•
Drill
•
Level
•
#2 Phillips screwdriver
To mount the controller
1. Mount 2 large screws (provided) into the wall as shown. Use wall anchors if needed. Leave
about 1/8 inch between the screw head and the wall. Ensure that the screws are level.
2. Hang the BlueSpray controller box on the two screws. Slide the controller box down and on to
the screws. If the controller box is loose, remove it and tighten the mounting screws slightly.
3. Open the controller access door. Use the third screw to secure the controller in place.
BlueSpray Irrigation Controller
5
Wiring the controller
Use this procedure to connect the valve wires from the sprinkler system.
Tools needed
•
1/4 in. slotted screwdriver (flat head)
To wire the controller
1. Connect the valve wires to the zone terminals marked 1 through 8.
The zones are ordered left to right, top to bottom.
If your controller has more than eight zones, it will have one or more expansion boards under
the main board.
RAIN
DOOR
RSVD
1
2
3
4
5
J9
6
7
8
M
COM
24V COM AUX1 AUX2
J2
CAUTION: Do not connect a valve wire to the first terminal on the expansion board. This
terminal is used by the 24 V AC power supply. Use the terminals marked 1 through 8 only.
2. Make the following connections:
• Connect the master valve wire (if applicable) to the terminal marked M.
• Connect the common wire to the terminal marked COM.
• Connect the sensor wires (rain/door) to the appropriate terminals. Polarity does not matter
here.
3. Route the wires through the bottom of the controller box and close the access door.
4. Connect the power wire from the power supply (supplied) to the 24 V and COM terminals.
5. Ensure that the status switch is in the up (NORMAL) position.
6. Plug in the power supply. The green power light will come on.
The controller will start. The amber status light will come on for a few seconds, and then start
blinking. When the amber status light starts blinking, the controller has started. You are now ready
to configure the controller.
6
BlueSpray Irrigation Controller
Installing the garage door kit
Use this procedure if you purchased the optional garage door kit.
Mounting the garage door sensor
The garage door sensor attaches to your garage door to detect whether it is open or closed. The
sensor is made up of two pieces: one with a wire terminal and one without.
To mount the garage door sensor
1. Close the garage door. Locate a spot on the wall or garage door frame to mount the sensor.
2. Mount the piece with the wire terminal on the wall or garage door frame.
3. Mount the piece with the magnet on the garage door. Ensure that it is aligned with the other
piece.
The two pieces must be no more than 1 inch apart when the door is closed. After the pieces
are attached, open and close the garage door to ensure the pieces can move freely without
colliding.
BlueSpray Irrigation Controller
7
Connecting the garage door sensor
After you have mounted the garage door sensor, connect the wires to the BlueSpray controller.
To connect the garage door sensor
1. Slide the status switch down.
2. Turn off the BlueSpray controller by removing the AC power supply from the power outlet.
3. Connect the two wires from the garage door sensor to the Door sensor terminal on the
controller.
To door motor/
wall switch
To door sensor
RAIN
DOOR
RSVD
1
J9
2
3
4
5
6
7
8
M
COM
24V COM AUX1 AUX2
J2
4. Connect the two wires from the door switch relay terminal on the controller to either the garage
door switch or the terminals on the garage door motor.
5. Slide the status switch up to return to normal mode.
8
BlueSpray Irrigation Controller
Getting started
Use the information in this section to get started with the BlueSpray controller.
Status lights
The status lights are on the left side of the BlueSpray controller above the status switch.
Color
Light
Description
Green
Power
The controller is on.
Blue
Data
The light blinks while the controller is
sending or receiving data over the
wireless connection.
Amber (solid)
Attention
The controller is starting.
Attention
The controller's time is not synced. If in
standalone mode, connect to the
controller and time will be synced
automatically. If in Internet mode, the
controller cannot get the time from the
Internet, possibly not able to connect to
your wireless router.
Amber (blinking)
Status switch
The status switch is on the left side of the BlueSpray controller under the status lights. Use the
switch to select the mode of the controller.
Normal mode
To run the controller in normal mode, slide the switch up.
Default mode
To run the controller in default mode, slide the switch down for at least 10 seconds, and back up in
less than 30 seconds.
In default mode, the controller uses the default network settings. All programs and schedules are
saved. You can use default mode to restore a connection to the controller if the network settings
are changed or lost. See “Connecting to the BlueSpray user interface” on page 10.
Service mode
To run the controller in service mode, slide the switch down. The controller goes into service mode
after 30 seconds.
In service mode, the controller temporarily sets itself to Standalone mode with the SSID bluespray,
no encryption, and no password. This allows someone such as a service technician to access the
BlueSpray controller for manual runs and configuration. In Service mode, you cannot change the
configuration, but you can water.
BlueSpray Irrigation Controller
9
Connecting to the BlueSpray user interface
We recommend that you use a desktop computer or laptop computer the first time you connect to
the BlueSpray device.
To connect to the BlueSpray user interface
1. On your computer, view the available wireless networks. The specifics of how you do this
depend on the device you are using.
2. Look for the network named bluespray.
3. Connect to the bluespray network. There is no password.
4. Start a web browser and enter the following address in the address bar:
http://192.168.1.1
You will see the BlueSpray user interface in your browser.
10
BlueSpray Irrigation Controller
Status panel
The status panel on the left side of the BlueSpray user interface shows the current condition of
your BlueSpray controller.
Connection Status
Shows whether your browser is connected to the controller.
Controller Status
•
On. The controller is on and operating normally.
•
Standby. The controller is in standby mode. All watering activities are suspended until the
controller is returned to normal mode.
•
Delayed. The controller is on, but all watering activities are suspended temporarily. Typically,
Delayed status means that the rain sensor has detected rain, or a manual delay has been set.
Note: You can click the Power button
mode.
to switch between on (normal mode) and standby
Controller's time
Shows the controller’s current time of day.
Note: You can click the Sync button
day on your computer.
to synchronize the BlueSpray controller with the time of
Today's Runs
Shows the runs that are scheduled for the current day. You can click the magnifying glass button to
see the details of a run. Click the X button to cancel a run.
•
Grey. A watering run is scheduled but has not run yet.
•
Green. A watering run is currently running.
•
Crossed out grey. A watering run has already run.
•
Crossed out red. A watering run was scheduled, but was cancelled.
Note: To start a manual run, click the faucet button
or any zone icon
.
Current Season
Shows the current season and the water budget for the current season.
Rain Sensor
Shows the current status of the rain sensor. This panel appears only if you have a rain sensor.
•
Inactive. the rain sensor is dry.
•
Active. the rain sensor is wet (triggered).
BlueSpray Irrigation Controller
11
Door Sensor
Shows the current status of the garage door. This panel appears only if you have a door sensor.
When the door is opened, the panel will show the time that the door is scheduled to close. Click
the Edit button to change the time you want to close the door.
•
Close door at. The time you want to the door to close. Applies to the current day only.
Note: You can click the garage button to open and close the garage door manually.
Configuring Bluespray
You use the BlueSpray user interface to configure the BlueSpray controller. If you have not
connected to the BlueSpray user interface, see “Connecting to the BlueSpray user interface” on
page 10.
Setting up zones
A zone is a collection of sprinkler heads grouped together to water a part of your lawn. A typical
irrigation system has multiple zones.
To create a zone
1. Click the Lawn View tab.
2. In the upper right corner, click the sprinkler head icon
and drag it onto the lawn. Place it in
the approximate location of the zone on your property.
To edit a zone
1. Click the Lawn View tab.
2. Right-click the zone you want to edit. On a touch screen device, you can press and hold the
zone.
3. Enter the following:
• Name. Enter a unique name for this zone.
• Active. Enable or disable the zone. If you select No, the zone is disabled. It will not be
watered until you select Yes. Use this feature to prevent a zone from watering if a sprinkler
head is malfunctioning.
To move a zone
1. Click the Lawn View tab.
2. Locate the icon for the zone you want to move. Click and drag it to its new location.
Note: If you are using a touch screen device, you might inadvertently drag a zone when you tap on
it. To prevent inadvertent dragging, you can disable the click and drag feature. Tap the lock button
on the upper right corner of the lawn view.
12
BlueSpray Irrigation Controller
To reorder zones
BlueSpray will water zones in the order they are added. You can reorder the zones using the
BlueSpray user interface; you do not need to rewire the controller.
1. Click the shuffle button
in the upper right corner of the lawn view.
2. Drag the zones up or down to put them in the desired order.
3. Click OK.
To delete a zone
If you've added more zones than you need, you can delete them.
•
Drag the zone icon to the trash can icon
in the upper right corner. When the trash can turns
red, drop the icon to delete it.
Setting up programs
A program is a set of run times for some or all zones. You can add as many programs as you like.
You will associate a program with a schedule.
To create a program
1. Click the Settings tab, then click the Programs tab.
2. Click the New button.
3. Enter the following:
• Program name. Enter a unique name for the program.
• Run times. Enter the number of minutes to water each zone.
4. Click Save.
To edit a program
1. Click the Settings tab, then click the Programs tab.
2. Click the program you want to edit.
3. Make the appropriate changes to the program.
4. Click Save.
To delete a program
1. Click the Settings tab, then click the Programs tab.
2. Click the program you want to delete.
3. Click Delete.
4. Click Save.
Note: The program is not deleted until you click Save. If you change your mind about deleting the
program, click the Cancel button.
BlueSpray Irrigation Controller
13
Setting up seasons
You can use seasonal settings, to water more efficiently during various times of year. You can
water more in the Summer, less in the Spring and Fall, and perhaps not at all during the Winter.
To create a season
1. Click the Settings tab, then click the Seasons tab.
2. Click the New button.
3. Enter the following:
• Season name. Enter a unique name for the season.
• From date. Enter a start date for the season.
• To date. Enter an end date for the season.
• Percentage. Enter the water budget for the season. The percentage applies to the run time
configured. For example, if you set 100% for the summer and 50% for the fall, and each
zone to run for 10 minutes, then the controller will run the full 10 minutes in the summer and
5 minutes in the fall. A percentage ending with a 5 is rounded up. For example, 55% will run
for 6 minutes.
To edit a season
1. Click the Settings tab, then click the Seasons tab.
2. Browse to the season you want to edit.
3. Make the appropriate changes to the season.
4. Click Save.
To delete a season
1. Click the Settings tab, then click the Seasons tab.
2. Browse to the season you want to delete.
3. Click Delete.
4. Click Save.
Note: The season is not deleted until you click Save. If you change your mind about deleting the
season, click the Cancel button.
14
BlueSpray Irrigation Controller
Setting up schedules
A schedule is a watering run. You will associate a program with the schedule.
To create a schedule
1. Click the Settings tab, then click the Schedules tab.
2. Click the New button.
3. Enter the following:
• Run Name. Enter a unique name for the schedule.
• Start Time. Enter the time of day to start watering.
• Run Program. Select a program that you want to run with this schedule.
• Apply to Season. Select a season for this watering run. By default, a run is applied to all
seasons (year round).
• Active. Select Yes to keep this run active. Select No to disable the watering run.
• Run Interval. Specify how often you want this schedule to water.
Even days: Run on even days of the month only.
Odd days: Run on odd days of the month only.
Every X days: Run every X number of days.
Days of Week: Run on certain days of the week.
To edit a schedule
1. Click the Settings tab, then click the Schedules tab.
2. Browse to the schedule you want to edit.
3. Make the appropriate changes to the schedule.
4. Click Save.
To delete a schedule
1. Click the Settings tab, then click the Schedules tab.
2. Browse to the schedule you want to delete.
3. Click Delete.
4. Click Save.
Note: The schedule is not deleted until you click Save. If you change your mind about deleting the
schedule, click the Cancel button.
BlueSpray Irrigation Controller
15
Setting up sensors
If you installed a rain sensor or door sensor, use the information in this section to configure it.
Consult your rain sensor user manual to see what type of sensor you have. Configuring the
sensors improperly may affect the operation of your BlueSpray controller.
To set up a sensor
1. Click the Settings tab, then click the Sensors tab.
2. Enter the following to set up the rain sensor:
• Sensor type. Select the type of rain sensor that you have.
NO: Normally Opened rain sensor
NC: Normally Closed rain sensor
3. Enter the following to set up the door sensor:
• Close after (minutes). Close the door automatically if it has been open for a specified
amount of time.
• Close at. Close the door automatically at a particular time of day, if it is open.
4. Click Save.
To test the Door Switch relay, click the garage door button on the Status Panel and see if your
garage door opens and closes on demand. If the controller is unable to close the door, it will try
again until the door is successfully closed. The time between attempts is the same value as Close
after, and one minute if Close at is configured.
Setting up operations
Use the information in this section to configure the general behavior of the BlueSpray controller.
To set up operations
1. Click the Settings tab, then click the Operations tab.
2. Enter the following information to set up the controller settings:
• Master Valve. Select Yes if you have a master valve installed.
• Delay watering. Temporarily suspends all watering for X number of days. The controller will
count down this value each day until it reaches 0, then all scheduled runs will resume as
normal. While in delay mode, you still can water manually.
• Bypass Rain Sensor. If the rain sensor is not operating properly, you can bypass it and
resume all scheduled runs.
• Stack runs. In Stack mode, overlapping runs will be rescheduled to be run sequentially.
Otherwise, they will be run in parallel. Note that if you run concurrent runs, you may not
have enough pressure to water your lawn properly. Residential users should typically
choose Yes for Stack mode.
16
BlueSpray Irrigation Controller
3. Enter the following information to set up the lawn settings:
• Lawn picture. Specify the picture that represents your lawn in the BlueSpray user interface.
For more information, see “Changing the lawn picture” on page 21.
• Zone text color. Select a color to use for the text in your lawn picture.
4. Click Save.
Setting up weather options
BlueSpray can modify your scheduled watering based on the weather forecast.
Note: To use weather settings, the BlueSpray controller must be running in Internet mode and
have access to the Internet. Also, you must register your controller to use this feature. See
“Registering the BlueSpray controller” on page 20.
To set up weather options
1. Click the Settings tab, then click the Weather tab.
2. Enter the following:
• Chance of rain is at least. Do not water if rain is likely.
• Extend rain forecast to. Look X number of hours further into the forecast.
• Temperature is less than. Do not water if it is too cold.
• Wind speed is greater than. Do not water if it is too windy.
Note: Forecast data is obtained from NOAA. The forecast is based on ZIP code and may not
reflect the actual weather conditions at your property. Use it as a guideline only. BlueSpray is not
responsible for the accuracy of the weather forecast.
Setting up system information
Use the information in this section to configure system and security information.
To set up system information
1. Click the Settings tab, then click the System tab.
2. For Controller Name, enter a descriptive name for the BlueSpray controller.
3. Enter the Wi-Fi settings:
• Operating Mode. Select the controller’s mode. See “Standalone mode and Internet mode”
on page 18.
• Network SSID. Select the SSID of the wireless network you want to join. In Stand alone
mode, the SSID is the controller's Wi-Fi SSID. To search for nearby wireless networks, click
the Wi-Fi button next to the “Network SSID” field.
• Encryption. Select the type of encryption of the wireless network.
• Key. Enter the key or password for the wireless network.
BlueSpray Irrigation Controller
17
4. Enter the time settings:
• Time zone. Select the time zone for your location.
• NTP servers. Specify the address of Internet time servers. You can use the default NTP
servers unless you need to use custom ones.
5. Enter the security settings:
• Enable login. Select Yes to restrict access to your controller.
• Login Name. If login is enabled, enter the login or user name that you want to login as.
• Password. If login is enabled, enter the password for the login name above.
6. Click Save.
The controller will sync if it can’t get to the Internet when it starts. After syncing, the controller will
run on its own.
In case of power loss, the controller's clock may need to be synced. If so, the amber light on the
controller will blink. To sync, connect to the controller using any computer.
Standalone mode and Internet mode
The BlueSpray controller can work with or without an Internet connection. If there is no Internet
connection available, set the controller to Standalone mode.
In Standalone mode, you can access the BlueSpray user interface to configure, change, and
monitor the system. Once set, BlueSpray can run on its own. However, with Internet access, you
can use features such as weather settings, remote access, and automatic time syncing.
If the BlueSpray controller successfully joins your home network, it will have access to the Internet.
You can access the BlueSpray controller from any computer on your home network. Open a web
browser and enter the following address in the address bar:
http://my.bluespray.net
If you cannot access the BlueSpray controller on your home network, check the wireless signal
strength at the controller. If you still cannot access the controller, set the controller to default mode
and try again. See “Status switch” on page 9.
Note: In Internet mode, the controller gets the system time from the Internet and automatically
adjusts for Daylight saving time. In Stand Alone mode, the controller automatically gets the system
time from the computer you are using to connect to the controller.
18
BlueSpray Irrigation Controller
Updating firmware
BlueSpray periodically provides new firmware to fix bugs or add features.
To update firmware
1. Download the latest firmware image file from www.bluespray.net/support.html
2. Save the firmware image file to your local computer.
3. Click the Settings tab, then click the Administration tab.
4. Under Firmware update, click the Browse button. Select the firmware image file and click OK.
The update process takes about two minutes. Do not disconnect power from the controller while
the update is in progress.
Restarting the controller
Use this procedure to restart the controller.
To restart the controller
1. Click the Settings tab, then click the Administration tab.
2. Click the Restart Controller button.
Using the Calendar view
Use the calendar view to see your scheduled runs for the week.
To use the calendar view
•
Click the Calendar tab.
To advance to the following week, click the Next button.
BlueSpray Irrigation Controller
19
Viewing the history report
BlueSpray logs all run times for up to one year. Use the history report to track your watering
schedule and water usage.
To use the history report
•
Click the History tab.
You can view your watering history for the past 7 days, past 30 days, last week, or last month.
The left column represents the number of minutes your controller waters each day.
Registering the BlueSpray controller
If your controller has not been registered, you will see a Register button on the Weather tab.
Registering your controller will enable additional features such as:
•
Automated weather forecast and settings
•
Remote access to your controller through our web site without having to set up DNS.
To register your controller
1. On the Weather tab, click the Register button.
2. In the registration window, enter the controller location. This information is used to provide
accurate weather data from NOAA.
• Address. Enter the street address where the controller is used.
• City, State, and ZIP code. Enter the postal information for the address.
20
BlueSpray Irrigation Controller
3. Enter the account information to create an account with BlueSpray. If you have already created
an account, click Use existing account and enter your email address and password.
• Name. Enter the name to be used for the account.
• Email. Enter the email address to be used for the account.
• Password. Enter a password for the account.
4. Click Submit.
Using the BlueSpray controller
After your BlueSpray controller is set up, it should run automatically. You can always access the
BlueSpray user interface for manual operation and configuration tweaks.
Watering a zone manually
If you want to water a zone outside of a schedule, you can do it manually.
To water a zone manually
1. Open the BlueSpray user interface.
2. Click the zone icon on the lawn.
3. Enter the number of minutes to water.
4. Click OK.
Changing the lawn picture
If you don't like the default picture lawn, you can change it. You can use a picture of your actual
lawn, or one that is similar.
There are many sources for finding lawn pictures.
•
From our collection of images at www.bluespray.net/lawns
•
Take a screen shot of your lawn in Google Earth or Google Maps.
•
Take an aerial picture of your own property.
The picture must be 4x3 aspect ratio and at least 800 pixels wide and 600 pixels in height. The
image must be hosted on the Internet. There are many free picture hosting services on the
Internet, such as Imgur, Google+, or Flikr.
To change the lawn picture
1. Find a picture, or host your own on the Internet. Copy the URL.
2. In the BlueSpray user interface, click the Settings tab, then click the Operations tab.
3. Under Lawn picture, specify the address (URL) where the picture is hosted on the Internet.
4. Click OK.
BlueSpray Irrigation Controller
21
Troubleshooting
Use the information in this section to resolve common issues.
Can’t connect to the BlueSpray controller
If you think you might have entered incorrect network information during BlueSpray setup, you can
reset the controller to the default network settings.
Locate the status switch located below the status lights on the left side of the controller. Slide the
switch down for 10 seconds (but no more than 30 seconds), then slide it back up.
After you have reset the controller, you can try connecting to the controller. See “Connecting to the
BlueSpray user interface” on page 10.
Support
Contract BlueSpray if you have any issues with your BlueSpray controller.
Email support is available at: [email protected].
We will respond to your questions within 24 hours. We do our best to answer your questions and
resolve your issues in a timely manner.
You can also browse our discussion forum at:
www.bluespray.net/forums
22
BlueSpray Irrigation Controller
Index
A
getting started 9
about BlueSpray 4
H
B
BlueSpray
configuration 12
getting started 9
using 21
bypass rain sensor 16
C
calendar view 19
changing the lawn picture 21
common wire 6
configuring BlueSpray 12
connecting the garage door sensor 8
connecting to the controller 10
connecting to the user interface 10
connecting valve wires 6
connection status 11
controller
restarting 19
status 11
time 11
current season 11
D
default mode 9, 18
delayed mode 11
door sensor 12, 16
E
encryption 17
F
firmware
updating 19
version 19
G
garage door kit
configuring 12
installing 7
garage door sensor 7
BlueSpray Irrigation Controller
history report 20
I
installing
BlueSpray controller 5
garage door kit 7
Internet mode 18
introduction 4
L
lawn picture, changing 17, 21
LEDs, status 9
lights, status 9
M
master valve 16
master valve wire 6
mounting the controller 5
N
network name 10
network SSID 17
normal mode 9
NTP servers 18
O
operating mode 17
operations
delaying 16
setting up 16
P
power supply 6
programs
deleting 13
setting up 13
R
rain sensor 11, 16
rain sensor bypass 16
registering your controller 20
23
restarting the controller 19
run interval 15
S
schedules
deleting 15
setting up 15
seasons
deleting 14
setting up 14
security settings 18
sensors
setting up 16
type 16
wires 6
service mode 9
setting up
operations 16
programs 13
schedules 15
seasons 14
security 18
sensors 16
system information 17
time 18
weather options 17
zones 12
SSID 17
stack runs 16
standalone mode 18
standby mode 11
status lights 9
status switch 6, 9
support 22
synchronizing time 11
system information
setting up 17
24
T
time
setting up 18
zones 18
time zone 18
today’s runs 11
troubleshooting 22
U
updating firmware 19
URL 10
user interface
connecting 10
using 21
W
wall mount 5
water budget 14
water usage 20
weather options 17
web address 10
Wi-Fi 4, 10
wireless network 10
wiring the controller 6
wiring zones 6
Z
zones 6
color 17
deleting 12
moving 12
setting up 12
watering manually 21
wiring 6
BlueSpray Irrigation Controller