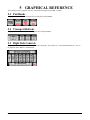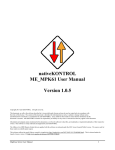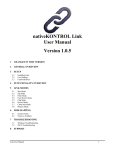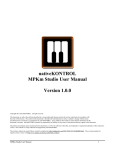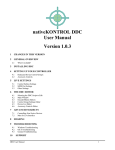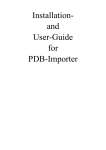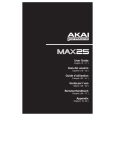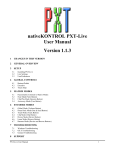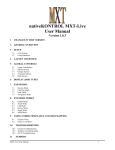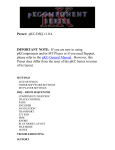
1
nativeKONTROL MPKRx
User Manual
Version 1.0.3
1
CHANGES IN THIS VERSION
2
GETTING STARTED
2.1
2.2
2.3
3
SETUP
3.1
3.2
3.3
3.4
3.5
4
Pad Banks
Transport Buttons
Right Side Controls
TROUBLESHOOTING
6.1
6.2
6.3
7
Faders, Fader Buttons and Knobs
Pads
Transport Buttons
GRAPHICAL REFERENCE
5.1
5.2
5.3
6
Required Live Settings
Optional Live Settings
Required MPK Settings
MPK Customization
UserPreferences
FUNCTIONS
4.1
4.2
4.3
5
Transferring the MPKRx Preset
Installing MPKRx
Next Steps
Windows Troubleshooting
OS X Troubleshooting
General Troubleshooting
SUPPORT
MPKRx User Manual
I
1 CHANGES IN THIS VERSION
-
Fixed issue where UserPreferences wouldn’t be read in certain cases.
-
UserPreferences are now written to Live’s Log.txt file to assist in troubleshooting.
-
Added Live 9.5.1-compatible installers.
MPKRx User Manual
II
2 GETTING STARTED
This section covers the initial installation steps you will need to complete in order to use MPKRx. Please take your time
when completing these steps. If you should run into trouble when performing any of these steps, please refer to the
Troubleshooting section.
2.1 Transferring the MPKRx Preset
In order to use MPKRx with your MPK, you will need to transfer the MPKRx preset to the controller using Vyzex MPK6188. An *.SQS is provided for the MPK61 (MPKRx-61 Set.SQS) and for the MPK88 (MPKRx-88 Set.SQS). You should load
this file with Vyzex MPK61-88 and then using the following steps to transfer the MPKRx preset to the controller:
1.
2.
3.
4.
5.
6.
7.
Ensure that the MPKRx preset is selected in Vyzex MPK61-88.
Under EDITOR MODES, select DATA.
Click the SYNC PRESET button to send the preset to the controller.
Press the Right Button (>) on the controller.
Use the Encoder to select the location to save the preset to.
Press the Encoder to save the preset to the selected location.
Close Vyzex MPK61-88.
2.2 Installing MPKRx
To install MPKRx, first close Live and then run the provided Setup executable (Windows) or package (OS X). For OS X
users, you may receive a message stating “Setup can't be opened because it is from an unidentified developer”. If so,
Control-click or right click on the Setup package and select Open from the menu that appears.
In most cases, you will only need to install MPKRx once. It will remain installed even after updating to a newer version of
Live. However, if you re-install Live or install Live to a new location, you will need to install MPKRx again. It’s
recommended that you keep the MPKRx Setup files on hand for such cases.
Once installation is complete, please launch Live to complete setup.
2.3 Next Steps
The rest of the information in this manual is also available as a Live Lesson. In most cases, it is recommended that you use
the Live Lesson instead of this manual as the Live Lesson is viewable from within Live’s window, which makes it easier to
refer to than having a separate pdf viewer open. To access the Live Lesson:
1.
Show Help View by selecting Help View from Live’s Help menu.
2.
Click the home button (rightmost button at the top of Help View) to return to the front page of Help View.
3.
Scroll down to the bottom of Help View and click the Show all built-in lessons link to show the Table of Contents.
4.
Scroll down to the bottom of the Table of Contents where you’ll find the MPKRx Lesson section.
5.
Click the MPKRx Contents link and then the Setup link for instructions on setting up MPKRx.
Once setup is complete, use the other links in the MPKRx Contents section to learn more about using MPKRx.
MPKRx User Manual
1
3 SETUP
This section covers the settings you will need to make in Live and on the MPK in order to use MPKRx. Please take your
time when completing these steps. If you should run into trouble when performing any of these steps, please refer to the
Troubleshooting section.
3.1 Required Live Settings
The following settings will be found in Live’s Preferences on the MIDI/Sync tab. All of the settings listed here are required
for proper functionality of MPKRx.
1.
Select MPKRx as a Control Surface.
2.
For the Input, select your MPK’s first
input port. This will typically be named
Akai MPK61 or Akai MPK88.
3.
Select whichever Takeover Mode you’d
prefer. Selecting a Takeover Mode other
than None will prevent jumps in values of
parameters that are controlled by the
MPK’s Faders and Knobs.
4.
Turn on the Track switch for MPKRx Input.
3.2 Optional Live Settings
When using the Required Live Settings, it is not possible for other controllers/MIDI devices to conflict with MPKRx as
MPKRx has a direct line of communication with Live. However, these settings will also prevent you from being able to use
your MPK for MIDI mapping.
In order to allow for MIDI mapping, you will need to turn on the Remote switch for MPKRx Input. When this switch is
turned on, this will open up the potential for conflicts with other controllers/MIDI devices and/or other MPK presets.
To avoid such conflicts, you should ensure that other controllers/MIDI devices and other MPK presets do not use the
following MIDI messages for MIDI mapping:
-
Any MIDI messages on MIDI Channel 16.
-
CC115 – 119 on MIDI Channel 1.
3.3 Required MPK Settings
In order to access the functionality that MPKRx offers, you will need to have the MPKRx preset selected on your MPK.
You will also need to ensure that your MPK is set to use Common Channel 1A. You can make this setting by pressing the
MPK’s Global Button, navigating to CommonCH and selecting CHANNEL 1A.
Lastly, it is recommended that you configure the MPK to not send out MIDI Clock as this uses up unnecessary MIDI
bandwidth and could potentially interfere with MPKRx’s functionality. You can make this setting by pressing the MPK’s
Global Button, navigating to MIDI CLK and selecting EXTERNAL.
MPKRx User Manual
2
3.4 MPK Customization
MPKRx only uses Control Bank A in the MPKRx preset. Control Banks B and C have been configured to use MIDI
messages that won’t conflict with MPKRx. This allows you to use the controls in Control Banks B and C for MIDI mapping.
In order to use these controls for MIDI mapping, you will need to use the settings listed in Optional Live Settings.
While using MPKRx, you can also use other MPK presets. However, other presets should not use any MIDI messages on
MIDI Channel 16A.
It is also possible to access MPKRx functionality from controls in Control Banks B and C in the MPKRx preset and/or from
controls in other MPK presets. For example, if you wanted to have access to the Swing control (F8), set up a control to send
the same MIDI message that the Swing control uses (CC#7 on MIDI Channel 16A). You can find this info by selecting the
MPKRx preset and pressing/moving the control associated with the functionality you want to access. The MPK’s display
will show the MIDI message assigned to the associated control.
3.5 UserPreferences
MPKRx includes a UserPreferences.txt file that allows you to change some of its default behaviors. You can find this file
along with instructions on how to modify it in the following location:
On Windows:
- ProgramData\Ableton\Live 9\Resources\MIDI Remote Scripts\MPKRx
On OS X, go to Applications, find Ableton Live 9.app, right-click and select Show Package Contents and then navigate to:
- Contents/App-Resources/MIDI Remote Scripts/MPKRx
4 FUNCTIONS
This section covers the MPKRx functions that are accessible from the MPK’s controls. These functions include a Shift
Button (S8). When pressed, this will modify the function of other controls. For any controls that can be modified by the
Shift Button, a Default and Shifted function will be listed.
4.1 Faders, Fader Buttons and Knobs
The following functions are accessible from the Faders (F1 – 8), Fader Buttons (S1 – 8) and Knobs (K1 – 8) when in Control
Bank A. In Control Banks B and C, the Faders, Fader Buttons and Knobs can be used for MIDI mapping as covered in the
MPK Customization section.
F1 – 7:
- Default: Adjust Volume, Pan and Sends A – E for either the selected Drum Rack Pad or the selected Track
depending upon whether a Drum Rack exists on the selected Track.
-
Shifted: Adjust Volume, Pan and Sends A – E for the selected Track.
-
Default: Adjust the amount of Swing that will be applied to Note Repeat (see section 4.3).
-
Shifted: Adjust Master Track Volume.
F8:
S1 – 7:
- Default: Select the Note Repeat (see section 4.3) Rate. The new Rate will be shown in Live’s Status Bar.
-
Shifted: Select the Record Quantization value. If the newly selected value is the same as the current value, Record
Quantization will be turned off. The new value will be shown in Live’s Status Bar. Also, S1 and S2 will both select
Quarter-Note Quantization.
S8: When pressed, this will modify the function of other controls.
MPKRx User Manual
3
K1 – 8: Adjust the first 8 parameters (or 8 most useful parameters) of the selected Device.
4.2 Pads
PAD BANK A: Trigger the Visible Pads in the Drum Rack. When Note Repeat (see section 4.3) is enabled, applying
pressure to the Pads will vary the Note Repeat velocity. The Pads in this bank use a basic Chromatic scale layout and so they
can also be used to play instruments other than just the Drum Rack.
PAD BANK B:
- Default: Toggle the Mute Buttons of the Visible Pads in the Drum Rack.
-
Shifted: Toggle the Solo Buttons of the Visible Pads in the Drum Rack.
PAD BANK C:
- Default: Select the Visible Pads in the Drum Rack without triggering them.
-
Shifted: Select the length of Clips that will be recorded when the Session Record (see section 4.3) function is
triggered. The new length will be shown in Live’s Status Bar.
PAD BANK D:
The Pads in this bank edit Note Lanes (a horizontal row of notes in a MIDI Clip) in the selected MIDI Clip, which is
indicated by a colored ring around the Clip. The Note Lanes that the Pads will edit correspond to the Visible Pads in the
Drum Rack.
-
Default: When pressed, each Pad will Erase the portion of notes in the corresponding Note Lane that the playhead is
currently passing over. The Pads will do nothing if the Clip is not playing.
-
Shifted: Each Pad will Delete the corresponding Note Lane.
Note: The Pads in this Bank will not remove notes that extend past the Clip’s last marker (either End Marker or Loop End
marker depending on which comes last).
4.3 Transport Buttons
<< and >>:
- Default: Move the Drum Rack Selector down or up.
-
Shifted: Move left or right between Devices on the selected Track.
STOP:
- Default: Toggle Note Repeat on/off. When enabled, holding down a Pad in Pad Bank A or a key on the keyboard
will produce a stream of continuous, rhythmic notes. The Note Repeat state will be shown in the Live’s Status Bar.
- Shifted: Toggle the selected Device on/off.
PLAY:
- Default: Toggle playback.
REC:
-
Shifted: Continue playback from the stop point.
Default: In Session View, toggle Session Record/Overdub. In Arrangement View, toggle Arrangement Overdub.
Shifted: In Session View, trigger Session Record on all Armed Tracks. By default, Clips that are recorded will be 1
Bar long. Different lengths can be selected via Pad Bank C. In Arrangement View, toggle Arrangement Record.
MPKRx User Manual
4
5 GRAPHICAL REFERENCE
This section provides a graphical reference of the functions assigned to the MPK’s controls.
5.1 Pad Banks
The graphic below shows the Pad functions accessible from each Pad Bank.
5.2 Transport Buttons
The graphic below shows the functions assigned to the Transport Buttons.
5.3 Right Side Controls
The graphic below shows the functions assigned to the Knobs (K1 – K8), Faders (F1 – F8) and Fader Buttons (S1 – S8) on
the right side of the MPK in Control Bank A.
MPKRx User Manual
5
6 TROUBLESHOOTING
This section provides resolutions to common problems that you may run into when installing or setting up MPKRx. If you
do not find a resolution to your problem here, please contact Support.
6.1 Windows Troubleshooting
I’ve ran the provided Setup executable, but don’t find MPKRx listed under Control Surfaces or the MPKRx Lesson section
listed in the Table of Contents of Help View.
If Live was running at the time you ran the Setup executable, you will need to restart Live. If this doesn’t resolve the
problem, then it’s likely that you’ve installed Live in a protected location (such as Program Files). In this case, you will need
to elevate the permissions on your Live installation directory so that you can write to it. Once this is done, re-run the Setup
executable.
6.2 OS X Troubleshooting
I’ve ran the provided Setup package, but don’t find MPKRx listed under Control Surfaces or the MPKRx Lesson section
listed in the Table of Contents of Help View.
If Live was running at the time you ran the Setup application, you will need to restart Live.
When trying to run the Setup package, I receive a message stating “Setup can't be opened because it is from an unidentified
developer”.
Control-click or right click on the Setup package and select Open from the menu that appears.
6.3 General Troubleshooting
After installing and setting up MPKRx, Live sometimes hangs when I try to close it.
Ensure that the Output of the MPKRx Control Surface is set to None.
MPKRx User Manual
6
7 SUPPORT
Email:
[email protected]
Forum:
Beatwise Network
Copyright 2013-2015 nativeKONTROL. All rights reserved.
This document, as well as the software described in it, is provided under license and may be used or copied only in accordance with
the terms of this license. The content of this document is furnished for informational use only, is subject to change without notice,
and should not be construed as a commitment by nativeKONTROL. Every effort has been made to ensure that the information in this
document is accurate. nativeKONTROL assumes no responsibility or liability for any errors or inaccuracies that may appear in this document.
All product and company names mentioned in this document, as well as the software it describes, are trademarks or registered trademarks of their respective
owners. This software is solely endorsed and supported by nativeKONTROL.
The Ableton Live MIDI Remote Scripts that are supplied with the software are released under the GNU Lesser General Public License. The source code for
these scripts is available upon request.
MPKRx User Manual
7