1
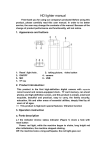
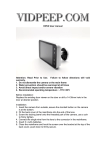
NXTGEN-WDVP2P camera
User Manual
Thank you for purchasing the world’s smallest Wi-Fi mini IP/action camera NXTGEN-WDVP2P camera. Please carefully
this user manual in order to use the many functions and settings.
NXTGEN Cams
Business
Children
Church
Conventions
Family
Home
Meetings
Parties
Recording
School
Security
Sports
1
Contents
NXTGEN Cams ........................................................................................................................................................................ 1
Go to: http://www.nxtgentechnology.com to downloadable apps: ............................................................................................ 2
Android...................................................................................................................................................................................... 2
PC Client- Basic Viewer ............................................................................................................................................................ 2
PC Software ............................................................................................................................................................................... 2
IOS ............................................................................................................................................................................................ 2
Download instruction manuals .................................................................................................................................................. 2
Online Instruction ManualCamera Layout: ............................................................................................................................... 2
Light Indicators ......................................................................................................................................................................... 3
Specifications: ........................................................................................................................................................................ 4
How to use NXTGEN WDVP2p Camera ................................................................................................................................. 5
Recording .............................................................................................................................................................................. 5
APP Layout ............................................................................................................................................................................... 7
APP Software Operation ........................................................................................................................................................... 7
To set up the connection between camera and Wireless network: ........................................................................................... 11
Software Operation on PC ....................................................................................................................................................... 14
Restore Default .................................................................................................................................................................... 17
Image Control tools ............................................................................................................................................................. 17
Go to: http://www.nxtgentechnology.com to downloadable apps:
Android
PC Client- Basic Viewer
PC Software
IOS
Download instruction manuals
Online Instruction Manual
2
Camera Layout:
1. Photo/ Video button
2. Lens
3. Orange indicator light
4. Green indicator light
5. Blue indicator light ,Red indicator light
6. SD slot
7. Wi-Fi button
8. Microphone
9. Strap hole
10. Power button
11. MINI USB port
Light Indicators
Orange light : Wi-Fi signal light
1. Flashing - Wi-Fi start up, waiting for be connecting;
2.On - Wi-Fi have normal working status;
3. Off - Wi-Fi signal shut down.
Green light: Power indicator light
1.On: camera turn on,
2.Off: no card hint
3. Flashing: Recording Video
Blue light: Battery indicator
1.Flashing: low battery
Red light:Charge
1.Light on: charging
2.light off: charging complete
Accessories:
Attachable Clip, Clip-Stand, Fixed-Stand, Micro USB Cable, Strap, wall charging adapter.
3
Specifications:
1
2
3
Model No.
SIZE
Image sensor
NXTGEN-WDVP2P camera
56.0L*21.5W*19.0H mm
1.3 Mega pixels CMOS(up to 5.0Mega pixels)
4
Image Resolution
5.0 Mega Pixels (2560 x 1920)
5
6
7
Picture Format
JPEG
Video Resolution
HD
720P@30fps
Video Format
USB port
H.264 (avi)
Micro USB(Only support for charging )
9
10
Wi-Fi
Power
802.11n
Built-in Lithium 200mAh
9
10
11
12
Wi-Fi
Power
Power Consume
Lens
Output :DC 5.0V/1000mA;
Input: AC 100-240V 50/60Hz)
13
14
Weight
Temperature range
15
16
Environment humidity
Recording time
17
Language
8
Min:250mA(under the state of both Recording and
Wi-Fi mode )
High sensitivity lens; Angle 72°
Appr. 20g
0℃ ~ 45℃
≧ 85%
Appr. :50mins(under the state of both Recording and
Wi-Fi mode)
Simplified Chinese,English,Germany
Notice:
1. Please abide by the state video recording laws. This device is not intended for illegal purposes.
2.
3.
5.
Please insert the SD card correctly into the SD slot before starting to avoid the damage of card or camera.
Format new SD cards or clear the files to avoid files missing.
Please fully charge before using the camera or if it has not been used recently. A wall plug has been provided - 5V 1A
Watts adapter.
4
How to use NXTGEN WDVP2p Camera
1)Preparation:
1. First step: Insert Micro SD or Micro SDHC card into card slot. if no card is inside green light will shut off .
2. Recommend above Class 6 micro SDHC, please turn off this device while inserting or pulling out the card.
3. Charging: the NXTGEN-WDVP2P camera. Use the USB cable to charge NXTGEN-WDVP2P camera
. The Red light will be on while charging..
2)Power ON /OFF
1. Power On: Press the power button for 2s, the red light flashes. After 4 seconds, flashing orange light appear(Wi-Fi).
orange
2. Power off: Press the power button for 4s. All indicator lights will be off.
3)Basic Digital Video Record-DVR.
Recording
The NXTGEN camera, is a 30fps 5mp camera and will provide excellent video, audio and snapshots. This camera
operates in three modes;
1) Camera Only Mode – functions as a standalone DVR cam;
2) Wi-Fi Mode / Local Wi-Fi Camera - video sharing;
3) Remote Viewing Mode. a remote viewing and wan p2p as well as regular camera picture and record function.
How to Record in Stand Alone Camera Only Mode.
It is very easy to record high quality video with NXTGEN camera.
1) Make sure an SD card (upto-32GB) is inserted in the SD slot. A 32 GB can hold many hours of video, audio and
hundreds of pictures.
2) Turn the camera on by pressing the right button on the back of the camera. Wait for the red light to turn green.
3) After the green light appears hold the camera button down for 3-4 seconds.
4)
Video Recording: When the light flashes red video recording has started. They will automatically be saved to the
SD card.
5) Snapshot
Pictures: To take a picture simply press the video button once and you will take a picture. An SD card
reader makes it easy to view your saved files.
6) Hold the on off button for 3 seconds then release. NO lights should be on indicating that the camera power is off.
Video
Green light off, it means the TF card is full or no card inside; if the Green light always keep a bright state ,it means the
camera working normally, can start to video.
Start video: Press the Photo/ Video button for 3s , the Green light turn to quick shining(1Hz), it means on recording;
when the Green light turn to keep a bright state, it means video stopped. When the TF card is full or low battery, the
camera will auto stop video, the video will auto save before the camera shut down.
Photo
5
Please confirm the TF card in the TF slot before photo. if the Green light quick shining, it means the card is full or no
card inside, if the Green light is keep a bright state, it means NXTGEN-WDVP2P camera can start to take photo.
Press the “Photo/ Video” button means take one photo.
6
APP Layout
Resolution and FPS of video
Timer
clock
indicates how
long
the
camera has been
recording.
Battery life and how long the
camera has been connected.
WHITE BALANCE:
change lighting modes for
sunshine, cloudy,
fluorescent and
incandescent light settings.
Gallery,
for
viewing
snapshots (JPG) and video
files (AVI)
Sound on/off
STOP AND
START
Video
Take
Snapshot
( up to 3 ps)
CAMERA
SETTINGS
Various settings and
functions for camera
and video
ZOOM IN/OUT- video
and snapshots
Switch between snapshot
picture and video mode.
1. Wi-Fi connecting setting
Wi-Fi mode will be start-up while NXTGEN-WDVP2P camera start to work, the Wi-Fi light (orange light) on,
it means NXTGEN-WDVP2P camera change to the Wi-Fi connection status ,the Wi-Fi signal light will keep bright
state after Wi-Fi success to connect.
Wi-Fi setting instruction can check the details in APP operation .
After setting succeed, and re-start the camera ,if nothing changes , the camera will auto connect to the Wi-Fi
which
have
succeed
to
setting
before.
2. Default Settings
Pull out the TF card and under the camera working state , press the Wi-Fi button and Photo/Video button at the same
time, when the Orange light and Green light keep bright state at the same time, it’s means the camera have finished default
setting ,then just need to re-start the device.
APP Software Operation
1)Go to: http://www.nxtgentechnology.com to link to downloadable app for Android, PC and IOS.
2)Wi-Fi connecting setting
1. “NXTGEN W_DV P2P” icon will show on the screen after the Apps installed successfully in mobile phone or tablet pc.
2. Put the Micro SD or Micro SDHC card into camera , then turn on the camera.( please format the TF card in APP
software for the first operation ).
7
3. Open the Wi-Fi setting in mobile phone or tablet pc. Search the name of “W-DV_XXXX” Wi-Fi signal then connect to
that Wi-Fi signal ,input password :12345678, until you connect..
4. Click the APP icon “W-DV P2P” on mobile phone or tablet pc, open the APP software to the list of device page, then
continue to operate.
a. Add new camera:
Click “add new camera”, enter the camera setting interface , support manual input or scan QR code or search local area
network to get the P2P UID NO. , then input the UID password: 666666 (default password), and click “save” to finish
this step.
8
Android
Add camera interface
Main interface
Method 1: scan QR code
Method 2:search
9
Method 3 : manual
input UID code
IOS
Method 1:manual
input UID, to add
camera.
Method 2: Scan
UID code to add
camera
Main interface
Add camera interface
IOS
Wi-Fi function in local area network(LAN):
After adding a camera check the image , “LAN” means the Network environment type for the camera is local area
network. under Wi-Fi Direct mode in the LAN, support take photo, recording video, monitor the voice(turn on or
off), document query etc. function.
Android
10
IOS
Image interface
To set up the connection between camera and Wireless network:
Android system:
Click “configure Wi-Fi” , enter the Wi-Fi configure interface, choose the camera in the “device list” , choose the point
11
wireless router in the “wireless router list”, then enter the wireless router password ,and click “confirm”, mobile
phone will send connection message to camera ,then the camera will auto connect to the point Wi-Fi wireless router.
IOS system:
Click “configure Wi-Fi” , enter the Wi-Fi configure interface, choose the point camera in the “device list” , choose the
point wireless router in the “wireless router list”, then enter the wireless router password ,and click “confirm”,
mobile phone will send connection message to camera ,then the camera will auto connect to the point Wi-Fi wireless
router.
b.
Verify the Wi-Fi connection Settings.
Open the Wi-Fi setting on Android mobile or tablet pc, search the Wi-Fi Wireless router connected with camera,
and connected to the wireless router→APP “W-DV P2P”, check the camera frame. If the word “LAN” show in the
middle of frame, it means the connection settings are successful.
Remote use introduction:
After finished all the above setting, just keep the camera working normally, then use android mobile or tablet pc to
check the camera frames at any time under network environment, also can remote control the camera to take photo
or recording video etc.
12
Android:
IOS:
13
Software Operation on PC
1. Download the APP “NXTGEN WEBCAM CLIENT for PC from nxtgentechnology.com.
2. Open the software→Click add camera→Input the UID and password (default password:666666) in the dialog box →
3.Add more cameras click ADD .
14
.
NOTES:
1.
2.
3.
4.
5.
6.
The camera will auto-save the last Wi-Fi connection information. If nothing changes ,the camera can auto connect
to Wi-Fi network.
Mobile phone can’t search the camera’s Wi-Fi AP signal after Wi-Fi connection settings finished.
To change the Network setting pull out the SD card then press the Wi-Fi button and Photo/video button at the same
time. Both of the orange and green light on ,it means the camera re-set succeeded, then can set the Wi-Fi connection
as the steps above.
The APP software functions are slightly different between Android and IOS system, because of the differences in
each process and hardware.
Wi-Fi effective connection range :30M Various conditions will affect the distance including distance from the Wi-Fi
signal.
User can set the UID password in setting interface for protect personal information. If you forget the personal
password, also can press the Wi-Fi button and Photo/video button, and make sure no card inside the camera , and
the green light keep bright state , then just re-start the camera ,will restore to default settings.
Press these two
buttons at the
same time, to
restore defaults.
7.
15
16
Camera Settings
VIDEO
TIME:
Choose
the
length of time
the camera will
record.
FREQUENCY: The frequency
or refresh rate the camera is
set at is 50Hz or 60Hz.
B_Online settings enable you to stream the
Restore Default
internet via WIFI, 3G, 4G ETC… Extra data
charges may apply depending on data plans. Restores the App
settings to default, any
changes made before
choosing this option
will be reset.
17
Image Control tools
Balance the Brightness, Contrast
and Saturation
The WIFI Setting is the
advanced LAN settings,
this is primarily used for
changing
the
security
options, like the password.