1
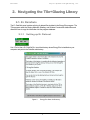
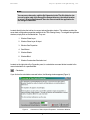
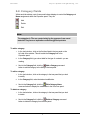
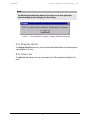
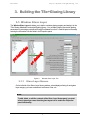
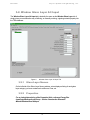
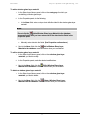
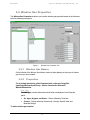
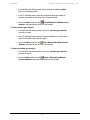
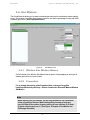
Release
Alpha 1.0
TAYLOR SYSTEMS ENGINEERING, INC.
Professional Engineering Services
TSe+ Glazing Library
PROFESSIONAL ENGINEERING SERVICES
TSe+
Taylor Systems Engineering, Inc.
9801 Fair Oaks Blvd. • Suite 100
Fair Oaks, CA 95628
Phone: 916.961.3400 • Fax: 916.961.3410
September 2003
Table of Contents
1.
INTRODUCTION...............................................................................................................................2
1.1. OVERVIEW............................................................................................................................1
1.2. THE USER MANUAL..............................................................................................................1
1.2.1 SCOPE ..................................................................................................................................1
1.3. INSTALLATION......................................................................................................................2
1.3.1 DOWNLOAD............................................................................................................................2
1.3.2 SYSTEM REQUIREMENTS ..........................................................................................................2
1.3.3 INSTALLATION.........................................................................................................................2
2.
NAVIGATING THE TS E+GLAZING L IBRARY ...........................................................................................3
2.1.
2.1.1
2.2.
2.3.
2.4.
2.5.
3.
BUILDING THE TS E+GLAZING L IBRARY ...............................................................................................7
3.1.
3.1.1
3.1.2
3.2.
3.2.1
3.2.2
3.3.
3.3.1
3.3.2
3.4.
3.4.1
3.4.2
3.5.
3.5.1
3.5.2
3.6.
3.6.1
3.6.2
3.7.
3.7.1
3.7.2
3.7.3
4.
E+ DATASETS .......................................................................................................................3
SETTING UP E+ DATASET .........................................................................................................3
CALCULATION TOOL ............................................................................................................4
CATEGORY FIELDS ..............................................................................................................5
DISPLAY UNITS .....................................................................................................................6
STORE AS.............................................................................................................................6
WINDOW GLASS LAYER .......................................................................................................7
GLASS LAYER NAMES ..............................................................................................................7
PROPERTIES ..........................................................................................................................8
WINDOW GLASS LAYER ALT INP UT ................................................................................... 10
GLASS LAYER NAMES ............................................................................................................ 10
PROPERTIES ........................................................................................................................ 10
WINDOW GAS PROPERTIES............................................................................................... 12
W INDOW GAS NAMES ............................................................................................................ 12
PROPERTIES ........................................................................................................................ 12
GAS MIXTURE ..................................................................................................................... 14
W INDOW GAS MIXTURE NAMES ............................................................................................... 14
PROPERTIES ........................................................................................................................ 14
WINDOW SHADE ................................................................................................................. 16
W INDOW S HADE NAMES ........................................................................................................ 16
PROPERTIES ........................................................................................................................ 16
WINDOW BLIND .................................................................................................................. 18
W INDOW BLIND NAMES .......................................................................................................... 18
PROPERTIES ........................................................................................................................ 18
WINDOW CONSTRUCTION ................................................................................................. 20
CONSTRUCTION .................................................................................................................... 20
GLAZING MATERIALS ............................................................................................................. 20
PROPERTIES ........................................................................................................................ 20
EXPORTING WINDOW GLASS/GAS/SHADE/CONSTRUCTION DATA TO IDF.................................................. 23
4.1.
4.2.
OVERVIEW.......................................................................................................................... 23
EXPORT.............................................................................................................................. 23
Preface
TSE has provided technical engineering services to facility owners and managers, worldwide, since
1974. We are specialists in complex mechanical heating, ventilation and air conditioning (HVAC)
systems for corporate, industrial, laboratory and biotech facilities. We apply quality control and
techniques gained from our experience in the following areas: Mechanical HVAC Systems Design
and Analysis; Temperature and Building Control; Energy Conservation/Efficiency; Commissioning;
Project Management; Operation/Maintenance Consulting; Facilities Operation Training; Fire and Life
Safety
TSe+ is a suite of applications under development by TSE to enhance the user side data
management for EnergyPlus inputs. The TSe+ suite consists of a number of smaller modules each
addressing a specific group/sub-group of data required by EnergyPlus. The development stage of
TSe+ is yet pre-release. TSe+Mat Alpha1.0 was the first module to be developed, and TSe+Glz
Alpha 1.0 is the next. Each module at this time functions independently, though future efforts may
unite them under a single unified interface. Similar in approach to its predecessor module (TSe+Mat),
TSe+Glz addresses the window glazing material properties and construction.
TSe+Glz
Taylor Systems Engineering, Inc.
1. Introduction
1.1. Overview
TSe+Glz is designed to support the user side management of the glazing, gas, shade and blind data
associated with window construction. It allows for the creation of new materials and the use of the
existing dataset library included in the EnergyPlus installation.
Figure 1.
TSe+Glazing Library
1.2. The user manual
1.2.1
Scope
This user manual aims to provide the basic navigation instructions to the use of the TSe+Glz
library. It assumes that the user is fairly comfortable and aware of the text input format for
EnergyPlus. For help on input details refer to EnergyPlus documentation file
inputoutputreference.pdf.
1
TSe+Glz
Taylor Systems Engineering, Inc.
1.3. Installation
1.3.1
Download
The tool can be downloaded free of cost from the following website:
http://www.tse-inc.net/tseplus
1.3.2
System requirements
TSe+ suite of tools are all for the PC platform and require few system resources to operate.
•
PC platform
•
Windows OS (98, NT, 2000, XP)
•
5 mb of free hard disk space
Also, it would be preferable to have an installed version of EnergyPlus to make full use of the
tools and the dataset libraries provided with E+.
1.3.3
Installation
Simply extract the downloaded TSe+Glz.zip (use freeware Winzip to extract) file into a folder
on your hard disk. Then launch the tool by clicking on the TSe+Glz.exe file.
Note:
Please send all comments and feedback to [email protected]
Disclaimer: TSe+ modules are provided free of cost and their use is totally voluntary. TSE will not be responsible for
any loss or damages of any kind incurred due to the use of these tools.
2
TSe+Glz
Taylor Systems Engineering, Inc.
2. Navigating the TSe+Glazing Library
2.1. E+ DataSets
The E+ DataSets panel contains a listing of dataset files included in the EnergyPlus program. The
TSe+program reads the Glazing Materials, Shading, and Window Construction dataset files and
allows the user to copy the information into the program database.
2.1.1
Setting up E+ Dataset
Use <Tools> then <E+ DataSet Dir> to set the directory where EnergyPlus is installed on your
computer and point to the DataSet sub directory.
Figure 2.
EnergyPlus Data Set Directory.
3
TSe+Glz
Taylor Systems Engineering, Inc.
Note:
You can as an alternative, edit the file Dataset.txt in the TSe+Glz folder for the
correct location path of the EnergyPlus Dataset directory, the default location
is set as C:\EnergyPlus\Datasets\. Save the file and restart the application for
the change to take effect.
Located directly below the tool bar is a seven-tab configuration window. This window provides the
seven basic configuration properties available in the TSe+Glazing Library. To navigate through these
windows, simply click on the labeled tab. They are:
1. Window Glass Layer
2. Window Glass Layer Alt Input
3. Window Gas Properties
4. Gas Mixture
5. Window Shade
6. Window Blind
7. Window ConstructionCalculation tool
Located on the right-side of the Properties panel, is a calculation command button to assist in the
manual calculation of a specified field:
Calculation
If you click on the calculation command button, the following window appears (Figure 3).
Figure 3.
Conversion of Glass Optical Properties - Calculation Window
4
TSe+Glz
Taylor Systems Engineering, Inc.
2.2. Category Fields
Within each tab window, a set of command buttons displays to control the Category and
Name assignments within the Properties panel. They are:
Add
Delete
Edit.
Note:
The categories in TSe+ are created solely for the purpose of user saved
materials. They have no implication on the EnergyPlus input data.
To add a category
1.
In the <tab window>, click on the first item listed in the tree panel on the
left -side of the window. This will enable the Category field in the
Properties panel.
2.
In the Category field, type a short label for the type of <material> you are
creating.
3.
Next to the Category field, click the
Add a Category command
button to add the category to the listing in the tree panel.
To edit a category
1.
In the <tab window>, click on the category in the tree panel that you wish
to modify.
2.
In the Category field, make the desired modification.
3.
Next to the Category field, click the
Edit a Category Name
command button to display the modification in the in the tree panel.
To delete a category
1.
In the <tab window>, click on the category in the tree panel that you wish
to delete.
2.
Next to the Category field, click the
Delete a Category command
button to delete the category from the tree panel.
5
TSe+Glz
Taylor Systems Engineering, Inc.
Note:
The following Error Message displays if you have one or more glass layer
materials assigned to the category you are deleting.
Figure 4.
Error Message for Deleting a Category w/Materials Assigned
2.3. Display Units
The Display Units field allows you to view specific data fields within the Properties panel in
either English or SI Units.
2.4. Store As
The Store As field allows you to store information in the TSe+ database in English or SI
Units.
6
TSe+Glz
Taylor Systems Engineering, Inc.
3. Building the TSe+Glazing Library
3.1. Window Glass Layer
The Window Glass Layer tab allows you to define a window glazing property and assign it to the
TSe+Glazing Materials/Construction/Shading Library. You are able to define the window glazing
parameters by selecting a pre-defined EnergyPlus dataset from the E+ DataSet panel or manually
entering the information into the fields in the Properties panel.
Figure 5.
3.1.1
Window Glass Layer Tab
Glass Layer Names
On the left-side of the Glass Layer Names window, a tree displays a listing of each glass
layer category you have created such as Bronze, Clear, etc.
Note:
To add, delete, or edit the contents of the Glass Layer Names panel, you must
select a glass layer name from the glass layers tree to enable the Properties
panel functionality.
7
TSe+Glz
Taylor Systems Engineering, Inc.
3.1.2
Properties
For an indepth description of the Properties fields, reference the EnergyPlus
InputOutputReference.pdf/Group – Surface Construction
Elements/Material:WindowGlass directory.
Optical Data Type
The Optical Data Type selection determines which fields are displayed in the
Properties panel.
•
SpectralAverage – Data is defined with Solar, Visible, and IR Transmittance and
Reflectance.
•
Spectral – Data is defined with IR Transmittance and Hemispherical Emmissivity.
Note:
There are rules to follow when building your window glass layers:
1.
A maximum of four (4) glass layers and one (1) shading layer is
permitted. If there is a shading layer, it must be the first or last layer.
2.
A gas layer must always separate adjacent glass layers in a multipane glazing.
3.
Putting two (2) gas layers adjacent to each other is not permitted
because the resistance of a gas layer is dependent upon the thickness
of the gap.
To add a window glass layer material
1.
In the Glass Layer Names panel, click on the <category> for which you
are defining a window glass layer.
2.
In the E+ DataSets panel, select the preferred dataset or manually enter
data into the fields in the Properties panel.
3.
In the Properties panel, do the following:
•
In the Name field, enter a unique short definitive label for the material.
•
In the Optical Data Type field, select the data type for the window glass material you
are defining from the drop-down window.
Note:
The fields that are displayed are dependent upon your Optical Data Type
selection: SpectralAverage or Spectral. (See the Properties/Optical Data Type
section above).
8
TSe+Glz
4.
Taylor Systems Engineering, Inc.
Next to the Name field, click the
Add a Window Glass Material to
the database command button to display the glass material name in the
Glass Layer Names panel.
To edit a window glass layer material
1.
In the Glass Layer Names panel, click on the <glass layer material> you
wish to modify.
2.
In the Properties panel, make the desired modifications.
3.
Next to the Name field, click the
Edit a Window Glass Layer
Material in the database command button when you are finished.
To delete a window glass layer material
1.
In the Glass Layer Names panel, click on the <glass layer material> you
wish to delete.
2.
Next to the Name field, click the
Delete a Window Glass Layer
Material from the database command button when you are finished.
9
TSe+Glz
Taylor Systems Engineering, Inc.
3.2. Window Glass Layer Alt Input
The Window Glass Layer Alt Input tab is basically the same as the Window Glass Layer tab. It
simply gives you an alternative way of defining, or manually entering, a glazing material property into
the TSe+database.
Figure 6.
3.2.1
Window Glass Layer Alt Input Tab
Glass Layer Names
On the left-side of the Glass Layer Names window, a tree displays a listing of each glass
layer category you have created such as Bronze, Clear, etc.
3.2.2
Properties
For an indepth description of the Properties fields, reference EnergyPlus
InputOutputReference.pdf/Group – Surface Construction Elements/
Material:WindowGlass:AltInput.
10
TSe+Glz
Taylor Systems Engineering, Inc.
To add a window glass layer material
1.
In the Glass Layer Names panel, click on the <category> for which you
are defining a window glass layer.
5.
In the Properties panel, do the following:
•
In the Name field, enter a unique short definitive label for the window glass layer
material.
Note:
Do not click the
Add a Window Glass Layer Material to the database
command button until you have entered all of the data into the fields in the
Properties panel.
•
2.
Manually enter data into the fields. (See Properties section above.)
Next to the Name field, click the
Add a Window Glass Layer
Material to the database command button when you are finished.
To edit a window glass layer material
1.
In the Glass Layer Names panel, click on the <window glass layer
material> you wish to modify.
2.
In the Properties panel, make the desired modifications.
3.
Next to the Name field, click the
Edit a Window Glass Layer
Material in the database command button when you are finished.
To delete a window glass layer material
1.
In the Glass Layer Names panel, click on the <window glass layer
material> you wish to delete.
2.
Next to the Name field, click the
Delete a Window Glass Layer
Material from the database command button when you are finished.
11
TSe+Glz
Taylor Systems Engineering, Inc.
3.3. Window Gas Properties
The Window Gas Properties tab allows you to define window gas properties based on the thickness
between window glazing layers.
Figure 7.
3.3.1
Window Gas Properties Tab
Window Gas Names
On the left-side of the Window Gas Names window, a listing displays of each type of window
gas name you have created.
3.3.2
Properties
For an indepth description of the Properties fields, reference EnergyPlus
InputOutputReference.pdf/Group – Surface Construction Elements/
Material:WindowGas.
Gas Type
The Gas Type selection determines which fields are displayed in the Properties
panel:
•
Air, Argon, Krypton, and Xenon – Data is defined by Thickness.
•
Custom – Data is defined by Conductivity, Viscosity, Specific Heat, and
Molecular Weight.
To add a window gas material
12
TSe+Glz
Taylor Systems Engineering, Inc.
1.
In the Window Gas Names panel, click anywhere to enable the Name
field in the Properties panel.
2.
In the E+ DataSets panel, select the preferred window gas dataset or
manually enter data into the fields in the Properties panel.
3.
Next to the Name field, click the
Add a Window Gas Material to the
database command button when you are finished.
To edit a window gas material
1.
In the Window Gas Names panel, click on the <window gas material>
you wish to modify.
2.
In the E+ DataSets panel, select the preferred dataset or manually enter
data into the fields in the Properties panel.
3.
Next to the Name field, click the
Edit a Window Gas Material in the
database command button when you are finished.
To delete a window gas material
1.
In the Window Gas Names panel, click on the <window gas material>
you wish to delete.
2.
Next to the Name field, click the
Delete a Window Gas Material
from the database command button when you are finished.
13
TSe+Glz
Taylor Systems Engineering, Inc.
3.4. Gas Mixture
The Gas Mixture tab allows you to create customized gas mixtures for use between window glazing
layers. This is where you define which gases you wish to use and the percentage of each gas within
a window gas mixture. (See Properties section.)
Figure 8.
3.4.1
Gas Mixture Tab
Window Gas Mixture Names
On the left-side of the Window Gas Mixture Names panel, a listing displays of each type of
window gas mixture you have created.
3.4.2
Properties
For an indepth description of the Properties fields, reference EnergyPlus
InputOutputReference.pdf/Group – Surface Construction Elements/ Material:Window
GasMixture.
Note
When defining your gas mixtures, you are only permitted to use a maximum
of four (4) gases per mixture. When entering the percentage of each gas
used, the total of the number of gases, rather you have used two (2) or three
(3) gases, should equal one (1). (See Figure 1 Example of Gas Mixture and
Percentage Allocation.)
14
TSe+Glz
Taylor Systems Engineering, Inc.
Figure 9.
Example of Gas Mixture and Percentage Allocation
To add a window gas mixture
1.
In the Window Gas Mixture Names panel, click anywhere to enable the
Name field in the Properties panel.
2.
In the Properties panel, do the following:
•
In the Name field, enter a unique short definitive label for the gas mixture.
Note:
Do not click the
Add a Window Gas Mixture to the database command
button until you have entered all of the data into the fields in the Properties
panel.
•
3.
Manually enter data into the fields. (See Properties section above.)
Next to the Name field, click the
Add a Window Gas Mixture to the
database command button when you are finished.
To edit a window gas mixture
1.
In the Window Gas Mixture Names panel, click on the <gas mixture>
you wish to modify.
2.
In the Properties panel, make the desired modifications.
3.
Next to the Name field, click the
Edit a Window Gas Mixture in the
database command button when you are finished.
To delete a window gas mixture
1.
In the Window Gas Mixture Names panel, click on the <gas mixture>
you wish to delete.
2.
Next to the Name field, click the
Delete a Window Gas Mixture
from the database command button when you are finished.
15
TSe+Glz
Taylor Systems Engineering, Inc.
3.5. Window Shade
The Window Shade tab allows you to define a shading surface based on what type of shading you
are using, i.e. drapes, blinds, etc.
Figure 10.
3.5.1
Window Shade Tab
Window Shade Names
On the left-side of the Window Shade Names panel, a listing displays each type of shading
you have created.
3.5.2
Properties
For an indepth description of the Properties fields, reference EnergyPlus
InputOutputReference.pdf/Group – Surface Construction Elements/
Material:WindowShade.
16
TSe+Glz
Taylor Systems Engineering, Inc.
To add a window shade
1.
In the Window Shade Names panel, click anywhere to enable the Name
field in the Properties panel.
2.
In the E+ DataSets panel, select the preferred window shade dataset or
manually enter data into the fields in the Properties panel.
3.
Next to the Name field, click the
Add a Window Shade to the
database command button when you are finished.
To edit a window shade
1.
In the Window Shade Names panel, click on the <window shade> you
wish to modify.
2.
In the E+ DataSets panel, select the preferred dataset or manually enter
data into the fields in the Properties panel.
3.
Next to the Name field, click the
Edit a Window Shade in the
database command button when you are finished.
To delete a window shade
1.
In the Window Shade Names panel, click on the <window shade> you
wish to delete.
2.
Next to the Name field, click the
Delete a Window Shade from the
database command button when you are finished.
17
TSe+Glz
Taylor Systems Engineering, Inc.
3.6. Window Blind
The Window Blind tab allows you to define a customized window blind deployment. This is where you
define how much or how little light, heat, cold, etc. enters into a specified space. The properties are
based on blinds with equally spaced slats.
Figure 11.
3.6.1
Window Blind Tab
Window Blind Names
On the left-side of the Window Blind Names panel, a listing displays each type of window
blind deployment you have created.
3.6.2
Properties
For an indepth description of the Properties fields, reference EnergyPlus
InputOutputReference.pdf/Group – Surface Construction Elements/
Material:WindowBlind.
18
TSe+Glz
Taylor Systems Engineering, Inc.
To add a window blind
1.
In the Window Blind Names panel, click anywhere to enable the Name
field in the Properties panel.
2.
In the E+ DataSets panel, select the preferred window blind dataset or
manually enter data into the fields in the Properties panel.
3.
Next to the Name field, click the
Add a Window Blind to the
database command button when you are finished.
To edit a window blind
1.
In the Window Blind Names panel, click on the <window blind> you wish
to modify.
2.
In the E+ DataSets panel, select the preferred dataset or manually enter
data into the fields in the Properties panel.
3.
Next to the Name field, click the
Edit a Window Blind in the
database command button when you are finished.
To delete a window blind
1.
In the Window Blind Names panel, click on the <window blind> you wish
to delete.
2.
Next to the Name field, click the
Delete a Window Blind from the
database command button when you are finished.
19
TSe+Glz
Taylor Systems Engineering, Inc.
3.7. Window Construction
The Window Construction tab allows you to create customized window construction assemblies.
Figure 12.
3.7.1
Window Construction Tab
Construction
On the left-side of the Construction panel, a construction type tree displays a listing of each
type of window construction category and subcategory you have created.
3.7.2
Glazing Materials
In the center of the Window Construction panel, a glazing materials tree displays a listing of
each type of glazing material you have created.
3.7.3
Properties
For an indepth description of the Properties fields, reference EnergyPlus
InputOutputReference.pdf/Group – Surface Construction Elements/ Construction.
20
TSe+Glz
Taylor Systems Engineering, Inc.
To add a window construction
1.
In the Properties panel, do the following:
•
In the Category field, type a short label for the type of <window construction> you
are creating.
•
Next to the Category field, click the
Add a Category command button to add the
category to the listing in the tree panel.
•
In the SubCategory field, enter a short definitive label for the subcategory you are
creating.
•
Next to the SubCategory field, click the
Add a SubCategory command button.
2.
In the Construction panel, click on the <subcategory> to which you are
assigning the window construction.
3.
In the E+ DataSets panel, select the preferred window construction
dataset or continue to Step 4.
4.
In the Glazing Material Layers panel, select all of the materials required
for the window construction you are defining. The maximum number of
layers permitted is 10.
Note:
To select materials for a window construction, simply click on the preferred
material in the Glazing Materials panel and click on the appropriate layer field
inside of the Glazing Material Layers panel. Remember to select the materials
from the outside layer to the inside layer. This procedure copies the selected
material and places it in the appropriate layer field. (See Figure 13 below.)
Figure 13.
Window Construction - Outside to Inside Layer Example
21
TSe+Glz
Taylor Systems Engineering, Inc.
5.
In the Properties panel, in the Name field, enter a short definitive label for
the window construction you are creating.
6.
Next to the Name field, click the
Add a Window Construction to
the database command button when you are finished.
To edit a window construction
1.
In the Construction panel, click on the <window construction> you wish
to modify.
2.
In the E+ DataSets panel, select the preferred dataset or manually enter
data into the fields in the Properties panel. (See Step 5, To add a
window construction section above)
3.
Next to the Name field, click the
Edit a Window Construction in the
database command button when you are finished.
To delete a window construction
1.
In the Construction panel, click on the <window construction> you wish
to delete.
2.
Next to the Name field, click the
Delete a Window Construction
from the database command button when you are finished.
22
TSe+Glz
Taylor Systems Engineering, Inc.
4. Exporting window
glass/gas/shade/construction data to
IDF
4.1. Overview
This section gives the details of the export sequence of materials data selected by user to the
requisite IDF format for EnergyPlus input.
4.2. Export
At the bottom of the window is a frame, which provides the functionality to view and export the user
selected materials information into the IDF format.
Select a material from the E+ or the user created/saved Materials database panes so as the
properties are visible in the various fields, then click the <Add and View Materials> button to display
the material properties in the text box alongside. Click and add as many materials as required to
populate the text box. When finished, click the <save materials to IDF> button to save the materials
to a file glass.idf found in the TSe+Glz folder. This file can then used as a base or to copy paste the
materials input for EnergyPlus.
Figure 14.
Exporting to E+ section
This procedure can be repeated for all the tabs. The properties selected will be appended to the
glass material properties selected and exported in the previous tab to the glass.idf file. Be sure to first
select and add the main glass/gas/shade properties before adding on the construction. Use the
glass.idf file to cut and paste the relevant portions into the main input file.
23