1
Kyoceramita KM-8530
PS Visual Driver
Printing System(2)
(UG-1)
User’s Manual
PostScript
Option for
Print
Controller
This user’s manual describes how to set up the Kyocera Mita KM-8530 PS Visual Driver and provides
notes on using the driver.
© 2002 by Kyoceramita Corporation
ACKNOWLEDGEMENT:
Microsoft, MS and MS-DOS are registered trademarks of Microsoft Corporation in the United States.
IBM is a registered trademark of International Business Machines, Inc. in the United States.
WindowsTM is a trademark of Microsoft Corporation.
Apple, Macintosh and Mac are registered trademarks or trademarks of Apple Computer, Inc.
Adobe, Adobe Logo, Acrobat, Acrobat Logo, PostScript and PostScript Logo are registered trademarks
or trademarks of Adobe Systems, Inc.
Other company names and product names used in this manual are the registered trademarks or trademarks of their respective companies.
MAINTENANCE AGREEMENT:
The Kyoceramita Workgroup Document SystemTM will give you many years of trouble-free service. To
ensure high quality copying performance and to prevent premature wear and failure of precision parts
and components, schedule periodic cleaning and routine adjustments.
We recommend that you contact your service center to discuss the benefits and advantages of Kyoceramita's Customer Service Maintenance Agreement and to be shown how a maintenance plan can be
tailored to your individual copying needs.
NOTICE:
KYOCERA MITA AMERICA, INC. has made every effort to ensure that the information in this manual is
complete and accurate. However, constant efforts are also being made to improve and update the
product. Therefore, KYOCERA MITA AMERICA, INC. shall not be liable for errors in this manual or for
any consequential damages resulting from the use of this manual. The information contained herein is
subject to change without notice.
FEDERAL OR STATE STATUTES MAY PROHIBIT THE COPYING OF CERTAIN DOCUMENTS OR
INFORMATION, RESULTING IN FINES OR IMPRISONMENT FOR VIOLATORS.
WEB SITE ADDRESS:
http://www.kyoceramita.com/home/index.cfm
CORRESPONDENCE:
Correspondence regarding this manual may be mailed to the address shown below.
KYOCERA MITA AMERICA, INC.
Headquarters. MARKETING DEPARTMENT
225 Sand Road, P.O. Box 40008
Fairfield, New Jersey 07004-0008
NON-EXCLUSIVE LICENSE AGREEMENT
READ THE TERMS AND CONDITIONS OF THIS
LICENSE AGREEMENT CAREFULLY
BY USING THE PRODUCTS DESCRIBED IN THIS USER MANUAL, BY OPENING A SHRINK-WRAP
PACKAGE CONTAINING SOFTWARE OR DOWNLOADING SOFTWARE OR PRINTER DRIVERS TO
YOUR COMPUTER YOU AGREE TO BE BOUND BY THE TERMS OF THIS LICENSE.
The computer programs embedded in the equipment and User Documentation are licensed (not sold) to You by Kyoceramita Corporation ("Kyoceramita or LICENSOR"). The term "Software" shall be used to describe accompanying Printer
Drivers, software included as part of the printing system including PostScript software and other Adobe software ("Printing Software"), digitally-encoded machine-readable outline data encoded in the special format and in the encrypted form
("Font Programs"), and/or other software which runs on a computer system for use in conjunction with the Printing Software ("Host Software"), and related explanatory written materials ("Documentation"), Upgrades, Modified Versions,
Additions, and Copies of the Software (the "Software"). This license agreement represents the entire agreement concerning the Software between You and Kyoceramita and it supersedes any prior proposal, representation, or understanding between the parties. Kyoceramita reserves any rights not expressly granted to You. This package may contain
third-party software provided by Adobe Systems Incorporated ("Adobe") or other suppliers in which case Kyoceramita
grants to you a non-exclusive sublicense to use the Software and Documentation, provided that you agree to the following:
1.
LICENSE GRANT. You do not receive title to the Software or User Documentation. Licensor grants to You, and
You accept, a nonexclusive license to use the Software embedded in the Equipment in machine-readable, object
code form only (referred to as the "Computer Program"), the accompanying User Documentation, and Printer Drivers furnished to You, (collectively the "Licensed Articles") only as authorized in this License Agreement. The Computer Program may be used only on the Equipment in which it is embedded and may not be shared with or
transferred to any other equipment or product. The Printer Drivers shall be used only with printer products designed
to work with the equipment containing the embedded Computer Program. You may make a single archive copy of
the Printer Drivers for back-up purposes, provided that it includes all copyright notices, markings and proprietary
legends on the original, including the markings of any other company contained therein. This archive copy may not
be in use at any time, may only be used for back-up purposes and must remain in Your possession and control.
You may not copy the drivers to a bulletin board or similar system.
a)
You may use the Printing Software and accompanying Font Programs for imaging to the licensed output device(s),
solely for your own internal business purposes.
b)
In addition to the license for Font Programs set forth in (a), you may use Roman Font Programs to reproduce
weights, styles, and versions of letters, numerals, characters and symbols ("Typefaces") on the display or monitor
for your own internal business purposes.
c)
Notwithstanding the restrictions in 1 above, you may install the Adobe Driver and/or other third-party’s Driver Software on any number of computers solely for use with one or more printing systems running the Printing Software.
d)
You agree not to modify, adapt or translate the Software and Documentation.
e)
You agree that you will not attempt to alter, disassemble, decrypt, reverse engineer or decompile the Software or
use any other method to discover the printer driver’s or Software’s source code.
f)
You may not rent, lease, sublicense, modify, adapt, pledge, lend, share or transfer versions or copies of the Software You do not use, or Software contained on any unused media, or any of Your rights under this Agreement
except as part of the permanent transfer of all Software and Documentation as described in (d) above or to the
extent expressly permitted by the laws of the country in which you use the Software and Licensed Articles, You may
not create derivative works based upon the Software or any part thereof. You may not copy the Licensed Articles
except as specifically provided in this License Agreement.
Print Controller PostScript3 Option
i
g)
You may assign your rights under this Agreement to an assignee of all of Your rights and interest to such Software
and Documentation ("Assignee") provided you transfer to Your Assignee all copies of such Software and Documentation and the Assignee agrees to be bound by all of the terms and conditions of this Agreement.
2.
TITLE: Title to and ownership of the Software and Documentation and any reproductions thereof shall remain with
the owner of the third-party software and Kyoceramita.
3.
TRADEMARKS: Trademarks shall be used in accordance with accepted trademark practice, including identification
of the trademark owner’s name. Trademarks can only be used to identify printed output produced by the Software.
Such use of any trademark does not give you any rights of ownership in that trademark.
4.
LICENSOR’S RIGHTS. You acknowledge and agree that the Licensed Articles, including but not limited to the Software and the Documentation, are owned by Licensor and its suppliers, and its structure, organization and code are
proprietary and valuable trade secrets of Licensor or its suppliers. United States Copyright Law and International
Treaty Provisions also protect the Licensed Articles and Documentation, including but not limited to the Software
and the Documentation. You further acknowledge and agree that all right, title and interest in and to the Licensed
Articles, including associated intellectual property rights, are and shall remain, with Licensor or its supplier. Licensor’s suppliers may protect their rights in the Licensed Articles in the event of a violation of this License Agreement.
This License Agreement does not convey to You an interest in or to the Licensed Articles, but only a limited right of
use revocable in accordance with the terms of this License Agreement.
5.
TERMINATION. This License Agreement is effective upon the purchase and acceptance of the Equipment by You
or the downloading of any Software or Printer Driver from Kyoceramita’S Website or other authorized electronic
medium and shall continue until terminated. This License Agreement will terminate upon Your sale, transfer or disposal of the Equipment having the Software embedded therein. Licensor may terminate this License Agreement
upon the breach by You of any term hereof. Upon such termination by Licensor, You agree to delete the Software
and Printer Drivers from the hard drive of the Product, destroy all copies of the Software and Printer Drivers from
the hard drive of the Equipment and destroy all copies of the Software and Printer Drivers and User Documentation.
6.
LICENSE FEES. The license fees of $250.00 (included in the purchase price of the Equipment) paid by You are
paid in consideration of the license granted under this License Agreement.
7.
LIMITED WARRANTY. Licensor warrants, for Your benefit alone, for a period of 90 days from the date of commencement of this License Agreement (referred to as the "Warranty Period"), that the Software and Printer Drivers
shall operate substantially in accordance with the functional specifications in the User Documentation. Kyoceramita
specifically does not warrant that the Software or Printer Drivers will operate uninterrupted or error-free. If during
the Warranty Period, a defect in the Software or Printer Drivers appears, You may contact the Licensor for either a
replacement or, if so elected by Licensor, refund of amounts paid by You under this License Agreement. You agree
that the foregoing constitutes Your sole and exclusive remedy for breach by Licensor of any warranties made under
this Agreement. EXCEPT FOR THE WARRANTIES SET FORTH ABOVE, THE LICENSED ARTICLES, AND THE
SOFTWARE CONTAINED THEREIN, ARE LICENSED "AS IS," AND, TO THE MAXIMUM EXTENT PERMITTED
BY LAW, THE LICENSOR DISCLAIMS AND EXCLUDES ANY AND ALL OTHER WARRANTIES, WHETHER
EXPRESS OR IMPLIED, INCLUDING, WITHOUT LIMITATION, ANY IMPLIED WARRANTIES OF MERCHANTABILITY OR FITNESS FOR A PARTICULAR PURPOSE.
8.
LIMITATION OF LIABILITY. To the maximum extent permitted by law, and except for claims which result in personal injury or death caused by Licensor’s negligence or intentional acts, Licensor’s, or any of its affiliates or subsidiaries, cumulative liability to You or any other party for any loss or damages resulting from any claims, demands,
or actions arising out of or relating to this License Agreement shall not exceed $250.00. In no event shall Licensor,
or Adobe, the owner of other third party software or any of their affiliates or subsidiaries be liable to you or any third
party for any indirect, incidental, consequential, special, or exemplary damages or lost profits, even if Licensor has
been advised of the possibility of such damages or for any claim by any third party. Some states do not allow the
limitation or exclusion of liability for incidental or consequential damages, so the above limitation or exclusion may
not apply to You.
9.
GOVERNING LAW. This License Agreement shall be construed and governed in accordance with the laws of the
State of Connecticut, United States of America. Should any court of competent jurisdiction declare any term of this
License Agreement void or unenforceable, such declaration shall have no effect on the remaining terms hereof.
ii
Print Controller PostScript3 Option
10. COSTS OF LITIGATION. If any action is brought by either party to this License Agreement against the other party
regarding the subject matter hereof, the prevailing party shall be entitled to recover, in addition to any other relief
granted, reasonable attorneys’ fees and expenses of litigation.
11. NO WAIVER. The failure of any party to enforce any rights granted hereunder or to take action against the other
party in the event of any breach hereunder shall not be deemed a waiver by that party as to subsequent enforcement of rights or subsequent actions in the event of future breaches.
12. Notice to Government End Users: U.S. GOVERNMENT RESTRICTED RIGHTS: The Licensed Articles are provided with restricted rights. Use, duplication, or disclosure by the government is subject to restrictions set forth in
subparagraph (c)(1)(ii) of the Rights in Technical Data and Computer Software clause at DFARS 252.277-7013,
and paragraph (c)(1) and (2) of the Commercial Computer Software - Restricted Rights clause at FAR 52.277-19.
The Software is a "commercial item," as that term is defined at 48 C.F.R. 2.101, consisting of "commercial computer
software" and "commercial computer software documentation," as such terms are used in 48 C.F.R. 12.212. Consistent with 48 C.F.R. 12.212 and C.F.R. 227.7202-1 through 227.7202-4, all U.S. Government End Users acquire
the Software with only those rights set forth herein. The manufacturer is: KYOCERA MITA AMERICA, INC., 500
Day Hill Road, Windsor, Connecticut 06095
13. THIRD PARTY BENEFICIARY: You are hereby notified that Adobe Systems Incorporated, a Delaware corporation,
located at 345 Park Avenue, San Jose, CA 95110-2704 is a third-party beneficiary to this Agreement to the extent
that this Agreement contains provisions which relate to Licensee’s use of the Software, Font Programs, Typefaces
and the trademarks licensed hereby. Such provisions are made expressly for the benefit of Adobe and are enforceable by Adobe in addition to Kyoceramita.
Adobe® and PostScript® are registered trademarks of Adobe Systems Incorporated.
Macintosh® is a registered trademark of Apple Computer, Inc.
Windows® is a registered trademark of Microsoft Corporation.
Print Controller PostScript3 Option
iii
CONTENTS
Introduction.............................................................................................v
FCC Regulations....................................................................................................... v
Canadian Department of Communications Regulations ...................................... v
Patent Notice............................................................................................................. v
About the Kyocera Mita KM-8530 PS Visual Driver ............................vi
About this Manual..................................................................................vi
Structure of this Manual........................................................................vi
System Requirements ..........................................................................vii
Windows.................................................................................................................. vii
Monitor .................................................................................................................... vii
Conventions Used in this Manual ......................................................viii
Chapter 1 Overview ......................................................................... 1-1
Contents of this Chapter.....................................................................1-2
Overview of the PostScript3 Option ..................................................1-3
Printer Driver.......................................................................................................... 1-3
Page Description Language ................................................................................. 1-3
Chapter 2 Setup ............................................................................... 2-1
Contents of this Chapter.....................................................................2-2
How to Install the Kyocera Mita KM-8530 PS Visual Driver .............2-3
Before Installation ................................................................................................. 2-3
Installing to Windows............................................................................................ 2-3
Uninstalling the Kyocera Mita KM-8530 PS Visual Driver.................................. 2-5
Chapter 3 Driver Functions............................................................. 3-1
Contents of this Chapter.....................................................................3-2
Working Environment .........................................................................3-3
Compliant OS......................................................................................................... 3-3
Printing from Applications..................................................................3-4
Printing ................................................................................................................... 3-4
Print Settings ......................................................................................................... 3-4
Description of the Functions Available in the Kyocera Mita KM-8530
PS Visual Driver ...................................................................................3-5
Appendix A Troubleshooting ........................................................A-1
Basic Troubleshooting....................................................................... A-2
Cannot get the correct outputs using the Kyocera Mita KM-8530
PS Visual Driver.....................................................................................................A-2
iv
Print Controller PostScript3 Option
Introduction
Introduction
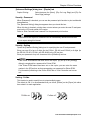
The Kyocera Mita KM-8530 PS Visual Driver is a PostScript3 printer driver for use with Controllers.
For instructions on how to operate your printer (copier), printer controller, or network board,
refer to its user’s manual.
For detailed operations of Windows 95/98/Me/NT 4.0/2000/XP, refer to the operating manuals
for each operating system. For applications operations, refer to the operating manuals provided with each application.
FCC Regulations
Warning: The Controller+PostScript3 option generates, uses and can radiate radio frequency
energy. If it is not installed and used in accordance with the user’s manual, interference with
radio communications may result. This equipment has been tested and found to comply with
the limits for a Class A computing device, pursuant to Subpart B, Part 15, of FCC rules, which
are designed to provide reasonable protection against interference from such equipment when
it is operating in a commercial environment.
Users operating this equipment in a residential area are likely to cause interference, in which
case they may be required to correct the interference at their own expense.
Canadian Department of Communications Regulations
Le présent appareil n’émet pas de bruits radioélectriques dépassant les limites applicables aux
de Class A prescrites dans le règlement sur la brouillage radioélectrique édicté par Le Ministère des Communications du Canada.
This equipment does not exceed the Class A limits for radio noise emissions as set out in the
radio interference regulations of the Canadian Department of Communications.
Patent Notice
The program of this product includes an implementation of LZW licensed under U.S.Patent
4,558,302.
•
•
•
•
•
A part or all of this user’s manual shall not be used or copied without permission.
Kyoceramita shall have no liability for any damages caused by using this printer driver and
this manual.
Information written in this user’s manual is subject to change without notice.
Kyoceramita Corporation shall have the copyright of this printer driver.
This printer driver shall not be copied except for backup purposes.
Print Controller PostScript3 Option
v
Introduction
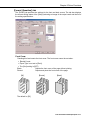
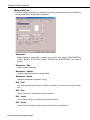
About the Kyocera Mita KM-8530 PS Visual Driver
A separate PS printer driver is provided for each model of IP controller.
The following shows the correspondence between the IP controller and the PostScript3 option
(as of July, 2002).
• Printing System(2) (UG-1)
About this Manual
This user’s manual relates to the Kyocera Mita KM-8530 PS Visual Driver.
It describes how the Kyocera Mita KM-8530 PS Visual Driver is used to perform printing on a
computer running Windows 95/98/Me/NT 4.0/2000/XP.
For details on the functions and settings specific to your IP controller, refer to its
user’s manual.
Structure of this Manual
This manual consists of the following three chapters and an appendix.
Chapter 1: Overview
Chapter 1 describes a functional overview of the Kyocera Mita KM-8530 PS Visual Driver.
Chapter 2: Setup
Chapter 2 describes how to install the Kyocera Mita KM-8530 PS Visual Driver on your
computer. This printer driver enables printing from a Windows application to a Kyoceramita printer by way of a network/parallel port.
Chapter 3: Driver Functions
Chapter 3 describes the functions of the Kyocera Mita KM-8530 PS Visual Driver installed
on a computer.
Appendix A: Troubleshooting
Appendix A describes troubleshooting tips for your PostScript3 option.
vi
Print Controller PostScript3 Option
Introduction
System Requirements
Windows
The following are required to print from Windows-compliant computers to the Print Controller.
• Computers on which Windows 95/98/Me/NT 4.0/2000/XP can run
• CD-ROM drive (necessary to install the printer driver)
Using Windows 95/98/Me
• Microsoft Windows 95/98/Me
• 32 MB RAM or more
Using Windows NT 4.0
• Microsoft Windows NT 4.0 and NT Service Pack 3 or later
• 32 MB RAM or more
Using Windows 2000/XP
• Microsoft Windows 2000/XP
• 32 MB RAM or more
Macintosh systems do not support the Kyocera Mita KM-8530 PS Visual Driver.
Monitor
Resolution
• 800 x 600 or higher for the UG-1
Print Controller PostScript3 Option
vii
Introduction
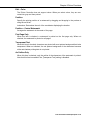
Conventions Used in this Manual
•
•
•
Notational conventions used in this manual when referring to specific features are written
within quotation marks, e.g., “Chapter 1 Overview.”
Names shown on the screen are written within square brackets, e.g., click the [OK] button.
Cautions in this manual are shown with the caution symbol.
Each mark used in this manual has the following meaning.
Precautions and limits at the time the operating hardware or software was written.
Hints, advice, confirming items, etc. at the time the operating hardware or software was written.
•
Notation of sub-folders
Sub-folders are written in a logical string, e.g., “\route level folder\sub folder 1\sub folder 2.”
For example, instructions for selecting the [ko431118e.exe] file in the [Driver] folder in the
[English] folder in the [PS3] folder of the User Software CD, are written:
Select the [ko431118e.exe] file in the “PS3\English\Driver” folder of the User Software CD.
viii
Print Controller PostScript3 Option
Chapter 1 Overview
Contents of this Chapter ........................................... 1-2
Overview of the PostScript3 Option......................... 1-3
Printer Driver ....................................................................... 1-3
Page Description Language ............................................... 1-3
Print Controller PostScript3 Option 1-1
Chapter 1 Overview
Contents of this Chapter
This chapter describes an overview of the Kyocera Mita KM-8530 PS Visual Driver.
1-2
Print Controller PostScript3 Option
Chapter 1 Overview
Overview of the PostScript3 Option
Printer Driver
This printer driver has the same functions as the PCL Printer Driver.
This printer driver can be used under the following operating systems.
• Windows 95
• Windows 98
• Windows Me
• Windows NT 4.0 and NT Service Pack 3 or later
• Windows 2000
• Windows XP
Refer to "Chapter 2 Setup" (p.2-1) for how to set up the printer.
Refer to "Chapter 3 Driver Functions" (p.3-1) for detailed functions of the printer driver.
Page Description Language
The Page Description Language of PCL (standard) and Adobe PostScript3 are mounted on the
printing system.
Print Controller PostScript3 Option
1-3
Chapter 1 Overview
1-4
Print Controller PostScript3 Option
Chapter 2 Setup
Contents of this Chapter ............................................2-2
How to Install the Kyocera Mita KM-8530 PS Visual
Driver............................................................................2-3
Before Installation ............................................................... 2-3
Installing to Windows ......................................................... 2-3
Uninstalling the Kyocera Mita KM-8530 PS Visual Driver 2-5
Print Controller PostScript3 Option 2-1
Chapter 2 Setup
Contents of this Chapter
To use the PS printing system, you must install the dedicated PostScript3 printer driver on
your computer.
The section describes the installation of the printer driver.
Refer to "Chapter 3 Driver Functions" (p.3-1) for how to print from applications and functions of
the printer driver.
2-2
Print Controller PostScript3 Option
Chapter 2 Setup
How to Install the Kyocera Mita KM-8530 PS Visual Driver
Before Installation
Models and Environment of Computers
The printing system can be used with most computers, from personal computers to workstations.
Installing to Windows
Perform the following steps to install the PS option printer driver to Windows 95/98/Me/NT 4.0/
2000/XP.
The “User Software CD” is required to install the printer driver.
1. Turn on the computer and start Windows.
Exit from all active Windows applications, if running.
Using Windows NT 4.0/2000/XP
Log on as an Administrator (or a user entitled to install printer drivers, such as
Power User, etc.).
2. Place the “User Software CD” in the CD-ROM drive.
3. Double-click the [My Computer] icon on the desktop to open the [My Computer] window. Then double-click the CD icon (User Software CD).
Opening from the [Start] menu
Right-click the [Start] button of the task bar to click [Explore].
Then, select the CD icon (User Software CD) from [Address].
4. Double-click the [Setup.exe] file in the folder for the Kyocera Mita KM-8530 PS Visual
Driver on the “User Software CD”.
After unzipping the program files, the PostScript3 Driver Setup program will run to display
the [Welcome] window.
The location in which Setup.exe is stored varies depending on the model of the IP
controller.
5. Check the [I accept the term of the above License Agreement] and click the [Next]
button.
To use the PS option printer driver, you are required to agree to the License. When you
agree to the license, check the [I accept the term of the above License Agreement] to proceed to the next step.
Print Controller PostScript3 Option
2-3
Chapter 2 Setup
6. Select the port to which the PS printing system is connected, and click the [Next]
button.
Select [LPT1:] if a direct connection is established between the copier and the computer on
which the printer driver is being installed. For your printer to default to the LPT1 port, put a
check next to [Make this the Default Printer].
When selecting [Network Printer]
When personal computers or workstations are connected to a network and you
want to print via the network, put a check next to [Add Network Port], and select
the corresponding system.
7. Determine whether the printer name is appropriate. If you are satisfied, click the
[Next] button.
If you want to change the printer name, enter a new name into the [Model] text box.
The printer name defaults to [Kyocera Mita KM-8530 PS VD].
8. Once the screen displays the printer name and the selected port, click the [Finish]
button.
The printer driver will be installed.
9. If you want to manually configure the printer, click the [Printer Setup] button.
You can open the [Properties] window to manipulate printer settings as the need arises.
Properties windows
The printer properties window will be different for each environment depending on
the Windows environment in which you install the printer driver.
For more information, refer to "Chapter 3 Driver Functions" (p.3-1).
10. Click the [Exit to Windows] button.
The installation session is over and you go back to the desktop. Your printer is now available for use.
You don’t need to restart the computer for the installed printer driver to take effect.
2-4
Print Controller PostScript3 Option
Chapter 2 Setup
Uninstalling the Kyocera Mita KM-8530 PS Visual Driver
1. Click [Start]-[Settings]-[Control Panel].
The [Control Panel] window appears.
2. Double-click the [Add/Remove Programs] icon.
The [Add/Remove Programs Properties] window appears.
3. Select the [Kyocera Mita KM-8530 PS VD] in the [Install/Uninstall] tab, click [Add/
Remove] button.
The [Printer Uninstall] window appears.
4. Click the [Next] button.
The [Ready to Start Deleting] window appears.
5. Confirm your selection on the window that is [Kyocera Mita KM-8530 PS VD].
The [Uninstall Successful] window appears.
6. Click the [Restart Windows Now] button.
The Kyocera Mita KM-8530 PS Visual Driver is uninstalled and then Windows restarts.
“xxxx” indicates the model name of your copier.
Print Controller PostScript3 Option
2-5
Chapter 2 Setup
2-6
Print Controller PostScript3 Option
Chapter 3 Driver Functions
Contents of this Chapter ............................................3-2
Working Environment .................................................3-3
Compliant OS....................................................................... 3-3
Printing from Applications .........................................3-4
Printing................................................................................. 3-4
Print Settings ....................................................................... 3-4
Description of the Functions
Available in the Kyocera Mita KM-8530
PS Visual Driver ..........................................................3-5
Print Controller PostScript3 Option 3-1
Chapter 3 Driver Functions
Contents of this Chapter
This chapter describes how to set up the Kyocera Mita KM-8530 PS Visual Driver for printing
from an application. It also describes the functions of the Kyocera Mita KM-8530 PS Visual
Driver.
Refer to "Chapter 2 Setup" (p.2-1) for installation of the printer driver.
For details on the settings for each printer controller, refer to the corresponding user’s manual.
3-2
Print Controller PostScript3 Option
Chapter 3 Driver Functions
Working Environment
Compliant OS
The Printer Driver can be used on the following OS:
• Windows 95
• Windows 98
• Windows Me
• Windows NT 4.0 and NT Service Pack 3 or later
• Windows 2000
• Windows XP
Refer to "Chapter 2 Setup" (p.2-1) for installation of the Printer Driver.
Print Controller PostScript3 Option 3-3
Chapter 3 Driver Functions
Printing from Applications
Printing
1.
Click the [File] menu of each application and click [Print].
2.
Check that the PS option printer’s name is shown on [Printer Name] and click
[OK].
When the PS option printer is not shown, select it from the list box.
Setting the [Print] dialog box
Refer to the user’s manual of each application.
Deselect the [Collate Printing] check box from each application.
Print Settings
Various settings required from printouts are primarily made in the [Print] dialog box. The settings made in the [Print] dialog box of a specific application are effective only when that application is running.
The windows for kinds of settings appear differently depending on the Windows environment.
3-4
Print Controller PostScript3 Option
Chapter 3 Driver Functions
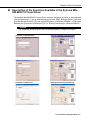
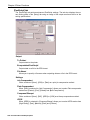
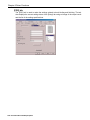
Description of the Functions Available in the Kyocera Mita
KM-8530 PS Visual Driver
The Kyocera Mita KM-8530 PS Visual Driver supports the typical functions, or user-definable
settings, listed below. To set up these settings you choose [Start]-[Settings]-[Printer], right-click
[Kyocera Mita KM-8530 PS VD], and choose [Properties] in Windows 95/98/Me, or [Document
Defaults] and [Properties] in Windows NT4.0, or [Printing Preferences] in Windows 2000/XP.
The [Properties] screen may vary with the operating system or model of the copier.
[Properties] in Windows NT4.0
[Document Defaults] in Windows NT4.0
[Properties] in Windows 2000
[Printing Preferences] in Windows 2000
[Properties] in Windows XP
[Printing Preferences] in Windows XP
Print Controller PostScript3 Option 3-5
Chapter 3 Driver Functions
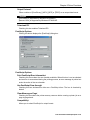
[Setup] tab
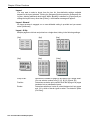
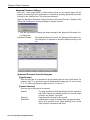
The [Setup] tab is used to make the paper, output, layout, security, sort, and other settings.
The tab displays the current setting status using an image of the output result and the list of
setting specifications. It also graphically indicates the mounted copier options, selected
source tray and output tray.
Copies
Click the [
] or [
] button or directly enter to type the number of copies.
The default is 1.
Orientation
This function is used to specify the paper orientation.
The default is [Portrait].
Original Paper
Select the original paper from the list shown by clicking the [
] button.
The default is [8.5 x 11].
Output Paper
Select the output paper from the list shown by clicking the [
] button.
If you change the [Original Paper] setting, the [Output Paper] setting automatically
changes accordingly. This is accessible by choosing [Paper] on the [Setup] tab. If the
[Output Paper] setting is different from the [Original Paper] setting, the scaling factor in
[Layout] - [Fit] automatically changes appropriately.
The [Original Paper] or [Output Paper] list varies with the model of your IP controller.
For details on the settings that can be made, refer to the user’s manual for your IP
controller.
3-6
Print Controller PostScript3 Option
Chapter 3 Driver Functions
Source
Select the paper source from the list shown by clicking the [
] button.
The default is [Auto Select].
When you select [Auto Select], a paper tray is automatically selected.
Paper Type
Select the paper type from the list shown by clicking the [
] button.
The default is [Plain].
• You have no choice but to select [Plain] unless you select [Output Tray 1] for Output
Tray.
The [Paper Type] list varies with the model of your IP controller.
For details on the settings that can be made, refer to the user’s manual for your IP
controller.
The Paper Type setting defaults to [Plain]. Note that you cannot select [Offset] when
Paper Type other than [Plain] is selected.
Output - Output Tray
Select an output tray from the list shown by clicking the [ ] button. When the Finisher
option is not selected on the [Setup] tab, or when the Finisher is not installed, any setting
other than [Printer Default] and [Output Tray 1] is ineffective.
Output - Duplex
Select the Duplex setting from the list shown by clicking the [
] button.
The settings you can select are as follows:
[None], [Long Edge], [Short Edge]
The default is [None].
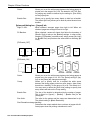
[Long Edge]
Prints paper so that heads of
both sides are at the top of the
paper.
[Short Edge]
Prints paper so that the head
of the front becomes the foot
of the back.
Print Controller PostScript3 Option 3-7
Chapter 3 Driver Functions
Output - Staple
To select the Staple position, click [Output-Staple] from the list shown by using the [ ]
button.
The settings you can select are as follows:
[None], [1 Left], [1 Right], [2 Left], [2 Right], [2 Top].
The default is [None].
The [Staple] setting cannot be made when:
• [None] is selected for [Finisher] on the [Device Options] tab.
• [OHP], [OHP Interleaved], or [OHP I/L Printed] is selected for [Paper Type] on the
[Setup] tab.
• The following combination is set:
(Example: 2 Left for A3-size paper (portrait))
For details on how to position the staple, refer to the user’s manual for the copier.
Stapling is performed as shown for the following orientations:
2-point stapling is not available with papers of A5 size and smaller.
1 Left (Portrait)
1 Right (Portrait)
2 Left (Portrait)
1 Left (Landscape)
1 Right (Landscape) 2 Left (Landscape)
Unavailable with A5-size paper
3-8
Print Controller PostScript3 Option
2 Right (Portrait)
2 Top (Portrait)
2 Right (Landscape) 2 Top (Landscape)
Chapter 3 Driver Functions
Output - Punch
Select the punch position from the list shown by clicking the [
] button.
The settings you can select are as follows:
[Left], [Right], [Top]
For each printing orientation, punching is performed as shown below:
Left
(Portrait)
Top
(Portrait)
Right
(Portrait)
ABCD
ABCD
ABCD
Left
(Landscape)
Top
(Landscape)
ABCDEF
ABCDEF
Right
(Landscape)
ABCDEF
The [Punch] setting cannot be made when:
• [None] is selected for [Finisher] on the [Device Options] tab.
• [None] is selected for [Punch] on the [Device Options] tab.
• [OHT], [OHT Interleaved], or [OHT I/L Printed] is selected for [Paper Type] on the
[Setup] tab.
• Other than [Off] is selected for [Fold/Stitch/Trim] on the [POD] tab.
• [Collate] is not checked on the [Setup] tab.
• [Sub Tray] is selected for [Output Tray] on the [Setup] tab.
• An invalid combination of staple position and punch position is selected.
(Example: Staple - 2 Top, Punch - Left)
For details on the valid combinations of staple position and punch position, refer to
the user’s manual for the copier.
Print Controller PostScript3 Option 3-9
Chapter 3 Driver Functions
Layout
You may want to select a layout from the icon list. User-definable settings available
depend on the layout selected. Clicking the [Advanced] button opens the [Advanced] dialog box, allowing additional detail setup. When [Booklet] is selected for [Layout] and you
change the layout to any other than [Poster], a confirmation message will appear.
Layout - Normal
No layout process is engaged, so no user-definable setting is provided and you cannot
select [Advanced].
Layout - N-Up
Multiple pages are laid out and printed on a single sheet, taking in the following settings:
[2up]
[4up]
[6up]
[8up]
[9up]
[16up]
N-Up Order:
Position:
Border:
3-10 Print Controller PostScript3 Option
Specifies the number of pages to be laid out on a single sheet.
You can select a number from [2], [4], [6], [8], [9] and [16].
Determines a relative print position when the laying out of pages
translates into an unbalanced space.
Determines whether a border is printed between laid out pages
and, if it is, which of border types to select. The default is [None
(Full Size)].
Chapter 3 Driver Functions
[Advanced] dialog box - [N-Up] tab
Pages Per Sheet:
Scale Borders:
Print Page Borders:
Layout Type:
Determines how many pages to lay out on a single sheet. The
[Layout] – [N-Up] setting on the [Setup] tab changes accordingly.
When checked, thins the borders. This makes available wider
space for page data.
Determines whether a border is inserted between pages to be
printed on a single sheet. The [Layout] – [Border] setting on the
[Setup] tab changes accordingly.
Decides how to arrange pages.
[Advanced] dialog box - [Layout] tab
Right to Left:
When checked, arranges pages from right to left. When not
checked, allows pages to be arranged from left to right.
Page Placement:
Determines a relative print position when a space occurs consequent to the laying out of pages. The [Layout] – [Position] setting
on the [Setup] tab changes accordingly.
Size/Orientation change handling:
Determines how to output a sheet on which pages with different
paper sizes or orientations are printed.
[Advanced] dialog box - [Duplex] tab
Duplex Printing:
Allows you to select from [None], [Flip on Long Edge] and [Flip
on Short Edge].
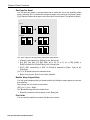
Layout - Booklet
Produces printouts that can be folded and bound into a booklet. This option cannot be
selected when:
• Staple is enabled.
• Cover/Back Cover is enabled.
[Bundle_8]
7
8
1
2
7
8
5
6
1
3
2
A4/B5/A5
4
A3/B4/A4
A3/B4/A4
[Bundle_16]
15
61
1
2
15
16
41
1
A3/B4/A4
11
21
3
2
A4/B5/A5
13
01
5
4
A3/B4/A4
9
7
6
8
A3/B4/A4 A3/B4/A4
Print Controller PostScript3 Option 3-11
Chapter 3 Driver Functions
Gutter:
Allows you to set the white space between the facing pages as
printed out in the range of 0 to 150. The default is 100. The [Gutter] setting can further be defined by the setting for [Size Units]
on the [Layout] tab.
Allows you to specify how many sheets to bind into a booklet.
The default [No Limit] allows you to bind all printed sheets into a
booklet.
Bundle Size:
[Advanced] dialog box - [Layout] tab
Right To Left:
When checked, arranges pages from right to left. When not
checked, pages are arranged from left to right.
When checked, causes all sheets that follow the boundary of
[Bundle Size] to take on the [Booklet] settings. In other words,
checking [Fill Bundles] overrides every setting except [No Limit]
for [Bundle Size] and produces the same effect as selecting [No
Limit].
Fill Bundles:
[Fill Bundle_OFF]
7
8
1
2
8
9
5
6
1
3
2
A4/B5/A5
A3/B4/A4
9
4
A3/B4/A4
A4/B5/A5
[Fill Bundle_ON]
9
1
2
8
9
1
A4/B5/A5
Gutter:
8
3
2
A3/B4/A4
7
4
A3/B4/A4
5
6
A3/B4/A4
Allows you to set the white space between the facing pages as
printed out in the range of 0 to 150. The [Gutter] setting in [Layout] on the [Setup] tab changes accordingly.
Creep:
Allows you to specify how far to expand the white space
between the facing pages printed on outer sheets, (outer when
bound into a booklet), in the range of 0 to 20. The default is 0.
You may want to define the [Size Units] setting to specify how
many sheets will take on the Creep setting.
Bundle Size:
The size of the booklet is determined by the number of pages.
This is linked to [Layout] – [Booklet] – [Bundle Size] on the
[Setup] tab.
Size Units:
The units for the gutters and the creeps are determined in dpi.
The default setting is [Match Resolution].
Size/Orientation change handling:
Determines the output method when a mixture of pages with different paper sizes and printing orientations is used.
3-12 Print Controller PostScript3 Option
Chapter 3 Driver Functions
[Advanced Settings] dialog box – [Duplex] tab
Duplex Printing:
The [Flip on Short Edge] setting is selected and cannot be
changed.
Layout – Fit
Enlarges or reduces the paper size set by the application to adjust it to the actual paper
size to be printed.
[Advanced Settings] dialog box – [Fit to Page] tab
Application Page Size:
Fit To Paper Size:
The paper set is displayed by the [Original Paper] setting.
Determines the size of the paper to be actually printed. This is
linked to [Paper] – [Output Paper] on the [Setup] tab.
[Advanced Settings] dialog box – [Layout] tab
Size/Orientation change handling:
When a mixture of pages with different paper sizes and printing
orientations is used, determines the output method.
[Advanced Settings] dialog box – [Duplex] tab
Duplex Printing:
Select between the [None], [Flip on Long Edge] and [Flip on
Short Edge] settings.
Layout – Scale
Perform scaled printing.
Scale Factor (%):
Determines the scaling rate in the range of 25 to 400%. The
default setting is 50%.
Position:
When performing scaled printing, click the [
a list to determine the position for printing.
] button to display
[Advanced Settings] dialog box – [Scaling] tab
Scale Factor (%):
Set the scaling rate in the range of 25 to 400%. This is linked to
[Layout] – [Scale] – [Scale Factor] on the [Setup] tab.
[Advanced Settings] dialog box – [Layout] tab
Page Placement:
Determines where to print when performing scaled printing. This
is linked to [Layout] – [Scale] – [Position] on the [Setup] tab.
Size/Orientation change handling:
Determines the output method when a mixture of pages with different paper sizes and printing orientations is used.
[Advanced Settings] dialog box – [Duplex] tab
Duplex Printing:
Select between the [None], [Flip on Long Edge] and [Flip on
Short Edge] settings.
Print Controller PostScript3 Option 3-13
Chapter 3 Driver Functions
Layout – Poster
Prints a page over multiple sheets.
Poster Style:
Determines how pages are divided for enlargement.
Position:
Determines where to print when performing poster style printing.
Scale Factor:
When selecting [Poster Style] – [Custom], set the scale factor in
the range from 101 to 400%. The default setting is 150%.
[Advanced Settings] dialog box – [Poster] tab
Poster Style:
Overlap:
Scale Factor:
Determines how pages are divided for enlargement.
Determines the amount of overlap for the borders of the divided
page from 0 to 150. The default setting is 100.
When selecting [Poster Style] – [Custom], set the scale factor in
the range from 101 to 400%. This is linked to [Layout] – [Poster]
– [Poster Factor] on the [Setup] tab.
[Advanced Settings] dialog box – [Layout] tab
Page Placement:
Determines where to print when performing scaled printing. This
is linked to [Layout] – [Poster] – [Position] on the [Setup] tab.
Size Units:
The units for the gutters and the creeps are determined in dpi.
The default setting is [Match Resolution].
Size/Orientation change handling:
When a mixture of pages with different paper sizes and printing
orientations is used, determine the output method.
[Advanced Settings] dialog box – [Duplex] tab
Duplex Printing:
The [None] setting is selected and cannot be changed.
Layout-Log/Phys
Prints a different paper size without reducing/enlarging the printing size. This enables
printing of crop marks and shadows corresponding to the original paper size.
Crop Marks:
Determines presence and size of crop marks.
Position:
Determines where to print on the output paper.
[Advanced Settings] dialog box – [Log/Phys] tab
Application Page Size:
Target Paper Size:
Crop Marks:
Displays the determined paper size using the [Original Paper]
setting.
Sets the actual paper size to be printed. This is linked to [Paper]
– [Output Paper] on the [Setup] tab.
Determines presence and size of crop marks. This is linked to
[Layout] – [Log/Phys] – [Crop Marks] on the [Setup] tab.
[Advanced Settings] dialog box – [Layout] tab
Page Placement:
Determines where to print on the output paper. This is linked to
[Layout] – [Log/Phys] – [Position] on the [Setup] tab.
Size/Orientation change handling:
Determines the output method when a mixture of pages with different paper sizes and printing orientations is used.
3-14 Print Controller PostScript3 Option
Chapter 3 Driver Functions
[Advanced Settings] dialog box – [Duplex] tab
Duplex Printing:
Select between the [None], [Flip On Long Edge] and [Flip On
Short Edge] settings.
Security - Password
When [Password] is checked, you can use the password print function to print confidential
documentation.
The [Password Setting] dialog box appears when you check this box.
When this box is checked, printing does not start unless you enter the user ID and password on the LCD touch panel of the copier.
Refer to “Print Controller user’s manual” for the password print function.
Data saved to the copier for Password Print is automatically deleted 24 hours later
if not output during this interval.
Security - Setting
Opens the [Password Setting] dialog box for specifying the user ID and password.
Enter your user ID of up to 5 digits (for the PS-341, PS-342, and PS-343) or 8 digits (for
the PS-332, PS-351, PS-361, and PS-361M) in the [ID] text box.
Enter your password of up to 8 characters in the [Password] text box.
If the Printer ECM feature has been set on the copier, [ID] set up in the [Settings]
dialog is recognized for a password for Printer ECM.
If the Printer ECM feature has been set on the copier, you can enter the same
number in the [ID] text box as that representing your password for Printer ECM.
For information pertaining to the Printer ECM, refer to “Print Controller user’s manual”.
Sorting - Collate
This function is used to specify how to output multiple pages.
The default is ON. It is recommended that you check [Collate] on the [Paper] tab rather
than select it for each application.
Collate on
Collate off
Print Controller PostScript3 Option 3-15
Chapter 3 Driver Functions
Sorting - Offset
Checking this box enables the offset function for the copier.
How to offset papers differs depending on whether the finisher is installed or not.
Example)
3rd set
1st set
3rd set
2nd set
3rd set
2nd set
1st set
2nd set
1st set
None
Without Finisher
With Finisher
• When the finisher is not installed, every set of copies is output in a direction at right
angles to the previous set of copies.
• When the finisher is installed, every set of copies is offset upon exit.
When the finisher is not installed, make sure to set the papers with the same size
in both portrait tray and landscape tray.
(Example: 8.5 x 11 and 8.5 x 11R)
To enable the offset function, check the [Offset] box on the [Setup] tab.
The default is Off.
About
Clicking this button shows system information and the Printer Driver version number.
Restore Defaults
The function is used to restore all settings to their defaults.
3-16 Print Controller PostScript3 Option
Chapter 3 Driver Functions
[Covers] ([Insertion]) tab
The [Covers] tab performs the settings for the front and back covers. The tab also displays
the current setting status of the [Setup] tab using an image of the output result and the list of
the setting specifications.
Front Cover
Checking this item inserts the front cover. The front cover cannot be set when:
• [Booklet] is set.
• Paper Type is not set to [Plain].
• The [Sort] setting is [OFF].
Blank:
Outputs the front cover of the page without printing.
Printed:
Outputs and prints the front cover of the page
[Off]
[Printed]
[Blank]
The default is [Off].
Print Controller PostScript3 Option 3-17
Chapter 3 Driver Functions
Back Cover
Checking this item inserts the back cover. The back cover cannot be set when:
• [Booklet] is set.
• Paper Type is not set to [Plain].
• The [Sort] setting is [OFF].
Blank:
Outputs the back cover of the page without printing.
Printed:
Outputs and prints the back cover of the page.
[Off]
[Printed]
[Blank]
The default is [Off].
Covers Tray
Sets the tray for the front cover/back cover. The default setting is [Bypass].
When [Paper] – [Source] on the [Setup] tab is not set to [Auto Select], the same tray cannot be selected for the item set by [Paper] – [Source] on the [Setup] tab.
PI Cover
Specifies whether a sheet in the PI tray is to be inserted as a front or back cover. You can
specify a front cover and/or a back cover.
The [PI Cover] box cannot be checked when:
• [None] is selected for [Finisher] on the [Device Options] tab.
• [PI-108] is not selected for [Cover Sheet Feeder] on the [Device Options] tab.
3-18 Print Controller PostScript3 Option
Chapter 3 Driver Functions
Print Controller PostScript3 Option 3-19
Chapter 3 Driver Functions
Advanced Document Settings
With UG-1, either single-sided or double-sided printing on the inserted paper can be
selected for each page of the document to be printed by selecting [Advanced Document
Settings] of the [Insertion] tab. This setting can be saved.
When the [Advanced Document Setting] function is active and [Source] or [Duplex] of the
[Setup] tab is changed, a warning message as follows is shown.
• Click the [OK] button to change the default settings of the [Advanced Document Control] dialog box.
Advanced Controls:
By selecting Advanced Controls, the [Advanced Document Control] dialog box is displayed in which the Mixplex printing is set
up.
[Advanced Document Control] dialog box
[Page Number]
Enter the page No. to be inserted for the tab sheet printed on one or both sides. For
instance, enter "3" to specify the page 3. When specifying the page 3, 5 and 12, enter
"3, 5, 12." When specifying the pages from 3 to 7, enter "3-7."
[Feature Selection]
Enter the type of the page to be inserted.
[Duplex]
The page specified in the [Page Number] field is printed on
both sides. Specify the binding position for the both-sided
printing in the [Duplex Type] field.
[Chapter]
Page specified is printed on the top side.
[Intersheet]
A blank sheet of paper is inserted after the page specified.
When [0] is specified in the [Page Number] field, a blank
sheet of paper is inserted at the head.
3-20 Print Controller PostScript3 Option
Chapter 3 Driver Functions
[Tab]
A tab sheet is inserted after the specified page. By selecting
the [Tab Details]-[Print a page] check box, contents of the
document of the specified page are printed on the inserted
tab sheet.
By entering [0] in the [Page Number] field, the tab sheet is
inserted at the head.
• The tab sheet cannot be printed on both sides.
[Duplex Type]
Specify the binding position when printing on both sides of the inserted paper.
When any type other than Duplex has been specified in the [Feature Selection] field,
this function cannot be selected.
[Tray]
Used to specify the paper feeding tray.
[Tab Details]
Set up the timing when the tab sheet is used as an inserted paper.
This function cannot be set up when any item other than [Tab] has been selected.
[Print Index Text]
When setting the header characters for the tab sheet to be
inserted, select this check box and enter the header characters into the [Index Text to print on the tab] text box.
[Print a page] check box When printing the contents of the document on the inserted
tab sheet also, select this check box.
[Index Text to print on the tab]
Enter the header characters for the inserted tab sheet. If the
[Print Index Text] check box has not been selected, the
header characters cannot be entered.
[Add] button
Contents of the setting in the [Advanced Document Control] window are listed with
this button.
[Delete] button
Used to delete lines selected from the list. The line indicated as [Default] cannot be
deleted.
[Clear All] button
Used to delete the contents of the list and return to the default setting screen.
By clicking the [Clear All] button, a confirmation message is indicated. To delete the
list and return to the default setting screen, click the [Yes] button.
[Edit] button
Used to change the contents of the list.
Select the line to be changed, click the [Edit] button, change as required and click the
[Add] button. Then the setting of the line selected can be changed.
• Setting of [Page Number] and [Feature Selection] cannot be changed.
• Setting of the line of [Default] cannot be changed.
Print Controller PostScript3 Option 3-21
Chapter 3 Driver Functions
[OK] button
To save the contents set in the [Advanced Document Control] window and return to
the [Insertion] tab, click the [OK] button. A confirmation message is indicated asking
whether to save the contents of the setting. To save the contents, click the [Yes] button and return to the [Insertion] tab.
[Cancel] button
To return to the [Insertion] tab without saving the settings in the [Advanced Document
Control] window, click the [Cancel] button. A confirmation message is indicated. To
return to the [Insertion] tab without saving the settings, click the [Yes] button and
return to the [Insertion] tab.
[Save] button
Used to save the settings in the [Advanced Document Control] window. A confirmation message is indicated asking whether to save the settings and change the contents of the default settings. Click the [Yes] button to save the settings.
[Sage As] button
Used to save the setting for the first time in the [Advanced Document Control] window. By clicking the [Save As] button, the [Save K-Doc File] window is displayed.
Specify where to save and the file name to save. Extension of the file name is [kdc].
[Load] button
Click the [Load] button when reading the file saved with the [Save As] button. As the
[Load K-Doc File] window is displayed, select the file to be read and click the [Open]
button. Then the [Advanced Document Control] window is displayed and the settings
of the file selected are listed.
[Tab Settings] button
When inserting the tab sheet, set up the header characters for the tab sheet in the
[Tab Sheet parameters] window.
For the settings in the [Tab Sheet parameters] window, see p.3-23
3-22 Print Controller PostScript3 Option
Chapter 3 Driver Functions
[Tab Settings]
By clicking the [Tab Settings] button in the [Advanced Document Control] window, the
[Tab Sheet Parameters] window is displayed.
In the [Tab Sheet Parameters] Window, header characters and other details can be set
for the tab sheet.
[Size of Tab Paper]
Used to set the tab sheet size and No. of tabs.
[A4] button
Select when the tab sheet inserted is of the A4 size.
[U.S. Letter] button
Select when the tab sheet inserted is of the letter size.
[Number of Tabs]
Used to specify the number of tabs of the tab sheet
inserted.
• Select the number of the tabs of the tab sheet in the
range of 3 to 9.
[Dimensions] button
Used in the [Tab Dimensions] window displayed by clicking
the [Dimensions] button to set the length from the upper
side of the paper to the center of the first tab, distance
between tabs, width of the header characters, etc.
These values can be set respectively in the range as follows. (Unit: inch)
Offset to first Tab:
30-1000
Distance between Tabs: 30-1000
Printable Width:
30-1000
Offset to first Tab
Printable Width
Distance between tabs
Print Controller PostScript3 Option 3-23
Chapter 3 Driver Functions
[Set Orientation of text on Tabs]
Used to select the direction of the header characters for the tab sheet.
[Font to be used on Tab Indices]
Used to specify the font, style and size of the header characters for the tab sheet.
[Change Font Detail]
Setting of the header characters for the tab sheet can be
changed with this button. By clicking this button, the [Font]
window is displayed. Select the font, style and size to be
changed in this window.
[Tray in which Tab sheets are stored]
Used to specify the paper feeding tray for the tab sheet to be inserted.
Restore Defaults
The function is used to restore all settings to their default settings.
3-24 Print Controller PostScript3 Option
Chapter 3 Driver Functions
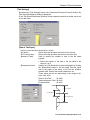
[Graphics] tab
The [Graphics] tab sets image rotation, reverse image rotation, resolution, etc. The tab also
displays the current setting status of the [Setup] tab using an image of the output result and
the list of the setting specifications.
Image Rotation
Sets the rotation of the printing data to 0°, 90°, 180° or to 270° (counterclockwise).
Effects
Mirror Image:
Checking this item prints a mirror image of the printing data.
Negative Image:
Checking this item prints a negative image of the printing data.
Image
:If the graphic appears too bright, slide the brightness slider to the left.
If the graphic appears too dark, slide the brightness slider to the right.
:To decrease contrast, slide the contrast slider to the left.
To increase contrast, slide the contrast slider to the right.
Density:
Determines the print density of a graphic.
If a graphic appears too dark, move the slider towards [Light]. If the graphic appears too
light, move the slider towards [Normal]. The default setting is [Normal].
Print Controller PostScript3 Option 3-25
Chapter 3 Driver Functions
Smoothing
Use Bitmap Smoothing:
Checking this item enables smoothing.
Type:
When you check [Use Bitmap Smoothing], click the [
type from the list that appears. The default is [Off].
] button to select the smoothing
Color Modification
Specify whether a driver or printer is used to apply monochrome conversion to a graphic.
Restore Defaults
The function is used to restore all settings to their default settings.
3-26 Print Controller PostScript3 Option
Chapter 3 Driver Functions
[Fonts] tab
The [Fonts] tab sets the font used.
Send To Printer As
Selects [Adobe (Type1)], [Bitmap (Type3)], or [TrueType (Type 42)] as the method of
sending TrueType fonts.
Threshold Units
Selects between [Points], [1/100inch], and [Pixels] as the setting unit for the threshold.
Threshold
Specify the threshold in the range from 1 to 3000.
For System Font
Displays a list of TrueType fonts installed in the system.
Use Printer Font
Displays a list of printer fonts. The selected system fonts and printer fonts indicate they
can be mutually substituted, i.e. they have a substitution relationship. When reselecting
the printer font, printer fonts that can be substituted are changed. Click the Default Substitution button to restore the original substitution relationship.
Use Printer Fonts For All True Type Fonts
Checking this item substitutes printer fonts for all TrueType fonts for output.
Use Substitution Table
Checking this item uses the TrueType font and printer font substitution table.
Default Substitution
Clicking the button restores the TrueType font and printer font substitution relationship.
Restore Defaults
The function is used to restore all settings to their defaults.
Print Controller PostScript3 Option 3-27
Chapter 3 Driver Functions
[PostScript] tab
The [PostScript] tab performs advanced PostScript settings. The tab also displays the current setting status of the [Setup] tab using an image of the output result and the list of the
setting specifications.
Output
To Printer:
Outputs data to the printer.
Encapsulated PostScript:
Outputs data as a file in the EPS format.
File Name:
Allows you to specify a file name when outputting data as a file in the EPS format.
Settings
Job Compression:
Offers a choice of [None], [LZW] or [Flate] as a print job compression method.
Flate Compression:
When [Flate] is selected for [Job Compression], allows you to select Flate compression
modes from [Fastest], [Fast], [Default] and [Best Compression].
Compress Bitmaps:
Offers a choice of [None], [RLE], [JPEG] or [LZW] as a bitmap compression method.
JPEG:
When [JPEG] is selected in [Compress Bitmap], allows you to select JPEG modes from
[High Quality], [Fast], [Medium], [Draft] and [Custom].
3-28 Print Controller PostScript3 Option
Chapter 3 Driver Functions
Output Protocol:
Offers a choice of [Pure Binary], [ASCII], [BCP] or [TBCP] as an output data format.
[Pure Binary] is supported by Windows NT/2000/XP.
[Gamma Level] is supported by Windows NT/2000/XP.
Tokenised PS:
Checking this box enables Tokenised PS.
PostScript Options
Clicking this button displays the [PostScript] dialog box.
PostScript Options
Print PostScript Error Information:
Checking this box makes the error handler available. When this box is set as checked
and an error is encountered during the printing process, an error message is printed out
under the action of the error handler.
Use PostScript Pass-through:
Checking this box declares this driver as a PostScript driver. The box is checked by
default.
Clear Memory per Page:
Checking this box clears the printer memory resource before running a printer job on a
page-by-page basis.
Compatibility:
Allows you to select PostScript for output format.
Print Controller PostScript3 Option 3-29
Chapter 3 Driver Functions
Page Size Policy:
Determines what to do if a discrepancy occurs between the choices of tray and paper
size.
Timeouts
Job Timeout (seconds):
Defines a maximum length of time in seconds available for the printer to complete a single print job.
Wait Timeout (seconds):
Defines a maximum length of time in seconds during which the printer waits for print
data to be fed in from the computer during the printing process.
Send Ctrl-D To Printer:
Determines how to send a [Ctrl-D] signal to the printer to notify it of the completion of
the print job at hand.
Print Enhance
Checking this box makes the halftone frequency and angle enabled.
Halftone Frequency: (Halftoning)
Set the halftone frequency in the range from [8.0] to [600.0]. The default is [75.0].
Halftone Angle: (Screen Angle)
Set the halftone angle of degree in the range from [0.0] to [360.0]. The default is [15.0]
Restore Defaults
The function is used to restore all settings in the [PostScript] dialog box to their defaults.
Print Watermark On Logical Page
Checking this box causes a watermark to be printed on every original sheet when
[N-Up] or [Booklet] is selected.
Unchecking this box causes a watermark to be printed on every output sheet.
Restore Defaults
The function is used to restore all settings on the [PostScript] tab to their defaults.
3-30 Print Controller PostScript3 Option
Chapter 3 Driver Functions
[Device Options] tab
Optional products attached to the copier are set with the printer driver. The status of the
copier’s option settings are graphically displayed.
The [Device Options] tab varies with the model of your IP controller.
For details on the settings that can be made, refer to the user’s manual for your IP
controller.
Print Controller PostScript3 Option 3-31
Chapter 3 Driver Functions
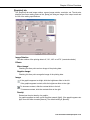
[Overlay] tab
The [Overlay] tab sets the overlay of the document to be printed. The tab also displays the
current setting status of the [Setup] tab using an image of the output result and the list of the
setting specifications. To use overlay, the overlay data must be prepared in advance.
Overlay Data
Printed Document
Printing result
using overlay
Overlays
Displays a list of stored overlay files.
When [None] is selected, the overlay function is disabled. For the overlay printing procedure, refer to “Overlay Printing Procedure.”
Load Overlay
Opens the [Load Page Overlay File] dialog box that is used to select an overlay file.
Create Overlay
Opens the [Create Page Overlay] dialog box. For creating overlays, refer to “To create
overlay.”
Delete
Deletes the overlay file selected in the [Overlays] list.
Check Before Print
When this box is checked, a message confirming overlay printing appears during printing.
3-32 Print Controller PostScript3 Option
Chapter 3 Driver Functions
Overlay File Information
Displays information about the selected overlay file.
Overlay Creation Status
Displays the creation status of an overlay file.
To create overlay
For creating overlays, perform the following procedure.
1. Create an overlay with the application in use.
2.
Select [Print] from the [File] menu.
The selected menu may differ depending on the application used.
3.
Select [Kyocera Mita xxxx PS VD].
“xxxx” indicates the model name of your copier.
4.
Click [Properties].
The property screen opens.
5.
Click the [Overlay] tab.
6.
Click [Create Overlay].
The [Create Page Overlay] dialog box opens.
7.
Input the file name in [File Name].
Use “esp” as the extension.
8.
Click [OK].
The [Create Page Overlay] dialog box closes.
9.
Click [OK] to create the overlay.
The [Properties] dialog box closes.
10. Click [OK] and create the overlay.
The overlay creation confirmation dialog box appears.
11. Click [Yes].
The overlay data is stored.
Overlay Printing Procedure
When printing overlays, perform the following procedure.
1. Select [Print] from the [File] menu.
The selected menu may differ depending on the application used.
2.
Select [Kyocera Mita xxxx PS VD].
“xxxx” indicates the model name of your copier.
3.
Click [Properties].
The property screen opens.
4.
Click the [Overlay] tab.
5.
Select the overlay file to be printed.
6.
Click [OK].
The [Properties] dialog box closes.
7.
Click [OK] and create the overlay.
Along with the overlay data the document to be printed is printed on top of the overlay
data. Select [Overlay], [None] after printing has been completed.
Print Controller PostScript3 Option 3-33
Chapter 3 Driver Functions
[Watermarks] tab
Performs settings concerning the watermark. A preview of the watermark that is selected or
the watermark that is being edited is displayed.
Watermark
Select whether a watermark is present and its type from [None], [CONFIDENTIAL],
[COPY], [DRAFT], [FILE COPY], [FINAL], [PROOF], and [TOP SECRET]. The default is
[None].
Watermark – Add
Adds an edited watermark.
Watermark – Update
Updates a watermark while it is being edited.
Watermark – Delete
Deletes the watermark selected in the list.
Edit – Text
The selected watermark is shown in this box for editing. You can also enter new characters.
Edit – Size
Set the font size for a watermark with the scroll bar.
Edit – Angle
Set the rotation angle for a watermark with the scroll bar.
Edit – Fonts
Opens the [Font] dialog box that is used to set the font for a watermark.
3-34 Print Controller PostScript3 Option
Chapter 3 Driver Functions
Edit – Color
The Printer Controller does not support colors. When you select colors, they are converted into gray and then printed.
Position
Specify the printing position of a watermark by dragging and dropping in the preview or
using the scroll bar.
inches/mm: Determines the unit of the coordinates displaying the location.
Position – Center Watermark
Arranges the watermark in the center of the page.
First Page Only
When this item is checked, a watermark is printed on the first page only. When not
checked, the watermark is printed on all pages.
Transparent Text
When this item is checked, characters are printed with a net pattern background that looks
transparent. When not checked, the net pattern background of the characters becomes
white and shadow printing data is not printed.
As Outline Only
When this item is checked, only the outline of the characters of the watermark is printed.
Note that this item is enabled if the [Transparent Text] setting is disabled.
Print Controller PostScript3 Option 3-35
Chapter 3 Driver Functions
[POD] tab
The [POD] tab is used to make the settings related to book binding and finishing. The tab
also displays the current setting status of the [Setup] tab using an image of the output result
and the list of the setting specifications.
3-36 Print Controller PostScript3 Option
Chapter 3 Driver Functions
Fold/Stitch/Trim
You can select one of the following finish settings:
[Fold] makes a folded set of copies and outputs it to the finisher tray.
[Fold & Stitch] makes a folded and stitched set of copies and then outputs it to the finisher
tray.
[Fold & Trim] makes a folded set of copies, cuts off the excess resulting from the folding to
attain the proper size, and then outputs it to the finisher tray.
[Fold, Stitch & Trim] makes a folded and stitched set of copies, cuts off the excess resulting from the folding to attain the proper size, and then outputs it to the finisher tray.
[Z Fold (A3, B4, 11 x 17, 8K)] makes Z-folded pages (only A3, B4, 11 x 17 or 8K paper)
and then outputs them to the finisher tray.
[Z Fold (8.5 x 14)] makes Z-folded pages (only 8.5 x 14 paper) and then outputs them to
the finisher tray.
The [Fold/Stitch/Trim] setting cannot be made when:
• [None] is selected for [Finisher] on the [Device Options] tab.
• [OHT], [OHT Interleaved], or [OHT I/L Printed] is selected for [Paper Type] on the
[Setup] tab.
• [Offset] is checked on the [Setup] tab.
• Other than [None] is selected for [Staple] on the [Setup] tab.
• Other than [None] is selected for [Punch] on the [Setup] tab.
[Fold & Trim] or [Fold, Stitch & Trim] cannot be selected when [TU-108] is not selected on
the [Device Options] tab.
[Z Fold] cannot be selected when [PZ-108] is not selected for [Punch] on the [Device
Options] tab.
Wait Mode
Selecting [Wait] allows you to check the current job settings on the copier's LCD touch
screen. Selecting [Wait with Proof] allows you to check the current job settings on the
copier's LCD touch screen and to see how the printed job looks like before printing multiple sets.
Image Shift
Selecting [On] adds a binding margin to the output paper. You can set a value for a binding margin using the copier's LCD touch screen.
Print Controller PostScript3 Option 3-37
Chapter 3 Driver Functions
One Page Per Sheet
You can print two pages on a single sheet that is double the size of the specified output
paper. Selecting [2 In 1] causes two contiguous pages to be printed on one sheet. Selecting [2 Repeat] causes each page to be printed twice on one sheet. The default is [None].
2 in 1
ABCD
ABCD
ABCD
ABCD
1
2
1
2
ABCD
ABCD
ABCD
ABCD
1
2
1
1
ABCD
ABCD
2
2
2 repeat
The [One Page Per Sheet] setting cannot be made when:
• [Collate] is not checked for [Sorting] on the [Setup] tab.
• [A3], [B4], [A6], [B6], [F4], [8K], [16K], [8.5 x 14], [11 x 17], [11 x 17W], [A3W], or
[B4W] is selected for [Output Paper] on the [Setup] tab.
• [OHT], [OHT Interleaved], or [OHT I/L Printed] is selected for [Paper Type] on the
[Setup] tab.
[2 In 1] or [2 Repeat] cannot be selected when:
• [Back Cover] and/or [Front Cover] is/are selected.
Booklet (Keep Original Size)
You can specify duplex printing to create booklets by folding the output paper into two and
then stitching.
The settings you can select are as follows:
[Off], [4 in 1], [4 in 1 Right]
The [Booklet] setting cannot be made when:
• [Booklet] is selected under [Layout] on the [Setup] tab.
Print Order
You can specify whether the printed side faces up or down.
3-38 Print Controller PostScript3 Option
Chapter 3 Driver Functions
Image Storage
Specify whether print data is to be stored on the hard disk of the printer. You cannot check
[Image Storage] when [None] is selected for [Copier HDD] on the [Device Options] tab.
Store Job:
Store and Print:
Password Setting:
Print data is stored on the hard disk of the printer.
Print data is stored on the hard disk of the printer and then
printed.
Opens the [Password Setting] dialog box. This dialog box is
used to enter the job ID and password required to store print
data on the hard disk of the printer. For [ID], enter a number of
up to 8 digits. For [Password], enter a password of up to 8 characters, which can consist of numbers, uppercase letters, spaces,
., -, and _. This password replaces the password specified in the
dialog box that appears when you check [Security]-[Password]
on the [Setup] tab.
Restore Defaults
This button is used to restore all the settings to their defaults.
Print Controller PostScript3 Option 3-39
Chapter 3 Driver Functions
3-40 Print Controller PostScript3 Option
Chapter 3 Driver Functions
Print Controller PostScript3 Option 3-41
Chapter 3 Driver Functions
3-42 Print Controller PostScript3 Option
Chapter 3 Driver Functions
Print Controller PostScript3 Option 3-43
Chapter 3 Driver Functions
Driver configuration store function
This function allows you to easily load saved settings during printing. This function is
available on the [Setup], [Covers], [Graphics], [POD], and [PostScript] tabs. You can also
delete a saved setting or restore the initial setting.
The following settings are not saved by the driver configuration store function.
• The [Copies] setting on the [Setup] tab
• The ON/OFF setting of [Password] on the [Setup] tab
• The [ID] and [Password] settings in the dialog box that appears when you click the
[Setting] button or [Password] on the [Setup] tab
Saving a setting
To save the current setting, click the [Save] button, enter the configuration name in the
[Configuration Name] dialog box, and then click the [OK] button. You can save the current
setting only when [Untitled] appears under [Configuration Sets].
Loading a setting
To load a saved setting, select the desired setting from the [Configuration Sets] list. The
current setting is replaced with the loaded setting. When you select [Defaults] from the
[Configuration Sets] list, the initial setting is restored.
Deleting a setting
To delete a saved setting, select the desired setting from the [Configuration Sets] list and
then click the [Delete] button. The [Delete] button appears only when a saved setting is
selected.
3-44 Print Controller PostScript3 Option
Appendix A Troubleshooting
Basic Troubleshooting .............................................. A-2
Cannot get the correct outputs using the Kyocera Mita KM-8530
PS Visual Driver. .........................................................................................A-2
Print Controller PostScript3 Option A-1
Appendix A Troubleshooting
Basic Troubleshooting
For basic troubleshooting, see “Appendix A: Troubleshooting” in the Print Controller user’s
manual.
Cannot get the correct outputs using the Kyocera Mita KM-8530
PS Visual Driver.
Try using the Adobe PS Driver.
A-2 Print Controller PostScript3 Option
KYOCERA MITA AMERICA, INC.
Headquarters. MARKETING DEPARTMENT
225 Sand Road, P.O. Box40008
Fairfield, New Jersey 07004-0008
TEL: (973)808-8444
FAX: (973)882-6000
2002.10