1
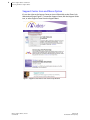
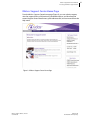
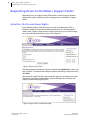
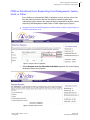
Midas+ Support Center User Manual Software Version 2014.1 March 2014 Confidential For Licensed Use Only Confidential and Proprietary This document contains confidential information that is proprietary to MidasPlus, Inc. Possession and use of this document or any part thereof, in any form, is limited to licensed Midas+ clients only and is regulated by specific license agreement provisions. Any other use or unauthorized disclosure is strictly prohibited. Copyright Notice Midas+ Document BK-1403-SUPCNTR-2014.1 This document contains no actual patient information. Names of people and facilities have been fabricated to illustrate system usage. Any resemblance to actual people and places is coincidental and unintentional. Copyright ©2014 Xerox Corporation and MidasPlus, Inc. All Rights Reserved. Except as specifically provided in the License Agreement, no part of this publication may be reproduced or distributed in any form or by any means without the prior written permission of: Midas+ Solutions A Xerox Company 4801 East Broadway, Suite 335 Tucson, Arizona 85711-3633 (800) 737 8835 Visit our website at: http://www.midasplus.com/ Trademarks Midas+ and design are trademarks of MidasPlus, Inc. in the United States and/or other countries. XEROX® and XEROX and Design® are trademarks of Xerox Corporation in the United States and/or other countries. All other trademarks are the exclusive property of their respective owners. 1 Midas+ Support Center User Manual Contents: 2 Introduction 3 Accessing the Midas+ Support Center 6 Requesting Access to the Midas+ Support Center 9 Installing the ActiveX Control 10 Using the Dashboard 12 Troubleshooting Guide 13 Submitting a Request 20 Viewing Support Log History 25 Confirming Resolutions Midas+ Support Center, v2014.1 User Manual March 2014 Confidential and Proprietary 2 Midas+ Support Center User Manual Introduction Introduction The Support Center system functions as a wizard to allow you to submit questions and log issues about Midas+ software directly to an assigned Midas+ Solutions Support expert. This includes the ability to track any previously submitted requests, and communicate directly with the assigned Midas+ Solutions Support staff member by email. Purpose of the Support Center Our goal is to provide the fastest route to getting your support questions answered. The Support Center application will expedite the support process by immediately directing your questions to the appropriate resource. Although it is intended to provide assistance in urgent matters, the Support Center application is not designed for emergency issues. Important: If you have an emergency such as a system failure, call your Account Manager. These are the primary functions of the Support Center application: Submit questions/issues/enhancements to key Midas+ product experts. Provide a means to track outstanding issues and retain a history of all previously submitted questions/issues/enhancements. Notifications Once a request has been submitted, an email confirmation is sent notifying you your question has been successfully submitted. Additional emails will be sent for any change in status, and upon the resolution of the issue. To receive all emails regarding Midas+ Solutions Support issues related to your facility, regardless of the type, contact your Account Manager. System Requirements The Midas+ Support Center is a Web-based application that does not require the installation of additional software, with the exception of prompting you to install an Active X control the first time you log in. This control allows you to copy and paste screenshots directly into the application. Midas+ Support Center, v2014.1 User Manual March 2014 Confidential and Proprietary Midas+ Support Center User Manual Accessing the Midas+ Support Center Accessing the Midas+ Support Center There are two types of product-dependent securities for access to the Midas+ Support Center. A user may be granted one or both of the following types of security: CPMS/DataVision Care Management, Seeker, Statit, Midas+ Live, Midas+ Comply or Other Requests Security Rights for CPMS/DataVision Requests If a user is assigned to a facility that is actively contracted for CPMS or DataVision services, the user will be assigned the following rights: Access to the Support Center application The ability to select CPMS or DataVision as a product type for any problem or question Access to the History section of the Support Center to view questions or problems that the user has submitted, either via a request through the Support Center, or a request to an ACS Midas+ staff member Security Rights for Care Management, Seeker, Statit, Midas+ Live, Midas+ Comply or Other Requests For the purposes of submitting questions or problems related to Care Management, Seeker, Statit, Midas+ Live, Midas+ Comply or Other non-CDSS related issues, a user may be given access to the Support Center by their Midas+ Account Manager. With this level of access, the user will be able to Access the Support Center Select Care Management, Seeker, Statit, Midas+ Live, Midas+ Comply or Other as a product type for any problem or question Access the History section of the Support Center and view questions or problems that a system manager or designated site manager has submitted, either via a request through the Support Center, an e-mail, or phone request to an ACS Midas+ staff member Additional Security Rights Users may be granted additional rights that will allow them to view the Support History for any questions or problems that any user within their facility has submitted for a Midas+ product, either via a request through the Support Center, an e-mail, or phone request to their Midas+ Account Manager. Midas+ Support Center, v2014.1 User Manual March 2014 Confidential and Proprietary 3 4 Midas+ Support Center User Manual Accessing the Midas+ Support Center Support Center Icon and Menu Option If a user has rights to the Support Center, an icon will be visible on the Clients Only Website Home page (Figure 1). To enter the Support Center, click the Support Center icon, or select Support Center from the Support Menu. Figure 1: Support Center Access from Clients Only Website Midas+ Support Center, v2014.1 User Manual March 2014 Confidential and Proprietary Midas+ Support Center User Manual Accessing the Midas+ Support Center Midas+ Support Center Home Page From the Midas+ Support Center home page (Figure 2), you can submit a request, view the support history of all previously submitted requests, and download the current Support Center release notes, quick reference card, and user manual from the Help menu. Figure 2: Midas+ Support Center Home Page Midas+ Support Center, v2014.1 User Manual March 2014 Confidential and Proprietary 5 6 Midas+ Support Center User Manual Requesting Access to the Midas+ Support Center Requesting Access to the Midas+ Support Center Requesting access to Support Center will be based on the two types of productdependent securities currently used for managing access to the Midas+ Support Center. Initial Use - No Current Access Rights If you click the Support Center link and you are not associated with a CDSS or DataVision facility, and you have not been granted access to Care Management, Seeker, Statit, Comply or Other product support requests by your system manager, the system will display the Request Access form (Figure 3). Figure 3: Request Access Form Click the appropriate checkboxes (Figure 3) and click the Send Email to submit your access request. To cancel and close the form without submitting a request for access, click Close. When you click Send Email, the system sends the request in an email to the system manager for your facility and the Midas+ Account Manager for your facility, and displays a confirmation page (Figure 4). Figure 4: Request Access Confirmation Page Midas+ Support Center, v2014.1 User Manual March 2014 Confidential and Proprietary Midas+ Support Center User Manual Requesting Access to the Midas+ Support Center CPMS or DataVision Users Requesting Care Management, Seeker, Statit, or Other If your facility has contracted for CPMS or DataVision services, and you select a site from the Site drop-down list that only has CPMS or DataVision rights when submitting a support request, the system will display a hyperlink to the form used for requesting Care Management, Seeker, Statit, or Other support types (Figure 5). To request access to Care Management, Seeker, Statit, or Other support types as a CPMS or DataVision user: Figure 5: Request Access Hyperlink 1 Click the Request access for CM/Seeker/Statit/Other hyperlink. The system displays the Request Access form (Figure 6). Figure 6: Request Access Form Midas+ Support Center, v2014.1 User Manual March 2014 Confidential and Proprietary 7 8 Midas+ Support Center User Manual Requesting Access to the Midas+ Support Center 2 Mark the appropriate checkboxes. 3 Click the Send Email button. The system sends the request in an email to your facility’s system manager and the Midas+ Account Manager, and displays a confirmation page (Figure 7). Figure 7: Request Access Confirmation Page Midas+ Support Center, v2014.1 User Manual March 2014 Confidential and Proprietary Midas+ Support Center User Manual Installing the ActiveX Control Installing the ActiveX Control The Midas+ Support Center is a Web-based application. You will be prompted to install a required ActiveX control the first time you use it. Note: If you have difficulties installing the ActiveX control, please contact your IT department. To Install the ActiveX Control: 1 Click the Information Bar. The drop-down list is displayed. Figure 8: Install AtiveX Control 2 From the drop-down list, select Install ActiveX Control. A dialog box is displayed asking if you want to install the ActiveX Control software. 3 Click Install. Midas+ Support Center, v2014.1 User Manual March 2014 Confidential and Proprietary 9 10 Midas+ Support Center User Manual Using the Dashboard Using the Dashboard The dashboard (Figure 9) provides links and information pertaining to current log activity, as well as links to additional Midas+ support resources. Figure 9: Dashboard My Active Logs Link to and the number of active logs you have submitted All Active Logs Link to and the number of active logs associated with your site Awaiting Client Follow-up Link to and the number of logs requiring additional information from you Resolved-Pending Confirmation Link to and the number of logs awaiting client confirmation of the resolution Most Recently Closed Logs Link to and the number of logs closed within the last 7 days with a count Service Manager and Extn. Name and extension of Midas+ Service Manager (now called Account Manager) assigned to your site CPMS/DataVision Current Known Issues Link to list of known CPMS/DataVision Issues CPMS/DataVision Upcoming Events Link to a calendar view of CPMS/DataVision Events Midas+ Support Center, v2014.1 User Manual March 2014 Confidential and Proprietary Midas+ Support Center User Manual Using the Dashboard CPMS/DataVision Resources Link to the Midas+ DataVision Web page Support Center Release Notes Link to PDF of current Support Center release notes Troubleshooting Guide Link to tips for how to troubleshoot support issues Midas+ Support Center, v2014.1 User Manual March 2014 Confidential and Proprietary 11 12 Midas+ Support Center User Manual Troubleshooting Guide Troubleshooting Guide A troubleshooting guide is available from the Quick Links section of the Dashboard (Figure 10) to assist you in isolating the conditions under which you experience an issue. Use the guide either for resolution the issue on your own or as troubleshooting answers to provide to your Account Manager. Figure 10: Link to Troubleshooting Guide 1 Click the Troubleshooting Guide link. The following page is displayed. Figure 11: Troubleshooting help document 2 Click Close to exit the Troubleshooting help. Midas+ Support Center, v2014.1 User Manual March 2014 Confidential and Proprietary Midas+ Support Center User Manual Submitting a Request Submitting a Request To submit a request, follow the instructions below. To submit a request: Select Submit a Request from the main menu bar or click the Submit a Request icon. Figure 12: Submit a Request tab The system displays the Submit a Request form (Figure 13). Figure 13: Submit a Request form 3 Select the affected Site from the drop-down list. Midas+ Support Center, v2014.1 User Manual March 2014 Confidential and Proprietary 13 14 Midas+ Support Center User Manual Submitting a Request Note: The Site selection will determine the available Product options. Asterisks indicate required fields. If your user account is affiliated with only one site, the Site field will default to it. The session timer will count down from twenty minutes, but will reset when you click a button to proceed or click another tab. Data entry into the form does not reset the timer, nor does selecting a dictionary field from the drop-down list. 4 Choose one of the following options: If you select CPMS or DataVision Product, see “Entering Request Details for CPMS/ DataVision Products” on page 15. If you select any other product, see “Entering Request Details for Midas+ Care Management, Seeker, Statit, Live, Comply or Other Products” on page 16. Midas+ Support Center, v2014.1 User Manual March 2014 Confidential and Proprietary Midas+ Support Center User Manual Submitting a Request Entering Request Details for CPMS/DataVision Products Follow these instructions for submitting requests for CPMS or DataVision Products. To submit a support request for CPMS or DataVision products: 1 From the Product drop-down list, select CPMS or DataVision. Figure 14: Example of CPMS Request 2 Select the appropriate Category and Sub-categories from the drop-down lists. 3 Enter the Quarter and Year for requests related to CPMS or DataVision products. 4 Enter a Subject. This is a brief description of the subject matter and is limited 60 characters. The data in the subject field will display in an unsecured auto-generated email, therefore, no PHI should be entered. 5 Enter a Question / Issue. Include helpful examples or account numbers. PHI data entered in this field is secure. 6 Once you complete the required fields, you can optionally attach files or paste a screenshot, see “Attaching a File and Pasting a Screenshot” on page 18. 7 Click Submit. Midas+ Support Center, v2014.1 User Manual March 2014 Confidential and Proprietary 15 16 Midas+ Support Center User Manual Submitting a Request Entering Request Details for Midas+ Care Management, Seeker, Statit, Live, Comply or Other Products To submit a support request for a Midas+ product: 1 Select the Product from the drop-down list. 2 Select the Functions from the drop-down list. 3 Select the Category from the drop-down list. 4 Select the Sub-category from the drop-down list. Figure 15: Example of Care Management Request 5 Click Continue. Midas+ Support Center, v2014.1 User Manual March 2014 Confidential and Proprietary Midas+ Support Center User Manual Submitting a Request The system displays the Additional Details Forms page (Figure 16), which is specific to the Product, Function, Category and Subcategory selected. Figure 16: Example of Additional Details Form Additional Details Form The purpose of the Additional Details Form (Figure 16) is to provide additional information that will expedite resolution of your request. Completing applicable fields, especially those labeled in bold type, will be most helpful in assisting with the resolution of your issue. Subject: This is a brief description of the subject matter and is limited 60 characters. The data in the subject field will display in an unsecured autogenerated email, therefore, no PHI should be entered. Question/Issues: Include helpful examples or account numbers. PHI data entered in this field is secure. 6 Provide any Additional Details and optionally attach files or paste screenshots, see “Attaching a File and Pasting a Screenshot” on page 18. 7 Click Submit. Midas+ Support Center, v2014.1 User Manual March 2014 Confidential and Proprietary 17 18 Midas+ Support Center User Manual Submitting a Request Attaching a File and Pasting a Screenshot Click the Attach/Paste button to display the Midas+ Support File Upload dialog box (Figure 17). You can securely add file attachments containing PHI from your computer or network and copy images here. Figure 17: File Upload Dialog Box Buttons for Adding, Deleting, or Viewing Files Select Add to browse to the location where the file is stored on your computer or network, select it, and attach the file. Select Delete to remove a selected file from the frame. Select View to view a selected file before sending. Copying and Pasting Screenshots To copy and paste screenshots: 1 Copy an image to the clipboard on your PC, click inside the frame, then click Paste. 2 Click thumbnails in the frame to review submitted files and screenshots or to remove them. Midas+ Support Center, v2014.1 User Manual March 2014 Confidential and Proprietary Midas+ Support Center User Manual Submitting a Request 3 After you have attached all desired files and screenshots, choose one of the following buttons: Save and Close Form to return to the Submit a Request screen to cancel and return to the Submit a Request screen without attaching files or screenshots. Confirmation of your Request Submission When you submit your request, the system will display a confirmation (Figure 18). Figure 18: Confirmation Message Support Log History Midas+ Support Center, v2014.1 User Manual March 2014 Confidential and Proprietary 19 20 Midas+ Support Center User Manual Viewing Support Log History Viewing Support Log History You can track support requests received by Midas+ Solutions Support. If you have security rights, you will see ALL support issues associated with your site in the Support Log History. Otherwise, you will only be able to view issues that you have submitted. You can use the filter options (Figure 19) to narrow your search. The results are displayed in the Support History grid (Figure 20). Figure 19: Filter Options The filter options include the following fields: Site: Site for which the request was reported Product: Name of Midas+ product associated with the request Functions: Name of function associated with request (based on selection of Product) Category: Name of category associated with request (based on selection of Functions) Sub Category: Name of sub category associated with request (based on selection of Category) Reported By: Name of employee that submitted support request Assigned To: Name of Midas+ Solutions Support staff member assigned to the log Status: Current status assigned to the log by Midas+ Support From: and To: Date range in which requests were submitted Log ID: System-generated ID for log Keywords: Specify words contained in the log Active Logs Only: Displays only logs that do not have a status of Closed. Clear this checkbox to include all logs in your search. Midas+ Support Center, v2014.1 User Manual March 2014 Confidential and Proprietary Midas+ Support Center User Manual Viewing Support Log History Items closed in the last __ days: Mark the checkbox and type a value in the text box to filter the list to show logs closed within a specific number of days from the current date. Sorting Column Headers You can sort the Support History grid (Figure 20) by clicking any of the column headers. Click any row in the grid to view additional information contained in the Details View (Figure 21). Figure 20: Support History grid Log ID: Internal ID assigned to the request Subject: Subject line of the original request Reported Date: Date the request was submitted Reported By: Email of the person who submitted the request Assigned To: Midas+ Solutions Support staff member handling the request Status: Current disposition of the request (see Status Definitions) Completed Date: If resolved, the date of the resolution is displayed here Icon Functions Click the following icons to e-mail or export the results. Click to send an email to the responsible Midas+ Solutions Support staff member Click to export your support log information to a CSV file Midas+ Support Center, v2014.1 User Manual March 2014 Confidential and Proprietary 21 22 Midas+ Support Center User Manual Viewing Support Log History Viewing Details The Details View displays the Status History, Status Notes, and Problem Description associated with the selected log. Click any row in the Support History grid (Figure 20) to display the Details View (Figure 21). Figure 21: Details View The Status field near the top of the page displays the current status of the request. The Status History field displays all of the status changes associated with the request, See“Status Type Definitions” on page 22. Click Edit to update the request with additional information (not available for closed logs). Click Print to print the contents of the Details View window. Click Close to exit the Details View. Status Type Definitions Entered By Midas+ Staff A Midas+ staff member has entered the log from the internal support log system. Support Log Received A record of the log has been created. Acknowledgement of Receipt A Midas+ Support staff member has viewed the log. Researching A Midas+ Solutions Support staff member is working on the request. Midas+ Support Center, v2014.1 User Manual March 2014 Confidential and Proprietary Midas+ Support Center User Manual Viewing Support Log History Awaiting Client Follow-up Solutions Support staff member is waiting for a response or additional information from the client. On Hold The client has postponed the request. Triaged The request has been forwarded to another Midas+ Solutions Support staff member. Escalated The request has been forwarded to higher level staff for resolution. Resolved-Pending Confirmation Email has been sent to client and awaiting Yes or No client confirmation response. If there is no response after 7 days, the log is closed automatically. Closed-Resolved The issue has been resolved and the client has been notified. Reopened Log The log has been reopened by Midas+ staff. Editing an Existing Support Request Note: You cannot edit a log that has been closed. To add information to an existing, open request: 1 In the Details View (Figure 21) click Edit for the request for which you want to update with additional information. The Support History Update Description form is displayed (Figure 22). Figure 22: Support History Update Description form Midas+ Support Center, v2014.1 User Manual March 2014 Confidential and Proprietary 23 24 Midas+ Support Center User Manual Viewing Support Log History 2 In the Problem Description field, type the information you want to add to the request, then click Save. Note: You can attach files and screenshots when editing an existing log. The system updates the Status History grid and the Problem Description field with a time and date stamp and the information you added (Figure 23). Figure 23: Support History Details View-Information and Timestamp Midas+ Support Center, v2014.1 User Manual March 2014 Confidential and Proprietary Midas+ Support Center User Manual Confirming Resolutions Confirming Resolutions Once you’ve submitted your request through the Support Center and the issue is being resolved or has been resolved, you’ll receive an e-mail requesting confirmation. Confirming a Resolved-Pending Confirmation Status in an Email The system sends you an email when a Midas+ Solutions Support staff member changes the status of your issue to Resolved-Pending Confirmation in the Midas+ Support log (Figure 24). Your confirmation of the resolution is required to close the support request. If you do not confirm the resolution within seven days of the status change, the system will automatically change the status to Closed-Resolved. Figure 24: Hyperlinks in system email When you receive the email requesting confirmation, click on the appropriate hyperlink that is displayed in the email. Confirming a Resolved-Pending Confirmation Status in Support History To confirm the resolution from the Support History page of Support Center: 1 Click a record in the results grid with a status of Resolved-Pending Confirmation. The system displays the Details View of the log. 2 Click a record in the Status History grid that has a status of Resolved-Pending Confirmation. A confirmation is displayed to the right of the Status Notes field. 3 Click Yes to confirm the resolution and close the log. Click No to provide additional information and keep the log open. Midas+ Support Center, v2014.1 User Manual March 2014 Confidential and Proprietary 25 26 Midas+ Support Center User Manual Confirming Resolutions Midas+ Support Center, v2014.1 User Manual March 2014 Confidential and Proprietary