1
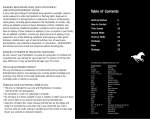
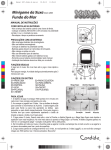
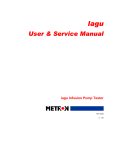
WARNING: PHOTOSENSITIVITY/EPILEPSY/SEIZURES
A very small percentage of individuals may experience epileptic seizures or blackouts when exposed to certain light patterns or flashing lights. Exposure to certain
patterns or backgrounds on a television screen or when playing video games may trigger epileptic seizures or blackouts in these individuals. These conditions may
trigger previously undetected epileptic symptoms or seizures in persons who have no history of prior seizures or epilepsy. If you, or anyone in your family, has an
epileptic condition or has had seizures of any kind, consult your physician before playing. IMMEDIATELY DISCONTINUE use and consult your physician before
resuming gameplay if you or your child experience any of the following health problems or symptoms:
• dizziness • eye or muscle twitches • disorientation • altered vision • loss of awareness • seizures or convulsion.
• any involuntary movement
RESUME GAMEPLAY ONLY ON APPROVAL OF YOUR PHYSICIAN.
Use and handling of video games to reduce the likelihood of a seizure
• Avoid large screen televisions. Use the smallest television screen available.
• Avoid prolonged use of the PlayStation®3 system. Take a 15-minute break during each hour of play.
• Avoid playing when you are tired or need sleep.
Stop using the system immediately if you experience any of the following symptoms: lightheadedness, nausea, or a sensation similar to motion sickness; discomfort
or pain in the eyes, ears, hands, arms, or any other part of the body. If the condition persists, consult a doctor.
NOTICE:
Use caution when using the DUALSHOCK®3 wireless controller and the PlayStation®Move motion controller motion sensor function. When using
the DUALSHOCK®3 wireless controller or the PlayStation®Move motion controller motion sensor function, be cautious of the following points. If the
controller hits a person or object, this may cause accidental injury or damage. Before using, check that there is plenty of space around you. When
using the controller, grip it firmly to make sure it cannot slip out of your hand. If using a controller that is connected to the PS3™ system with a USB
cable, make sure there is enough space for the cable so that the cable will not hit a person or object. Also, take care to avoid pulling the cable out of
the PS3™ system while using the controller.
WARNING TO OWNERS OF PROJECTION TELEVISIONS:
Do not connect your PS3™ system to a projection TV without first consulting the user manual for your projection TV, unless it is of the LCD type. Otherwise, it may
permanently damage your TV screen.
HANDLING YOUR PS3™ FORMAT DISC:
• Do not bend it, crush it or submerge it in liquids. • Do not leave it in direct sunlight or near a radiator or other source of heat. • Be sure to take an occasional rest
break during extended play. • Keep this disc clean. Always hold the disc by the edges and keep it in its protective case when not in use. Clean the disc with a lint-free,
soft, dry cloth, wiping in straight lines from center to outer edge. Never use solvents or abrasive cleaners.
3D TV DISCLAIMER:
PS3 system software v3.30 or higher, HD 3D television with compatible 3D active glasses and highspeed HDMI cable (sold separately) required for 3D features. Visit
www.us.playstation.com/support/3D for details.
Some people may experience discomfort (such as eye strain, eye fatigue, or nausea) while watching 3D video images or playing stereoscopic 3D games on 3D
televisions. If you experience such discomfort you should immediately discontinue use of your television until the discomfort subsides.
SCE recommends that all viewers take regular breaks while watching 3D video, or playing stereoscopic 3D games. The length and frequency of necessary breaks
may vary from person to person – please take breaks that are long enough to allow any feelings of discomfort to subside. If symptoms persist, consult your doctor.
The vision of young children (especially those under six years old) is still under development. SCE recommends that you consult with a doctor (such as a pediatrician
or eye doctor) before allowing a young child to watch 3D video images or play stereoscopic 3D games. Adults should supervise young children to ensure they follow
the recommendations listed above.
When using any 3D enabled device with your PlayStation®3 system you should read the instruction manual for that device and check www.us.playstation.com/
support/3D for updated information.
Consumer Service/ Technical Support Line 1-800-345-7669
Call this number for technical support, installation or general questions regarding PS3™ and its peripherals.
Representatives are available Monday – Saturday 6AM – 8PM and Sunday 7AM – 6:30PM Pacific Standard Time.
Online Setup Information
Wired Connection Setup
Plug one end of an Ethernet cord into the back of the PS3™ system, and plug the other end into an open slot on your router or modem.
Enter Setting on the XMB™ and select System Update to update your system with the latest version of its software.
To confirm your Ethernet connection is working properly, select Internet Connection Test from within Network Settings on the XMB™.
Wireless Connection Setup
If you have an available wireless connection, you can connect your PS3™ system to the Internet without an Ethernet cord.
Enter Setting on the XMB™ and select Network Settings. Choose Internet Connection Settings, select Easy for your setting method, and then select Wireless for
your connection method. Choose Scan to have your PS3™ system search for, and then display, a list of available wireless networks.
NOTE: If your router supports AirStation One-Touch Secure System LAN setup, select Automatic for your setting method. If you follow the on-screen instructions,
the necessary settings will be completed automatically.
Choose your wireless network via its SSID (the network name). Select your preferred network and the type of security it uses.
If your network uses a password, select if it is a WEP or WPA then enter the password. If your network does not have a password, select None for security. Save
your settings when you are finished.
To confirm your connection is working properly, select Test the Connection.
NOTE: Depending on the network environment, additional settings for PPPoE,proxy server, or IP address may be required. For details on these settings, refer to
information from your Internet service provider or the instructions supplied with the network device. or eye doctor) before allowing a young child to watch 3D video
images or play stereoscopic 3D games. Adults should supervise young children to ensure they follow
TECMO KOEI AMERICA CORP.
TABLE OF CONTENTS
TABLE OF CO
NTENTS
CONTROLS
GAME SCREE
N
GETTING STA
RTED
ACTIONS
LEVELING UP
NINJA GAID
EN Z
5
6
6
7
9
9
Dolby and the double-D symbol are
trademarks of Dolby Laboratories.
L:
the below UR
s
s
e
cc
a
y
e
rv
roduct su
pleting our p
m
co
in
d
te
s
re
iba/
om/survey/ya
For those inte
.c
ca
ri
e
m
ia
e
ecmoko
http://www.t
4/9
C
ONTROLS
(DUALSHOCK®3 wireless controller)
tw button
S button Dash
F button Slash
tr button
tq button
A button Flail/Zombie weapon
D button Punch
te button
q button Cyborg vision
SELECT button
w button Execute
e button Block
gd button
gf button
ga button
gs button
r button Grab/Throw zombie
b+n buttons Bloodlust
Left stick Movement
Right stick Not used
SELECT button Unlock/Collectibles/Gameplay Menu
START button Pause Menu
PS button
Directional
buttons
Left stick /
mb button
START button
Right stick /
mn button
“PlayStation”, “DUALSHOCK” and “SIXAXIS” are registered trademarks and “PS3” and
the PlayStation Network logo are trademarks of Sony Computer Entertainment Inc.
5/9
G
AME SCREEN
Bloodlust
Combo Hits
Health
Elemental Damage/Attribute
G
ETTING STARTED
Score
MAIN MENU
NEW GAME Start a new game.
CONTINUE Continue a previously saved game.
MISSIONS Select and play a story mission.
NINJA GAIDEN Z Classic arcade action.
OPTIONS Adjust various game settings.
Zombie Weapon
Health Shard
SAVING
This game saves data automatically in the course of play. You need at least 768KB of
free space on the PlayStation®3 hard disk drive in order to save the game.
OPTIONS
AUDIO Set audio options.
VIDEO Set video options.
CONTROLS Set control options.
GAME Set game options.
6/9
A
CTIONS
COMBOS
Use different sequences of slash, punch and flail attacks to perform a variety of
combos. Here is a sample of some of Yaiba's sword combos unlocked with Sword
Mastery from the Leveling menu:
Dead Staying the Fuck Down f
g ,gd,gd,d
g
Yaiba's default weapons are his sword, rocket punch and cyber fist flail.
Long Distends f
g ,ga,ga,ga
HEARTLESS BLADE
Kamikaze Drop f
g ,gd,gd,ga
They called it the Tempest Blade - until Yaiba Kamikaze got his hands on it. Wield it
for rapid flurries against large groups of enemies. Good all-around weapon.
CYBER ARM
This prototype cybernetic substitute for Yaiba's severed arm delivers enhanced
strength, power and torque. Best for concentrated high-damage attacks against
individuals or small groups.
RM
CYBER A
FLAIL
n
tto
g bu
d
Discrete links of an advanced graphite
polymer blend are joined for a versatile,
high-impact endo-armament. The Flail
is highly resistant to electrical current.
Useful for crowd control.
Scrub Orbital f
g ,ga,ga,gd,gd
Many more combos with punch and flail can be unlocked with
Upgrade Points in the Leveling menu.
DASH
GUARD
HEA
n
tto
g bu
f
FLAIL
n
tto
g bu
s
Use dash to dodge enemy attacks, remove zombie
torsos which have attached themselves to Yaiba
or extinguish flames when Yaiba is on fire. It is also
useful to get out of a crowd when surrounded by
enemies.
Use guard to block enemy attacks. But watch out
because some enemies have attacks that are too
powerful to block.
LADE
B
S
S
E
L
T
R
ton
t
g bu
,d
g
g ,d
g ,d
f
n
butto
t
q
Pressing the guard button just before an enemy
attack lands will counter its attack. Enemies will
slow down for a short period of time, allowing you
to cause tons of damage on a defenseless enemy.
n
tto
g bu
a
7/9
GRAB/EXECUTION
BLOODLUST
Yaiba can grab Stiffs to use them as weapons or to
solve environmental puzzles.
Filling up the meter in the upper left of the
screen allows Yaiba to trigger Bloodlust. Once in
Bloodlust, Yaiba will move extremely fast and do
massive damage to enemies for a period of time.
n
butto
t
r
When
displays above an enemy, press W to
execute it. Yaiba will perform a brutal kill that adds
to his Bloodlust meter, drops health packs, and
- for certain enemies - harvests a weapon from
them.
n
butto
t
w
m
+n
m
b
CYBER VISION
Use Yaiba’s cyber vision to display information
about the environment around him. Traversal
routes, zombie elemental attributes and hints of
past events all display in cyber vision.
ZOMBIE WEAPONS
Successfully complete a minigame when executing
certain enemies to harvest a special weapon from
them. Harvested weapons can only be used a
limited number of times, shown by the weapon
icon in the lower right of the screen.
n
tto
g bu
a
n
butto
t
q
TRAVERSAL
Yaiba can move quickly across stages using a
combination of buttons through traversal routes.
Colors on anchor points hint at which button to
press in order to progress.
ELEMENTAL SYSTEM
Certain enemies and zombie weapons have elemental
attributes: fire, electricity or bile. Combine weapon
and enemy elements to cause a variety of effects. For
example, hitting a fire enemy with an electrical zombie
will cause a Static Storm, stunning the enemy. However,
make sure Yaiba is not caught in the Static Storm too!
ns
butto
n
tto
g bu
g /s
a
8/9
L
EVELING UP
N
INJA GAIDEN Z
An homage to the classic 2D Ninja Gaiden games,
take Yaiba on a side-scrolling romp through level
after level of enemy onslaughts. Compete for the
high score on leaderboards and help Yaiba find his
lost sake bottle!
Health
Yaiba will level up as he kills enemies, earning Perk Points with each new level. Spend
Perk Points in the upgrade tree (Press SELECT Q / E to switch to the Leveling
menu) to unlock new attacks and abilities.
Collect life shards and elemental shards to increase maximum health and increase
elemental resistance.
You can check the shards you have collected in the Equipment menu (Press SELECT
Q / E to switch to the Equipment menu).
9/9