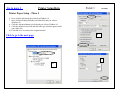
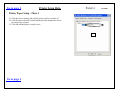
1
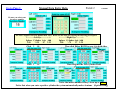
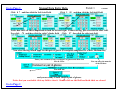
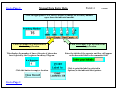
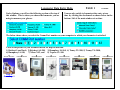
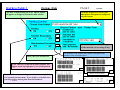
Glasses Reader Program Documentation and Help Summary page.
Click on one of the following links to go directly to the area of documentation which interests you.
Click on the title page of page 1 of each section to return to this menu.
Build Inventory
Manual Entry
Barcode Entry
Lensmeter Entry
File Options
Reports Options
Options Window
Printer
Go to Main Menu
Help in Building your Inventory
PAGE 1
12/28/2006
Building an inventory can be an extensive task. Typical inventories are from 2000-8000 pairs of glasses. The Glasses Reader program makes this
a considerably less complex task.
The Glasses Reader program allows input from three different sources:
1. Lensmeters (currently there are 8 different models),
2. Glasses which are labeled with Barcodes (produced by this program), and
3. Manual data entry.
In order to build such a large inventory, it is necessary for several people to be working on it simultaneously. To understand how this might
work, here is an example.
Suppose that 4 people are building an inventory of 4000 pairs of glasses. Prior to their starting their work, a team of people at their church have
gotten together on a Saturday and placed labels on the temples and the bags of all the glasses. They printed these labels using the Excel
spreadsheet named Boxes and Glasses Labels.xls on the Glasses Reader CD. The 4 people now have glasses which have already been assigned
inventory numbers.
Here is the list:
Name of person
James
Mary
George
Fred
Range of numbers assigned
1-1000
1001-2000
2001-3000
3001-4000
How he/she is building the inventory.
Using a Reichert LensChek lensmeter.
All her glasses are barcoded.
George is entering the prescriptions manually.
Fred has a TopCon CL-100 Lensmeter and some of his are entered manually.
James has taken the responsibility of maintaining the master copy of the inventory. Mary, George and Fred will E-Mail their work to James to
enter into his system. Browse and load / merge other Inventory Files is the Glasses Reader options that he uses:
James and the other people have set up their options Window as
shown below.
Their inventory will be placed into the:
C:\My Documents\Glasses_Data
directory and is called: Total_Inventory.txt
Go to Next Page Î
Go to Page 1
Help in Building your Inventory
PAGE 2
12/28/2006
James receives a message from Mary. She has completed the entry of all her glasses. Barcoded glasses can be entered in 1/10 the time of any
other form of data entry. James saves the attachment to C:\TEMP on his PC. Here are the steps that he follows to merge her inventory with his
inventory:
1. Click: File | Browse and load / merge other inventory files.
2. Change the range of acceptable number to match what Mary is providing.
3. James browses to where he saved Mary’s file and clicks Open. 4. After the load is completed, the status window is below.
and the highest inventory number displays below.
5. James can then click the following button, both options are already
selected as shown to the right and then the new combined
inventory will be written and error checked 100 records at a time.
Go to Next Page Î
Go to Page 1
Help in Building your Inventory
PAGE 3
12/28/2006
When the new inventory has been written, there is an indication as to how many errors were detected as shown below.
The report will list the numbers of the locations that have an error. Enter the location number of each location in error and the system will
describe the error. You can then correct this error and save the record again. After all locations have been corrected, you should write the sorted
inventory file again.
Should James try to exit without saving, he will see.
Click YES and the save will take place. Otherwise, the
change is not saved.
As different team members complete their inventory, James using the same procedure to merge all their files together.
Go to Page 1
Go to Main Menu
Manual Data Entry Help
PAGE 1
9/29/2005
This help covers the part of the screen which is shown below. Click on blue underlined
areas for the part of the screen for which you need help or information.
PAGE 4
PAGE 4
PAGE 4
PAGE 2
PAGE 4
PAGE 3
PAGE 4
Go to Page 1
Manual Data Entry Help
PAGE 2
9/29/2005
Be sure you select your
inventory number.
The above keypad is used for manual data entry. Below are the steps for entering the following prescription
<––––––-Left Eye –––––-–->
Sphere Cylinder Axis Add
2.50
-1.25
87 2.25
Click
2
.50
Click 1
.25
<––––––-Right Eye –––––->
Sphere Cylinder Axis Add
2.50
-.75
97 2.25
Then click Either BOTH to copy it to both sides.
Then click into the Left Cylinder Field.
Notice that minus numbers always show up as yellow.
Notice that when you enter a positive cylinder the system automatically makes it minus. (Option setting)
Go to Page 1
Manual Data Entry Help
Click 8 7 and then click the Left Axis Field.
PAGE 3
9/29/2005
Click 2 .25 and then click the Left Add Field.
Notice how the Left Add is duplicated on both the left and right. If that is wrong, just overwrite the other Add.
Now click .75 and then click the right Cylinder field. Click 97 then click the right axis field.
Now select the flags which apply for this pair of glasses (Prescription sunglasses for a Male, Medium size)
Enter your comment (if any) on this pair of glasses and then click
Save & Clear.
You can enter the mm size
of the PD here.
You will see:
and you are ready to enter the next pair of glasses.
Notice that you can double click any field to clear it. Double click an Add field and both Adds are cleared.
Go to Page 1
Go to Page 1
Manual Data Entry Help
PAGE 4
9/29/2005
Click the appropriate UP or DOWN arrows to change the inventory number
up or down the indicated amount.
Click Last Empty to go backwards to
the last empty location.
This displays the number of times this pair of glasses has
been rejected by the Eyeglasses Inventory Program.
Click this button to empty a location.
Go to Page 1
Click Next Empty to go forwards to the
next empty location.
Enter the initials of the operator and they will appear
on the barcoded label in the comments field.
Click to print the label (as selected in
Options) to the indicated label printer.
Go to Main Menu
Barcode Data Entry Help
PAGE 1
9/29/2005
This help covers the part of the screen which is shown below. Click on blue underlined
areas for the part of the screen for which you need help or information.
Located at the bottom / left portion of the screen.
1. When you click the above checkmark,
3. When you click the above yellow button,
5. When you click the above Expand Window button.
Go to Page 2
Located at the bottom / right portion of the screen
2. The yellow button on the right bottom appears.
4. The below window appears.
6. The below window appears.
Go to Page 1
Barcode Data Entry Help
PAGE 2
9/29/2005
Below is a repeat of the larger barcode window and the very important inventory number
on the main window.
Barcode Label
1. The bottom barcode is scanned into the window.
(You may scan either barcode first)
5. And the Inventory number increments
automatically to the next number.
S1./-2./123/2.25/12
2. The data is extracted and placed
in the left side of the main window.
Go to Page 1
3. The Add is copied
from left to right.
4. When both barcodes are scanned,
the SAVE barcode is scanned also.
Go to Main Menu
Lensmeter Data Entry Help
Under Options you will see the following section at the top of
this window. This is where you choose the lensmeter you are
using to measure your glasses.
PAGE 1
12/28/2006
You can also switch to lensmeter data entry at any
time by clicking the checkmark as shown below on the
bottom / left of the main window at an time.
The below shows where you select the Comm Port number on your computer to which your lensmeter is attached.
Click on the picture of your lensmeter below for help on this unit.
1) Reichert LensCheck, 2) Reichert AL-200, 3) Humphrey LA360, 4) Tomey TL-900, 5) Tomey TL-3000,
6) Humphrey LA340,
7) Nikon NL2, and
8) Topcon CL-100.
-----1----- -----2-----
Click to
Go to Page 2
-----3-----
-----4-----
-----5-----
-----6-----
-----7-----
-----8-----
Go to page 1
Lensmeter Data Entry Help
PAGE 2
12/28/2006
Reichert LensChek Help
Connect Kendall Optometry Ministries, Inc part number 30005 cable between the lensmeter and the P.C. The default
settings from the factory are sufficient to operate this unit with this program.
To Measure Single Vision and BiFocal Glasses:
Select Single/BiFocal
1. Use top blue button and select the setting shown to the right.
2. Be sure that the correct inventory number is showing in the Glasses Reader program. Verify that this
number matches the number you have on the glasses bag and frame.
3. Place Glasses on platform facing you with temples away from you. Bottom of frame is down. Right lens
will be first.
4. Press the third blue button on the right until you see the word “Right” showing under the starburst
Starburst
pattern.
5. Make sure you have pressed the top right blue button to point to the center symbol (Single / BiFocal).
6. Adjust platform up and down and glasses left and right until you see the starburst pattern (to the right).
7. If these are BiFocals press the 2nd blue button until the pointer points to “Add”. If these are single
vision, skip to step 8.
8. For BiFocals move the pair of glasses until the Add segment is position over the hold in the rubber boot.
The Add will be automatically read.
9. Press the Hold Button.
10. Press the third blue button on the right until you see the word “Left” showing under the starburst
pattern.
11. Adjust platform up and down and glasses left and right until you see the starburst pattern (to the right).
12. If these are BiFocals press the 2nd blue button until the pointer points to “Add”. If these are single
Hold Button
vision, skip to step 8.
13. For BiFocals move the pair of glasses until the Add segment is position over the hold in the rubber boot.
The Add will be automatically read.
14. Press the Hold Button.
15. Press the PRINT blue button (above the green button).
16. Measurement will be transferred to the glasses reader program.
17. Click SAVE on the Glasses Reader program.
18. Start at step 1 for the next pair of glasses.
To Measure Progressive Lens Glasses, select the top symbol in the above and refer to the user’s manual to understand what you will see
on the display. As before press PRINT to transfer the reading to the P.C.
Go to page 1
Lensmeter Data Entry Help
PAGE 3
12/28/2006
Reichert AL200 Lensmeter Help
Connect Kendall Optometry Ministries, Inc part number 30005 cable between the lensmeter and the P,C. The default
settings from the factory are sufficient to operate this unit with this program.
Go to page 1
Lensmeter Data Entry Help
PAGE 4
12/28/2006
Humphrey LA360 Lensmeter Help
Connect Kendall Optometry Ministries, Inc part number 30005 cable between the lensmeter and the P.C. The default
settings from the factory are sufficient to operate this unit with this program.
Detailed step-by-step operating instructions are not available for this unit. There are
setup instructions available and they will be provided upon request.
Go to page 1
Lensmeter Data Entry Help
PAGE 5
12/28/2006
Tomey TL-900 Lensmeter Help
Connect Kendall Optometry Ministries, Inc part number 30005 cable between the lensmeter and the P.C. The default
settings from the factory are sufficient to operate this unit with this program.
Detailed step-by-step operating instructions are not available for this unit. There are
setup instructions available and they will be provided upon request.
Go to page 1
Lensmeter Data Entry Help
PAGE 6
12/28/2006
Tomey TL-3000 Lensmeter Help
Connect Kendall Optometry Ministries, Inc part number 30005 cable between the lensmeter and the P.C. The default
settings from the factory are sufficient to operate this unit with this program.
Detailed step-by-step operating instructions are not available for this unit. There are
setup instructions available and they will be provided upon request.
Go to page 1
Lensmeter Data Entry Help
PAGE 7
12/28/2006
Humphrey LA-340 Lensmeter Help
Connect Kendall Optometry Ministries, Inc part number 30001 cable between the lensmeter and the P.C. The default
settings from the factory are sufficient to operate this unit with this program.
Proper operation of the lensmeter.
When you measure a pair of glasses you must make sure that the instrument displays RIGHT or LEFT on the panel when you do a STORE using
the either the foot petal or STORE button. You will see something like the below on the screen when (for example) you measure the right lens.
Realize that you can cause the RIGHT light to come on by pressing the edge of the left lens while you are doing your measurement. Make sure
you also see ADD when measured (see below/right). Press the STORE button or foot petal after each operation.
Store
Button
Press the PRINT button when you have measured both the RIGHT and the LEFT lens doing a
STORE after each operation. 8 seconds later the computer will receive and process the data.
The 8 second pause is due to the fact that the lensmeter is delaying the amount of time that it
previously took to print data to the printer.
PRINT
button
Go to page 1
Lensmeter Data Entry Help
PAGE 8
12/28/2006
Nikon NL-2 Lensmeter Help
Connect Kendall Optometry Ministries, Inc part number 30004 cable between the lensmeter and the P.C. The default
settings from the factory are sufficient to operate this unit with this program.
For the following usage instructions refer the drawing to the right for the location of the HOLD and ADD buttons
on the front of the instrument.
For bifocals and progressive lens glasses.
HOLD
1.
Put glasses in holder right lens first and with bottom of glasses against the holding plate.
2.
Adjust until you get a centered position.
3.
Press the ADD button to measure the power of the ADD segment.
4.
Move glasses until you are viewing through the ADD part (BiFocal segment) of the lens.
5.
Press HOLD button.
6.
Press Right button until green right light comes on.
ADD
7.
Press HOLD button again to free up instrument.
8.
Put glasses in holder left lens first and with bottom of glasses against the holding plate.
9.
Adjust until you get a centered position.
10.
Press the ADD button to measure the power of the ADD segment.
11.
Move glasses until you are viewing through the ADD part (BiFocal segment) of the lens.
12.
Press HOLD button.
13.
Press left button until red left light comes on
14.
Press PRINT button and information is transmitted to the computer.
For single vision glasses.
1.
Put glasses in holder right lens first and with bottom of glasses against the holding plate.
2.
Adjust until you get a centered position.
3.
Press HOLD button.
4.
Press Right button until green right light comes on.
5.
Press HOLD button again to free up instrument.
6.
Put glasses in holder left lens first and with bottom of glasses against the holding plate.
7.
Adjust until you get a centered position.
8.
Press HOLD button.
9.
Press left button until red left light comes on
10.
Press PRINT button and information is transmitted to the computer.
The picture below on the right shows a completed reading where the PRINT key is being depressed to send the information to the computer.
Go to page 1
Lensmeter Data Entry Help
PAGE 9
12/28/2006
Topcon CL-100 Lensmeter Help
Connect Topcon cable part number ZZ-1-T013308 between the lensmeter and the P.C. The default settings from the
factory are sufficient to operate this unit with this program.
Detailed step-by-step operating instructions are not available for this unit. There are
setup instructions available and they will be provided upon request.
Go to Main Menu
File Options Help
PAGE 1
5/21/2007
Below is what you see when you click the File option in the Glasses Reader program. The numbers have been added as reference points for
explanation. Click the Jump links to go to selections on different pages.
1.
2.
3.
4.
5.
6.
JUMP PAGE 2
JUMP PAGE 3
JUMP PAGE 4
JUMP PAGE 5
Selection 1: (Load Inventory File from Default Location)
When you choose selection number one you will load the inventory into memory from the default location (C:\My Documents\Glasses_Data) as
defined in the options screen entry as shown below.
Notice that the checkmark in the above indicates that this load has already happened when Glasses Reader started.
Selection 2: (Browse and load / merge other Inventory Files.)
Selection number two allows you to combine the inventory built by several different people. For example one person my create records 1-1000,
another 1001-2000 and the third 2001-3000. When you choose this option, you will get the following windows:
If you are loading inventory
records 1001-2000 you will
change the window to read:
Notice that this option is described in a separate help file which describes how to build your inventory.
You will then browse to the
inventory file that you are
loading, click OPEN and it
will be loaded into memory.
Go to Page 1
File Options Help
PAGE 2
10/4/2005
Selection 3: (Load Deleted & Rejected inventory from Glasses Inventory Program).
The Glasses Reader program is used to build the inventory while the Glasses Inventory Program is used to dispense the inventory. This option
provides an interface between the two programs. If on the Glasses Inventory program a person has used 199 pairs of glasses, these eyeglasses
need to be removed from the inventory maintained by the Glasses Reader program. Here are the steps involved:
On Glasses Inventory select the first option:
and the following popup
will appear. This indicates
that the deleted inventory
file is now in C:\
On Glasses Reader if you select the vacancy report from the below.
you will
then see:
Notice that zero locations are empty.
If you use Glasses Reader selection 3 and load the Deleted & Rejected inventory file from the Glasses Inventory program you will see:
Click Open and you will in the status window:
and the vacancy report will now show:
Note that if any of the locations being deleted have previously already been filled with some more
inventory, this new inventory will not be deleted by this procedure.
Go to Page 1
File Options Help
PAGE 3
10/4/2005
Selection 4: (Load Update inventory into Vacant Locations).
After the inventory removed by the Glasses Inventory program has been removed from the file maintained by the Glasses Reader program this
selection can be used to introduce new inventory into the system and in the process label with inventory with appropriate labels.
While the mission team is on their trip, people at the church are busily inputting new inventory into a separate file. This file should start
numbering at 1 and represents the “Update Inventory File”. When the team returns and the deleted inventory is removed from the Glasses
Reader file, this option can be used to easily and quickly remove the inventory. New labels can also be produced for the update inventory
eyeglasses bags and temples. Here are the steps involved.
These same two numbers (circled) are retained in the options window.
Select the option and you will see:
Vacancy file
Click Continue & Select File and you will see:
The first number is set to be +1 more than the last
number used by this option. The second number should
correctly indicate the maximum number of locations
in your inventory system.
and you will see in the status window:
Note that in the Default location you will also find a file called
“Vacancy_list.txt” which shows exactly how the update inventory
has been used. To the far right is an excerpt of that file. This says
that update number 1 went into location 22, 2 into location 39, etc.
Click OPEN and you will see the status window to the left.
A spreadsheet called “Optical Labels.xls” provided with this program allows you to print
labels to go over the existing update labels. To the right is a sample of one of those labels.
In Red is the previous update number (10101) and in black is the new location number.
Go to Page 1
File Options Help
PAGE 4
10/25/2005
Selection 5: (Transfer inventory to Glasses Inventory Program).
When you have completed building your inventory, you now need to transfer this inventory over to the Eyeglasses Inventory Program. If you
select this option you will see the following window. Read carefully what it says. In most cases both options are selected and the transfer takes.
This will appear in the status window upon completion.
place.
You may instead receive this error message:
Note that any previous inventory and journal file kept by the Glasses
Inventory program has been backed up.
if you have changed your inventory but not saved it.
NOTICE
In some cases the Glasses Inventory files are kept on an entirely different computer. To handle this condition the Glasses Reader program will
execute a command file (if exists) called: MoveInventory.bat located in C:. The likely contents of this file might be:
@echo off
Echo Place a blank floppy in drive A:
pause
Copy /Y c:\total_inventory.txt a:\
Copy /Y c:\journalfile.txt a:\
This will place the files on a floppy. When you get to the target PC both files should be copied to C:\.
Go to Page 1
File Options Help
PAGE 5
5/21/2007
Selection 6: (Create Vacancy List for Label Generation).
After having used option #3 (Load Deleted and Rejected inventory from Glasses Inventory Program), there are a block of
vacancies within the inventory managed by the Glasses Reader program. The purpose of this option is to create a file called
“vacancies.txt” which can be used by the Excel spreadsheet to print labels for glasses which will be placed in these locations.
After selecting this function, you will see the following graphic:
If the maximum number of locations in your inventory is correct, click continue. Otherwise, correct the number and click
continue. The vacancies file will then be created. Click CANCEL if you have changed your mind.
When you have completed this function launch the Excel Spreadsheet named “Print Update Labels with Excel” from:
START | Programs | Glasses Reader
And you will see a button which looks like the below.
Click this button to print the labels from the vacancies.txt file created by running this option.
Go to Main Menu
Reports Options Help
PAGE 1
10/22/2005
Below is what you see when you click the Reports option in the Glasses Reader program. The numbers have been added as reference points for
explanation. Click the Jump links to go to selections on different pages.
1
2
3
4
5
6
JUMP PAGE 2
JUMP PAGE 3
JUMP PAGE 4
JUMP PAGE 5
JUMP PAGE 5
(Bottom)
Selection 1: (Display the error list report from a previous sorted inventory save.)
Here is a sample of a report:
---------- Numbers of Erroneous Glasses in Inventory. ---------As of: 10/7/2005 2:35:47 PM
10092 14973
Number of errors = 2
If you change the inventory number on the screen to display the two numbers, you will see the
error below for location 10092. The error to the right is for location number 14973.
Location 10092 Error
Location 14973 Error
Go to Page 1enu
Reports Options Help
PAGE 2
10/7/2005
Selection 2: (Display the rejected item report from the Eyeglasses Inventory Program)
-Inventory Numbers and Occurrences of Rejected Glasses in Inventory. -As of: 10/7/2005 2:55:36 PM
0076 01 0121 01 0129 01 0163 01 0164 01 0268 01 0271 01 0288 01
0290 01 0298 02 0304 01 0305 01 0310 01 0324 02 0458 01 0490 01
0546 01 0567 01 0568 01 0585 01 0586 01 0591 01 0784 01 0844 01
0856 01 0885 01 1092 01 1106 01 1141 01 1210 02 1254 01 1262 01
1293 01 1298 01 1456 01 1477 01 1480 01 1484 01 1566 01 1584 01
1586 01 1604 01 1673 01 1683 01 1692 01 1695 01 1757 01 1763 01
1853 01 1864 01 1928 01 1985 01 2142 02 2211 01 2284 01 2305 01
2318 01 2561 01 2568 01 2582 01 2640 01 2693 01 2722 01 2739 01
2787 01 2803 02 2819 01 2872 01 2881 01 2914 01 2932 01 2968 01
3037 01 3062 01 3225 01 3327 01 3331 01 3332 01 3526 01 3566 02
3576 01 3599 01 3616 01 3684 01 3743 01 3747 01 3779 01 3867 03
3884 01 3908 01 4014 01 4059 01 4083 01 4111 01 4247 01 4261 01
4275 01 4284 01 4292 01 4324 01 4371 01 4379 01 4380 02 4408 02
4421 01 4427 01 4430 01 4470 02 4484 01 4536 01 4567 02 4596 02
4609 01 4615 01 4626 01 4650 01 4664 01 4751 01 4891 01 4896 01
4899 01 4927 01 4967 01 5017 01 5022 01
Number of rejections = 125
Please note that a “rejection” is defined as a pair of glasses which were the right prescription for the patient but the patient
could not see properly through the glasses. It is not a pair of glasses which simply were not liked by the patient. This is a
pair which you suspect may be improperly measured. Generally when occurrence count for a pair of glasses goes as high as
4 or 5, you remove it from the inventory as likely it has been improperly measured.
Realize a patient can reject a pair of glasses that are properly measured because they do not physically fit or the focal center
of each lens is not positioned properly on the pupil of the patient (PD is not right). Other patients may find this pair to be
totally acceptable.
Go to Page 1enu
Reports Options Help
Selection 3: (Display the list of vacant locations in inventory.)
Here is the list of vacant locations in inventory.
---------- Open Location Numbers in Inventory. ----------As of: 10/7/2005 2:58:29 PM
0022 0039 0040 0041 0076 0080 0086 0090 0105 0110
0113 0129 0136 0138 0145 0149 0157 0167 0170 0177
0197 0202 0210 0219 0262 0268 0277 0282 0290 0295
0297 0312 0314 0337 0375 0386 0391 0399 0406 0438
0454 0469 0474 0489 0490 0511 0512 0520 0542 0547
0581 0584 0593 0596 0601 0606 0608 0624 0625 0627
0635 0642 0658 0660 0666 0669 0714 0721 0738 0748
0790 0800 0822 0836 0843 0896 0902 0908 0917 0948
0988 0992 1029 1050 1055 1124 1172 1187 1188 1211
1214 1233 1239 1242 1245 1259 1271 1275 1283 1285
1315 1326 1327 1476 1480 1520 1525 1547 1599 1608
1609 1617 1647 1651 1665 1680 1686 1687 1735 1736
1778 1788 1856 1860 1868 1874 1895 1912 1956 1963
1999 2004 2028 2029 2032 2053 2068 2117 2126 2165
2192 2219 2270 2282 2329 2336 2340 2414 2415 2420
2426 2429 2438 2443 2468 2477 2497 2546 2562 2577
2602 2621 2643 2735 2755 2780 2794 2795 2798 2828
2829 2847 2854 2871 2889 2899 2904 3013 3020 3026
3027 3033 3059 3078 3081 3161 3187 3205 3252 3388
3422 3522 3536 3604 3632 3846 3849 3939 3959
Number of Openings = 199
PAGE 3
10/7/2005
Go to Page 1 Menu
Reports Options Help
Selection 4: (Display the number of eyeglasses with a specific gender.)
This is a typical display of the gender of the eyeglasses in inventory.
GENDER OF EYEGLASSES IN INVENTORY
As of: 10/7/2005 2:49:07 PM
Eyeglasses for:
Male = 2344
Female = 4833
Either = 1938
Child = 97
With a Total Count of 9212
Go to Page 1
PAGE 4
10/7/2005
Go to Page 1 Menu
Reports Options Help
PAGE 5
10/22/2005
Selection 5: (Display the Inventory Analysis Report.)
This report provides a detailed analysis of the inventory. This report is very computer intensive as it will scan the entire inventory and indicate to
you how many pairs of glasses you have with a certain range of sphere, cylinder or axis. Below is a sample of this report:
Circled in Red in the Total column you see an
indication that the highest number of glasses are in
the spherical range from +.25 to +1.25.
Circled in green you can see that most of your
glasses have NO cylinder (<.25).
Looking at the black circled items you can see that
most of your glasses have axis which are WTR
(With The Rule) which means from 0-30 and 150180 or on a horizontal axis.
Looking at the orange circled items you can see
that you have nearly 80 pairs of NON BiFocal
glasses which have clear lens on one side or the
other or both. The yellow alert indicates you
should look at the clear glasses report to see which
pairs are clear on both lens. There are some
glasses in your inventory which are clear glass and
are only useful for eye protection.
Below is a copy of the clear glass report for this
inventory. You should probably remove this list of
glasses.
---------- Clear Glasses in Inventory. ----------As of: 10/22/2005 10:08:58 PM
0399 0843 1265 1285 1756 1970 2133 2330 2363 2613
2634 2877 3178 3542
Number of clear glasses = 14
Go to Page 1
Click Display to PRINT to produce a copy of this report in notepad that you can print.
Go to Main Menu
Options Help
PAGE 1
5/22/2007
This help covers the part of the screen which is shown below. Click on blue boxed or circled
areas or underlined text for the part of the screen for which you need help or information.
PAGE 2
PAGE 2
PAGE 2C
PAGE 2C
PAGE 2B
PAGE 2B
PAGE 3
PAGE 3
PAGE 4
PAGE 4
PAGE 4B
PAGE 5
PAGE 4B
PAGE 5
BACK to PAGE 1
Options Help
PAGE 2
12/28/2006
Select the model of your lensmeter or if you have no lensmeter select either Barcode Reader or Keyboard input.
Select the COMM Port number to which your Lensmeter is attached. If you have no lensmeter select None.
The default path can be changed but not the file name. If you click on the circled item, no file will be produced. If
you click the item in a square then the file will be loaded into memory upon startup of the program.
BACK to PAGE 1
Options Help
PAGE 3
5/22/2006
Click this dropdown to choose your
label printer from printers configured
on your system.
Click here to turn printing on or off. PRINT button
will appear or disappear to/from the main window.
1
2
3
4
Select your style of label here.
Click this dropdown to select the type
of label material you are using (if any).
The numbers of the sample labels below correspond to the
numbers of the selections above.
Click YES here so that the inventory number will
appear on the top/right part of every label printed.
1
3
Above are two labels.
Turn ON this to automatically print a label after completion
of a lensmeter measurement. If you do this, you should select
your flags before entering data from the lensmeter.
2
4
BACK to PAGE 1
Click this option to automatically put
the same Add in both the Left and
Right positions. If this is wrong the
duplicated Add can be corrected.
Options Help
PAGE 4
12/28/2006
Select this option so that every time you enter a number into a cylinder
field a “-“ sign is automatically added at the first. This save you the time
required to enter a minus sign when all your cylinder values are minus.
Click to reverse the position of the Right and Left areas of the main window.
This is used when you are measuring glasses and they are zero cylinder
and the sphere is plus and the same for both sides. (Rarely Used)
Do not allow the entry of minus (-) Adds.
Enter here the maximum allows Sphere, Cylinder and Add.
Should the above be exceeded, you will see an error message
in the status window (below) and a large red asterisk (*) to
the right of the suspect field.
When scanning in barcoded labels from
lens which have been measured by
Glasses Reader, enter here the default
AXIS assumed for any lens entered
which have some amount of cylinder.
Enter here the smallest add which can
be entered without flagging an error.
Enter the maximum number of locations you ever
expect your inventory file to contain. 32000 is the
architectural maximum of this program.
BACK to PAGE 1
Click this button to save the options which
you have chosen to fine and then continue the
operation of the Glasses Reader program.
Click UnProtect and the number will no longer be
grey. You can then enter a new “Next Number”
which will be put in the main window “Inventory
Number” when it next starts up.
BACK to PAGE 1
Options Help
PAGE 5
12/28/2006
Click this number to continue with the
currently chosen options without saving them
to file for use next time the program starts.
Click UnProtect and then the number will no longer be
grey. You can then enter a new “Last Used Update
Number”. This number +1 will be the next update
inventory number used by the system.
Go to Main Menu
Printer Setup Help
PAGE 1
5/22/2007
Currently it is recommended that the Dymo labelwriter series be used for printing the labels generated by this program. Here is the section of the
options windows which is used to setup the Dymo Labelwriter.
The option which is circled above is used to select the printer on your system to which labels will be printed. Click the dropdown to select the
right printer. This prevents you from having to always print to just the default printer. Be sure that the printer that you select is not greyed out
(offline) in your printer folder.
The second areas (in a square box) allows you to select the type of labels. To the right if each selection you are allowed to select the type of label.
There are three different types of Dymo paper involved.
Part number
30256
30252
30270
Label Description
White Shipping Labels
White Address Labels
White Continuous Wide
Program Setting
Brief Large Text Plus Barcodes and Detailed Text plus Barcodes
Brief Large Text only - No Barcode
All three types of labels.
NOTICE
Please understand that as of version 3.0-x of the Glasses Reader program, the selection of the Type of label stock does not consistently work. It is
therefore necessary to manually set this label type on the Dymo Labelwriter printer icon. The following pages describe the steps to perform to
select the paper type used by the Dymo Labelwriter printer.
Go to first page of printer setup.
Go to page 1
Printer Setup Help
PAGE 2
Printer Paper Setup – Phase 1
1. Right click the printer icon and select Properties and you will see the
window #1 to the right.
2. Click Printing Preferences (circled) and you will see window #2.
3. Click Advanced and you will see window #3 below.
4. Click the dropdown window (circled) and select the correct type of
printer paper.
5. Click OK twice to return to the main window.
1
Click to go to the next page.
2
3
10/3/2005
Go to page 1
Printer Setup Help
PAGE 3
10/3/2005
Printer Paper Setup – Phase 2
6. Now click the Advanced tab (circled) in Window # 4.
7. Next click the Printing Defaults (circled below) and you will see
Windows #5.
8. Click the Advanced button (circled) and you will see Window #6.
9. Click the dropdown (circled) and select the type of printer paper which
you wish to use.
10. Click OK twice to return to the original window.
4
Click to go to the next page.
5
6
Go to page 1
Printer Setup Help
PAGE 4
Printer Paper Setup – Phase 3
11. Click the Device Settings tab (circled) and you will see window #7
12. Click the paper selection (circled) and then use the dropdown to select
the correct type of paper.
13. Click OK and the printer is ready for use.
7
Go to page 1
10/3/2005


![Intra-Pod instructions.ppt [Read-Only]](http://vs1.manualzilla.com/store/data/007247390_1-f78b03339eb740c14aa24b2c59786747-150x150.png)