1
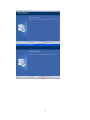
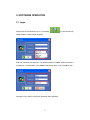
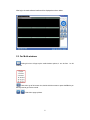
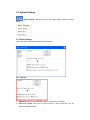
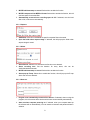
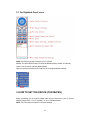
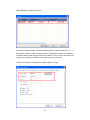
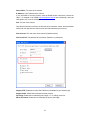
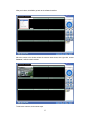
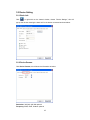
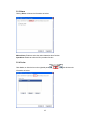
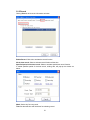
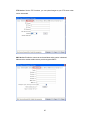
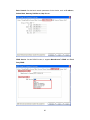
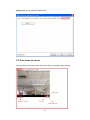
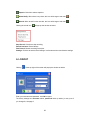
IPCam Client User Manual
For X10 IP Camera models
XX34A, XX36A, XX39A, XX40A
Contents
1. INSTALLATION ................................................................................................. 3
2. SOFTWARE OPERATION ................................................................................ 5
2.1. Login ....................................................................................................................... 5
2.2. For Multi-windows ................................................................................................... 6
2.3. System Settings ...................................................................................................... 7
2.3.1 Basic Settings .................................................................................................... 7
2.3.2 User Settings ..................................................................................................... 9
2.3.3 Device List ....................................................................................................... 10
2.3.4 Search File (Playback) ..................................................................................... 11
2.4. For E-map ............................................................................................................. 11
2.5. Log ........................................................................................................................ 12
2.6. Software Interface Operation ................................................................................ 12
2.7. For Rightside Panel Icons ..................................................................................... 13
3. HOW TO SET THE DEVICE (FOR MJPEG) ................................................... 13
4. PRESET SETTINGS ........................................................................................ 22
5. SHORTCUT KEY ON SCREEN ...................................................................... 23
5.1 Advanced Settings: ................................................................................................ 24
5.2 Three Icons on screen ........................................................................................... 27
6. LOGOUT .......................................................................................................... 28
7. OBTAINING TECHNICAL SUPPORT ............................................................. 29
2
1. INSTALLATION
NOTE: This IP Client software can be used with all X10 MJPEG and H.264 IP cameras.
The example used in this manual is MJPEG, H.264 is similar. Before installation please
turn off your firewall and disable any Antivirus software in your computer so that this
software can be installed successfully. After installation, restart your computer, then you
can use the IP Client software.
Double-click on the IPCamClient icon on the CD that came with your camera, or run the
installation if you downloaded it from our web site. Follow the steps on the screens that
appear.
3
4
2. SOFTWARE OPERATION
2.1. Login
Double-click the IPCamClient icon on your desktop
you will see the login
interface below, choose English language:
Enter the username and password. The default username is admin, default password is
no password, i.e. leave blank. (Or try admin if that doesn’t work). Then click OK to login:
See page 9 if you want to change the username and/or password.
5
After login, the main software interface will be displayed as shown below:
2.2. For Multi-windows
Clicking this icon will pop-up the multi-windows options, it can be from 1 to 64
windows.
Click this to go to full screen view, double click the screen or press the Esc key on
the keyboard to go back to normal.
Click this to page up/down.
6
2.3. System Settings
System Setting: Click this to pop-up the system setting options as shown
below.
2.3.1 Basic Settings:
Click this to login to the basic settings interface as below:
2.3.1.1 Record:
1. Add/Delete: Click this to set/delete the path for record files to be saved.
2. Record file length: Click this to set the length for every record file, can be
30/60/120/180/300 minutes.
7
3. MJPEG add timestamp on record: Select this to enable the function.
4. MJPEG compressed into MPEG-4 format: Select this to enable the function, this will
use less space for recorded files.
5. Automatically recovered once recording space is full: If selected, once the hard
disk is full, it will recover automatically.
2.3.1.2 Capture:
1. Add/Delete: Click this to set/delete the path for snapshot files to be saved.
2. Open the folder when capture image: if selected, this will pop-up the folder when
capture image is saved.
2.3.1.3 Alarm:
1. Alarm Record: Select this to activate record function once alarmed.
2. Alarm recording time: Set the duration for every alarm, this can be
30/60/120/180/300 seconds.
3. MJPEG add timestamp on record: Select this to enable the function.
4. Alarm pop-up E-map: Select this to enable the function, this will pop-up the E-map
which was set once alarmed.
2.3.1.4 Auto run
1. Program runs automatically connect all the devices: If selected, when running the
program, this will connect all the devices which were set successfully automatically.
2. Auto run when computer powering on: If selected, when your computer starts up
the software will run automatically. You can save the username and password here in
advance.
8
2.3.1.5 Version
Click Version to get the version details of the software.
2.3.2 User Settings
Click this to login to the user settings interface as shown below:
9
Click Add to set user accounts.
Fill in the username, password, then click OK to submit.
2.3.3 Device List
Clicking this will show all the devices connected as shown below:
10
2.3.4 Search File (Playback)
Clicking this will pop-up the search file interface as shown below:
2.4. For E-map
Show Map: Clicking this will pop-up the E-map which has been set
successfully already.
Set Map: Clicking this will pop-up the E-map settings interface.
11
Add: Click this to add a new map, it will pop-up the window as shown below, set the map
name and browse the map to active it.
NOTE: Only supports “.bmp” format images.
Delete: Choose the map first, click delete to remove the map.
Modify: Choose the map first, click modify to change/modify the map.
2.5. Log
Search Log: Click this to search the log of the software.
Map settings: Please note that you need to set the map in your LAN network before using
map function.
2.6. Software Interface Operation
Shown at the top right corner of the screen, from left to right, this means:
1.
2.
3.
4.
Minimize the program interface.
Maximization the program interface.
Lock/Unlock the program.
Close the program.
12
2.7. For Rightside Panel Icons
NOTE: Choose the type which matches your IP camera.
MJPEG: For all the MJPEG series IP Cameras (Models XX34A, XX36A, and XX40A).
H.264: For the H.264 IP Camera (Mode XX39A).
Click the up arrow at the bottom, this will pop-up the image parameter settings:
3. HOW TO SET THE DEVICE (FOR MJPEG)
Before connecting the IP Camera, please make sure the firmware of your IP camera
(MJPEG) begins with: 17.22.2.**(XX34A) / 17.25.2.**(XX36A/XX40A).
NOTE: For H.264 series cameras, it’s the same settings.
13
3.1 Add Device
Clicking
will pop-up the window as shown below:
Choose MJPEG, then click OK, this will pop-up the window as shown below. (Or choose
H264 if your camera is model XX39A).
14
Clicking Search, will pop-up the result:
If there are no cameras listed, check the firmware version to see if it starts with 17.*.*.*. If
the firmware version is correct, and there is still no cameras listed, maybe your computer’s
IP address doesn’t match with the camera’s IP address, or they are not in the same LAN.
Change your computer’s IP address to the same LAN as your camera’s.
Choose the IP camera, and click OK to show the Basic Info page:
15
Device Name: The name of the camera.
IP Address: The IP address of the camera.
If you use DDNS to view the camera, enter the DDNS domain name here, remove the
“http://”, for example, if the DDNS http://test.aipcam.com:95 sets successfully, then type
“test.aipcam.com” in the IP Address.
Port: The port of the camera.
Once all this information is shown, the firmware of the camera is correct, and the software
works well, then just enter the View Account and View Password you have set:
View Account: The user name of the camera. (Default is admin).
View Password: The password of the camera. (Default is no password).
Support PTZ: Enable this to active Pan/Tilt/Zoom (if available for your camera type).
Support Audio: Enable this to activate the audio function.
Flip Image: Enable this to vertically flip the image. I.E., for ceiling mount, etc.
Mirror Horizontal: Enable this to horizontally flip (mirror) the image.
16
After you’re done, click OK to go back to the software interface:
Move the mouse to the window where the camera name shows, then right-click, choose
Connect, it will show the live video:
To add more cameras, do the same steps.
17
3.2 Device Setting
3.2.1 Basic Info.
Click
or right-click on the channel window, choose “Device Settings”, this will
pop-up the window showing the basic info for the device connected as shown below:
3.2.2 Device Params.
Click Device Params, this will show the information as below:
Resolution: 320*240, 640*480 optional.
Frequency: 50HZ, 60HZ, Outdoor optional.
18
3.2.3 Alarm
Clicking Alarm, will show the information as below:
Motion Alarm: Enable to active the motion detection alarm function.
Input Alarm: Enable to active the I/O input alarm function.
3.2.4 Cruise
Click Cruise, or click the icon on the rightside panel
information as below:
19
this will show the
Clicking Add will pop-up the add cruise window:
Up to 10 cruise positions are supported.
Click Add to set a preset cruise position.
Preset: Choose the preset you set already, this can be from 1-9.
Pause: Set the duration for each preset, this can be from 1-60 seconds.
NOTE: Before using the cruise function, you need to set preset first, up to 9 presets can
be set. (For details see chapter 4. Preset Settings).
20
3.2.5 Record
Clicking Record, will show the information as below:
Enable Record: Click this to activate the record function.
All the time record: Select to activate record function all the time.
Specified period of the time record: Select to activate special time record function.
If enable specified period of the time record, clicking add, will pop-up the window as
below:
Week: Set the day for every week.
Time: Set the start time and finish time for activating record.
21
3.2.6 Additional Info
Clicking Additional Info will show the information as below:
You can set additional information for this device, such as Full name, Phone, Address,
Memo etc.
4. PRESET SETTINGS
On the rightside panel, there are some icons for preset, details as shown below:
Numbers 1-9: Means the preset positions, this software supports up to 9 presets.
Set Preset: Click this to set the preset position.
Use Preset: Click this to call the preset position.
22
STEPS:
1. Select the number you want to set, such as 1.
2. Rotate the camera to a special position you want to set as preset.
3. Click Set preset icon to set this position as preset 1. Do the same steps for other
presets, such as preset 2, preset 3…
4. If you want to check the preset 3, select the number 3 first, then click use preset icon,
then the camera will rotate to the appointed position that you set.
5. SHORTCUT KEY ON SCREEN
Move the mouse to the window where the camera name is shown, then right-click, to
show the pop-up the window as below:
Connect: Click this to connect to the device set already.
Disconnect: Click this to disconnect the device which is showing live video.
Capture: Click this to take a snapshot, pictures will be saved to the appointed file.
Stop Alarm: Click this to stop alarm. When there is alarm active, you can click it to stop it.
Device Settings: Click this to pop-up the Device Settings interface.
Advanced Settings: Click this to pop-up the advanced settings contents as below:
23
5.1 Advanced Settings:
NOTE: For all the advanced settings details, please check the user manual for your model
of camera.
Alias: Set the device name.
Date & Time: Set the date & time for the device.
1. Set time zone.
2. Synchronization with NTP server.
3. Synchronization with PC time. (The PC connected to the camera).
24
FTP Service: Set the FTP functions, you can upload images to your FTP server when
motion is detected.
Mail Service: Enable the camera to send email alerts when motion is detected.
Make sure the sender mailbox server provider supports SMTP.
25
Basic Network: Set the basic network parameters for the device, such as IP address,
Subnet Mask, Gateway, DNS Server, Http Port etc.
DDNS Service: Set the DDNS function, it supports Manufacturer’s DDNS and Third
Party DDNS.
26
System Tool: You can reboot the camera here.
5.2 Three Icons on screen
Once the device is connected, there will be three icons on the bottom right, as below:
27
Capture: Click this to take a snapshot.
Alarm Notify: When there is any alarm, this icon will change to red color.
Record: When record function is active, this icon will change to red color.
Clicking the record icon
will pop-up the window as below:
Stop Record: Click this to stop recording.
Record has been: Record always.
Plan Record: Record according to the plan.
Settings: Click this to set the record settings. It’s the same as the record device settings.
6. LOGOUT
Clicking
at the top right of the screen will pop-up the window as below:
Enter your username and password, click OK to logout.
The factory settings are: username: admin; password: blank (or admin), or use yours if
you changed it, see page 9.
28
7. OBTAINING TECHNICAL SUPPORT
We hope your experience with your IP network camera is enjoyable, but if you experience
any issues or have any questions that this User's Guide has not answered, please visit
www.x10.com/support, e-mail [email protected] or call 1-800-442-5065. If your camera
does not support some special functions shown in this manual, please contact our
technical support team to obtain the latest Firmware and WEB UI file for upgrading.
FCC Caution
THIS DEVICE COMPLIES WITH PART 15 OF THE FCC RULES.
OPERATION IS SUBJECT TO THE FOLLOWING TWO CONDITIONS:
(1) THIS DEVICE MAY NOT CAUSE HARMFUL INTERFERENCE, AND
(2) THIS DEVICE MUST ACCEPT ANY INTERFERENCE RECEIVED, INCLUDING
INTERFERENCE THAT MAY CAUSE UNDESIRED OPERATION.
This equipment generates and uses radio frequency energy, and if not installed and used
properly, that is, in strict accordance with the manufacturer’s instructions, it may cause
interference to radio and television reception. It has been type tested and found to comply with
the limits for remote control devices in accordance with the specifications in Sub-Parts B and C
of Part 15 of FCC Rules, which are designed to provide reasonable protection against such
interference in a residential installation. However, there is no guarantee that interference will
not occur in a particular installation. If this equipment does cause interference to radio or
television reception, which can be determined by unplugging the equipment, try to correct the
interference by one or more of the following measures.
•
Reorient the antenna of the radio/TV experiencing the interference.
•
Relocate the equipment with respect to the radio/TV.
•
Move the equipment away from the radio/TV.
•
Plug the equipment into an outlet on a different electrical circuit from the radio/TV
experiencing the interference.
•
If necessary, consult your local dealer for additional suggestions.
NOTE: Modifications to this product will void the user’s authority to operate this equipment.
X10 Wireless Technology, Inc.
90 Day Limited Warranty
X10.com, a division of X10 Wireless Technology, Inc. (X10) warrants X10 products to be free
from defective material and workmanship for a period of 90 days from the original date of
purchase at retail. X10 agrees to repair or replace, at its sole discretion, a defective X10
product if returned to X10 within the warranty period and with proof of purchase. If service is
required under this warranty:
Call 1-800-675-3044, visit www.x10.com, or e-mail [email protected].
For help or more information on setup, please visit:
www.x10.com/support
X10 Wireless Technology, Inc., 400 Forge Way, Rockaway, NJ 07866
29