1
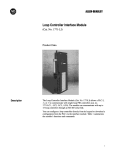
ALLEN-BRADLEY Bulletin 5370 CVIM OCR–PAK Option (Catalog No. 5370–OCR) Addendum: OCR–PAK User’s Manual Disclaimer Important User Information Solid state equipment has operational characteristics differing from those of electromechanical equipment. “Application Considerations for Solid State Controls” (Publication SGI-1.1) describes some important differences between solid state equipment and hard–wired electromechanical devices. Because of this difference, and also because of the wide variety of uses for solid state equipment, all persons responsible for applying this equipment must satisfy themselves that each intended application of this equipment is acceptable. In no event will the Allen-Bradley Company be responsible or liable for indirect or consequential damages resulting from the use or application of this equipment. The examples and diagrams in this manual are included solely for illustrative purposes. Because of the many variables and requirements associated with any particular installation, the Allen-Bradley Company cannot assume responsibility or liability for actual use based on the examples and diagrams. No patent liability is assumed by Allen-Bradley Company with respect to use of information, circuits, equipment, or software described in this manual. Reproduction of the contents of this manual, in whole or in part, without written permission of the Allen-Bradley Company is prohibited. 1993 Allen-Bradley Company, Inc. Addendum OCR-PAK User’s Manual Addendum Contents Objectives . . . . . . . . . . . . . . . . . . . . . . . . . . . . . . . . . . . . . . . . . . . . . . . Addendum Contents . . . . . . . . . . . . . . . . . . . . . . . . . . . . . . . . . . . . . . . Search Window . . . . . . . . . . . . . . . . . . . . . . . . . . . . . . . . . . . . . . . . . . . Enhanced Search Mode . . . . . . . . . . . . . . . . . . . . . . . . . . . . . . . . . . . . Enhanced Threshold / Filter . . . . . . . . . . . . . . . . . . . . . . . . . . . . . . . . . 1 1 1 6 6 Objectives The objective of this addendum is to provide a supplement to the original OCR-PAK User’s Manual, Cat. No. 5370–ND007. This addendum discusses the new features and enhancements included in the product revision, 5370-OCR, Series A, Revision B. For information on installation, and/or on other OCR-PAK features, refer to the OCR-PAK User’s Manual. Addendum Contents The contents of this addendum are briefly described in Table A below. Table A Topic Descriptions Topic Description Search Window: Referencing Discusses a new feature which allows the user to assign to the current OCR window to a search window for a previously defined OCR window. Search Window: Foreground/Background Enhanced Search Mode Enhanced Threshold / Filter Discusses an enhancement which allows the search window to search based on either background or foreground content. Discusses an enhancement which allows the OCR window to recognize characters which appear upside-down in the inspection image. Discusses the new image filter options which can be used to enhance the appearance of characters within the OCR window. Note: Because of the advanced Threshold/Filter options now available for the OCR window, the Reconnect feature has been eliminated from OCR-PAK for Series A, Revision B. Search Window Referencing The Search Win. feature now allows the user to assign, or reference, an OCR window to the search window of a previous OCR window. The following factors apply for the assignment of the current OCR window to the search window of a previous OCR window: 1 Addendum OCR-PAK User’s Manual • At least one previous (smaller-numbered) window must be enabled, and defined for OCR, for which the Search Win. feature is enabled. • If more than one previous OCR windows are enabled, with respective search windows enabled, only the OCR window closest in number is assignable to the current OCR window. • This option is typically practical only if characters to be read by the current OCR window always shift in accordance with the content of the OCR window assigned to provide the search window referencing. • One or more subsequent OCR windows can be assigned to the same OCR search window. • The assignment of multiple OCR windows to the same OCR search window decreases overall processing time. To select or change the Search Win. option (for a window with OCR as the selected operation): • Pick Define Window → Search Win: box to cycle through the Search Win. options (see Figure 1, page 2). Figure 1 Selecting the referencing option Indicates the search window for window #1 is assigned to the current window When picked, the Search Win. box cycles through these options: Enabled: The search window for the current OCR window is enabled, and will provide the referencing for the current OCR window. Disabled: The search window for the current OCR window is disabled; no search window referencing is provided for the OCR window. Ref. #:* The search window for the current OCR window is disabled, and the referencing for the OCR window will be provided by the search window of the OCR window whose number is indicated in the box. *Note: This is the default setting, only if at least one previous (smallernumbered) OCR window is enabled and its search window is enabled. If no previous OCR windows, with enabled search windows, are currently enabled, the Ref. # option is not available. 2 Addendum OCR-PAK User’s Manual Figure 2 Example of assigning an OCR window to a previous OCR search window OCR window #3 Search window for OCR window #3 OCR window #6, assigned to reference OCR window #3 The shift applied to OCR window #3 is also applied to OCR window #6 The search window for an OCR window can always be set to Enabled, or Disabled, in any case. Consider this example: Suppose window 3, window 6, and window 10 are defined for OCR. Since there are no smaller-numbered OCR windows than window 3 to reference, the search window options for window 3 would be: 1. Enabled: This enables the search window for window 3, and also allows the search window to be referenced by subsequent OCR windows. 2. Disabled: This disables the search window for window 3. Suppose the search window for window 3 is Enabled. At this point, the search window options for window 6 would be: 1. Ref. #3: This is the default setting, which assigns window 6 to the search window for window 3 (see Figure 2, page 3). This option is not available if the search window for window 3 is Disabled. 2. Enabled: This enables the search window for window 6, in which case window 6 uses its own search window. This also enables the search window for window 6 to be referenced by subsequent OCR windows. 3. Disabled: This disables the search window for window 6, in which case no search window is used for window 6. As for window 10, the search window for window 10 can be disabled, or enabled, in any case. The Ref # option for window 10 would differ depending, in this case, on the search window option you selected for window 6. The search window options for window 10 would be these: 1. Ref. #3 or Ref. #6: One of these two would be the default setting, which assigns window 10 to the search window indicated. Ref. #6 would be listed only if the search window for window 6 is set to Enabled. Otherwise, the Ref. #3 option would be listed. 2. Enabled: This enables the search window for window 10, in which case window 10 uses its own search window. 3. Disabled: This disables the search window for window 10. 3 Addendum OCR-PAK User’s Manual Foreground / Background The Search Mode menu includes a new item, Search Win, which allows the search window to analyze its contents, and position the OCR window, in terms of either the “foreground” content, or the “background” content, of the search window. To change the Search Win option: • Pick Define Char String → Search Mode to access the Search Mode menu (see Figure 3, page 4). • Pick Search Win box to toggle the setting between Foreground and Background (Note: The Search Win box is disabled and non-selectable unless the search window is enabled for the OCR window). Figure 3 Selecting Foreground or Background for the search window operation The Search Win: box is set to Foreground The effect of selecting either the Foreground or Background option is relative to the Background box setting, also found on the Search Mode menu (refer to the OCR-PAK User Manual for details on the Background options). Figure 4 Example of Background colors in an OCR window “Dark” Background “Light” Background Dark Foreground (characters) OCR search windows Light Foreground (characters) If the Background box is set to Light, the OCR window reads dark characters against a lighter background. The Search Win settings have these effects: 4 Addendum OCR-PAK User’s Manual Background: The search window analyzes its content in terms of the lighter (background) contents in the search window. Foreground: The search window analyzes its content in terms of the dark characters (foreground) in the search window. If the Background box is set to Dark, the OCR window reads light characters against a darker background. The Search Win settings have these effects: Background: The search window analyzes its content in terms of the darker (background) contents in the search window. Foreground: The search window analyzes its content in terms of the light characters (foreground) in the search window. Using Foreground: The Foreground selection is the default setting. The Foreground selection is more useful where the character string appears within a relatively large area of contrasting shade. Using Background: The Background selection is typically more useful where the character string appears within a relatively small area of the image of contrasting shade, which is itself contained within a larger area of contrasting shade, such as when characters are printed on a small label. Example of using Background: Suppose the characters to be inspected are black, and they appear on a small white label, which is affixed to a dark surrounding surface (see Figure 5). Assume the Background box is set to Light, so the OCR window will read the black characters against the light background. With the Search Win. box set to Background, the OCR search window will search for the position of the white label (the light background), not the dark characters, and position the OCR window according to the position of the white label. Figure 5 Example of using Background setting for search window OCR search window OCR window Dark Foreground (characters) Light Background of white label Dark area surrounding white label 5 Addendum OCR-PAK User’s Manual Enhanced Search Mode The Orientation feature, found on the Search Mode menu, is enhanced. Now, when the Horizontal is selected for Direction (on the Search Mode menu), you can select from two optional Orientation settings, Right-sideup or Upside-down. This enhancement allows you to choose whether to have an OCR window read “upside-down” character strings, or to read characters in the typical “right-side-up” orientation (see Figure 6, page 6). To select the Right-side-up or Upside-down option for the Direction (for a window with OCR as the selected operation): • Pick Define Char String → Search Mode to access the Search Mode menu (see Figure 6). • Pick the Orientation box to toggle the setting to Horizontal. • Pick the Direction box to toggle the setting to Upside-Down, if necessary. Figure 6 Example of Upside-Down characters The Direction: box is set to Upside-down OCR window Enhanced Threshold / Filter The Pixel/Obj Filter feature has been enhanced to include a greater variety of filtering options (for OCR windows only). Your main objective in setting the Pixel/Obj Filter is to optimize the binary image within the window in order to produce the most accurate and repeatable OCR results. The desired effect of the filtering functions is to filter out noise in the binary image in order to help create consistency in the appearance of characters in the window, without seriously distorting the size or shape of the characters. 6 Addendum OCR-PAK User’s Manual Note: Typically, your objective in setting the threshold cursor is to adequately isolate individual characters, while eliminating noise from all other areas with the OCR window. Sometimes this is not possible; the Pixel/Obj Filter functions are intended to be of use in these cases to eliminate the noise in the window, and to enhance and clarify the appearance of characters. The Pixel/Obj Filter menu contains six menu boxes, numbered 1-6, each of which can be assigned to one of 13 filtering functions, including one “function” with no filtering effect (Identity). Initially, by default, all boxes on the Pixel/Obj Filter menu boxes are set to Identity, meaning that no filtering is in effect. To change the filter function assignment of any of the boxes on the Pixel/Obj Filter menu (see Figure 7): • Pick Define Window → Threshold/Filter box to access the Pixel/Obj Filter menu. • Pick the desired box (1-6) on the Pixel/Obj Filter menu to access the Proc filter menu. • Pick the appropriate box on the Proc filter menu to assign that function to the selected Pixel/Obj Filter box. Figure 7 Accessing the Pixel / Obj Filter options Proc filter menu Pixel / Obj Filter menu 7 Addendum OCR-PAK User’s Manual The Proc filter menu (see Figure 7, page 7) contains 13 menu boxes, each of which represents one of the available filtering functions. Most of the Proc filter menu consist of pairs of two types of filter operation – Erode (for example, Hex Erode) and Dilate (for example, Tri Dilate). These two general types of filter operation are described below: Erode – Generally, to erode is to decrease the area of the character(s) in the window. Typically, you would use an Erode filter to eliminate noise in the window, and/or to decrease the thickness of characters. Five different types of erosion are selectable, each its own characteristic effect. Dilate – Generally, to dilate is to increase the area of the character(s) in the window. Typically, you would use a Dilate filter to eliminate noise in the window, and/or to increase the thickness of characters. Five different types of dilation are selectable, each its own characteristic effect. Figure 8 Examples demonstrating the effects of erosion and dilation Character string with no filters applied Effect of applying erosion (Characters get thinner) Effect of applying dilation (Characters get thicker) Listed below are the Proc filter menu items and a brief description of the tasks that they perform: Identity – This is a null selection, and performs no filtering effect on the binary image in the window. When all six menu boxes are set to Identity, for example, the image in the window is not affected by any filtering. Hex (hexadecimal) Erode – Use this function in instances where coarse filtering is required, such as when characters otherwise are very thick, and loops may appear to be filled in, resulting in misreads. Hex (hexadecimal) Dilate – Use this function in instances where coarse filtering is required, such as when characters are very thin, and parts of the characters may not otherwise be detected, resulting in misreads. Tri (triangular) Erode – Use this function in instances where less coarse filtering than Hex Erode is required. 8 Addendum OCR-PAK User’s Manual Tri (triangular) Dilate – Use this function in instances where less coarse filtering than Hex Dilate is required. ← – → (horizontal) Erode – Use this function to erode horizontally only. This can be useful in instances where only horizontal erosion is desired, such as when characters come close to touching each other, or occasionally touch. ← – → (horizontal) Dilate – Use this function to dilate horizontally only. This can be useful in instances where only horizontal dilation is desired, such as when a particular character breaks, leaving two separate parts, side by side, resulting in an unreadable character. Horizontal dilation could be used to reconnect the two character parts resulting in a readable character. // (oblique) Erode – Use this function to erode obliquely (at an angle) only. This can be useful in instances where only oblique erosion is desired, such as when parts of a character come close to touching each other, or occasionally touch, resulting in an unreadable character, or a misread character. // (oblique) Dilate – Use this function to dilate obliquely (at an angle) only. This can be useful in instances where only oblique dilation is desired, such as when a particular character breaks, leaving two separate parts, lying at oblique angles to each other, resulting in an unreadable character. Oblique dilation could be used to reconnect the two character parts resulting in a readable character. || (vertical) Erode – Use this function to erode vertically only. This can be useful in instances where only vertical erosion is desired, such as when parts of a character come close to touching each other, or occasionally touch, resulting in an unreadable character, or a misread character. || (vertical) Dilate – Use this function to dilate vertically only. This can be useful in instances where only vertical dilation is desired, such as when a particular character breaks, leaving two separate parts, one part above the other, resulting in an unreadable character. Vertical dilation could be used to reconnect the two character parts resulting in a readable character. Triple Point – This function is somewhat like an attenuated version of the –White/+Black function (available for non-OCR windows); its effect is less pronounced than the –White/+Black function. This function is a relatively coarse filter, though not so much as the –White/+Black function, for example. Smoothing – This function examines the “neighboring” pixels around each pixel for black/white status, and can toggle the color (change from black-to-white or white-to-black) of each pixel according to the colors in the neighboring area. This function is a relatively fine filter which, in effect, connects isolated larger groups of white pixels, and eliminates smaller isolated groups of white pixels. Here are some general guidelines when using the Pixel/Obj Filter functions: Erode and Dilate directional effects are relative to horizontal: The effects of the dilate and erode functions are consistent, regardless of the 9 Addendum OCR-PAK User’s Manual vertical or horizontal orientation of the OCR window search mode. Their effects are relative to horizontal, as observed on the monitor screen. Numerical order of performance: Each selected filtering function is performed in order by box number, and the selected filtering functions have a cumulative effect on the binary image in the window. The desired overall, top-to-bottom effect of these filtering functions is to filter out noise in the binary image to create consistent inspection images, and to do so without distorting the size or shape of the characters beyond recognition. Use the Erode and Dilate functions in tandem: For best results, you would typically (though not always) assign one Erode function for every Dilate function assigned, in order to minimize unwanted alteration of the characters’ size in the image. Try several approaches: Experiment, if necessary, with different filter functions, and/or different sequences of filter function assignment, until good results are obtained through trial and observation. Use whatever Pixel/Obj Filter functions provide the best results, and the fewest misreads. Example of using the filters: Suppose that, in an application, only vertical breaks in the characters are likely to occur. In this case, it might be useful to use the vertical Dilate and vertical Erode filters, as shown in Figure 9. Figure 9 Example of using vertical Dilate and vertical Erode Vertical dilation/ erosion useful here Effect of using vertical Dilate filter only Effect of using vertical Dilate then vertical Erode Check filter settings with all characters read: Using the filter options can at times produce unexpected and unwanted results. For this reason, when using the filters, make sure you check the OCR window results using representative examples of all characters to be read by the OCR window. Figure 10 Getting different results using horizontal Dilate and horizontal Erode Horizontal Dilate / Erode useful here Horizontal Dilate / Erode could change the G into more of a 6 10 Addendum OCR-PAK User’s Manual Consider a case where horizontal Dilate and horizontal Erode are used to close breaks in some characters (see Figure 10, page 10). This could, in this case, also have the unwanted effect of causing other characters to be misread. Using separate OCR windows for each character: Using filter options to apply to all of the characters within a single OCR window can be tricky, and at times can produce unexpected and unwanted results (see Figure 10, page 10). For this reason, it is suggested that, if necessary, separate OCR windows be used for each character in the string, when the character is constant for each position in the string (see Figure 11). If a different OCR window is used for each character, the filtering can be tailored for each window, for the specific character that is to appear in the window. Figure 11 Example of separate OCR windows for each character Horizontal Dilate / Erode useful here Two separate OCR windows used Horizontal Dilate / Erode not used here Horizontal Dilate / Erode not useful here 11 1993 Allen-Bradley Company ALLEN-BRADLEY A ROCKWELL INTERNATIONAL COMPANY A subsidiary of Rockwell International, one of the world’s largest technology companies, Allen-Bradley meets today’s automation challenges with over 85 years of practical plant floor experience. Over 11,000 employees throughout the world design, manufacture and apply a wide range of control and automation products and supporting services to help our customers continuously improve quality, productivity and time to market. These products and services not only control individual machines, but also integrate the manufacturing process while providing access to vital plant floor data that can be used to support decision–making throughout the enterprise. With offices in major cities worldwide. WORLD HEADQUARTERS Allen-Bradley 1201 South Second Street Milwaukee, WI 53204 USA Tel:(414) 382–2000 Telex:43 11 016 FAX:(414)382–4444 EUROPE/MIDDLE EAST/ AFRICA HEADQUARTERS Allen–Bradley Europe B.V. Amsterdamseweg 15 1422 AC Uithoorn The Netherlands Tel:(31) 2975/43500 Telex:(844) 18042 FAX:(31) 2975/60222 ASIA/PACIFIC HEADQUARTERS Allen–Bradley (Hong Kong) Limited Room 1006, Block B, Sea View Estate 2-8 Watson Road Hong Kong Tel:(852)887-4788 Telex:(780) 64347 FAX:(852)510-9436 Catalog No. 5370–ND007 – RN1 (Series A) CANADA HEADQUARTERS Allen–Bradley Canada Limited 135 Dundas Street Cambridge, Ontario N1R 5X1 Canada Tel:(519)623–1810 FAX:(519)623–8930 LATIN AMERICA HEADQUARTERS Allen-Bradley 1201 South Second Street Milwaukee, WI 53204 USA Tel:(414)382–2000 Telex:43 11 016 FAX:(414)382–2400 40064–004–01 (A) Printed in USA 3