1
AGI SDI SERVER
Release 2011-04 RC1
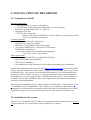
CONTENTS
1. TECHNICAL DESCRIPTION ................................................................. 3
1.1. General concept ..................................................................................... 3
1.2. Specifications......................................................................................... 3
1.2.1. Linux Operating System................................................................. 3
1.2.2. SDI services.................................................................................... 4
1.3. Pre-installed applications....................................................................... 4
1.4. Pre-configured databases....................................................................... 6
1.5. Downloads ............................................................................................. 7
2. INSTALLATION OF THE SERVER ...................................................... 8
2.1. Preparation to install.............................................................................. 8
2.2. Installation of the system....................................................................... 8
3. POST-INSTALL CONFIGURATION ................................................... 17
3.1 Create new user .................................................................................... 17
3.2. Changing the network connection settings .......................................... 17
3.2.1. Set up the host name..................................................................... 18
3.2.2. Set up the DNS parameters........................................................... 18
3.2.3. Set up the static IP address ........................................................... 18
3.2.4. Restart the network....................................................................... 19
3.3 Restarting the system............................................................................ 19
4. SYSTEM SECURITY .............................................................................. 20
4.1. CHANGE THE DEFAULT PASSWORDS ....................................... 20
4.1.1. Default system user and root ........................................................ 20
4.1.2. Database administrator and user................................................... 20
4.1.3. Tomcat manager ........................................................................... 20
4.1.4. Deegree database connection........................................................ 22
4.1.5. GeoServer administrator............................................................... 22
4.2. Management of the user accounts ....................................................... 22
5. ACCESS TO WEB APPLICATIONS AND FTP.................................. 24
5.1. Webmin ............................................................................................... 24
5.2. Apache Tomcat.................................................................................... 24
5.3. Deegree................................................................................................ 25
5.4. GeoServer ............................................................................................ 25
5.5. proftpd ................................................................................................. 25
6. HOW TO USE - DEEGREE CSW ......................................................... 27
6.1 Create metadata records........................................................................ 28
6.1.1 Logging in, creating new group..................................................... 28
6.1.2 Uploading dataser series XML file................................................ 29
6.1.3 Creating dataset metadata document ............................................. 31
6.1.3.1 Metadata on metadata............................................................. 33
6.1.3.2 Identification........................................................................... 34
6.1.3.3 Temporal reference................................................................. 35
6.1.3.4 Spatial information ................................................................. 36
6.1.3.5 Reference system information ................................................ 37
6.1.3.6 Classification of data and keywords....................................... 38
6.1.3.7 Distribution information ......................................................... 39
6.1.3.8 Quality and validity ................................................................ 40
6.1.3.9 Constraints related to access and use...................................... 41
6.1.4 Exporting to XML dataset metadata document ............................. 42
6.2 Upload metadata XML files to CSW ................................................... 43
6.3 List metadata records, uploaded to CSW ............................................. 44
6.3.1 Generic client................................................................................. 45
6.3.2 catalogueManager search .............................................................. 45
6.4 Delete metadata records from CSW ..................................................... 46
6.4.1 Generic client................................................................................. 46
6.4.2 catalogueManager editor ............................................................... 47
7. HOW TO USE - GEOSERVER .............................................................. 50
7.1 Understanding GeoServer data directory structure .............................. 50
7.2 Personalising GeoServer....................................................................... 50
7.2.1 Contact information....................................................................... 50
7.2.2 Turn features on and off ................................................................ 51
7.3 Publishing data on GeoServer .............................................................. 51
7.3.1 Create a workspace........................................................................ 53
7.3.2 Add style for vector data ............................................................... 54
7.3.3 Upload data to GeoServer data directory ...................................... 55
7.3.4 Publish vector datasets................................................................... 56
7.3.4.1 Create new vector data source ................................................ 56
7.3.4.2 Publish vector layers............................................................... 57
7.3.5 Create the layers group .................................................................. 62
7.4 Security considerations......................................................................... 64
8. TECHNICAL SUPPORT ........................................................................ 65
9. LICENSING.............................................................................................. 66
1. TECHNICAL DESCRIPTION
1.1. General concept
AGI SDI Server 2011 is a custom remastering of Debian Squeeze (version 6.0.1a), bundled
with the best system management tools, spatial (geo-) data processing libraries, deployment
containers, on-line data distribution services and web mapping interfaces. It is a complete
Open Source Spatial Data Infrastructure (SDI) server solution, developed by a team of
experts working at the Applied Research Center of the Institute of Aerial Geodesy in Kaunas
(Lithuania) under the EC FP7-SPACE-2007-1 project "Geoland2 - Towards an Operational
GMES Land Monitoring Core Service" (Grant Agreement No.218795). The abbreviation
"AGI" stands for the Lithuanian name of the company UAB "Aerogeodezijos institutas"
(Institute of Aerial Geodesy, also known as AGI - see Section 6 for details).
A distinctive feature of AGI SDI Server is that it is a highly customized system with a
completely pre-installed setup of software and configuration of all elements, including even
database containers, which makes it a fully functional ready-to-go out-of-the-box solution for
powering large-scale Spatial Data Infrastructure (SDI), implemented on the basis of Open
Source operating system and software technology. AGI SDI Server also includes customised
scripts designed to automate the process of configuration and activation of SDI services with
minimum input required from the Administrator.
The first version of the AGI SDI Server was released for operational testing by FP7 "Geoland
2" project team in late August 2009. It appeared in 4 variants (editions) - "LITE", "PRO",
"COMBO" and "CAT" activating different applications for SDI services. The same concept
of different servers with different level of complexity and functionality, dedicated for either
small or large spatial data deployments will be maintained in future as well.
The second (updated) version of AGI SDI Server was released on April, 2011. It appears in 2
editions - "G2" and "FULL" (see section 1.3 of the current manual). Difference between
editions is what services are running:
• "G2" edition by default has only WMS and CSW services enabled (other services are
installed, but disabled);
• "FULL" edition has all services installed (disabled by default) - they can be enabled
as needed.
1.2. Specifications
1.2.1. Linux Operating System
The first preview version of AGI SDI Server (2009) was released on June 27, 2009 and is
based on Debian GNU/Linux 5.0.2. Testing of the system and updating the SDI applications
with their new versions lasted for about 6 months, and the stable version was ready during the
first week of 2010. Therefore we may consider the first (2009) release of AGI SDI Server as
an SDI platform providing the latest stable open source software released before the end of
2009.
Second preview version of AGI SDI Server (2011) was released on April 2011. All
components were updated to current versions - operating system is Debian GNU/Linux
6.0.1a.
The current release of the Server is built on Linux kernel version 2.6. To avoid any possible
hardware conflicts, we reduced the system down to the absolute minimum of interface
requirements. There is no GUI interface in the current release of the AGI SDI Server 2011,
instead of that we deployed the best available open source web applications dedicated for
management of Linux operating systems and services (see Section 5 of the current manual).
The AGI SDI Server 2011 uses all the latest versions of applications and libraries available
from Debian 6.0.x repositories, and there are no system components and applications, which
would be "locked" to a certain version with pending restrictions on upgrades.
1.2.2. SDI services
In Deegree 2.4, there are OGC WebServices for Web Map Service (WMS) 1.1.1, Web
Feature Service (WFS) 1.1, Web Coverage Service (WCS) 1.0 and Catalogue Service WebProfile (CSW) 2.0.2 available. WMS and WCS are the official reference implementations of
the Open Geospatial Consortium; WFS and CSW are fully transactional. CSW supports
ISO19115/ISO19119 Application Profile and DE-Profile 1.0.1. More details are available on
Deegree 2.4 features web page.
GeoServer 2.0.3 is fully compliant to WMS 1.1.1, WFS (1.0 and 1.1, transactions and
locking) and WCS (1.0 and 1.1) specifications, as tested by the CITE conformance tests.
GeoServer additionally serves as Reference Implementation for WCS 1.1 and WFS 1.0 and
1.1. A detailed description of capabilities is presented in GeoServer features web page.
1.3. Pre-installed applications
AGI SDI Server has a complete set of tools and applications for effective and user-friendly
management of the Linux system, it's users and databases, as well as support of the core
Internet services, including file transfer protocols, web interfaces for building SDI, web
mapping projects and publishing of the on-line content.
There are two AGI SDI Server 2011 activation options:
1. G2 (former COMBO) version (GeoServer WMS, Deegree CSW)
2. FULL version (services are enabled as needed)
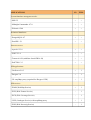
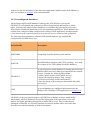
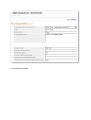
The following table summarizes the most essential software applications and services preinstalled and configured on AGI SDI Server 2011 and activated with the above-mentioned 2
options:
APPLICATIONS
G2
FULL
- SSH 5.5
+
+
- Midnight Commander 4.7.0
+
+
- Webmin 1.540
+
+
- PostgreSQL 8.4.7
+
+
- PostGIS 1.5.1
+
+
- Apache2 2.2.9
+
+
- PHP5 5.2.6
+
+
- Tomcat 6.0.28 (with Sun-Java6-JDK 6.24)
+
+
- ProFTPd 1.3.3
+
+
- GeoServer 2.0.3
+
*
- Deegree 2.4
+
*
- G2 soap2http-proxy (required for Deegree CSW)
+
*
- WMS (Web Map Service)
+
*
- WFS (Web Feature Service)
-
*
- WCS (Web Coverage Service)
-
*
- CSW (Catalogue Service) with soap2http-proxy
+
*
- WPS (Web Processig Service)
-
*
System/database management tools:
Relational databases:
Internet servers:
SDI applications:
SDI services:
Links to on-line documentation of the main web applications installed on the AGI SDI Server
2011 are available in Section 5 of the current manual.
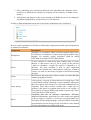
1.4. Pre-configured databases
All the PostgreSQL/PostGIS databases loaded on the AGI SDI Server (except the
GEODATA) are dedicated and connected to SDI web applications and interfaces. All the
tables, functions and content of those databases are automatically generated by SQL scrips
following the installation instructions of the corresponding applications. Those databases also
contain some examples of data records used for testing of web applications, but deployment
of new data records is perfectly possible as soon as the servers would become operational.
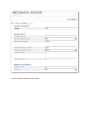
The following table summarizes relational GIS-enabled databases pre-installed and
configured on AGI SDI Server 2011:
DATABASES
Description
POSTGRES
PostgreSQL/PostGIS default system database.
POSTGIS
PostGIS database template with UTF-8 encoding - to be used
for creation of new GIS-enabled (PostGIS) databases.
GEODATA
A general purpose spatial database for storing and processing
attribute tables and vector data layers imported from external
sources. Contains the following DB schemas :
- public (default schema for the public access) ;
- import (for importing shapes, temp. storage) ;
- work (for processing of tables and features) ;
- data (for storing of processed geo-data outside the public
access area).
CSW
A special database pre-configured and connected to the
Deegree Web Catalogue CSW application (see Section 5.4).
GEODATA is the only general-purpose AGI SDI Server database with pre-installed GIS
functionality, which is intended to be used for deployment of the operational vector GIS
datasets for further publishing through the available SDI services. Due to technological
limitations of PostGIS, it is currently possible to load only attribute tables and vector data.
PostGIS raster data functionality is under development.
Additional databases can be created by the user if needed.
1.5. Downloads
AGI SDI Server is distributed as ISO disk image files, which must be downloaded and either
burned to CD or DVD disks using standard applications, or used as ISO installation media for
virtual machines. The current repository of those ISO files is on a web server at the Institute
of Aerial Geodesy in Kaunas (Lithuania) :
http://www.agi.lt/sdi-iso
ISO files of AGI SDI Server are named according to the year of release, also indicating if the
system has support for 32 or 64-bit processors. Checksums (md5) of the ISO files (named
accordingly) are provided for the download as well. The current Manual is available as a
separate PDF file at the same FTP folder as the ISO images.
AGI SDI Server ISO files :
• agi-sdi-server-2009-i386.iso
32-bit (x86)
• agi-sdi-server-2009-amd64.iso
64-bit (x86_64)
• agi-sdi-server-2011-G2_RC1-amd64.iso 64-bit (x86_64)
For the operational "production" servers you should consider using modern hardware with
sufficient storage capacity, processing power and memory. Please note that both modern Intel
and AMD processors are designed to support 64-bit and 32-bit operating system architecture.
We recommend to use 64-bit version of AGI SDI Server.
For legacy systems, that do not support 64-bit instructions, 32-bit AGI SDI Server is
available.
2. INSTALLATION OF THE SERVER
2.1. Preparation to install
Network connectivity
• DNS registration of your server hostname
• Firewall/router protected network with DMZ access to some ports
• Minimum: Tomcat (8080), FTP (21), SSH (22)
• Optional: HTTP (80)
• TCP/IP cable connection
◦ Internet UPLOAD speed MUST be at least 2 Mbps, if you expect to use SDI
Server in production environment.
Computer hardware
• Minimum: a modern PC with at least
• Intel Dual Core processor (64 bits)
• Minimum: 2 Gb of RAM (4 Gb recommended)
• At least 20 Gb HDD space + disk space for the datasets
• DVD-ROM reading device
• No special requirements for multimedia components
◦ Video card, sound – not essential
Other requirements
• For servers, that MUST be operational on 24/7 basis:
• High-quality hardware components;
• UPS device is mandatory;
• Air-conditioning of the room may be also required (depending on the conditions)
Download an appropriate ISO image file from http://www.agi.lt/sdi-iso and "burn" the DVD
disk by using any commercial or open source software on any operating system (e.g. Brasero
on Ubuntu Linux). You can also use downloaded ISO image as is for virtual machine boot
media. If you have "modern" processor, we strongly recommend using 64-bit distributions
(Intel Dual-core processors support both 32-bit and 64-bit instructions) - this will allow you
to install with more than 4GB RAM and provide significant improvement in performance,
especially with large databases.
Before you start installation process, please read the current Manual - at least Sections 2 and
3 ("Installation" and "Configuration"). This will give you an insight on what software
components are included into the operating system, and what are the obligatory post-install/
configuration steps to be performed before your server can be opened for public access.
2.2. Installation of the system
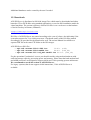
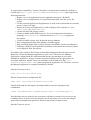
Insert the Live CD and start the PC. SDI Server operating system will start and load (as LiveCD) automatically. The system loads with pre-defined user "custom".
However, in order to start the installation process, you first have to switch from an ordinary
user ("custom") to the system to administrator ("root"). Type command sudo su ("superuser") at the console . To switch back to the ordinary user account, type exit at the
command prompt.
sudo su
...
exit
Installation of AGI SDI Server is guided by a special application called rematersysinstaller which has a minimalistic, yet very straight-forward text interface with
minimum questions to be answered. The most complicated part is disk partitioning with
cfdisk program. It is a pretty simple and usual step for those with previous experience in Unix
systems. However, if you are a new Linux user, we strongly advice you to read cfdisk pages
in google and consult someone with experience in Unix/Linux filesystems.
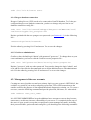
To start the installation process, switch to the root user (by entering "sudo su" at the
command prompt) and start installer :
sudo su
remastersys-installer
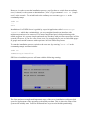
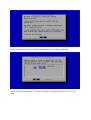
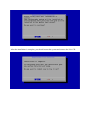
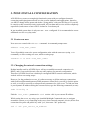
SDI Server installation process will start with the following warning:
The first (and most complicated/important) stage of the server installation configures disk
space for deployment of the operating system and your data. This is where the setup of the
system will actually start. You'll be instructed how to proceed with disk partitioning:
Then, you will have to select a physical disk (hardware) for further partitioning:
After you choose the hardware, a special disk partitioning program, called cfdisk, will
start:
While using cfdisk utility, you must BE VERY CAREFUL - ALL DATA ON THAT
DISK WILL BE LOST. A generic disk partitioning schema could look like this: first primary
partition (e.g. sda1) of ext3 type (83) with boot flag can take the whole disk, while the second
primary partition (e.g. ext2) of swap type (82) and the size of double your RAM can be
created in the end of the disk.
The installer allows you to put /home folder to a separate partition, so you can optionally
create a primary bootable (type 83) sda1 partition for the system (/), primary (type 83)
partition for user data (/home) and swap (type 82) partition for the swap space.
What partition layout to choose is up to you, but for testing purposes (or is you are unfamiliar
with Linux operating system), 2 partitions (/ and swap) are enough.
After completing the disk setup, choose [Write] and [Quit].
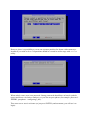
After you are done with disk partitioning, the installer will first ask you to identify swap
space - you should select sda5 the swap partition:
The next question is about root partition - you should select sda1 as root partition of your
system:
In next screen you will be asked to choose file system type for root partition - leave ext3
(default).
Then you will be warned that your /home folder will be placed at the same partition as /root
(the system) - which is OK for the default configuration, as most of your data is likely to be
located in the PostgreSQL/PostGIS database OR in /sdi folder:
However, there is a possibility to create one separate partition for /home with remastersysinstaller if you wish to do so. All partitions should be created in earlier stage with cfdisk
utility.
When asked, create (new) root password. Strong passwords should have at least 8 symbols
(upper and lower case letters, numbers), or you can use pass-phrase (for example: password fJk8ER2, passphrase - configuring5_this).
Then enter server user's real name (or just press ENTER), and username (you will use it to
login):
In next screen enter password for just created user. The same rules as for root password
apply.
Note. Due to an error in current version of remastersys-installer, only root user is
actually created.
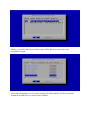
The installer then will also ask you for your server host name (consult your network
administrator):
... and location to install system loader grub (the Master Boot Record - MBR - is a good
choice for a server):
Finally, you will be asked to set clock (answer YES) and choose your time zone geographical region:
After final confirmation of your system settings, the disk partitions will be created and
formatted, and SDI Server system will be installed:
After the installation is complete, you should restart the system and remove the Live CD:
3. POST-INSTALL CONFIGURATION
AGI SDI Server comes as completely functional system with pre-configured network
connection and logins/passwords all over the system, databases and applications, therefore
you MUST change all the passwords before "going public" with your SDI Server. If you fail
to comply to this essential security requirement, all your data and services will be completely
unprotected, and sooner or later will be violated or even destroyed.
In just installed system there is only one user - root - configured. It is recommended to create
additional user for every-day tasks.
3.1 Create new user
New users are created with adduser command. At command prompt enter:
adduser <new_user_name>
You will probably want to do sytem configuration tasks with the same user (using sudo
command), so after creating new user, add it to sudo group:
usermod -a -G sudo <new_user_name>
3.2. Changing the network connection settings
Debian installer used in AGI SDI Server will try to establish a network connection via
DHCP, and (if successful) doesn't offer any other options for network configuration.
Therefore AGI SDI Server has a default pre-configured DHCP network connection, which
worked well on our testing setups.
However, for the production servers, it is often necessary to define stationary connections
with fixed host/IP/netmask/gateway/DNS parameters. Most likely you will go for this option
as well, so it will be necessary to setup network parameters for your server. To find out what
is your dynamic IP address during the current session, type the following command (as root) :
sudo ifconfig -a
Find the inet_addr: parameter in eth0 section - this is your current IP address.
While testing the server, try using a pre-installed Midnight Commander (mc) to navigate
around the system, or try connecting to the server from external computer via ssh (for the first
connection accept the ssh public key with "yes", then enter "sdi" password) :
ssh -l sdi your_server_IP_address
You can also test some internet services and applications from external computer connected
to the same sub-net. See Section 5 for detailed description of the bundled applications.
Before proceeding any further, please study the Debian networking guide at the following
URL :
http://www.debianhelp.co.uk/network.htm
Setting up network connection in Debian systems is pretty simple and well documented. You
have to :
3.2.1. Set up the host name
Modify the configuration file :
sudo nano /etc/hostname
Exit the editor by pressing Ctrl+X and answer Yes to save the changes (nano editor
commands and options are shown in the bottom of editor screen). OR enter the commands as
shown in Debian networking guide
3.2.2. Set up the DNS parameters
Modify the configuration file :
sudo nano /etc/resolv.conf
Exit the editor by pressing Ctrl+X and answer Yes to save the changes (nano editor
commands and options are shown in the bottom of editor screen).
3.2.3. Set up the static IP address
Modify the configuration file :
sudo nano /etc/network/interfaces
iface eth0 inet dhcp
#iface eth0 inet static
#address 192.168.1.1
#netmask 255.255.255.0
#gateway 192.168.1.254
The config which already has a pre-defined template for you to uncomment and fill in. Exit
the editor by pressing Ctrl+X and answer Yes to save the changes (nano editor commands
and options are shown in the bottom of editor screen).
3.2.4. Restart the network
sudo /etc/init.d/networking restart
3.3 Restarting the system
After completing all the above-mentioned post-installation steps you should restart your
system :
sudo reboot
When the system is re-loaded, log in as sdi user and test the network connection by running a
couple of simple ping tests :
ping <your_server_IP>
ping <your_server_host_name_and_domain>
ping 193.219.50.12
If ping works properly (bytes are returned back from your server and an external host
193.219.50.12), your network is configured and works well.
It is also very useful to run system upgrade immediately after it's deployment and regularly
during the whole period of it's operation. Programs aptitude or apt-get can be used for
this task:
sudo apt-get update
sudo apt-get upgrade
sudo apt-get purge
4. SYSTEM SECURITY
Debian Squeeze 6.0.1a operating system provides a solid foundation for a secure internet
server. However, AGI SDI Server has a broad variety of sophisticated web applications and
databases with pre-configured and documented default logins and passwords, which makes
the default system completely open and unprotected. Therefore the most important step of the
Server post-install configuration is OBLIGATORY modification of all passwords and fixing
the database connections. The following instructions will lead you all the way towards a
complete replacement of the default passwords, thus creating a secure SDI server.
4.1. CHANGE THE DEFAULT PASSWORDS
4.1.1. Default system user and root
sudo passwd sdi
sudo passwd root
(enter the new sdi user password)
(enter the new root user password)
4.1.2. Database administrator and user
Passwords of PostgreSQL/PostGIS database administrator and user can be changed by using
web administration applications (PhpPGAdmin or Webmin), but the "traditional" way is
logging into the PostgreSQL database and changing the passwords directly there. Enter the
following commands to become PostgreSQL database administrator and change the
passwords :
sudo su postgres
psql -U postgres -d template1 -c "ALTER USER postgres WITH
PASSWORD '<new_password>';"
psql -U postgres -d template1 -c "ALTER ROLE u_geodata WITH
PASSWORD '<new_password>';"
psql -U postgres -d template1 -c "ALTER ROLE u_csw WITH
PASSWORD '<new_password>';"
exit
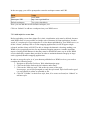
4.1.3. Tomcat manager
In many production environments, it is very useful to have the capability to deploy a new
web application, or undeploy an existing one, without having to shut down and restart the
entire container. In addition, you can request an existing application to reload itself, even if
you have not declared it to be reloadable in the Tomcat 6 server configuration file.
To support these capabilities, Tomcat 6 includes a web application (installed by default on
context path http://your.server.name:8080/manager/html) that supports the
following functions:
• Deploy a new web application from the uploaded contents of a WAR file.
• Deploy a new web application, on a specified context path, from the server file
system.
• List the currently deployed web applications, as well as the sessions that are currently
active for those web apps.
• Reload an existing web application, to reflect changes in the contents of /WEBINF/classes or /WEB-INF/lib.
• List the OS and JVM property values.
• List the available global JNDI resources, for use in deployment tools that are
preparing <ResourceLink> elements nested in a <Context> deployment
description.
• List the available security roles defined in the user database.
• Start a stopped application (thus making it available again).
• Stop an existing application (so that it becomes unavailable), but do not undeploy it.
• Undeploy a deployed web application and delete its document base directory (unless
it was deployed from file system).
It would be quite unsafe to ship Tomcat with default settings that allowed anyone on the
Internet to execute the Manager application on your server. Therefore, the Manager
application is shipped with the requirement that anyone who attempts to use it must
authenticate themselves, using a username and password that have the appropriate role
associated with them. Further, there is no username in the default users file (/etc/
tomcat6/tomcat-users.xml) that is assigned an appropriate role. Therefore, access to
the Manager application is completely disabled by default.
Stop the Tomcat 6 service :
sudo /etc/init.d/tomcat stop
Edit the Tomcat 6 users configuration file :
sudo nano /etc/tomcat6/tomcat-users.xml
Find the following line and replace sdi and geoland to some new login/password
combination.
<user username="sdi" password="geoland" roles="manager"/>
Note that those are not related to she system user sdi and its password, so you can use any
combination here. Exit the editor by pressing Ctrl+X and answer Yes to save the changes
(nano editor commands and options are shown in the bottom of editor screen).
Start the Tomcat 6 service :
sudo /etc/init.d/tomcat start
4.1.4. Deegree database connection
Deegree Catalog Server (CSW) needs to be connected to PostGIS database. To fix the preconfigured deegree-csw database connection, you have to change only one line in csw
database connection config file :
sudo nano /var/lib/tomcat6/webapps/deegree-csw/WEB-INF/conf/
csw/featuretypes/csw_postgres.xsd
Replace geoland with the new postgres user password (see Section 4.1.2.) in the following
line :
<Password>geoland</Password>
Exit the editor by pressing Ctrl+X and answer Yes to save the changes.
4.1.5. GeoServer administrator
GeoServer has a default login "admin" with password "geoserver". To change those to your
own combination, you have to edit the GeoServer users properties file :
sudo nano /sdi/geoserver/data/security/users.properties
Replace "geoserver" with any other password. You can also change the login "admin", and
even add new lines like the uncommented one to define additional users with administrator
role. Exit the editor by pressing Ctrl+X and answer Yes to save the changes.
4.2. Management of the user accounts
Creating new users (besides root and your primary login) on your system is OPTIONAL, but
could be very useful if you need to temporary open some FTP or SSH connections to the
outside world for the purpose of data upload/download, diagnostics, training, etc. To create a
new user, enter the following command and provide password, full name, etc. when asked :
sudo adduser <new_user_name>
It is NOT RECOMMENDED to keep the additional user accounts as soon as they become
unnecessary, as this may increase vulnerability of your server. To completely delete any of
the users on your system (except the root and some system-managed accounts), including
their personal folders, passwords and config files, you should type the following command :
sudo userdel -r <user_name>
For instructions on modifying the existing user accounts, see Section 4.1.1.
For mode information about adduser and userdel commands type in command prompt:
man adduser
man userdel
If you want to add only FTP user without login rights, use /usr/bin/passwd as shell
when creating user.
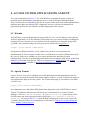
5. ACCESS TO WEB APPLICATIONS AND FTP
As it was mentioned in Section 1.3, the AGI SDI Server includes the latest versions of
essential system and database management tools, as well as SDI and CMS applications.
Those on-line tools are intended to provide the system with a sufficient remote administration
platform and replace the missing GUI component, but first of all the pre-installed web
applications provide the user interface to SDI components of the system.
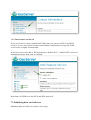
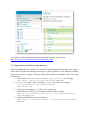
5.1. Webmin
AGI SDI Server system administration can be made in a very user-friendly way by using the
Webmin application. Go to the following URL (make sure you connect to https, not http port)
and login as root with your new root password. In the original server setup the password is
"geoland", but you must change the root password as instructed in Section 4.1.1.
https://your.server.name:10000
Navigation in Webmin interface is very simple, but you have to be experienced in
administration of Linux systems in order not to avoid destructive actions. Webmin detects all
the services and servers available on your system and provides interfaces for their
administration. Tou can even run management tasks such as backups of the whole system and
databases in Webmin environment. There is a comprehensive Webmin Wiki and module
documentation pages available on Webmin documentation web page.
5.2. Apache Tomcat
Apache Tomcat Java Servlet platform has useful administration and management tools for,
where you can check the system status and available resources, as well as control the status of
Java applications deployed on the system. The Tomcat front-page is accessible on port 8080
of your server :
http://your.server.name:8080
It is important to note that all the SDI applications deployed on the AGI SDI Server run on
Tomcat 5.5 platform, and the most efficient way to control them is by usin the Tomcat
Manager. Click on [Tomcat Manager] in [Administration] section on top of the
left-side menu and enter login/password as specified in /etc/tomcat5.5/tomcatusers.xml file (see Section 4.1.3). In the default configuration we used "sdi" login with
"geoland" password. There is a comprehensive collection of Tomcat 5.5 on-line documents
on the Apache Tomcat web site.
5.3. Deegree
AGI SDI Server is powered by Deegree 2.4 suite of applications (see Section 1.3), which can
be accessed directly on port 8080 of your server :
http://your.server.name:8080/deegree-wms
http://your.server.name:8080/deegree-wfs
http://your.server.name:8080/deegree-wcs
server)
http://your.server.name:8080/deegree-csw
server)
http://your.server.name:8080/deegree-wps
server)
http://your.server.name:8080/deegree-wpvs
view)
http://your.server.name:8080/geoportal
(WMS - web map server)
(WFS - web feature server)
(WCS - web coverage
(CSW - web catalogue
(WPS - web processing
(WPVS - web perspective
(iGeoPortal application)
If you have already completed the post-install configuration (editing and running 2_xml.sh
script), there is no other post-install configuration needed for Deegree 2.2 applications,
except CSW (catalogue) connection to the PostGIS database (csw). There is no need to enter
any passwords directly while working with Deegree applications, but after changing the
postgres password, you must also change the CSW config file (see Section 4.1.5). You should
study PDF manuals of the above-mentioned applications available on the Deegree 2.4
download page.
5.4. GeoServer
AGI SDI Server is powered by GeoServer 2.0 which provides WMS, WFS and WCS
services (see Section 1.3). GeoServer application can be accessed at port 8080 of your server
:
http://your.server.name:8080/geoserver
All the geoserver and data management tasks are done in [Config] section, where the
default login is "admin" and password "geoserver". You should immediately change the
admin user password as described in Section 4.1.6. No database connection needs to be
configured for GeoServer 2.0 at the setup phase. There is a comprehensive on-line GeoServer
2.0 Users Manual available on GeoServer web site.
5.5. proftpd
A powerful and highly customizable FTP server (proftpd) has been included into AGI SDI
Server in order to enable file exchange using the FTP protocol. The default setup of proftpd
server is restricted only to password protected user access (i.e. there is no public FTP service
available). In order to maintain system security, we strongly recommend using temporary
user accounts for FTP access (see Section 4.2). You can read more about proftpd server
configuration and management at http://www.proftpd.org .
If you want to add FTP-only user (without login rights), use /usr/bin/passwd as shell
when creating user. By default, users are restricted to their home directory.
6. HOW TO USE - DEEGREE CSW
Metadata records are stored and served by CSW (Catalogue Service - Web). AGI SDI server
provides Deegree CSW server for such task.
Instructions below were written for SATChMo dataset providers - you may need to adjust
them to meet your needs.
Before going into details of metadata creation, we need to define the “minimum” set of G2
requirements related with publishing the projects data and metadata. Due to the formal
requirement to deliver the datasets as downloadable files (archives) to the G2 clients, also for
the purpose of data exchange between partners, it was decided that archived dataset files will
be published on “download” services (FTP/HTTP) by the data providers. To make those
datasets “discoverable”, a central catalogue is established on G2 portal, where metadata
records on all downloadable datasets are searched and download links, as well as dataset
quicklooks, are provided to the clients through those dataset metadata records. This part of
SDI implementation is completely under the responsibility of the data providers.
In order to structure the massive amount of G2 metadata, it was decided to create thematic
G2 metadata search services on the G2 portal. Those services are defined by service metadata
records, created by project partners maintaining metadata CSW catalogues where all dataset
metadata records from data providers are published. Those partners hosting G2 “component
catalogs” also maintain their metadata search services on the G2 portal. For instance, AGI has
established a metadata service catalog called “SATChMo VHR Land Cover Dataset
Catalogue” on G2 portal and connected it to a CSW metadata dataset catalogue hosted on
AGI CSW server. AGI will also maintain the G2 configures the G2 “SATChMo VHR Land
Cover Dataset Catalogue” setup while dataset metadata XML records and URLs of newly
established WMS services will be sent to AGI by the SATChMo data providers.
After a considerable effort within G2 SDI team and data providers to find a reasonable
solution for creation/editing of metadata, it was decided that the best option would be to
create a new on-line application for metadata creation and editing, that would be compliant
with the INSPIRE specifications and fully satisfy the needs of the project. Therefore it is
HIGHLY RECOMMENDED to use GMES metadata editor for creating metadata records for
the datasets containing SATChMo VHR Land Cover Data classification results. The
following chapters will describe and illustrate the whole procedure of metadata creation
based on a real example of one of AGI SATChMo VHR datasets. You can follow this
example closely with only minor simple changes to be included while creating your own
metadata records.
Note - if you plan to connect your Deegree CSW server to Geoland 2 portal, you must
have enabled and properly configured soap2http-proxy. Edit server-config.wsdd,
located at /var/lib/tomcat6/webapps/soap2http-proxy/WEB-INF:
<service name="deegreeSOAPInterface" style="message">
<parameter name="httpLocation"
value="http://your.server.address:8080/deegree-csw/services"/>
6.1 Create metadata records
Although Deegree CSW 2.4 has it's own catalogueManager metadata editor, DO NOT use it
for creating or editing G2 metadata records - it does not support all required fields.
catalogueManager editor can be used to delete unnecessary metadata records from CSW, and
Deegree catalogueManager search - to display what records are served by CSW.
6.1.1 Logging in, creating new group
If you are a new metadata provider, you will first of all need to register on the Geoland2
Expert Portal at http://www.geoland2.eu before starting to create your own metadata records.
Registration is free and rather simple, so we will not focus on that in detail.
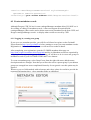
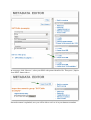
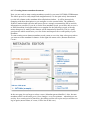
After completing your registration, open the G2 GMES metadata editor page on
http://land.eu/gmes-metadata-editor/login/auth and log in. Metadata records are organized by
assigning them to appropriate group, so first thing you will have to do is create new group for
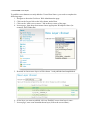
metadata records on your SATChMo VHR Land Cover datasets.
To create a metadata group, select Goup/Create from the right side menu, add the name,
description and save changes. Note that you will need to select a parent group if your dataset
groups are arranged into some complicated hierarchy. In our generic case this option may be
ignored.
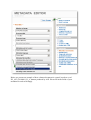
Wherever you see fields marked with red arrows and colour, please be careful to provide the
requested information there – those metadata fields are obligatory!
Fill in required information, then press „Save changes“. Press „Back to overview“ - you can
see new just created group.
6.1.2 Uploading dataser series XML file
To create a searcheable thematic metadata catalog (e.g. for SATChMo datasets) on the G2
Portal, it is necessary to create a so-called dataset series metadata XML file. This initial
operation is done by the partner hosting the corresponding datasets metadata catalog (in case
of SATChMo VHR that would be AGI). But it is also essential that all the data providers load
this metadata series XML document into their GMES metadata editor workspaces before
starting to create their own dataset metadata XML documents, which will need a „Parent ID“
field to be filled in by simply pointing to that previously imported dataset series metadata
record.
The dataset series metadata XML record is like a „summary“ of all datasets which will be
present in that series. Structurally this XML file is identical to the datasets metadata XML
files. However, there is one essential difference. Dataset series defines a so-called „Parent
ID“ code, which must be further replicated in all the dataset metadata XML files as their
„parent“ identificator. This code is the only XML element binding all metadata records into a
certain searcheable „series“ on the G2 Portal, although all those datasets and corresponding
metadata documents are produced independently by different data providers.
GMES metadata editor does not allow to edit metadata file identifiers – they are generated
automatically. To ensure, that correct metadata parent identifier is assigned to all dataset
metadata records belonging to the same dataset series, the original dataset series metadata
XML document with a unique file identifier („parent ID“) must be uploaded to the group by
each data provider in their GMES metadata editor environments.
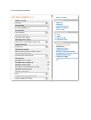
In the overview window (if you are not there – press „Back to overview“ link), select your
group, then in the right side menu select „Collection (series) Document – Import from XML“.
In next page, click „Browse“, select your XML with parent identifier file. Then press „Import
from XML“ button above.
Parent document is uploaded, now you will be able to refer to it in your datasets metadata.
6.1.3 Creating dataset metadata document
Now you are ready to start creating metadata records for your own SATChMo VHR datasets.
The whole process is really simple and straightforward, it is also quite nicely documented
(see the left column on the metadata editor allpication window – it will be interactively
changing with short descriptions as you navigate over the certain fields). The oblidatory
fields are marked with red color and arrows, but we strongly recommend to fill in as much
information as possible. If you do so for the first metadata record, you will be able to save it
as XML document, load again and use as a template for the following records, with only
minor changes to be made (as the datasets will be thematically identical). This is a really
good practice which would save you a lot of time and improve the overall quality of your
metadata.
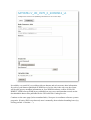
To start creating a new dataset metadata record, return to overview, then select group where
you want to create metadata for dataset. In the right side menu select „Dataset document –
Create“.
In the next page, do not forget to select correct „Metadata parent identifier“! Also, because
metadata editor is web based, press „Save changes“ every few minutes – when there are no
activity for a certain period of inactivity, the editing session will expire and you will have to
log in again (unsaved data, of course, will be lost in this case).
Below we present an example of how a dataset document is created, based on a real
ES_1052_20100801_K_v1 dataset produced by AGI. Please fill in the fields of your
metadata records accordingly.
6.1.3.1 Metadata on metadata
6.1.3.2 Identification
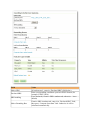
Resource abstract is a critically important field in the metadata record. It will show up in all
metadata search engines presented along with your dataset title. Please be careful to briefly,
but clearly define your datasets here. Please note that the classification schema (class names
and codes) will only be listed within this field – there is no other place in the metadata
document to do that. The same is for reference data (source imagery), classification
methodology, post-processing, etc.
6.1.3.3 Temporal reference
6.1.3.4 Spatial information
The bounding box can be calculated automatically.
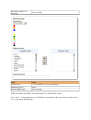
6.1.3.5 Reference system information
Note, that different datasets may be in different reference systems! If there is no CRS of your
particular dataset in this list, you can easily define one. The only thing to know is the EPSG
code of the CRS used in your dataset.
6.1.3.6 Classification of data and keywords
Kewords used in all the dataset metadata records within a certain dataset series should be the
same, so this issue should be discussed by the production tem and a clear recommendation
made on how this part of metadata should be filled in.
6.1.3.7 Distribution information
6.1.3.8 Quality and validity
6.1.3.9 Constraints related to access and use
6.1.4 Exporting to XML dataset metadata document
After filling in the required fields, dataset document is ready to be saved in XML format. To
do that, return to overview, go to group and select the document you want to save as XML
file.
Then select „Dataset document – Export as XML“ in the right-side menu bar. After that, save
that page, selecting „File – Save Page As“/“File – Save As“ in the web browser menu.
The resulting XML file can be uploaded to CSW server.
6.2 Upload metadata XML files to CSW
Metadata XML file to Deegree CSW server can be uploaded using it's Generic OGC
WebService Client. Navigate to
http://your.server.name:8080/deegree-csw/client/client.html
Then prepare request field to insert data - replace it with these lines:
<?xml version="1.0" encoding="UTF-8"?>
<csw:Transaction service="CSW" version="2.0.2"
xmlns:csw="http://www.opengis.net/cat/csw/2.0.2">
<csw:Insert>
</csw:Insert>
</csw:Transaction>
Then copy/paste your XML file contents (except first line - "<?xml version="1.0"
encoding="UTF-8"?>") between <csw:Insert> and <csw:Insert> tags.
Press SEND button. If record was inserted successfully, there should be
<csw:totalInserted>1</csw:totalInserted> line in transaction response.
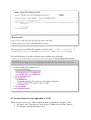
6.3 List metadata records, uploaded to CSW
There are two ways to view, what metadata records are uploaded to Deegree CSW:
1. In Generic OGC WebService Client execute "GetRecords_title.xml" request.
2. Use Deegree catalogueManager search.
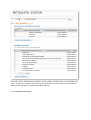
6.3.1 Generic client
Navigate to
http://your.server.name:8080/deegree-csw/client/client.html,
then select and execute "GetRecords_title.xml" request. <gmd:MD_Metadata> fields
can be expanded to view more detailed information.
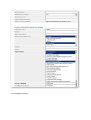
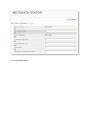
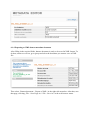
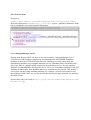
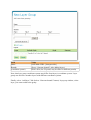
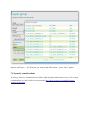
6.3.2 catalogueManager search
Starting with Deegree CSW 2.4, there is new tool available - catalogueManager. It is a
collection of client and server applications for managing ISO and INSPIRE compliant
metadata. It provides HTTP/SOAP interfaces for searching, accessing, harvesting and
manipulating metadata for geographic data and services. Metadata can be searched by their
title, topic, date etc. and the spatial extent of the described data/service. deegree supports
Dublin Core and INSPIRE compliant ISO 19115/19119/19139 metadata encoding. If the ISO
metadata format is used, data metadata and service metadata can be coupled. This enables a
user to first search for data metadata matching, for example, a specific topic and area and
then finding a WMS, WFS etc. serving the data described by the data metadata sets matching
the initial search.
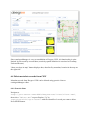
Search client can be accessed at http://your.server.name:8080/deegree-csw/
md_search.jsp
Since catalogueManager is very recent addition to Deegree CSW, it's functionality is quite
limited. It can search by text and date (search by spatial definition is restricted to Germany,
Utah and Hessen).
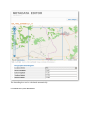
"show envelope in map" button displays data, described by metadata, location in the map on
the right side.
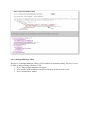
6.4 Delete metadata records from CSW
Metadata records from Deegree CSW can be deleted using generic client or
catalogueManager editor.
6.4.1 Generic client
Navigate to
http://your.server.name:8080/deegree-csw/client/client.html,
then select "delete.xml" request. Replace "%" in
<ogc:Literal>%</ogc:Literal> with file identifier of record you want to delete.
Press SEND button.
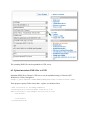
6.4.2 catalogueManager editor
Deegree 2.4 catalogueManager editor is NOT suitable for metadata editing. Howevet, it can
be used to delete existing records in CSW:
1. Press "Edit existing metadata set" button.
2. New window with metadata records list will open. Select desired record.
3. Press "ubernehmen" button.
4. Then, press "delete metadataset" button. Confirm your choice by pressing "OK"
button.
7. HOW TO USE - GEOSERVER
GeoServer is an open source software server written in Java that allows users to share and
edit geospatial data. Designed for interoperability, it publishes data from any major spatial
data source using open standards.
GeoServer is the reference implementation of the Open Geospatial Consortium (OGC) Web
Feature Service (WFS) and Web Coverage Service (WCS) standards, as well as a high
performance certified compliant Web Map Service (WMS). In AGI SDI Server "G2" version,
only GeoServer WMS component will be used.
7.1 Understanding GeoServer data directory structure
Note: do not to the confuse the “GeoServer data directory” itself and the (user) data directory
in it.
• "GeoServer data directory” is set at $GEOSERVER_DATA_DIR variable (or default
value is used, which is root of GeoServer web application);
• $GEOSERVER_DATA_DIR/data is a location where actual data can be stored. This
directory is commonly used to store shapefiles and raster files but can be used for
any data that is file based.
In our case it is:
• /var/lib/tomcat6/webapps/geoserver/data - default value of
$GEOSERVER_DATA_DIR
• /var/lib/tomcat6/webapps/geoserver/data/data - user files
location
Variable $GEOSERVER_DATA_DIR can be set in WEB-INF/web.xml file for the
GeoServer application. In our case, it is located at
/var/lib/tomcat6/webapps/geoserver/WEB-INF/web.xml
In AGI SDI server default $GEOSERVER_DATA_DIR is set to /sdi/geoserver/data.
7.2 Personalising GeoServer
7.2.1 Contact information
You can change contact information at Server -> Contact information. See GeoServer user
manual for details.
7.2.2 Turn features on and off
If you use GeoServer only to publish SATChMo data, you can turn off WCS and WFS
services. To save your system resources and simplify configuration, leaving only WMS
service active is highly recommended.
In Services menu, select WCS, WFS and deselect “Enable WCS”, “Enable WFS” in Service
Metadata properties, then click on “Submit”.
By default, AGI SDI server has WCS and WFS turned off.
7.3 Publishing data on GeoServer
Publishing data in GeoServer consists of two steps:
1. Files, containing vector (and raster) data has to be uploaded to the computer, where
GeoServer is installed (for example, by using ftp servise remotely, or samba service
locally).
2. After placing the datasets on the server running your WMS, the service is configured
and datasets published by using GeoServer's web interface.
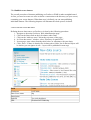
GeoServer data management menu has several main components to be configured:
Here is a quick explanation of GeoServer Data menu components and the required operations
to publish your datasets:
Component
Description
Workspace is a container which is used to organize other items.
In GeoServer, a workspace is (often) used to group similar layers
Workspaces
together. For instance, typical workspace could be called
SATChMo to contain G2 SATChMo dataset.
A store connects to a data source that contains raster or vector
datasets. A data source can be a file or group of files such as
a table in a database, a single file (such as a shapefile), or a
Stores
directory. The store construct is used so, that connection
parameters are defined once, rather than for each piece of data in
a source. As such, it is necessary to register a store before loading
any data.
In Geoserver, the term layer refers to raster or vector data that
Layers
contains geographic features.
A layer group, is a group of layers that acts as a single layer. This
is useful when creating a basemap, or other situations when more
than one separate layer needs to be requested simultaneously or
Layer groups
frequently. Since layers tend to contain only a single type of
geometry, this allows to combine data types in one request. A
layer group is relevant to WMS (map image) requests only. There
is no equivalent to WFS requests.
Geospatial data has no inherent visualization. Therefore
additional information, in the form of a style, needs to be applied
to data in order to visualize it. GeoServer uses the Styled Layer
Styles
Descriptor (SLD) markup language, a subset of XML, to describe
geospatial data. See the Styling section in GeoServer user manual
for more information on working with styles.
So, to publish your vector datasets on the WMS after you place them physically on the server
running WMS service, it is necessary to complete at least those three steps:
1. Create a workspace;
2. Register a data store for your uploaded dataset(-s);
3. Create a new WMS layer and point to a certain newly uploaded dataset (to be
repeated for all new datasets);
4. Create (if not done already) a new style and assign it to your newly created layers.
The procedure will be described in detail. Data, used as example, is G2 SATChMo VHR
dataset.
7.3.1 Create a workspace
The first step in data loading is creation of a workspace (unless you already have created one
earlier). This creates a certain container for your datasets related methodologically or
thematically under one project. Creating a workspace is also essential, because it will allow to
distinguish between different groups of WMS layers published on the same WMS server.
As for G2, you will have to provide a link to a certain workspace on your WMS server which
contains SATChMo VHR datasets in order to publish them on the G2 Portal.
To create a GeoServer workspace, you will need to follow these steps:
1. Navigate to the main GeoServer Web Administration page
(http://your.server.address:8080/geoserver).
2. Click on the Workspaces link on the left column, under Data.
3. Click on the “Add new workspace” link at the top centre of the page.
In the next page, you will be prompted to enter the workspace name and URI.
Field
Value
Name
SATChMo
Namespace URI
http://www.geoland2.eu
Default workspace
Yes (select checkbox)
Note: you can add data to non-default workspace, too.
Click on “Submit” to add new workspace into your WMS server.
7.3.2 Add style for vector data
Before uploading vector data (shape files), their visualization style must be defined, because
with WMS client it is not possible to change style of datasets in client application. In other
words, if a certain style is not assigned to a vector dataset published by your WMS server, on
all the “clients” (desktop GIS or on-line mapping applications) it will all appear singlecoloured, and the clients will NOT be able to change the thematic colouring, making your
WMS service practically useless for any thematic mapping purposes. Another important
aspect of styling WMS datasets is that they must be defined the same way in all the WMS
services hosted by separate data providers in order to maintain thematic integrity in largescale (regional) thematic mapping applications.
In order to set up the style(-s) of your datasets published over WMS services, you need to
complete the following steps:
1. Navigate to the main GeoServer Web Administration page.
2. Click on the Styles link on the left column, under Data.
3. Click on the “Add new style” link at the top centre of the page.
In next page, you will be prompted to enter the style name. Style itself can be typed
(or copy/pasted) in editor or uploaded as file.
4. Click on “Validate” to check new style, then, if no errors are found, on “Submit” to
add new style.
See GeoServer documentation for detailed information about style creation:
http://docs.geoserver.org/stable/en/user/styling/index.html
7.3.3 Upload data to GeoServer data directory
Before publishing data in GeoServer, it should be uploaded into Data Directory first. Again,
please make sure that file naming conventions are properly followed. The following example
shows how a typical sequence of dataset deployment operations on Ubuntu Linux server may
look like this:
1. Create folder SATChMo in $GEOSERVER_DATA_DIR/data, for example
sudo mkdir /sdi/geoserver/data/data/SATChMo
2. In SATChMo folder, create a subfolder shp for vector data. For example:
cd /sdi/geoserver/data/data/SATChMo
sudo mkdir shp
3. Copy your vector data to shp folder. For example, for
UK_20090912_3970_K_v1.zip (unpack archive before copying):
sudo cp V_UK_20090912_3970_K_v1.* /sdi/geoserver/data/
data/SATChMo/shp
4. Change SATChMo directory permissions:
sudo chown -R tomcat6:tomcat6 /sdi/geoserver/data/data/
SATChMo/
7.3.4 Publish vector datasets
The overall procedure of datasets publishing on GeoServer WMS is rather straightforward.
At first, you need to create new store to define a connection to the directory (on your server)
containing your vector datasets. When data store is defined, you can start publishing
individual datasets. The following chapters will illustrate the whole process in detail.
7.3.4.1 Create new vector data source
Defining the new data source on GeoServer is done by the following procedure:
1. Navigate to the main GeoServer Web Administration page.
2. Click on the Stores link on the left column, under Data.
3. Click on the “Add new store” link at the top centre of the page.
4. In “New data source” window, select “Directory of spatial files”
5. In next page, enter values from the table below (or substitute with your data);
6. Click „Save“. If there is already files in data source folder, list of detected layers will
be shown (you can ignore it now – layers will be published in next step)
Field
Workspace
Data source name
Description
Enabled
URL
Value
SATChMo
shp
Yes (tick checkbox)
file:data/SATChMo/shp
7.3.4.2 Publish vector layers
To publish vector datasets recently added to Vector Data Source, you need to complete the
following steps:
1. Navigate to the main GeoServer Web Administration page.
2. Click on the Layers link on the left column, under Data.
3. Click on the “Add a new resource” link at the top centre of the page.
4. In next page, from drop-down menu choose appropriate Workspace:Store (for
example: SATChMo:shp)
5. Detected in chosen store layers will be shown – both published and unpublished.
6. Select layer you want to publish, click on “Publish” next to that layer's name .
7. In next page, enter some metadata about layer (follow the screen-shots) :
It would be very useful if you could provide an abstract and at least some other information
for each of your datasets published as WMS layers. In fact, this is the only way the clients
will be able get any metadata information on your WMS broadcasts, as there will be NO
DIRECT LINK between WMS layers published on your server and metadata records on the
downloadable dataset files published on the G2 Portal Web Catalog Service.
Continue on the same page (below metadata links). Next part is coordinate reference systems
properties. If native SRS is not detected, enter it manually, then calculate bounding boxes (by
clicking on link “Calculate ...”).
Field
Native SRS
Declared SRS
SRS handling
Native Bounding Box
Value
(if not detected – enter in “Declared SRS” field below)
Enter corresponding coordinate system in EPSG format (for
example: EPSG:32630)
Force declared (if native SRS is undetected, otherwise – leave
default)
If native SRS is undetected, enter it in “Declared SRS” field,
then press “Compute from data” link. Otherwise it will be
calculated automatically.
Lat/Lon Bounding Box
If native SRS is undetected, enter it in “Declared SRS” field,
then press “Compute from native bounds” link. Otherwise it will
be calculated automatically.
DO NOT press “Save” yet – you need to configure publishing information as well!
In the Publishing tab you will have to enter layer's publishing properties.
Field
Name
Enabled
Response Cache Headers
Cache Time (seconds)
Per-Request Feature limit
Value
(leave default)
Yes (tick checkbox)
(leave default)
(leave default)
(leave default)
Maximum number of
decimals
(leave default)
Field
Default style
Additional styles
Default WMS Path
Value
G2_SATChMo (or your created style)
(none)
(leave default)
WMS Attribution and KML Format Settings leave with default values.
Press “Save”. Congratulations, new WMS layer is published! The web clients will be able to
“see” your layers immediately.
7.3.5 Create the layers group
After layers are published, they should be assigned to layer group. This step otherwise is not
obligatory, but on the G2 Portal there is a so-called “SATChMo VHR Land Cover Dataset
Catalogue”, which is configured to access a layer group, not separate layers – so for
SATChMo datasets published on your WMS server creation of a layer group is obligatory.
Later, you can add/update layers in that group without reconfiguring Geoland2 catalog.
The procedure is simple: you must select “Data – Layer” groups in left menu, then select
“Add new layer group”.
In next page, enter layer group name, coordinate system (EPSG:4326), then add layers. After
that, press “Generate Bounds” button.
Field
Name
Bounds
(coordinate system)
Value
SATChMo VHR – [data provider]
(Press “Generate bounds” after adding layers)
EPSG:4326 (for G2 portal; may be other for different portals)
Note, that layer group coordinate system may differ from layer(s) coordinate system. Layer
group can also have member layers with different coordinate systems.
Finally, select “Add layer” link (below “Generate bounds” button). In pop-up window, select
layer, you want to add to the group:
Repeat “Add layer...” for all layers you want to add. When done – press “Save” button.
7.4 Security considerations
As always, there are essential rules to follow while dealing with internet servers. For security
considerations, see the GeoServer user manual: http://docs.geoserver.org/stable/en/user/
security/index.html
8. TECHNICAL SUPPORT
A limited technical support on installation, configuration and maintenance of AGI SDI Server
will be provided free of charge within FP7 "Geoland 2" project. Requests for technical
support, comments, inquiries and suggestions and can be addressed to the main designer of
this system, who is also responsible for it's further development :
Dr. Gediminas VAITKUS
Applied Research Center
Institute of Aerial Geodesy
Pramones pr. 13, 51327 Kaunas
LITHUANIA
tel.: +370-37-755226
fax.: +370-37-451497
mob.: +370-620-72870
e-mail: [email protected]
9. LICENSING
AGI SDI Server is built on free software and therefore it is free software as well; you can
redistribute it and/or modify it under the terms of the GNU General Public License as
published by the Free Software Foundation; either version 2 of the License, or (at your
option) any later version. The Debian GNU/Linux 5.0 (Lenny) license text can also be found
at http://www.gnu.org/copyleft/gpl.html and /usr/share/commonlicenses/GPL-2 on AGI SDI Server.
Java 6 JDK from Oracle Corporation is distributed under a separate license available at
http://www.oracle.com/technetwork/java/javase/downloads/
jdk-6u21-license-159167.txt . It is not an open source software, so it is prohibited
to modify, decompile, or reverse engineer Sun Java 6 JDK software.
AGI SDI Server is distributed in the hope that it will be useful, but WITHOUT ANY
WARRANTY; without even the implied warranty of MERCHANTABILITY or FITNESS
FOR A PARTICULAR PURPOSE. See the GNU General Public License for more details.
GNU General Public License is maintained by :
Free Software Foundation, Inc.,
59 Temple Place, Suite 330,
Boston, MA 02111-1307 USA
KAUNAS
2011.04.15