1
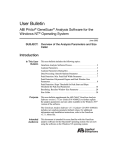
Biotype® Template Files for GeneMapper ID Software
Introduction
Biotype® Template Files are software sets for the GeneMapper ID Software in
order to simplify the evaluation of analysis data. Biotype® Template Files may
be used with ABI PRISM® single- and multi capillary instruments of Applied
Biosystems.
GeneMapper ID Software with Biotype® Template Files assigns the analyzed
DNA fragments relative to their length to the allele designation of the STR loci.
Optionally, the corresponding fragment length of peaks in base pairs or peak
height in relative fluorescent units (RFU) can be indicated. These data
(genotypes) can be tabulated and exported.
Biotype® Template Files are available for all STR-kits from GeneMapper ID
software version 3.1.
The following documentation shows the analysis of PCR products of the
Mentype® Nonaplex I (6-FAM/HEX/NED) PCR Amplification Kit using ABI
PRISM® 310 Genetic Analyzer and Biotype’s DNA Size Standard 550 (ROX)
consistently. Analyses were performed with GeneMapper ID Software version
3.2.1 and Mentype® Nonaplex I Template File.
For general introductions of the software, please read the GeneMapper ID
software User Guide.
More info about Human Identification products (HID) from Applied Biosystems:
https://products.appliedbiosystems.com/ab/en/US/adirect/ab
- Products
- Human Identification and Forensic DNA
- Software
Validity for HID
The Biotype STR-Kits require a calibration with an allelic ladder. Therefore, the
software used must be compatible with human identification (HID) products for
forensic applications. This Biotype Template Files are valid with GeneMapper ID
software.
Ordering Information
Biotype® Template Files
for Windows®
CD-ROM
Cat. No. 49-10900-0000
-2-
Content
1
Setup on the Analysis Computer.............................................................. 3
1.1 Login...................................................................................................... 3
1.2 Panel Manager ....................................................................................... 4
1.3 GeneMapper Manager............................................................................. 5
2
Calibration using Allelic Ladders.............................................................. 6
3
Evaluation of Analysis Data ..................................................................... 7
4
Template Files for Biotype® Test Kits..................................................... 10
A. Size Standards ................................................................................... 11
B. Panels and BinSets ............................................................................. 12
C. Analysis Methods................................................................................ 14
D. Plot Settings....................................................................................... 22
E. Table Settings .................................................................................... 24
5
Check Analysis Data............................................................................. 27
6
Print Options and Page Setup ............................................................... 31
7
Troubleshooting Guide.......................................................................... 32
GeneMapper ID Template Files
March 2010
-3-
1 Setup on the Analysis Computer
Biotype® Template Files for GeneMapper ID Software are available as free
downloads from our homepage www.biotype.de or as CD-ROM on request.
Before using the GeneMapper ID Software for the first time Biotype® Template
Files either have to be saved to the local analysis computer (Windows® PC) or
can be imported directly from intranet or CD-ROM.
Panels and BinSets are imported by the Panel Manager. Other template files
like Analysis Methods, Table Settings, Plot Settings, etc. are importable to the
local PC by the GeneMapper Manager.
1.1 Login
- Open GeneMapper Software and login
- First Login
User Name → “gmid”
old Password → (none)
- Change password Tools → Options → Users → New User
- Repeat procedure in order to register new users and passwords
GeneMapper ID Template Files
March 2010
-4-
1.2 Panel Manager
Use Panel Manager to import Panels and BinSets for Biotype® products into
the GeneMapper ID software.
Recommendation: For Biotype’s Panels and BinSets install a “Biotype folder”
(AppliedBiosystems → GeneMapper → Panels → Biotype).
Content:
Biotype_Panels_v3 (or current version)
Biotype_Bins_v3 (or current version)
- Tools → Panel Manager
- File → Import Panels
Select the folder Panel Manager, mark the designated panel version and
import.
- File → Import BinSet
Select the corresponding Panel from the Panel Manager, mark the equivalent
BinSet version and import (see Figure 1).
Fig. 1 Import of Panels and BinSets
- Apply → OK
- New Panels and BinSets could be generated in the Panel Manager.
GeneMapper ID Template Files
March 2010
-5-
1.3 GeneMapper Manager
Use GeneMapper ID Manager to import Analysis Methods, Table Settings,
Plot Settings, or Size Standards for Biotype® products into the GeneMapper
ID software.
Recommendation: Further Biotype® Template Files like analysis methods,
Table Settings, Plot Settings or Size Standards should be saved as new folders
onto the local computer (AppliedBiosystems → GeneMapper → new folder).
- Tools → GeneMapper Manager
Select the designated tab and click the button Import
- Analysis Method → Import
- Table Setting → Import
- Plot Setting → Import
- Size Standard → Import
Imported Analysis Methods, Table Settings, Plot Settings or Size
Standards could be redefined and saved by the user.
New Analysis Methods, Table Settings, Plot Settings or Size Standards
could be generated in the GeneMapper Manager and should be compiled in
Advanced version.
GeneMapper ID Template Files
March 2010
-6-
2 Calibration using Allelic Ladders
Workings with the GeneMapper ID Software are done with related analysis
data, i.e. analyzed DNA samples with allelic ladders of one folder (Project). To
analyse DNA samples with the GeneMapper ID Software, calibration with the
allelic ladder has to be done. The allelic ladder of the used test kit should be
analysed ideally at the beginning and the end of the DNA samples.
For calibration the measured allele sizes are transferred automatically to the
expected sizes within the project. In general, calibration bases on one
appropriate run of the allelic ladder. If more runs will be used, calibration is
implemented with the means of all allelic ladders. The correct assignment of
the alleles should be reviewed. If not, DNA samples should be further runs with
an appropriate allelic ladder.
Calibration using Multi-Capillary Analysers
To ensure a reliable allelic assignment on multi-capillary analysers, a number
of allelic ladders should be run on different capillaries.
The room temperature might influence the running performance of PCR
products that might result in split peaks especially at low temperatures or an
altered run velocity of DNA fragments. Please pay attention to keep conditions
recommended by the instrument manufacturer.
System Parameters
Different analysis instruments, DNA size standards or polymers may result in
different fragment lengths. Thus, DNA samples and allelic ladders from one
sample set should be analysed using the same system parameters.
GeneMapper ID Template Files
March 2010
-7-
3 Evaluation of Analysis Data
- Open GeneMapper ID Software and login
- Import data
File → Add Samples to Project
- Select Analysis Data Files (.fsa)
Add Samples → Add to List → Add
- Select Table Setting via pull-down menu at the top of the centre, use Table
for 2 Alleles for samples with one DNA (use Table for 10 Alleles for DNA
mixtures)
- Data Files appear as new project in the Samples tab. The table sheet
displays the following columns: Status, Sample Name, Sample Type,
Analysis Method, Panel, Size Standard, Matrix as well as the quality
values SQO*, SFNF*, OS*, SQ*, UD1* (PQV explanation in table 1).
Table 1. Process quality values (PQV)
PQV*
Definition
SQO
Sizing Quality Overridden: size calling of the sample overridden
SFNF
Sample File Not Found
OS
Off-scales: signals are outside of the scaling, pull-up peaks in
other colors
SQ
Sizing Quality: size calling of the sample or allelic ladder
UD1
User Defined Column 1:
For more information, please check the chapter Process Quality Values of the
GeneMapper ID Software User Guide.
- Select Sample Typ via pull-down menu
(e. g. Sample, Allelic Ladder, Positive Control, Negative Control, etc.,
see Figure 3). One project has to contain at least one allelic ladder.
Optionally, data of the control DNA might serve as positive control, data
without DNA as negative control.
GeneMapper ID Template Files
March 2010
-8-
- Select Analysis Method via pull-down menu
(e. g. Biotype® template: Analysis_HID_310)
The analysis method is already prepared for evaluation of data from
Windows® PC (= Advanced Peak Detection) for ABI PRISM® 310
instruments. There are other methods for ABI PRISM® multi capillary
instruments like 3130, etc.
Important Annotation
New analysis methods refer to the last BinSets used of the GeneMapper ID
Software. For Biotype® products, please select the updated Biotype BinSets
(e. g. Biotype_Bins_v3) from the tab Allele (see Figure 2).
Fig. 2 Analysis Method, tab Allele, check here Adjustment of the BinSet
- Select Panel via pull-down menu, e. g. Nonaplex_I_Panels_v2
- Select Size Standard via pull-down menu, e. g. SST-ROX_50-400bp for the
DNA Size Standard 550 (ROX)
- Matrix for ABI PRISM® 310 samples is shown (not for ABI PRISM® multi
capillary instruments, e.g. 3130 samples)
- Click onto the green arrow ►-Icon in order to start Analysis, name the
project and save it. If the analysis worked well, the icon disappears from the
column Status (see Figure 3)
Fig. 3 Start Analysis
Annotation
Use the function Fill Down in order to analyse all samples with the same
parameters. Select the parameter (e. g. Nonaplex_I_Panels_v2), mark the top
column via the pull-down menu and press Strg + D or do Edit → Fill Down.
GeneMapper ID Template Files
March 2010
-9-
Project Analysis
- Select data
Edit
→ Select All
Analysis → Display Plot
- Select Plot Setting via pull-down menu
e. g. Plot_4dyes (for the blue/green/yellow/red panel)
Scaling of the Analysis Range
In order to scale up the analysis range of the test kit (e. g. Nonaplex I / ca. 75405 bp), click the magnifying-glass-icon atop the horizontal scale in front of
the first possible allele and pull it behind the last possible allele. To return to
basic setting, double-click onto the scale.
Fig. 4 Scaling of the Analysis Range in Sample Plot
GeneMapper ID Template Files
March 2010
- 10 -
4 Template Files for Biotype® Test Kits
A.
Size Standards
B.
C.
Panels
BinSets
Analysis Method
D.
Plot Settings
E.
Table Settings
SST-ROX_50-500bp
SST-BTO_60-500bp
Biotype_Panels
Biotype_Bins
Analysis_HID_310
Analysis_HID_3130
Analysis_HID_310_50rfu
Analysis_HID_3130_50rfu
Plots_2dyes
Plots_3dyes
Plots_4dyes
PlotsBT5_4dyes
Plots_5dyes
Table for 2 Alleles
Table for 10 Alleles
Panels and BinSets always need to be executed whereas the use of additional
Template Files is facultative.
GeneMapper ID Template Files
March 2010
- 11 -
A.
Size Standards
SST-ROX
To check the correct assignment of the labels to the sample, click the colour
panel of the Size Standard (red icon) in the upper toolbar of the GeneMapper ID
Software. Thus, the red panels (DNA Size Standard) of all samples are
displayed. Compare the sample fragments sizes with the sizes of the DNA
Size Standard 550 (ROX) that should be 50, 60, 70, 80, 90, 100, 120, 140,
160, 180, 190, 200, 220, 240, 260, 280, 300, 320, 340, 360, 380, 400,
425, 450, 475, 500, 525 and 550 bp. If sizes differ, further analysis should
be performed with GeneMapper ID Software. If necessary, create a new size
standard definition within the GeneMapper ID Software.
Adjustment of the basic template
The basic template SST-ROX_50-500 bp defines all fragments from 50 bp to
500 bp (see figure 5). If for example only 400 bp are necessary for analysis of
a particular test kit, define fragment length just up to 400 bp. The new
template could be saved as e.g. SST-ROX_50-400bp and used for further
analyses.
Fig. 5 Electropherogram of the DNA Size Standard 550 (ROX), Lengths of Fragments in bp
Definition of a New Size Standard
To define a new size standard, please perform the following steps:
- Tools → GeneMapper Manager
Select the tab Size Standards
- New → Basic or Advanced
Assign a name (e.g. SST-ROX_50-500bp) and define the size range on the
lines of the analysis range of the corresponding test kit. See also horizontal
scaling in the user´s manual.
- Size Standard Dye
Für SST-ROX=Red auswählen (für SST-BTO = Orange)
SST-BTO
For Biotype test kits in 5 Color Assay with the fluorescent labels 6-FAM, BTG,
BTY, BTR, and BT0 (matrix BT5) the DNA Size Standard 550 (BTO) in orange
Panel is necessary. Please use DNA Size Standard 550 (BTO) template SSTBTO_60-500bp to define fragment length for particular test kit.
GeneMapper ID Template Files
March 2010
- 12 -
B.
Panels and BinSets
Panels
The following features of the test kit’s markers (STR-Loci) are depicted:
- Marker Name (STR Locus)
- Dye Colour
- Min. Size and Max. Size (upper and lower allelic range in bp)
- Control Alleles (alleles of the Control DNA)
- Marker Repeat (units of the repeats in bp)
- Marker Specific Stutter Ratio („Stutter filter“, 0.13 corresponds to 13% of
the marker’s peak height )
- Comments
- Ladder Alleles (alleles of the allelic ladder, not shown)
Fig. 6 Structure of a Panel
GeneMapper ID Template Files
March 2010
- 13 -
BinSets
The following features of the allelic designation are depicted:
- Name (number of the allele)
- Length of fragments (in bp)
- Upper and lower range of tolerance (in bp)
Fig. 7 Structure of a BinSet
GeneMapper ID Template Files
March 2010
- 14 -
C. Analysis Methods
There different analysis methods for ABI PRISM® single- and multi capillary instruments.
ABI PRISM® single capillary instrument = ABI 310, multi capillary instruments = ABI 3130, etc.
Analysis_HID_310
Analysis_HID_3130
Analysis_HID_310_50rfu
Analysis_HID_3130_50rfu
HID analysis method with 20% Filter for samples of one DNA
HID analysis method with 20% Filter for samples of one DNA
Sensitive HID analysis method for stains and DNA mixtures
Sensitive HID analysis method for stains and DNA mixtures
Note: This guide focuses on the HID_310 and HID_310_50rfu examples.
Analysis_HID_310
- To analyze samples of one DNA, unsuitable for DNA mixtures
- Label peaks according to filter values used. Peaks will be designated with the
appropriate allele
- Filter value pre-selection: Labels lower then 20% of the highest peak height
of a marker (STR-locus) will not be displayed
- In plot-window (Sample Plot), the labelled colour panels are displayed
Fig. 8 Sample Plot after Execution of analysis method HID_310
Problems with importing analysis methods
To solve import problems, please create own analysis methods in your
GeneMapper ID software according to Applied Biosystems instructions and fill
in the biotype setting of fig. 9-13.
GeneMapper ID Template Files
March 2010
- 15 -
Analysis_HID_310
Fig. 9 Tab General describes the analysis method
GeneMapper ID Template Files
March 2010
- 16 -
Analysis_HID_310
Fig. 10 Tab Allele
Cut-off Value
Cut-off Value 0.2 corresponds to 20% filter in comparison to the highest peak
of a marker. With this setting all signals with peak heights less than 20% will
not shown in plots and tables.
Method limitation
The methods Analysis_HID_310 and Analysis_HID_3130 contain a 20%
filter and are unsuitable for the analysis of DNA mixtures.
GeneMapper ID Template Files
March 2010
- 17 -
Analysis_HID_310
Fig. 11 Tab Peak Detector
- For an improved peak detection especially for detection of point alleles (i. e.
alleles with at least 1 bp difference to the next integer allele) the value for the
Peak Window Size can be minimized to 11 pts. For improved peak
detection, minimize the Peak Window Size further on.
Only the setting for Peak Window Size is different to defaults from Applied
Biosystems for HID analysis.
GeneMapper ID Template Files
March 2010
- 18 -
Analysis_HID_310
Fig. 12 Tab Peak Quality, for adjustment of the peak quality parameters.
All settings here are defaults from Applied Biosystems for HID analysis.
GeneMapper ID Template Files
March 2010
- 19 -
Analysis_HID_310
Fig. 13 Tab Quality Flags for weighting of the peak quality parameters.
All settings here are defaults from Applied Biosystems for HID analysis.
GeneMapper ID Template Files
March 2010
- 20 -
Sensitive HID analysis method for stains and DNA mixtures
Analysis_HID_310_50rfu
Fig. 14 Tab Allele for adjustment of the filter values, pre-selection: No Cut-Off filter
Changing the Filter Value in the Allele tab
To change the lower thresholds please perform the following steps:
- Tools → GeneMapper Manager
- Select Analysis Method and edit via double-click
- The following filter values can be changed in the tab Allele: Cut-off Value,
MinusA, Minus Stutter, Plus Stutter (see figure 14)
- Select the value you would like to change and save changes of the analysis
method under a new name
GeneMapper ID Template Files
March 2010
- 21 -
Analysis_HID_310_50rfu
Fig. 15 Tab Peak Detector, pre-selection: 50rfu filter
Changing the Filter Value in the Peak Detector tab
- Peak Amplitude Threshold describes the minimal peak height which can
be detected with the GeneMapper ID Software. Common values are 50-200
RFU and should be determined individually be the laboratory.
Recommendation: The minimal peak height should be three times higher
then the background noise of the baseline.
GeneMapper ID Template Files
March 2010
- 22 -
D.
Plot Settings
Plots_2dyes
Plots_3dyes
Plots_4dyes
PlotsBT5_4dyes
Plots_5dyes
Display of two colour panels (B, R)
Display of three colour panels (B, G, R)
Display of four colour panels (B, G, Y, R)
Display of four colour panels (B, G, Y, O)
Display of five colour panels (B, G, Y, R, O)
Description
- To compare samples with the appropriate allelic ladder
- Shows the peak designation (e. g. allele) with the chosen analysis method
- Designations of alleles can be changed
- allelic ladders and defined control samples are fixed in the upper part of the
window. In the lower part, DNA samples will be displayed
- Zoom up the appropriate area in order to simplify allocation (see Figure 4 on
page 9)
- Plot Settings are initialised without tables
Fig. 16 Plot Window with allelic ladder and DNA Sample
GeneMapper ID Template Files
March 2010
- 23 -
New Peak Designations (Labels)
To change peak designation, please perform the following steps:
- Tools → GeneMapper Manager
- Select Plot Setting and edit via double-click
- The following designations can be adjusted in the tab Labels: Allele Call,
Height, Size (see Figure 17)
- Select the value which has to be changed or added and save the changing
with OK
Fig. 17 Plot Setting, Tab Labels for Designation of the Peaks
- Designation of peaks which have to be displayed in the table is defined in the
tab Sizing Table (see Figure 18)
- Select the value which has to be changed or added and save the changing
with OK
Fig. 18 Plot Setting, Tab Sizing Table for Table Display
GeneMapper ID Template Files
March 2010
- 24 -
E.
Table Settings
Table for 2 Alleles
Table for 10 Alleles
For samples with one DNA
For samples with DNA Mixtures
Table for 2 Alleles
- To analyze samples of one DNA, e. g. for a DNA-database
- Displays the allele designation of two peaks of each marker
- Generates a table where the analysis of each marker (STR-Locus) is
displayed in one line (e. g. Nonaplex I: all markers x 2 alleles)
- The following columns are displayed in the tab Genotypes: Sample Name,
Marker, Allele 1, Allele 2, as well as the quality values AE*, OS*, BIN*,
PHR*, SPU*, AN*, BD*, CC*, GQ* (PQV explanation in table 2)
Fig. 19 Output File after Execution of Table for 2 Alleles
- In GeneMapper ID all quality criteria are pre-adjusted by Applied Biosystems
for HID products. When a colour signal (Check, Low Quality) appears, a PQV
was not hold.
- Check the reason of the out range PQV in the table, use PQV explanation in
table 2
Peak quality assessment via different signals:
Signal
Pass
Check
Low Quality
Table
green Icon (square)
yellow icon (triangle)
red Icon (stop)
GeneMapper ID Template Files
March 2010
- 25 -
Table 2. Process Quality Values (PQV)
PQV*
Definition
AE
Allele Edit:
OS
Off-scales: signals are outside of the scaling, pull-up peaks in other
colors
BIN
Out of bin allele: allele is outside Bin definition
PHR
Peak Height Ratio: indicates if the peak height ratio between the
lowest and highest peak is less than defined in the analysis method
SPU
Spectral Pull-Up: spectral pull-peaks in another colour channel
AN
Allele Number:
BD
Broad Peaks: the allele peak is wider as expected (default 1.5 bp)
CC
Control Concordance: comparison with an internal control, e .g.
Control DNA
GQ
Genotype Quality: quality of the DNA profile or allelic ladder
For more information, please check the chapter Process Quality Values of the
GeneMapper ID Software User Guide.
GeneMapper ID Template Files
March 2010
- 26 -
Table for 10 Alleles
- To analyze stains or mixed samples of different DNAs
- Displays the allele designation of up to ten peaks of each marker
- Generates a table where the analysis of each marker (STR-Locus) is
displayed in one line (e. g. Nonaplex I: all markers x 10 alleles)
- The following columns are displayed in the tab Genotypes: Sample Name,
Marker, Allele 1 … Allele 10, as well as the quality values AE*, OS*,
BIN*, PHR*, SPU*, BD*, CC*, GQ* (PQV explanation in table 2)
Fig. 20 Output File after Execution of Table for 10 Alleles
Table Export
- Sample Plot with table has to be displayed
- File → Export Table
- In order to save add „.txt“ for tab-delimited text or „.csv“ for commadelimited text
For general instructions for table export, please read the chapter Exporting
Table Data from GeneMapper ID Software User Guide.
GeneMapper ID Template Files
March 2010
- 27 -
5 Check Analysis Data
General Procedure for Analysis
1. Check Size Standard
2. Check Allelic Ladder
3. Check Positive Control
4. Check Negative Control
5. Review Sample Data
Check Size Standard
- The first step in any new project with low Size Quality (PQV=SQ) is to check
the size standard for the correct fragments, named size calling (see chapter
size standards).
Fig. 21 Checking Size Calling
GeneMapper ID Template Files
March 2010
- 28 -
Check Allelic Ladder
- Second action is to check Allelic ladder, for correct allele calling
Fig. 22 Checking Allelic Ladder
Controls
In order to check allele designations please compare the alleles of the allelic
ladder and Control DNA of the test kit with data of the latest user’s manual.
We recommend the quality value:
- AN = Allele Number for checking the allelic ladder
- CC = Control Concordance for the Positive Control
GeneMapper ID Template Files
March 2010
- 29 -
Check Positive Control
Fig. 23 Checking Control DNA
Positive Control
We recommend the following quality value:
- Control Concordance for the Positive Control (=CC).
Negative Control
The negative control contains no DNA and is a helpful information for
background signals of the current analysis conditions.
GeneMapper ID Template Files
March 2010
- 30 -
Review Sample Data
Fig. 24 Changing the Allele Designation
Off-Ladder Allele
Peaks labelled with OL (= Off-Ladder) could not be assigned to an allele size.
These labels have to be checked manually and may be deleted or redefined by
clicking on.
Delete Allele
- In order to change the allele designation of unrealized peaks, click onto the
OL -icon below the peak (icon gets bold). Open pull-down menu by clicking
onto the right mouse button and chose Delete Allele
- Thereafter, window Add Allele Comment opens in order to take notes
regarding to the changes.
Rename Allele
Inside the pull-down menu, known alleles of the marker can be chosen from
the Bins. Predefine a new allele based on its length via Custom.
GeneMapper ID Template Files
March 2010
- 31 -
Change Panels and BinSets
Panels/BinSets data are saved locally on Windows® PC within the folder
(AppliedBiosystems → GeneMapper → Panels → Biotype). In order to modify,
open them with the Windows® Explorer via double-click (see chapter 4B).
- Change date and version of the Panels and BinSets. Important: Version
number of Panels and BinSets have to be identical in one version, e.g. v3
- Choose the allele and change its range of tolerance or fragment length
- File → Save as
- Load the new version of Panels and BinSets in the Panel Manager and delete
the old version
Annotation
New categories can be created in the same way e.g. for newly found point
alleles (SE33 20.1 etc.). The tolerance range of ±0.5 bp for all alleles and ±0.4
for point alleles respectively should be entered.
Biotype assumes no liability for changing of Panels and BinSets. The actual
versions for all test kits can be downloaded from the homepage www.biotype.de.
6 Print Options and Page Setup
In Samples Plot the following print options can be chosen via File → Page Setup:
- Table to edit i.e. size or typeface
- Plot to choose one of four different settings:
Honor plots per pane (to print data and/or plots onto one page)
Small, Medium, Large (to scale the plot size per page)
GeneMapper ID Template Files
March 2010
- 32 -
7 Troubleshooting Guide
General Help in software
Click the menu Help → GeneMapper ID 3.2.1 Help in GeneMapper ID
software and search the User Guide for your specific theme.
Observation
Possible Cause
Comments
Error message during saving
data.
Country setting
Setting from the PC has to be edit to
English (United States)
Error message during import
(Panels and BinSets) “unable
to save panel data:
java.SQLException: ORA00001: unique constraint
(IFA.CKP_UK) violated.”
Path on your computer
AppliedBiosystems\GeneMapper
and check text file Panel-ImportLog for error message
First, delete all Panels in the Panel
Manager, then import Panels/Bin Sets
from the Biotype first.
Panels and BinSets are not
identified correctly.
Compatible versions of Panels and
BinSets have to be saved within one
folder.
Error message during import
(Panels) “Invalid marker
repeat value in line # for
marker D10S2325. Valid
marker repeat values are 2, 3,
4 & 9.”
GeneMapper ID v3.1 does not
identify penta repeat motives (5
bases) like the marker D10S2325
of the Humantype Chimera® test
kit.
Open panel txt.-data in Windows®
Explorer and change the penta repeat
motive of D10S2325 from 5 to 4.
Then, import the new panel data again.
Alternatively, install at least version 3.2
of GeneMapper ID Software.
Error message during import
(Analysis Method, Plot Setting,
Table Setting, Size Standard)
GeneMapper Software is not
GeneMapper ID Software.
Install GeneMapper ID Software.
Essor message during
analysis “There are samples
that do not meet analysis
requirements. Please see
Error Message in the info view
of each sample…”
An invalid BinSet is preselected in
Analysis Method.
Select the actual BinSet.
For Biotype® Templates Files (Panels
and BinSets) always use the same
version, e.g. v3
Data from different analysers like
ABI 310 and ABI 3130 have been
saved within one run folder.
Data from different analysers always
have to be saved within different run
folders.
Injection/file of the allelic
ladder not appropriate
An additional signal can be
identified as peak of the allelic
ladder because of dysfunctions
during the electrophoresis. If peaks
of the allelic ladder are miscalled,
the ladder can not be used for the
analysis.
Use a different injection/file of the
allelic ladder and check firstly the data
of the analysed sizes from the Size
Standard (in bp) of the allelic ladder.
Always use the DNA Size Standard
550 for Biotype® test kits.
One peak of the allelic ladder is
below the Peak Detection Value
(50-200 RFU) of the analysis
method used which is not
identified.
The allelic ladder has to be load with
higher concentration onto the analysis
instrument. Alternatively, data of the
allelic ladder can be analysed with a
lower Peak Detection Value from
GeneMapper ID Software.
One peak of the allelic ladder is not
identified because it is outside the
expected size range of the software
(in bp).
First compare the length of the
fragments (in bp) of the first allele in
one colour of the allelic ladder with the
corresponding value in the categories,
then of the other alleles.
GeneMapper ID Template Files
March 2010
- 33 -
Observation
Possible Cause
Comments
Single marker is not identified.
Various causes
Open the “project” folder, mark the
corresponding sample and check
Error Message in the tab Info or
PQV.
Many peaks are termed OL as
off-ladder alleles in the
samples.
DNA Size Standard 550 (ROX
or BTO) was not defined or
identified correctly.
Click onto the red icon Size Match
Editor in the upper toolbar or the
GeneMapper ID Software. Check
the red or orange fragments of all
samples. Always use the internal
DNA Size Standard 550 for
Biotype® test kits.
Too high intensities at the
analysis instrument. If the
peak heights of the samples
are outside the linear detection
range (>4000 RFU/ABI310;
>5000 RFU/ABI3130),
stutters, split peaks, and
artefacts might be increased.
Reduce the injection time up to
1 second, reduce the amount of the
PCR amplification product for
analysis, or reduce the quantity of
DNA for PCR.
Bubbles in the capillary lead to
pull-up peaks in all colour
panels („spikes”) that result in
allele misnomer.
Repeat electrophoresis to confirm
results.
Differences in the capillaries’
run performances of a multicapillary analyser might result
in allelic assignment shift.
For reliable allelic assignment on
multi-capillary analysers, a number
of allelic ladder should be run
for further information see
chapter “Electrophoresis” of the test
kits’ manuals.
Point alleles, i.e. alleles with at
least 1 bp difference to the
next integer allele (e. g. TH01
9.3/10), are not found.
The point alleles were not
separated in the GeneMapper
ID Software.
Check the settings of the analysis
method. Lower the Peak Window
Size value to 11 pts.
Homocygote alleles are not
displayed as duplicates in the
table.
Preferences of the
GeneMapper ID Software
Adjustment can be changed via
Tools → Options choose the tab
Analysis and the setting
Duplicate homozygous alleles
so that e. g. the homocygote allele
18 is displayed as 18/18.
Trademarks
6-FAM, HEX, NED, ROX, ABI PRISM®, GeneScan®, Genotyper®, GeneMapper® and
Applied Biosystems are trademarks of Life Technologies.
Windows® is a trademark of Microsoft Corporation.
GeneMapper ID Template Files
March 2010