1
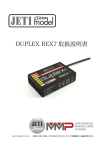
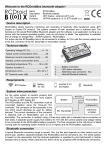
USER MANUAL MBAR EX By JETI model s.r.o. 14. 11. 2014 User Manual: MBar EX CONTENTS 1. INTRODUCTION......................................................................................................................................3 2. MAIN FEATURES.....................................................................................................................................3 3. PLACEMENT OF MBAR EX SENSOR.................................................................................................3 4. CONNECTING THE MBAR EX SENSOR............................................................................................4 5. SETTING VIA JETIBOX.........................................................................................................................5 5.1 THE MBAR EX SENSOR MENU:............................................................................................................................5 6. SETUP VIA DC/DS TRANSMITTERS...................................................................................................6 7. WARRANTY..............................................................................................................................................7 8. MBAR EX MENU DISPLAYED ON THE JETIBOX LCD:................................................................7 -2- User Manual: MBar EX 1. Introduction MBar EX is a sensor that measures high pressures of non-corrosive and unionized gases and liquids. The sensor records the maximum and minimum measured values of pressure and temperature. Also, it is possible to set an alarm for a high pressure measurement or a pressure drop. The information from the sensor is transmitted to the user via Duplex EX system. The MBar EX can be used for measuring pressure in containers with compressed air (retractable landing gear systems) or for controlling the oil pressure in hydraulic systems. The Duplex EX system takes advantage of the 2.4GHz band for communication. This system not only transmits control data to the model but also sends data from the model back to the transmitter. The telemetry data collected during operation is shown as actual, measured values in real time. The values are shown either on the LCD screen of a connected JETIBOX or on the display of JETI model DC/DS transmitters. 2. Main features - Measurement of pressure and temperature. - Possible sound alarm signaling of excessive pressure or pressure drop using a JETI Tx module (EU only) or JETIBOX profi. - Can be used as an Expander and to connect other sensors. - Can detect logical voltage levels on up to two inputs (e.g. detection of securing the chassis). - The device is compatible with EX Bus protocol, i.e. it is possible to be configured comfortably via a special menu in DC/DS JETI model transmitters. - Firmware updates. Technical data MBar EX Dimensions 30x23x13mm Weight 7g Measuring accuracy of absolute pressure ±2% Resolution of measured pressure 0,1kPa Measurement range 0÷1000kPa (150psi, 10bar) Operating temperature -10÷85°C Recommended supply voltage 3.5 ÷ 8.4V Maximum supply voltage 16V Consumption 15mA Diameter of the extension 2mm -3- Dimensions of the extension User Manual: MBar EX 3. Placement of MBar EX sensor The sensor should be mounted in the model to a hard surface to prevent accidental pulling out of cables or pressure tubing. Properly protect the sensor against the transmission of vibrations, e.g. using double-sided adhesive tape. Use pressure tubing properly sized for the required pressure. Attention! The sensor itself is not mechanically suited for frequent pulling out of the tubing. It is strongly recommended to have the tubing permanently connected to the sensor. If necessary, disconnect the tubing further away from the sensor. Failure to do so may damage the sensor. 4. Connecting the MBar EX sensor The MBar EX has an output marked Ext. and two programmable ports that are labeled as Ext1 and Ext2. Using the Ext. port of the sensor the data is transmitted to the receiver or to the connected JETIBOX, and it serves as a power supply as well Possible functions of the programmable pins Ext1 Ext2 Disabled Disabled Expander (by default) Expander (by default) Logical input No. 1 Logical input No. 2 Connection with the JETIBOX terminal only The three-wire cable with JR connectors can be plugged in into the Ext. sensor connector and then directly to the JETIBOX (socket with the label Impulse, + -). For power supply use the second input of the JETIBOX with the (+ -) label, apply a voltage of 5-8.4V. When taking advantage of this type of connection, you must be aware that no wireless data transfer exists and the measured data is shown directly on the LCD screen of the JETIBOX. This connection type allows no alert signal generation, because the buzzer is a component of the transmitter module (non US) which is not connected in this case. Any alert signals are only shown on the JETIBOX LCD screen. Connection with a receiver and Duplex transmitter module (non US) Connect the three-wire extension cable with JR plug to the Ext. socket of the MBar. The other end of the cable is to be connected to the Duplex receiver (also the Ext. socket). The MBar sensor gets its power supply through the receiver. In order to adjust parameters of the MBar, connect the JETIBOX to the transmitter module and switch on the receiver and the transmitter. Connection via Expander Connect the three-wire extension cable with JR plugs to one of the EXPANDER inputs. The other end of the cable is to be connected to the Ext. socket of the MBar. The Expander enables connection of several telemetry sensors to one receiver. In such a case the MBar sensor gets its power supply through the Expander and the Expander through the receiver. -4- User Manual: MBar EX Connection to the Ext. socket of the receiver with the possibility to connect other sensors Connect the three-wire extension cable with JR plugs to the Ext. socket of the MBar EX sensor. The other end of the cable is to be connected to the Duplex EX receiver (marked Ext.). In such a case the MBar EX sensor is configured this way: Ext1 Mode (Expander), Ext2 Mode (Expander). Now other JETI model sensors can be connected to free sockets of the MBar EX sensor. MBar EX gets its power supply from the receiver and other sensors from the MBar EX. Connection to the Ext. socket of the receiver with the possibility of logical levels detection and transmission of the values via telemetry Connect the three-wire extension cable with JR plugs to the Ext. socket of the MBar EX sensor. The other end of the cable is to be connected to the Duplex receiver (marked Ext.). In such a case the MBar EX sensor is configured this way: Ext1 Mode (Logical input), Ext2 Mode (Logical input). Now the sockets of the MBar EX can be connected in such a way that logical level of the applied voltage is detected on the signal (yellow) wire. Based on this value it is possible to report alarms or perform another action in the transmitter. Note: Modes of Ext1 and Ext2 sockets can be arbitrarily combined, e.g. a sensor connected to the Ext1 and Ext2. as a logical input. 5. Setting via JETIBOX The parameters can be set and the data can be displayed via JETIBOX. After connecting to the MBar sensor, the welcome screen appears and shows the sensor identification and measured pressure in MPa and psi. If the D button is pressed, you get to the MBar EX main menu. If you press the button on the right, you get to the Expander menu (if any of the Ext1/2 outputs are set to the Expander mode). 5.1 The MBar EX sensor menu: MBAR MENU: ACTUAL VAUES - by pressing the D button (arrow down) selects the display of actual measured values Pressure – pressure measured in units of hPa and psi. Temperature – shows actual temperature of the sensor. MBAR MENU: MIN/MAX - – by pressing the D button (arrow down) selects the display of extremes that occurred during the measurements Pressure MIN/MAX – shows the minimum and maximum measured pressure. Temperature MIN/MAX - shows the minimum and maximum temperature of the sensor. Reset MIN/MAX – manual reset of the maximums and minimums. Pushing R and L arrows (right and left) together for several seconds deletes the extremes of all measured parameters MBAR MENU: SETTING - by pressing the D button (arrow down) you get to the basic settings of the Mbar EX sensor. -5- User Manual: MBar EX Ext1 Mode, respectively Ext2 Mode – port Ext1, resp. Ext2 can be configured to several functional alternatives: Off – the port has no function. Expander – it is possible to connect any sensor to the port (sensors using JETIBOX, Duplex EX and EX Bus protocols are supported). Log. input – the port will be switched to the digital input mode. Detected value (log. 1 or log. 0) is then available through EX telemetry and e.g. in the DC/DS transmitters it is possible to assign any action on the basis of the sensor logical input. Voltage threshold levels table Voltage range Log. 0 0 – 1V Log. 1 1.9 – 3.3V Pressure high alarm - adjustment of the signal representing high pressure. If the measured value exceeds the set value, the alert will be activated. Pressure low alarm - adjustment of the signal representing low pressure. If the measured value is lower than the set value, the alert will be activated. Beep pressure alarm – adjustment of one of the Morse code letters, which represents exceeding the set pressure alarm by the sound from the Duplex Tx transmitter module. (EU only) MBAR MENU: SERVICE Factory Defaults - by simultaneously pressing the arrows R and L (right and left) for several seconds the factory settings of the Mbar EX are loaded. 6. Setup via DC/DS transmitters you EX be MBar EX sensor can be easily configured via any DC/DS transmitter. If switch the paired receiver to the EX Bus mode and you connect the MBar to its Ext. port, the device will be detected automatically and then might configured in the menu Model → Device Explorer. Notice: For proper function the transmitter version at least 2.20 (or newer) and the receiver version 3.14 (or newer) is necessary. Further, make sure that in the Devices folder of your SD card there is a configuration file MBAR.bin. On the main screen there is a general menu of available possibilities, actual pressure and temperature, also measured maximums and minimums. The minimum and maximum values can be reset manually in the menu or using a driver of the transmitter. -6- User Manual: MBar EX In the main setting of the Mbar EX, the Ext1 and Ext2 sockets can be configured (possible selections: Disabled, Expander, Log. Input). 7. Warranty This product is guaranteed for 24 months from the date of purchase, provided that it has been operated in accordance with these instructions at the prescribed load and becomes mechanically damaged. Proof of purchase required for any warranty claim. For customer service, see your JETI dealer or the manufacturer. 8. MBar EX menu displayed on the JETIBOX LCD: -7-