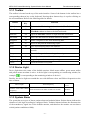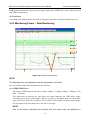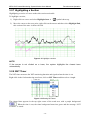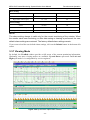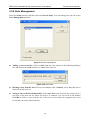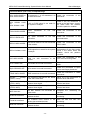
1
About this Manual P/N: 01.54.13095-28 Release Date: June 2011 © Copyright EDAN INSTRUMENTS, INC. 2008 - 2011. All rights reserved. Statement This manual will help you understand the operation and maintenance of the product better. It is reminded that the product shall be used strictly complying with this manual. User’s operation failing to comply with this manual may result in malfunction or accident for which EDAN INSTRUMENTS, INC. (hereinafter called EDAN) can not be held liable. EDAN owns the copyrights of this manual. Without prior written consent of EDAN, any materials contained in this manual shall not be photocopied, reproduced or translated into other languages. Materials protected by the copyright law, including but not limited to confidential information such as technical information and patent information are contained in this manual, the user shall not disclose such information to any irrelevant third party. The user shall understand that nothing in this manual grants him, expressly or implicitly, any right or license to use any of the intellectual properties of EDAN. EDAN holds the rights to modify, update, and ultimately explain this manual. Responsibility of the Manufacturer The manufacturer only considers itself responsible for any effect on safety, reliability and performance of the equipment if: Assembly operations, extensions, re-adjustments, modifications or repairs are carried out by persons authorized by the manufacturer, and The electrical installation of the relevant room complies with national standards, and The instrument is used in accordance with the instructions for use. Upon request, the manufacturer may provide, with compensation, necessary circuit diagrams, and other information to help qualified technician to maintain and repair some parts, which the manufacturer may define as user serviceable. Terms Used in this Manual This guide is designed to give key concepts on safety precautions. WARNING A WARNING label advises against certain actions or situations that could result in personal injury or death. I CAUTION A CAUTION label advises against actions or situations that could damage equipment, produce inaccurate data, or invalidate a procedure. NOTE A NOTE provides useful information regarding a function or a procedure. II Table of Contents Chapter 1 Introduction................................................................................................................. 1 1.1 Intended Use....................................................................................................................... 1 1.2 Hardware Requirements..................................................................................................... 2 1.3 Operating System Requirements........................................................................................ 3 Chapter 2 Safety Guide ................................................................................................................ 4 2.1 Precautions ......................................................................................................................... 4 2.1 Symbols.............................................................................................................................. 5 Chapter 3 Functions and Operation............................................................................................ 7 3.1 Main Interface .................................................................................................................... 7 3.1.1 Toolbar ..................................................................................................................... 8 3.1.2 Device Light............................................................................................................. 8 3.1.3 System Alarm........................................................................................................... 8 3.1.4 System Time........................................................................................................... 10 3.2 Monitoring Interface ........................................................................................................ 10 3.2.1 Selecting Display Mode ......................................................................................... 10 3.2.2 Monitoring Frame – Mat. Fet. Monitoring............................................................. 11 3.2.3 Monitoring Frame – Fetal Monitoring ................................................................... 12 3.2.4 Monitoring Frame – Maternal Monitoring............................................................. 15 3.2.5 Selecting a Section Manually................................................................................. 15 3.2.6 Making Notes ......................................................................................................... 16 3.2.7 Highlighting a Section............................................................................................ 18 3.2.8 NST Timer ............................................................................................................. 18 3.2.9 Saving the Data ...................................................................................................... 19 3.2.10 Clearing the Data.................................................................................................. 19 3.3 Viewing a Bed.................................................................................................................. 20 3.3.1 Monitoring Frame .................................................................................................. 20 3.3.2 CTG Review Frame ............................................................................................... 20 3.3.3 Trend Review Frame.............................................................................................. 21 3.3.4 NIBP Review Frame .............................................................................................. 22 3.3.5 Event Review Frame .............................................................................................. 23 3.3.6 Alarm Settings Frame ............................................................................................ 24 3.3.7 Viewing Mode........................................................................................................ 26 3.4 Maternal Information ....................................................................................................... 28 3.5 Moving Bed...................................................................................................................... 29 3.6 Diagnosing ....................................................................................................................... 30 3.7 Printing............................................................................................................................. 31 3.7.1 Printing Reports ..................................................................................................... 31 3.7.2 Exporting................................................................................................................ 34 3.7.3 Emailing ................................................................................................................. 35 3.8 Archives ........................................................................................................................... 37 3.8.1 Searching for a Study ............................................................................................. 37 3.8.2 Loading a Study ..................................................................................................... 38 3.8.3 Statistic................................................................................................................... 38 3.9 System Setup.................................................................................................................... 39 III 3.9.1 Fetal Monitoring Setup .......................................................................................... 39 3.9.2 Maternal Monitoring Setup .................................................................................... 40 3.9.3 CTG Option Setup.................................................................................................. 40 3.9.4 Interface Setup ....................................................................................................... 41 3.9.5 Inputting Hospital Name ........................................................................................ 42 3.9.6 Setting Alarm Sound .............................................................................................. 42 3.9.7 Setting Auto Saving Timer .................................................................................... 43 3.9.8 Note Management .................................................................................................. 44 3.9.9 Setting Maternal Information Options ................................................................... 45 3.9.10 Setting Auto Created ID....................................................................................... 45 3.9.11 Service Setup........................................................................................................ 45 3.10 User Login...................................................................................................................... 47 3.10.1 Login .................................................................................................................... 47 3.10.2 Modifying Password ............................................................................................ 48 3.10.3 Logout .................................................................................................................. 48 3.10.4 Adding a User ...................................................................................................... 48 3.10.5 Modifying a User’s Information .......................................................................... 50 3.10.6 Deleting a User..................................................................................................... 50 3.11 Downloading Data ......................................................................................................... 50 3.12 Opening Files ................................................................................................................. 51 3.13 Help ................................................................................................................................ 52 3.14 Exit from MFM-CNS..................................................................................................... 52 Chapter 4 Shortcut for Operation ............................................................................................. 53 Chapter 5 Maintenance .............................................................................................................. 55 Chapter 6 Service ........................................................................................................................ 56 Appendix 1 Alarm Messages ...................................................................................................... 57 IV MFM-CNS Central Monitoring System Monitor User Manual Introduction Chapter 1 Introduction CAUTION 1 Federal U.S. laws restrict this device to sale, distribution, and use by, or on the order of a physician. 2 Read this user manual prior to using the device. NOTE: 1 This manual is explained basing on the highest configuration and advanced users. Some functions can not be operated with other configuration or by general users. 2 This manual only describes operation of the software. The configuration of the network system is introduced in MFM-CNS Central Monitoring System Service Manual. 1.1 Intended Use The Maternal Fetal Monitoring – Central Nurse System (hereinafter called “MFM-CNS”) is a clinical data managing software application and is indicated for antepartum and intrapartum monitoring of pregnant women in a healthcare setting. The MFM-CNS is intended to manage perinatal monitoring data acquired from bedside monitors or manual input for viewing at the central nursing station. The system also produces an electronic medical record. The MFM-CNS has display fields for the following obstetric data: patient demographics provider notes fetal heart rate (FHR) uterine activity (via tocodynamometry or IUP) Maternal heart rate SpO2 non-invasive blood pressure (NIBP) respiratory rate temperature pulse -1- MFM-CNS Central Monitoring System Monitor User Manual Introduction WARNING 1 Check the displayed results on the corresponding bedside prior to intervening based on this data. 2 The MFM-CNS is intended to be operated by or under guidance of qualified healthcare professionals. It is not intended for home use. 3 The MFM-CNS is intended to be used in obstetric area. The maternal vital signs monitoring is applicable during antepartum period, delivery and post partum. It is not intended to be used in ICU or CCU. 4 As medical information equipment, the physiological waveforms and parameters displayed on the screen can only be used for reference of the doctor. But they can not be criterion of clinical treatment. 1.2 Hardware Requirements Components Specification System Meet the IEC control requirements defined for ITE equipment. CE marked, meeting LVD (Low voltage directive) and EMC directive requirements. PC workstation PC compatible CPU: Intel 2G RAM: XP 512M, Win7 2G 80G Fixed Diskette 1440 x 900, 65536 Color, 75Hz non-interlaced 10 Base – T 802.3 controller 4 USB ports CE Mark Keyboard PS/2 or USB keyboard with CE Mark Mouse PS/2 or USB mouse with CE Mark Display Display Monitor with CE Mark 19” LCD 1440 x 900 Printer HP LaserJet series with CE Mark Printer performance specifications: Resolution: 600DPI * 600DPI Interface: USB port Paper size: A4 -2- MFM-CNS Central Monitoring System Monitor User Manual Introduction Speaker PC or built-in in the display. It should adopt liable connecting mode and should bear some measures to adjust the volume, preventing the sound device from being turned off. UPS 1000 W with CE Mark CAUTION 1 Make sure the computer hardware meets the installing and running requirements of the software, otherwise the software may not work normally. 2 The hardware specifications require the use of PC that complies with IEC requirements for ITE equipment. 3 The configuration mentioned above is not permanent. EDAN preserves the right to change and update system settings. 1.3 Operating System Requirements 1) Microsoft Windows XP Professional with service pack 3 or Win7 32. 2) Microsoft MSDE2000A database system. CAUTION 1 Make sure the computer operating system meets the installing and running requirements of the software, otherwise the software may not work normally. 2 The manufacturer only guarantees that MFM-CNS runs normally when the operating system language is the same as the software language. -3- MFM-CNS Central Monitoring System Monitor User Manual Safety Guide Chapter 2 Safety Guide 2.1 Precautions WARNING and CAUTION messages must be observed. To use the system safely and effectively, please read the user manual in detail to be familiar with the proper operation method. WARNING 1 The system should be installed by a qualified service engineer. 2 Do not turn on the device until all cables have been properly connected and verified. 3 Do not use the device in the presence of flammable anesthetics due to explosion risk. 4 SHOCK HAZARD - the power receptacle must be a three-wire grounded outlet. A hospital grade outlet is required. Never adapt the three-prong plug to a two-slot outlet. 5 SHOCK HAZARD - Do not attempt to connect or disconnect a power cord with wet hands. Make sure your hands are clean and dry before touching a power cord. 6 SHOCK HAZARD - Do not remove the covers during operation or while power is connected. Only authorized service engineer could remove the unit cover. 7 Do not move the main unit, monitor or other parts of the device when they are electrified. 8 The system is designed for continuous operation. 9 Only connect the equipment to EDAN supplied or recommended accessories. 10 Ensure that the environment in which the system is operated is not subject to any sources of strong electromagnetic interference, such as radio transmitters, mobile telephones, etc. Keep them far away. 11 Clinical decision making based on the output of the device is left to the discretion of the provider. 12 Prior to intervening based on the data displayed on the MFM-CNS, providers must verify this data with the corresponding bedside monitor. 13 Make sure the speaker is always in a state of activation. 14 It is strictly prohibited to mute the speaker or turn down its volume. Make sure that the alarm sound can always be heard. 15 Do not unplug the computer hardware when the MFM-CNS is in operation. CAUTION 1 2 The system should be used within temperature range from +10°C (+50°F) to +30 °C (+86°F). Keep the environment clean. Keep the system hardware far from corrosive medicine, dust area, high-temperature and humid environment. -4- MFM-CNS Central Monitoring System Monitor User Manual Safety Guide CAUTION 3 4 5 6 7 8 9 10 11 12 13 Check if the power cable is worn out or damaged before each use. If damage is evident, replacement is recommended. Turn off the system power before connecting or disconnecting any accessories. If the system does not work properly, or any abnormality is detected, stop using it at once and contact the manufacturer for service. Turn off the system power and remove the power cable before servicing or maintaining the system. If RJ45 interface is used, when inserting or pulling out the network cable, please press the spring of the cable port to avoid the damage caused by incorrect operation. Precautionary maintenance, including periodic cleaning and appearance checking can be finished by the users because this maintenance does not touch the interior. Turn off the system power before cleaning. Cleaning consists of removing all dust from the exterior surface of the equipment with a soft brush or cloth. Use a brush to dislodge any dirt on or around the connectors and panel edges. Remove dirt with a soft cloth, slightly dampened with a mild detergent solution or 70% ethanol or isopropranol. Avoid pouring liquids on the device while cleaning, and do not immerse any parts of the device into any liquids. This system is the device special for medical use. Forbid installing any other software in this system to avoid virus and system breakdown. Forbid deleting or revising any file on the hard disk to avoid that the operating system and monitoring software can’t run normally. MFM-CNS can not replace the bedside monitoring completely, the users should not stay at the central monitoring station and leave the patient alone for a long time, because the accuracy of the software depends on the stability of the operating system, the performance of PC station and network. 2.1 Symbols Serial Number Date Of Manufacture Manufacturer Authorized Representative in the European Community The symbol indicates that the device complies with the European Council Directive 93/42/EEC concerning medical devices. -5- MFM-CNS Central Monitoring System Monitor User Manual Safety Guide The symbol indicates that the device should be sent to the special agencies according to local regulations for separate collection after its useful life. Federal (U.S.) Law restricts this device to sale by or on the order of a physician. NOTE: CE only aims at the software. -6- MFM-CNS Central Monitoring System Monitor User Manual Functions and Operation Chapter 3 Functions and Operation 3.1 Main Interface Switch on the computer and accompanying accessories. After a ‘Do’ alarm sound is heard, the system enters the main interface automatically, as shown in figure below. CAUTION A ‘Do’ alarm sound must be heard when starting-up this software. If any abnormality is heard, do not use this system. Check the audio output devices or contact the manufacturer for service. 1 2 3 4 5 Figure 3-1 Main operation interface 1 Tool Bar 2 Monitoring Window 4 Audio Alarm Indication 3 Device Light 5 System Time NOTE: You should wait until the main interface opens before starting the operation. -7- MFM-CNS Central Monitoring System Monitor User Manual Functions and Operation 3.1.1 Toolbar The toolbar is located on the top of the main interface. Some of the buttons in the toolbar has a corresponding shortcut key on the keyboard. Pressing these shortcut keys is equal to clicking on the relevant button. Refer to the following table for details. Button Shortcut Key Function MainScreen F2 Return to the Monitoring window from the ViewBed window. ViewBed F3 Maximize the current Monitoring window and enter the ViewBed window to observe the data and trends. Mat.Info F4 Open the Mat.Info window to input maternal information. MoveBed F5 Move the data from one bedside monitor to another. Diagnose F6 Make a diagnosis to the fetal monitoring data. Print F7 Preview and print the monitoring report. Save F8 Save all monitoring data to the database. Archive Enter the Archive window to view, search or load monitoring records. Setup Enter the Setup window to change the settings. Help F1 Get help information of the software operation. Login/Logout Log in/Log out of the current operating user. Close Close the MFM-CNS system. 3.1.2 Device Light Device light shows the status of the bedside monitor: black means offline, green means online and yellow means an alarm is active. A device light is corresponding to a monitoring window, for is corresponding to the monitoring window of device 1. example, Besides, the device light can remind the user with different colors and flicker frequencies at the time of alarm. Device Light Alarm Frequency Alarm Level Yellow with 0.5Hz flicker frequency Interval between two alarm sounds is 8 seconds Medium Yellow and no flicker Interval between two alarm sounds is 16 seconds Low 3.1.3 System Alarm The system has two types of alarm: patient alarm and technical alarm. Patient alarms indicate the situation of vital sign exceeding its configured limit. Technical alarms indicate the disconnection of the transducers, signal loss of the bedside monitor, and therefore the monitor can not detect critical patient conditions reliably. -8- MFM-CNS Central Monitoring System Monitor User Manual Functions and Operation In terms of severity, the alarms have two levels: medium and low. Medium level alarm is a moderate warning, labeled with the symbol **; low level alarm is a general warning. The alarm levels are preset, and can not be changed. The medium level alarms have higher priority than low level alarms. If both types of alarms are active at the same time, the monitor gives the sound for the medium level alarms. When an alarm is active, the system issues both audio and visible signals to draw your attention. (1) Audio alarm is given by speakers: - Medium level alarm: a “Do” tone is repeated three times, and then pauses for 8 seconds. - Low level alarm: a “Do” tone is sounded once, and then pauses for 16 seconds. The alarm silence duration has several options: Silence, Pause (for 1min, 2 min or 3) and Off. It is set in General Setup. If the alarm silence duration is set to Silence. A silence button appears in the toolbar. When an alarm is active, you can click on this button to disable the alarm sound, and the audio alarm indicator on the interface reads “Silence”. During the silence period, if another alarm presents, the system enables the alarm sound automatically. Alternatively, you can click on the button to enable alarm sound manually. If the alarm silence duration is set to Pause. A pause button appears in the toolbar. When an alarm is active, you can click on this button to disable the alarm sound temporarily, and the audio alarm indicator on the interface reads “Alarm Sound Paused” and the remaining time is shown next to it, e.g. 2:20 (2 minutes and 20 seconds). When the remaining time is out, the system enables the alarm sound automatically. Alternatively, you can click on the button to enable alarm sound manually. If the alarm silence duration is set to Off. A silence button appears in the toolbar. When an alarm is active, you can click on this button to disable the alarm sound, and the audio alarm status indicator on the interface shows the flickering message “Alarm Sound Off”. The sound is not enabled until the button is pressed. (2) Visual alarms appear in the title bar area of each monitor frame. When an alarm is active, the system shows the following information on the interface: : the alarm indicator is shown on the right end of the title bar. It is - Alarm indicator illuminated in green if there is no alarm, and it turns yellow when a low level alarm occurs, or flickers in yellow when a medium level alarm is active. - Alarm message: the alarm message appears in the middle of the title bar. If there are more than one message, they appear at the same area in succession. -9- MFM-CNS Central Monitoring System Monitor User Manual - Alarm symbol alarm occurs. Functions and Operation : the system marks an alarm symbol on the CTG at the place where a patient The alarm messages that might appear during monitoring are listed in the table in Appendix 1. NOTE: Alarms of MFM-CNS and bedside monitors are separated. MFM-CNS evaluates the patient vital signs and triggers patient alarms according to its alarm settings, but does not deal with the alarm status or limits on bedside monitors. To test the functions of visible and audible alarms, perform the following procedures: 1 Start up the system. 2 Enable the alarm. 3 Set the alarm limits to a small range. 4 Stimulate a signal that is higher than the upper limit or lower than the lower limit. Or disconnect one of the plugs. 5 Verify if the visible and audible alarms are working properly. 3.1.4 System Time The system time shows the date and time of the computer. The data/time and their formats are set in the control panel of the computer. You can not change them on MFM-CNS. WARNING To avoid possible hazards caused by the difference between the system time and local time, you must set the computer time correctly before starting up the MFM-CNS, or restart the MFM-CNS after the computer time is changed. 3.2 Monitoring Interface 3.2.1 Selecting Display Mode Every monitoring interface of a bedside monitor has three display mode options: Fetal Monitoring Mode, Mat. Fet. Monitoring Mode and Maternal Monitoring Mode. Right-click in the numeric area of the interface, the following dialogue is shown: Figure 3-2 Display mode selecting menu - 10 - MFM-CNS Central Monitoring System Monitor User Manual Functions and Operation Select one display mode, and the interface changes accordingly. NOTE: When viewing a bed, you can only right-click on the mouse to select display mode in the monitoring frame. 3.2.2 Monitoring Frame – Mat. Fet. Monitoring (1) (2) (3) (4) (5) Figure 3-3 Monitoring window (1) Title Bar The title bar shows the device number of the bedside monitor and the patient name. When an alarm is active, the alarm message is displayed in the middle of the bar and the alarm indicator flickers in yellow. (2) Review Frame Option Click on one of the frames to open this frame. (3) Maternal Information The information of the patient you input is displayed in this area. (4) Numeric Area The numeric measurement result of fetal monitoring includes FHR (fetal heart rate), UA (uterine activity) and MFM (manual fetal movement count). That of maternal monitoring may include - 11 - MFM-CNS Central Monitoring System Monitor User Manual Functions and Operation MHR (maternal heart rate), SpO2 (arterial oxygen saturation), NIBP (non-invasive blood pressure) and TEMP (temperature). (5) Trend Area According to the display mode, the trend area displays fetal and/or maternal monitoring traces. 3.2.3 Monitoring Frame – Fetal Monitoring a b c d e f i h g Figure 3-4 Fetal Monitoring display NOTE: The displayed time corresponds to the thick graduation on the left. You can read the following information on this interface: (a, b) FHR1/FHR2 Trace The range of FHR numerics has three options: 60bpm ~ 210bpm, 30bpm ~ 240bpm, or 50 bpm ~ 210 bpm. The dark band in between the fetal heart rate panes indicates the FHR safety range. (according to the preset alarm limits, and the top edge is not higher than 180, the bottom edge is not lower than 100). It makes it easy to observe if the FHR exceeds the normal range. So you can tell if the fetal heart rate is too low or too high. NOTE: Due to the screen resolution and window size, the traces may look different on - 12 - MFM-CNS Central Monitoring System Monitor User Manual Functions and Operation different LCDs. The screen with high resolution and big size provides the interpreter with better reading effect. The diagnosis should be made based on the printed monitoring report. (c) HR Trace Maternal heart rate trace, the y-axis of the trace indicates the numerics of HR. (d) SpO2 Trace Maternal SpO2 trace, the y-axis of the trace indicates the numerics of SpO2. (e) AFM Trace The y-axis indicates the scope of fetal movement. NOTE: The AFM trace is only for reference, please take the MFM marks as criterion. (f) TOCO Trace The y-axis indicates the numeric of TOCO. The range is 0% ~ 100%. (g) Scroll Control To review more data, you can drag the scroll bar left or right or use the play back and review keys. Scroll Bar Playback and Review Keys Figure 3-5 Scroll control keys Alternatively, you can right-click in the trace area and select the keys in the pop-up menu. Figure 3-6 Scroll control keys in Right-Click Menu Icon Description Function Scroll Bar Drag the scroll bar to jump to the required position. Home Click on Home or Backward to play the monitoring trend backward fast. Click on Backward or Click in the trend display area to stop playing midway. Forward Click on Forward or to play the monitoring trend forward fast. Click in the trend display area to stop playing midway. End Click on End or to jump to the start of the monitoring trend; to jump to the end of the monitoring trend. - 13 - MFM-CNS Central Monitoring System Monitor User Manual Functions and Operation (h) Maternal Vital Signs If maternal monitoring is in process, the MHR, SpO2 and TEMP are listed every 10 minutes, and NIBP is listed when it is performed. (i) Signal Sources The sources of FHR, UA and MHR are shown beneath the trends. Parameter Source Description FHR1 US FHR1 signal comes from an ultrasound transducer. DECG FHR1 signal comes from a fetal scalp electrode. FHR2 US FHR2 signal comes from an ultrasound transducer. UA TOCO UA signal comes from a TOCO transducer. IUP UA signal comes from an IUPC. ECG HR signal comes from ECG leads. Pulse HR signal comes from a SpO2 sensor. MHR Besides, some other symbols appear among the traces: New monitoring, it indicates the screen starts advancing. The bedside monitor starts new monitoring by pressing the START key. A manual fetal movement. It appears after the patient presses the FM marker when she feels a fetal movement. Note icon, indicating a note is added on CNS or the MARK key is pressed on the bedside monitor. The monitor is zeroed by pressing the AUTO ZERO key. A patient alarm is active. Signals overlap. Maternal vital sign list, or maternal NIBP result. NOTE: The screen starts advancing when there is 3-second continuous fetal heart signal, or if the UA change in 3 seconds is larger than 3. It stops advancing if no valid fetal heart signal is received in 1 minute, and the UA change in 1 minute is smaller than 3. - 14 - MFM-CNS Central Monitoring System Monitor User Manual Functions and Operation 3.2.4 Monitoring Frame – Maternal Monitoring j k m Figure 3-7 Maternal monitoring window You can read the following information on this interface: (j) ECG waveform ECG waveform is a continuous waveform of the patient’s cardiac electric activity detected by one of the leads. (k) SpO2 waveform SpO2 waveform is a plethysmogram indicating the oxygen saturation of hemoglobin in the arterial blood. (m) NIBP list The system keeps records of NIBP in the format of SYS/DIA(MAP). NOTE: The bedside monitor type and network protocol determine whether the maternal ECG/PLETH will be transferred to MFM-CNS. 3.2.5 Selecting a Section Manually The auto section length in the CTG Review frame is preset and fixed. You can also select a section manually. The manual section has the highest priority when making a diagnosis and printing, and the auto section take the second place. Right-click in the fetal heart trend area and then choose Select Section Start, a “ ”symbol shows up. Move the cursor to the next position, right click on the mouse and then choose Select - 15 - MFM-CNS Central Monitoring System Monitor User Manual Section End, a “ Functions and Operation ” symbol shows up, and the selected area is encircled. Figure 3-8 Select a section NOTE: The manual section should include at least 1-minute CTG data, and the start/end can only be selected in the valid data area. If the section start and (or) end points are located between the gridlines, the system moves them to the closest gridline automatically when printing the report or making a diagnosis. The manual section is cleared after performing diagnosing, printing, saving, clearing, or clicking on another window. 3.2.6 Making Notes When there is a significant event, for example the patient takes injection or changes position, you can make a note on the trend. 1) Adding a Note Move the cursor to the fetal monitoring trend area, right click on the mouse and then select Add Note. - 16 - MFM-CNS Central Monitoring System Monitor User Manual Functions and Operation Figure 3-9 Adding a Note In the pop-up dialog box, you can type in the note content (At most 50 letters are allowed.), or select one of the notes from the note list below, and then click on OK. A note icon “ ” appears in the CTG area where the mouse was clicked, with the event content displayed next to it. For example: Figure 3-10 The event NOTE: 1 To avoid the note covering the trend, click on the mouse at a vacant area. 2 At most 1024 notes can be added in a monitoring window. After the note amount has reached the maximum, save the data to start new monitoring. 2) Editing a Note To change the content of a note, move the cursor to this note icon, right click on the mouse and select Edit Note. Type in the new content and then click on OK. 3) Deleting a Note To delete a note, move the cursor to this note icon, right click on the mouse and then select Delete Note. - 17 - MFM-CNS Central Monitoring System Monitor User Manual Functions and Operation 3.2.7 Highlighting a Section Highlighting a section of a trace makes this section noticeable. To highlight a section, 1) Right-click on a trace and select Highlight Start. A “ ” symbol shows up. 2) Move the cursor to the next point, right click on the mouse and then select Highlight End, this section of the trace is shown in bold. Figure 3-11 Highlight a section NOTE: If the mouse is not clicked on a trace, the system highlights the closest trace automatically. 3.2.8 NST Timer The NST timer measures the NST monitoring duration and signals when the time is out. Right-click in the fetal monitoring trend area, click on NST Timer and then select a length. Figure 3-12 Setting NST timer The elapsed time appears in the top right corner of the trend area, with a purple background . When the time is out, the timer background turns into green and the message “NST overtime” is issued. - 18 - MFM-CNS Central Monitoring System Monitor User Manual Functions and Operation Save the data to start new monitoring, the timer will be reset. NOTE: Instead of the time span, the NST timer counts the length of effective CTG that the system has received. The timer stops if no data is transferred to the system. (When the bedside monitor is offline/ does not has signal, or MFM-CNS is closed.) 3.2.9 Saving the Data After a patient finishes monitoring, you should save her data as a study in the archives. If it is not saved, data of the new patient will be connected to that of the previous patient, making it difficult to distinguish and diagnose. If the current window contains data of only one patient, you can click on the Save button in the toolbar. All data will be saved as a study in the archives. The data includes patient information, CTG trends, maternal vital sign trend and NIBP list. You can load the study for review, diagnosis and printing. If the current window contains data of more than one patient, you can save it partially. Drag the scroll bar or click on the playback key to the new monitoring mark , right click on the mouse and select Save Previous. Click on Yes to confirm saving. The system saves the previous data as a study in the archives, and clears it from the current window. NOTE: 1 The system automatically saves the data every minute. You only need to save the data once at the end of every monitoring. 2 If the monitoring continues after 24 hours, the system saves the data as a study in the archives, and begins new monitoring. 3.2.10 Clearing the Data For the useless data, you can clear it. To clear the data partially, move the cursor to a point, right-click in the CTG area and then select Clear Previous. Click on Yes to delete the data previous to the point, or click on No to cancel. If you want to clear all data of the current window, right click on the mouse and then select Clear All. Click on Yes to delete all data, or click on No to cancel. NOTE: The cleared data cannot be restored. Make sure the data is useless before clearing it. - 19 - MFM-CNS Central Monitoring System Monitor User Manual Functions and Operation 3.3 Viewing a Bed The monitoring window of every monitor is arranged equally on the main interface, and the selected window is marked with dark title bar. In order to observe a bed in detail, you can select it and then click on the ViewBed button the trend display area. in the toolbar or double-click on the mouse in The ViewBed window includes several frames: Monitoring, CTG Review, Trend Review, NIBP Review, Event Review and Alarm Settings. In the ViewBed window, click on the MainScreen button double-click on the mouse in the CTG area to return to the main interface. in the toolbar or 3.3.1 Monitoring Frame By default, the system enters the Monitoring frame after the ViewBed window is open. You should enter this frame before having access to other frames. The monitoring frame is the full size of the monitoring interface. You can perform all operations introduced in section 3.2. 3.3.2 CTG Review Frame Figure 3-13 CTG review frame - 20 - MFM-CNS Central Monitoring System Monitor User Manual Functions and Operation The top half of the CTG Review frame is the CTG trend of the whole monitoring process (24 hours at most). Click on the mouse in the top half area, the system covers a section (auto section) with black background. The bottom half shows details of it. The length and start of this auto section are set in the Monitoring Setup menu. 3.3.3 Trend Review Frame The Trend Review frame lists maternal monitoring parameters of 24 hours, and it is saved every minute. The parameters include MHR, MSpO2, NIBP and TEMP. Figure 3-14 Trend review frame - 21 - MFM-CNS Central Monitoring System Monitor User Manual Functions and Operation 3.3.4 NIBP Review Frame NIBP Review frame can list 200 groups of NIBP measured during monitoring. The system saves a group of data after every NIBP measurement. Figure 3-15 NIBP review frame - 22 - MFM-CNS Central Monitoring System Monitor User Manual Functions and Operation 3.3.5 Event Review Frame The top half of the Event Review frame shows the CTG, and the bottom half of the Event Review frame lists all the events. Click on one of the events, the system positions it at the center of the screen, marked with a pink vertical line. Figure 3-16 Event review frame The events in the list are divided into four types: Basic, Note, Alarm and System. You can choose to show some or all types of events. Right-click in the event list, and tick the type(s) of the event you want to show. Figure 3-17 Event type selection - 23 - MFM-CNS Central Monitoring System Monitor User Manual Functions and Operation 3.3.6 Alarm Settings Frame The Alarm Settings frame shows alarm settings of this window. You can change the setting or load default settings. Figure 3-18 Alarm setting frame The alarm items and their status and other information are listed. If you want to change the alarm settings, select the alarm item and then click on the Modify button. The following figure takes FHR alarm settings as an example. - 24 - MFM-CNS Central Monitoring System Monitor User Manual Functions and Operation Alarm: To switch the alarm on or off Low Alarm Limit: The lower limit that will trigger the alarm High Alarm Limit: The upper limit that will trigger the alarm Alarm Delay: The continuous time of the vital sign exceeding its limit that will trigger the alarm. Figure 3-19 FHR Alarm setup menu The table below lists options and default setting of each alarm item: Item Options Default Setting Alarm On/Off On Low Alarm Limit (bpm) 60 ~ 209 120 High Alarm Limit (bpm) 61 ~ 210 160 Alarm Delay (s) 0 ~ 300 10 Alarm On/Off On Low Alarm Limit (bpm) 30 ~ 239 50 High Alarm Limit (bpm) 31 ~ 240 120 Alarm On/Off On Low Alarm Limit (bpm) 0 ~ 99 90 High Alarm Limit (bpm) 1 ~ 100 100 Alarm On/Off On Low Alarm Limit (bpm) 21.0 ~ 43.9 36.0 High Alarm Limit (bpm) 21.1 ~ 44.0 38.0 Alarm On/Off On Low Alarm Limit (bpm) 50 ~ 239 90 High Alarm Limit (bpm) 51 ~ 240 160 FHR (bpm) MHR (bpm) SpO2 (%) Temp (°C) SYS (mmHg) - 25 - MFM-CNS Central Monitoring System Monitor User Manual Functions and Operation DIA (mmHg) Alarm On/Off On Low Alarm Limit (bpm) 15 ~ 179 50 High Alarm Limit (bpm) 16 ~ 180 90 Alarm On/Off On Low Alarm Limit (bpm) 25 ~ 199 60 High Alarm Limit (bpm) 26 ~ 200 110 MAP (mmHg) NOTE: The alarm setting change is valid only for the current monitoring of the window. When the monitor starts new monitoring, or after data saving or clearing is performed, the user default alarm settings are restored. The factory default alarm settings remain. If you want to load the user default alarm settings, click on the Default button in the bottom left corner. 3.3.7 Viewing Mode By default, the ViewBed window provides a full screen of the current monitoring information. Optionally, two more viewing modes are available: Up and Down split mode and Left and Right split mode. It is configurable by service engineers. Figure 3-20 Up and down split screen viewbed - 26 - MFM-CNS Central Monitoring System Monitor User Manual Functions and Operation Figure 3-21 Right and left split screen viewbed To acquire optimal split-screen effect, the screen specification should meet the following requirements: Viewing Mode Full Screen Up and down Split Right and left Split Dual Screen 1~8 17” LCD 1024x768 19” LCD 1280x1024 19” LCD 1440×900 19” LCD 1440×900 9 ~ 16 19” LCD 1440×900 24” LCD 1920x1200 24” LCD 1920×1200 19” LCD 1440×900 17 ~ 32 24” LCD 1920x1200 Not available Not available 24” LCD 1920×1200 Monitor Qty NOTE: 1 Resolution of the LCD should be set to the factory default; otherwise the display may be affected. 2 If all the optional functions are enabled, the LCD resolution should be set to 1440X900 or greater. 3 Only Win XP operating system supports dual-screen viewing mode. - 27 - MFM-CNS Central Monitoring System Monitor User Manual Functions and Operation 3.4 Maternal Information It is recommended to enter the maternal information at the beginning of every monitoring, to make sure that one monitoring record is corresponding to one patient. For the studies in the archives, you can load them to the main interface and then enter/edit the maternal information. NOTE: By default, CNS does not accept the patient information from the bedside monitors. You should enter this information for the patient on CNS. Operation Method: 1) Click on the Mat.Info button in the toolbar, and the Mat.Info window opens. Figure 3-22 Maternal information editing menu NOTE: Some of the items in the above figure may not be shown, depending on the items ticked in the Mat.Info Setup menu. 2) To input the information, type in the content directly. The box at the bottom of the window indicates the format of content. 3) To input DOB or EDC, click on the calendar - 28 - next to DOB or EDC box. MFM-CNS Central Monitoring System Monitor User Manual Functions and Operation Figure 3-23 Calendar – Click on the figure of the year, e.g. 1980, two selection icons are enabled. them to select a year. Click on – Click on the month, e.g. November, all month options are enabled. Select the month. Alternatively, you may use these two icons to select the month: . – Double click on the date to select DOB (date of birth) or EDC (expected date of childbirth). NOTE: 1 The system gives Age automatically in accordance with DOB. Or you can input the age. 2 The system automatically updates the patient’s GesWeek until it reaches 50+6. 3 Before GesWeek reaches 40+0, the system automatically calculates EDC accordingly. If gestation week or gestation day is not inputted, the system takes it as 0. 3) Click on OK. The system keeps the maternal information in its database. When inputting the name, all the maternal names which start with the same letters appear next to the blank. If you choose a patient whose information is saved in the database, the system loads her information and calculates the gestation week and day automatically. NOTE: After (50+6) gestation time, the patient’s name will not be displayed. 3.5 Moving Bed To move a bed is to transfer monitoring data of the source monitor to the target monitor, and then connect their data. This often happens when moving a patient from predelivery room to delivery room. For example, after monitoring a patient with a fetal monitor (Monitor 1) in the predeliver room, you need to move her to the delivery room with a fetal & maternal monitor (Monitor 2). - 29 - MFM-CNS Central Monitoring System Monitor User Manual Select the source monitor, and then click on the MoveBed button open the Movebed menu. Functions and Operation in the toolbar to Figure 3-24 Bed moving Select a target monitor number and click on OK. Data of the source monitor is transferred to the target monitor, and is saved in the front of the new data. You can save data of the two parts in one study. There are a few limitations on moving a bed: The source monitor should not be empty. The time should not conflict. If time conflict exists, a dialog box “CTG time conflict, are you sure to move bed?” pops up. The total time length of the data should not exceed 24 hours. Moving bed can be carried out between any types of bedside monitor. All the data will be transferred when a bed is moved, including maternal information, fetal monitoring data and maternal vital signs. 3.6 Diagnosing In the diagnose window, you can grade and give comments. The manual section (at least 5-minute data) has the priority for diagnosing. Click on the Diagnose button to open the diagnose window: - 30 - MFM-CNS Central Monitoring System Monitor User Manual Functions and Operation Figure 3-25 Diagnose window Input the comments and select the operators. The messages inputted before in the comments and signature areas are automatically saved. You can open the pull-down menus to find the used messages. 10 previous comments can be saved. 3.7 Printing There are four types of monitoring report: fetal monitoring graph, maternal trend list, NIBP list and event list. You can print them with a printer or export them. 3.7.1 Printing Reports 1) Fetal Monitor Graph Click on the Print button in the Monitoring frame or CTG Review frame of a bed. NOTE: There must be more than 1-minute data before you have access to the printing interface. - 31 - MFM-CNS Central Monitoring System Monitor User Manual Functions and Operation Figure 3-26 Fetal Monitoring Graph To acquire the required report, all the items should be set properly according to the print content. Figure 3-27 Print options - 32 - MFM-CNS Central Monitoring System Monitor User Manual Functions and Operation z To select a printer: The pull-down menu of Printer lists all the supported printers. NOTE: Select the connected printer, and set the printing quality to Best to acquire the optimum printing effect. z To select the report orientation: The monitoring report is either in Portrait or Landscape orientation. z To select print shade: To add some shade to the report printout: Light, Demitint or Dark. z To add page footer: To input some information, this will be printed on the footer area of the report. z To select report color: Tick Color Printing, the report is chromatic, otherwise the report is monochromatic. NOTE: The report is printed chromatically only if a color printer is used, and if the screen color is set to Orange or Green. Do not tick this item if a mono printer is used. z To select trend report format: Tick One Page Trend, the system compresses the trend list to fit one page. z To select the CTG length of every section The CTG length of every section is the product of the paper speed and the time span of this section. For example, if the printing speed is 3cm/min and the CTG length is 60cm, the time span of every section of the report is 20min. You can set it to 20cm, 30cm, 40cm, 50cm, 60cm or All. The manufacturer recommends 30cm CTG length for landscape direction, or 20cm CTG length for portrait direction. NOTE: 1 To acquire optimum readability, choose the Landscape direction for the section length of 40cm, 50cm and 60cm. 2 “All” only takes effect on exporting the report in a PDF file, the longest CTG length is 1 hour. z To select the diagnosis column: choose whether to print the diagnosis column on the report , or where to print it. z To select the paper range If you want to print all the data, select All Pages. If you want to print the page that is shown in the window only, select Current Page. NOTE: Do not print all the pages when receiving data. - 33 - MFM-CNS Central Monitoring System Monitor User Manual Functions and Operation z To zoom in/zoom out the report in the preview area Select the preview scale in the pull-down menu of the Preview Zoom item. Full Page, 25%, 50%, 75%, 100%, 150% and 200% are available. z To select a page to preview: Depending on the CTG data, the report might include several pages. Select a page to review. Click on Print to start printing the report. Click on Exit to exit. 2) Maternal Vital Sign List Open the Trend Review frame of a bed and click on the Print button maternal vital sign list. to print the Set the items as introduced above. 3) NIBP List Open the NIBP Review frame of a bed and click on the Print button NIBP list. to print the Set the items as introduced above. 4) Event List Open the Event Review frame of a bed and click on the Print button event list. to print the Set the items as introduced above. 3.7.2 Exporting You can export the report into PDF, JPG or TIF file(s). To export the report, 1) Open the Print window. 2) Set all the items properly. 3) Click on Export, type in the file name, select a file format and a path, and then click on OK. - 34 - MFM-CNS Central Monitoring System Monitor User Manual Functions and Operation Figure 3-28 Export the report The report is exported to the preset directory. NOTE: 1 The program PDF Creator needs to be installed before you have access to exporting a report in a *.pdf file. 2 Wait until export completes before performing any other operations. 3 When exporting a multipage report in JPG format, each page is saved in a separated *.jpg file. The page numbers differentiate their file names, e.g. xxxx-1.jpg, xxxx-2.jpg. 4 Do not export more than 10 pages at a time. 3.7.3 Emailing NOTE: Windows XP sends email with Outlook, and Win 7 sends email with Windows live. Make sure this software can send emails normally before attempting to email the reports. You can email the report file to others. The file format is set in the export window. To email the report, 1) Open the Print window. 2) Set all the items properly. 3) Click on Email to, select a recipient, type in the subject and note, and then click on OK. - 35 - MFM-CNS Central Monitoring System Monitor User Manual Figure 3-29 Email the report The report is attached in the email and sent. To add a recipient, 1) Open the Email to window, and click on Add. Figure 3-30 Add a recipient 2) Type in the recipient name and Email address. 3) Click on OK, this recipient is added. To change a recipient information, 1) Open the Email to window, and click on Modify. 2) Edit the recipient name and/or Email address. 3) Click on OK, the new information is saved. - 36 - Functions and Operation MFM-CNS Central Monitoring System Monitor User Manual Functions and Operation To delete a recipient, 1) Open the Email to window, and click on Delete. 2) Click on Yes, the recipient is deleted. 3.8 Archives Click on the Archives button to open the Archives window. It lists all the monitoring studies and the patient information. By clicking on the page turners on the bottom left corner, you can review more studies. Figure 3-31 Archive window 3.8.1 Searching for a Study When you are looking for a study, use the search tool to find it quickly. Search Method: 1) Select a search condition in the pull-down menu on the right of the interface, e.g. “Name”. 2) Input the key word (either a part or all of the key word). 3) Click on Search. All the monitoring studies that meet the requirement are listed in the window. - 37 - MFM-CNS Central Monitoring System Monitor User Manual Functions and Operation Figure 3-32 Searching for a study 4) To return to the previous archives window, click on the Refresh button. 3.8.2 Loading a Study For the studies in the archives, you can load them to the main interface. At most 35 windows are allowed to be open at the same time. Select a study in the list, click on the Load button, or double click on it. It will be loaded to the ViewBed window. You can review the traces and other information, edit maternal information, make diagnosis or print the reports. Click on the button to close the window. NOTE: After modifying or inputting maternal information, the change takes effect after the Archives window is closed. 3.8.3 Statistic The statistic feature is used to search for the studies that were performed between the specified dates. Click on the Statistic button in the Archive window, input the start date and the end date (in the same format as the system date), and then click on OK. Figure 3-33 Archive statistic menu The studies that meet the requirement are listed in the window. To return to the previous archives window, click on the Refresh button. NOTE: Statistic only supports the date between 2000-1-1 and the current date. - 38 - MFM-CNS Central Monitoring System Monitor User Manual Functions and Operation 3.9 System Setup Click on the Setup button in the toolbar to open the Setup window. In this window, you can change setting of the system. NOTE: 1 Settings of MFM-CNS and the bedside monitors are separated; they do not affect each other. 2 The following setup can only be performed by advanced users. General users do not have access to the setup window. System Setup and Service Setup are supposed to be operated by authorized service engineers. 3.9.1 Fetal Monitoring Setup After the Setup button is clicked, the system enters the Monitoring Setup interface. You can set the fetal monitoring items listed in the following table, and the parameters underlined are default values. Item Options Explanation Paper Speed 1cm/min 2cm/mim 3cm/min Speed of the CTG trend paper advancing. FHR2 Offset -20 0 +20 When monitoring twins, set FHR2 offset to separate the two FHR trends. Paper Style Compact (USA) USA International Time Scale Real Time Relative Time The background paper style for CTG trend. − Compact (USA): 60bpm ~ 210bpm, vertical ordinate is 30bpm/cm; − USA: 30bpm ~ 240bpm, vertical ordinate is 30bpm/cm; − International: 50bpm ~ 210bpm, vertical ordinate is 20bpm/cm. The time format of the x-axis. − Real Time: The x-axis displays the real time. − Relative Time: The x-axis displays the elapsed time of the system running. Auto Section 20min 30min Length When the manual section is empty, the system selects a section automatically for review, diagnosing and printing. This section length is adjustable. − 20min: The length is 20min − 30min: The length is 30min - 39 - MFM-CNS Central Monitoring System Monitor User Manual Start Center Select Position Grid Style Line Solid Dashed Functions and Operation For every auto section, − Start: The cursor stays at the start of the section. − Center: The cursor stays at the center of the section. − Solid: The trend background has solid grid line. − Dashed: The trend background has dashed grid line. 3.9.2 Maternal Monitoring Setup On the Monitoring Setup interface, you can set the maternal monitoring items listed in the following table, and the parameters underlined are default values. Item NIBP Unit Options mmHg Explanation Select NIBP unit. kPa Temp Unit ºC Select temperature unit. ºF HR Source ECG Pulse Select maternal HR source priority. If the set HR source does not have input signal, the system switches the source to the other automatically. Fill Wave: Choose the way of describing respiratory wave and PLETH, and the default is Fill Wave;; 3.9.3 CTG Option Setup On the Monitoring Setup interface, you can set the CTG items listed below. Show normal FHR range: Choose whether to show FHR safe range with green background in the FHR trend display area, and the default is ;. The green band indicates the preset alarm range (the top edge is not higher than 180 and the bottom edge is not lower than 100). It makes it easy to observe if the FHR exceeds the normal range, and you can tell if the fetal heart rate is too low or too high. Show mat. name synchronously: Show maternal name synchronously when showing date and time every 10 minutes, and the default is □. Show AFM trace : Choose whether to show AFM trace, and the default is □; Show fetal movement count: choose whether to show the count of fetal movement mark on the CTG, and the default is □; Show CTG duration: choose whether to show the monitoring duration timer for each bed, and the default is □. Show MHR trace: Choose whether to show MHR trace, and the default is □; Show MSpO2 trace: Choose whether to show MSpO2 trace, and the default is □; - 40 - MFM-CNS Central Monitoring System Monitor User Manual Functions and Operation 3.9.4 Interface Setup Enter the Setup interface and then click on General Setup. You can set the interface items listed below. Screen Color: Select the color style for the Monitoring window, Orange, Green, Blue, Black, Customize. Color Customizing: When Screen Color is set to Customize, Item Color is enabled. You can customize the color for a certain item by performing the following procedures: 1) Select Customize in the pull-down menu of Color Config. 2) Select the item that you want to customize color for in Item Color, for example “FHR1”. 3) Click on the color box on the right of the item; 4) Select a new color in the Color window and then click on OK; From the color box, you can see that the color of selected item has been changed. a) b) d) c) Figure 3-34 Color Customizing Numeric Window: Select the position of the numeric window relative to the trend area, Right, Top, Left, Bottom. NOTE: To acquire optimal display effect, the numeric window should be set at a proper place according to the LCD size and screen split mode. We recommend you to set - 41 - MFM-CNS Central Monitoring System Monitor User Manual Functions and Operation the numeric window to Top or Bottom for Up and Down split mode, and set it to Left or Right for Left and Right split mode. 3.9.5 Inputting Hospital Name Enter the Setup interface and then click on General Setup. You can input the hospital name. Input the hospital name in the blank under the Hospital item. This name will be shown on the monitoring report. NOTE: You should set the hospital name before the monitoring starts. If the hospital name is changed, it will take effect after new monitoring starts. 3.9.6 Setting Alarm Sound Enter the Setup interface and then click on General Setup. You can change the alarm settings. (Alarm) Volume: Select the alarm volume to level 1, 2 or 3. 1 is the lowest level and 3 is the highest level. The default is 2. Silence Duration: Select the alarm silence mode: Silence, Alarm Sound Paused 1min / 2min/3min, or Alarm Sound Off. The default is Silence. Modify Default: You can change the alarm settings here and save them as user default. This default will be loaded in the Alarm Settings frame. To change the alarm user default: a) Click on Modify Default. Figure 3-35 Modify alarm default b) Select an alarm item, and then click on Modify. - 42 - MFM-CNS Central Monitoring System Monitor User Manual Functions and Operation Figure 3-36 Modify FHR default c) Change the editable items, and then click on OK. Load Factory Default: Set all user default to factory default by clicking on the Load Factory Default button. 3.9.7 Setting Auto Saving Timer Enter the Setup interface and then click on General Setup. You can set the auto saving timer. If the bedside monitor is offline, the system saves the data automatically after this preset interval. Auto. Saving Timer: Select None, 10 min ~ 60 min; the default is 30 min. NOTE: The system does not save the data automatically if the window is being opened or modified. - 43 - MFM-CNS Central Monitoring System Monitor User Manual Functions and Operation 3.9.8 Note Management Enter the Setup interface and then click on General Setup. You can manage the note list on the Note Management interface. Figure 3-37 Note management Adding a note to the list: Click on Add, input the note content in the following dialogue box and then click on OK, this note is added to the note list. Figure 3-38 Add a note Deleting a note from the list: Select a note and then click on Delete, select Yes, this note is deleted from the note list. Saving a note to the list automatically: If the Auto. Save item is ticked, the system saves a new note to the note list for future use after it is inputted. You can click on the buttons Ctrl+Del to delete a note from the list. If this item is not ticked, the inputted note is not saved, and can not be deleted directly. - 44 - MFM-CNS Central Monitoring System Monitor User Manual Functions and Operation 3.9.9 Setting Maternal Information Options Enter the Setup interface and then click on Mat. Info Setup. You can choose the maternal information options. By default, only some of the items are shown. You can select or deselect the items as required in the Mat Info area. After an item is selected, it will appear in the maternal information menu, the archives interface and the pull-down menu of study searching condition. 3.9.10 Setting Auto Created ID Enter the Setup interface and then click on Mat. Info Setup. You can choose whether to create an ID automatically. If both Auto Create ID and ID in Mat. Info are selected, the system creates an ID for the patient when inputting maternal information. This ID is editable, and is available for real-time monitoring. 3.9.11 Service Setup The items in the Service Setup menu are password protected. Only service engineers can change their settings. Once they are changed, the software should be restarted. Therefore, do not change the service settings during monitoring. ♦ User Login: The user management feature. In order to protect the user’s operation, the software should be logged in to using a username and the correct password. The default is on. ♦ Protect settings: Password is required for entering setup interface. The default is off. ♦ Protect archives: Password is required for entering the Archives window. The default is off. ♦ Download: To download the data in the memory of the bedside monitors (F9, software of version 2.4 or greater). The default is off. ♦ Open file: To open the downloaded files from the bedside monitors (at most 10 files are allowed to be opened at one time, and only the files on the local hard drive are openable.), or the files imported from USB disk. The default is off. ♦ Export: Export the monitoring report to a file. The default is off. ♦ Email to: Send the exported file as attachment by email. When the report has more than one page, it should be exported in the format of PDF or tif. Only the first page will be sent if the report is in JPG format. The default is off. ♦ Chalkboard: Summarize all patient information in a small window for quick review. The default is off. ♦ Partogram: According to the inputted patient’s parameter during delivery, the system draws a partogram for the physician’s or midwife’s reference. The default is off. ♦ Enable MoveBed: When the patient is moved from one bed to another, the system allows moving the data from the source monitor to the target monitor. The default is on. - 45 - MFM-CNS Central Monitoring System Monitor User Manual Functions and Operation ♦ Enable time conflicting (MoveBed): When the time of the source monitor and the target monitor conflicts (Ending time of the source data is later than the starting time of the target monitor), the system allows the moving bed operation. The default is on. ♦ Accept ID from monitor: The system accepts the ID (made up of digitals or English letters) inputted on the bedside monitor (F9, software of version 2.5 or greater). The default is off. NOTE: Even this feature is enabled, the user can still input patient ID on CNS, and the most recently modified one will prevail. ♦ Send ID to monitor: The system sends the inputted ID (made up of digitals or English letters) to the bedside monitor. This feature is reserved, and the default is off. ♦ Show RESP: Show RESP waveform and numeric. The default is off. ♦ Signals Overlap: When the twin signals or the fetal heart signal and maternal heart signal overlap, the system issues a message. The default is off. ♦ Transfer: To monitor the fetus and the mother synchronously, transfer the real-time data of a patient monitor to a fetal monitor. The default is off. NOTE: When this feature is enabled, you can set the transfer condition on the monitoring window by right clicking on the mouse and choosing Transfer. If the data transfer succeeds, the window title flickers and shows “3->5”, indicating that data of monitor 3 is transferred to monitor 5. If the transfer fails, you should check if the source monitor is a patient monitor and the target monitor is a fetal monitor, and if the same patient ID is inputted on both monitors. If you want to transfer the data by ID, patient ID should be inputted on the patient monitor before new monitoring starts. Otherwise the data cannot be transferred to the target window correctly. ♦ Copy to: To copy the opened file or study and save it in the target directory. The default is off. ♦ Manual Section: To select the start and end of a section manually. The default is on. ♦ Clear Previous: To clear the data previous to a point on CTG interface. The default is on. ♦ Save Previous: To save the data previous to a point on CTG interface. The default is on. ♦ NST Timer: After choosing NST duration, the system shows the elapse time of the monitoring, and gives a message when time is out. The default is off. ♦ Highlight: To highlight a section of a trace. The default is off. ♦ Show initials (notes): To show initials of the user next to the note (on the condition of that the user login feature is enabled). The default is off. ♦ Show deleted notes: To show the deleted notes on the CTG interface. The default is off. ♦ Enable closing monitor window: To enable a closing button in each real-time monitoring window. The default is off. ♦ Fixed CTG Duration (ViewBed): When viewing a bed, the CTG duration on the screen is fixed to 20 or 30 minutes (depending on the auto section length). The default is off. ♦ Disable OS: To disable the operating system when the software is running, the user cannot - 46 - MFM-CNS Central Monitoring System Monitor User Manual Functions and Operation run other software. The default is off. ♦ Shutdown after exit: To shut down the computer automatically after exiting the software. The default is off. 3.10 User Login NOTE: 1 This is an optional feature enabled or disabled in Service Setup. To protect the user’s operation, it is recommended to enable this feature. 2 Only advanced users can add, modify or delete user information. But information of users who already logs in is not modifiable. 3.10.1 Login The login dialog box pops up when running the software: Figure 3-39 User login All user names are listed in the pull-down menu of the UserName item. Select your user name, type in the correct password and then click on OK to login. The user name is shown on the main interface . - 47 - MFM-CNS Central Monitoring System Monitor User Manual Functions and Operation 3.10.2 Modifying Password After login, you can change your password. 1) Click on the user name button on the main interface. Figure 3-40 Confirm user identity 2) Input the old password to confirm the user’s identity. Figure 3-41 Modify password 3) Input the new password twice, and then click on OK. The password is changed. NOTE: General users can only change their passwords in this way. However, advanced users can also change password by modifying user information on the User Management interface. 3.10.3 Logout Click on the Login button in the tool bar, the Login dialog box pops up. You should log in again to get access to the operation. 3.10.4 Adding a User Enter the Setup interface and then click on General Setup. On the User Management interface, you can add, modify or delete a user’s information. - 48 - MFM-CNS Central Monitoring System Monitor User Manual Functions and Operation Figure 3-42 User management To add a user: 1) Click on Add in the User Management interface. Figure 3-43 Input user information 2) On the User Info. interface, type the user name and the password (the password can only be case insensitive letters a ~ z or numbers 0 ~9); select a profession (Nurse, Midwife, Technologist or Physician) and a class (General or Advanced). 3) Click on the directory icon and choose the *.jpg file of your signature. - 49 - MFM-CNS Central Monitoring System Monitor User Manual Functions and Operation 4) Click on OK, this user is added to the user list. NOTE: 1 Only the physicians can make a diagnosis. 2 Scan the signature and save it in a *.jpg file in advance. The optimum size of the *.jpg file is 113x49. 3 After the customized picture signature is added, the system saves the *.jpg file in the folder D:\files\signature. Do not delete it. 3.10.5 Modifying a User’s Information To change a user’s information: 1) Select a user on the User Management interface. 2) Click on Modify. 3) Retype in the user’s information. 4) Click on OK. 3.10.6 Deleting a User To delete a user: 1) Select a user on the User Management interface. 2) Click on Delete. 3) Click on Yes to confirm operation, this user is deleted from the list. 3.11 Downloading Data NOTE: 1 This is an optional feature enabled or disabled in Service Setup. 2 The system can only receive the data from the memory of F9/F6 series fetal & maternal monitors (F9 with software of version 2.4 or greater and F6 with software of version 1.5 or greater). 3 Only the data files whose time length is shorter than 16 hours are transmittable. 4 Do not unplug the connecting cable in the process of downloading data. 5 The downloaded data does not include maternal vital signs. When the bedside monitor is offline, the data is saved in the monitor memory. You can download this data after the monitor gets online again. - 50 - MFM-CNS Central Monitoring System Monitor User Manual Functions and Operation To download the data from the memory, 1) Click on the Download button to open the Download window. All examinations from the memory are listed, and the examinations that do not exist in the database are marked with New Archives, and their progress is 0.0%. Figure 3-44 Download offline data 2) Select the examination(s) you want to download. Select All is used to select all the examinations, and Select None is used to deselect them. 3) Click on Download. 4) When downloading is completed, click on Exit to exit. 5) The data is saved in the preset directory d:\fmdata\download.You can perform operations on them like other files, e.g. saving, printing, and making notes. 3.12 Opening Files For the downloaded files and other .trc files imported from USB disk, you can load them to the main interface. Click on the OpenFile button on the tool bar, the downloaded files are listed. - 51 - MFM-CNS Central Monitoring System Monitor User Manual Functions and Operation Figure 3-45 Open files To load a file, select a file in the list, right click on the mouse and select Load, or click on the Load button on the right. This file is opened. To delete a file, select a file in the list, right click on the mouse and select Delete, click on Yes, the file is deleted. To open the files in another directory, you can click on the directory icon and open them. to find other files 3.13 Help Press the Help button this software. in the toolbar or shortcut button F1 to get help information of 3.14 Exit from MFM-CNS After finishing monitoring, you should close the system software. Click on the Close button in the toolbar to exit from the system. If there is still monitoring data that has not been saved to database, a dialogue box will pop up to remind you. Click on Yes to save the data in the current monitoring window, and exit from the system. When the system is running again, it will automatically reload the data saved temporarily last time. - 52 - MFM-CNS Central Monitoring System Monitor User Manual Shortcut for Operation Chapter 4 Shortcut for Operation Please follow the basic operation flow below when monitoring the pregnant woman with MFM-CNS System. Power On Register Mat.Info Monitor/View Curves, Parameters MoveBed (Optional) Diagnose Print Save 1) After connecting the system, turn on the power of the host, monitor and printer, etc., the system enters the main interface several seconds later. 2) Login/Logout (optional): Click on the Login button, select a user name, enter the password, and then click on OK to confirm user login. Click on the Logout button to logout the current user. 3) Select a bed: Click on the device light or the window of a bedside monitor to select a bed. NOTE: To avoid performing operation on the wrong bedside monitor, the monitor’s device number should be confirmed before taking any action. 4) Register maternal information: Click on the Mat.Info button, and enter maternal information in the Mat.Info window. Click on OK to save the information. 5) Start monitoring: Turn on the bedside monitor, and monitor the patient with transducers. The central station receives data from the monitors automatically, including fetal monitoring trends, or maternal monitoring trends and other parameters. 6) ViewBed: Click on the ViewBed button or double click in the Monitoring window to enter the ViewBed window. You can review CTG, trends and NIBP. 7) Note Mark: When you want to mark a note during monitoring, right click on the position in the note display area, and select Add Note in the right-click menu. Also you can edit or delete the note marker by right clicking on the note icon “ ”, and then select Edit Note or Delete Note. - 53 - MFM-CNS Central Monitoring System Monitor User Manual Shortcut for Operation 8) Jump and play: When the monitoring data is more than one screen, you can drag the scroll bar at the bottom of the interface directly, or click on the Playback and Review buttons to view the previous monitoring trends. 9) Diagnose: Click on the Diagnose button to open the Diagnose window and then input diagnostic contents directly. 10) Print report: Click on the Print button to preview or print fetal monitoring graph, maternal vital signs list or NIBP list. 11) Save: Click on the Save button to save all the monitoring data in the current window to database, and clear it afterward. 12) Archives: Click on the Archives button to open the Archives window. You can select one of the records, load it to the ViewBed window to make a diagnosis, revise maternal information, or print report, etc. If there are too many records, click on the Search button to find all the necessary records of the pregnant woman. 13) Setup: Click on the Setup button to open the Setup window and change settings of the system. 14) Help: Click on the Help button to get the information of how to use this software. 15) Exit: Click on the Close button to exit from MFM-CNS. - 54 - MFM-CNS Central Monitoring System Monitor User Manual Maintenance Chapter 5 Maintenance You should be familiar with the operation process and method of this system. Read this manual in detail and understand the whole operation process before operating it. MFM-CNS needs simple maintenance during use. However, proper operation is required to guarantee longtime, steady working of the system. WARNING Turn off the power and remove the power cords before cleaning. Maintenance for the Main Unit and Monitor 1) Keep the main unit and the monitor clean. The main unit casing can be cleaned with a soft cloth dampened with water (or mild detergent, if necessary). Use liquid very sparingly to prevent liquid from entering the equipment, and remove any residue completely afterward. 2) The main unit and the monitor should be placed in the dry and well-ventilated place. The air path for cooling the system should be kept well ventilated. Avoid being placed in the dusty and humid environment. CAUTION Avoid pouring liquids on the device while cleaning, and do not immerse any parts of the device into any liquids. - 55 - MFM-CNS Central Monitoring System Monitor User Manual Service Chapter 6 Service If you have any question about maintenance, technical specifications or malfunctions of devices, contact your local distributor. Alternatively, you can send an email to EDAN service department at: [email protected]. - 56 - MFM-CNS Central Monitoring System Monitor User Manual Alarm Messages Appendix 1 Alarm Messages The following table lists the alarm/prompt messages that might appear during monitoring, their respective causes and countermeasures. Alarm Message Cause Countermeasure Patient Alarm (Medium Level) **FHR1 HIGH, >xxx bpm, > y s or **FHR2 HIGH, >xxx bpm, >ys FHR1 or FHR2 measuring result is higher than the set upper limit (xxx) over the alarm delay time (y). **FHR1 LOW, <xxx bpm, > y s or **FHR2 LOW, <xxx bpm, >ys FHR1 or FHR2 measuring result is lower than the set lower limit (xxx) over the alarm delay time (y). **HR HIGH, >xxx bpm Maternal HR result is higher than the upper limit (xxx). **HR LOW, < xxx bpm Maternal HR result is lower than the upper limit (xxx). ** SpO2 HIGH, >xxx% SpO2 result is higher than the upper limit (xxx). ** SpO2 LOW, <xxx% SpO2 result is lower than the upper limit (xxx). **SYS HIGH, >xxx mmHg SYS result is higher than the upper limit (xxx). **SYS LOW, <xxx mmHg SYS result is lower than the upper limit (xxx). **DIA HIGH, >xxx mmHg DIA result is higher than the upper limit (xxx). **DIA LOW, <xxx mmHg DIA result is lower than the upper limit (xxx). **MAP HIGH, >xxx mmHg MAP result is higher than the upper limit (xxx). **MAP LOW, <xxx mmHg MAP result is lower than the upper limit (xxx). **TEMP HIGH, > xxx °C TEMP result is higher than the upper limit (xxx). **TEMP LOW, < xxx °C TEMP result is lower than the upper limit (xxx). - 57 - Check if the alarm limits are suitable; check the patient’s condition. MFM-CNS Central Monitoring System Monitor User Manual Alarm Messages Technical Alarm (Low Level), Prompt Message US1 UNPLUGGED or US2 UNPLUGGED US transducer 1 or US transducer 2 is not well connected. Check the connection of the transducer. US1 SIGNAL LOSS or US2 SIGNAL LOSS FHR1 or FHR2 signal is too weak for the system to analyze. Check if the US transducer is aimed at the fetal heart; check if the alarm limits are suitable; check the patient’s condition. TOCO UNPLUGGED TOCO transducer connected. well Check the connection of the transducer. DECG LEADS OFF The spiral connected. well Check the connection of the spiral electrode. DECG UNPLUGGED The DECG cable is not well connected to the monitor. Check the connection of the DECG cable. DECG SIGNAL LOSS DFHR signal is too weak for the system to analyze. Check if the spiral electrode is well attached to the fetus scalp; check if the alarm limits are suitable; check the patient’s condition. IUP UNPLUGGED The IUPC and/or connecting cable are/is not well connected to the monitor. Check the connection of the IUPC and connecting cable. ECG LEADS OFF ECG leads are not well connected. Check the connection of ECG leads. SpO2 SENSOR OFF SpO2 sensor is not well connected. Check the connection of SpO2 sensor and finger placement. TEMP UNPLUGGED TEMP transducer is not well connected. Check the connection of TEMP transducer. Signals Overlap (FHR1, FHR2) Two ultrasound transducers are aimed at the same fetal heart. Adjust one of the transducers to find the other fetal heart. Signals Overlap (FHR1, MHR) US transducer 1 has maternal heart signal. picked the Adjust the US transducer 1 to find the fetal heart. Signals Overlap (FHR2, MHR) US transducer 2 has maternal heart signal. picked the Adjust the US transducer 2 to find the fetal heart. NST times out The NST duration has exceeded the preset timer. Complete required. Event list overflows. The event amount of the window has reached the limit. Save the data and start new monitoring. Trend list overflows. The maternal trend amount of the window has reached the limit. Save the data and start new monitoring. NIBP list overflows. The NIBP amount of the window has reached the limit. Save the data and start new monitoring. is electrode not is - 58 - not the monitoring as