1
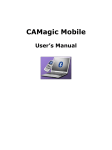
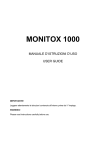
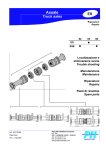
R-Biopharm AG
x
®
RIDA SMART APP
User manual
RIDA®SMART APP Version 1.0.0 | Manual
All rights reserved.
This manual may be used only for its intended purpose. It may not be reproduced in whole or
in part or be translated into another language without our express, prior written consent.
Subject to technical changes.
Manual for
®
RIDA SMART APP
Version 1.0.0
© Copyright 2015 by R-Biopharm AG
R-Biopharm AG
An der neuen Bergstraße 17
64297 Darmstadt, Germany
Phone: + 49 (0) 6151 8102 0
Fax:
+ 49 (0) 6151 8102 40
E-mail: [email protected]
2
RIDA®SMART APP Version 1.0.0 | Manual
Content
Inhalt
1 Introduction ...................................................................................................................... 4
1.1 Purpose of the RIDA®SMART APP.................................................................................. 4
1.2 About this manual ............................................................................................................ 4
1.3 General information ......................................................................................................... 4
2 Installing the RIDA®SMART APP ..................................................................................... 5
2.1 Access data ..................................................................................................................... 5
2.2 Registration and installation............................................................................................. 5
3 Implementation – use of the RIDA®SMART APP ............................................................ 7
3.1 Test Processing ............................................................................................................... 7
3.2 Settings ......................................................................................................................................................... 9
3.3 Analyze the test strip with RIDA®SMART APP ...............................................................11
3.3.1 Measurement ................................................................................................................................ 11
3.3.2 Method selection .......................................................................................................................... 13
3.3.3 Scanning......................................................................................................................................... 14
3.3.4 Result .............................................................................................................................................. 15
3.4 Data export .....................................................................................................................16
3.4.1 E-mail Export................................................................................................................................. 17
3.4.2 Printer Export ................................................................................................................................ 18
3.5 Data storage ...................................................................................................................19
3.5.1 Search Readings ......................................................................................................................... 20
3.5.2 Results Database ........................................................................................................................ 21
4 Customer service information ........................................................................................22
5 Additional Options ..........................................................................................................24
6 Technical Specifications .................................................................................................25
7 Proof of manufacturer .....................................................................................................26
3
RIDA®SMART APP Version 1.0.0 | Manual
1 Introduction
1.1 Purpose of the RIDA®SMART APP
The RIDA®SMART APP is for general lab use and for the quantitative determination of food
and feed parameters. The application can only be installed on a Nexus 6 Smartphone from
Google Inc. The app works quickly, is easy to operate and determines accurate, reliable
results.
Please note that the RIDA®SMART APP Mycotoxins was developed for the evaluation of
R-Biopharm RIDA®QUICK RQS standard products and can only be used in combination with
the R-Biopharm RIDA®QUICK RQS test kits. All additional documents and required
accessories (plastic cover and label) for the evaluation with the RIDA®SMART APP will be
delivered with your standard RIDA®QUICK RQS test kit.
1.2 About this manual
The user manual guides you in detail through the installation and the application of the
RIDA®SMART APP Mycotoxin. It is recommended to thoroughly read the manual before first
use of the program.
1.3 General information
A network connection is required to install and activate the RIDA®SMART APP. Once this is
done the application can be used in full without any requirement for a network connection,
SIM card or data contract. A network connection is only required if you need to download
additional documents or to export data and for technical service requests. A network
connection can be established via Wi-Fi, Bluetooth or USB. Also, a SIM card and a suitable
mobile or data contract can be used if necessary. More information about how to set up an
internet connection on the Nexus6 device can be found at:
https://support.Google.com/nexus/topic/3416342?hl=en & ref_topic = 3415468
Please note that for technical reasons and to guarantee functionality of the application the
RIDA®SMART APP needs to be able to connect to the R-Biopharm Servers on occasion. The
user will be prompted and informed every 2 month to check for updates!
The test results, which have been carried with the RIDA®SMART APP, can be exported to a
pre-defined e-mail address. To export data you need a network connection and an e-mail
account which is set up in the Nexus 6 device. For more information on how to set up an email account on the Nexus 6 device please see:
https://support.google.com/nexus/answer/2840815?hl=end.
4
RIDA®SMART APP Version 1.0.0 | Manual
A Google account is not required to use the app.
If you want to use the application and all of the features which come with the Nexus 6 device
but you have occasional or no access to an appropriate data connection via Wi-Fi, Bluetooth
or USB, we recommend to use a SIM card in conjunction with a suitable mobile phone
provider's data contract.
2 Installing the RIDA®SMART APP
2.1 Access data
Currently the RIDA®SMART APP can only be installed on the Google Smartphone Nexus 6.
You can purchase the Nexus 6 smartphone from any retailer of your choice. In addition,
there is the opportunity to obtain the smartphone directly through our distributors.
Please keep in mind that the RIDA®SMART APP can only be exclusively purchased through
our distributors. Before you can install the RIDA®SMART APP on your Nexus 6, you have to
buy an activation code. After purchase a booklet with the activation code and registration
information will be sent via mail. Please follow the instructions for registration and installation
of the RIDA®SMART APP in the booklet.
2.2 Registration and installation
To start the registration process please switch on your supported smartphone and ensure
that you have a working internet connection. If your supported smartphone does not have a
barcode scanner app, we recommend installing an app that is able to detect all common 1D
and 2D codes.
Scan the QR code, which is located on of the back of your activation code card. This will
automatically redirect you to our RIDA®SMART APP homepage. Alternatively, you can
navigate using the browser app of your supported smartphones to visit the following page:
http://www.app.r-biopharm.de.
You must be registered with the RBAG website to complete your download. Please follow the
instructions provided to register. After registration you will be redirected to the page where
you can download the RIDA®SMART APP onto your smartphone. After installation is
complete please start the RIDA®SMART APP and follow the final registration instructions on
your Nexus 6 device. To activate the application you will need your user name, password,
and your activation code (fig. 1).
Note: during the entire installation process, your Nexus 6 device must have an internet
connection.
5
RIDA®SMART APP Version 1.0.0 | Manual
Registration
Complete registration
after installation of the
®
RIDA SMART APP by
entering your user name,
password, and the
activation code.
Once done, press the
Register button.
Fig. 1 Registration
Once you press the Register button the RIDA®SMART APP is ready to use. Please keep in
mind that the access data with the corresponding registration code are unique and valid for
only one user and Nexus 6 device. After activation of the RIDA®SMART APP reuse of the
access data and registration code for installation on a different smartphone is not possible.
If you lose your access data or registration code, please contact your local distributor.
6
RIDA®SMART APP Version 1.0.0 | Manual
3 Implementation – use of the RIDA®SMART APP
3.1 Test Processing
First, complete the immunochromatographic test with the appropriate sample preparation
according to the test kit instructions. After the prescribed incubation period a control band
(control line) should be visible in the reaction window of the test strip (fig. 2). If this band is
missing the test was not conducted correctly or the reagents were used in the wrong order.
The test should then be repeated with a new test strip. For more reasons why a control line
might not be visible or is only weakly visible please refer to the instructions for use provided
with the test kit.
Test line
Control line
Fig. 2 Test strip with visible bands after incubation
To evaluate the test strip with the RIDA®SMART APP the yellow plastic cover with a lot
specific paper label is required. Before you begin evaluating please check that the lot number
which will be analyzed corresponds to the printed lot number on the front of the paper cover
and the lot number on the test strip certificate. Now, place the yellow cover onto the test strip
to be analyzed (fig. 3). Note: without the cover strip the evaluation of the test strip with the
RIDA®SMART APP is not possible! If the yellow cover strip is lost or destroyed you can use a
yellow cover strip from a different test kit, which has the same batch number (lot number).
Otherwise, please contact your local distributor.
To evaluate the lateral flow
®
strip with the RIDA SMART
APP you must position the
yellow cover strip on the test
strip as shown.
Fig. 3 Positioning of the cover strip
7
RIDA®SMART APP Version 1.0.0 | Manual
Log-in
Start the RIDA®SMART APP to activate the application on the smartphone. Enter your user
data to activate the LOGIN button below (fig. 4). This is subdivided into different
subchapters, which are described below in detail.
Enter your user name and
password
Then press the LOGIN
button.
Fig. 4 Login
8
RIDA®SMART APP Version 1.0.0 | Manual
3.2 Settings
Before the first measurement can be carried out, all user settings should be set up. In the
main menu (fig. 5) the Settings option can be found.
User settings can be
changed in the Settings
menu.
Fig. 5 Main Menu
In the Settings menu, your country and default e-mail address can be stored (fig. 6). The
selection of the country selects the distributor for your area who is responsible for answering
your technical questions (Refer to Customer service information). The default e-mail
address will be used to export all data collected by the RIDA®SMART APP (Refer to Data
export). The country and default e-mail address can be changed at any time.
9
RIDA®SMART APP Version 1.0.0 | Manual
Use the drop down button
to select your country.
Enter your e-mail address
and the name of the
operator. It is important
that the correct operator is
selected when performing
the tests!
The preferences are
updated when you press
SAVE.
Fig. 6 Settings
Several operators can be added to the app through this menu. When performing a test or
series of tests, the correct operator should be selected in the menu. All entries are saved by
pressing the SAVE button.
10
RIDA®SMART APP Version 1.0.0 | Manual
3.3 Analyze the test strip with RIDA®SMART APP
3.3.1 Measurement
To read the test strip, select the button Measurement button (fig. 7) in the main menu. This
will take you to the menu required to measure a test strip.
In the main menu, a new
measurement is started by
pressing the Measurement
button.
Fig. 7 Main Menu
Here, the operator, the sample going to be measured, and the method are determined.
Sample identification is done by entering the sample number (sample ID) and the customer
(customer ID). This information can also be scanned if a barcode is present (fig. 8).
11
RIDA®SMART APP Version 1.0.0 | Manual
New Measurement
Before performing the
measurement, the
operator, the sample
number (sample ID) and
the customer (customer
ID) is entered. The sample
and customer ID can be
entered either manually or
via a scanned barcode by
pressing the SCAN
button.
Scanning the QR code on
the cover strip enters all of
the parameters for your
measurement.
Fig. 8 Sample and test information
After identifying the sample, you can select the method. All parameters which are necessary
for evaluation of the samples are stored on the QR code of the yellow cover strips. By
scanning the QR code the parameters for the analysis are recorded in the device and the
subsequent evaluation is carried out using this method (fig. 9).
12
RIDA®SMART APP Version 1.0.0 | Manual
3.3.2 Method selection
By pressing the NEXT
button, the method and the
sample information are
stored.
Fig. 9 Method selection
After the selecting the application and identification of the sample, the reading of the test strip
can be started with the NEXT button. Ensure that the black outlines on the screen line up
exactly with the edges of the test strip while scanning (fig. 10). A reliable test evaluation can
only be done when the camera is positioned correctly. If the positioning is incorrect the
smartphone will inform you that the scan has failed. This process must then be repeated.
13
RIDA®SMART APP Version 1.0.0 | Manual
3.3.3 Scanning
For a reliable test result, we recommend that scanning should only take place within your
laboratory to control the lighting conditions.
When you scan the test strip
be sure that it is inside the
black outlines. A reliable
evaluation is not possible
when the smartphone is
incorrectly positioned!
An image is recorded through
the camera button and will be
evaluated by the
®
RIDA SMART APP.
Fig. 10 Scanning
14
RIDA®SMART APP Version 1.0.0 | Manual
3.3.4 Result
By pressing the camera button we take a photo which will be evaluated. The result of the test
strip (fig. 11) appears in the Results window automatically opens. The RIDA®SMART APP
calculates the concentration of the analyte in the test band and provides a result.
In the Results window, you
will automatically receive the
test result. The control line is
compared to the test line
allowing the concentration of
the analyte to be calculated
and specified.
You can export the result
of the test via the
EXPORT button.
The NEW button allows
you to perform a new
measurement. The test
result is stored and can be
viewed at any time.
The DELETE button deletes
the test result.
Fig. 11 Results
The test result can be deleted immediately via the DELETE button. On the other hand a new
measurement can be carried out straight away via the NEW button without exporting the
result of the fisrt measurement (fig. 11). The results from non-exported samples is stored
within the RIDA®SMART APP database. These can be viewed again at a later time and
exported (see storage).
15
RIDA®SMART APP Version 1.0.0 | Manual
3.4 Data export
The result of the test strip can be exported via two different routes. Press the Export button
to access the Export Options menu (fig. 12). The test result can be exported via e-mail or
sent to a printer.
The Export Options menu
opens immediately after a
measurement. Through the
Email button, you can
export your test results to
any e-mail address.
To print the test result, press
the Print button.
Fig. 12 menu Export Options
16
RIDA®SMART APP Version 1.0.0 | Manual
3.4.1 E-mail Export
The default e-mail address stored in the Settings menu appears automatically in the
recipient’s column. (fig. 13). The test result named with the appropriate sample ID is attached
to the email. The exported file format of the result is an HTML file which can be easily
opened in every web browser and includes all of the necessary information and a picture of
the analyzed test strip. The E-mail is sent when the Send button is pressed.
The test result is sent to
the email address that
was saved in the
Settings menu.
Additional email
addresses can be
entered through the drop
down button.
Press Send to send the
test result.
The file attached to the
e-mail contains the test
result.
Fig. 13 E-mail Export
17
RIDA®SMART APP Version 1.0.0 | Manual
3.4.2 Printer Export
There is also the possibility to export test results direct to a printer. Many printer
manufacturers have released apps to allow smart devices to connect with their printers.
Check the Google Play store to see if there is an app for your printer. If one exists install it on
to your Nexus 6. For instructions on printer app installation on an Android based operating
system, please refer to https://support.google.com/nexus/answer/3473588?hl=en & ref_topic
= 3415467. You can also send your data via the “Cloud print" app, which utilizes the Google
cloud print service, to your printer. You can get more information at
http://www.google.com/landing/cloudprint/.
In the Export Options menu click on the Printer button (fig. 12). Select the desired printer
from the drop down menu. Finally, the data export is completed when the button with the
printer icon is pressed (fig. 14).
The test result is
exported when the printer
button is pressed.
The printer to which the test
result will be sent is selected
via the drop down menu.
Fig. 14 Printer Export
18
RIDA®SMART APP Version 1.0.0 | Manual
3.5 Data storage
Each measurement performed is stored by the RIDA®SMART APP database and can be
reopened at any time, regardless of whether it was exported or not. It is therefore not
necessary to export each individual test result that you have taken with the RIDA®SMART
APP immediately. This allows you to take multiple measurements first and then export them
at a later date. To open stored test results, press the Results button (fig. 15) in the main
menu.
To search for test results in
the database press the
Results button in the main
menu.
Fig. 15 Main Menu
19
RIDA®SMART APP Version 1.0.0 | Manual
3.5.1 Search Readings
In the Search Readings menu the search / filter parameter can be set. Stored test results
can be located by specifiying the sample ID, operator, date, batch number and / or the
method (product name). At least one option must be ticked and defined to perform a search.
Press the SEARCH button to start (fig. 16).
To search for test results in
the database define the
search parameters in the
Search Readings menu.
The operator can be
selected using the drop
down button and the date
can be set by scrolling. All
other data is entered
manually.
The query is started by
pressing the SEARCH
button.
Fig. 16 Search
20
RIDA®SMART APP Version 1.0.0 | Manual
3.5.2 Results Database
All results stored in the database are displayed in the Results Database window (fig. 17).
The requested file is selected by pressing the tick box. It can be displayed by pressing then
VIEW button or deleted by pressing the DELETE button. The selected result can also be
exported to your e-mail address or to your printer via the EXPORT button.
All results in the database
are displayed in the Results
window. Select test result
you want by pressing the
corresponding tick box. It
can be exported to your email address or your printer
(EXPORT button), deleted
(DELETE button), or viewed
(VIEW button).
Fig. 17 Database
21
RIDA®SMART APP Version 1.0.0 | Manual
4 Customer service information
RIDA®SMART APP allows you to contact your local technical services directly through the
application to discuss difficulties with the analysis of test results and other problems and
questions. You can select the Service button from the Export Options menu which is
displayed immediately after carrying out a measurement of (fig. 18). The Service button will
take you to the Technical Service window.
If you have any technical
requests or problems with test
results you can get in contact
with your local technical
service via the Service button
in the Export Options menu.
Fig. 18 Menu Export Options
So that your request can be processed and answered as quickly as possible, various
information regarding your measurement is required. This information is stored in the
Technical Service menu. First select the reason for your service request in the Service
Type column. Select from Handling Error / Kit Test Error / Matrix / Application /
Software. The request will be directed to a local field assistant, who you can select in the
Agent column. It automatically displays all of the field service staff responsible for your
region. This information comes from the region you selected during the initial setup process
and can be seen via the Settings button (Refer to Settings). Scroll down the screen to
manually enter further information (fig. 19).
22
RIDA®SMART APP Version 1.0.0 | Manual
The following questions must be answered:
• Which matrix does your sample come from?
• How was the sample diluted?
• What concentration was used by you for calculation?
• What is the specific problem?
• What is your name?
• What is your e-mail address?
• What is your e-mail phone number?
Please note that only a completely filled out request can be sent.
For a request to our technical service, enter all of the information
about your testing and sample in the Technical Service menu. You
can select the relevant options for Service Type and Agent via
their drop down menus. All other fields need to be completed
manually. Please keep in mind that only a completed form can be
sent.
After specifying all of the
necessary information, the
request will be sent by
pressing the Send button.
Fig. 19 Service Menu
Your request will be sent by pressing the Send button. The sales assistant will contact you
promptly after receipt of the request. Warning: to send your request your smartphone must
be connected to the Internet via WLAN, Bluetooth or USB.
23
RIDA®SMART APP Version 1.0.0 | Manual
5 Additional Options
For more information about the RIDA®SMART APP additional documents such as the
validation report, a Quick Start Guide and a list of FAQs are on our website, along with this
guide. This app can take you directly to them by pressing the Manuals button in the Main
Menu. The News button in the same menu will take you directly to the News section of our
website (www.r-biopharm.com/news) where there is lots of information about our new
products (fig. 20). Note: to use the above options or Info, your smartphone must be
connected to the Internet.
Through the Manuals button
you will automatically be
taken to other documents
(validation report, FAQ etc.)
®
for the RIDA SMART APP.
Lots of information about new
products can be found on
www.r-biopharm.com/news
through the News button.
More information about the
®
RIDA SMART APP can be
found by pressing the About
button.
Fig. 20 Main menu
24
RIDA®SMART APP Version 1.0.0 | Manual
By pressing the About button in the Main Menu, you get additional information on the
RIDA®SMART APP (fig. 21).
Fig. 21 App Information
6 Technical Specifications
• Format:
Software: Application for operating system Android 5.1 from Google.
• Compatibility:
RIDA®SMART APP can only be installed and used exclusively with the Android based
smartphone Nexus 6 from Google.
• Data exports:
Export of test results to an optional e-mail address, cloud or printer via WiFi and Bluetooth.
• Data retention:
Test results are stored in the RIDA®SMART APP and can be accessed again at any given
moment.
• Specific for the test systems:
R-Biopharm AG RIDA®QUICK RQS product line.
25
RIDA®SMART APP Version 1.0.0 | Manual
7 Proof of manufacturer
R-Biopharm AG
An der neuen Bergstrasse 17
64297 Darmstadt, Germany
Phone: +49 (0) 61 51 - 8102-0
Fax:
+49 (0) 61 51 - 8102-40
E-mail: [email protected]
www.r-biopharm.com
26