1
10
Part I: A New Way to Play
The common process for transferring images from your camera to computer is:
1. Make sure you turn your computer on.
2. If transferring directly from your camera, make sure you turn your
camera off.
3. Plug the camera or card reader into your computer by inserting
the camera end of the USB cable into your digital camera and the
computer end of the USB cable into an available USB connection on
your computer.
4. Turn on your digital camera if transferring directly from the camera
or plug in a memory card into
the card reader.
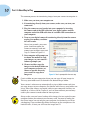
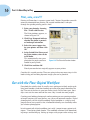
After a few seconds, your computer should recognize the
camera or memory card and
prompt you to choose your next
step, as shown in Figure 1-4.
5. Your computer will prompt you
to choose the method to copy
your images, or your camera’s
software prompts you.
6. Choose to either copy the
images to the default folder on
your computer or better yet,
choose a specific directory
you created to copy these
Figure 1-4: You’re prompted for the next step.
images to.
Create a folder on your computer where you can copy all your images to.
This way your folder won’t be buried in the default images folder.
Your camera’s software may automatically assign a folder name each time
you copy images to your computer. Get familiar with the way your folders are
set up. After your images are copied safely to your computer and they are
backed up, as discussed in Chapter 4, you can then reformat your memory
card in your camera to make room for more pictures.
Always make sure you have a backup of the images that are copied to your
computer before you reformat your memory card. You want to make sure
that these images are not only on your computer, but backed up to CD for
safe-keeping. If you accidentally delete the images on the computer or the
hard disk fails, at least you still have the images on CD.