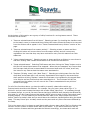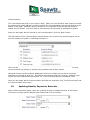
1
User Guide
1. Initial Configuration
1. Venues
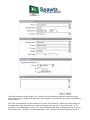
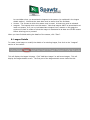
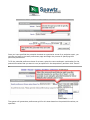
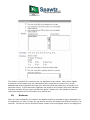
Venues are set up via the Config Settings Section of the application
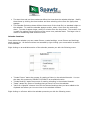
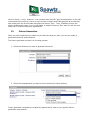
Click on the “Venues” link in the Config Settings section. This will show you a list of existing
venues. To create a new venue, click “Add Venue” and then fill in the name, address, country and
region of the venue. This information will be displayed to users in the external part of your
website, so ensure this data is correct.
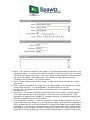
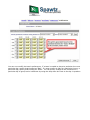
Also select any people who should have permission to manage this venue. You must select at
least one venue manager. Venue managers are able to create bookings, fixtures, teams and
users at this venue and also receive emails whenever anyone registers at this venue or creates a
booking online at the venue.
Click “Save” to save the venue when you have finished.
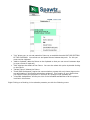
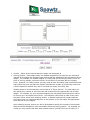
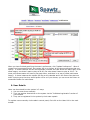
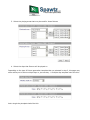
2. Playing Areas
Once the venue has been set up, you can set up the playing areas at that venue by clicking the
“Playing Areas” button next to the venue in the list
Create each of the courts/fields at the venue by typing their name in the empty text box at the
bottom of the list and then clicking Add.
The “Parent” drop down list is used to indicate if this playing area is a part of another playing
area. For example, you may want to set up a set of Badminton courts which are actually just 4
sections of one of your main courts, say “Court 1”. In this case, for each of the Badminton courts
you would set the parent playing area as “Court 1”. That way, whenever a booking or fixture
appears on court 1, the badminton courts will be unavailable, and similarly if there are ever
fixtures or bookings in any of the badminton courts, court 1 will be unavailble.
In most cases, you will leave the parent drop down as “No parent” though.
3. Playing Area Timeslots
Once the playing areas are set up you can set up the timeslots for the playing areas – these are
just the times that appear in the main calendar, and the usual method is to set up timeslots every
half an hour.
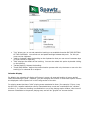
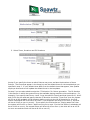
4. Playing Area Booking costs
1) Create the costs for a booking for each court by clicking “Booking Costs” next to each court in
the playing area list.
a. Cost fields:
i. Booking Type – Cricket, netball, social, birthday party etc etc. Booking types
are configurable under “Resource Booking Types” under the Config section
ii. Cost Type – Costs are either fixed (ie the cost will be the same regardless of
how long the court is booked for) or timed (eg $100/hour)
iii. Duration – Used in conjunction with a “timed” cost type. It is the number of
minutes that customers will get for the amount in the amount field (ie 100 in
the amount field, 60 in the Duration field equates to $100/hour. So does 50 in
the amount field, 30 in the duration field)
iv. Minimum – the Minimum amount that will be charged regardless of how long the
booking has been made for. For for a cost type of timed with an amount of 100,
a duration of 60 and a minimum cost of 60, if a user books a court for 30
minutes, they will get charged $60 instead of $50, because $50 is below the
minimum amount.
Each court can have as many costs per booking type as required. So, for example, for a
booking type of “Cricket”, there can be one cost of $100 per hour (the peak rate), one cost
of $80 per hour (off peak) and one of $50 per hour (really off peak). In the next step you
specify the times at which those costs apply.
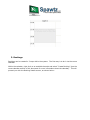
b. Set the time periods that those costs apply to.
i. For each cost, click the “Time Periods” button and enter which times apply to
this cost.
ii. Let's say for example that you want the “Peak” cost to apply from 5pm to 9pm
every weeknight. To set this accordingly you should add 5 time periods – one
for each day of the week and from 17:00 to 20:59.
iii. The system will not allow you to apply two different costs to the same time
period for a court. For example, if you have a cost of $100/hour and another
cost of $80/hour and you set the $100/hour cost to apply from 17:00 to 20:59
on Mondays and then try to set the $80/hour cost to apply from 20:00 to 23:59
on Mondays, the system will report that you cannot apply the second time
period as another cost is already applied to that time period.
iv. Note that any bookings created at times that are not covered by any of
the time periods you set up will not have a line item create for them.
2. Venue Calendar
The Venue Calendar is where you will spend most of your time in the Spawtz Application. It
displays a calendar view of all your fixtures/bookings for the currently selected date.
To get to the venue calendar, first click on Fixtures/Bookings in the main menu:
Next, click “View Calendar” from the list of available options. The calendar will appear, with a
toolbar at the top, as shown below:
The toolbar along the top of the calendar has the following functions:
●
●
●
The venue drop down contains a list of all the venues that you manage. Change this drop
down to move from one venue to another.
The next drop down, if visible, is the “Group” drop down. You can group playing areas
together so you only display certain playing areas at a time if you wish. This is to reduce
the size of the calendar. For example, if you have 5 indoor courts, 4 outdoor tennis courts,
4 indoor badminton courts and 2 outdoor volleyball courts, that is a total of 15 playing
areas, which makes for a very large calendar. You can group these courts together so that
you can show just the indoor courts, or just the badminton courts etc etc.
The date textbox show the date which is currently being displayed in the calenar. You can
modify this date by selecting a date from the small calendar that pops up when you click
the date textbox or by clicking the day or week buttons in the toolbar.
●
●
The start time and end time textboxes define the times that the calendar displays. Modify
these times by clicking the time textbox and then selecting a time from the popup that
appears.
The Calendar Scale drop down defines the amount of time that fits in a standard height on
the calendar. To make the calendar appear smaller, select 1 hour from the scale drop
down. To make it appear larger, select 15 minutes from the drop down. The smaller view
is useful for getting a large overview of the venue on a particular date. The larger view is
useful for scheduling small sections of time.
Calendar functions
From within the calendar you can create fixtures, create bookings, move fixtures and bookings,
email players etc. All these functions are accessed by right clicking your mouse within a section
of the calendar.
Right clicking on an available section of the calendar presents you with the following menu:
●
●
●
●
“Create Fixture” starts the process of creating a fixture in the selected timeslot. You can
also start this process by DOUBLE CLICKING in an available timeslot.
“Create Booking” starts the process of creating a booking in the selected timeslot.
“Paste” pastes any fixture or booking that you have Cut from the calendar
“Get from clipboard” shows a list of all the fixtures/bookings that you have added to the
clipboard and allows you to move them to the selected timeslot.
Right clicking on a fixture within the calendar presents you with the following menu:
●
●
●
●
●
●
“Cut” allows you to cut and paste this fixture to an available timeslot ON THIS SECTION
OF THE CALENDAR. You cannot cut and paste fixtures between days etc. For this you
must use the clipboard
“Add to clipboard” adds the fixture to the clipboard so that you can move it between days
(or even venues if required)
“Edit” displays the details of the fixture. You can also select this option by double clicking
on the fixture
“Delete Fixture” deletes the fixture.
“Email/SMS Participants” begins the communication process with only those players who
are participating in this fixture selected as recipients. This function is very useful when
you need to inform all the players in a fixture of a change to the schedule etc.
“View/Edit Availabilities” shows you a list of the indicated availabilities of all the players
involved in this fixture.
Right Clicking on a Booking in the calendar presents you with the following menu:
●
●
●
●
●
“Cut” allows you to cut and paste this booking to an available timeslot ON THIS SECTION
OF THE CALENDAR. You cannot cut and paste bookings between days etc. For this you
must use the clipboard.
“Add to clipboard” adds the booking to the clipboard so that you can move it between days
(or even venues if required).
“Edit” displays the details of the booking. You can also select this option by double clicking
on the booking.
“Delete Booking” deletes the booking.
“Email/SMS Booker” begins the communication process with only the team or user who the
booking is for selected as a recipient.
Calendar Display
By default, the calendar will display all fixtures in green, all reserved booking in brown and all
confirmed bookings in blue. However, you can configure the colours in which each sport's fixtures
are displayed via the Sports link in the Config section of the site.
For playing areas that have “child” playing areas associated to them (for example, if Court 1 can
be split into 4 smaller badminton courts, these badminton courts are considered to be “children”
of court 1), if a fixture or booking is scheduled on one of the playing area's children, this time will
become unavailable to the parent playing area, and will be “greyed out” as seen below:
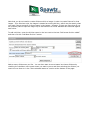
3. Bookings
Bookings can be created in 3 ways within the system. The first way is to do it via the venue
calendar.
Within the calendar, right click on an available timeslot and select “Create Booking” (see the
venue calendar section of this document for more information about the calendar). This will
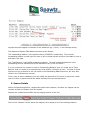
present you with the Booking Details screen, as shown below:
The booking details screen allows you to specify all the information about a booking including
where and when the booking will take place, the duration of the booking, the TYPE of the booking
and it's status.
The TYPE of the booking will also determine the cost of the booking. Within the config section of
the application, you can specify the costs per booking type, per court, per time period. So for
example, a cricket booking on court 1 can have a different cost than a football booking on court 1
at the same time. Similarly, a Cricket booking on court 1 at 9am can have a different cost to a
cricket booking on court 1 at 6pm. For more information on configuring booking types and
booking times, please see the “Initial Configuration” section of this document.
Bookings can also be set to be associated to a particular user or team. When a booking is
associated to a user or team that user or team will AUTOMATICALLY receive a line item on their
statement for the total amount of the booking. If no user or team is selected, the line item will be
associated to the user doing the booking – ie, you. Therefore, before creating a booking for a
user it is a good idea to create a user profile for that user first.
For bookings with a status of “Reserved”, you can also set the “Valid Until” date and time for the
booking. Once this date and time pass, the timeslot will again become available for booking by
other users.
Bookings can also be set as “Block” type bookings so that multiple bookings can be created at
once. Note that once block bookings are created they are no longer associated to one another.
So for example, if you incorrectly set the duration of a booking and then set it as a block booking
to be repeated 10 times, once it is saved you will have to modify EACH of the 10 bookings that
are created as a consequence. As such, it pays to take care when creating block bookings.
The notes section of the booking details is for you to fill in information that is pertinent to the
booking. For example, you might fill in that only a deposit has been paid for this booking, or that
a referee is required etc. This information will then be visible on the venue calendar when you
mouse over the booking, and also on the calendar “List view” which is a handy report for printing
out before the start of each evening.
Once a booking has been saved, the amount charged for that booking will become visible at the
bottom of the booking details page.
Online Bookings
Players can create their OWN bookings by following the online booking process on the external
part of your website. During this process they will view a calendar of available times, select a
time and duration and make the booking.
Online bookings are valid for 30 minutes. Within that time the booker must pay all or part of the
booking to confirm it. If they do not, the timeslot will return to the pool of available timeslots.
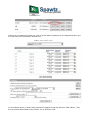
4. Statements and Payments
User and team statements are visible by clicking the “Statement” button next to the team or user
in the team or user lists, or by clicking the “Statement” link in the quick popup box.
Statements display all the line items (charges, or debits) that have been billed to a user or team
and all the payments (credits) that they have made:
Payment amounts appear in brackets on the statement (eg “(20.00)” in the example above).
The statement displays TWO balance amounts at the bottom.
The “Outstanding Balance” is the balance that is CURRENTLY outstanding. The currently
outstanding balance is made up of the sum of all line items that do not have a due date or have a
due date in the past.
The “Total Balance” is the TOTAL oustanding balance. The total outstanding balance is the
outstanding amount REGARDLESS of the due date of any of the line items.
It is not uncommon for a team to have an “Outstanding Balance” that is in credit and a “Total
Balance” that is in debit (if for example they have paid for 4 fixtures up front. The fees for those
fixtures will not yet be due so will not reflect in the Outstanding Balance amount, but they WILL
reflect in the Total balance amount).
From a user or team's statement you can modify the amounts of line items or payments, create
new line items or payments and also delete existing line items and payments.
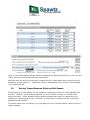
5. Season Details
Within the Spawtz application, leagues take place within seasons, so before any leagues can be
created, at least one season must be created.
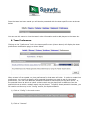
Seasons are created and modified via the Leagues section of the site:
Click on the “Seasons” button above the leagues list to display a list of the existing seasons:
Click the Add Season button to create a new season.
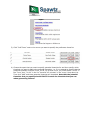
Seasons have the following fields:
● Name. The name of the season. It is usually useful to name the season in accordance
with the time period that it covers, for example “Summer 2006” or “Jan/Feb/Mar 2007”
● Start and End dates. These are the default start and end dates for this season. These can
●
●
be overridden when you associate the leagues to the season (as explained in the league
details section). Note that the start date must be earlier than the end date.
Venues. The venues at which this season may be used. At least one must be selected.
Leagues. The leagues which use this season. Note that leagues MUST be associated to at
least one season, so if you try to disassociate a league from a season on this page the
system will check to make sure that the league is associated to at least one OTHER season
before allowing you to proceed.
When you have finished setting the details of the season, click “Save”.
6. League Details
To create a new league or modify the details of an existing league, first click on the “Leagues”
section of the toolbar:
This will display the league list page. Click “Add New League” to add a new league. This will
display the league details screen. The first part of the league details screen looks like this:
●
●
●
●
●
●
Name – the name of the league as will appear in the fixtures and standings lists and on the
registration pages. You can choose whatever naming conventions you like, but you should
not include any season information in the name, and it is usually good to include day/time
and sport information in the league name. For example, a league should be called
“Thursday evening netball”, not “Summer league”
Sport – choose the sport type of this league. To add new sports do so under the config
settings tab
Class – whether this league is a mixed, men's or ladies league. This information is mostly
for reporting purposes – it is not displayed on the external part of the site.
Statistics set – if Spawtz.com have set up a statistics set for your organization, you select
the stats set here.
Team Count – the number of teams that can participate in this league. If teams register
for a league that has more teams already in it than this value, they will get the “Team
registration for league that is already full” message instead of the standard message (see
Autotext configuration for more information)
Allow registration checkbox – check this checkbox to have the league appear in the list of
leagues that teams can register for in the registration pages. Note that online registrations
will be accepted into the most recent season of a league if that league has multiple season
associated to it (for example, if a league has a summer 2006 and an autumn 2006 season
associated to it and the allow registration checkbox is checked, teams that register for this
league online will automatically go into the latest available season, ie autumn 2006 in this
●
●
case. The dates of a season are specified in the season details screen)
Days – for reference only, though this field may be used for ordering leagues in any fixture
and standings lists.
Costs: Leagues have "Deposit", "Full price" and "Cost per round" fields. These fields are
used as follows:
● Deposit. The amount that you will allow people to pay online in order to confirm
their place in a league. No line item will be created for the deposit amount, it is
simply the amount that teams will have the option of paying when they register in
order to confirm their space.
● Full price. The amount that will be added to a team's statement when they
register or are associated to a league. Their statement will show this line item as
"Registration fee - {League name} - {Season name}" where league name and
season name pertain to the appropriate league and season.
● Cost per round. This amount will be added to a team's statement every time they
are associated to a fixture within the league. The line item will appear on their
statement as "Fixture fee: {Team name} vs {Opposition}, {Date} {Time}". Fixture
line items become due on the day that the fixture is played.
● An often made mistake is to set the "Full price" field for a league to be the actual
amount that a team would be billed if they were to play all the fixtures for that
season and then to also set the "Cost per round" field to the cost that that works
out to per round. In this instance the team will essentially be billed twice.
● Example 1:
You want to charge teams 250 to play in your league, all of which much be paid up
front.
Set the "Full price" field to 250 and the "Cost per round" field to 0. Set the deposit
amount to whatever you want for teams to have to pay in order to confirm their
space in the league.
●
●
Example 2:
You want to charge teams 250 in total, but you want to charge them 50 up front
and then have them pay 25 at each of the 8 fixtures that they will play during the
season.
Set the "Full price" field to 50 and the "Cost per round" field to 25. Again, set the
deposit amount to whatever you want for teams to have to pay in order to confirm
their space in the league.
Description – this text will appear in the registration lists for the leagues. It should contain
information that will be useful to prospective entrants at the point when they’re deciding
which league to register for (for example “This is our most social league and is for teams
that haven’t played in a while”)
The second part of the league details screen looks like this:
●
●
Venues – Select all the venues that this league can be played at
Scoring System. Each league within the Spawtz application may have its own individual
method of calculating the results of each fixture and the standings of all the teams within a
league. For example, for football leagues it is likely that you will simply need a “score a v
score b” scoring system, where the winner of the fixture is the team with the highest
score. However, for indoor cricket you may need to track the teams' total scores AND how
many skins they won and have the system calculate the number of points they receive for
a fixture based on whether they won or not and how many skins they won.
Spawtz allows for this functionality via the idea of a “Score Service”. For each sport you
can specify any number of score services and choose the most appropriate one for each
league. For example, for your corporate leagues you may assign bonus points for teams
for turning up in the same colour shirts. You therefore need a way to track if they wore
the same colour shirts when entering results. A Spawtz employee will create whatever
scoring services you need and add them to the system so you can select the appropriate
score service for your league.
Upon selecting a score service you will be prompted to specify the number of points each
team should be awarded for each eventuality within the scoring system. For example, for
cricket you may specify that each team should receive 3 points if they win a fixture, 2 if
they draw it, 1 if they lose and 0 if they forfeit. Additionally, you may say they they get
0.5 extra points for each skin that they win and 0.5 extra points if they all wear the same
coloured shirts. The cricket score service will allow you to enter all this points information
on the league details screen.
●
Seasons – Select the seasons that apply to this league. IMPORTANT NOTE: once you have
associated a season to a league and accepted registrations into that season or generated
fixtures for that season, you cannot disassociate the season from the league either via the
league details screen or the season details screen. This is because important information
may become lost if you disassociate the season. Once a season is in place, leave it there.
Seasons have a default start and end date. This information is important as it determines
when the fixtures and standings pages for this league/season combination are visible on
the external part of the website.
For some of the leagues within a season, the default start and end dates may not be
correct (for example, if your football league starts and ends a couple of weeks after your
cricket league it will be no good to have football fixtures appear and disappear from the
site at the same time as your cricket fixtures). For this reason, you can choose to
OVERRIDE the season start dates in the league details screen. For each season, by default
the “Inherit dates from season” radio button will be checked, but you can chose to specify
specific dates for this league/season combination by selecting the other radio button and
then setting the start and end dates to the more appropriate dates for this league.
7. Team Details
Teams appear in the Spawtz application either by you creating them within the Admin control
panel or by players registering teams online via the online registration process. For teams that
register online, any venue managers at the venue for which the team registers will receive an
email indicating that a team has registered.
To view a list of teams in the system, click the teams link on the main toolbar:
Click “Add Team” to add a team to the system.
Enter the details of the team accordingly. Optionally, you can enter the organiser of the team's
details on this screen as well. You do not have to do this now though – it can be done later.
Finally, enter the league and season that you are entering this team into. Teams MUST be
associated to at least one league/season combination.
For league/season associations you can also note how the team intends to pay and their current
payment status (“Interest”, “Deposit paid” or “Fully paid”). These statuses can be used to quickly
see which teams are still owing money etc.
Once the team has been saved you will also be presented with the team specific menu as shown
below:
You can use this menu to view the team's other information and to add players to the team etc.
8. Team Preferences
Clicking on the “Preferences” link in the team specific menu (shown above) will display the team
preferences modification page, as shown below:
When a team is first created, no time preferences for that team will exist. In order to create time
preferences, you must first specify which potential timeslots you want to use for the team’s
preferences. You can have different potential timeslots for each sport and for each venue – ie,
the potential times at which an indoor cricket match may be played will be different from the
potential times at which a netball match may be played. To specify these potential timeslots, you
will need to set them up in the “Config” section, as explained below:
1) Click on “Config” in the main menu:
2) Click on “Venues”:
3) Click “Pref Times” next to the venue you want to specify the preference times for:
4) Choose the sport that you want to specify potential timeslots for and then specify which
timeslots you want to add to the potential timeslots – ie, if you wanted to specify that the
potential timeslots could be 18:00, 18:45, 19:30 and 20:15, you would select “18:00” in
the “From” box, “21:00” in the “to” box and “45 minutes” in the “every” drop down list.
Then click “Add” and those potential timeslots will be added. Note that the potential
timeslots that you specify should EXACTLY match the timeslots that you use
when generating fixtures.
Once you have specified the potential timeslots at a particular venue for a particular sport, you
can then go back to the team preferences page and begin the process of specifying their
particular preferences.
To fill the potential preference times for a team, select the venue and sport combination for the
potential timeslots that you want to use (as specified in the steps above) and then click “Reset”:
The system will generate a preferences grid for this team based on the potential timeslots you
specified:
You can now modify the team’s preferences. If a team is unable to play at a particular time on a
particular day, specify that timeslot as “Bad”. If a team prefers to play at a particular time on a
particular day, specify that timeslot as “Good”. You can quickly change all the timeslots on a
particular day to good, bad or indifferent by using the drop down box next to the day in question:
When you have finished specifying the team’s preferences, click “Update Preferences”. When it
comes time to generate fixtures, the system will try to honour all the team preferences that you
specify. In some instances this will be impossible (consider the case where two teams play in the
same league, one doesn’t want to play at 18:00, the other doesn’t want to play at 20:15. At
some point those teams will have to play each other, and there is no way to make both teams
happy). In those instances the system will flag on the calendar and in the fixture lists that one
team is playing at a time they would prefer not to so if you choose, you can move the fixture to
somewhere better for both teams.
9. User Details
Users can be entered into the system in 3 ways:
1. You can enter them manually
2. They can register themselves on the system via the “Individual registration” section of
your website
3. They can be registered in the system by their team captain
To register users manually via the admin control panel, first click on the Users link in the main
toolbar:
To add a user click the “Add User” button
The first part of the user details screen is as follows:
Into this section you should add all the user's personal information
The second section of the details screen looks like this:
If you are an administrator you will have the option to make the new user an administrator as
well. If you are a venue manager, you will not be able to set the user as an administrator but can
set the user as a venue manager for any venues that you manage.
You can also associate this user to any teams that you wish. Users can take the following roles
within teams:
1. Team organiser. Responsible for ensuring the team turns up to play each week. Team
organisers have access to all the data on players within their team
2. Regular. A regular player on the team. Receives fixture reminders about games, but does
not have access to the data for any other players on the team
3. Stand In. Stand ins do no receive fixture reminder emails and they are essentially just a
way for team organisers to keep track of any players who play for them “Time to time”
when they're short.
The final section of the user detail screen looks like this:
This section is primarily for users who are not associated to any teams. When users register
themselves on the system they can indicate that they would like to be part of the “ringer”
database that team organisers can draw upon when they find their team short of players for a
particular fixture. In this case team organisers can search a list of players who have indicated
that they would be willing to play the odd extra game if called upon, and whether a player is
called upon depends on the information they submit here.
10.
Divisions
When you have created all your seasons and leagues and have accepted as many registrations to
the leagues as you want or need, you can start to structure the league into different divisions if so
required. You do this via the “Divisions/Teams” button next to the league name in the league list:
Clicking on this button will show you a list of all the teams registered in this league and allow you
to move them around between divisions etc:
In the example above, 8 teams have entered the league during the Summer 2006 season. They
are currently unassociated to any division, as no divisions exist.
Note that you do not need to create divisions within a league in order to create fixtures for that
league. If no divisions exist, the league is treated as one big division, which may be exactly what
you want if there are say 8 or fewer teams in the league. However, if there are more than 8 you
will probably want to split the league up so that teams of a similar standard are matched against
each other.
To add a division, enter the division name in the box next to the text “Add a new division called”
and then click the “Add New Division” button:
Add as many divisions as you like. You can then start to move teams into those divisions by
checking the checkbox next to each team you want to move and then selecting the division you
want to move them to in the “Move selected teams to” section at the bottom of the page:
Once you have selected the relevant teams and selected the destination division, you can click the
“Move” button to move those teams into that division.
Note that once any divisions exist within a league then only those teams within a division will be
deemed to be taking part in it. Teams that remain “Unassociated to any division” will not appear
in any standings lists.
11.
Moving Teams Between Divisions Mid Season
At the beginning of each season you will probably try and group teams of a similar standard into
divisions. However, as the season progresses you may find that one team is in division that
doesn't suit them – either because they are getting thrashed each week, or because they are
handing out a thrashing each week. Similarly you might want to increase the size of a division
halfway through a season.
To perform these sorts of functions, you must again go to the “Divisions/Teams” section from the
league list page:
At the bottom of this section are a group of utility functions for moving teams around. These
functions are as follows:
1. “Remove selected teams from divisions”. Selecting a team (by checking the checkbox next
to the team's name) or teams and then clicking this button causes the team to be removed
from the division and to appear in the “Teams unassociated to any division” section of the
page.
2. “Remove selected teams from season entirely”. Selecting a team or teams and then
clicking this button will remove them from the season entirely and will remove any
registration line item that they may have received for entry into this season from their
statement
3. “Move selected teams to”. Selecting a team or teams and then a division to move them to
and then clicking “Add” causes those teams to be moved into that division
4. “Swap selected teams”. Selecting TWO teams and then clicking the “Swap” button next to
this text will cause those teams to be swapped. When they are swapped, any fixtures that
the first team had will now be associated to the second team and vice versa, as will any
line items for any fixtures that the teams were associated to.
5. “Replace {Existing team} with {New Team}”. Selecting an existing team from the first
drop down and a team that is not currently associated to this league in the second drop
down and then clicking “Replace” causes the first team to be replaced by the second team
in its division and any fixtures that were associated to it. The first team will NOT be
removed from the season, but will move to the “Teams unassociated to any division”
section of the page.
For all of the functions above, you have the ability to specify a date before which any
fixtures/results should not be affected. For example, say you have a team called “Bye 1” in
division 1 and you want to swap that team with a team called “New Guys”. It is halfway through
the season though, so you do not want fixtures that have ALREADY been played to be affected by
this swap (ie, you don't want fixtures that actually WERE a bye to show up as a fixture that wasn't
actually played). For this instance you would leave the date in the “Keep results and fixtures
before” section as today's date and you would leave the checkbox checked before doing the actual
swap. This way fixture prior to today remain as they were and only future fixture are affected by
the swap.
This is the reason why it is always a good idea to add a dummy team called “Bye” to divisions that
have an uneven number of teams at the start of the season. If you leave the division with an
uneven number of teams and then generate the fixtures accordingly, one team each week will
have no fixture – a bye. However, if you create a team CALLED “Bye” and associate it to the odd
numbered division to bring it up to an even number of teams and THEN generate all the fixtures,
each week there will be one team that plays the dummy “Bye”. Then, if halfway through the
season a NEW team enters, it is a trivial matter to swap the dummy “Bye” team for the real new
team and no fixtures need to be regenerated.
12.
Fixture Generation
When you have organised your teams into the divisions that you want, you are now ready to
generate fixtures for those divisions.
The fixture generation process is a nine step process:
1. Select the divisions you want to generate fixtures for
2. Select the templates that you want to use to fixtures for those divisions
Fixture generation templates are created by Spawtz staff to cater to your specific fixture
generation requirements.
3. Select the playing areas that may be used for these fixtures
4. Select the days that fixtures will be played on
Depending on the type of fixture generation template that you selected in step 2, this page may
either allow you to select multiple days or just one day. A multiple day template looks like this:
And a single day template looks like this:
5. Select Times, Durations and Fill Directions
At step 5 you specify the times at which fixtures may occur and also the durations of those
fixtures. The times that appear in the times box are the default times for the template that you
specified in step 2. If your default times differ from the default times that appear, let a Spatwz
employee know and we will update the default times in the templates.
On step 5 you are also asked to select the “Fill direction” for fixture generation. The fill direction
is the manner in which the system fills up the available playing area/time slot combinations. For
example, if you specify that Courts 1 and 2 may be used for fixtures and that times 18:00, 18:45
and 19:30 may be used and specify that the fill direction should be “Times first” then the system
will fill up all the available 18:00 timeslots before moving to the 18:45 timeslots (ie, the first
fixture it schedules will be at 18:00 on court 1, the second will be at 18:00 on court 2, the third
will be at 18:45 on court 1 etc etc). If you specify the fill direction as “Playing areas first” then
the system will first fill up Court 1 before moving on to court 2 (ie the first fixture it schedules will
be at 18:00 on court 1, the second fixture will be at 18:45 on court 1, the third will be at 19:30
on court one and the fourth will be at 18:00 on court 2)
6. View and Modify Fixture Conditions
Fixture conditions are conditions that the fixture generation process should try to meet when
generating fixtures. Examples of conditions that can be specified are:
“All teams must play fewer than 2 games on Sundays at any time”
This condition will cause the fixture generation process to schedule at MOST 1 fixture per team on
a Sunday during generation set
“All teams must play at least one game on any day at 21:00”
This condition will cause the fixture generation process to ensure that all teams play at least one
game at 21:00.
If the fixture generation process CANNOT meet the conditions (if for example there are no time
slots available at 21:00 etc) it will WARN you of the fact that a team did not meet those
conditions.
Conditions can be set up to apply to all teams or to just one team in particular.
Conditions can also be set up at the league level. Click the “Conditions” button next to the league
name in the league list to set up conditions that always apply to a league – this saves you having
to readd them every time you generate fixtures.
7. Select Start Dates, Rounds and Exclusion Dates
This step allows you to specify date on which NO FIXTURES should be generated. This is useful
when scheduling fixtures around public holidays etc.
This step also allows you to specify the start date of the generation set and which rounds should
be generated. The default is to generate all rounds, but you can restrict the generator to only
generate a set of rounds instead.
You can also tell the generator to skip fixtures that have already been played at this point and
also to ignore any team preferences that exist (Team preferences are explained in the team
details section)
8. Change Team Order and Preview Fixtures
Fixture generation templates specify fixtures as “1 v 2” or “6 v 8” etc where 1, 2, 6 and 8 are the
positions of teams within an ordered list. This step offers you the opportunity to modify that
order so that slightly different generation outcomes occur. You can see what fixtures will be
generated based on a specific order by clicking the “Show which fixtures will be generated” link.
This reordering is useful if you have manually generated the first round and want to have the
system generated the remaining rounds- the ability to reorder the teams allows you to set the
order so that none of the first week's fixtures are regenerated.
9. View Suggested Fixture List, Move and Confirm
The table(s) on step 9 of the generation process show the suggested fixtures for the specified
league/season/divisions. Save these fixtures by clicking the "Confirm and Save Fixtures" button at
the bottom of thepage, or modify the generation criteria by clicking the "Prev" button.
Rows highlighted in yellow contain warnings (if for example the fixture occurs at a time which is
bad for the home team). A playing area/time slot combination could not be found for any rows
highlighted in red. These fixtures will NOT be saved when you confirm the fixtures by clicking the
button. Find out what the warning or errors are by hovering the mouse over the required row.
Fixtures that are struck through (eg Home team vs Away team) will not be saved as they are
duplicates of fixtures that have already been played.
IMPORTANT NOTE! While you are reviewing these fixtures, any playing areas that may be used in
this generation process are LOCKED. This means that until you move from this screen either by
clicking "Prev" or "Confirm and Save Fixtures" at the bottom of this page NO ONE will be able to
create fixtures or bookings for any of the playing areas specified in this generation set. This
includes people making bookings on the external part of your website. This locking is done to
ensure no clashes occur while you are reviewing and modifying the suggested fixtures.
Once you click Confirm and Save fixtures the system will save all the fixtures to the database and
also generate any fixture fees for all the teams participating in those fixtures.
If the generation system was UNABLE to save any fixtures for any reason (if for example there
were no timeslots available for a fixture etc) the system will report on this fact on the last page of
the generation process. YOU MUST MAKE A NOTE of any fixtures that could not be saved – they
will not have been stored anywhere else and must be recreated manually to avoid a hole in your
schedule.
13.
Bulk Deleting Fixtures
If you make a mistake when generating fixtures (such as selecting the wrong start date, or
generating fixtures on the wrong day) you may want to quickly delete all the fixtures that you
generated. You can do this via the fixture list.
First, click on the “Fixtures/Bookings” link in the main toolbar:
Next, click the “List fixtures by League, enter quick results and update statistics”
Select the venue, league season and (if necessary) division you are interested in from the
applicable drop down lists. You will then be presented with a list of all the fixtures within that
league/season/division:
Each fixture has a checkbox next to it in the list. Check the checkbox next to each fixture you
wish to delete, or check the checkbox in the header row (highlighted above) to select ALL the
fixtures and then click “Delete” to delete all those fixtures.
14.
Quick Lookup and Team Detail Hover
Often the data you will be most interested in finding is the contact information for a particular
person or team. The Spawtz system makes it easy for you to find this information in two ways.
The first is that wherever you see a team name in the venue calendar, fixture list or daily report,
hovering over that team name will cause the team's organiser's details to pop up:
The second way to quickly find team or player information is to use the “Quick Lookup” popup
box. You can activate the quick lookup box either by clicking “Quick Lookup” in the main toolbar
or by holding down the “Ctrl” key and then hitting either “T”, “Q”, “G” or by holding down Ctrl +
Shift + A (Note that in Internet Explorer 7, ctrl T and ctrl Q do not work as these key
combinations have specific internet explorer functionality in that browser).
The quick lookup popup looks like this:
Into the quick lookup text box you can type a team name, a user name, an email address or a
mobile phone number, or a part of any of the above. You can then click “Go” or just hit the enter
key and the system will return a list of all the teams and users that match the text you entered:
The quick lookup box is a quick way to find out a team's contact details, their next fixture
information and also to link to their statement, a list of their bookings or to send them all an email
etc. You can also quickly find out individual user information from the quick lookup box:
Again, the player's contact details are displayed, and the next fixture that they are due to play in
along with links to their statement, bookings list and full details page.
15.
Email/SMS
You will at some point want to communicate with all the players who are registered in your
database. You do this via the “Email/SMS” section:
The first step in the communication process is to specify the recipients:
You specify recipients by selecting criteria from the available criteria sections. For example, if you
wanted to send an email to all the players in the “Bristol Cricket League” you would click “Add
League Criteria” (as has been done in the section above). You would then click on “Bristol Cricket
League” and click the “Add” button. This would specify that all players in this league should
receive this email.
When adding recipient criteria to a communication there are two ways to select multiple venues,
leagues, seasons or teams.
The first way is simply to select multiple items by holding down the "Ctrl" key and clicking on each
of the items you want to send to before clicking "Add" to add the criteria.
The second way is to add the items one at a time. When adding one at a time you should make
sure that "Or" is selected in the first drop down box for the second, third and subsequent items.
Otherwise Spawtz will try to send to all the users who exist in the first item AND the second item
AND the third item etc etc. Invariably this comes to a sum total of zero users.
Once you have specified all the users you wish to send the communication to, click the “Next”
button
The second step of the process allows you to specify the body of the communication.
The first thing to do is to set the type of the communication – either SMS or Email. Smses are
text only, but Emails can be richly formatted, so the formatting toolbar is visible only for email
communications.
Fill in the subject and body of your email or SMS. When you have finished, send a test to yourself
by entering your email address (or Mobile number for sms messsages) into the test section at the
bottom of the page. Sending a test to yourself is very important to ensure that the format is
exactly as you wanted. You don't want to send a poorly formed email to thousands of people.
Once you are happy with the format of your communication, click the “Next” button
The final section of the communication process allows you to review your communication and to
see who exactly the system is intending to send it to:
Here you can specify to send the communication to all the indicated users or to send it to only
those users that you specify by checking the checkbox next to their names.
Note that if there are NO recipients displayed in this list it is likely that you have incorrectly
specified your criteria on step one. Go back to step one and make sure that any “Multiple” type
criteria you have specified are joined with “Or” in the first drop down box instead of “And”.
Once you are happy with the communication and with the recipients, click “Confirm and send” and
the communication will be sent.
16.
Updating Results, Payments, Notes etc
Once a fixture has been played, there are a variety of ways to update the score of the fixture.
The first is to simply edit the details of the fixture and fill in the results:
Depending on which score service the league for this fixture uses, the available score boxes may
differ - for example, for indoor cricket leagues there may also be a space for skins:
The second way to update results is to enter them via the “Quick Results” button which appears in
the fixtures list.
First, click on the “Fixtures/Bookings” link in the main toolbar:
Next, click the “List fixtures by League, enter quick results and update statistics”
Select the venue, league season and (if necessary) division you are interested in from the
applicable drop down lists. You will then be presented with a list of all the fixtures within that
league/season/division, and above them will be a button entitled “Quick results”.
The quick results page allows you to quickly enter all the results for all the fixtures that have been
played in the past:
Again, depending on the score service in use, the available text boxes may differ slightly.
However, the most common method of updating results is via the daily report which can be
accessed from the venue calendar page:
Click this button to see a list view of all the fixtures/Bookings at the specified venue on the
specified date:
On the right hand side of the list view is an area for you to enter the results of the fixtures for this
day.
The list report also allows you to enter payments that were made by teams on the night in
question and also allows you to enter any bonus points that they were awarded (for example, for
paying their league fees within the first 3 weeks of a season etc). You can also modify the cost
that was charged to each team for a particular fixture and also quickly link to their statement by
clicking on the amount that they currently owe, which is displayed in the last column of the list.
When making updates to the daily report, MAKE SURE YOU CLICK THE “UPDATE ALL ITEMS”
button at the bottom of the page when you are done. Otherwise all your changes will be lost.
17.
Reports
Spawtz employees will create whatever reports you need in order to go about the day to day
running of your arena and indeed to create whatever monthly, quarterly or yearly reports you
require to see how well your arena is doing. However, the standard reports are as follows:
Financial Reports
●
Payments Taken
Show all the payments taken between a specified date range for each specified venue
●
Teams with outstanding balances
Show all the teams within the specified venues, leagues and seasons that have balances
now due
●
Users with outstanding balances
Show all the users within the specified venues, leagues and seasons that have balances
now due
Team Reports
●
Team Details
Show all the players with each team in the specified venues, leagues and seasons
●
Team counts
Show the number of teams registered group by sport and by category
●
Team Fixture Counts
Show the number of times each team has played the other for the specified season
Usage reports
●
Court usage
Show a percentage utilisation report of all the courts at the specified venues for the
specified dates and times. Includes bookings with a status of "Booked" only (not
"Reserved")
●
Court pressure
Shows a weekly view of all the courts at a particular venue to get an overview of court
usage for that week. This report is particularly useful for getting an overview of which
courts are available over a weekly period (for when someone calls up and says “I need a
court at 9pm on a weeknight sometime this week – what can you do for me?)