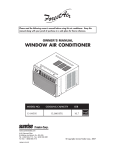
1
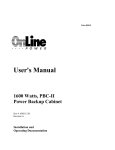
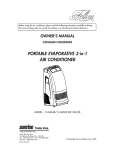
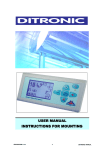
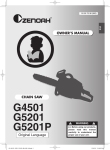
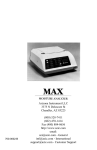
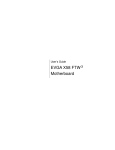
Please read the following owner’s manual before using this air conditioner. Keep this
manual along with your proof of purchase in a safe place for future reference.
OWNER’S MANUAL
CASEMENT AIR CONDITIONER
MODELS
13-04596/13-04597
© Copyright, Sunrise Tradex Corp., 2006
00220-17/12/06
TABLE OF CONTENTS
USE ......................................................................3
SAFETY NOTES........................................................3
INSTALLATION
Accessories and hardware .............................. 4
Tools needed .................................................. 4
Air conditioner diagram .................................. 5
Unpacking the air conditioner............................5
Electrical requirements ......................................5
Recommendations ............................................5
Sliding window installation ........................ 6-7-8
Casement window installation ........................ 8
UNIT OPERATION
Electronic control models
LED display control panel .............................. 9
Cooling..........................................................10
Fan only ........................................................10
Energy Saving ................................................11
Setting the timer..............................................11
Air Exchanger ................................................11
Remote Control ..............................................12
Mechanical control models ............................13
CHANGING AIR DIRECTION..................................13
MAINTENANCE
Cleaning the filter ......................................... 14
Cleaning the housing..................................... 14
Storage......................................................... 14
NOISE AND VIBRATION ................................... ....14
TROUBLESHOOTING ............................................15
AIR CONDITIONER SELECTION GUIDE ..................16
CUSTOMER SERVICE INFORMATION ....................16
WARRANTY ..........................................................17
2
WARNING
Please read the following owner’s manual before using this air conditioner. This manual is not a
contract and should be used as a reference guide only. We reserve the right to make technical
changes at all times without prior notice.
USE
Thank you for purchasing this Casement Air Conditioner. This unit is designed to improve indoor
living and working comfort by providing cooling and ventilation with minimal installation.
SAFETY NOTES
When using this window air conditioner, or any other electric appliance, always follow these basic
safety precautions. Not doing so could result in injuries, electrical shocks or fire.
1.
2.
3.
4.
5.
6.
7.
8.
9.
10.
11.
12.
13.
14.
15.
16.
17.
18.
19.
20.
The unit must be connected to a grounded (three prongs) power supply properly rated. For
your safety, this unit is grounded through the power cord plug when connected to a grounded
wall outlet.
Do not alter the power cord nor the plug end by removing the ground prong.
It is recommended not to use an adapter plug or extension cord.
Do not plug the unit in a damaged electrical receptacle.
Do not connect the unit to an outlet that is being used for other electrical appliances.
Before unplugging the unit, always turn it off. Always unplug the unit before cleaning or
servicing. When unplugging the unit, never pull on the power cord - always grip the plug.
Do not start or stop the unit by plugging in or pulling out the power cord.
Always check the power cord for signs of damage before use. If the power cord is damaged,
contact SUNRISE TRADEX Customer Service (see end of this manual).
Do not install or use the unit in the following places:
• near a heat source;
• an area with possible gas leakage or in an explosive atmosphere ;
• near a bath, shower enclosure, swimming pool, or any other steamy and wet areas ;
• in a greenhouse.
Do not apply insecticides or any other flammable products on the unit.
Do not operate with wet hands or spray water or other liquid on the unit, nor immerse the
appliance.
This unit is not intended for the use of children and close supervision is necessary when it is
operating near children.
Never insert fingers, foreign objects, or anything to obstruct the air inlet and outlet grills.
Warn children.
Never operate with an outside protective cover in place or other objects blocking the outside
airflow.
For a maximum efficiency, do not block inside airflow with curtains, blinds, furniture or else.
Do not expose skin or eyes directly to cool air over a long period of time.
Ensure that all parts and accessories are correctly fitted before turning on the unit.
If an abnormal odour or smoke comes out of the unit, immediately unplug the unit and contact
SUNRISE TRADEX Customer Service (see end of this manual).
Do not place a plant or allow a pet to be exposed directly to the unit cool airflow.
Do not put any combustion appliance in the direct path of the unit airflow ; it could affect the
combustion efficiency.
3
INSTALLATION
ACCESSORIES
(PRODUCTS
MAY DIFFER FROM THE LINE ARTS)
Before beginning to install, make sure to have close at hand all the tools you will need (listed below) and
that all accessories and hardware parts provided with your air conditioner (as shown) are all included.
3/8" screw (4)
Nut (2)
1” self-tapping screw (4)
Washer (2)
7/16" screw (2)
Locknut & leveling bolt (1)
Support platform(1)
Filler panel(1)
Speed clips (2)
Side mounting rail (2)
(factory installed)
Support angle (1)
Slider (2)
Top mountaing rail (1)
(factory installed)
Short seal (1)
Bottom mounting rail (1)
(factory installed)
Long seal (2)
Top retainer (1)
Side seal (2)
(factory installed)
Foam seal (1)
A
Tools needed
B
C
D
E
G
F
A. Level
B. Gloves
C. Flat blade and Phillips screwdrivers
D. Utility knife or scissors
E. Drill with 1/8” bit
F. Safety glasses
G. Measuring tape
*Spare screws (not shown)
4
INSTALLATION
UNIT DIAGRAM
Air exchanger
Control panel
Enclosure
Horizontal air vent
Interior air outlet
Vertical air vent
Air filter
(under the louvers)
Interior air inlet grille
Exterior air inlet
Front panel
*ILLUSTRATIONS
MAY DIFFER FROM THE PRODUCTS.
UNPACKING THE AIR CONDITIONER
• Remove and save the shipping carton and packing materials for future storage or transport
of the unit. Otherwise, dispose of packaging materials, waste recycling where possible.
Remove tape and glue residue from surface before turning on the air conditioner. Rub a
small amount of liquid dish soap over the glue residue with your fingers. Wipe with warm
water and dry.
• Do not use sharp instruments, rubbing alcohol, flammable fluids, or abrasive cleaners to
remove tape or glue. These products can damage the surface of your air conditioner.
• Handle with care. We recommend that 2 persons move and install this air conditioner.
ELECTRICAL REQUIREMENTS
• The electrical ratings are listed on the rating plate of this air conditioner.
• Make sure to follow the requirements for the type of plug ending the power supply cord :
- 125 V (103,5 min. - 126,5 max.)
- 0-15 A
- 15A time-delay fuse or circuit breaker
- Do not connect to an outlet use by other appliances ;
preferably, use on a single outlet circuit
• The air conditioner must be grounded ; it is equipped with a power supply cord ending
with a grounded plug (3 prongs) and must be plugged into a properly rated 3-prong
grounded outlet.
• If you do not have a grounded outlet available, contact a qualified electrician to have a
grounded outlet properly installed.
• Do not alter the power supply plug by removing the ground plug.
RECOMMENDATIONS
• This air conditioner is designed for an easy installation in a vertical window (casement or
sliding type). It is not designed for single or double-hung window.
• Make sure you install the air conditioner in a window that will hold the weight (refer to the
rating plate on your unit) ; reinforce if necessary.
• Secure the unit as per the instructions.
5
INSTALLATION
Note : Installation instructions described in this guide are for standard type windows.
Styles vary widely ; if necessary, modify accordingly to the type and size of your window,
or have the unit installed by a skilled carpenter.
SLIDING WINDOW INSTALLATION
1. Choose the location.
A
7/16” screws
2. Open one window sash to install
the support platform.
3. Using the 2 x 7/16” screws, the
flat washers and the nuts, loosely
attach the support angle to the
bottom of the platform (Fig. A).
Support
platform
Support angle
4. Place the support platform against
the lower window track and the
vertical edge of the window frame.
Leveling
bolt
5. Using 2 x 1” self-tapping screws,
fix the platform on the window sill.
• If necessary, install a 2” wide
shim on the window sill. The length
of the shim should be the same as
the width of the support platform
and should be flush with the back
edge of the sill. The thickness
should be gauged on the gap to fill
in beetween the support platform
and the window track (Fig. B).
6. Pull the support angle against the
outside structure. Tighten the 2 x
7/16” screws on top of the support
platform.
B
1” self-tapping screws
Support platform
assembly
Lower window
frame
7. Adjust leveling bolt until the sup
port angle is correctly level. Secure
the leveling bolt with the locknut.
Important:
• The unit must be level or tilted back slightly to facilitate water drainage.
• Do not drill a hole in bottom pan. This air conditioner is designed to operate with
approximately 1/2” of water in bottom pan.
6
INSTALLATION
8. • Cut two pieces of adhesive foam
seal to the height of the window
opening.
• Remove the backing and apply on
the inside edges of the vertical
window sash frame (fig. C).
CC
Foam seal
Top retainer
Filler panel
Slider
9. • Put the unit on the support platform.
• Check for the unit side rail to butt
against the edge of the window
vertical frame.
• If the unit side rail does not
correctly fit, remove the unit and
adjust leveling bolt.
Foam seal
10.• Drill 2 x 1/8” holes through the window sash frame in alignment with the holes in
the unit bottom rail (factory installed).
• Insert 2 x 3/8” screws through these holes.
• If the window sash frame is not long enough to use the pre-drilled holes, drill new
holes off and attach the bottom part of the air conditioner to the support platform.
• The air conditioner should be firmly anchored to window rail frame or support
platform (Fig. D).
11. •
•
•
•
Close the window.
Check for the inside edge of window vertical frame to close tightly on side of unit.
Cut remaining adhesive foam seal to width of the window opening.
Remove backing and fix it into inside edge of the top window frame (Fig.C).
12. Secure the installation by fixing the speed clips on the inside edge of the window top and
bottom frame (fig. E, next page).
13. Cut a seal to proper length and
insert it between the inside and the
outside window sash
(fig. E, next page)
C
D
Support platform
Drilled holes
14. •Place the top retainer on the top
edge of the filler panel.
• Then place the bottom edge of the
filler panel Into the groove of the
unit bottom mounting rail.
• The filler panel should be trimmed
to tightly fit in the window opening
(fig. C).
Bottom mounting rail
Window sash frame
15. Insert the sliders upward making
sure the filler panel aligns in sliders.
3/8” screws
16. •With sliders up against top retainer, drill on each side a 1/8” hole through the
window frame in alignment with the pre-drilled holes in the sliders.
•Insert 3/8” screws and tighten.
7
INSTALLATION
Note :
• Make sure all seals and accessories
are correctly fitted.
Drilled holes
E
E
3/8” screws
Speed clips
• To eliminate air or insect intrusion,
use the balance of the seal provided
with your air conditioner to fill in any
left opening not properly covered.
CASEMENT WINDOW INSTALLATION
Foam seal
Mounting rail
• This air conditioner is designed to fit into most casement type windows with a minimum
opening of 15 1/2” wide x 22” high.
• For safety reasons, ideally the unit should be installed in a closed or fixed window.
• However, if the unit has to be installed in an open window frame, the window should be
secured from the outside or completely removed.
1.Closed or fixed window :
• Ideally, install the air conditioner in a close or fixed window sash.
• If the unit is to be installed in or next to a movable sash, remove catch and handle.
• Secure the window in closed position.
• Remove the glass panes and parting strips to the height necessary to install the
unit.
• Install the air conditioner as per the instructions described for the sliding windows.
2. Open window frame :
• Remove handle mechanism and catch. Open the window sash back against the
building exterior wall.
• Secure the window or remove completely where possible.
Install the air conditioner as per the instructions described for the sliding windows.
Note :
• A filler panel will be required if the window opening is larger than 15 1/2”.
• The panel should made of wood - 3/4” thickness, and should run full length of window.
• Securely anchor the panel to one side of the window.
Important :
• For wood frame casement windows, it could be necessary to build a wood frame 1” minimum thickness, with a 15 1/2” opening.
• Securely fix and seal the wood frame into the window opening.
• Follow usual instructions for installing the air conditioner.
8
LED DISPLAY CONTROL PANEL
Turns the air conditioner on or off.
Press this button to choose one of the following modes : COOLING; FAN ONLY;
ENERGY SAVING. A matching icon lights on when mode is selected.
*Allow 3 minutes for operations to resume when switching to a new mode.
Turns the timer on or off.
Decrease/increase the degrees (by 1) when setting the temperature in
COOLING and ENERGY SAVING modes. If both keys are pressed at the same
time, the temperature LED display will alternate between oC and oF.
Decrease/increase the hours when setting the timer for an automatic start or
shut off of the air conditioner.
To set fan speeds : AUTO, LOW, MEDIUM or HIGH ; each level is paired with
an icon lighting on when selected.
To circulate only air in the room (CLOSED), or in and out of the room (OPEN).
LED display : shows all matching icons when mode or function are selected,
and shows the set temperature or set time when timer is on.
Control LED icons
(light on only when matching mode or operation is set)
Auto fan speed
Cooling
Low fan speed
Fan only
Display set temp
Display set timer
Medium fan speed
Timer
(when timer is on)
High fan speed
Energy-saving
9
UNIT OPERATION
• Plug the unit into a grounded outlet. Do not use an extension cord nor an adapter plug.
• Press the ON/OFF button to begin operation.
• When turning your air conditioner off, always wait at least 3 minutes before turning it back
on ; it will prevent the air conditioner from blowing a fuse or tripping a circuit breaker.
• Do not run your air conditioner in cooling mode when the outdoor temperature is below
19oC (66oF). The internal evaporator will freeze up and the unit will not operate properly.
COOLING MODE
1. Press on MODE until the COOLING icon
lights on.
2. Press
or
to set room temperature - 19 to 31°C (66 to 88oF). The set temperature
will show on the LED display. If both keys are pressed at the same time, the temperature
LED display will alternate between oC and oF.
3. Press on FAN SPEED to set fan speed at : AUTO, LOW, MEDIUM or HIGH. The matching
LED icon will light on when selected.
AUTO
: This automatically sets the fan speed to provide an optimum comfort
level based on the set temperature. The fan speed will increase or
decrease in order to adjust the cooling airflow as per the set
temperature. This level can be activated only when in COOLING mode.
It cannot be activated in FAN ONLY mode.
LOW
: Fan speed lowest level - for NIGHTIME and/or a SMOOTH cooling.
MEDIUM
: Fan speed medium level - for NORMAL cooling.
HIGH
: High velocity airflow - for a MAXIMUM and FAST cooling.
• For maximum cooling efficiency, draw the curtains or blinds if the room is exposed to direct
sunlight. Do not place near a heat source.
• If the air conditioner is turned off or switched on from FAN ONLY or ENERGY SAVING
mode, upon turning the unit on to COOLING mode, allow a 3 minute delay before the
compressor and cooling operation resume.
FAN ONLY MODE
The FAN ONLY mode provides ventilation and air filtration without cooling. When using this
mode, the temperature settings cannot be adjusted.
1. Press on MODE until the FAN ONLY icon
lights on.
2. Press on FAN SPEED and set to : LOW, MEDIUM or HIGH. The matching
LED icon will light on when selected.
NOTE : The AUTO fan speed cannot be used in FAN ONLY mode.
10
UNIT OPERATION
ENERGY SAVING MODE
Based on set temperature, the fan cycles on and off along with the compressor. This mode
will result in large variations of room temperature and humidity. It is recommended to use
this mode when the room is unoccupied.
1. Press on MODE and set until the ENERGY SAVING icon
lights on.
2. Press
or
to set room temperature. The set temperature will show on the LED
display. If both keys are pressed at the same time, the temperature LED display will
alternate between oC and oF.
3. Press on FAN SPEED to set fan speed at : AUTO, LOW, MEDIUM or HIGH. The matching
LED icon will light on when selected.
NOTE : The fan and the compressor may not cycle on and off simultaneously.
SETTING THE TIMER
The timer is used to set an automatic start or shut off of the air conditioner.
Automatic start :
1. Press on TIMER when the unit is OFF ; the TIMER icon
will light on.
2. Press
or
to set the numbers of hours (1-24) before the automatic start.
3. The LED display shows the time left (in hours) before the unit turns on.
4. To cancel the timer, press on TIMER again.
Automatic shut off :
1. Press on TIMER when the unit is ON ; the TIMER icon
will light on.
2. Press
or
to set the numbers of hours (1-24) before the shut off.
3. The LED display shows the time left before the unit turns off for only 12 seconds, then LED
shifts to display set temperature.
4. To cancel the timer, press on TIMER within the 12 seconds.
AIR EXCHANGER
• For maximum continuous cooling, set the AIR EXCHANGER control to CLOSED - it only
circulates the air in the room.
• To draw stale or smoky air out of the room, set the air exchanger control to OPEN - it
exhausts outdoor the air in the room.
Note : the Air Exchanger will function only when the fan is operating.
11
REMOTE CONTROL
NOTE : Remote control may differ from illustration.
POWER : turns the unit on or off
TIMER : to set timer on or off
MODE : to set operation mode
POWER SAVER : sets the unit in
ENERGY SAVING mode
AUTO : fan speed automatic mode
HIGH : highest fan speed
MID : medium fan speed
+ - KEYS : to set room temperature in
cooling mode or to set time when
Timer is on
LOW : lowest fan speed
2 x AA (1.5V) batteries (included) power the remote control.
• Do not use rechargeable batteries.
How to insert the batteries
• Following the arrows shown in the figure, remove the
battery cover.
• Insert the 2 batteries, making sure that the terminals
(+ /-) are correctly fitted.
• Put the cover back into position.
USING THE REMOTE CONTROL
• Always line up the remote signal transmitter with the unit signal receiver on the front panel.
TO
TURN THE AIR CONDITIONER ON OR OFF
: press on POWER.
TO SELECT THE MODE : Press MODE to set the unit in COOLING mode, or press POWER
SAVER to set the air conditiioner in ENERGY SAVING mode.
TO
SELECT THE FAN SPEED
: Press HGH, MID, LOW or press AUTO.
*Note : AUTO fan speed cannot be used in FAN ONLY mode.
TO
SET THE TEMPERATURE
: Press the + - keys to set the temperature. Each time you press or
hold these buttons, the temperature goes up or down by 1o.
TO
SET THE TIMER
:
• Automatic start time : Press TIMER when the unit is OFF. Then, press the + - keys to set the
numbers of hours (1-24) before the turn on. Presss TIMER again to cancel the timer.
• Automatic shut off : Press on TIMER when the unit is ON. Then, press the + - keys to set
the numbers of hours (1-24) before the shut off. Press TIMER again to cancel the timer.
12
MECHANICAL CONTROLS
MODE CONTROL :
Rotate the MODE control knob to turn the air conditioner on and set the COOLING SPEEDS
or the FAN SPEEDS. Set the knob to OFF to turn the unit off.
COOLING SPEEDS
•HIGH COOL - For an automatic maximum and quick cooling on extremely hot days.
Once room is cooled, change cooling setting to MED or LOW.
•MED COOL - For NORMAL cooling.
•LOW COOL - For NIGHTIME and/or a SMOOTH cooling, with minimum air circulation.
FAN SPEEDS
• HIGH FAN - For high velocity airflow without cooling.
• MED FAN - Medium fan speed without cooling.
• LOW FAN - Lowest fan speed without cooling.
TEMPERATURE SETTINGS (THERMOSTAT) :
• This air conditioner is equipped with a built-in thermostat that controls the cooling cycle
(compressor) based on set temperature, allowing to maintain room temperature.
Compressor cycles on and off, and the fan operates continuously, even when the
compressor is off (cycle is completed).
• Turn the THERMOSTAT (TEMPERATURE) rotary control to a mid-setting (5). Then, when
necessary, set the emperature to the desired level of room comfort by turning the
THERMOSTAT control towards COOLER or counterclockwise for a warmer temperature.
• Changing too quickly and too frequently could result in blowing a fuse or tripping the
circuit-breaker.
NOTE : Always turn the control knob slowly in order to allow unit to adjust to new setting.
AIR EXCHANGER :
• For maximum continuous cooling, set the AIR EXCHANGER control to CLOSED - it only
circulates the air in the room.
• To draw stale or smoky air out of the room, set the air exchanger control to OPEN - it
exhausts outdoor the air in the room.
• The Air Exchanger will function only when the fan is operating.
CHANGING AIR DIRECTION
This air conditioner is designed with mobile
air louvers to easily control the airflow direction.
Using the tabs of the louvers located on front
top ot the air conditioner, simply move the louvers
in ay direction. Louvers can be controlled separately.
13
MAINTENANCE
Always turn off and unplug the unit before cleaning to avoid electrical shock.
CLEANING THE FILTER
The air filter is removable for easy cleaning. A clean filter helps to
remove dust, lint and other particles from the air. A clean filter is
also essential to maximize the cooling and operating efficiency of
the air conditioner.
1. Turn the unit off and unplug the unit.
2. The air filter is located behind the air outlet front upper louvers.
3. To remove the air filter : using the levers, move
completely the left louver to the left and the right louver to the
right ; then move both louvers down in order to clear the opening. Using the filter tabs,
slide the air filter up.
4. Gently clean with a vacuum cleaner or wash the filter in warm soapy water. Rinse well and
let it dry completely before putting it back.
5. Put the filter back in place and reposition the louvers.
NOTE :
• A dirty air filter reduces air volume. We recommend to clean the air filter every two weeks,
or more frequently if there are animals around.
• Never run the air conditioner without the air filter.
• Do not clean the air filter in the dishwasher, nor use chemical products or abrasive detergents.
CLEANING THE HOUSING
1. Turn the unit off and unplug the unit.
2. Wipe the surface of the unit with a soft damp cloth. Never immerse the unit.
3. Air dry completely and reconnect the unit.
4. Never use gasoline, paint thinner, other chemical products or abrasive detergents ; it could
damage the finish of the unit.
STORAGE
1. Set the air conditioner to fan mode for about 3 hours to completely dry out the inside of the unit.
2. Turn off and unplug the unit.
3. Clean the filter and the housing.
4. Store the unit upright in a clean and dry area.
5. It is recommended to store the unit in its original packing box.
6. If the unit is installed permanently, during winter protect it with a heavy-duty cover ; it will
reduce air drafts, as well as paint and finish damages.
NOISE AND VIBRATION
When the air conditioner is in good working conditions, it may produce the following noises
or vibrations:
• Pinging or clicking noise caused by water dropping on the condenser.
• The relay clicking when the compressor cycles on and off.
• Clicks from the thermostat cycle.
• Vibrations or noises due to poor wall or window construction.
14
TROUBLESHOOTING
Before getting service, please check the following::
PROBLEM
POSSIBLE CAUSE
Is the unit plugged in?
Securely plug the power cord into the
wall outlet.
Is the main power supply on?
Re-establish the main power
supply.
Is there a power failure ?
Wait for power to restore. When
power is back, wait 3 minutes before
starting the unit.
Is the timer on ? (some models)
Change time settings.
Is the airflow restricted ?
Clear out the air inlets and
outlets (curtains, blinds, etc.).
Is the air exchanger set to OPEN ?
Set the air exchanger to
CLOSED.
Is there any other heat source in the room?
Close or move the heat source.
Is the air filter dirty?
Clean the air filter.
Is the set temperature suitable ?
Change set temperature.
Is the fan speed set at low or in Energy
Saving mode ?
Increase the fan speed or change
the unit mode.
Is the unit capacity adequate ?
Check the room cooling chart at the
end of this user’s guide
Is the unit freezing up
(ice blocking the airflow)?
Set highest fan speed and coolest
temperature and wait for frost to melt.
Is the outdoor temperature
within the unit working range ?
The unit will not operate properly
when the outside temperature is
below 19oC (66oF).
Is the unit plugged alone or
connected to an extension cord?
Make sure that there is no other
appliance plugged on the same circuit
nor connected to an extension cord.
The internal evaporator and
outside condenser coils look dirty or
obstructed by debris.
Call SUNRISE TRADEX Customer
Service.
Mold, mildew or algae
formation on wet surfaces
Remove drain plug and base pan,
clean throughly. If necessary, replace
drain plug.
Unit does not operate
Air cooling is not
efficient.
The unit starts and stops frequently, or frequently blows fuses
or trips the circuit breaker.
Odors
Water drips from unit into the
house
SOLUTION
Is the unit correctly installed and
properly leveled ?
The unit should slope slightly
downward the outside (half a bubble
on the level). Reposition or shim
the unit if necessary.*
*Never dril a hole in the bottom of the metal base and condensate pan. This would void warranty of the unit.
15
AIR CONDITIONER SELECTION GUIDE
NOTE :
If room temperature is not within the unit working range, it may not work properly. data may
vary from one model to another ; always refer to the rating label of the air conditioner.
AIR CONDITIONER SELECTION GUIDE
COOLING SURFACE
9 - 14 m²
100 - 150 ft²
14 - 23 m²
150 - 250 ft²
23 - 28 m²
250 - 300 ft²
28 - 33 m²
300 - 350 ft²
33 - 38 m²
350 - 400 ft²
38 - 41 m²
400 - 450 ft²
41 - 46 m²
450 - 500 ft²
46 - 51 m²
500 - 550 ft²
51 - 65 m²
550 - 700 ft²
65 - 93 m²
700 - 1 000 ft²
CUSTOMER SERVICE
Contact SUNRISE TRADEX Customer Service for :
• Replacement parts
• Technical support
• Warranty claims
• Customer service
16
CAPACITY (BTU/H)
5,000
6,000
6,500
7,250
8,000
8,750
9,650
10,500
12,500
15,000
WARRANTY
LIMITED WARRANTY
This air conditioner is covered by a warranty against defects in materials and
workmanship including the compressor, if used for the applications specified in this owner’s
manual, for a period of two (2) YEARS from the date of original purchase in Canada.
Note : The internal compressor is covered by a 5-YEAR limited warranty.
During the warranty period, if this air conditioner fails under normal use, SUNRISE TRADEX
CORP. will, at its option, either repair the unit or replace it, free of charge, within a
reasonable period of time after the air conditioner is returned.
As a condition to any warranty service obligation, the customer must present this warranty
certificate along with the proof of purchase.
THIS WARRANTY DOES NOT COVER :
1. Damage, accidental or otherwise, to the air conditioner that are not caused by materials or
workmanship defect.
2. Damage caused by misuse, tampering or failure to follow the operating and maintenance
instructions provided in this owner’s manual.
3. Damage to the finish of the unit enclosure or to other outer features caused by wear.
4. Filter.
5. Damage caused by repairs or modifications to the air conditioner made by any person not
duly authorized by SUNRISE TRADEX CORP.
6. Insurance and freight costs for the warranty service.
ALL IMPLIED WARRANTIES, INCLUDING ANY IMPLIED WARRANTY OF MERCHANTABILITY,
ARE LIMITED TO A TWO YEAR (2) PERIOD COVERED BY THIS EXPRESS LIMITED
WARRANTY. SUNRISE TRADEX CORP. DISCLAIMS ANY LIABILITY FOR CONSEQUENTIAL
OR INCIDENTAL DAMAGES AND, IN NO EVENT, SHALL SUNRISE TRADEX CORP. LIABILITY
EXCEEED THE RETAIL VALUE OF THIS AIR CONDITIONER FOR BREACH OF ANY WRITTEN
OR IMPLIED WARRANTY WITH RESPECT TO THIS AIR CONDITIONER.
Keep this owner’s manual along with your proof of purchase in a safe
place for future reference. You must provide proof of purchase for
warranty service.
Enter the following information on your air conditioner; it will help you upon getting
assistance or service if you ever need it. You will have then to provide the model and serial
numbers of the air conditioner – these data are detailed on the rating plate of the unit.
Dealer name :
Address :
Model number:
Serial number :
Date of purchase :
17