1
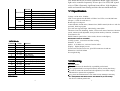
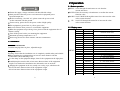
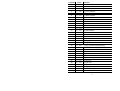
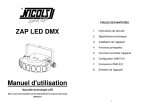
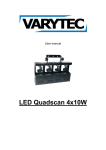
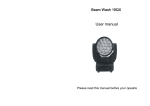
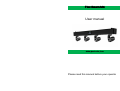
Flex Beam M4
User manual
4x10w,Quad-color,Cree
Please read this manual before your opearte
Flex Beam M4 has an excellent combination Beam Light, each head
light can be controlled separately.Tt have 4pcs Cree LED,10W (Quadcolor or White).Extremely significant beam effects , high brightness,
stable and smooth linear diming and ultra fast movement make the
PROM1
PROGRAM
SPEED
LED
UER
RESET
PROM2
4 heads 1-20
PROM3
PROM4
MOTOR
COLOR
ON
OFF
U1.0.0
RESET
Built-in grogam mode
Pan/tilt speed
Marco effect speed
Display ON mode
Display OFF after 20 second
Software version
Reset
14CH Mode
Channel
Value
1
0~255
2
0~255
3
0~255
4
0~255
5
0~255
6
0~255
7
0~255
8
0~255
9
0~255
10
0~255
11
0~255
12
0~255
13
0~255
14
250~255
Function
Dimmer
Strobe
Red dimmer
Green dimmer
Blue dimmer
White dimmer
Marco function
Built-in program play
Built-in program play speed
Pan scan
Tilt scan
Pan scan speed
Tilt scan speed
Reset
32CH Mode
4
1.1 Specification
Voltage: AC90-260v, 50/60hz
LED: 4x10w Quad-color RGBW or White Cree LEDs, over 80,000 hours
lifespan. (1 LED for each mover)
Beam Angel: 4.8 degrees
Control Model: Sound-active, Master/slave, DMX control(32chs or 14chs for
optional), built-in program
4pcs mini moving head light, individually controllable
Functions: Pan/Tilt, Dimming, Strobe, LED on/off, macro functions, function
speed, scanner speed adjustable ,Scan position memory function , automatic
reset function..etc
DMX Channel: Quad-color (32chs/14chs, choose on the lights ),
White(9chs/19chs are available)
Cooling system:convection and fans cooling
Dimmer:0~100%
Strobe:0~20 times/sec, various of strobe effect
Display:Digital display screen
Powercon in and Powercon out, 3pin XLR connector in and out
Dimension: 1025*85*95mm
Net weight: 8.0kg
1.2 Warning
Important notice:
This product must be installed by a qualified professional.
The equipment had been inspected strictly before leaving the factory.
In order to ensure the normal and safe operation,Users must comply
with manual to operate this equipment.
Key point: the manufacturer is not liable for any damages caused by
the manipulation that hasn't follow the Manual or private change
the devices without permission.
1
2 Operation
! ATTENTION !
Ensure the supply voltage consistent with host labeled voltage.
Don't put other electrical power cord connect this equipment power
input and output line.
Before connecting 110-240V AC, please ensure the power switch
socket connected with the ground.
Ensure safety, please choose the power socket of high quality.
This equipment's ground wire is yellow-green color.
Prevent collision when you move or install this equipment.
When the equipment stop working is hot, please touch the equipment after 10
mintues cooling.
Turn off the power before you mounting the equipment.
Maximum operating temperature is 45℃
Please keep at least 0.5 meter distance with the combustibles.
2.1 Button operation
MENU: Scroll through the main menu or exit from the
current sub-menu
ENTER:Enter the currently selected menu or confirm the current
function value.
DOWN:Scroll "DOWN"through the menu list or decrease the value
of the current function.
Scroll"UP"through
the menu list or increase the value
UP:
of the current function.
2.2 Display menu
Address
chnd
Auto
CoLo
1.3 Installation
Horizontal installation:
:
Fixed the hanging frame in place, adjustable angle.
Hang installation:
Warning: Ensure that the installation site is completely suitable,safety and reliable.
When installing the equipment,keep at least 0.3 meter distance with the
combustibles (decorated things, etc) .
Fix the clamp on the equipment hanger, then fix the equipment in the right place.
Installation place must be able to bear more than ten times of the equipment
weight. Test whether the installation site deformed or not in one hour.
Hanging the equipment in the air, usually use a safety rope, which must be
able to bear more than ten times of the equipment weight.
able to bear more than ten times of the equipment weight.
2
MENU
Address setting
001~512
32CH
14CH
Channel mode select
AUto
WHITE4
Built-in program play speed
Sound control auto
0~255 red dimmer
0~255 green dimmer
0~255 blue dimmer
0~255 white dimmer
0~255 red dimmer
0~255 green dimmer
0~255 blue dimmer
0~255 white dimmer
0~255 red dimmer
0~255 green dimmer
0~255 blue dimmer
0~255 white dimmer
0~255 red dimmer
0~255 green dimmer
0~255 blue dimmer
0~255 white dimmer
SHUT
0~255 strobe
Audio
RED1
GREEN1
BLUE1
WHITE1
RED2
GREEN2
BLUE2
WHITE2
RED3
GREEN3
BLUE3
WHITE3
RED4
GREEN4
BLUE4
3
Channel Value
1
0~255
2
0~255
3
0~255
4
0~255
5
0~255
6
0~255
7
0~255
8
0~255
9
0~255
10
0~255
11
0~255
12
0~255
13
0~255
14
0~255
15
0~255
16
0~255
17
0~255
18
0~255
19
0~255
20
0~255
21
0~255
22
0~255
23
0~255
24
0~255
25
0~255
26
0~255
27
0~255
28
0~255
29
0~255
30
0~255
31
0~255
32
250~255
Function
Dimmer
Strobe
① Red dimmer
① Green dimmer
① Blue dimmer
① White dimmer
② Red dimmer
② Green dimmer
② Blue dimmer
② White dimmer
③ Red dimmer
③ Green dimmer
③ Blue dimmer
③ White dimmer
④ Red dimmer
④ Green dimmer
④ Blue dimmer
④ White dimmer
①②③④ Marco function
①②③④ Built-in program play
①②③④ Built-in program play speed
① pan scan
① tilt scan
② pan scan
② tilt scan
③ pan scan
③ tilt scan
④ pan scan
④ tilt scan
①②③④ pan speed
①②③④ tilt speed
Reset
5