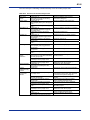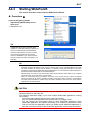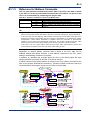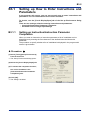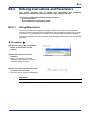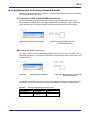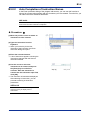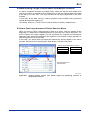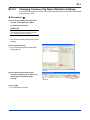
1
User’s Manual FA-M3 Programming Tool WideField3 (Introduction and Troubleshooting) IM 34M06Q16-01E IM 34M06Q16-01E Y okogaw a E lectric C orporation 3rd Edition Blank Page i Applicable Product: Range-free Multi-controller FA-M3 - Model Name: SF630-MCW FA-M3 Programming Tool WideField3 The document number and document model code for this manual are given below. Refer to the document number in all communications; also refer to the document number or the document model code when purchasing additional copies of this manual. - Document No.: IM 34M06Q16-02E Document Model Code: DOCIM IM 34M06Q16-01E Media No. IM 34M06Q16-01E (CD) 3rd Edition: Apr. 2013 (YHQ) All Rights Reserved Copyright 2008, Yokogawa Electric Corporation 3rd Edition: Apr. 26, 2013-00 ii Important About This Manual - This Manual should be passed on to the end user. - Before using the controller, read this manual thoroughly to have a clear understanding of the controller. This manual explains the functions of this product, but there is no guarantee that they will suit the particular purpose of the user. Under absolutely no circumstances may the contents of this manual be transcribed or copied, in part or in whole, without permission. The contents of this manual are subject to change without prior notice. - Every effort has been made to ensure accuracy in the preparation of this manual. However, should any errors or omissions come to the attention of the user, please contact the nearest Yokogawa Electric representative or sales office. Symbols Related to Safety Danger. This symbol on the product indicates that the operator must follow the instructions laid out in this user's manual to avoid the risk of personnel injuries, fatalities, or damage to the instrument. Where indicated by this symbol, the manual describes what special care the operator must exercise to prevent electrical shock or other dangers that may result in injury or the loss of life. Protective Ground Terminal. Before using the instrument, be sure to ground this terminal. Function Ground Terminal. Before using the instrument, be sure to ground this terminal. Alternating current. Indicates alternating current. Direct current. Indicates direct current. IM 34M06Q16-01E 3rd Edition: Apr. 26, 2013-00 iii The following symbols are used only in the user's manual. WARNING Indicates a “Warning”. Draws attention to information essential to prevent hardware damage, software damage or system failure. CAUTION Indicates a “Caution”. Draws attention to information essential to the understanding of operation and functions. TIP Indicates a “TIP”. Gives information that complements the present topic. SEE ALSO Indicates a “SEE ALSO” reference. Identifies a source to which to refer. Safety Precautions when Using/Maintaining the Product - For the protection and safe use of the product and the system controlled by it, be sure to follow the instructions and precautions on safety stated in this manual whenever handling the product. Take special note that if you handle the product in a manner other than prescribed in these instructions, the protection feature of the product may be damaged or impaired. In such cases, Yokogawa cannot guarantee the quality, performance, function and safety of the product. - When installing protection and/or safety circuits such as lightning protection devices and equipment for the product and control system as well as designing or installing separate protection and/or safety circuits for fool-proof design and fail-safe design of processes and lines using the product and the system controlled by it, the user should implement it using devices and equipment, additional to this product. - If component parts or consumable are to be replaced, be sure to use parts specified by the company. This product is not designed or manufactured to be used in critical applications which directly affect or threaten human lives and safety — such as nuclear power equipment, devices using radioactivity, railway facilities, aviation equipment, shipboard equipment, aviation facilities or medical equipment. If so used, it is the user’s responsibility to include in the system additional equipment and devices that ensure personnel safety. - - Do not attempt to modify the product. In order to prevent electrical shock, turn off all the power sources before connecting wires, etc. - This product is classified as Class A for use in industrial environments. If used in a residential environment, it may cause electromagnetic interference (EMI). In such situations, it is the user’s responsibility to adopt the necessary measures against EMI. IM 34M06Q16-01E 3rd Edition: Apr. 26, 2013-00 iv Exemption from Responsibility - - Yokogawa Electric Corporation (hereinafter simply referred to as Yokogawa Electric) makes no warranties regarding the product except those stated in the WARRANTY that is provided separately. Yokogawa Electric assumes no liability to any party for any loss or damage, direct or indirect, caused by the use or any unpredictable defect of the product. Software Supplied by the Company - Yokogawa Electric makes no other warranties expressed or implied except as provided in its warranty clause for software supplied by the company. Use the software with one computer only. - You must purchase another copy of the software for use with each additional computer. Copying the software for any purposes other than backup is strictly prohibited. - Store the original media that contain the software in a safe place. Reverse engineering, such as decompiling of the software, is strictly prohibited. - Under absolutely no circumstances may the software supplied by Yokogawa Electric be transferred, exchanged, or sublet or leased, in part or as a whole, for use by any third party without prior permission by Yokogawa Electric. IM 34M06Q16-01E 3rd Edition: Apr. 26, 2013-00 v General Requirements for Using the FA-M3 Controller Set the product in a location that fulfills the following requirements: - - Where the product will not be exposed to direct sunlight, and where the operating surrounding air temperature is from 0C to 55C (32F to 131F). There are modules that must be used in an environment where the operating surrounding air temperature is in a range smaller than 0C to 55C (32F to 131F). Refer to hardware user’s manual or the applicable user’s manual. In case of attaching such a module, the entire system's operating surrounding air temperature is limited to the module’s individual operating surrounding air temperature. Where the relative humidity is from 10 to 90%. In places where there is a chance of condensation, use a space heater or the like to constantly keep the product warm and prevent condensation. - For use in Pollution Degree 2 Environment. Where there are no corrosive or flammable gases. - Where the product will not be exposed to mechanical vibration or shock that exceed specifications. - Where there is no chance the product may be exposed to radioactivity. Use the correct types of wire for external wiring: - USE COPPER CONDUCTORS ONLY. Use conductors with temperature ratings greater than 75C. Securely tighten screws: - Securely tighten module mounting screws and terminal screws to avoid problems such as faulty operation. - Tighten terminal block screws with the correct tightening torque. Refer to the hardware user’s manual or the applicable user’s manual for the appropriate tightening torque. Securely lock connecting cables: - Securely lock the connectors of cables, and check them thoroughly before turning on the power. Interlock with emergency-stop circuitry using external relays: - Equipment incorporating the FA-M3 controller must be furnished with emergencystop circuitry that uses external relays. This circuitry should be set up to interlock correctly with controller status (stop/run). Ground for low impedance: - For safety reasons, connect the [FG] grounding terminal to a Japanese Industrial Standards (JIS) Class D (earlier called Class 3) Ground*1. For compliance to CE Marking, use braided or other wires that can ensure low impedance even at high frequencies for grounding. *1 Japanese Industrial Standard (JIS) Class D Ground means grounding resistance of 100 max. IM 34M06Q16-01E 3rd Edition: Apr. 26, 2013-00 vi Configure and route cables with noise control considerations: - Perform installation and wiring that segregates system parts that may likely become noise sources and system parts that are susceptible to noise. Segregation can be achieved by measures such as segregating by distance, installing a filter or segregating the grounding system. Configure for CE Marking Conformance: - For compliance with CE Marking, perform installation and cable routing according to the description on compliance to CE Marking in the “Hardware Manual”. We recommend that you stock up on maintenance parts: - We recommend that you stock up on maintenance parts, including spare modules, in advance. - Preventive maintenance (replacement of the module) is required for using the module beyond 10 years. Discharge static electricity before touching the system: - Because static charge can accumulate in dry conditions, first touch grounded metal to discharge any static electricity before touching the system. Wipe off dirt with a soft cloth: - Gently wipe off dirt on the product’s surfaces with a soft cloth. - If you soak the cloth in water or a neutral detergent, tightly wring it out before wiping the product. - Letting water enter the module interior can cause malfunctions. Do not use volatile solvents such as benzine or paint thinner or chemicals for cleaning, as they may cause deformity, discoloration, or malfunctioning. Avoid storing the FA-M3 controller in places with high temperature or humidity: - Since the CPU module has a built-in battery, avoid storage in places with high temperature or humidity. - Since the service life of the battery is drastically reduced by exposure to high temperatures, take special care (storage surrounding air temperature should be from –20C to 75C). There is a built-in lithium battery in a CPU module which serves as backup power supply for programs, device information and configuration information. The service life of this battery is more than 10 years in standby mode at room temperature. Take note that the service life of the battery may be shortened when installed or stored at locations of extreme low or high temperatures. Therefore, we recommend that modules with built-in batteries be stored at room temperature. - Always turn off the power before installing or removing modules: - Failing to turn off the power supply when installing or removing modules, may result in damage. IM 34M06Q16-01E 3rd Edition: Apr. 26, 2013-00 vii Do not touch components in the module: - In some modules you can remove the right-side cover and install ROM packs or change switch settings. While doing this, do not touch any components on the printed-circuit board, otherwise components may be damaged and modules may fail to work. Do not use unused terminals: - Do not connect wires to unused terminals on a terminal block or in a connector. Doing so may adversely affect the functions of the module. Use the following power source: - Use only power supply module F3PU□□-□□ in FA-M3 Controller for supplying power input for control circuit connection. - If using this product as a UL-approved product, for the external power supply, use a limited voltage / current circuit power source or a Class 2 power source. Refer to the user’s manual before connecting wires: - Refer to the hardware user’s manual or the applicable user’s manual for the external wiring drawing. Refer to “A3.6.5 Connecting Output Devices” in the hardware user’s manual before connecting the wiring for the output signal. Refer to “A3.5.4 Grounding Procedure” in the hardware user’s manual for attaching the grounding wiring. IM 34M06Q16-01E 3rd Edition: Apr. 26, 2013-00 viii Waste Electrical and Electronic Equipment Waste Electrical and Electronic Equipment (WEEE), Directive 2002/96/EC (This directive is only valid in the EU.) This product complies with the WEEE Directive (2002/96/EC) marking requirement. The following marking indicates that you must not discard this electrical/electronic product in domestic household waste. Product Category With reference to the equipment types in the WEEE directive Annex 1, this product is classified as a “Monitoring and Control instrumentation” product. Do not dispose in domestic household waste. When disposing products in the EU, contact your local Yokogawa Europe B. V. office. How to Discard Batteries The following description on DIRECTIVE 2006/66/EC (hereinafter referred to as the EU new directive on batteries) is valid only in the European Union. Some models of this product contain batteries that cannot be removed by the user. Make sure to dispose of the batteries along with the product. Do not dispose in domestic household waste. When disposing products in the EU, contact your local Yokogawa Europe B. V. office. Battery type: Lithium battery Note: The symbol above means that the battery must be collected separately as specified in Annex II of the EU new directive on batteries. IM 34M06Q16-01E 3rd Edition: Apr. 26, 2013-00 ix Introduction About This Manual The WideField3 manual set consists of the following four volumes. Table 1 Manual List Volume Introduction and Troubleshooting Offline Online Script Document No. IM 34M06Q16-01E IM 34M06Q16-02E IM 34M06Q16-03E IM 34M06Q16-04E This manual is the operation manual, Introduction and Troubleshooting, for the Rangefree Multi-controller FA-M3 Programming Tool (known as WideField3 in this manual). Overview of This Manual This manual describes how to install, utilize and troubleshoot WideField3. For enquiries, please contact the store where you purchased the product or the nearest Yokogawa sales office listed at the back of this manual. We recommend using this manual together with the operation manuals of your computer or printer, as required. Structure of the Manual This manual consists of 3 parts: A, B and C. Part A is targeted at first-time users of WideField3, as well as users migrating from WideField (SF610) or WideField2 (SF620) to WideField3. It describes the operating environment and basic specifications of the WideField3 software, as well as steps for installing WideField3. Part B describes advanced and efficient use of WideField3 that facilitates various user operations. Part C describes troubleshooting of WideField3. PART A Startup Manual A1. Overview Gives an overview of WideField3 and describes functional differences in comparison to WideField2 (SF620), as well as restrictions of WideField3. A2. Operating Environment Describes the operating environment of WideField3. A3. Basic Specifications Describes the screen layouts, list of functions, as well as basic specifications such as key operation. A4. Installing and Starting WideField3 Describes how to install and setup WideField3, how to uninstall and remove WideField3 from a personal computer, as well as to how to start and exit from WideField3. IM 34M06Q16-01E 3rd Edition: Apr. 26, 2013-00 x PART B Advanced User’s Manual B1. Storing Comments to CPU and Restoring Comments Describes the various states of comment data as stored in CPU, as well as the precautions and operation when comments are displayed or manipulated online. B2. Updating Programs after a Change in the I/O Module Slot Position Describes how to easily update a program when an I/O module is moved to a different installed slot position. B3. How to Rapidly Enter and Modify Instructions and Parameters Describes how to rapidly enter and modify instructions and parameters. B4. How to Use Customization Effectively Describes various customization functions. B5. How to Use Component Macros Effectively Describes effective use of component macros. B6. Collaborative Program Development Describes how to use WideField3 in collaborative system development. B7. Advanced Editing of Component Blocks Describes reuse of created blocks and advanced editing of component blocks. PART C Troubleshooting Manual C1. Developing Programs for a Multi-CPU System Describes precautions when configuring I/O settings for a multi-CPU system. C2. Recovering from Communications Errors Describes how to recover from communications errors between the personal computer and FA-M3. C3. Troubleshooting Describes common errors when using WideField3 and how to perform troubleshooting. C4. E-mail Technical Support Describes how to send an E-mail to Yokogawa’s technical support team. IM 34M06Q16-01E 3rd Edition: Apr. 26, 2013-00 xi How to Read This Manual Be sure to read the “Introduction” as well as “How to read this manual” before using WideField3. Part A of the manual describes how to set up the application, as well as gives an overview of the software. Part B describes advanced and efficient use of the application. Part C describes how to troubleshoot the application. This manual is structured so that each chapter or section can be read independently for details on the basic specifications and individual functions of the application. We have tried to make the user interface, operations and editing functions of the WideField3 application as similar as possible to other generally available Windows software. This manual does not contain information on general Windows editing operations, which are not specific to WideField3. Notation Notation for Windows Screens and Operation - Items in initial caps denote symbols, names and window names. - Example: WideField3, Program Monitor dialog Bracketed items denote menu bar items, dialog box fields, commands, and buttons. Example: Select [File]–[New] from the menu bar. Click [OK]. Representations in WideField3 Figures and Screens Screen examples given in this manual assumes that the application is running under Windows XP operating system environment. Under Windows 2000, Windows Vista and Windows 7 operating systems, you may observe slight differences such as differences in icon names or application names. Some figures in this manual may, for reasons of convenience, be emphasized or simplified, or parts of it may be omitted. Some screen images in this manual may differ from actual screens due to differences in the operating machine environment. Notation for Procedures Procedure pages are laid out with the procedure steps on the left and the corresponding screen images on the right. Procedure :User actions are displayed in bold. Description of the results of user actions is provided after the mark. Screens :The procedure step(s) corresponding to a screen image is indicated by step numbers below the screen. Function Keys and Shortcut Keys In addition to using a mouse, you can operate WideField3 menus using function keys and shortcut keys. In general, this manual describes operations using a mouse, and does not include equivalent operations using function keys or short cut keys. IM 34M06Q16-01E 3rd Edition: Apr. 26, 2013-00 xii Other User's Manuals You should read the following user's manuals. - FA-M3 Programming Tool WideField3 Read Me First (IM 34M06Q16-11E) FA-M3 Programming Tool WideField3 Offline (IM 34M06Q16-02E) - FA-M3 Programming Tool WideField3 Online (IM 34M06Q16-03E) FA-M3 Programming Tool WideField3 Script (IM 34M06Q16-04E) For individual sequence CPU modules, please refer to the relevant user's manuals. F3SP71, 76 - Sequence CPU Instruction Manual - Functions (for F3SP71-4N/4S, F3SP76-7N/7S) (IM 34M06P15-01E) - Sequence CPU – Network Functions (for F3SP71-4N/4S, F3SP76-7N/7S) (IM 34M06P15-02E) Sequence CPU Instruction Manual – Instructions (IM 34M06P12-03E) - F3SP66, 67 - Sequence CPU – Functions (for F3SP66-4S, F3SP67-6S) (IM 34M06P14-01E) Sequence CPU – Network Functions (for F3SP66-4S, F3SP67-6S) (IM 34M06P1402E) Sequence CPU Instruction Manual – Instructions (IM 34M06P12-03E) F3SP22, 28, 38, 53, 58, 59 - Sequence CPU Instruction Manual – Functions (for F3SP22-0S, F3SP28-3N/3S, F3SP38-6N/6S, F3SP53-4H/4S, F3SP58-6H/6S, F3SP59-7S) (IM 34M06P13-01E) Sequence CPU Instruction Manual – Instructions (IM 34M06P12-03E) F3SP05, 08, 21, 25, 35 - Sequence CPU – Functions (for F3SP21, F3SP25 and F3SP35) (IM 34M06P1202E) Sequence CPU Instruction Manual – Instructions (IM 34M06P12-03E) IM 34M06Q16-01E 3rd Edition: Apr. 26, 2013-00 xiii Refer to the following manuals as required. Specifications and Layout*1 of the FA-M3, Mounting and Wiring, Testing, Maintenance and Inspection, and System-wide Restrictions for Mounting Modules *1: See specific manuals for products other than the power module, base module, I/O module, cables, and terminal block units. - Hardware Manual (IM 34M06C11-01E) Fiber-optic FA-Bus Functions - Fiber-optic FA-bus Module and Fiber-optic FA-bus Type 2 Module, FA-bus Type 2 Module (IM 34M06H45-01E) FA Link Functions - FA Link H Module, Fiber-optic FA Link H Module (IM 34M06H43-01E) IM 34M06Q16-01E 3rd Edition: Apr. 26, 2013-00 xiv Copyrights and Trademarks Copyrights Copyrights of the programs and online manual included in this CD-ROM belong to Yokogawa Electric Corporation. This online manual may be printed but PDF security settings have been made to prevent alteration of its contents. This online manual may only be printed and used for the sole purpose of operating this product. When using a printed copy of the online manual, pay attention to possible inconsistencies with the latest version of the online manual. Ensure that the edition agrees with the latest CD-ROM version. Copying, passing, selling or distribution (including transferring over computer networks) of the contents of the online manual, in part or in whole, to any third party, is strictly prohibited. Registering or recording onto videotapes and other media is also prohibited without expressed permission of Yokogawa Electric Corporation. Trademarks - The trade and company names that are referred to in this document are either trademarks or registered trademarks of their respective companies. IM 34M06Q16-01E 3rd Edition: Apr. 26, 2013-00 TOC-1 FA-M3 Programming Tool WideField3 Introduction and Troubleshooting IM 34M06Q16-01E 3rd Edition CONTENTS Applicable Product:...................................................................................i Important ...................................................................................................ii Introduction..............................................................................................ix Copyrights and Trademarks .................................................................xiv PART-A Startup Manual A1. Overview .....................................................................................A1-1 A1.1 Overview of WideField3 ........................................................................A1-1 A1.2 New and Updated Functions in WideField3........................................A1-2 A1.2.1 Differences between WideField2 R5 and WideField3 R1..........A1-2 A1.2.2 Differences between WideField3 R1 and WideField3 R2........A1-10 A1.3 WideField3 Function Limitations .......................................................A1-14 A1.4 Migrating from WideField2 .................................................................A1-15 A1.5 Migrating from WideField ...................................................................A1-16 A2. Operating Environment .............................................................A2-1 A3. Basic Specifications ..................................................................A3-1 A3.1 Screen Layout........................................................................................A3-1 A3.2 Function List ........................................................................................A3-12 A3.3 List of Generated Files........................................................................A3-18 A3.4 Elements of Edit Circuits ....................................................................A3-20 A3.5 Shortcut Keys ......................................................................................A3-21 A3.6 Basic Keys ...........................................................................................A3-24 A3.7 Types of Screens .................................................................................A3-25 A4. Installing and Starting WideField3 ............................................A4-1 A4.1 Setting up WideField3...........................................................................A4-2 A4.2 Removing WideField3 ...........................................................................A4-6 A4.3 Starting WideField3 ...............................................................................A4-7 A4.4 Exiting from WideField3 .......................................................................A4-8 A4.5 Installing USB Driver.............................................................................A4-9 IM 34M06Q16-01E 3rd Edition: Apr. 26, 2013-00 TOC-2 PART-B Advanced User’s Manual B1. Storing Comments to CPU and Restoring Comments ............B1-1 B1.1 Storage of CPU Comments...................................................................B1-2 B1.1.1 Reference for Tag Name Definition and I/O Comments ............B1-3 B1.1.2 Reference for Circuit Comments and Subcomments ................B1-4 B1.1.3 Reference for Balloon Comments..............................................B1-5 B1.2 Integrating Comments ..........................................................................B1-7 B2. Updating Programs after a Change in the I/O Module Slot Position ...............................................................................B2-1 B2.1 If I/O Module Slot Positions Are Changed ..........................................B2-2 B2.2 If an I/O Module is Added......................................................................B2-3 B2.3 Reusing a Program in a System with a Different I/O Configuration .........................................................................................B2-4 B3. How to Rapidly Enter and Modify Instructions and Parameters..................................................................................B3-1 B3.1 Setting up How to Enter Instructions and Parameters......................B3-2 B3.1.1 Setting up Instruction/Instruction Parameter Completion ..........B3-2 B3.1.2 Setting up Parameter Direct Change Input................................B3-3 B3.2 Entering Instructions and Parameters ................................................B3-4 B3.2.1 Using Mnemonics.......................................................................B3-4 B3.2.2 Auto Completion of Instruction Names ......................................B3-6 B3.2.3 Auto Completion of Instruction Parameter Names ....................B3-7 B3.3 Modifying Instructions..........................................................................B3-8 B3.3.1 Modifying Contact Instructions...................................................B3-8 B3.3.2 Modifying Application Instructions..............................................B3-9 B3.3.3 Modifying the Property of an Application Instruction..................B3-9 B3.4 Modifying Instruction Parameters .....................................................B3-11 B3.4.1 Modifying Only Addresses and Constants ............................... B3-11 B3.4.2 Modifying Instruction Parameters Including the Device Types......................................................................B3-12 B4. How to Use Customization Effectively .....................................B4-1 B4.1 Displaying and Hiding Confirmation Messages.................................B4-2 B5. How to Use Component Macros Effectively ............................B5-1 B6. Collaborative Program Development .......................................B6-1 B7. Advanced Editing of Component Blocks .................................B7-1 B7.1 Reuse of Blocks ....................................................................................B7-2 B7.1.1 Registering to the Library...........................................................B7-2 B7.1.2 Using Blocks in the Common Library Folder .............................B7-4 B7.1.3 Using Blocks of Other Projects ..................................................B7-5 B7.2 Effective Way of Using Executable Program Settings.......................B7-6 B7.2.1 Block Protection .........................................................................B7-6 B7.2.2 Changing Common Tag Name Definition Settings ....................B7-7 B7.2.3 Changing Block Settings............................................................B7-8 IM 34M06Q16-01E 3rd Edition: Apr. 26, 2013-00 TOC-3 PART-C Troubleshooting Manual C1. Precautions When Programming for a Multi-CPU System .....C1-1 C2. Recovering from Communication Errors .................................C2-1 C3. Troubleshooting .........................................................................C3-1 C4. E-mail Technical Support ..........................................................C4-1 Index .......................................................................................................... Index-1 Revision Information ............................................................................................i IM 34M06Q16-01E 3rd Edition: Apr. 26, 2013-00 Blank Page FA-M3 Programming Tool WideField3 Introduction and Troubleshooting PART-A Startup Manual IM 34M06Q16-01E 3rd Edition The startup manual describes basic specifications of WideField3 as well as setup and startup procedures. IM 34M06Q16-01E 3rd Edition: Apr. 26, 2013-00 Blank Page A1-1 A1. Overview This chapter gives an overview of the FA-M3 programming tool WideField3, and describes its difference from its predecessor, the WideField2 (SF620) software. Overview of WideField3 The WideField3 software provides a Windows environment for developing programs which operate with FA-M3. Using this tool, developers are able to carry out all aspects of development, from creating programs to debugging and maintenance. WideField3 allows online connection to be made to FA-M3 using USB (RS-232C for some CPU types), Ethernet or FL-net. The WideField3 software supports a rich set of functions that facilities efficient program development such as multi-window editing, monitor functions and integration with other tools. The WideField3 software not only allows you to divide a large program into smaller modules for collaborative development, but also supports object ladder program development with high data and program independence. Thanks to these features, you can now create highly reusable programs. Personal Computer U R S SB -2 o r 32 C A1.1 Ethernet /FLnet A01_01.VSD Figure A1.1 WideField3 Operating Diagram IM 34M06Q16-01E 3rd Edition: Apr. 26, 2013-00 A1-2 A1.2 New and Updated Functions in WideField3 This section describes the differences in functionalities between the following WideField2 and WideField3 versions: - Differences between Widefield2 R5 and WideField3 R1 A1.2.1 Differences between WideField2 R5 and WideField3 R1 This subsection describes functional differences between Widefield2 R5 and WideField3 R1. SEE ALSO For details of individual differences, see sections given in the “SEE ALSO” column in Table A1.4. TIP To confirm the software version in WideField3 R1, select [Help]–[Version Information] from the menu bar. A dialog box as shown in Figure A1.2 appears. Verify that the software version is displayed as “R1.xx”. A01_02_R101.VSD Figure A1.2 WideField3 R1 Version Information IM 34M06Q16-01E 3rd Edition: Apr. 26, 2013-00 A1-3 List of Supported CPU Types WideField3 R1 supports the following CPU types: Table A1.1 List of Supported CPU Types in WideField3 R1 CPU Type F3SP71-4S/F3SP76-7S Support F3SP71-4N/F3SP76-7N Yes F3SP66-4S/F3SP67-6S Yes F3SP59-7S Yes F3SP58-6S Yes F3SP53-4S Yes F3SP38-6S Yes F3SP28-3S Yes F3SP22-0S Yes F3SP28-3N/F3SP38-6N Yes F3SP53-4H/F3SP58-6H Yes F3FP36-3N Yes F3SP25-2N/F3SP35-5N Yes F3SP21-0N Yes F3SP05-0P Yes F3SP08-0P Yes TIP There is correspondence between CPU types as shown below. For description of F3SPV-, check the following list and refer to the explanation of the corresponding CPU. - F3SPV3-4H: Equivalent to F3SP53-4H - F3SPV8-6H: Equivalent to F3SP58-6H - F3SPV3-4S: Equivalent to F3SP53-4S - F3SPV8-6S: Equivalent to F3SP58-6S IM 34M06Q16-01E 3rd Edition: Apr. 26, 2013-00 A1-4 List of Supported Device Types WideField3 R1 supports the following device types: SEE ALSO For details of devices, see "Sequence CPU – Functions." Table A1.2 List of Supported Device Types in WideField3 R1 Device Symbol X Y I E L M T C D B Device Name Input relay Output relay Internal relay Shared relay or extended shared relay Link relay Special relay Timer Counter Data register File register Support Yes Yes Yes Yes Yes Yes Yes Yes Yes Yes F W Z R V P H A U Q Cache register Link register Special register Shared register or extended shared register Index register Pointer register Macro relay Macro register Macro index register Structure pointer register Yes Yes Yes Yes Yes Yes Yes Yes Yes Yes List of Supported Communication Media WideField3 R1 supports the following communication media: Table A1.3 List of Supported Communication Media in WideField3 R1 Communication Media USB Ethernet RS-232C FL-net Support Yes Yes Yes Yes Note - Not available for Windows Me/98 operating systems - USB3.0 is not supported. Available for F3LX02-1N Rev 01:00 or later IM 34M06Q16-01E 3rd Edition: Apr. 26, 2013-00 A1-5 New and Updated Functions Table A1.4 Category New and Updated Functions in WideField3 R1 Function Details Summary New CPU types New CPU types Overall Resume references Resume screens [Close All Except Frontmost Window] menu Opening a file saved with a different name Environment setup Hiding a confirmation dialog box Import/Export/Rest ore defaults Communication setup SEE ALSO Supports F3SP22-0S/71-4N/76-7N, with corresponding new functions and ladder instructions added. When a file selection dialog box opens, the path from the previous file selection operation is shown. When a screen is opened, the state in which the screen was last closed is restored. Added the [Close All Except Frontmost Window] menu. After a file or project is saved with the [Save As] menu, the saved file or project can be opened for further editing. Added a setting to hide a confirmation dialog box for subsequent operations. Allows importing and exporting of environment setups. Allows all the parameters of the environment setup to be reset to default values. Allows selection of the communication port number used to connect with the CPU. — — — A3.2 Function List D2.2 Creating a Project D4.3 Saving Block and Macro Files E2.5 Group Templates F4.2 Defining Structure Types H5.2 CPU Properties Function K3.2 System Log K3.3 User Log B4.1 Displaying and Hiding Confirmation Messages D1.2 Environment Setup D1.2 Environment Setup H12 FA-M3 Communication Server IM 34M06Q16-01E 3rd Edition: Apr. 26, 2013-00 A1-6 Category Compare Function Details Summary Comparison by the components definition registration order Comparison is made not by file name but according to the order in which files are registered in the components definition. Allows the program edit screen to be split vertically or horizontally. Allows two blocks to be compared and separately edited in a single program edit screen. In the Instruction Parameter Setup dialog box of the program edit screen, IME is automatically switched from Japanese input mode to Alphanumeric mode. Allows comments to be added in balloons within screens. Allows adjustment of the height of circuit comment lines. Split display Editing blocks by referring and comparing Editing programs Automatic IME control Balloon comment Adjustment of line height of circuit comments Pasting content in a selected paste format Collective setup of display mode Circuit comment input dialog box Rapid entry of parameter changes Drag and drop Read and write mode When pasting a circuit, its tag name definition can also be pasted. Allows collective setup of display mode. Allows consecutive editing of multiple lines of circuit comments. When entering an instruction in the program edit screen, entering a number changes the device address, and entering an alphabet changes the device type and address. Allows data to be dragged and dropped from the following screens to the program edit screen: - Program monitor screen - Tag Name Definition Monitor screen - Tag Name Definition edit screen - Registered Device Monitor screen - Device monitor screen Allows block and macro files from other projects to be opened in a specified mode. SEE ALSO E7.2 Compare Project E7.3 Compare Window E7.3 Compare Window — E1.2.39 Creating and Deleting Balloon Comments D1.2.4 Circuit Display/Input Setup E1.2.31 Copying and Moving a Tag Name Definition E1.5.4 Setting Multiple Display Modes J2.3.9 Setting Multiple Display Modes E1.2.35 Entering and Deleting Circuit Comments B3 How to Rapidly Enter and Modify Instructions and Parameters E1.2 Editing Ladder Programs D4.2 Opening Block and Macro Files IM 34M06Q16-01E 3rd Edition: Apr. 26, 2013-00 A1-7 Category Summary SEE ALSO E4.1.1 Finding Devices/Comments User account setup Integrated separate dialog boxes for searching blocks and an entire project into a single search dialog box. Integrated separate dialog boxes for searching blocks and an entire project for instructions into a single instruction search dialog box. Integrated separate dialog boxes for replacing in blocks and an entire project into a single replace dialog box. Added jump destinations such as next and previous inputs/outputs. Up to three I/O comments can be specified to a single tag name definition. Allows selection of whether to load a common tag name definition template when creating a new project. Allows data to be dragged and dropped from the following screens to the Tag Name Definition screen: - Program edit screen - Program monitor screen - Tag Name Definition Monitor screen - Registered Device Monitor screen - Device monitor screen Integrated Define Components, Configuration, and CPU Properties of WideField2 R5 into Project Settings/Configuration. From the print setup dialog box, items to be printed and the print layout can be specified. Print order modification and print page preview are also possible. Allows device data in csv format to be imported. Sets up information of users who log in to the CPU. Operation protection Sets up protection against operations on the CPU. Cross reference Cross reference Device list Device list The cross reference window shows other locations where the device currently selected in the program is used. Also allows jumping to the location in another program where the device is used. Lists device usage status for each device type in a project. Find, replace and jump Function Details Find Find Instructions Replace Jump Tag name definitions Using multiple I/O comments Common tag name definition template Drag and drop Project Project setup/ configuration Print Print setup Device manager FA-M3 Defender Import E4.1.2 Finding Instruction E4.2 Replace E4.1 Find E2.8 Multiple I/O Comments D2.2.1 Creating a New Project E2.2.4 Copying, Cutting, Pasting, Moving and Deleting D3.1 Building a Project H5 CPU Properties E8 Printing H8 Device Manager H11 FA-M3 Defender (User Authentication and Operation Protection) H11 FA-M3 Defender (User Authentication and Operation Protection) E6 Cross Reference E5 Device List IM 34M06Q16-01E 3rd Edition: Apr. 26, 2013-00 A1-8 Category Sampling trace Function Details Setup wizard Number of items to be traced Number of trace operations Start and end trigger conditions Trace result window Registered device monitor Drag and drop Copy and paste Register Sort Device monitor Tag name definition monitor I/O comment display Advanced function module relay monitor Advanced function module monitor Drag and drop Drag and drop Summary Added a wizard for setting up the sampling trace. Increased the number of traceable items as follows: - Bit device: from 16 to 64 - Register device: from 4 to 128 Allows up to 174,762 operations based on the number of devices to be traced. Added conditions specifiable to start and end triggers. Allows operations such as selection and filtering of displayed data and overlapping with past data. Allows data to be dragged and dropped from the following screens to the Registered Device Monitor screen for device registration: - Program edit screen - Program monitor screen - Tag Name Definition screen - Tag Name Definition Monitor screen - Device monitor screen Allows moving and copying of registered devices. Items from the following screens can be selected and set in the registered device monitor: - Program edit screen - Program monitor screen - Tag Name Definition screen - Tag Name Definition Monitor screen - Device monitor screen Allows sorting of monitored devices by switching the order of the line positions of the devices. Displays I/O comments of monitored items. Allows display of I/O comments assigned to addresses. Allows selection of module types when the monitor starts up. Allows device monitor data to be dragged and dropped to the following screens: - Program edit screen - Program monitor screen - Tag Name Definition screen - Tag Name Definition Monitor screen - Registered Device Monitor screen Allows tag name definition monitor data to be dragged and dropped to the following screens: - Program edit screen - Program monitor screen - Tag Name Definition screen - Registered Device Monitor screen - Device monitor screen SEE ALSO K4.3 Sampling Trace Setup K4 Sampling Trace Tool K4 Sampling Trace Tool K4.3.5 Setup of Trigger Conditions K4.4 Using Sampling Trace Results J5 Registered Device Monitor J5 Registered Device Monitor J5 Registered Device Monitor J5.1 Registered Device Monitor Window J5.1 Registered Device Monitor Window J3.6.1 Advanced Function Module Relay Monitor Window J3.6 Advanced Function Module Monitor J3 Device Monitor J4 Tag Name Definition Monitor IM 34M06Q16-01E 3rd Edition: Apr. 26, 2013-00 A1-9 Category Program monitor Function Details Drag and drop Balloon monitor Circuit comment out Online Online editing Project window Operation log Operation log Summary SEE ALSO Allows program monitor data to be dragged and dropped to the following screens: - Program edit screen - Tag Name Definition Monitor screen - Tag Name Definition screen - Registered Device Monitor screen - Device monitor screen Allows current values of devices to be displayed in program monitor balloons. Allows programs to be executed by temporarily activating or disabling selected instructions or circuits. Allows pasting of circuits copied or cut from other blocks. Added alarm statuses, various logs, CPU properties and module configuration to the project tree. Maintains a record of operations performed on the CPU by users. J2 Program Monitor J2.6 Balloon Monitor K2.3 Commenting Out Circuits K2 Online Edit — K3.4 Operation Log IM 34M06Q16-01E 3rd Edition: Apr. 26, 2013-00 A1-10 A1.2.2 Differences between WideField3 R1 and WideField3 R2 This subsection describes functional differences between Widefield3 R1 and WideField3 R2. SEE ALSO For details of individual differences, see sections given in the “SEE ALSO” column in Table A1.6. TIP To confirm the software version in WideField3 R2, select [Help]–[Version Information] from the menu bar. A dialog box as shown in Figure A1.3 appears. Verify that the software version is displayed as “R2.xx”. A01_02_R201.VSD Figure A1.3 WideField3 R2 Version Information List of Supported CPU Types F3SP71-4S and F3SP76-7S have been added to the CPU types previously supported by WideField3 R2. Table A1.5 List of Supported CPU Types in WideField3 R2 CPU Type F3SP71-4S/F3SP76-7S Support Yes F3SP71-4N/F3SP76-7N Yes F3SP66-4S/F3SP67-6S Yes F3SP59-7S Yes F3SP58-6S Yes F3SP53-4S Yes F3SP38-6S Yes F3SP28-3S Yes F3SP22-0S Yes F3SP28-3N/F3SP38-6N Yes F3SP53-4H/F3SP58-6H Yes F3FP36-3N Yes F3SP25-2N/F3SP35-5N Yes F3SP21-0N Yes F3SP05-0P Yes F3SP08-0P Yes IM 34M06Q16-01E 3rd Edition: Apr. 26, 2013-00 A1-11 TIP There is correspondence between CPU types as shown below. For description of F3SPV-, check the following list and refer to the explanation of the corresponding CPU. - F3SPV3-4H: F3SPV8-6H: F3SPV3-4S: F3SPV8-6S: F3SPV9-7S: Equivalent to F3SP53-4H Equivalent to F3SP58-6H Equivalent to F3SP53-4S Equivalent to F3SP58-6S Device capacities and instructions are equivalent to F3SP76-7S New and Updated Functions Table A1.6 Category New and Updated Functions in WideField3 R2 Function Details Summary New CPU types New CPU types Editing programs Instruction range display Find Find circuit comment-out Monitoring during online editing Online editing Script Operating environment Balloon Balloon Find Find devices Circuit commentout All cancel Scrip Editing 64-bit OS support Supports F3SP71-4S/76-7S, with corresponding new functions and ladder instructions added. Displays the range of instructions used in pairs, such as IL-ILC and FOR-NEXT. Circuit comment-out locations can be searched for. Program monitoring and debugging functions can be used during online editing. Programming can be done using languages such as BASIC, in addition to the ladder language. Windows Vista (64-bit version) and Windows 7 (64-bit version) are now supported. - Balloons can be stored in the CPU. - All balloons can be collectively shown and hidden. - Balloons can be copied. - The display setup can be saved. Only the displayed devices can be searched. All the circuit commenting-out can be canceled. - Display of constant name candidates is available. - Constant names can be registered. - The ++ and -- operators are supported. - The SELECT statement is supported. - The maximum nests of the IF/SELECT and FOR statements are increased from 2 to 8. SEE ALSO Version R2.01 D1.2.4 Circuit Display/Input Setup E1.5.3 Display Instruction Range E1.5.4 Setting Multiple Display Modes E4.1.10 Find Circuit Comment-out D1.2.4 Circuit Display/Input Setup D1.2.5 Program Monitor Setup K2.5 Monitoring During Online Editing Throughout PART G R2.01 R2.01 R2.01 R2.01 R2.03 B1.1.3 Reference for Balloon Comments E1.2.39 Creating and Deleting Balloon Comments H9.1.3 Storing Balloon Comments H9.3 Online Operation of Balloon Comments E4.1.1 Finding Devices/Comments K2.3.4 Canceling All Circuit Commenting-Out E4.1.10 Find Circuit Comment-out G3.2.1 Arithmetic Operators G3.3 Control Statements G11. Program Control Functions G2.3.4 Display of Input Candidates G2.3.5 Registering and Editing of Constant Definition IM 34M06Q16-01E R2.03 R2.03 R2.03 R2.03 3rd Edition: Apr. 26, 2013-00 A1-12 Category Function Details Script Monitoring Online editing Cancel operation New CPU types Editing programs New CPU types Editing programs Vertical line input Editing programs Editing programs Continuation line Line range selection Editing programs Device list Editing programs Displaying of I/O comment Project Saving Print Cross reference Print Print screen Download Tag name definitions Upload Tag name definitions Program monitor Watch monitor Online editing Circuit comment/subco mment Conversion Summary SEE ALSO Version The script monitor can be hidden. If any conversion error occurs during online editing, you can exit the online editing and restores the state before the editing by discarding the entire changes made. The program on the CPU retains the state before editing. Supports F3SPV9-7S, with corresponding new functions. If a circuit has multiple branches in the same line to which the same logic is specified, a conversion error occurs. Inserting and deleting vertical lines using the function keys are improved. Return numbers in continuation lines are shown. Line ranges can be selected by specifying start and end lines, without dragging a mouse. The device list screen can be displayed in the output window. Also, device usage in the program edit screen can be immediately viewed. If a space character is included in an I/O comment and there should be a new line in the middle of the next character string, the new line occurs at the space character and the character string is displayed. When a project is closed, project settings, blocks, and other configurations can be saved at the same time. Cross reference printing can be selected when a device list is printed. The print range of the program output settings is valid, even for print screen. Tag name definitions can be downloaded during RUN. (Valid for F3SP71-4S/SP76-7S R3 or later) Items to be transferred during a project upload can be selected. SP71/76 supports uploading of tag name definitions only. G5.4 Monitoring in the Script Pane K2. Online Edit Devices are automatically displayed in accordance with the visible area of the program monitor, allowing such devices to be monitored. Also, the display format and data length can be specified for each device. Circuit comments and subcomments can be added during online editing. (Valid for F3SP71-4S/SP76-7S R3 or later) R2.03 R2.03 R2.04 E1.1.2 Circuits with Conversion Errors R2.04 E1.2.23 Inserting Connection Lines R2.04 E1.2.24 Entering Continuation Circuit E1.2.27 Selecting Circuits R2.04 R2.04 E5.1 Fundamentals of Device List R2.04 E1.2.38 Entering and R2.04 Deleting I/O Comments D2.2.4 Closing a Project R2.04 E8.4.4 Device List Settings E8.5.5 Print Layout for Device List E8.3.4 Configuring Program Output Settings R2.04 H2.3 Downloading Tag Name Definitions during RUN R2.04 H3.1.2 Procedure for Uploading a Project H3.2 Uploading Blocks and Macros H3.3 Uploading Tag Name Definitions R2.04 J6 Watch Monitor R2.04 K2.4.3 Precautions for Online Editing R2.04 IM 34M06Q16-01E R2.04 3rd Edition: Apr. 26, 2013-00 A1-13 Function Details Summary Online editing Category Forcible canceling of the CPU online editing mode Properties Initial values If you are writing data to the CPU using the online editing function but the operation does not finish successfully due to a communication error, you can recover FA-M3 by forcibly canceling the CPU online editing mode, without having to turning FA-M3 off and then on again. (Valid for F3SP71-4S/SP76-7S R3 or later) For a new project or new block/macro, circuit comments/subcomments, common tag name definitions, and block tag name definitions are stored to the CPU by default. SEE ALSO Version J1.10 Forcibly Canceling Online Editing Mode R2.04 D3.1.16 Component Block Setup R2.04 CAUTION - - - Once a project is opened in WideField3 R2 and is converted to WideField3R2 format, the project can no longer be used in WideField3 R1. A project created in WideField3 R2 must be converted to a lower format so that it can be used in WideField3 R1 if necessary. For WideField3 versions earlier than R2.03, the script monitoring is not possible for programs using script syntax that contains a SELECT statement or any other new features. Also, trying to perform online editing causes a compile error. When downloading a program created with WideField3 R1.01 or earlier (including R1.01) to the CPU, you cannot download only balloons to the CPU. TIP To identify the type and Rev number of the CPU connected from WideField3, check the information displayed on Status Bar. SEE ALSO For details on Status Bar, see Section A3.1, "Screen Layout" (Introduction and Troubleshooting). IM 34M06Q16-01E 3rd Edition: Apr. 26, 2013-00 A1-14 A1.3 WideField3 Function Limitations This section describes some limitations of WideField3. These limitations refer to specific functions accessible from the WideField3 user interface, including incomplete functions intended for future use and known operational instability under specific conditions. Table A1.7 WideField3 Function Limitations Category Windows 2000 Windows XP Windows Vista Function Details Security setting for directories USB Communications FL-net Communications FA Link Communications Sampling trace Communications Device manager Communications Limitations To allow restricted users to use WideField3, you must set the access permissions on directories to grant restricted users access to all directories used by WideField3 such as the installation directory and program directory. Depending on the chipset used by the PC running the WideField3 software, reliable USB connection is not always guaranteed. A USB connection may be unreliable or even disconnected due to noise. If this happens, remove and re-attach the USB cable to the PC. Communications to the CPU may fail during FL-net (OPCN-2) setup when the WideField3 window is minimized. Communications to the CPU may fail during FA link setup when the WideField3 window is minimized. Communications to the CPU may fail when the WideField3 window is minimized. Communications to the CPU may fail when the WideField3 window is minimized. IM 34M06Q16-01E 3rd Edition: Apr. 26, 2013-00 A1-15 A1.4 Migrating from WideField2 This section highlights differences between the use of WideField2 and WideField3 for the convenience of users migrating from WideField2. User File Compatibility In WideField3, blocks or macros created in WideField2 can be opened in read or write mode. In write mode, you can also edit blocks and macros. CAUTION - A project that has been opened in WideField3 and automatically converted to WideField3 format can no longer be used directly in WideField2 again. To use a projected created in WideField3 in the WideField2 software, you must first convert it to a lower version format. - A project saved by WideField3 in card load format cannot be opened in WideField2. To save a WideField3 project in WideField2 compatible card load format, downgrade and save the project using WideField3 in WideField2 format, and then open the project in WideField2 and save it in card load format. Automatic Conversion of Projects Project configuration files are added when a project created in WideField2 is opened in WideField3. The following table shows the files to be added. Table A1.8 List of Automatic Project Conversions Item to be Added Long and shot names file Screen resume file File Name LONGNAME.TXT Resumeinfo.USR TIP The long and shot names file saves the corresponding relationship between project, block and macro names recognized by the personal computer and those stored in the CPU. IM 34M06Q16-01E 3rd Edition: Apr. 26, 2013-00 A1-16 A1.5 Migrating from WideField This section highlights differences between the use of WideField and WideField3 for the convenience of users migrating form WideField. User File Compatibility When you open a project, block or tag name definition created in WideField using WideField3, WideField3 automatically converts the file into WideField3 format to allow editing. CAUTION A project that has been opened in WideField3 and automatically converted to WideField3 format can no longer be used directly in WideField again. To use a projected created in WideField3 in the WideField software, you must first convert it to a lower version format. Automatic Conversion of Tag Name Strings All period (“.”) characters used in tag names in a project created in WideField are automatically converted to underscore (“_”) characters when the project is opened in WideField3. All the mappings between tag names and addresses are correct after conversion. Note that all programs are modified during conversion. Table A1.9 List of Automatic Tag Name Conversions Item Tag name strings Before Conversion “.” After Conversion by WideField3 “_” Automatic Conversion of Projects Formats of all user files are automatically converted when a project created in WideField is opened in WideField3. The following table shows the setup information after conversion. Table A1.10 List of Automatic Project Conversions Item Reference tag name definition Store tag name definition Store circuit comments and I/O comments Maximum common tag name definitions Before Conversion 5120 After Conversion by WideField3 Block tag name definition No No Preset value +1 Project configuration files are added when a project created in WideField is opened in WideField3. The following table shows the files to be added. Table A1.11 List of Files to be Added Item to be Added Long and shot names file Screen resume file File Name LONGNAME.TXT Resumeinfo.USR IM 34M06Q16-01E 3rd Edition: Apr. 26, 2013-00 A1-17 Tag Name Oriented Development The WideField3 program development environment is designed as a tag name oriented development environment. Entered data (tag names or addresses) is stored in block files which are displayed as programs with the entered data unchanged. However, addresses entered during online editing or uploading which already have tag names assigned are converted to tag names before saving. Consistent to its tag-name oriented development design philosophy, the replace operation is not allowed in address display mode in WideField3. Using Projects Created in WideField3 in WideField or WideField2 Projects created in WideField3 and WideField projects which have been opened in WideField3 cannot be used directly in WideField or WideField2. To use a project which has been opened in WideField3 in WideField or WideField2, perform conversion by selecting [File]–[Save Project in Other Formats]–[Downgrade and Save] from the WideField3 menu. CAUTION If a project that is opened and then downloaded to a sequence CPU using WideField3 is uploaded using WideField or WideField2, the project may sometimes fail to be generated properly. If this happens, perform [File]–[Save Project in Other Formats]– [Downgrade and Save] in WideField3 for the project saved on the personal computer before using it in WideField or WideField2. IM 34M06Q16-01E 3rd Edition: Apr. 26, 2013-00 Blank Page A2-1 A2. Operating Environment This section describes the operating environment of WideField3. Table A2.1 Operating Environment Item PC Operating System *1 Required Software Software Media CPU *2 Memory *3 Hard Disk Capacity Display Communications *4*5 Printer Compatible CPU Modules Specifications PC/AT compatible Microsoft Windows 7 (32bit/64bit) Microsoft Windows Vista (32bit/64bit) Microsoft Windows XP Microsoft Windows 2000 Internet Explorer 5.01 or later, .NET Framework2.0 CD-ROM Pentium 133MHz or better, and can run an operating system listed above 32MB or more, and can run an operating system listed above 400MB or more available 800 x 600 dots or more (1024×768 recommended) USB, RS-232C, Ethernet, FL-net Any printer compatible with the operating systems listed above and supports A4 printing F3SP05-0P, F3SP08-0P, F3SP08-SP, F3SP21-0N, F3SP22-0S, F3SP25-2N, F3SP35-5N, F3SP28-3N, F3SP38-6N, F3SP53-4H, F3SP58-6H, F3SP28-3S, F3SP38-6S, F3SP53-4S, F3SP58-6S, F3SP59-7S, F3SPV3-4H, F3SPV8-6H, F3FP36-3N, F3SPV3-4S, F3SPV8-6S, F3SP66-4S, F3SP67-6S, F3SP71-4N, F3SP76-7N, F3SP71-4S, F3SP76-7S, F3SPV9-7S *1: Only the 32 bit (x86) versions of Windows XP can be used. The 64 bit (x64) versions cannot be used. *2: For FL-net communications, CPU speed must be Pentium III 750 MHz or higher. *3: For FL-net communications, memory must be 128MB or more. *4: For FL-net communications, network card must support TCP/IP protocol. Usable communications conditions vary with CPU type. *5: Depending on the chipset used by the PC running the WideField3 software, reliable USB connection is not always guaranteed. CAUTION Set the display font size to a small font size. The text on the screen may be displayed incorrectly if a large font size is chosen. Pay careful attention to the Windows folder security before installing and running the WideField3 software. CAUTION Some operating environments may not display the font you choose on WideField3. Start it by choosing the font which can be displayed. CAUTION Do not run the WideField3 software and the WideField (SF610) or WideField2 (SF620) software concurrently. IM 34M06Q16-01E 3rd Edition: Apr. 26, 2013-00 A2-2 Connecting to FA-M3 FA-M3 sequence CPU module and WideField3 (running on PC) can be connected via RS-232C, USB, Ethernet, or FL-net. Connecting Using USB Prepare a standard USB cable, which is available commercially. - Connecting to the PC Connect the cable to the USB port of the PC. Connecting to the sequence CPU module Connect the cable to the USB port located on the front panel of the sequence CPU module. Inserting the cable when the RDY LED is lit initiates installation of the driver software. Follow the displayed messages to install the driver software. TIP - Use a USB1.1/2.0-compliant generic USB cable (up to 5m long). - Depending on the chipset used by the PC running the WideField3 software, reliable USB connection is not always guaranteed. - A USB connection may become unreliable or even disconnected due to noise. If this happens, remove and re-attach the USB cable to the PC. Connecting Using RS-232C Prepare a proprietary FA-M3 CPU cable as shown in Table A2.2. Select a cable with an appropriate serial port connector for the PC to be used. Table A2.2 Cables for CPU Port Type KM11 KM13 Basic Specifications Code -2T (3m long) -3T (5m long) -4T (10m long) -1N (3m long) -1S (3m long) Specifications DOS/V compatible, D-sub 9 pin DOS/V compatible USB1.1-compliant cable for use with USB port - Connecting to the PC Connect the cable to the serial port of the PC. The serial port is located at the back for most PCs but located in front for some PCs. - Connecting to the sequence CPU module Connect the cable to the PROGRAMMER or SIO port of the sequence CPU module. Remove the protective cover from the sequence CPU module to be accessed or configured from WideField3, and connect the cable securely. SEE ALSO When using a USB cable for connection, you may need to configure the serial port on the PC. For more information on the USB-Serial converter cable, see “USB-Serial Converter” (IM34M06C91-01E). IM 34M06Q16-01E 3rd Edition: Apr. 26, 2013-00 A2-3 Connecting Using Ethernet via Ethernet Interface Module Connect the (10BASE5/10BASE-T/100BASE-TX) connector on the PC to the (10BASE5/10BASE-T/100BASE-TX) connector on the Ethernet interface module using a (10BASE5/10BASE-T/100BASE-TX) cable. SEE ALSO For details on Ethernet connection, see “Ethernet Interface Module” (IM 34M06H24-01E, IM 34M06H24-04E). Connecting Using Ethernet via Connector on Front Panel of CPU Module Connect the (10BASE-T/100BASE-TX) connector on the PC to the (10BASE-T/ 100BASE-TX) connector on the front panel of the CPU module using a (10BASE-T/ 100BASE-TX) cable. SEE ALSO For details, see “Sequence CPU – Network Functions (for F3SP66-4S, F3SP67-6S)” (IM34M06P1402E) and “Sequence CPU – Network Functions (for F3SP71-4N/4S, F3SP76-7N/7S)” (IM34M06P1502E). Connecting Using FL-net Connect the (10BASE5/10BASE-T) connector on the PC to the (10BASE5/10BASE-T) connector on the FL-net (OPCN-2) interface module using a (10BASE5/10BASE-T) cable. CAUTION To connect to FL-net, use FL-net (OPCN-2) Interface Module revision 01:00 or higher. SEE ALSO For details on FL-net connection, see “FL-net (OPCN-2) Interface Module” (IM34M06H32-02E) IM 34M06Q16-01E 3rd Edition: Apr. 26, 2013-00 Blank Page A3-1 A3. Basic Specifications This chapter describes basic specifications, including screen layout, a list of all functions and operations of shortcut keys. A3.1 Screen Layout This section describes the layout of a WideField3 screen. A03_01.VSD Figure A3.1 Screen Layout Title Bar The title bar displays the file name of the open project, the name of the active window and the name of the block or macro file being edited. Project file name Name of active window and file name A03_02.VSD Figure A3.2 Layout of Title Bar IM 34M06Q16-01E 3rd Edition: Apr. 26, 2013-00 A3-2 Menu Bar The menu bar displays names of menus which are available in WideField3. You can select a menu from the menu bar. The menus displayed in the menu bar are dependant on the function that is currently active e.g. online or tag name definition function. Figure A3.3 Layout of Menu Bar A03_03.VSD Toolbar The toolbar displays icons of the most frequently used menus from the menu bar. You can select a menu from the menu bar or the toolbar. To register a menu to the toolbar, use the Set up Environment dialog box. To switch between showing and hiding the tool bar, use [View]–[Toolbar]. A03_04.VSD Figure A3.4 Layout of Toolbar (The figure shows the single row of icons divided into two.) Instruction Palette The instruction palette displays icons for instructions and comments. You can create a circuit by selecting instructions from the instruction palette. To switch between showing and hiding the instruction palette, use [View]–[Instruction Palette]. A03_05.VSD Figure A3.5 Layout of Instruction Palette Find Bar The find bar displays an area for entering devices for search conditions and icons to specify for performing searches. You can also select devices for search conditions from past history. To switch between showing and hiding the find bar, use [View]–[Find Bar]. A03_06.VSD Figure A3.6 Layout of Find Bar IM 34M06Q16-01E 3rd Edition: Apr. 26, 2013-00 A3-3 File Comparison Bar The file comparison bar displays icons for operations related to the file comparison function. You can use these icons to compare files and specify operations in the comparison results display screen. To switch between showing and hiding the file comparison bar, use [View]–[File Comparison Bar]. A03_07.VSD Figure A3.7 Layout of File Comparison Bar Status Bar The status bar displays various status information of the WideField3 software. To switch between showing or hiding the status bar, use [View]–[Status Bar]. Describes the menu item under the mouse cursor. Displays the type and Rev number of the CPU connected. Displays Communication medium. The status of the FA-M3 connection is displayed here. Displays Overwrite/ Insert mode. Displays the number of lines and steps in the block and command macro. A03_08.VSD Figure A3.8 Layout of Status Bar IM 34M06Q16-01E 3rd Edition: Apr. 26, 2013-00 A3-4 Project Window - Offline In offline mode, the Project window displays the components of a project open in WideField3. It displays the components of the executable program, and lists the blocks and instruction macros within the project. To switch between showing or hiding the Project window, use [View]–[Project Window]. Displays the CPU type specified in the project. Double-click to open the CPU Type Settings screen of the Project Settings/Configuration window. Double-click to open the Common Tag Name Definition window. Double-click to open the Constant Definition window. Double-click to open the CPU Properties screen of the Project Settings/Configuration window. Switches the project tree between [Offline] and [Online]. Double-click to open the Execution Block Components screen of the Project Settings/Configuration window. Double-click to open the Project Settings/Configuration window. Displays the program components set in the Execution Block Components screen of the Project Settings/Configuration window. Blocks in the common library or other projects are indicated with an asterisk (*) at the end of the block name. Displays the blocks in the project. The blocks registered in the program components are displayed in black, and the blocks not registered are displayed in gray. Double-click to open the Edit Block window. Displays the macros in the project. Double-click to open the Edit Macro window. A03_10.VSD Figure A3.10 Layout of Offline Project Window IM 34M06Q16-01E 3rd Edition: Apr. 26, 2013-00 A3-5 You can call up the following functions directly from the offline project tree. Table A3.1 Function List of Offline Project Tree Tree Item Project CPU Type Name Component Definition Common Tag Name Definition Constant Definition CPU Properties Project Settings/ Configuration Operation Select [Compare Project] from the popup menu. Select [Check Program] from the popup menu. Select [Find in Project] from the popup menu. Select [Find Instruction in Project] from the popup menu. Select [Replace in Project] from the popup menu. Select [Obsolete Device List] from the popup menu. Double-click, or select [Open] from the popup menu. Double-click, or select [Open] from the popup menu. Double-click, or select [Open] from the popup menu. Select [Compare] from the popup menu. Select [Output CSV Data] from the popup menu. Select [Load CSV Data] from the popup menu. Double-click, or select [Open] from the popup menu. Select [Compare] from the popup menu. Double-click, or select [Open] from the popup menu. Double-click Component Blocks Select [Define Program Components] from the popup menu. Block under the Component Blocks Double-click, or select [Open] from the popup menu. Select [Reference Block (Read Mode)] from the popup menu. Select [Reference Block (Write Mode)] from the popup menu. Select [Rename Library Block] from the popup menu. Select [Delete Library Block] from the popup menu. Select [Copy File] from the popup menu. Select [Insert File] from the popup menu. Select [Rename File] from the popup menu. Select [Delete File] from the popup menu. Block List Function Opens the Start Project Comparison dialog box. Performs a syntax check on the project. Opens the Find in Project dialog box. Opens the Find Instruction in Project dialog box. Opens the Project Replace dialog box. Opens the Obsolete Device List dialog box. Opens the CPU Type Settings screen of the Project Settings/Configuration window. Opens the Execution Block Components screen of the Project Settings/Configuration window. Opens the Common Tag Name Definition edit window. Compares files in Common Tag Name Definition. Exports Common Tag Name Definition as CSV data. Imports CSV data to Common Tag Name Definition. Opens the Constant Definition edit window. Compares files in Constant Definition. Opens the CPU Properties screen of the Project Settings/Configuration window. Opens the Project Settings/Configuration window. Opens the Execution Block Components screen of the Project Settings/Configuration window. Opens the Edit Block window. Opens the block in read mode. Opens the block in write mode. Renames the common library block file. Deletes the selected block from the common library. Copies a project block with a different name. Adds a block file to the project. Changes the file name of the specified block in the project. Deletes a block file in the project. IM 34M06Q16-01E 3rd Edition: Apr. 26, 2013-00 A3-6 Tree Item Block under the Block List Macro List Macro under the Macro List Operation Select [Compare] from the popup menu. Select [Block Tag Name Definition] from the popup menu. Select [Local Device/Properties] from the popup menu. Select [Copy File] from the popup menu. Select [Rename File] from the popup menu. Select [Delete File] from the popup menu. Select [Add to Library] from the popup menu. Double-click, or select [Open] from the popup menu. Select [Copy File] from the popup menu. Select [Rename File] from the popup menu. Select [Delete File] from the popup menu. Select [Extract Macro] from the popup menu. Select [Compare] from the popup menu. Select [Block Tag Name Definition] from the popup menu. Select [Local Device/Properties] from the popup menu. Select [Copy File] from the popup menu. Select [Rename File] from the popup menu. Select [Delete File] from the popup menu. Select [Register Macro] from the popup menu. Double-click, or select [Open] from the popup menu. Function Compares block programs. Opens the Block Tag Name Definition window. Opens the Local Device/Properties dialog box. Copies a block with a different name. Changes the block file name. Deletes the block. Registers the block in the common library. Opens the Edit Block window. Copies a project macro with a different name. Changes the file name of the specified macro in the project. Deletes a macro file in the project. Adds a macro file to the project. Compares macro programs. Opens the Macro Tag Name Definition window. Opens the Local Device/Properties dialog box. Copies a project block with a different name. Changes the macro file name. Deletes the macro. Registers a macro in the macro folder. Opens the Edit Macro window. IM 34M06Q16-01E 3rd Edition: Apr. 26, 2013-00 A3-7 Project Window - Online In online mode, the Project window displays the information for the CPU module that WideField3 is connected to online. It displays the CPU type name, components of the executable program, and instruction macro list as the information for the CPU module. To switch between showing and hiding the Project window, use [View]–[Project Window]. Displays the CPU type for the connection destination. Double-click to open the Display CPU Program Information dialog box. Double-click to open the Alarm display window. Double-click to load the CPU properties information from the CPU and open the CPU Properties window. Double-click to load the project setup from the CPU and open the Project Settings/Configuration window. Displays the module configuration. Double-click a module type name to open the advanced function module monitor. Double-click to open windows for each log type. Double-click to open the Common Tag Name Definition monitor window. Displays the component blocks in the CPU program. Double-click to open the Monitor Block window. Displays the macros in the CPU program. Double-click to open the Monitor Macro window. Switches the project tree between [Offline] and [Online]. A03_11.VSD Figure A3.11 Layout of Online Project Window IM 34M06Q16-01E 3rd Edition: Apr. 26, 2013-00 A3-8 You can call up the following functions directly from the online project tree. Table A3.2 Function List of Online Project Tree Tree Item CPU Type Name Alarm Status Operation Log System Log User Log Common Tag Name Definition CPU Properties Project Settings/Config uration Block under the Component Blocks Operation Double-click, or select [CPU Program Information] from the popup menu. Double-click, or select [Display Alarm] from the popup menu. Select [Cancel Alarm] from the popup menu. Double-click, or select [Display Operation Log] from the popup menu. Select [Save As] from the popup menu. Double-click, or select [Display System Log] from the popup menu. Select [Clear System Log] from the popup menu. Select [Save As] from the popup menu. Double-click, or select [Display User Log] from the popup menu. Select [Clear User Log] from the popup menu. Select [Save As] from the popup menu. Double-click, or select [Common Tag Name Definition] from the popup menu. Select [Download Common Tag Name Definition] from the popup menu. Select [Upload Common Tag Name Definition] from the popup menu. Double-click, or select [CPU Properties] from the popup menu. Double-click Select [Local Device/Properties] from the popup menu. Select [Block Tag Name Definition] from the popup menu. Select [Download Block] from the popup menu. Select [Download Block Tag Name Definition] from the popup menu. Select [Upload Block] from the popup menu. Select [Upload Block Tag Name Definition] from the popup menu. Select [Compare] from the popup menu. Double-click, or select [Open] from the popup menu. Function Opens the Display CPU Program Information dialog box. Opens the Display Alarm dialog box. Cancels the alarm. Opens the Display Operation Log window. Saves the operation log. Opens the System log display window. Clears the system log. Saves the system log. Opens the User log display window. Clears the user log. Saves the user log. Opens the Common Tag Name Definition monitor window. Downloads common tag name definitions. Uploads and applies common tag name definitions to the offline project. Uploads the CPU properties. Uploads the project settings/configuration. Loads the local device/properties information from the CPU, and opens the Local Device/Properties dialog box. Opens the Block Tag Name Definition window. Downloads the block when an offline project contains the same block. Downloads block tag name definitions. Uploads the block and updates the data on the offline project. Uploads and applies block tag name definitions to the offline project. Compares the blocks when an offline project contains the same block. Opens the Monitor Block window. IM 34M06Q16-01E 3rd Edition: Apr. 26, 2013-00 A3-9 Tree Item Macro under the Macro List Operation Select [Local Device/Properties] from the popup menu. Select [Block Tag Name Definition Monitor] from the popup menu. Select [Download Block] from the popup menu. Module Components Module type under the Module Components Select [Download Block Tag Name Definition] from the popup menu. Select [Upload Block] from the popup menu. Select [Upload Block Tag Name Definition] from the popup menu. Select [Compare] from the popup menu. Double-click, or select [Open] from the popup menu. Select [Update with Latest Information] from the popup menu. Double-click Select [Adv. Function Module Register Monitor] from the popup menu. Select [Input Relay Monitor] from the popup menu. Function Loads the local device/properties information in the CPU, and opens the Local Device/Properties dialog box. Opens the Macro Tag Name Definition monitor window. Downloads the macro when an offline project contains the same macro. Downloads macro tag name definitions. Uploads the macro and updates the data on the offline project. Uploads and applies macro tag name definitions to the offline project. Compares the macros when an offline project contains the same macro. Opens the Monitor Macro window. Updates the module configuration. Opens the Device Monitor. Opens the Advanced Function Module Register Monitor. Opens the Input/Output Relay Monitor. IM 34M06Q16-01E 3rd Edition: Apr. 26, 2013-00 A3-10 Output Window The output window is an auxiliary window that facilitates WideField3 functions. Tab name of the output window A03_12.VSD Figure A3.12 Layout of Output Window The output window is used for the following WideField3 function. - Cross reference - Device list Balloon List Window The balloon list window shows a list of balloons created in the project. The display of the balloon list window can be switched between the Online and Offline tabs. A03_13.VSD Figure A3.13 Layout of Balloon List Window SEE ALSO For details of the balloon list window, see Section E1.2.39, "Creating and Deleting Balloon Comments" (Offline). IM 34M06Q16-01E 3rd Edition: Apr. 26, 2013-00 A3-11 Search Window The search window allows simple viewing of project cross references. A03_14.VSD Figure A3.14 Layout of Search Window SEE ALSO For details on the search window and cross references, see Chapter E6, "Cross Reference" (Offline). IM 34M06Q16-01E 3rd Edition: Apr. 26, 2013-00 A3-12 A3.2 Function List The following table lists all the WideField3 functions. Table A3.3 Function List Menu Bar Menu Command New Project Open project Open project (Restore Display Status) Close Project Save Project Save Project As Save Current Display Status Restore Display Status Open Project in Other Formats Save Project in Other Formats New Open File Close Close All Close All Except Frontmost Window Save Save As Print Setup Print Preview Print Compare Project Compare Window Recent Opened Projects Exit Description Creates a new project. Opens an existing project. Opens a project with the same screen configuration as when the project was last saved. Closes an open project. Saves an open project. Saves an open project with a different name. Saves the current screen configuration. Restores the saved screen configuration. Converts non-WideField3 format (card load format, CADM3 format) or compressed and segmented project data into WideField3 format and opens the project. Saves an open project in non-WideField3 format (card load format, CADM3 format, WideField2 or WideField format) or compressed and segmented project data. Creates a new block, instruction macro, group template or structure type definition. Opens a file (block/macro, reference block (in read mode), reference block (in write mode), CADM3 file, log file, group template, structure type definition, or CPU properties). Closes various open files and screens. Closes all open windows. Closes all windows except for the currently active window. Saves an open file, overwriting the existing file. During program monitoring or block monitoring, the menu display changes to [Reflect on File] and when selected, reflects online edited data on a file. Saves an open block or instruction macro with a different file name. During program monitoring or block monitoring, the menu display changes to [Reflect on Another File] and when selected, reflects online edited data on a file with a different name. Performs printer set up. Displays a preview of print output. Prints various screens and projects. Performs comparison between projects. Performs comparison against the active window. Displays a project history listing up to 5 most recently opened projects. Exits the application. IM 34M06Q16-01E 3rd Edition: Apr. 26, 2013-00 A3-13 Menu Bar Menu Command Undo Convert Cut Copy Paste Paste Special Delete Image Copy Revise Instruction/Circuit Insert Line Delete Lines Temporary Delete Edit Undo Temporary Delete Ladder Symbols Hide/Show Circuits Page Break Delete Page Break Insert Blank Page Create Balloon Comment/Monitor Circuit Comment-out Output CSV data for Circuit Comment/Subcomment Load CSV Data for Circuit Comment/Subcomment Block Tag Name Definition Local Device/Properties Description Cancels the previous operation and restores the original state. Converts the entered circuit into the instruction mnemonic. Cuts the designated area and pastes it on the clipboard. Copies the designated area and pastes it on the clipboard. Pastes the contents of the clipboard onto the designated area. Pastes the contents in a selected format. Deletes the designated area. Saves the circuits in the designated area to the clipboard as a bitmap. Revises the attributes of instructions in the program. Mnemonic/script contents can also be edited. Inserts one line. Deletes the lines in the designated area and removes the resulting empty spaces. Deletes lines in the designated area temporarily. The deleted lines simply change in color but do not disappear. Restores items that were temporarily deleted. Displays the circuit instruction symbols. Hides all circuits after the circuit comment up to the next circuit comment, or redisplays circuits that have been hidden. Inserts a page break mark in a circuit comment during printing. Deletes page breaks. Inserts a blank page. Creates balloon comments or monitor. Temporarily disables, activates or inactivates the circuit or instruction. Also, commenting out that has been set can be disabled. Exports circuit comment/subcomment information in the program as CSV data. Imports circuit comment/subcomment information from CSV data into the program. Displays the tag name definition screen.. Defines the number of local devices in a block and the properties of the block. IM 34M06Q16-01E 3rd Edition: Apr. 26, 2013-00 A3-14 Menu Bar Menu Command Find Find in Project Find Instruction Find Instruction in Project Find Circuit Comment-out Find Circuit Comment-out in Project Find Next Jump to Tag Name Definition Find Jump to Device Monitor Jump Replace Replace in Project Obsolete Device List Search Cross-Reference Toolbar Instruction Palette Status Bar Find Bar File Comparison Bar Action Monitor Project Window Output Window View Balloon Comment List Page Display Search Window Display Ladder Converted from Script Specify Display Mode Redraw Zoom Suspend Monitoring Description Searches for a device. Searches a project for a device, block name, label, circuit comment, subcomment, or I/O comment and displays results in a list. Searches for an instruction. Searches a project for an instruction and displays results in a list. Searches for circuit comment-out locations. Searches a project for circuit comment-out locations and displays them in a list. Searches upwards/downwards for the previous designated search item. Jumps to the appropriate location in the tag name definition for the device at the cursor position. Jumps to the appropriate location in the device monitor for the device at the cursor position. Jumps to a designated place. The submenu provides options for a sequential search, setting or jumping back to a starting point of a sequential search, jumping one step back, and jumping to the next input or output, the next address, the first line, the last line, a designated line number, a designated instruction number, the line start, the line end, and the next or previous circuit comment line. Replaces a circuit device with another. Replaces tag names or addresses over all blocks in a project. Displays a device list and marks devices currently used in a block. Creates a cross reference to the device currently selected in a block. Switches between displaying and hiding the tool bar. Switches between displaying and hiding the instruction palette. Switches between displaying and hiding the status bar. Switches between displaying and hiding the find bar. Switches between displaying and hiding the file comparison bar. Switches between displaying and hiding the action monitor. Switches between displaying and hiding the project window. Switches between displaying and hiding the output window. Switches between displaying and hiding the balloon list window. Specifies how to display a page. Displays the simplified cross reference window. Displays a ladder program converted from a script. Specifies various display modes. The submenu provides options for I/O comment display, (expanded) instruction parameter display, instruction number display, address display, detailed display, instruction range display, and display format. Redraws a circuit. Enlarges or reduces circuits in the display. The submenu provides options for enlargement and reduction. Temporarily stops monitoring the entire screen. The menu display changes to [Resume Monitoring]. IM 34M06Q16-01E 3rd Edition: Apr. 26, 2013-00 A3-15 Menu Bar Menu Command Project Settings Define Program Components User Log Message Common Tag Name Definition Constant Definition I/O Comment Display Settings Check Program Find in Project Find Instruction in Project Find Circuit Comment-out in Project Replace in Project Project Change I/O Installation Position Obsolete Device List Device List Copy File Insert File Rename File Delete File Add to Library Rename Library Block Delete Library Block Register Macro Extract Macro Convert Data Description Performs various project settings. Defines the components of an executable program. Creates a user log message in a project. Defines common tag names for all blocks in a project. Defines constant names and values in a project. Displays the I/O Comment Display Settings dialog box. Checks program syntax of all blocks in a project. Searches all blocks in a project for a device, block name, label, circuit comment/subcomment or I/O comment and displays the result as a list. Searches all blocks in a project for a specified instruction and displays the result as a list. Searches a project for circuit comment-out locations and displays them in a list. Replaces tag names or addresses over all blocks in a project. Changes all addresses of input/output relays to accompany a change in the I/O slot. Displays a device list and marks devices used in any block in a project. Displays device usage in a map or list. Copies a block in a project and saves it with a different name within the project. Copies block, common tag name definition or constant definition file from other folders into a project. Changes the block or macro file name of a block or instruction macro in a project. Deletes a block or instruction macro file in a project. Registers a block in the library. Changes the name of a block registered in the library. Deletes a block from the library. Registers instruction macros in a project to the macro folder. Extracts an instruction macro from a macro folder into a project. Converts data from tag name format to address format or vice versa. IM 34M06Q16-01E 3rd Edition: Apr. 26, 2013-00 A3-16 Menu Bar Menu Command Connect Disconnect Program Monitor Macro Monitor X+Y Input/Output Relay Device Monitor Registered Device Monitor Watch Monitor Configuration CPU Program Information Common Tag Name Definition Constant Definition CPU Properties Operating Mode Online Download[PC->CPU] Upload[CPU->PC] Compare File and CPU ROM Management Extended Functions Adv. Function Module Register Monitor Online Balloon Comment/Monitor Description Connects the PC and the FA-M3. Disconnects the PC and the FA-M3. Monitors the circuits of a block of the CPU. Monitors the circuits of an instruction macro of the CPU. Displays I/O component information for the connection destination. Monitors devices of the CPU. Designates devices to be monitored. Displays devices automatically in accordance with the visible area of the program monitor, allowing such devices to be monitored. Displays the project setup. Displays information of projects stored in the CPU in a list. Displays items copied from the project folder to the monitor folder. This menu command is not supported in WideField3 R1.01. Reads and displays CPU properties stored in a destination CPU. Switches the operating mode. The submenu provides options to change to Run mode, Stop mode or Debug mode. Downloads executable programs from the PC to the CPU. Transfers a designated block or macro from the PC to the CPU. Transfers executable programs from the CPU to the PC. Transfers a designated block or macro from the CPU to the PC. Transfers tag name definitions from the CPU to the PC. Compares the executable programs in the PC and the CPU. Manages the ROM pack. The submenu provides options to transfer from file to ROM, to transfer from CPU to ROM, to compare a file to the ROM, to erase the ROM, to switch to ROM Writer mode, and to cancel ROM writer mode. Performs various controls over the CPU. The submenu provides options to temporarily change communication speed, to set the time, to clear the program in the CPU, to clear devices, to reset start, to forcibly cancel online editing mode, to manage exclusive access control, to clear CPU properties, as well as to enable/disable CPU properties. Defines the data type and comment to be displayed in the Advanced Function Module Register Monitor. Executes online operation of balloon comments. This menu provides options to store online balloon comment/monitor in the CPU, to reflect online balloon comment/monitor to offline projects, and to read balloon comment/monitor from the CPU. IM 34M06Q16-01E 3rd Edition: Apr. 26, 2013-00 A3-17 Menu Menu Command Forced Set Forced Reset Cancel Forced Set/Reset Cancel All Forced Set/Reset Change Word Data Change Long Word Data Debug/ Maintenance Change Double Long Word Data Change Current Value of Timer/Counter Change Preset Value of Timer/Counter Start Online Editing Start Block Stop Block Stop Refreshing Restart Refreshing Display Alarm Cancel Alarm Display CPU Log Set up Environment Import Environment Settings Export Environment Settings Return to Default Environment Settings Display Hidden Message Dialog Boxes Customize Keys Language Change Tools Auto Indexing Return to Initial Display Status Mail E-mail to Technical Support Window Help Set up I/O Module Device Management Sampling Trace FA-M3 Defender Cascade Tile Arrange Icons Window List WideField3 Help Contents and Index About WideField3 Description Forces a device to set. Forces a device to reset. Cancels a device that has been forced set or reset. Cancels forced sets/resets on devices. Changes the current value of a device with word data. Changes the current value of a device with long word data. Changes the current value of a device with double long word data. Changes the current value of a timer or counter. Changes the preset value of a timer or counter. Starts online editing. In online edit mode, the menu display changes to [End Online Editing]. Restarts a stopped block. Stops a running block. Stops refreshing. The submenu provides options to stop input, output, common and link registers and relays. Restarts refreshing of all points. Displays all current alarms generated by the CPU. When alarms are displayed, the menu display changes to [Redisplay Alarm]. Cancels CPU alarm data. Displays various logs. The submenu provides options for displaying the operation, system and user logs, and for clearing the logs. Set up the PC environment. Imports an environment setup. Exports an environment setup. Restores the default environment setup. Resets the setting for hiding confirmation dialog boxes to allow them to be displayed again. Customizes shortcut keys for WideField3. Changes the language mode for WideField3. Automatically updates the database to be referred to in a cross reference. Reset the layout of windows currently displayed to the default. Uses E-mail to debug the sequence CPU. Starts the mailer program, and displays a screen for preparing a new message to be sent to technical support at Yokogawa. Starts FA link and FL-net tools. Starts Device Manager. Starts Sampling Trace. Starts FA-M3 Defender. Displays windows, overlapped in a cascade manner. Displays windows alongside, in a tile manner. Arranges the icons. Displays a list of all windows currently open. Displays help information by function. Displays help information by keyword. Displays WideField3 version information. IM 34M06Q16-01E 3rd Edition: Apr. 26, 2013-00 A3-18 A3.3 List of Generated Files This section describes the generated files. CAUTION User program files in WideField3 are managed as version 5 files in WideField series. Table A3.4 Specifications of Generated Files Generated File Project file Icon Extension Item File name .YPJT Project title File name .YPRG Executable program file Number of component blocks Configuration Settings User log message settings File name User log message file .YUMS Common tag name definition file .YCMN Constant definition file .YCDF File name Number of message characters Number of messages File name Number registered File name Number registered File name .YBLK Number of steps Macro tag name definition file .YMCS Group template file Number of steps Number of lines File name Up to 8 alphanumeric characters beginning with 2 letters. May also contain special characters ‘-‘ (hyphen) and ‘_’ (underscore) Up to 10K steps. Up to 20,000 lines. Can be created with the same name as the macro. Number registered Up to 5,120 data sets. File name .YMCR .YGRP 0 or 1 (setup is optional) Up to 5,120 data sets. .YC Instruction macro file 0 or 1 (setup is optional) Number registered Configuration file .YSIG Up to 1,024 blocks (Limit depends on CPU type.) Number of lines File name .YMPR Block tag name definition file Up to 8 alphanumeric characters, beginning with a letter. May also contain special characters ‘-‘ (hyphen) and ‘_’ (underscore). Up to 32 alphanumeric characters and special characters. Only one program file having the same name as the project can be created within a project. Up to 254 alphanumeric characters and special characters for an absolute path. The characters must be within Windows specifications range (file for E-mail). Only one file having the same name as the project can be created within a project. Only one file having the same name as the project can be created within a project. Up to 32 alphanumeric characters and special characters. Up to 64 messages Only one file with the same name as the project can be created within a project. Up to 70,000 Only one file with the same name as the project can be created within a project. Up to 2,048 Up to 8 alphanumeric characters beginning with two letters. May also contain special characters ‘-‘ (hyphen) and ‘_’ (underscore). Up to 56K steps, for models F3SP28-3S/38-6S/53-4S/586S/59-7S/66-4S/67-6S/71-4N/76-7N. Up to 10K steps, for models other than the above. Up to 20,000 lines. Can be created with the same name as the block. File name Block file Specifications File name Number registered Up to 8 alphanumeric characters beginning with a letter. May also contain special characters ‘-‘ (hyphen) and ‘_’ (underscore). Up to 64 data sets. IM 34M06Q16-01E 3rd Edition: Apr. 26, 2013-00 A3-19 Generated File Icon Extension Item Structure Type Definition File .YGRS File Name System Log File .YSLG File Name User Log File .YULG File Name Operation Log File .YCLG .YOLG File Name Sampling Trace Setup File .YTST2 .YTSC File Name Sampling Trace Results File .YTRC2 .CSV .YTRS File Name Device Management File .YDVF File Name .YMDV File Name .YPRP File Name .FAI File Name .YBLC File Name .TXT File Name .YODF File Name .YUSR File Name .YPRN File Name .YUSR File Name CPU Property File FA Link Setup File Balloon Comment File Long and Short Names File Operation Protection Settings File Screen State Save File Print Setup File Screen Resume File Specifications Up to 8 alphanumeric characters beginning with a letter. String may also include special characters ‘-‘ (hyphen) and ‘_’ (underscore) Up to 8 alphanumeric characters beginning with a letter. String may also include special characters ‘-‘ (hyphen) and ‘_’ (underscore) Up to 8 alphanumeric characters beginning with a letter. String may also include special characters ‘-‘ (hyphen) and ‘_’ (underscore) For a .yclg file: up to 8 alphanumeric characters beginning with a letter. String may also include special characters ‘-‘ (hyphen) and ‘_’ (underscore) For a .yolg file: up to 254 alphanumeric characters and special characters for an absolute path. (The characters must be within Windows specifications range) For a WideField3 format setup file (.ytst2): up to 255 characters for an absolute path. (The characters must be within Windows specifications range) The file name can be up to 80 characters including its file extension. For a card format setup file (.ytsc2): file name length and available characters within Windows specifications range. For a WideField3 format result file (.ytrc2): up to 240 characters for an absolute path. (The characters must be within Windows specifications range) For a card format result file (.ytrs): up to 127 characters for an absolute path excluding its file extention. Up to 254 characters for an absolute path. (The characters must be within Windows specifications range) Up to 254 characters for an absolute path. (The characters must be within Windows specifications range)(File for E-mails) Only one file with the same name as the project can be created within a project. Up to 8 alphanumeric characters, beginning with a letter. Only one file with the same name as the project can be created within a project. Fixed to LONGNAME.TXT. Up to 254 characters for an absolute path. (The characters must be within Windows specifications range) Fixed to ResumeInfo.YUSR. Only one file with the same name as the project can be created within a project. Fixed to ResumeInfo.YUSR. IM 34M06Q16-01E 3rd Edition: Apr. 26, 2013-00 A3-20 A3.4 Elements of Edit Circuits This section describes the elements of an edit circuit. Circuit Comment 0001 Label LABEL 0003 ***Initialization Routine*** Run Tag Name Circuit Y201 Turns on valve Startup SW I/O Comment Balloon Comment Subcomment Balloon Comment A03_15.VSD Figure A3.15 Elements of Edit Circuit Table A3.5 Specifications of Circuit Elements Element Tag Name Item Number of Characters, Valid Characters Number Registered Structure Structure name Structure member name Separator Constant name Circuit Circuit Comment Number of Characters, Valid Characters Number of Lines in 1 Circuit Number of Instructions in 1 Circuit Continuation Lines Number of Horizontal Columns Number of Characters Number Registered Number of Characters Subcomment I/O Comment Title Label Number Registered Number of Characters Number Registered Number of Characters Number of Characters Number Registered Balloon Comment Number of Characters Number Registered Specifications Up to 16 alphanumeric characters, beginning with two letters. String may also contain special characters ‘-‘ (hyphen), ‘_’ (underscore) and ‘.’ (period). A period character can be used as a separator between a structure name and a structure member name. However, strings that are not distinguishable from device names are not allowed. For block tag name reference, up to 5,120. For common tag name reference, up to 70,000. 2 to 7 alphanumeric characters, beginning with a letter. String may also contain special characters ‘-‘ (hyphens) and ‘_’ (underscore). However, strings that are not distinguishable from device names are not allowed. 1 to 8 alphanumeric characters. Period Up to 16 alphanumeric characters, beginning with a '#' character. String may also contain special characters ‘-‘ (hyphen) and ‘_’ (underscore). Up to 25 lines. Up to 128 instructions. Up to 3 lines. Fixed at 11 columns. Up to 72 characters. For model, F3SP-S and F3SP71/76, no restriction. For other CPU types, up to 3,000, including sub-comments in the entire executable program. Up to 24 characters. For model, F3SP-S and F3SP71/76, no restriction. For other CPU types, up to 3,000, including circuit comments in the entire executable program Up to 32 characters. For block tag name definition reference, up to 5,120. For common tag name definition reference, up to 70,000. Up to 24 characters. Alphanumeric string of up to 6 characters, beginning with two alphabets. Special characters ‘-‘ (hyphen) and ‘_’ (underscore). There is a maximum limit over the entire executable program, which is dependant on the CPU Type. A comment name must be up to 64 characters. A comment can contain up 32 lines. Each line can be up to 64 characters. No restriction IM 34M06Q16-01E 3rd Edition: Apr. 26, 2013-00 A3-21 A3.5 Shortcut Keys Shortcut keys are assigned to certain menus or instructions to allow a user to select menus or enter instructions using the keyboard. For example, pressing [Ctrl] + [N] selects the [New] menu. The following table lists typical shortcut keys and icons. Some functions on menus are not assigned with shortcut keys. Table A3.6 List of Shortcut Keys Classification Shortcut Key Menu Ctrl+N New Ctrl+S Save, Reflect on File Ctrl+Z Undo Ctrl+U Convert Ctrl+X Cut Ctrl+C Copy Ctrl+V Paste Delete Delete Shift+Insert Insert Line Shift+Delete Delete Lines Alt+Enter Local Device/Properties Ctrl+F Find F3 Find Next Shift+F3 Menu Icon — Find Previous Ctrl+R Replace Ctrl+Home Top Ctrl+End Bottom Ctrl+I Display I/O Comment Ctrl+K Display Instruction Number Ctrl+A Display Address Ctrl+W Detail F5 Forced Set Shift+F5 Forced Reset F6 Cancel Forced Set/Reset Shift+F6 Cancel All Forced Set/Reset F7 Change Word Data Shift+F7 Change Long Word Data F8 Change Current Value of Timer/Counter Shift+F8 Change Preset Value of Timer/Counter Ctrl+H Start Block Alt+Ctrl+Z Stop Block F1 Help IM 34M06Q16-01E 3rd Edition: Apr. 26, 2013-00 A3-22 Classification Instruction F4 Shortcut Key Icon Description Application Instruction Shift+F4 Application Instruction List F5 Contact A Shift+F5 Contact B F6 Contact A OR Shift+F6 Contact B OR F7 OUT Shift+F7 OUTN F8 Vertical Line Shift+F8 Delete Connect Line F9 Horizontal Line Shift+F9 Continuation Line F11 TIM Shift+F11 CNT F12 SET Shift+F12 RST Ctrl+F7 Circuit Comment Ctrl+F8 I/O Comment Ctrl+F9 Subcomment Ctrl+F6 Label IM 34M06Q16-01E 3rd Edition: Apr. 26, 2013-00 A3-23 Access Keys Access keys are letters assigned to menu items to allow a user to select a menu using the keyboard. Access keys are displayed as underlined letters on a menu. For example, pressing the [ALT] key, followed by the [T] key opens the [Tools] menu. Pressing the [E] key in this state selects the [Set up Environment] menu item. A03_16.VSD Figure A3.16 Access Keys IM 34M06Q16-01E 3rd Edition: Apr. 26, 2013-00 A3-24 A3.6 Basic Keys The following table list the keys used in WideField3 and their functions. Table A3.7 Basic Keys Key Esc Purpose - Interrupts execution. - Cancels the selection of an instruction. Tab - Switches between input areas in a dialog. Insert - Switches between overwrite and insert mode. Ctrl - Selects a menu item when used in combination with other keys. Alt - Selects a menu bar item when used in combination with other keys. Page Up - Scrolls the screen up. Page Down - Scrolls the screen down. Delete - Deletes the element at the cursor. - Deletes 1 character. Shift - Enters a shifted character. Backspace - Deletes the character to the left of the cursor position. Enter - Enters a carriage return character. $ - Prefixes a hexadecimal number. % - Prefixes in a floating-point number. ” - Delimits a character string. _ (underscore) - Separates a group name and a member name. . (period) - Separates a structure name and a member name. [] - Delimits an array index for a structure array. / - Prefixes a local device name. IM 34M06Q16-01E 3rd Edition: Apr. 26, 2013-00 A3-25 A3.7 Types of Screens This section describes the different types of screens and their restrictions. WideField3 uses the following types of screens. Windows Windows can be enlarged or reduced. Multi-window operations are supported. You can open up to 16 online windows concurrently. To close a window, select [File]–[Close] from the menu bar. To close all windows that are currently displayed, select [File]–[Close All]. To close all the windows except for the currently active window, select [File]-[Close All Except Frontmost Window]. TIP If you open a new window when the maximum number of windows are already open, the window at the back (the rearmost window of the window stack) automatically closes. If the window at the back is an Edit Block window being edited or is under online editing, a message box appears to check if you want to save or apply any changes made. Modeless Dialogs Menu operations sometimes move control to a modeless dialog. To close a modeless dialog, click on the corresponding button displayed on the dialog. Commands from menus have no effect on a modeless dialog. IM 34M06Q16-01E 3rd Edition: Apr. 26, 2013-00 A3-26 The following table summarizes the types of screen and their limitations. Table A3.8 Types of Screens Category Edit Block Edit Instruction Macro Compare file CPU Log Reference Edit Group Template Edit Structure Type Definition Edit Constant Definition Project Configuration Program Monitor Macro Monitor Device Monitor Registered Device Monitor Watch Monitor Alarm Monitor Compare Online E-Mail Project Settings/ Configuration Circuit edit screen Tag name definition edit screen Device usage status display screen Circuit edit screen Tag name definition edit screen Device usage status display screen Program comparison results screen Project comparison results screen System log reference screen User log reference screen Operation log reference screen Creates circuits for a block Screen Type Window Performs block tag name definitions. Window Group template edit screen Type of Screen Structure type definition edit screen Constant definition edit screen Tag name definition edit screen Purpose Creates circuits for a macro. Performs macro tag name definitions. Window 1 screen per macro Displays a list of devices used in a macro. Displays the comparison results for 2 programs as a ladder and/or a list. Displays the comparison results for 2 projects as a list. Loads system log files. Loads user log files. Modeless dialog 1 screen Window No restrictions Window No restrictions Window Window Up to 16 screens Up to 16 screens Loads operation log files. Window Up to 16 screens Sets the members in a group. Window No restrictions Defines the members of a structure type. Window No restrictions Defines constant names for constant values Window 1 screen Defines tags common to all blocks. Window 1 screen Window 1 screen Window Modeless dialog No restrictions Window 1 screen Project search list screen Project device usage status display screen Block operation status display screen Circuit monitor screen Device usage status screen Displays a list of devices used in a block. Circuit monitor screen Monitors circuits of macros. Device usage status screen Displays a list of devices used in a block. I/O configuration display screen Device monitor screen Registered device monitor screen Device monitor screen working in association with the program monitor screen Alarm monitor screen Comparison results screen Inbox mails screen Project settings/configuration edit screen 1 screen per block 1 screen per block Modeless dialog Window Displays a list of devices used in a block. Displays a list of errors detected during program syntax checking. Displays the results of a project search. Displays a list of devices used in all blocks. Displays a list of blocks with their execution status. Monitors circuits of blocks. Syntax check results screen Restrictions Window Modeless dialog Window Modeless dialog 1 screen 1 screen per macro 1 screen 1 screen per block 1 screen 1 screen per macro 1 screen Displays a list of the I/O configuration Window 1 screen Monitors devices displayed as a list. Window Up to 16 screens Registers and monitors devices. Window 1 screen Monitors a list of devices displayed in the program monitor screen. Window 1 screen Window 1 screen Reads the status of CPU alarms Displays a list of differences found in comparisons Displays a list of incoming mails Window 1 screen Window 1 screen Edits the project settings/configuration. Window 1 screen IM 34M06Q16-01E 3rd Edition: Apr. 26, 2013-00 A4-1 A4. Installing and Starting WideField3 This section describes how to install the WideField3 software, how to remove it from the PC when it is no longer required, how to start the WideField3 software, and how to exit from the WideField3 software. It also describes how to install the USB driver. CAUTION Log in with Administrator privileges in order to set up, perform maintenance on, or remove the WideField3 software. Users without Administrator privileges cannot set up, perform maintenance on, or remove the WideField3 software. In Windows Vista or Windows 7, select Run as Administrator in the installer program. Users without Administrator privileges will not be able to install this software. CAUTION When User Account Control (UAC) is enabled in Windows Vista or Windows 7, the installer might not automatically run from the CD-ROM. If this occurs, use Explorer to select Setup.exe on the CD-ROM, and then select Run as Administrator to start the installer. CAUTION When performing setup in Windows, it is recommended to install the software in a folder for which restricted users have access rights. If the software is installed in a folder that cannot be accessed by restricted users, such users will be unable to use the WideField3 software. IM 34M06Q16-01E 3rd Edition: Apr. 26, 2013-00 A4-2 A4.1 Setting up WideField3 This section describes how to install and set up the WideField3 software on a personal computer. TIP If you already have an older version of WideField3 installed on a PC, you may upgrade its version. Run the installation program as described below, and select the [Repair] option on the Welcome dialog to upgrade the software version. TIP We describe here WideField3 setup in the Windows XP environment. Take note that there may be some differences in the procedure for different operating systems. CAUTION Exit from all other applications such as virus protection software before installing the WideField3 software. Procedure (1) Insert the product CD-ROM into the CD-ROM drive. The installation program starts automatically. TIP In Windows Vista or Windows 7, select Run as Administrator. Step (1) A04_01.VSD TIP Start the setup, and you can choose the language displayed and used on WideField3 after installing it. TIP If an older version WideField2 (SF620) is already installed on the system, a confirmation dialog is displayed on the screen. Click [Yes] button to continue with installation. The WideField3 InstallShield Wizard runs and displays the Welcome to the InstallShield Wizard for WideField3 dialog box. Step (2) A04_02.VSD IM 34M06Q16-01E 3rd Edition: Apr. 26, 2013-00 A4-3 (2) Click [Next]. The License Agreement dialog box opens. (3) Select the [I accept the terms of the agreement] option button and click [Next]. TIP A license agreement document is provided with the product. Click [Next] only if you have carefully read the license agreement and agree with the terms therein. Clicking [Cancel] aborts the installation. The Customer Information dialog box will be displayed. Step (3) A04_03.VSD (4) Enter the CD-Key and click [Next]. TIP The CD-Key is given on the registration card provided with the product. The Choose Destination Location dialog box is displayed. (5) Select the installation destination and click [Next]. The Select Features dialog box is displayed. Step (4) A04_04.VSD Step (5) A04_05.VSD IM 34M06Q16-01E 3rd Edition: Apr. 26, 2013-00 A4-4 (6) Turn on the checkboxes for the components you wish to install and click [Next]. The Ready to Install the Program dialog box is displayed. TIP The components available for installation include program files (WideField3 software and sample program files), instruction manuals and I/O module help files. Turn on the checkboxes for the components you wish to install. Step (6) A04_06.VSD Step (7) A04_07.VSD (7) Click the [Install] button. Installation begins. TIP Restart the computer after installation ends. IM 34M06Q16-01E 3rd Edition: Apr. 26, 2013-00 A4-5 Changing Folder Security Windows allows a user to set access rights on folders. The WideField3 software should be installed in a folder for which restricted users have access rights. You can also change the access right for an installation folder during the installation. If you specify a folder for which restricted users do not have access right as the installation destination folder, the following message will be displayed. A04_08.VSD Figure A4.1 Changing Access Rights - - [Yes] button Adds access rights to folder for restricted users, and allows restricted users to continue with installation. [No] button Continues installation without changing folder security. In this case, restricted users will not be able to run the WideField3 software. - [Cancel] button Returns to an earlier screen to specify the installation destination folder. CAUTION WideField3 frequently accesses system files in the folder where it is installed. Therefore, if restricted users are not granted update permission for the installation folder, they cannot use the WideField3 software. We do not warrant that the operating system or other applications will operate correctly if and after folder security is changed. IM 34M06Q16-01E 3rd Edition: Apr. 26, 2013-00 A4-6 A4.2 Removing WideField3 This section describes how to remove the WideField3 software TIP Removing the WideField3 software does not automatically delete project files or other application files previously created by a user. It also does not delete the USB driver software. To remove WideField3 from your computer, use the following procedure. Procedure (1) Insert the product CD-ROM into the CD-ROM drive. TIP In Windows Vista or Windows 7, select Run as Administrator. (2) Using Explorer or some other program, move to the root folder on the CD-ROM, and browse the files in the folder. (3) Select and run SETUP.EXE TIP If your PC is running Windows Vista or Windows 7 operating system, select [Run as Administrator]. Step (4) A0402_01.VSD The InstallShield wizard runs and displays the Welcome dialog box if WideField3 is already installed on your PC. (4) Turn on the [Remove] option button and click [Next]. The Confirm Uninstall dialog box will be displayed. Step (5) A0402_02.VSD (5) Click [OK]. Uninstallation begins. The Maintenance Complete dialog box will be displayed when the program has been removed. (6) Click [Finish]. Step (6) A0402_03.VSD IM 34M06Q16-01E 3rd Edition: Apr. 26, 2013-00 A4-7 A4.3 Starting WideField3 This section describes how to start the WideField3 software. Procedure (1) Select [Programs]–[FA-M3 Application]–[WideField3] from the Start menu. WideField3 runs. TIP A0403_01.VSD If WideField2 R5 or later has already been installed, a confirmation dialog box appears at the time of initial startup of the WideField3 software, asking whether you wish to inherit the environment setup from the previous version of WideField. If you want to load the previous environment setup, click [Yes]. If not, click [No]. A0403_02.VSD TIP - Folder path information in Folder Setup is lost if an environment setup is passed between WideField versions with different major version numbers (that is, if XX of WideFieldXX RYY.ZZ does not match between the source and the target). For example, folder path information is lost when information is passed from WideField2 R5 to WideField3 R1. On the other hand, path information is preserved between WideField3 R1 and WideField3 R2. - Default values are used for new environment setup items that have been added in the recipient version and thus do not exist in the source version. - When an environment setup is inherited, any items of the source version to which non-default values have been set are used to update information in the target version. However, e-mail settings and folder path information in Folder Setup are always passed to and used in the target version regardless of the default values. CAUTION Do not install the WideField3 software and the WideField (SF610) or WideField2 (SF620) software on the same PC. The following restrictions apply if you have multiple WideField3 applications running concurrently: - You cannot open projects with the same name concurrently. - Only one WideField3 application can connect online to a single FA-M3. - You can change the environment setup in each WideField3 application. Each WideField3 application will operate according to its respective environment setup until you exit from the application. When you initiate a new WideField3 application, it uses the environment setup of the WideField3 application most recently terminated. IM 34M06Q16-01E 3rd Edition: Apr. 26, 2013-00 A4-8 A4.4 Exiting from WideField3 This section describes how to exit from WideField3. The required procedure is given below. Procedure (1) Select [File]–[Exit] from the menu bar. Alternatively, click the close button on the title bar. WideField3 exits. Step (1) A0404_01.VSD CAUTION If you attempt to exit from WideField3 with an extended tool (I/O module setup, device manager, sampling trace tool, FA-M3 Defender) running, WideField3 will display the following dialog box and abort exit processing. A0404_02.VSD Figure A4.2 Confirmation Dialog Box You must exit from all extended tools before exiting from WideField3. IM 34M06Q16-01E 3rd Edition: Apr. 26, 2013-00 A4-9 A4.5 Installing USB Driver This section describes how to install the USB driver software. For Windows 2000, XP, Vista CAUTION The USB driver software is installed when the PC detects a sequence CPU with USB support. Procedure (1) Connect the sequence CPU with USB support to the PC using a USB cable. The Found New Hardware Wizard is displayed. (2) Select [Install from a list or specific location (Advanced)], and click [Next]. (3) Select [Search for the best driver in these locations], turn on the [Include this location in the search] checkbox, and in the text box enter "%Program Files%\Common Files\yokogawa\Driver\USBDriver\x86". Click [Next]. Step (2) A0405_01.VSD TIP For 32-bit and 64-bit operating systems, open the x86 or x64 folder, respectively. Installation begins. (4) Click [Finish] to exit from installation. CAUTION Step (3) A0405_02.VSD Do not connect the same PC to two or more FA-M3 units using USB cables as only the first connected USB port can be used. The USB driver of the second and subsequent connected USB ports will not be correctly detected. To rectify the problem, remove and reattach the USB cable. IM 34M06Q16-01E 3rd Edition: Apr. 26, 2013-00 A4-10 For Windows 7 CAUTION To install a USB driver in Windows 7, use the installer provided with the product. Procedure ◆ (1) Open the "\Driver\UsbDriver\x86" folder on the CD-ROM using Explorer or some other means. TIP %Program Files%\Common Files\yokogawa\Driver\x86 Folder is also available instead of CD-ROM. CAUTION For the location of the driver software folder, select x86 for a 32-bit OS or x64 for a 64-bit OS. TIP During driver installation, a dialog box will be displayed to confirm upgrading to Administrator privileges. Select a suitable operation on the dialog box and continue the installation. (2) Run "dpinst.exe" as administrator. The FA-M3 USB Driver Setup dialog box is displayed. IM 34M06Q16-01E 3rd Edition: Apr. 26, 2013-00 A4-11 (3) Click [Next]. The USB driver installation is automatically started. An installation confirmation message is displayed. TIP Check that the status shows "Ready to use" on the message dialog box. Step (3) A0405_04.VSD CAUTION Do not connect the same PC to two or more sequence CPU modules using USB cables as only the first connected USB port can be used. The USB driver of the second and subsequent connected USB ports will not be correctly detected. To rectify the problem, remove and reattach the USB cable. In addition, you cannot concurrently connect a single PC to two or more sequence CPU modules using a single USB cable. IM 34M06Q16-01E 3rd Edition: Apr. 26, 2013-00 Blank Page FA-M3 Programming Tool WideField3 Introduction and Troubleshooting PART-B Advanced User’s Manual IM 34M06Q16-01E 3rd Edition This manual describes useful functions that will help the user take full advantage of WideField3. IM 34M06Q16-01E 3rd Edition: Apr. 26, 2013-00 Blank Page B1-1 B1. Storing Comments to CPU and Restoring Comments There are two types of comments: those attached to programs and those attached to devices. The former are circuit comments, subcomments and balloon comments, and the latter are I/O comments. Circuit comments and subcomments are saved in block and macro files (with file name extensions '.yblk' and '.ymcr'), and balloon comments are saved in balloon comment files (with the file name extension '.yblc'), while I/O comments are saved in tag name definition files (with file name extensions '.ysig' and '.ymcs'). Some CPU types allow comments contained in programs created using WideField3 to be stored in the CPU, and also allow these stored comments to be restored to circuits by online operations (upload, program monitor). Stored comments enable more user-friendly edit operations. Only the CPU types listed in the table below support stored comments in the CPU. Table B1.1 CPU Types that Support Stored Comments CPU Type that Support Stored Comments F3SP22-0S, F3SP28-3S, F3SP38-6S, F3SP53-4S, F3SP58-6S, F3SP59-7S F3SP66-4S, F3SP67-6S F3SP71-4N, F3SP76-7N, F3SP71-4S, F3SP76-7S Circuit Comments/ Subcomments I/O Comments Balloon Comments Other CPU types that are not listed in the above table do not support stored comments. Even for CPU types that support stored comments, comments will not be stored to the CPU if programs are downloaded with the stored comments option disabled. IM 34M06Q16-01E 3rd Edition: Apr. 26, 2013-00 B1-2 B1.1 Storage of CPU Comments Comments within programs created in WideField3 are stored in the CPU during download operations. Downloaded comments can be broadly classified into three categories: - tag name definition and I/O comments - circuit comments and subcomments - balloon comments These comments are restored along with the circuits by WideField3 through upload and program monitor operations. WideField3 always uses I/O comment data stored with the tag name definition in the project file created on the personal computer regardless of whether I/O comment data is stored in the CPU. If circuit comment and subcomment data is stored in the CPU, WideField3 uses the data for reconstruction on the PC. If not, WideFiled3 uses the circuit comment and subcomment data saved in the project file for reconstruction (see the figures below). Comment data that is reconstructed in WideField3 can be modified, added or deleted by online operations (e.g. online edit operations). In some situations (for instance, if the project file is absent in WideField3 or if debug operations are carried out from multiple PCs), however, comment data may become inconsistent between the CPU and the project file. This chapter describes the various states of stored comment data (the concept of reference for comment integration) and how modified comments are handled in online operations. IM 34M06Q16-01E 3rd Edition: Apr. 26, 2013-00 B1-3 B1.1.1 Reference for Tag Name Definition and I/O Comments Tag name definition and I/O comment data may be stored in the CPU but the data source used for reconstructing comments in WideField3 varies with the operation performed. Table B1.3 Reference Source for Combining Tag Name Definition and I/O Comments WideField3 Operation Upload Program monitor Stored to CPU? Yes No Yes No Reference Tag name definition in CPU Tag name definition in project file*1 Tag name definition in project file Tag name definition in project file *1: Only for an "overwriting" upload. For an initial upload, no target is referred to. If tag name definition and I/O comment data is stored in the CPU, a user may add to or modify the data in the CPU online edit. The program monitor function, however, makes such changes only to the project file and thus the changes are not reflected in the tag name definition and I/O comment data in the CPU. In addition, on a PC without the project file, tag name definition and I/O comments are not displayed in the program monitor (the information cannot be reconstructed in the program monitor) unless the program monitor is executed after an upload operation. It can be seen from this description that if comment data is edited from multiple PCs, data may become inconsistent so it is necessary to keep information in the CPU always up-to-date by downloading or consolidate and use the latest project data. Displayed during operations but not updated Operations by a PC without the project file Operations by the PC which created the project Modify/ delete during online edit Store to CPU Modify/delete during online edit ■ Project Upload Online edited info. - tag name definition (I/O comments) Program monitor Only tag name definition and I/O comments stored at the time of download can be reconstructed by uploading. Tag name definition and I/O comments are not displayed as offline information is absent. Offline information is displayed if created through uploading. B01_03.VSD Displayed during operations but not updated Operations by a PC without the project file Operations by the PC which created the project Modify/ delete during online edit Not stored to CPU Modify/delete during online edit ■Project Online edited info. - tag name definition (I/O comments) Upload Program monitor Tag name definition and I/O comments cannot be reconstructed by uploading Tag name definition and I/O comments are not displayed as offline information is absent. (Addresses are displayed instead) B01_04.VSD C04_02.VSD IM 34M06Q16-01E 3rd Edition: Apr. 26, 2013-00 B1-4 B1.1.2 Reference for Circuit Comments and Subcomments Circuit comment and subcomment data can be stored in the CPU as part of the program. If the comment data is stored in the CPU, it can always be reconstructed but beware that if the data is not stored in the CPU, it is reconstructed by combining with project data. Table B1.4 Reference Source for Combining Circuit Comments/subcomments WideField3 Operation Upload Program monitor Stored to CPU? Yes No Yes No Reference Comment data in CPU Comment data in project file*1 Comment data in CPU Comment data in project file *1: Only for an "overwriting" upload. For an initial upload, no target is referred to. If circuit comment and subcomment data is stored in the CPU, data can only be modified or deleted. Addition is not possible. These online edited changes are written immediately to the CPU. In addition, by reflecting the changes to the project file, data integrity can be secured and ensured even if data is being updated from multiple PCs. If circuit comment and subcomment data is not stored in the CPU, the data is combined with project data and reconstructed so comment data cannot be reconstructed on a PC with no project file. Addition is not possible Operations by PC without the project file Operations by the PC which created the project. Modify/ delete during online edit Store to CPU Modify/delete during online edit ■ Project - Circuit comments - Subcomments Upload Program monitor Comment data (comment position and string) stored in the CPU is reconstructed. Comment data stored in the CPU is displayed, independently of the open project. B01_05.VSD Displayed during operations but actually not updated Operations by PC without the project file Operations by the PC which created the project. Modify/ delete during online edit Not store to CPU Modify/delete during online edit ■ Project - Circuit comments - Subcomments Upload Program monitor Only comment position information of program is reconstructed. Only comment position information of program is reconstructed. B01_06.VSD IM 34M06Q16-01E 3rd Edition: Apr. 26, 2013-00 B1-5 B1.1.3 Reference for Balloon Comments You can store balloon comment and monitor data in the CPU. If the data is stored in the CPU, it can be reconstructed but beware that if the data is not stored in the CPU, it is reconstructed by combining with project data. Table B1.5 Reference for Balloon Comment and Monitor Data WideField3 Operation Upload Program monitor Stored to CPU? Yes No Yes No Reference Balloon comment and monitor data in CPU Balloon comment and monitor data of the project*1 Balloon comment and monitor data in CPU Balloon comment and monitor data at the time of program download *1: Only for an "overwriting" upload. For an initial upload, no target is referred to. TIP - The top tree name on the [online] tab of the [Balloon Comment List] window shows whether online balloon comment and monitor data refers to the CPU or the data at the time of program download. - If the CPU does not store balloons, offline balloon comment and monitor data at the time of the download is referred to immediately after the program is downloaded. If the reference is "(When Downloaded)", online balloon information is updated when the connection is disconnected. Therefore, for the second and subsequent connections, the program monitor shows the online balloon comment and monitor data at the time when the last connection was disconnected. - If the CPU is not set to store balloon comment and monitor data, online balloon comment and monitor data is not applied to the CPU even when online editing is done. Regardless of whether balloon comment data is stored in the CPU, data can be modified, deleted and added. However, to write balloon comments to the CPU, online editing or downloading of balloons is required. In addition, by uploading the changes within the CPU to the offline project file, data integrity between the project file and the CPU can be secured. If balloon comment and monitor data is not stored in the CPU, balloon comments at the time of the program download are referred to. Therefore, balloon comments cannot be reconstructed on the program monitor on a PC with no project data. IM 34M06Q16-01E 3rd Edition: Apr. 26, 2013-00 B1-6 SEE ALSO For details on online operations for balloon comments, see Section H9.3, "Online Operation of Balloon Comments" (Online). IM 34M06Q16-01E 3rd Edition: Apr. 26, 2013-00 B1-7 B1.2 Integrating Comments When running WideField3 on multiple PCs, depending on the state of stored comment data in the CPU and the state of offline project data, the master comment data sometimes cannot be constructed for some CPU types. In such situations, knowing the state of the created comment data will allow you to integrate the comment data, and in the unlikely event that this cannot be done, to restore the data. The flowchart below shows the measures to be taken under various situations. State and Recovery of Comment Data Store to CPU? No Yes Is project data at the time of download available? No Yes Comment data in CPU is master copy Comment data in Download folder is master copy Upload CPU project Comment data can be reproduced using comment file in Download folder Comment data cannot be reproduced B01_09.VSD As shown in the above figure, if comment data is stored in the CPU, it can be reconstructed by uploading but tag name definition and I/O comment data will be current only as of the most recent download. If tag name definition or I/O comment has been modified only on another PC, those changes cannot be reconstructed by uploading as they were not updated in the CPU. If comment data is not stored in the CPU, comment data can still be combined and displayed on another PC by making use of data of the project file stored in the Dwnload folder at the time of download. The procedure for restoring comment data from data in the Dwnload folder is described on the next page. When monitoring a program on a PC other than the PC where the program is created with no comment data stored in the CPU, comments are not displayed. (only position information of comments is stored in the CPU). Also, balloon comments are not displayed. However, if project data current as of the time when the project was downloaded to the PC is available, comment data can be reconstructed even on a PC other than the PC where the program is created. Comment data can be reconstructed by copying block files, macro files (with filename extensions of ".yblk" and ".ymcr"), tag name definition files (with filename extensions of ".ycmn", ".ysig" and ".ymcs"), and balloon comment files (with the filename extension of ".yblc") to the PC where monitoring is to be performed. IM 34M06Q16-01E 3rd Edition: Apr. 26, 2013-00 B1-8 The procedure for doing so is given below. For ease of explanation, the PC where the project was created is named personal computer 'A', the personal computer where monitoring is to be performed is named personal computer 'B', and it is assumed that project "AAA" has been downloaded to the FA-M3. Procedure (1) Create a new project on personal computer 'B'. TIP We recommend that you make the name of a project downloaded to the FA-M3 (i.e., “AAA”) the same as the project file name and the project name. (2) Find folder “Dwnload” on personal computer ‘A’ containing the project that was downloaded to the FA-M3, and copy the entire content of the folder to the newly created project folder on personal computer ‘B’. (3) Open project “AAA” on personal computer ‘B’ and start monitoring. The monitor screen displays programs with comments. On personal computer 'A' Step (2) On personal computer'B' B01_10.VSD TIP - In step (2) above, you can also restore comment data by uploading the program to project “AAA” on personal computer ‘B’. To restore tag name I/O comments, you can also copy tag name definition files (filename extension '.ysig') directly to the project after uploading. - To upload the project to personal computer ‘A’ into a different project, say “CCC”, create a new project “CCC” and perform step (2), substituting “personal computer B” with “personal computer A” in the instructions. The comments will be restored after uploading. SEE ALSO For details on how to store comments in a CPU, see Chapter H2, "Downloading" and Chapter H9, "Storing Comments and Tag Name Definitions" (Online). IM 34M06Q16-01E 3rd Edition: Apr. 26, 2013-00 B2-1 B2. Updating Programs after a Change in the I/O Module Slot Position You may sometimes need to change the slot position of an I/O module during debugging or trial runs, or add an I/O module. Manually changing all device addresses used in a program in such situations would be a major retrogression in programming. It would also necessitate debugging the entire program all over again. Using the Change I/O Installation Position function allows you to update the programs easily. The function can be used to change terminal numbers such as “X00301”, as well as slot numbers in READ/WRITE and HRD/HWR instructions. CAUTION - - The Change I/O Installation Position function is not applicable to constant names specifying slot numbers in READ/WRITE and HRD/HWR instructions. In this case, modify the relevant constant specification in the constant definition, or change instruction parameters directly. The Change I/O Module Installation Position function is not applicable to blocks referring the common library or another project. The Change I/O Installation Position function changes not only instruction parameters in ladder programs but also tag name definition data. When tag names are used in a ladder program and actual addresses are defined in the tag name definition, you do not need to update the ladder program to correspond to a change in the I/O slot position. It is only necessary to change the actual addresses in the tag name definition. TIP Selecting [Project]–[Change I/O Installation Position] from the menu bar does not change I/O installation positions for any blocks that refer to the common library or another project. IM 34M06Q16-01E 3rd Edition: Apr. 26, 2013-00 B2-2 B2.1 If I/O Module Slot Positions Are Changed This section describes how to change the slot position of an I/O module. The following description assumes that I/O modules in slots 003-005 are to be relocated to slots 103-105. 1 2 3 4 5 6 Main unit X D 3 2 X D 6 4 Y D 3 2 Sub unit 1 X D 3 2 X D 6 4 Y D 3 2 B02_01.VSD Figure B2.1 Changing I/O Installation Position The relevant procedure is given below. Procedure (1) Select [Project]–[Change I/O Installation Position] from the menu bar. The Change I/O Installation Position dialog box opens. (2) Enter the old slot number and the new slot number, and click [OK]. TIP To relocate more than one I/O module, specify a range for the old and new slot numbers. The "Change I/O Installation Position Progress" dialog box is displayed, followed by another dialog box which notifies the completion of replacement process. (3) Click [OK]. The notification dialog box closes. (4) Check the execution status, and click [Close]. The "Change I/O Installation Position Progress" dialog box closes. Step (2) Step (3) B02_02.VSD B02_03.VSD IM 34M06Q16-01E 3rd Edition: Apr. 26, 2013-00 B2-3 B2.2 If an I/O Module is Added This section describes how to relocate old modules to make room for a new I/O module. The following description assumes that four existing I/O modules are to be relocated from slots 003-006 to slots 004-007 and a new I/O module is to be inserted in slot 003. 1 2 3 4 5 6 7 X D 3 2 X D 6 4 X D 6 4 Y D 3 2 1 2 3 4 5 6 7 X D 3 2 X D 6 4 X D 6 4 Y D 3 2 B02_04.VSD Figure B2.2 Inserting an I/O (Adding an I/O to “003”) The relevant procedure is given below. Procedure (1) Select [Project]–[Change I/O Installation Position] from the menu bar. The Change I/O Installation Position dialog box opens. (2) Enter the old slot number, the new slot number and the number of slots to be shifted, and click [OK]. The "Change I/O Installation Position Progress" dialog is displayed, followed by another dialog box that notifies the completion of slot replacement. (3) Click [OK]. The notification dialog box closes. Step (2) B02_05.VSD (4) Check the execution status, and click [Close]. The "Change I/O Installation Position Progress" dialog box closes. Step (3) B02_06.VSD IM 34M06Q16-01E 3rd Edition: Apr. 26, 2013-00 B2-4 B2.3 Reusing a Program in a System with a Different I/O Configuration To reuse part of an existing program in a system with a different I/O configuration, you must update the blocks to be reused. To update selected blocks only, use the following procedure. Procedure (1) Select [Project]–[Change I/O Installation Position] from the menu bar. The Change I/O Installation Position dialog box opens. (2) Turn on the [Specified Block] option button in the [Replacement Range] group box, and click [Browse]. TIP The [Specified Block] option button is also available when I/O modules are relocated or a new I/O module is added. The Block List dialog box opens. Step (2) B02_07.VSD (3) Turn on the checkboxes for the blocks to be updated, and click [OK]. The Block List dialog box closes and control returns to the Change I/O Installation Position dialog box. TIP Blocks referring the common library or other projects cannot be selected. Such blocks are indicated with an "*" after the block name. Step (3) B02_08.VSD (4) Click [OK]. The Change I/O Installation Position dialog box closes. The "Change I/O Installation Position - Progress" dialog box is displayed, followed by a dialog box that notifies the completion of updating. Step (4) B02_09.VSD IM 34M06Q16-01E 3rd Edition: Apr. 26, 2013-00 B2-5 (5) Click [OK]. The notification dialog box closes. (6) Check the execution status, and click [Close]. The "Change I/O Installation Position Progress" dialog box closes. Step (5) B02_10.VSD IM 34M06Q16-01E 3rd Edition: Apr. 26, 2013-00 Blank Page B3-1 B3. How to Rapidly Enter and Modify Instructions and Parameters WideField3 provides a variety of ways to enter and modify instructions and parameters. For example, you can write programs by selecting instructions on the instruction palette or Instruction List dialog and entering relevant instruction parameters in the parameter input dialog. You can also avoid mouse operations by using an interface that allows you to write programs by using only the keyboard. In addition, an input completion function is provided so that a list of instruction or parameter candidates is shown when the first character is entered. This chapter describes WideField3 functions for writing programs quickly. This chapter explains how to perform the following operations. - Setting up how to enter instructions and parameters - Entering instructions and parameters - Modifying instructions - Modifying instruction parameters IM 34M06Q16-01E 3rd Edition: Apr. 26, 2013-00 B3-2 B3.1 Setting up How to Enter Instructions and Parameters In the program edit screen, you can use several ways to enter instructions and parameters. You can customize the use of these functions. To do this, use the [Circuit Display/Input] tab of the Set up Environment dialog box. There are two settings related to entering instructions and parameters. - Instruction/Instruction Parameter Completion - Parameter Direct Change Input Settings B3.1.1 Setting up Instruction/Instruction Parameter Completion When you enter an instruction or instruction parameter, a list of candidates can be displayed just by entering the first character of the desired instruction/instruction parameter. The procedure to specify whether a list of candidates is displayed in the program edit screen is given below. Procedure ◆ (1) Select [Tools]-[Set up Environment] from the menu bar. The Set up Environment dialog opens. (2) Select the [Circuit Display/Input] tab. (3) To activate the completion function, turn on the checkbox in the [Instruction/Instruction Parameter Completion] area. (4) Click [OK]. The setting is enabled. B0301_01.VSD IM 34M06Q16-01E 3rd Edition: Apr. 26, 2013-00 B3-3 B3.1.2 Setting up Parameter Direct Change Input You can select how to enter instructions and instructions parameters. To do this, use [Parameter Direct Change Input Settings] on [Circuit Display/Input] in the Set up Environment dialog. In [Parameter Direct Change Input Settings], you can select from the following three input methods. Table B3.1 Input Options Available in [Parameter Direct Change Input Settings] [Parameter Direct Change Input Settings] Checkbox Radio Button ON Command change has priority Parameter change has priority OFF — Input Operation Use keys on the keyboard to enter instructions. The keyboard is used for input operation. The cursor position determines whether the instruction or the instruction parameter is modified. Input operation is performed by selection on the instruction palette, double-clicking an instruction, or selection by the [Enter] key. As a guideline, turn on the checkbox when the keyboard is mainly used to enter and modify instruction/instruction parameters. Use the following procedure to customize what input method is selected in the program edit screen when using alphanumeric keys on the keyboard. Procedure ◆ (1) Select [Tools]-[Set up Environment] from the menu bar. The Set up Environment dialog opens. (2) Select the [Circuit Display/Input] tab. (3) Specify the input method in the [Parameter Direct Change Input Settings] area. (4) Click [OK]. The setting is enabled. B0301_02.VSD IM 34M06Q16-01E 3rd Edition: Apr. 26, 2013-00 B3-4 B3.2 Entering Instructions and Parameters This section describes how to rapidly enter instructions and instruction parameters or modify instruction parameters when editing programs. This section contains the following three procedures. - Using mnemonics - Auto completion of instruction names - Auto completion of parameter names B3.2.1 Using Mnemonics You can enter instructions rapidly by using the alphanumeric keys on the keyboard. To enter a generic instruction from the keyboard, type its unique mnemonic. As you type a mnemonic, it is automatically converted to the corresponding circuit and displayed. To enter an instruction from the keyboard using the alphanumeric keys, use the following procedure. Procedure ◆ (1) Place the cursor over the position where an instruction is to be entered. (2) Enter the instruction from the keyboard. When you hit the key for the first character of the instruction, the Enter Instruction dialog box opens. (3) Enter the remaining characters of the instruction and click [OK]. The instruction is inserted and displayed. Steps (1) and (2) Step (3) B0302_01.VSD B0302_02.VSD SEE ALSO For details of mnemonics, see "Sequence CPU – Instructions." IM 34M06Q16-01E 3rd Edition: Apr. 26, 2013-00 B3-5 Using Mnemonics for Entering Contacts A and B To enter contacts (contact A or contact B), you may use different instructions for different circuit configurations as follows. Entering LD (LDN) or AND (ANDN) Instructions To insert a contact at the beginning of a circuit or as an input condition serial to the previous input condition, use a LD (LDN) or AND (ANDN) Instruction. When used as an input instruction, the LD (LDN) and AND (ANDN) Instructions have the same effect. B0302_04.VSD B0302_03.VSD Figure B3.1 Entering a LD Instruction Figure B3.2 Screen Display after a LD Instruction Is Entered ● Entering OR (ORN) Instructions To insert a contact as an input condition parallel to the previous input condition, use an OR (ORN) instruction. A vertical connection line is automatically drawn to the right of the inserted contact. B0302_05.VSD B0302_06.VSD Figure B3.3 Entering an OR Instruction Figure B3.4 Screen Display after an OR Instruction Is Entered To edit connection lines, use the function keys and special keys as connection lines has no mnemonics. The following function keys are available for editing connection lines. Table B3.2 Entering and Deleting Connection Lines Vertical line Horizontal line Continuation line Input [F8], [/], [|] keys [F9], [-] keys [Shift]+[F9], [>], [<] keys Deletion Shift+F8 Delete Delete IM 34M06Q16-01E 3rd Edition: Apr. 26, 2013-00 B3-6 B3.2.2 Auto Completion of Instruction Names In the Enter Instruction dialog of the program edit screen, you can use this function to show a list of instructions starting with the character you have entered. From the list, you can select and enter a desired instruction. SEE ALSO For details on how to set up the input completion function, see Section B3.1.1, "Setting up Instruction/Instruction Parameter Completion." Procedure ◆ (1) Move the position cursor to where an instruction is to be inserted. (2) Type the instruction from the keyboard. When you hit the key for the first character of the instruction, the Enter Instruction dialog box opens. Steps (1) to (4) B0302_07.VSD (3) Enter the second character. A list of instructions appears, showing the instructions that start with the first two characters entered. (4) Use the cursor to select the instruction to be entered, and press the [Enter] key to confirm the selection. After the instruction is entered into the instruction input field, click [OK]. The instruction is inserted and displayed. After selecting an instruction, you can proceed to entering its instruction parameters. Step (4) B0302_08.VSD SEE ALSO After the first character is entered, you can press the [] key to display a list of instructions. IM 34M06Q16-01E 3rd Edition: Apr. 26, 2013-00 B3-7 B3.2.3 Auto Completion of Instruction Parameter Names In the Enter Instruction dialog of the program edit screen, you can use this function to show a list of tag names or addresses starting with the character you have entered. From the list, you can select and enter a desired tag name or address. SEE ALSO For details on how to set up the input completion function, see Section B3.1.1, "Setting up Instruction/Instruction Parameter Completion." The following describes operation when [Instruction/Instruction Parameter Completion] is enabled on the [Circuit Display/Input] tab of the Set up Environment dialog box. Procedure (1) Enter an instruction, or select an instruction of which the parameter is to be changed, to display the Enter Instruction or instruction parameter setup dialog. Step (1) B0302_09.VSD (2) Enter the first two characters of the parameter to be entered. A list of tag names/addresses starting with the entered two characters appears. Steps (2) and (3) (3) Select a parameter and press the [Enter] key. The parameter is entered. For instructions with multiple parameters, this procedure can be repeated to enter additional instruction parameters by separating each of them with a space. Step (3) B0302_10.VSD B0302_11.VSD SEE ALSO When entering an instruction parameter, you can select to use the [] key, instead of entering any character, to display tag names/address and select one of them. IM 34M06Q16-01E 3rd Edition: Apr. 26, 2013-00 B3-8 B3.3 Modifying Instructions When editing a program, you can change only an instruction without changing the parameters. This section describes the following procedures. - Modifying contact instructions - Modifying application instructions - Modifying the property (long-word, pulse, etc.) of application instructions B3.3.1 Modifying Contact Instructions To invert a contact A into a contact B or vice versa, or invert an OUT coil into an OUTN coil or vice versa, you need not re-enter the instruction parameters. There are two ways to do so: firstly, by entering only the new instruction mnemonic and inheriting the parameters of an existing instruction and secondly, by inverting the instruction using special keys. Modifying Instructions by Entering Mnemonics Place the cursor over the instruction to be modified, and enter a new mnemonic. B0303_01.VSD Figure B3.5 Changing a Contact A into a Contact B Modifying Instructions by Using Special Keys Place the cursor over the instruction to be modified, and press [Ctrl] + [M]. The table below lists instruction pairs, which can be inverted. Table B3.3 Inverting Instructions by [Ctrl] + [M] Instruction Pairs for Inversion Contact A Contact B OUT instruction OUTN instruction SET instruction RST instruction DIFU instruction DIFD instruction LDU instruction LDD instruction UP instruction DWN instruction UPX instruction DWNX instruction IM 34M06Q16-01E 3rd Edition: Apr. 26, 2013-00 B3-9 B3.3.2 Modifying Application Instructions When changing between similar instructions (such as from BMOV to BSET and from BIN to BCD), you do not need to re-enter the instruction parameters. In this case, you modify an instruction by specifying a new mnemonic for the existing instruction. This functions when [Parameter Direct Change Input Settings] is enabled and [Command change has priority] is also selected on [Circuit Display/Input] in the Set up Environment dialog box. Place the cursor over the instruction to be modified and enter a new mnemonic. In the Enter Instruction dialog, you have to enter the mnemonic. Then press the [Enter] key. B0303_02.VSD Figure B3.6 B3.3.3 Changing BIN Instruction into BCD Instruction Modifying the Property of an Application Instruction Application instructions have long-word, pulse and other versions, in addition to the standard word version. There are two ways to change a standard instruction to its long-word or pulse version, or vice versa: by using the instruction parameter setup dialog or by using special keys. Modifying the Property Using the Instruction Parameter Setup Dialog Double-click an instruction to be modified, or place the cursor over the instruction and press the [Enter] key. From the drop-down list in the displayed instruction parameter setup dialog box, select the desired instruction version using the arrow keys. B0303_03.VSD Figure B3.7 Changing the Property of an Instruction IM 34M06Q16-01E 3rd Edition: Apr. 26, 2013-00 B3-10 Modifying the Property Using Special Keys Place the cursor over the instruction to be modified and press the special key. The table below lists the properties that can be inverted along with their special keys. Table B3.4 Inverting Instruction Property Property Long word<->word instruction Pulse<->execute-while-on instruction Special Keys [Ctrl]+[L] [Ctrl]+[P] TIP There is no special key for inverting the double-long-word instruction. IM 34M06Q16-01E 3rd Edition: Apr. 26, 2013-00 B3-11 B3.4 Modifying Instruction Parameters WideField3 provides a function that assists the users in rapidly modifying instruction parameters during program editing. This section describes the following procedures. - Modifying only addresses and constants - Modifying instruction parameters including the device types B3.4.1 Modifying Only Addresses and Constants You can modify instruction parameters simply by entering numbers. In this case, the existing device type specified to the instruction parameters is inherited. The following explanation applies when [Parameter Direct Change Input Settings] is enabled and [Parameter change has priority] is also selected on [Circuit Display/Input] in the Set up Environment dialog box. SEE ALSO For details on how to set up the direct parameter modification input function, see Section B3.1.2, "Setting up Parameter Direct Change Input." Procedure (1) Place the cursor over the instruction parameter to be modified. Step (1) (2) Enter numbers from the keyboard. Entering a number displays the Instruction Parameter Setup dialog box with the device type fixed. Enter the remaining numbers. (3) When you finish entering all of the required information, press the [Enter] key. The instruction parameter is modified. Step (2) B0304_01.VSD B0304_02.VSD Step (3) B0304_03.VSD IM 34M06Q16-01E 3rd Edition: Apr. 26, 2013-00 B3-12 B3.4.2 Modifying Instruction Parameters Including the Device Types You can modify instruction parameters simply by entering device numbers. The following explanation applies when [Parameter Direct Change Input Settings] is enabled and [Parameter change has priority] is also selected on [Circuit Display/Input] in the Set up Environment dialog box. SEE ALSO For details on how to set up the direct parameter modification input function, see Section B3.1.2, "Setting up Parameter Direct Change Input." Procedure (1) Place the cursor over the instruction parameter to be modified. Step (1) B0304_04.VSD (2) Enter the desired device type using the alphanumeric keys. In the displayed instruction parameter setup dialog box, enter the remaining characters of the address. Step (2) (3) When you finish entering all of the required information, press the [Enter] key. The instruction parameter is modified. B0304_05.VSD Step (3) B0304_06.VSD IM 34M06Q16-01E 3rd Edition: Apr. 26, 2013-00 B4-1 B4. How to Use Customization Effectively WideField3 allows for customization of program editing, monitor display and other functions to meet specific needs and preferences of the users. You can customize these functions from the tool menu, the Setup Environment dialog, and similar screens. Customization affects either the entire WideField3 software, a single project, or a specified file, depending on what setting is customized. You can use customization effectively to set up a convenient operating environment to suit your own needs. You can customize the functions shown below. For details of these functions and how to set them up, see sections given in the "SEE ALSO" column. Table B4.1 List of Customizable Functions Entire WideField3 software Editing functions Monitor functions Settings Assignment of shortcut keys Items displayed on the toolbar Project window display Project folder setting Program syntax check level setting Circuit component display setting Background color setting Modified line identification display setting Instruction/parameter input completion Setting for entering an address with an I/O comment Direct parameter modification input setting Parameter TipHelp display Numerical digit grouping display setting Window initial display position setting Display font setting Number of local devices Displaying or hiding I/O comments Switching to 2-line parameter display Emphasized display of write parameters (in bold font) Escape sequence display Instruction number display Address display I/O comment display switching Tag Name Definition Monitor display style Advanced Function Module Register Monitor display/comment setting Data change indication Current timer/counter value display Prohibition of concurrent opening of the block and monitor windows Menu or Dialog [Tools]-[Customize Keys] [Set up Environment]-[Toolbar Setup] [Set up Environment]-[Folder Setup] [Set up Environment]-[Folder Setup] [Set up Environment]-[Program Syntax Check] [Set up Environment]-[Circuit Display/Input] SEE ALSO(*) OF D1.4 OF D1.2.7 OF D1.2.2 OF D1.2.2 OF D1.2.6 [Set up Environment]-[Circuit Display/Input] [Set up Environment]-[Circuit Display/Input] OF D1.2.4 OF D1.2.4 [Set up Environment]-[Circuit Display/Input] OF D1.2.4 [Set up Environment]-[Circuit Display/Input] OF D1.2.4 [Set up Environment]-[Circuit Display/Input] OF D1.2.4 [Set up Environment]-[Circuit Display/Input] [Set up Environment]-[Circuit Display/Input] OF D1.2.4 OF D1.2.4 [Set up Environment]-[Circuit Display/Input] OF D1.2.4 [Set up Environment]-[Circuit Display/Input] [Set up Environment]-[Circuit Display/Input] [View]-[Display I/O Comment] OF D1.2.4 OF D1.2.4 OF E1.5 [View]-[Display (Expanded) Instruction Parameter] [View]-[Display (Expanded) Instruction Parameter] [View]-[Display (Expanded) Instruction Parameter] [View]-[Display Instruction Number] [View]-[Display Address] [Project]-[I/O Comment Display Settings] Tag Name Definition Monitor window OF E1.5 OF D1.2.4 OF E1.5 OF E1.5 OF E1.5 OF E1.5 OF E2.8 ON J4.3 [Online]-[Adv. Function Module Register Monitor] ON J3.6.2 [View]-[Display (Expanded) Instruction Parameter] [Set up Environment]-[Circuit Display/Input] ON J2.3.8 [Setup Environment]-[Program Monitor Setup] OF D1.2.5 OF D1.2.4 (*) OF: Offline, ON: Online IM 34M06Q16-01E 3rd Edition: Apr. 26, 2013-00 B4-2 B4.1 Displaying and Hiding Confirmation Messages You can hide confirmation messages that would otherwise be displayed when performing WideField3 operations. To do this, turn on the [Do not ask again] checkbox in the displayed confirmation dialog box. You can also reset this setting to allow hidden confirmation messages to appear again. Hiding a Confirmation Message Procedure ◆ (1) Perform a WideField3 operation that will cause a confirmation message box to be displayed. A confirmation message with the [Do not ask again] checkbox is displayed. (2) Turn on the [Do not ask again] checkbox and click [Yes]. ⇒ The operation is performed. The confirmation message does not appear for the same operations in the future. Step (2) B0401_01.VSD Redisplaying Confirmation Messages Procedure ◆ (1) Select [Tools]-[Display Hidden Message Dialog Boxes] from the menu bar. Confirmation messages are set to be displayed again. TIP If you have set multiple message dialogs to be hidden, selecting [Display Hidden Message Dialog Boxes] affects all the messages, allowing them to appear again. IM 34M06Q16-01E 3rd Edition: Apr. 26, 2013-00 B5-1 B5. How to Use Component Macros Effectively Macros may be classified according to their uses into two types. - Instruction macros - Function macros The method for creation and invocation is the same for both macro types. To create a macro, select [File]–[New] from the menu bar, select [Macro] in the displayed New dialog box and edit the macro in the same way as editing a block. To call a macro, use the MCALL instruction. Table B5.1 Two Types of Macros Type Instruction macro Function macro Characteristics Completes execution in a single scan. Completes execution in multiple scans. Uses Used in the same way as MOV, CAL, and other standard instructions. Used to control sophisticated I/O instruments or complicated operations. Macros can be shared among users, but should not use devices that are used by other blocks or macros. We describe below how to use devices effectively in macros. When Using Instruction Macros Ensure that the devices used in a macro are not used by other blocks. As an instruction macro completes its execution in a single scan, devices of such macros may be shared with other macros. Macros may use special devices (A, H, and U), not available to blocks. By using these special devices (A, H, and U), you can safely avoid device overlap problems. B05_01.VSD Figure B5.1 Distribution of Devices between Blocks (upper) and Macros (lower) When Using Function Macros Ensure that devices used in a macro are not used by other blocks or macros. While you can avoid sharing devices with other blocks by using the special A, H, and U devices, if two or more macros are executed in the same scan, the latter macros may inadvertently overwrite contents of the A, H, and U devices stored by earlier macros. In this case, you can use local devices (/I, /D, /B, /F, /T and /C) instead. As local devices can be used independently of each other even if they have the same address, their data is assured until a macro completes execution, even if the execution requires multiple scans. IM 34M06Q16-01E 3rd Edition: Apr. 26, 2013-00 B5-2 B05_02.VSD Figure B5.2 Distribution of Devices between Macro 1 (upper) and Macro 2 (lower) CAUTION When using local devices in function macros, note the following precautions. If the same macro must be used in multiple locations, change the name of the macro. As local devices are allocated on a macro basis, calling the same macro in multiple locations causes device overlaps during execution. B05_03.VSD Figure B5.3 Example of Improper Use of the Same Macro at Multiple Locations B05_04.VSD Figure B5.4 Example of Proper Use of the Same Macro at Multiple Locations IM 34M06Q16-01E 3rd Edition: Apr. 26, 2013-00 B5-3 When Invoking a Single Function Macro from Multiple Locations If a macro completes execution in multiple scans, make sure that the device data to be used by the macro is assured in the invoking block so that the assured data is provided to the macro for each scan. This way, the data can be kept independent of the other invokers. In this case, all the data used by a macro program across multiple scans should be created at the pointer register (P). Conversely, devices A, H and U can be used for data not used by multiple scans. How to Pass Large Amounts of Device Data to a Macro When you have to pass a large amount of data to a macro, pass an address at the beginning of a data area of undetermined size to the macro as a macro argument. The macro indexes the pointer register (P) and processes the indexed and subsequent addresses from the device specified in the argument. This enables a single argument to pass a large amount of device data. In this case, you should write a program that indexes the pointer register in the macro program. Be careful when specifying the data ranges covered by the macro. Device ranges passed to the macro I00001 ~ I0004 D00001 ~ D0004 I00017 ~ I0020 D00017 ~ D0020 I00033 ~ I0036 D00033 ~ D0036 This macro does not save the data. B05_05.VSD Figure B5.5 Invoking Macros (lower) from Blocks (upper) by Specifying Pointers as Beginnings of Devices IM 34M06Q16-01E 3rd Edition: Apr. 26, 2013-00 Blank Page B6-1 B6. Collaborative Program Development WideField3 provides an environment that allows collaborative program development by multiple developers. A program to be developed may be divided by function into blocks, which are then assigned to different developers. Each developer creates and tests blocks independently which are then combined in an integration test. The development procedure is described below. CAUTION If another personal computer downloads a program to the same CPU that is connected online to WideField3 on your personal computer, WideField3 may no longer operate normally. In this case, disconnect your WideField3 from the CPU by selecting [Online]– [Disconnect], and then reconnect to the CPU by selecting [Online]–[Connect] from the menu bar. - A List data items to be shared among blocks. Classify the devices into global and local areas according to the number of such data items. Allocate addresses of global devices (e.g., D00001) to data items to be shared among blocks. Use local devices (e.g., /D00001) for data items that are to be used only within a block. D00001 Block 1 Block 2 Global area Local data Local data Global data Local area D32768 Block 3 Block 4 Local data Local data B06_01.VSD Figure B6.1 Global and Local Areas - B Create a new common project for all blocks. Perform common setup that applies to all blocks, including project setup/configuration, common tag name definition, constant definition, user log messages. In the project setup/configuration, set up the global and local areas as determined in step A above. IM 34M06Q16-01E 3rd Edition: Apr. 26, 2013-00 B6-2 - C Each developer creates his own new project, and writes into it the project setup/configuration and user log messages created in step B above. He may manually re-enter the data from the keyboard, or simply copy the data using Windows Explorer. Overall project Project setup/configuration Common tag name definition Constant definition User log message Developer A’s project Project setup/configuration Common tag name definition Constant definition User log message Copy Block A Developer B’s project Project setup/configuration Common tag name definition Constant definition User log message Copy Block B B06_02.VSD Figure B6.2 Common Project and Block-specific Projects for Each Developer - D Each developer creates blocks assigned to him and creates dummy interface blocks to test and debug interfaces with other blocks. - E Each developer transfers his blocks to the FA-M3 and debugs them. After finishing debugging of a block, he writes it to the common project created in step B by selecting [Project]–[Insert File] from the menu bar, or using the Windows Explorer function. - F Combine all debugged blocks in the common project, and transfer the project to the FA-M3. Perform integration tests to debug the entire project. - G During the integration test, multiple developers may perform debugging, as well as perform online-editing on the same CPU concurrently. IM 34M06Q16-01E 3rd Edition: Apr. 26, 2013-00 B6-3 CAUTION To transfer the online-edited data to the CPU, first convert the program by selecting [Edit]–[Convert] from the menu bar, and then exit online editing by selecting [Debug/Maintenance]–[End Online Editing] from the menu bar. While a developer is transferring his online-edited data to the CPU, other developers cannot convert their programs, or exit online editing in WideField3. When multiple developers are online-editing a program concurrently, it is important to know that once a developer transfers his online-edited changes to the CPU, the existing program in the CPU will no longer be the same as the programs currently edited by the other developers. When multiple developers are online-editing a program concurrently, only the first developer who stores balloons in the CPU can continue to do so. Note that for the other developers to store balloons later, they must first reload balloons from the CPU. IM 34M06Q16-01E 3rd Edition: Apr. 26, 2013-00 Blank Page B7-1 B7. Advanced Editing of Component Blocks WideField3 has a newly added [Project Settings/Configuration] function. In addition to the configuration of an entire project and definition of CPU settings, this function enables comprehensive setup of various aspects of projects, including the properties and protection setting of blocks that configure projects, the settings for storing tag name definitions to the CPU, and the maximum number of tag name definitions allowed. This chapter describes useful functions found in the Project Settings/Configuration window, including: - Function related to reuse of blocks - Function related to registration of component blocks - Function related to the settings of common tag name definitions and block properties IM 34M06Q16-01E 3rd Edition: Apr. 26, 2013-00 B7-2 B7.1 Reuse of Blocks WideField3 has a variety of functions that facilitate reuse of programs. This section describes the following topics. - Registering blocks to the library - How to use the common library - How to use blocks stored in other projects B7.1.1 Registering to the Library Blocks created for a project can be easily shared by other projects by "registering" the blocks to the common library. Common Library Block AA Project D Refer Block AA Refer Register Project A Refer Project C Block AA Block AA Project B Block AA B0701_01.VSD Figure B7.1 Overview of Common Library Common Library Folder The common library folder is a location where blocks referred to by multiple projects are stored. This folder can be set up on the [Folder Setup] tab of the Set up Environment dialog box. SEE ALSO For details on the common library folder settings, see Section D1.2.2, "Folder Setup" (Offline). IM 34M06Q16-01E 3rd Edition: Apr. 26, 2013-00 B7-3 Registering to the Library The procedure for registering blocks to the common library is given below. Procedure ◆ (1) In the Project Settings/Configuration window, select [Executable Program Settings]-[Execution Block Components] in the tree. SEE ALSO For details on how to open the Project Settings/Configuration window, see Section D3.1, "Building a Project" (Offline). The Execution Block Components screen appears. (2) Select a block to be registered to the common library, and click [Add] in the [Block Library Operation] area. A confirmation dialog box appears. (3) Click [Yes]. The specified block is registered to the common library. Step (2) B0701_02.VSD TIP If a block with the same name is already present in the common library, a warning message is displayed. To overwrite the block, click [OK]. To cancel the operation, click [Cancel]. Step (3) B0701_03.VSD IM 34M06Q16-01E 3rd Edition: Apr. 26, 2013-00 B7-4 B7.1.2 Using Blocks in the Common Library Folder Any project can use blocks stored in the common library folder. Procedure ◆ (1) In the Project Settings/Configuration window, select [Executable Program Settings]-[Execution Block Components] in the tree. SEE ALSO For details on how to open the Project Settings/Configuration window, see Section D3.1, "Building a Project" (Offline). The Execution Block Components screen appears. (2) Blocks registered to the common library are displayed. Select a block to be used by the project, and click [Add] in the [Executable Program] area. The selected block is registered to the executable program. TIP An "*" in the [Ref] column indicates the block is referred to by another project. TIP The same procedure applies when registering blocks in reference folders. Step (2) B0701_04.VSD IM 34M06Q16-01E 3rd Edition: Apr. 26, 2013-00 B7-5 B7.1.3 Using Blocks of Other Projects Specifying the project folder of another project as reference folder allows blocks of the project to be used. Procedure ◆ (1) In the Project Settings/Configuration window, select [Execution Block Components] in the tree. SEE ALSO For details on how to open the Project Settings/Configuration window, see Section D3.1, "Building a Project" (Offline). The Execution Block Components screen appears. (2) Click [Add Reference]. The Folder Selection dialog appears. Step (2) B0701_05.VSD (3) Select the folder of the project to be referred to, and click [OK]. The blocks of the selected project are added to and displayed in the block list. Steps (2) and (3) B0701_06.VSD (4) Select a block to be used by the current project, and click [Add] in the [Executable Program] area. Step (4) B0701_07.VSD IM 34M06Q16-01E 3rd Edition: Apr. 26, 2013-00 B7-6 B7.2 Effective Way of Using Executable Program Settings Settings applied to blocks can be changed together from executable program settings. This section describes the following topics. - Block protection - Changing common tag name definition settings - Changing block settings B7.2.1 Block Protection You can select a block from the block list and set a password to the block. Procedure ◆ (1) In the Project Settings/Configuration window, select [Protection Settings] in the tree. SEE ALSO For details on how to open the Project Settings/Configuration window, see Section D3.1, "Building a Project" (Offline). The Protection Settings screen appears. (2) Double-click the block. The Set up Password dialog appears. (3) Enter a password and click [OK]. The password is set to the block. Step (2) B0702_01.VSD B0702_02.VSD CAUTION - When setting protection, make sure to safely manage the password. We cannot accept any request from any user, including persons responsible for setting passwords, to clear passwords that have been set. TIP To cancel protection, clear both [New Password] and [Confirm Password] boxes in the Set up Password dialog (i.e., leave the boxes blank), and click [OK]. IM 34M06Q16-01E 3rd Edition: Apr. 26, 2013-00 B7-7 B7.2.2 Changing Common Tag Name Definition Settings You can set the maximum number of tag name definitions allowed and select downloads to the sequence CPU. Procedure ◆ (1) In the Project Settings/Configuration window, select [Execution Block Components] in the tree. SEE ALSO For details on how to open the Project Settings/Configuration window, see Section D3.1, "Building a Project" (Offline). The Execution Block Components screen appears. (2) Click [Details/Setup]. The Executable Program Details/Setup dialog appears. Step (2) (3) In the [Entire Project] group box, change the [Number of Common Tag Name Defs] and [CPU Storage] settings. B0702_03.VSD B0702_04.VSD Step (3) (4) Click [OK]. The settings are updated. IM 34M06Q16-01E 3rd Edition: Apr. 26, 2013-00 B7-8 B7.2.3 Changing Block Settings For component blocks, you can select the reference tag name definitions, specify the download setting of tag name definitions/comments to the sequence CPU, and specify the number of local devices used. Procedure ◆ (1) In the Project Settings/Configuration window, select [Execution Block Components] in the tree. SEE ALSO For details on how to open the Project Settings/Configuration window, see Section D3.1, "Building a Project" (Offline). The Execution Block Components screen appears. (2) Click [Details/Setup]. The Executable Program Details/Setup dialog appears. Step (2) B0702_05.VSD (3) In the [Executable Program] group box, change the [Tag Name Def. Reference], [CPU Storage] and [Local Device] settings. Step (3) B0702_06.VSD (4) Click [OK]. The settings are updated. IM 34M06Q16-01E 3rd Edition: Apr. 26, 2013-00 FA-M3 Programming Tool WideField3 Introduction and Troubleshooting PART-C Troubleshooting Manual IM 34M06Q16-01E 3rd Edition This manual describes how to solve problems that might occur in WideField3. IM 34M06Q16-01E 3rd Edition: Apr. 26, 2013-00 Blank Page C1-1 C1. Precautions When Programming for a Multi-CPU System If a system uses multiple CPUs, you need to create a project and develop programs for each CPU separately. This chapter describes precautions concerning project setup/configuration when creating the configuration for a multi-CPU system. The slot numbers to be used in a program are set in the I/O setting in project setup/configuration. CPUs perform I/O refreshing according to this setting. If multiple projects share the same output module, the module may not operate normally. Thus, an output module used by a project should not be used by another project at the same time. C01_01.VSD Figure C1.1 Project A Uses I/O Slots 5 to 7 C01_02.VSD Figure C1.2 Project B Uses I/O Slots 8 to 10 CAUTION The F3SP22/28/38/53/58/59/66/67/71/76 modules support sensor control blocks (SCB) in addition to normal blocks. SCB and normal blocks must be assigned unique slot numbers within the same CPU. C01_03.VSD Figure C1.3 SCB Uses Slot 2, and Normal Blocks Use Slots 3 to 5 on Unit 0 IM 34M06Q16-01E 3rd Edition: Apr. 26, 2013-00 C1-2 TIP - A multi-CPU system refers to a system configuration with two, three, or four CPU modules mounted in a unit. - In Project Settings/Configuration, you can refer to the I/O settings of other CPUs to check whether there is any conflict. SEE ALSO - For details on multi-CPU systems, see "Sequence CPU – Functions." - For details on the project settings/configuration, see Section D3.1, "Building a Project" (Offline). - For details on the procedure for referring to the I/O settings of other CPUs, see Section D3.1.13, "Inter-CPU Shared Memory Setup" (Offline). IM 34M06Q16-01E 3rd Edition: Apr. 26, 2013-00 C2-1 C2. Recovering from Communication Errors This chapter describes how to recover from an error during communications between a personal computer and the FA-M3. If a communications error is detected for whatever reason (often if the communications cable is disconnected or the FA-M3 is switched off), WideField3 automatically detects the failure and displays the following message on the personal computer screen. C02_01.VSD Figure C2.1 Communications Error Message If you wish to continue the connection, you can check the cable and/or switch off and then switch on the FA-M3, and click [Yes] on the error message dialog box. This recovery measure may remove the cause of the error and allow you to continue operation (this measure will not work if the CPU communications mode before power off is changed after power on). It is recommended that you click [No] to disconnect (all monitor windows will close automatically), check the communications cable, and reconnect online again by selecting [Online]–[Connect] from the menu bar. If the power supply to the FA-M3 is inadvertently turned off during Ethernet communications, always click [No] to disconnect. If you click [Yes] in this case, a communications error will again be generated due to connection processing between the personal computer and the Ethernet interface module. In the case of USB communications, the USB driver recognized by the PC may enter into an unknown state. If connection cannot continue, check the USB cable and/or switch off and then switch on the FA-M3, or disable and then enable the FA-M3 USB driver using Windows device manager. TIP When you select [Edit]–[Convert] from the menu bar to convert a program during online-editing, and then select [Debug/Maintenance]–[End Online Editing] from the menu bar to terminate online editing, online connection is terminated only after the converted program is successfully transferred (the CPU is notified of the program transfer status). If WideField3 is forced to terminate, or the FA-M3 is switched off, or the communications cable is disconnected during the conversion or transfer, you must switch off and then switch on the FA-M3. Try to ensure that the above events do not occur during conversion or transfer. If protection is enabled for the connected CPU, operation cannot continue even if you select [Yes] on the communications error message dialog box even though reconnection may seem to be successful. You should disconnect by selecting [No] on the communications error message dialog box and then try to reconnect. IM 34M06Q16-01E 3rd Edition: Apr. 26, 2013-00 Blank Page C3-1 C3. Troubleshooting This chapter describes some common problems that you may encounter when using WideField3, and how to perform troubleshooting. CAUTION This chapter suggests some standard measures to troubleshoot various problems but these remedial measures may not always work. Communications Failure Communication error Send error Ethernet Check IP address and Windows subnet mask Receive error Failure to connect USB RS-232C Check RS232C connection and Windows COM settings Check Ethernet connection Check USB connection Communication error detected FFFF-0007 Ethernet Check Ethernet connection Check IP address End C03_01.VSD Figure C3.1 Communications Error IM 34M06Q16-01E 3rd Edition: Apr. 26, 2013-00 C3-2 No or Incorrect Display of Tag Names and I/O Comments Tag name or I/O comment error Offline Online Online? Symptom? Nothing displayed Program uploaded? Yes Different display No Yes Program may have been uploaded into a wrong folder. Upload program into the correct folder where the downloaded file resides. Change reference for tag name in [Set up Environment][Program Monitor Setup] in offline project No Change reference for tag name in block property Tag name definition uploaded? No Displayed? Yes Upload and monitor again End C03_02.VSD Figure C3.2 Tag Name Definition Error IM 34M06Q16-01E 3rd Edition: Apr. 26, 2013-00 C3-3 Error Detected When Downloading CPU Properties CPU property related error Others What happened? CPU error after download Error at download Reset CPU Check CPU properties No problem Upload CPU properties from CPU and edit again Errors amended Download edited CPU properties No OK? Yes END C03_03.VSD Figure C3.3 CPU Properties Error IM 34M06Q16-01E 3rd Edition: Apr. 26, 2013-00 C3-4 Failure to Establish FL-net Connection in Windows 7/Vista/XP SP2 Windows7, Vista and XP SP2 feature enhanced security functions. The installed firewall function may affect online connection using FL-net protocol in WideField3. We describe here how to connect to FA-M3 using FL-net communication. Connecting using FL-net communication in WideField3 When executing online connection using FL-net communication in WideField3 under Windows XP SP2 environment, you may see the following security warning window. Select [Unblock] in response to the question: "Do you want to keep blocking this program?" to allow this and future connections. C03_04.VSD Figure C3.4 Windows Security Alert Selecting [Keep Blocking] instead of [Unblock] disallows communication. If you select [Keep Blocking], you can still enable communication subsequently by configuring the Windows Firewall as described under "Configuring Windows Firewall to allow online connection using FL-net communication". IM 34M06Q16-01E 3rd Edition: Apr. 26, 2013-00 C3-5 Configuring Windows Firewall to allow online connection using FL-net communication The setup described below can only be performed if you have selected [Keep Blocking] earlier. This setup is not required if you have selected [Unblock] instead. 1. Select and open Security Center from Windows control panel. C03_05.VSD Figure C3.5 Control Panel 2. Select and open Windows Firewall from the Windows Security Center screen. C03_06.VSD Figure C3.6 Windows Security Center IM 34M06Q16-01E 3rd Edition: Apr. 26, 2013-00 C3-6 3. Configure Windows Firewall. Although you can disable Windows Firewall by selecting [Off] on the General tab screen, we do not recommend doing so. C03_07.VSD Figure C3.7 Windows Firewall 4. Click the Exceptions tab and perform setup as shown in the following screen. C03_08.VSD Figure C3.8 Windows Firewall IM 34M06Q16-01E 3rd Edition: Apr. 26, 2013-00 C3-7 5. Click the Advanced tab, and click [Settings] in the ICMP group box. C03_09.VSD Figure C3.9 Windows Firewall 6. Turn on all checkboxes on the ICMP Settings screen. This configures Windows Firewall to allow mcomsrvex requests and responses to pass through. C03_10.VSD Figure C3.10 ICMP Settings 7. The setup is completed. Click [OK] to close all windows. IM 34M06Q16-01E 3rd Edition: Apr. 26, 2013-00 Blank Page C4-1 C4. E-mail Technical Support The E-mail Technical Support function enables you to send an E-mail query to Yokogawa’s technical support center from within WideField3. Selecting this function from the menu starts the mail program and displays a screen for preparing a new E-mail. The E-mail address of Yokogawa’s technical support center is automatically entered as the default destination address for your convenience. CAUTION The Mailer program to be invoked is defined in the [E-mail] field on the Programs tab of the Internet Options dialog box of the Internet Explorer software. C04_01.VSD Figure C4.1 Mailer Settings TIP To display the Internet Options dialog box, select [Internet Options] from the Internet Explorer software or Windows control panel. IM 34M06Q16-01E 3rd Edition: Apr. 26, 2013-00 C4-2 Procedure (1) Select [Tools]–[E-mail to Technical Support] from the menu bar. The mailer program is started and a screen for creating a new E-mail is displayed. TIP The E-mail address of Yokogawa’s Technical Support Center is displayed in the destination address field by default. (2) Create and send the mail, according to operating procedures of the mailer program. The created mail is sent to Yokogawa’s Technical Support Center. Step (2) C04_02.VSD IM 34M06Q16-01E 3rd Edition: Apr. 26, 2013-00 Index-1 FA-M3 Programming Tool WideField3 Introduction and Troubleshooting IM 34M06Q16-01E 3rd Edition INDEX A access key ....................................................... A3-23 Action monitor.....................................................J1-3 activating instructions ........................................ K2-8 Advanced function module register monitor .....J3-19 Advanced function module relay monitor .........J3-18 alarm display...................................................... K3-3 application instruction .......... E1-23,J2-4,J2-14,J2-15 B balloon comments............................................ E1-77 balloon list window........................................... A3-10 balloon monitor .................................................J2-31 basic instructions ............................................. E1-21 Battery error/Memory check error............K3-6,K3-11 block tag name definition ............ A3-18,D2-4,D3-78, E1-95,E2-3,E2-15,E2-26,E2-29,H9-3,J4-1 block…........................ D2-3,D4-2,D4-4,D4-7,D4-10, D4-13,E1-37,E8-30,F2-4,F2-9,H2-9,H3-6, H4-6,H13-4,H13-5,J2-2 built-in ROM........................................................J1-3 C CADM3 ........................... A3-12,D2-20,D4-13,H8-24 Cancel Forced Set/Reset .................................. K1-4 Cascade............................................................. K4-6 cell…................................ E1-54,E1-57,E1-60,F4-13 Change I/O installation position....B2-2,D3-69,F4-34 circuit comment......... E1-70,H2-5,H9-3,K2-18,K2-10 clear CPU properties .......................................H5-13 clear devices..................................................... J1-11 Clear Log ................................................ K3-9,K3-17 clear program....................................................J1-10 common library .................................................. B7-2 common tag name definition..........A3-4,A3-18,D2-4, D3-79,E1-95,E2-3,E2-16,E2-28,E2-29,E2-33, H2-5,H9-5,J4-1 Compact printing.............................................. E8-31 compare ....................... A1-6,E7-6,E7-16,H4-3,H4-6, H4-8,H6-7,H8-19,H9-9 Compare Project................................................ E7-6 Compare Window ............................................ E7-16 Comparing Files...................................... D1-32,E7-1 Comparison Bar........................................ A3-3,E7-3 concurrent execution ....A4-7,H7-4,H7-14,H8-7,K4-7 configuration .........................A3-4,A3-18,C1-1,D2-6, D2-21,D3-9,E8-27,E8-45,H4-7,J1-5,K4-33 connection history.......................................... H11-20 connection line ........................................ B3-5,E1-46 constant definition .............................................. E3-1 constant scan...................................................D3-31 contact A ...................................B3-5,B3-8,E1-9,J2-2 contact B ...................................B3-5,B3-8,E1-9,J2-2 continuation line............................A3-20,E1-4,E1-49 continuous type application instruction... E1-6,E1-24 conversion error.................................... E1-2,E1-103 convert .................................................. E1-2,E1-103 CPU properties ..................................................H5-1 D Define Program Components ................... A3-5,D2-6 Device Manager.................... A1-7,H8-1,H8-3,H8-17 Device monitor ........................ A1-6,A1-7,A1-8,A1-9, J3-1,J3-3,J3-8,J3-14,J3-21 disabling........................................................... K2-10 Display Data Change Identification.................. J2-23 display format.........................J2-15,J3-11,J4-1,J4-7, K4-38,K4-42,K4-44,K4-47 Display style........................................................J4-8 Display Operation Log ................. D1-28,D2-6,K3-21 Display User Log ............................................. K3-16 displaying details...............................................J2-14 download..................... D1-20,H1-1,H2-1,H2-3,H2-9, H5-9,H8-11,H9-8,H13-5, H13-6 E edit program................... A1-6,A1-7,A1-8,A1-9,E1-3, E1-8,F4-23,F4-24 E-mail……....................... C4-1,D1-30,H8-17,H10-11 environment setup ................................ D1-3,H10-11 exclusive access control ...................................J1-14 executable program .............. A3-18,D2-6,D2-7,D3-9 Export (Circuits comments/Subcomments) ... E1-104 Export (Cross reference) ................................. E6-19 Export (Device files).........................................H8-22 Export (Device list)........................................... E5-18 Export (Environment setup) .............................D1-34 Export (Key customization)..............................D1-38 Export (Tag name definition)............................ E2-34 Extract Macro................................................... F1-11 IM 34M06Q16-01E 3rd Edition: Apr. 26, 2013-00 Index-2 F FA Link error ............................................K3-6,K3-11 FA Link Tool ............................................ H7-4,H7-12 FA-M3 Defender .............................................. H11-1 Find Bar .................................................. A3-2,E4-50 Find in Project...................... A3-5,E4-8,E4-15,E4-31 Find Instruction in Project ................................ E4-15 Fixed Index Modification Monitor......................J2-20 FL-net Refreshing ............................................D3-52 FL-net Tool ............................................ H7-13,H7-27 Font ...................................................... B4-1,D1-19 Forced Reset ............................................. J2-3,K1-2 Forced Set ................................................. J2-3,K1-2 function key............................................. B3-5,E1-22 G global device....................... B6-1,D3-35,E1-12,F2-8, H14-2,J5-5 group tag name............................... E2-31,F3-2,F3-5 H M macro.. ..... A3-18,B5-1,D2-3,D4-2,D4-4,D4-7,D4-10, D4-13,E8-30,F1-1,F1-7,H2-9,H3-6,H4-6 Macro monitor ..........................................H14-3,J2-2 macro tag name definition .......... A3-18,D2-3,E1-95, E2-6,H2-10 Memory error/failure ................................K3-6,K3-11 Mnemonic editing.................................... E1-7,E1-91 MODE switch ......................................................J1-3 momentary power failure .........................K3-5,K3-11 multiple connections ........................................H1-22 O offline balloon.......................................... B1-5,H9-10 online balloon.......................................... B1-5,H9-10 online editing.......................................... A1-9,D3-80, H13-9,H9-9,H13-9,K2-1,K2-5,K2-15,J2-34 operating mode............................. A3-16,H1-23,J1-6 operation protection ........ A1-7,H11-5,H11-7,H11-12, H11-14 Output window ................................................. A3-10 Hide Circuits .......................................... E1-85,J2-13 P I power off .......................................................... K3-11 Program monitor ............. A1-6,A1-7,A1-8,A1-9,J2-2, J2-7,J2-30,J5-13,K2-5 project .......................... A1-5,A1-6,A1-7,A1-9,A1-12, A1-15,B2-4,D2-3,D2-7,D3-5,D3-61,E8-8, E8-26,E8-44,F2-5,F2-10,F4-30,H1-23,H2-3, H3-3,H4-3 project settings....................................................J1-5 Project window.......................................... A1-9,A3-4 protection .......................... D3-26,D4-5,D4-12,H5-12 pulse ............................................................... E1-23 I/O comment .....................A1-7,A3-20,D1-27,D3-80, E1-74,E2-2,F4-8,J2-24,K2-19 I/O comparison error................................K3-6,K3-11 I/O module error...................................... K3-6,K3-12 Image Copy ........................................... E1-65,J2-35 Import (Circuits comments/Subcomments) ... E1-105 Import (Device files).........................................H8-23 Import (Environment setup) .............................D1-35 Import (Key customization)..............................D1-39 Import (Tag name definition)............................ E2-35 inactivating instructions...................................... K2-8 index modification ................... E1-39,E2-5,F4-6,J2-4 indirect specification ............. E1-40,E2-5,J2-18,J5-1 instruction error........................................K3-6,K3-11 Instruction List......................................... E1-9,E1-23 instruction number ...................... E1-10,E1-96,J2-13 instruction palette...................................... A3-2,E1-9 Inter-CPU communication error...............K3-5,K3-11 interrupt error ...........................................K3-6,K3-11 invalid instruction found ...........................K3-5,K3-11 K Key customization............................................D1-39 L label….........................................A3-20,E1-37,E1-51 Language Setup ..............................................D1-39 local device ...................... B6-1,D3-35,D3-57,D4-10, E2-4,E1-12,F1-4,F1-12,F2-1,F2-2,F2-7,F2-8, H8-16,J3-9,J5-7 long word .......................... B3-9,E1-23,E1-28,E1-34, J2-16,K1-6, long-word index modification ........................... E1-39 R Read Circuits ........................................ E2-14,E3-10 Read mode ........................................................D4-6 Register Macro ........................................F1-7,F1-14 Registered device monitor ...... A1-6,A1-7,A1-8,A1-9, H13-2,J5-1,J5-3 replacing in project................................ D3-66,F4-31 Reset start................................................H1-2,J1-12 Restart Refreshing ........................................... K1-14 Resume Monitoring.................................J2-30,J3-16 ROM pack error ...................................... K3-5,K3-12 S sampling trace .............. A1-8,K4-3,K4-5,K4-6,K4-35 scan time.............................................................J1-3 scan timeout.............................................K3-6,K3-11 Search Window................................................ A3-11 security keyword ..............................................H5-10 self-diagnosis error ............................................ K3-5 sensor control block (SCB) ......... C1-1,D3-10,D3-32, J1-3,K3-6 Sequential Search ........................................... E4-21 set time ...............................................................J1-9 shared refreshing.............................................D3-44 IM 34M06Q16-01E 3rd Edition: Apr. 26, 2013-00 Index-3 shortcut key ..................................................... A3-21 Show Circuits................................................... E1-87 Simple Find...................................................... E4-50 slot number ....B2-1,C1-1,D3-32,D3-69,H7-12,H7-26 Split Display ..................................................... E1-89 SPU error.................................................K3-5,K3-11 Start block ........................................................ K1-15 status bar ............................... A3-3,E1-11,K4-4,H8-6 Stop block ........................................................ K1-15 Stop Refreshing ............................................... K1-13 structure.......... A3-19,D3-64,E1-19,E1-42,F4-1,F4-5 structure macro................................................ F4-25 structure member............A3-20,D3-64,E1-19,E1-42, F4-3,F4-7,F4-31,F4-33,F4-35 structure object definition.......................E2-20,F4-12 structure type definition........................ A3-19,D3-65, F4-3,F4-7,H4-8 subcomment ..................... A3-20,E1-10,E1-70,H4-8, H9-3,K2-16 subroutine error ............................................... K3-11 Subunit communication error.................. K3-6,K3-12 Subunit transmitter switching has occurred................................. K3-6,K3-12 Suspend Monitoring................................J2-30,J3-16 syntax check ............................... B4-1,D1-23,D3-62, F4-35,H2-3 system log............................................... E8-47,K3-8 T tag name ................................... A3-20,D3-66,D3-67, D3-78,E1-12,E1-42,E1-94,E1-96,E2-29, J2-26,J2-27,J4-3,K4-29,K4-44 tag name definition ...... A1-6,A1-7,A1-8,A1-9,A3-20, D3-78,E1-95,E2-1,E2-6,E2-24,E8-46,F4-18, H2-10,H3-8,H9-3,J2-27,J4-1,K2-19 Tag Name Definition Monitor ..............................J4-1 Temporarily change communication speed ........J1-7 Tile…....................................................... A3-17,K4-6 title…....................................A3-20,D2-8,D3-5,D4-11 toolbar....................................A3-2,D1-25,H8-3,K4-3 U Undo….................................................. A3-13,E1-66 upload ......................... D3-81,H1-2,H3-3,H3-6,H3-8, H5-4,H5-11,H8-4,H9-9,H13-5 USB… .................................... A2-2,A4-9,D1-11,H1-3 Used Device ...................................................... E5-9 user authentication ........................................ H11-28 user log message .............A3-15,A3-18,D2-7,D3-30, K3-15 W Watch Monitor.......................................... A1-12,J6-1 WideField.............................................. A1-16,H8-25 WideField2 R5 ................................................... A1-2 WideField3 R1 ........................................ A1-2,A1-10 Write mode......................................................... E2-6 IM 34M06Q16-01E 3rd Edition: Apr. 26, 2013-00 Blank Page i Revision Information Document Name : FA-M3 Programming Tool WideField3 - Introduction and Troubleshooting User's Manual Document No. : IM 34M06Q16-01E Edition Date 1st Jan. 2012 Revised Item 2nd Sep. 2012 Supported for WideField3R2.03 3rd May 2013 Supported for WideField3R2.04 New publication Written by PLC Product Development & Engineering Department Control Instruments Business Division IA Platform Business Headquarters Yokogawa Electric Corporation Published by Yokogawa Electric Corporation 2-9-32 Nakacho, Musashino-shi, Tokyo, 180-8750, JAPAN Printed by Kohoku Publishing & Printing Inc. IM 34M06Q16-01E 3rd Edition: Apr. 26, 2013-00 Blank Page