1
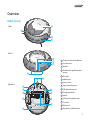
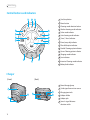
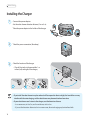
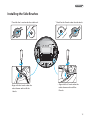
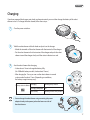
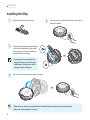
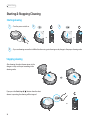
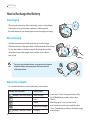
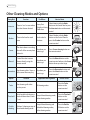
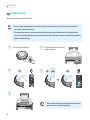
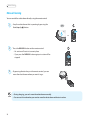
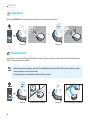
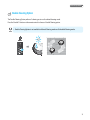
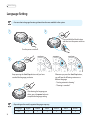
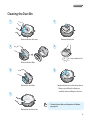
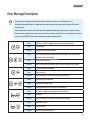
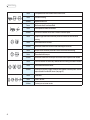
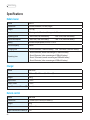
Ver 1.0
Robot Cleaner
User Manual
ME670 Series
Thank you for purchasing the ME670 series robot cleaner.
Before using the product, please read this User Manual carefully, and keep it for future reference.
Depending on your model, some contents of this User Manual may differ from the actual product.
The contents of this User Manual are subject to change without notice.
Robot Cleaner
User Manual
ME670 Series
Features
Shadow Cleaning
This is a function that enables you to clean area where the light does not reach. In Shadow
Cleaning mode, you can intensively clean areas under the bed, sofa, etc. that are difficult
to clean with a conventional vacuum cleaner.
High Performance BLDC Motor
The cleaning performance is excellent due to the powerful BLDC (suction) motor. The BLDC
motor is 30% more powerful than a DC motor, and the lifetime is approximately 10 times as
long (estimated: 5,000 hours).
8.2 cm Slim Design
8.2cm
With a slim design, the MONEUAL ME670 is just 8.2 cm high, enabling it to clean under the bed
and the sofa, where it is difficult to clean with a vacuum cleaner or by hand.
Various Cleaning Modes
The various cleaning modes provide different cleaning functions and levels of performance,
which are optimized for the user environment. Auto Cleaning
Intensive Cleaning
Corner Cleaning
Manual Cleaning
Detachable Micro fiber Mop
Using Detachable Micro fiber Mop, the ME670 can remove fine dusts.
Scheduled Cleaning
Twin Side Brushes
Twin side brushes, installed on the left and right sides of the bottom, completely clean the
corners that are difficult to clean with the vacuum suction system alone.
Eco-friendly Lithium Iron Phospate Battery
The MONEUAL ME670 uses an eco-friendly battery that does not contain any heavy metals or
acids that are harmful to the human body. The Lithium Iron Phospate Battery has a lifetime that
is approximately three times longer (1,000 cycles) than standard lithium-based or nickel-based
batteries. It provides higher levels of operational safety due to high resistance to heat and
explosion.
Auto Charging
After it is finished cleaning or when it detects that the battery is low, the robot cleaner automatically returns to the charger and starts charging.
Obstacle Avoidance and Fall Protection
The obstacle detection sensors in the bumper help the MONEUAL ME670 avoid obstacles and
walls, and the cliff detection sensors in the bottom detect height differences and prevent it
from falling down stairs.
Contents
Before Use
Installing
Product
Operation
Features
02
Language Setting
32
Safety Information
05
Cleaning the Dust Bin
33
What’s in the Box
10
Cleaning the Dust Filter
34
Overview
11
Cleaning Sensors and Wheels
35
Cleaning the Dust Inlet
36
Maintenance
Installing the Charger
14
Using and Managing the Battery
37
Installing the Side Brushes
15
Voice Guidance
40
Remote Control
16
Error Message Description
41
Charging
17
Installing the Mop
18
Troubleshooting
43
Specifications
44
Product Warranty
45
Before You Start
19
Starting & Stopping Cleaning
20
How to Recharge the Battery
22
Auto Cleaning
23
Other Cleaning Modes and Options 24
Customer
Support
Before Use
Safety Information
Please read and follow the instructions in this manual to ensure your safety and the safe use of your robot cleaner.
Safety symbols
In this manual, various Warnings, Cautions and Notes are provided to help you to avoid potential hazards that can hurt
you and/or damage your robot vacuum cleaner.
You may be killed or seriously injured
if you do not follow this instruction.
Warning
Caution
You may be injured or your appliance
may be damaged if you do not follow
this instruction.
Note
You should refer to this
note when using your
robot cleaner.
Before you use
Do not install or use the robot cleaner in a place where it will be exposed to direct sunlight.
ÞIf
the power adapter becomes overheated during charging it may cause a fire, short circuit, or electrical shock.
ÞThe
robot cleaner may become discolored and deformed.
Do not install the charger on an inclined floor, and do not apply impact to the charger.
ÞThe
charger may become damaged or broken.
Do not use the product in a room with an unattended child or an elderly person.
ÞThere
is a risk that the child or elderly person may become frightened or injured.
This robot cleaner is not intended for use by children, or by persons with reduced physical, sensory or mental capabilities, unless
they have given supervision or instruction concerning the use of the robot cleaner by a person responsible for their safety.
ÞThis
may cause injury or damage the robot cleaner.
Before you use the robot cleaner, remove any small objects, clothes, and fragile objects from the floor to be cleaned.
ÞThis
may cause damage to the robot cleaner and obstruct the movement of the robot cleaner.
ÞMake
sure to remove fragile objects (glass, china, flowerpot, etc.).
ÞSmall
cloths, power cords, belts, towels, pads, and telephone cords can become entangled in the wheels or brushes.
Remove obstacles on the floor before cleaning.
ÞThe
robot cleaner will not be able to move beyond obstacles of a certain height.
5
Robot Cleaner
Install the charger in a location that can be easily accessed by the robot cleaner.
ÞIf
you install the charger in a corner or if there are many obstacles around the charger, it may prevent the robot cleaner
from automatically charging.
Make sure that the charger is always plugged into a power source.
ÞIf
no power is supplied to the charger, you will not be able to use the automatic charge function.
When you use
Do not use the power adaptor with another appliance.
ÞThis
may cause damage to the appliance and fire by overheating.
Ensure that clothes or any part of the body (hair, finger, foot, etc.) do not get entangled in the brushes or wheels.
ÞThis
may cause injury.
Do not use or store the robot cleaner near flammable materials (alcohol, gasoline, kerosene, thinner, etc.) or heating
sources (cigarettes, candles, stove, etc.).
ÞThis
may cause fire and damage to the robot cleaner.
If you notice smoke or a burning smell coming from the robot cleaner, immediately turn the power switch off and
contact your service center.
Do not stand or sit on the robot cleaner.
ÞMovement
of the robot cleaner may cause injury or the robot cleaner may be damaged.
Do not use the robot cleaner on a narrow high place such as a desk, table, etc.
ÞThe
robot cleaner may fall off which could cause injury or damage to the product.
Do not let the robot cleaner pass over or sweep up liquids, oil, pet droppings, etc.
ÞThis
may cause malfunction of the robot cleaner and damage.
ÞLiquid
on the wheels may cause stains in other places.
If the robot cleaner sucks a plastic bag in while operating, immediately remove it.
ÞIf
you run the robot cleaner for a long time with the dust inlet covered with a plastic bag, the motor will be overheated
and the robot cleaner will be damaged.
Do not press strongly or impact the bumper.
ÞThis
6
may cause damage to bumper sensors and malfunction.
Before Use
Do not use the robot cleaner in a place where the temperature is too low or too high (lower than -5°C and higher than 35°C).
ÞThis
may cause damage to the product.
Do not use the robot cleaner when the dust bin is completely filled up.
ÞThis
may reduce the suction power.
Never use the robot cleaner without the filters.
ÞDoing
so may cause a malfunction of the robot cleaner.
Remove objects (such as loose clothing, towels, cloths, belts, or hairs) scattered on the floor before cleaning.
Keep objects away from brushes and wheels to prevent entanglement.
ÞThis
may cause noise, reduce the suction power, and damage the robot cleaner.
Do not use the robot cleaner in a place where the floor or wall is made of glass or mirrors.
ÞThe
robot cleaner detect obstacles by using an IR sensor, so it may not detect glass and mirrors as obstacle.
Do not use the robot cleaner in a utility room, on a wet floor, on stairs, on a table or shelf, in an underground room, in
a warehouse, in a commercial building, or outdoors.
If you have dropped or given an impact to the robot cleaner, contact your service center.
Electrical instructions
Please use the power source and socket with the correct voltage and current.
ÞIf
you use a power source or socket that does not fit the power specifications, there is the risk of fire, electrical shock,
and damage to the robot cleaner.
Make sure the power cord is not bent or crushed by heavy objects.
ÞA
damaged power cord may cause fire or electrical shock.
ÞTo
repair or replace a damaged power cord, contact a qualified service agent to ensure your safety.
When plugging in or removing the power plug, always plug it in or remove it by holding the plug, not the cable.
ÞStress
on the cable will damage the power cord, which may cause fire or electrical shock.
Do not use a damaged power cord! To repair or replace a damaged power cord, contact a qualified service agent to
ensure safety.
ÞIf
a non-qualified person repairs the power cord, there is a risk of fire or electrical shock.
7
Robot Cleaner
Do not touch the plug or wall socket with wet hands.
ÞDoing
so may cause electric shock.
If you spill water into the robot cleaner, unplug the power cord and allow the unit to dry completely before use.
ÞWater
can bring the risk of fire and electrical shock.
ÞImmediately
remove the power cord from the outlet and contact your service center.
Do not use chargers other than the charger that came with your robot cleaner.
ÞOvervoltage
brings the risk of fire and electrical shock.
Do not install the charger in a location that is damp or wet, dusty, or near water.
ÞThis
may cause a fire or an electrical shock and damage to the unit.
Do not touch the terminal of the charger with any metallic object (such as a clip, pin, etc.).
ÞThis
creates the risk of fire and electrical shock.
If you do not plan to use the robot cleaner for an extended period of time, turn off the power switch at the bottom of
the back.
ÞThe
battery may be discharged if you leave it switched on.
Management
To ensure safety, only a qualified service agent should repair or disassemble the product.
ÞRepair
by unqualified personnel may damage the robot cleaner, and brings the risk of fire and electrical shock.
Dispose of the battery properly.
ÞIf
you throw the battery into fire or expose it to direct sunlight, there is the risk of fire and explosion.
ÞDispose
of your old batteries according to the local laws and regulations of your region.
Clean the obstacle and bottom sensors periodically.
ÞIf the sensor becomes covered by lint and dust, the robot cleaner may malfunction.
Please use the specified filter.
ÞUse
8
of a different filter will void your warranty.
Before Use
Please clean the robot cleaner after turning it off.
ÞIf
you clean it when the power is on or it is operating, it may cause injury.
Clean the main brush, dust bin, dust filter, and dust inlet periodically.
ÞIf
you use the robot cleaner for a long time without cleaning it, there is the risk of malfunction and damage.
Copyright and instructions
ÞCopyright
© 2014 MONEUAL Inc. All rights reserved.
ÞPublished
March 5, 2014.
ÞMONEUAL,
MONCASO, MiNEW, RYDIS, and SONAMU are the trademarks or registered trademarks of MONEUAL Inc.
in the Republic of Korea and/or other countries.
ÞThis
publication is protected by copyright and all rights are reserved. No part of it may be reproduced or transmitted by
any means or in any form, without the prior written consent of MONEUAL.
ÞDepending
on the model and type of your appliance, some of the contents in this manual may differ from your actual
product.
ÞMONEUAL
Inc. assumes no responsibility for technical or editorial errors or omissions contained herein, nor for any
incidental or consequential damages and failures of the appliance caused by not following the precautions and
instructions.
ÞMONEUAL
Inc. assumes no responsibility for damages resulting from the use of the product that is not approved by
the company.
9
Robot Cleaner
What’s in the Box
Power adaptor
Charger
Power cord
Remote control
(included two AAA
batteries)
Ver 1.0
Robot
Cleane
Quick Start
r
Guide
ME685
Series
Robot cleaner
(1400mA built-in battery)
Side brushes
(1 set)
Cleaning brush
Screwdriver for
Side brush
User manual
Quick start guide
Mop kits
Microfiber Mop Kit
1. Mop plate for a microfiber mop
2. Microfiber mop
ĚThe
appearance and specifications may be changed without notice in order to improve functions or
performance.
10
Before Use
Overview
Robot cleaner
2
ǘTopǘ
1
3
4
ǘRearǘ
6
7
8
1 Control buttons and indicators
2 Dust bin cover
3 Bumper
4 Obstacle and signal detection
sensors
5
5 Air outlet
9
10
6 Adaptor jack
7 Power switch
ǘBottomǘ
13
12
9
8 Signal receiving sensor
11
12
9 Cliff detection sensors
9
10 Charging terminals
11 Wheels
11
11
12 Side brush installation pins
13 Dust inlet
14
15
14 Main brush
15 Mop plate installation holes
11
Robot Cleaner
Control buttons and indicators
11
10
9
1 Start/stop button
2 Power button
3 Cleaning mode selection button
12
8
13
7
14
15
6
5
4
4 Shadow cleaning mode indicator
5 Turbo mode indicator
6 Auto cleaning mode indicator
7 Timer (1 hour) indicator
8 Timer (every day) indicator
9 Threshold option indicator
10 Double Cleaning option indicator
11 Corner Cleaning option indicator
12 Charging mode indicator
1
13 Error indicator
3
2
14 Intensive Cleaning mode indicator
15 Battery level indicator
Charger
ǘFrontǘ
ǘBackǘ
1 Power/charging lamp
2 Guide signal transmission sensor
1
2
3
4
5
6
3 Charging terminals
4 Adaptor holder
5 Adaptor jack
6 Sensor’s signal distance
selection switch
12
Before Use
Remote control
You can conveniently access the various functions of the robot cleaner with your remote control.
Functions that can be controlled through the control panel on the robot cleaner: Auto cleaning, Shadow cleaning,
Intensive cleaning, Corner cleaning, and Charging.
Þ
Functions
that can be controlled through the remote control: Auto cleaning, Shadow cleaning, Intensive cleaning,
Corner cleaning, Double cleaning option, Threshold option, Manual cleaning, Charging, Turbo option,
Reservation cleaning, Mute, and Manual moving.
Þ
1 Power button
Press to turn the power on/off.
Press to return the robot cleaner to operation mode when it has stopped due to
failure.
Þ
1
Þ
2
3
4
5
2 Mode buttonÞPress to select the cleaning mode.
3 Start/Stop button
Press to start the selected operation.
Press to start/stop cleaning and driving.
Þ
Þ
4 Select/Manual button
Press to confirm your selection.
Press to start manual cleaning (see page 28).
Þ
6
7
8
9
11
12
13
14
Þ
5 Direction buttonsÞPress to drive the robot cleaner in manual mode
(forward, backward, left, and right).
6 Charge buttonÞPress to move robot cleaner to charger.
10
7 Intensive cleaning buttonÞPress to start intensive cleaning (see page 25).
8 Corner cleaning buttonÞPress to start corner cleaning (see page 27).
9 Turbo buttonÞPress to select Turbo option (see page 30).
10 Shadow cleaning buttonÞPress to start under furniture cleaning (see page 26).
11 Double cleaning buttonÞPress to select Double cleaning option (see page 31).
12 Reservation buttonÞPress to set the timer (see page 29).
13 Mute buttonÞPress to turn voice guidance on/off.
14 Threshold option buttonÞPress to select Threshold option (see page 30).
13
Robot Cleaner
Installing the Charger
1
Connect the power adaptor.
Þ
Set the robot cleaner detection distance (5 m or 8 m).
Þ
Place the power adaptor in the holder of the charger.
Þ
2
Þ
3
Þ
Check the power connection (blue lamp).
Check the location of the charger.
Clear all obstacles in the area within 1 m
in front, left, and right of the charger
ĚIf
you install the robot cleaner in a place where it will be exposed to direct sunlight, the heat of the sun may
interfere with the auto charging, and the robot cleaner may become discolored over time.
ĚIf
your robot cleaner can’t return to the charger, reset the detection distance.
In
If
14
a narrow area, set it to 5 m, and in a wide area, set it to 8 m.
you set the detection distance to 8 m in a narrow area, the auto charging may be interfered with.
Installing
Installing the Side Brushes
Check for the L mark under the side brush.
Þ
Align with the L mark under the
robot cleaner and install the
L brush.
Þ
Check for the R mark under the side brush.
Þ
Align with the R mark under the
robot cleaner and install the
R brush.
Þ
15
Robot Cleaner
Remote Control
Install the battery into the remote control.
ĚMake
ĚIf
sure to properly orient the + and – poles of the batteries when inserting the battery.
you insert batteries incorrectly, there is a risk of fire or damage to the remote control.
Be
careful if you use non-standard 1.5V batteries, as this may cause damage to the product and its function.
your battery has had a leakage, immediately replace it.
Dispose of batteries according to the local laws and regulations of your region.
If
Inserting batteries into the remote control
16
1
Þ
2
Þ
3
Þ
Remove the battery cover.
Insert the two AAA batteries that came with your robot cleaner.
Replace the battery cover.
Installing
Charging
If you have prepared the charger, main body, and remote control, you must then charge the battery of the robot
cleaner to use it. To charge the robot cleaner, follow these steps:
1
Þ
2
Þ
Turn the power switch on.
Hold the robot cleaner with both hands and put it on the charger.
Match the terminals of the robot cleaner with the terminals of the charger.
Put the robot cleaner in the front center of the charger and push the robot
cleaner toward the charger slowly until the status indicator turns red.
3
Use the robot cleaner after charging.
Þ
It takes about 1 hour to charge the battery fully.
(For 2800mAh battery models, it takes about 2 hours.)
After charging for 1 hour, you can use the robot cleaner in normal
suction mode for about 1 hour. (Depending on conditions,
the battery usage time may vary.)
Battery status indicator Charging
Charging completed
Low battery
Blinking every second
On
Blinking 4 times every second
ĚYou
can charge the robot cleaner using connecting the power
adaptor directly to the power jack on the lower-rear side of
the robot cleaner.
17
Robot Cleaner
Installing the Mop
1
Þ
3
Þ
Attach the mop to the mop plate.
2
Turn the power switch off (on the lower rear side of
the robot cleaner).
Þ
Place the robot cleaner upside down on
a soft cloth and attach the mop plate.
Please attach it so that it fits well into
the holes of the main body.
ĚIf
you apply excessive force to the
mop plate when you install it on the
robot cleaner, the joint parts of the
mop plate may be damaged.
4
18
Flip it over and turn the system power switch on.
Þ
ĚAfter
cleaning, remove the mop plate from the robot cleaner and the mop from the mop plate.
ĚWash
and dry the mop for its next use.
Product Operation
Before You Start
Check the following before you start the robot cleaner.
1
Be careful not to break the robot cleaner when you pull the robot cleaner out of the box.
For information of installing the robot cleaner, see page 14.
2
Check the location (L/R) of the brushes and install them.
For information on installing the brushes, see page 15.
3
Pull the robot cleaner out and manually charge it first.
When you start the robot cleaner for the first time, it may not work, as the battery has probably been
discharged. For information on manual charging, see page 17.
4
Remove any obstacles on the floor.
Remove small objects, clothes, and fragile objects from the floor before cleaning. Fold up lengthy carpet/rug
tassels or keep the robot cleaner away from them.
5
If the dust bin is full, the cleaning performance will be reduced. Emptying the dust bin frequently is highly
recommended.
For information on cleaning the dust bin, see page 33.
6
If there is anything on cliff detection sensors or wheels, remove it.
This may cause failure or malfunction of the robot cleaner. For information on cleaning cliff detection sensors and
wheels, see page 35.
7
Children and seniors may be surprised at the sight of the robot cleaner in operation.
Please let children and seniors know about the operation of the robot cleaner.
8
Be careful not to drop the robot cleaner from a high place.
Do not use the robot cleaner on a narrow and a high place such as a desk, table, etc. If shoes are placed side by side
at the entrance to the living room, the robot cleaner may recognize them as the floor, which may cause falling.
9
10
The robot cleaner cannot climb over a threshold higher than 1cm.
After charging is complete, keep the robot cleaner docked in the charger, or turn the power switch off which
is located on the lower rear side of the robot cleaner.
19
Robot Cleaner
Starting & Stopping Cleaning
Starting cleaning
1
Turn the power switch on.
Þ
2
3
or
4
or
If you are cleaning an area that is difficult to clean using auto cleaning mode, change to the proper cleaning mode.
Þ
Stopping cleaning
After cleaning, the robot cleaner returns to the
charger or stops on the spot according to the
cleaning mode.
If you press the Start/stop (ⶺĦ ) button when the robot
cleaner is operating, the cleaning will be stopped.
or
20
Product Operation
Changing the cleaning mode
User can set the cleaning mode to match the cleaning environment.
Cleaning modes that you can select using the Mode (M) button on the robot cleaner:
Þ
Auto
Cleaning
Shadow
Cleaning
Intensive
Cleaning
Corner
Cleaning
Cleaning modes that you can select using the remote control:
Þ
Auto
Cleaning
Shadow
Cleaning
Intensive
Cleaning
Corner
Cleaning
Manual
Cleaning
Scheduled
Cleaning
ĚYou
can’t change the cleaning mode during operation. Select the cleaning mode before starting the robot
cleaner, or select it after stopping the robot cleaner by pressing the Start/stop (ĚĦ ) button on the robot
cleaner or the remote control, then selecting the cleaning mode.
21
Robot Cleaner
How to Recharge the Battery
Auto charging
W
hen the robot cleaner has finished cleaning, it returns to the charger.
Þ
If the battery is low and the battery indicator is blinking rapidly,
the robot cleaner will stop cleaning and return to the charger to charge.
Þ
Manual charging
H
old the robot cleaner with both hands and put it on the charger.
Þ
M
atch the terminals of the robot cleaner with the terminals of the charger.
Þ
Put the robot cleaner in the front center of the charger and push the
robot cleaner toward the charger slowly until the status indicator
turns to red.
Þ
ĚYou
can charge the robot cleaner using connecting the power
adaptor directly to the power jack on the lower-rear side
of the robot cleaner.
Battery status indicator
You can check the battery status by the battery status indicator.
Þ
Battery status indicator
Blinking 4 times every second
Battery status
Need to charge
Low
Middle
High or fully charged
Blinking 1 time every second
22
Charging
It takes about 1 hour to charge the battery fully.
(For 2800mAh battery models, it takes about
2 hours.)
Þ
After charging for 1 hour, you can use the
robot cleaner in normal suction mode for about
1 hour. (Depending on conditions, the battery usage
time may vary.)
Þ
Product Operation
Auto Cleaning
It is the normal cleaning mode. The robot cleaner cleans all spaces are open.
1
Turn the power switch on.
Þ
2
or
3
4
or
ĚAfter
ĚIf
cleaning, the robot cleaner returns to the charger.
you press the Start/stop (ĚĦ) button when the robot cleaner is operating, the cleaning will be stopped.
If
you press the Start/stop (ĚĦ ) button when the robot cleaner stops, it will start the cleaning again.
In this case, the selected cleaning mode is ignored and the robot cleaner starts a new auto cleaning session.
ĚIf
the mop plate is installed on the robot cleaner, it cleans with suction and mop cleaning modes.
ĚWhile in Auto Cleaning mode, you can also select Double Cleaning Option and Threshold (climb over) Option.
To select these options, please refer to the pages that reference each.
23
Robot Cleaner
Other Cleaning Modes and Options
Cleaning Mode
Function
For Where
How to Select
Intensive
Clean in 1m x 1m area where
the robot cleaner located.
Heavy Dust
Particles or Heavy
Traffic Area
Select Intensive with the Mode
button on the Control Panel or press
the Intensive button on the remote
control
Shadow
Clean in the hard to reach
areas
Under a bed or
furniture
Select Shadow with the Mode
button on the Control Panel or
press the Shadow button on the
remote control
Corner
The robot cleaner runs along
the walls of the current place
where it is.
Anywhere you
want to go
Press Corner cleaning button on
the remote control.
Manual
Control the robot vacuum
cleaner directly using the
remote control
Anywhere you
want to go
Press the Manual button on the
remote control and press the Arrow
button where you want to go
Start cleaning after 1 hour or
at the same time every day
Anywhere you
want to go
Press the Reservation button and
press the Select button on the
remote control
Reservation
Option
Turbo
Threshold
Double
cleaning
24
Function
Applicable cleaning mode
How to Select
Start cleaning with turbo
suction power
All cleaning modes
Press the Turbo
button on the
remote control
Set to be able to climb over a
threshold lower than 0.4 inch
(1 cm)
Except Manual cleaning mode,
other cleaning modes.
Press the Threshold
button on the
remote control
Performs 2 cleaning sessions of
the selected cleaning mode.
Except Manual cleaning and
Scheduled cleaning modes,
other cleaning modes.
Press the Double
CL button on the
remote control
1 cm
Product Operation
Intensive Cleaning
The robot cleaner intensively cleans the surrounding area relative to its current location.
1
2
Turn the power switch on.
Þ
or
3
4
or
ĚIn
Intensive cleaning mode, the robot cleaner stops on the spot after it has finished the cleaning.
ĚIn
the area in which there are many obstacles, the robot cleaner may not operate in normal cleaning modes.
25
Robot Cleaner
Shadow Cleaning
You can clean under your bed or furniture.
ĚTo
use shadow cleaning mode, turn the room light on. In a dark room, the robot cleaner can’t detect the
space under the bed or furniture.
ĚThe robot cleaner moves to a place under the bed or furniture to start shadow cleaning. To reduce the time
spent moving through the room, put the robot cleaner in front of the bed or furniture under which you want to
perform shadow cleaning.
1
Turn the power switch on.
Þ
3
2
Put the robot cleaner in front of
a bed or furniture.
Þ
4
or
or
5
ĚWhen
shadow cleaning is completed, the robot cleaner
comes out under a furniture and stops.
26
Product Operation
Corner Cleaning
The robot cleaner runs along the walls of the current place where it is.
If the robot cleaner takes a turn around the walls or detects the signal of the charger twice, it will finish cleaning.
1
2
Turn the power switch on.
Þ
or
3
4
or
ĚIf
the robot cleaner finishes cleaning, it will return to the charger.
27
Robot Cleaner
Manual Cleaning
You can control the robot cleaner directly using the remote control.
1
Stop the robot cleaner that is operating by pressing the
Start/stop (ĚĦ) button.
Þ
or
2
Press the MANUAL button on the remote control.
Þ
Air suction will start in its current place.
If you press the MANUAL button again, air suction will be
stopped.
3
By pressing direction keys on the remote control, you can
move the robot cleaner where you want it to go.
Þ
ĚDuring
ĚYou
28
charging, you can’t move the robot cleaner manually.
can use this mode when you want to move the robot cleaner without air suction.
Product Operation
Scheduled Cleaning (Reservation Cleaning)
You can schedule the robot cleaner to start cleaning after 1 hour, or at the same time every day.
ĚBefore
You
If
scheduling, you must install the charger.
can only set the cleaning schedule using your remote control.
the robot cleaner is charging at the scheduled time, it will start the cleaning after finishing the charging.
ĚIf
the cleaning time is scheduled to ˄1 hour,˅ the schedule setting will be initialized after completing the
scheduled cleaning at the scheduled time.
ĚIf the robot cleaner is operating, set the time after stopping the robot cleaner by pressing the Start/stop (ĚĦ) button.
1
Select the time (1 hour or every day) by pressing the RESERVATION button on the
remote control.
Þ
Each time you press the RESERVATION button, the ˄1 hour˅Gor ˄every day˅Glamp will
turn on and off, in sequence. If all lamps are turned off, it means the time is not set.
2
Þ
3
Þ
Press the SELECT button to apply the setting.
The robot cleaner moves to the charger, and will start auto cleaning at the scheduled time.
If there is no charger nearby, the robot cleaner will not move to the charger.
If you set it to ˄every day,˅ the robot cleaner will start the cleaning at the same time
based on the scheduled time.
ĚDouble
Cleaning option is not available in Scheduled Cleaning mode.
29
Robot Cleaner
Turbo Option
By pressing TURBO button on the remote controller, you can control Suction power.
or
Power off
Power on
Threshold Option
For less than a 1cm threshold height of threshold or carpet, rug and etc, the user is able to choose Threshold climbing over
ON/OFF option by the remote control.
ĚWe
also recommend that you select the Threshold Option (climb over) ON while in Vacuum Cleaning mode.
ĚFactory
default is set to not climb over.
ĚThreshold
option is not available in Manual Cleaning mode.
1
3
2
2
1
or
3
Power on
30
Climbing over Threshold
Power off
Not climbing over Threshold
Product Operation
Double Cleaning Option
The Double Cleaning Option performs 2 cleaning sessions of a selected cleaning mode.
Press the Double CL button on the remote control to choose a Double Cleaning option.
ĚDouble
Cleaning Option is not available in Manual Cleaning mode and Scheduled Cleaning mode.
31
Robot Cleaner
Language Setting
ĚYou
can select a language for voice guidance from the ones available in the system.
1
2
Press and hold the Mode button,
and then turn the power switch on.
Turn the power switch off.
3
Keep pressing the Start/Stop button until you have
reached the language you desire.
Whenever you press the Start/Stop button,
you will hear the following sentence as a
different language.
- ˈStarting automatic cleaning.ˉ
- ˈCleaning is canceled.ˉ
4
After hearing the language you
desire, press the power button to
complete the language setting.
ĚDepending
on the model, supported languages may vary.
Language
No.
32
English
1
German
2
French
3
Russian
4
Italian
5
Spanish
6
Maintenance
Cleaning the Dust Bin
1
2
Remove the dust bin cover.
Remove the dust bin.
3
4
Empty the dust bin.
Remove the dust filter.
5
6
Replace the dust bin in the robot cleaner.
Replace the dust filter.
ĚMake
sure to follow the directions
carefully when installing the dust bin.
7
Click
ĚTo
clean the dust filter and determine its lifetime,
see page 34.
Replace the dust bin cover.
33
Robot Cleaner
Cleaning the Dust Filter
ĚThe
dust filter can be easily cleaned by gently scraping off the surface or compressed air.
The
It
ĚWe
If
dust filter is reusable.
is recommended not to clean with water.
recommend that you clean the dust filter whenever the bin is more than 2/3 full.
you do not clean the dust filter, the suction power of the robot cleaner can be reduced.
ĚReplace
the dust filter if you notice a tear or a hole.
The
lifetime of a dust filter is about 3 months for normal use, but may vary depending on the frequency and
operating environment.
1
Remove the dust filter.
4 Mesh filter
2 Fine mesh filter
2
3
Clean the dust filter.
(Remove dust from each of the four
filters by blowing.)
Filter cover
1 Pre filter
3 Main filter
Filter case
Assemble the dust filter .
(Assemble four filters as described above)
ĚApplying excessive force will damage the dust filter cover while disassembling the dust filter.
ĚIf you assemble the filter incorrectly, the performance may be degraded or the suction power may be reduced.
34
Maintenance
Cleaning Sensors and Wheels
Cleaning sensors
Clean (blow or wipe) the three sensors with the included cleaning brush or a cotton swab.
Þ
If sensors are severely contaminated, wipe with a moistened
cotton swab.
Do not wipe directly with water, and do not use benzene or
alcohol to clean sensors.
Cleaning wheels
Clean wheels using the brush.
Þ
To clean the front wheel and two main wheels, clean them with the brush while rotating slightly by hand.
Remove foreign objects such as hair that obstruct the wheel’s operation.
35
Robot Cleaner
Cleaning the Dust Inlet
2
1
Remove the dust inlet cover.
3
Remove the main brush.
4
Clean the removed main brush
with the cleaning brush.
5
To reinstall the dust inlet cover, insert the 2 tips to the
matching holes on the robot cleaner.
36
Check the groove’s shape and
insert the main brush into the
fixing hole, and then secure
the wing of the fixing pin to
the fixing pin.
Maintenance
Using and Managing the Battery
The battery is a consumable item. The more you use the battery, the shorter the battery’s lifetime.
Battery lifetime
We guarantee 6 months of use in a normal environment.
Þ
Always charge the battery for the best use experience.
Þ
The battery lifetime may vary depending on the use environment.
Þ
Charging battery
If you are using the robot cleaner for the first time, please fully charge the battery first.
Þ
It takes about 1 hour to charge the battery fully. (For 2800mAh battery models, it takes about 2 hours.)
Þ
To extend battery life
If you don’t intend to use the robot cleaner for an extended period of time, turn off the power switch after charging the
battery fully.
Þ
Clean the dust inlet, dust bin, main brush, and side brushes frequently. If you use the robot cleaner with the dust bin full,
the rotation of the internal motor will be increased, which may shorten the battery lifetime.
Þ
Always use the robot cleaner after charging.
Þ
Do not use the robot cleaner in a place where it will be exposed to direct sunlight or near the heating source.
Þ
37
Robot Cleaner
Battery replacement
If you notice that the operating time has been significantly reduced, you may need to replace the battery.
Þ
You must use a battery that is manufactured by Moneual.
Þ
Remove the battery from the robot cleaner when the system power is off.
Þ
Dispose of your old batteries according to the local laws and regulations of your region.
To purchase an extra battery, please contact our customer service.
Þ
If it is difficult to replace the battery by yourself, please contact our customer service.
Þ
1
2
Turn the power switch off.
Remove four screws and remove
the battery cover.
3
Disconnect the battery cable connector and remove the battery.
(Press and hold the lock clip to disconnect the battery cable connector.)
38
Maintenance
4
Install the new battery
and connect the battery
cable connector.
Replace the battery cover and
tighten with four screws.
Battery handling and safety information
If you leave the fully discharged battery for a long time, the battery may become damaged and you may not be able to
use it.
Þ
If you use a battery other than Moneual’s for use with the robot cleaner, the robot cleaner or the battery may be damaged.
Þ
R
emove the battery before disposing of the robot cleaner.
Þ
39
Robot Cleaner
Voice Guidance
Following voices are the basic voice list. Depending on your model, some contents of these voices may differ from the actual voices.
Voice Guidance
Starting automatic cleaning.
The robot cleaner will start auto cleaning.
Starting corner cleaning.
The robot cleaner will start corner cleaning.
Starting intensive cleaning.
The robot cleaner will start intensive cleaning.
Starting pre-set cleaning
The robot cleaner will start the scheduled cleaning.
Starting shadow Cleaning.
The robot cleaner will start shadow cleaning.
Cleaning is completed.
The cleaning is completed.
Cleaning is cancelled.
When you press the Start/Stop (ĚĦ) button during operating.
Moving toward the charger.
When you press the CHARGE button or the robot cleaner is moving to the charger for
auto charging.
Starting to charge.
The charger will start the charging process.
Starting scheduled cleaning after 1 hour. The time setting is completed for 1 hour later cleaning.
Setting daily cleaning.
The time setting is completed for every day cleaning.
Moving to shadowed area.
When starting a shadow cleaning, the robot cleaning moves to the shadowed area.
Starting a Double cleaning.
When you select the double cleaning option and start secondary cleaning, voice guidance.
Maintenance Messages
Out of battery.
The battery has been discharged.
Dust Bin is missing.
The dust bin has been removed.
Please place the cleaner on the floor.
The robot cleaner has been lifted from the floor.
Please check the wheels.
The wheels are jammed.
Please check the main brush.
The main brush is jammed with hairs or other obstacles.
Please check the side brush.
The side brushes are jammed with hairs or obstacles.
There is an error.
An error has occurred (refer to the error code).
40
Maintenance
Error Message Description
ĚThe
cleaner will display combination of numbers and icons to inform users of what the issue is.
Using the information below, it is important to resolve the issue first as pressing any button will clear the
error message.
ĚIf
the problem has not been solved with one of the solutions below, please contact your customer service.
ĚThe
error voice guidance comes only one time when the error has occurred. You can re-check the error status
by pressing the SELECT button on the remote control when the power is off.
Cause
The battery is fully discharged, so the robot cleaner does not work.
Voice
Out of battery.
Solution
Charge the robot cleaner manually.
Cause
The wheel motor has been overloaded. Some obstacles (hairs, wires, etc.) are
jammed on one or both wheels.
Voice
Please check the wheels.
Solution
Move the robot cleaner to another place. Remove obstacles on the wheel(s).
Cause
The dust inlet fan is overloaded.
Voice
There is an error.
Solution
Remove obstacles in the dust inlet and empty the dust bin.
Cause
The main brush is overloaded.
Voice
Please check the main brush.
Solution
Remove obstacles (hairs, wires, etc.) in the main brush.
Cause
You tried to charge the robot cleaner without the battery.
Voice
No Battery.
Solution
Check if the battery is installed in the robot cleaner properly.
Cause
The battery failure.
Voice
There is an error.
Solution
Contact your customer service.
41
Robot Cleaner
Cause
You operated the robot cleaner without the dust bin.
Voice
Dust bin is missing.
Solution
Cause
Both main wheels have been lifted.
Voice
Please place the cleaner on the floor.
Solution
Escape rough road mode continually occurred in excess of the limit while
moving.
Voice
Please check the front wheel.
Remove obstacles from the front caster and empty the dust bin.
Cause
Bumper crash continually occurred in excess of the limit while moving.
Voice
Please check the bumper.
Solution
Remove obstacles from the bumper and check if the bumper has been dented.
Cause
The robot cleaner has continually detected the risk of falling more than limitation.
Voice
Please check the bottom sensor.
Solution
If the color of the floor is black, move the robot cleaner to another place. Clean or
wipe obstacles from the cliff sensors (see page 35).
Cause
Other error.
Voice
There is an error.
Solution
42
Put the robot cleaner on the floor or move it to another place.
Cause
Solution
Replace the dust bin.
Contact your customer service.
Customer Support
Troubleshooting
Problem
Solution
The robot cleaner does not work.
̞Turn off the power switch on the lower-rear side.
̟Check the battery. Charge the battery in the charger.
The robot cleaner does not charge.
̞Remove any obstacles around the charger.
̟Check if the power cord is connected to the charger.
̠Turn on the power switch at the rear of the charger.
èIf you charge the robot cleaner affectedly, it may not be charged.
The remote control does not work.
Replace the batteries.
Suction power is weak.
̞Clear the dust bin.
̟Clear the filter of the dust bin.
̠Check if there is any obstacle in the dust inlet.
The power is not turned on.
̞Turn off the power switch on the lower-rear side.
̟ Check the battery.
The brush does not rotate.
̞Check if there is any obstacle in the brush.
̟Check if the brush has been installed properly.
The operational noise is louder than
normal.
̞Check if the dust filter is installed properly.
̟Check if there is any obstacle in the brush.
The robot cleaner action is not
working normally during cleaning.
̞Check if the mop plate is installed properly.
̟Clean the sensor with a soft cloth.
The scheduled cleaning does not work.
Press the SELECT button to confirm the time setting.
The robot cleaner does not respond
if you press the button.
When you are charging the robot cleaner by connecting the power adaptor
The operating time is short.
̞If you do not properly connect the robot cleaner to the charger or the
directly, the buttons will not be recognized. This is normal.
adaptor for a long time, the battery may be discharged. In this case, the
battery usage time may be short.
̟Do not disconnect the charger, even if the charge is completed.
̠ If you do not intend to use the robot cleaner for an extended period of time,
turn off the power switch on the lower-rear side.
I can’t control the suction power.
̞If the mop plate is attached to the robot cleaner, you can’t control the
suction power.
̟Clean the mop plate installation holes.
43
Robot Cleaner
Specifications
Robot cleaner
Model
Dimensions
ME670
348 mm (Diameter) x 82 mm (Height)
Weight
2.674 kg
Speed
Cleaning mode: 32 cm/sec., Driving mode: 30 cm/sec.
Operating noise
- Max. 68 dB (1400 mAh battery)
- Max. 70 dB (2800 mAh battery)
Power consumption
- Max. 20 W (1400 mAh battery)
- Max. 25 W (2800 mAh battery)
Battery
Lithium iron phosphate (LiFePO4) 12.8V DC
Dust bin capacity
600 ml
Charging time
- About 60 minutes (1400 mAh battery) - Max. 120 minutes (2800 mAh battery)
Operating time
- About 60 minutes (normal vacuuming and 1400 mAh battery)
- About 40 minutes (turbo vacuuming and 1400 mAh battery)
- About 120 minutes (normal vacuuming and 2800 mAh battery)
- About 80 minutes (turbo vacuuming and 2800 mAh battery)
Charger
Model
MRD6500
Dimensions
264 mm (W) x 179 mm (H) x 134 mm (D)
Weight
606 g
Input Power
18V DC
Output Power
18V DC
Signal Transmission Distance (IR)
5m/8m
Remote control
Model
MRC6500
Dimensions
139 mm (W) x 22 mm (H) x 50 mm (D)
Weight
66 g
Battery
AAA size x2
Signal Transmission Distance (IR)
5m
44
Product Warranty
The warranty service we provide to our consumers is based on the customer compensation regulation. If you request warranty service, MONEUAL will
provide the service. The company will notify the customer of whether he or she will be compensated and the details of the compensation within seven (7)
business days after the day of the customer’s request, and offer the compensation within fourteen (14) business days after the day of notification.
We do not offer any paid/free service for parallel imports.
Product Name
Purchased Date
Month
Date
Year
Dealer
The warranty
period for the
product is two (2)
years, and the
warranty for the
battery is six (6)
months.
Model Name
Serial No.
Price
Free Service
ℓIf products for general users are used for commercial purposes, free service may not be offered.
Compensation details
Type of damages to customers
Within the warranty period
Replace the product with a new one or
offer free service.
Essential repair is required within one (1) month after the purchase.
A replaced product is faulty, requiring essential repair within one (1)
month after replacement.
Malfunctions in
performance and
functions during
normal use within
the holding period
of parts.
Not applicable
Refund the product at the purchased price.
No replacement is available.
Repair is
available.
Malfunctions occur three (3) times due to the same
defects.
Paid repair
Malfunctions occur five (5) times due to different
defects.
The repair company has lost the product for which a repair was
requested by the customer.
Paid repair
Replace the product with a new one
or refund the product at the
purchased price.
Repair is NOT available as no parts for repair are in stock within the
period in which related parts should be stored.
Repair is NOT available.
Refund the product at the fixed
depreciated price after adding 10% of the
fixed depreciated amount.
Refund the product after the fixed
depreciation.
Repair is NOT available although parts for repairing are stored.
Malfunctions
due to intention
or negligence of
customers.
After the warranty period
Replace the product with a new one or
refund the product at the purchased price.
Essential repair is required within ten (10) days after the purchase.
Replace the product after the amount
corresponding to the expenses for paid
repair has been paid.
Replace the product by applying fixed
depreciation, after the expenses for paid
repair has been paid.
Paid repair
Paid repair
Repairs are available.
Paid Service
ℓIf you ask for after-sales service and the product is not found to be faulty, you will be responsible for the service fee. Please read through the User Manual before contacting the
service center.
Malfunctions due to customer negligence
Cases when the product is not faulty
ãMalfunctions caused by incorrect power capacity.
ãMalfunctions caused from external shock or fall.
ãM
alfunctions due to the use of consumables or optional devices not
specified by our company.
ãMalfunctions caused by repair person who is not from the partner
companies specified by our company.
ãM
alfunctions caused by ignorance of the ˈSafety Informationˉ described
in the User Manual.
ãUsers asking for warranty service before fully understanding the User Manual.
ãProblems in external environment, including propagation of radio waves and wired signals.
ãErrors in initial installation for the supplied product.
ãTreatment of filtering and removal of foreign substances from accessories.
ãMalfunctions caused by other companies’ products (including software).
A/S [email protected] l www.moneual.eu
Other cases
ãMalfunctions caused by natural disasters (lightning, fire, salt damage and water damage).
ãThe life of consumables has expired.
Customer Service
[email protected]
Before you call for service, please be ready to
provide the following information:
ˍGModel name
ˍGA description of your problem ˍGPhone no. & address
www.moneual.eu