1
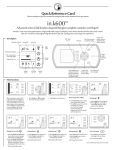
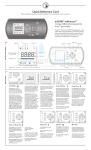
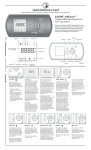
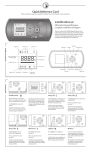
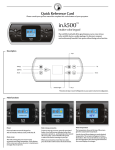
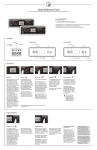
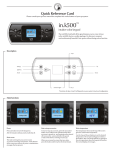
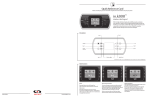
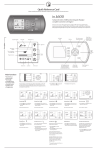
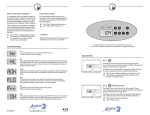
Quick Reference Card
Please consult your spa user manual for complete info on the features of your spa system.
in.k600™
Advanced series of full-function keypads that give complete control to wet fingers!
Aeware's® new series of keypads features a high profile with a large LCD display, menu-driven interface that let users easily control
all in.xm™ functions and programming directly from spa side, creating a true and unique user experience.
Description
Operation Mode
Soft Key 1,
2, 3, 4
Menu title
Lock icon
+ Key increases
parameter setting
OK Key
Mode Key
selects mode of
operation: Spa,
Audio, Options
Light
icon
Information display
Right
Multifunction
Key
Time, temperature
& messages
Pump
icons
Progress bar icon
Status
icons
AM/PM
(˚F/ ˚C)
Left Multifunction
Key goes back to
previous parameter
setting or increases
parameter value
Service
icon
- Key
decreases parameter setting
Next Key goes
to menu page
Main functions
This menu allows control of all
pumps, blower, and spa light,
as well as the activation of the
Economy and Standby modes.
Animated icons are displayed
when devices are on. All pump
activity can be stopped at once
by activating the Standby mode.
• Press Mode key to display
the mode Selection window.
Starting all accessories*
Starting Pump 1
• Press the Quick On/Off button
to start all accessories (pumps
and turbines) in high speed.
• Press the Quick On/Off button
again to stop all accessories
(pumps and turbines). There is
an integrated 120 minute timer.
• Select Pump 1 to turn Pump 1 on.
• Select Pump 1 repeatedly
to control pump 1 speed.
(20 minute built-in timer)
• Select Spa to view Spa menu.
Water temperature settings
Light
• Press Plus/Minus keys to select water temperature setting.
• Press OK or wait 5 seconds
to confirm new setting. The “Set Point” prompt indicates
the desired temperature NOT
the current water temperature.
• Select Light key to turn light on.
• Select Light key repeatedly to
control light intensity. A final
selection turns light off.
Starting Pump 2*
Starting Pump 3*
Next menu page
• Select Pump 2 to turn Pump 2 on.
• Select Pump 2 repeatedly
to control pump 2 speed.
• Select Pump 3 to turn Pump 3 on.
• Select Pump 3 once more
to turn pump 3 off.
• Press Next key to display
the next page in the spa menu.
(20 minute built-in timer)
(120 minute built-in timer)
Goes to blower option
(20 minute built-in timer)
*option available depending upon factory settings
Starting Blower*
Economy Mode
Standby Mode
Displaying time
Viewing active progress bars
• Press Blower to turn Blower on.
• Press Blower once more to turn
blower off.
Lowers the temperature set point
of the spa by 20˚F (11˚C).
Stops all pumps at the same time
by a simple click of a button!
• Select Economy to activate
the Economy mode.
• Select Economy again to override economy programming
(see spa setup section).
• Press Standby to activate
this mode.
• Press Standby again to resume
normal operations.
• Press OK key to display the time.
• Press OK key a second time to
go back to water temperature
display.
A progress bar is a visual indicator
of the time remaining before a
device is turned off . Only one
bar is displayed at the time.
(20 minute built-in timer)
• Use Left or Right keys
to visualize the progress bar
of each activated device.
System automatically returns
to Normal mode after a certain
period of time, unless the Standby
mode has been reactivated.
Spa light will flash for a few
seconds before the exit of
Standby mode and restart the
pumps. The "Standby" message
is also displayed during Standby
mode.
* Pump will stay turned on if there is a request for more heat.
Programming
Programming the spa system
Setting filter cycle start time
Setting cycle duration
Setting filter cycle frequency
Setting Economy mode*
To program the filter cycle, you
must enter these parameters: start
time, duration and frequency.
During a filter cycle, pumps run
for one minute to purge the plumbing, then Pump 1 runs for the
programmed number of hours.
The display will show the starting
hour previously set.
Here we set a value for the filter
cycle duration, in hours and
minutes.
Here we set the number of
filtering cycles that the system will
perfom per day.
•Select Economy
•Use (+) or (-) key to set hour.
•Use Right key to set minutes.
•Use (+) or (-) key to change
minutes.
•Select Next arrow on screen
menu to save changes and go to
the next parameter: filter cycle
frequency.
•Use (+) or (-) key to select
frequency setting.
•Select Enter to save changes
and go back to spa options
main menu.
Setting maintenance reminder
prompts
•Press Mode key
•Select Options menu
•Select Spa sub-menu
•Select Filter option
•Use (+) or (-) key to select hour
setting.
•Use Right key to set minutes.
•Use (+) or (-) key to change
minutes.
•Select Next arrow on
screen menu to go to the next
parameter: filter cycle duration.
Setting Economy status
Setting Economy start time
Setting Economy stop time
•Use (+) key to enable the
economy mode, the display will
show On.
•Use (-) key to disable economy
mode, the display will show Off.
•Select Next arrow to save
changes and go to economy
cycle start hour.
•Use (+) or (-) key to set hour
setting.
•Use Left key to access minutes
option.
•Use (+) or (-) key to set minutes.
•Select Next arrow to save
changes and go to the next
parameter stop economy.
•Use (+) or (-) key to set hour.
•Use Left key to access minutes
option.
•Use (+) or (-) key to set minutes.
•Select Enter option to save
changes and go back to spa
options menu.
Turning reminders on/off*
This menu allows you to activate/
deactivate or simply reset the
maintenance reminder prompts.
•Select Reminder option
•Use (+) or (-) key to activate
or deactivate prompt(s).
•Select Next arrow to save
changes and go to next menu
screen.
*option available depending upon factory settings
Resetting prompt messages
Viewing spa reminders
Spa warnings
Turning warnings on/off
Viewing spa warnings
•Use Left or Right keys to
review one by one all active
maintenance messages.
•Select Enter to reset
message and view next task
or go back to main menu.
The reminder icon will
show up when you have active
maintenance messages.
This menu allows you to view
all active warning messages i.e.
hot water.
•Use Left or Right keys to review
all warning messages.
•Press Mode key again to go
back to main menu.
The warning icon shows up
to prompt you to review active
warning messages.
•Select Warning option
Time setting
Setting the time
Setting hour settings
•Press Mode key
•Select Options menu
•Select Clock setting
•Use (+) or (-) key to set hour.
•Use Left or Right key to access
minutes option.
•Use (+) or (-) key to set minutes.
•Select Enter to go back
to the keypad main menu.
Other settings
To program keypad settings
Setting keypad display options
Adjusting contrast
Adjusting backlight
Normal/Reverse display
•Press Mode key
•Select Options menu
•Select Keypad sub-menu
This sub-menu is used to set
keypad display settings such
as contrast, backlight, etc.
•Select Display options
•Use Left or Right keys to adjust
desired level of contrast.
•Select Next arrow on
display to save changes
and go to next screen menu.
•Use Left or Right keys to adjust
backlight brightness.
•Select Next arrow on
display to save changes
and go to next screen menu.
•Use (+) or (-) key to activate
or deactivate reverse display.
•Select Next arrow on
display to save changes
and go to next screen menu.
Display orientation (inverting)
Setting keypad audio options
Keypad beep on/off
Alarm sound
Setting regional settings
•Use (+) or (-) key to activate
or deactivate inverted display.
•Select Enter option on
screen menu to back to
keypad main menu.
This sub-menu is used to set
keypad audio options such as:
keypad on (key beep)
and alarm.
•Use (+) or (-) key to activate or
deactivate the keypad beep.
•Select Next arrow on
display to save changes and
go to next screen menu.
•Use (+) or (-) key to activate
or deactivate alarm sound.
•Select Enter to save
changes and go back to
main menu.
This sub-menu is used to set
keypad regional settings such as
language, temperature display
units and format for time display.
•Select Sound options
•Select Regional options
Language
Temperature units
Time format
Security options
Partial keypad lockout
•Use (+) or (-) to select from:
English, Français, Español
& Deutsch
•Select Next arrow on display
to save changes and go to next
screen menu.
Water temperature can be
displayed in °F or °C.
•Use (+) or (-) to change setting.
•Select Enter on the screen
menu to save changes and go
back to keypad main menu.
Partial keypad lock: basic functions of the spa remain accessible
(pump and light outputs), but
it is impossible to change the
temperature Set Point, or to enter programming mode. Full lock:
all keys are disabled. When the
keypad is locked, the icon will
be displayed.
•Use (+) or (-) key to select
"Partial".
•Select Enter to go back
to the keypad main menu.
•Use (+) or (-) to change setting.
•Select Next arrow on display
to save changes and go to next
screen menu.
To unlock the keypad:
•Select Mode key
•Press and hold Option key
for 5 seconds
•Select Security options
Full keypad lockout
•Use (+) or (-) key to select "Full".
•Select Enter to go back to
keypad main menu.
To unlock the keypad, press and
hold the Light key for 5 seconds.
System info
Viewing information about
the system
Viewing information about spa
Viewing information on
heater software
Viewing information on
keypad software
Resetting keypad programmed
values
To view spa equipment data
and keypad software version,
and to reset programmed settings
and to upgrade keypad software.
Spa software ID number
and version are displayed.
Heater software ID number
and version are displayed.
Keypad software ID number
and version are displayed.
•Select Next arrow on display
to next screen menu.
•Select Next arrow on display
to next screen menu.
•Select Next arrow on
display to next screen menu.
•Press OK to reset back to default
factory values.
•Select Next arrow on display
to next screen menu.
•Press Mode key
•Select Options menu
•Select Info sub-menu
Upgrading keypad software
•Use OK key to start the upgrade
of the keypad software
•Select Enter to go back
to the keypad main menu
and cancel software upgrade.
© Groupe Gecko Alliance Inc., 2013
All trademarks or registered trademarks
are the property of their respective owners.
Printed in Canada 06-2013
9919-100713-D
Rev. 06-2013
www.geckoalliance.com