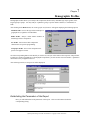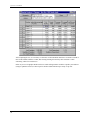
1
Contents
Chapter 1: Getting Started............................................................................... 1
Manual and System User Tips ..................................................................................................... 1
Downloading Data ....................................................................................................................... 3
Qualitap Setup ............................................................................................................................. 4
Chapter 2: What is "Criteria?"........................................................................ 19
Understanding the Criteria Setup Window................................................................................ 19
Building Qualitative Criteria ..................................................................................................... 20
The “And,” “Or” and “Not” Options..................................................................................................21
Other Criteria Setup Toolbar Options..................................................................................................22
Defining the Target Geography ................................................................................................. 22
Saving and Retrieving County/Zip Code Groups..................................................................................23
Chapter 3: Impact Reports ............................................................................ 25
Establishing the parameters of the report .................................................................................. 25
The Impact Report’s Display..................................................................................................... 27
Selecting your Target and Non-target Stations or Newspapers ................................................. 28
Understanding the Impact Report's Graph................................................................................. 28
Printing an Impact Report.......................................................................................................... 29
Chapter 4: Quick Reports ............................................................................... 31
IQP Reports ............................................................................................................................... 31
Multi-Media Rankers................................................................................................................. 36
Media Quintile Reports.............................................................................................................. 38
Shopped vs. Purchased Reports ................................................................................................. 40
Printing Quick Reports .............................................................................................................. 41
Saving Printed Reports .........................................................................................................................42
Opening Saved Reports.........................................................................................................................43
Chapter 5: Rankers ........................................................................................ 45
Establishing the Parameters of the Report ................................................................................. 45
The Ranker Display ................................................................................................................... 51
Printing a Ranker ....................................................................................................................... 52
How to Read a Ranker ............................................................................................................... 53
User Strategies ........................................................................................................................... 55
Chapter 6: Multi-Media Scheduling................................................................ 57
Establishing the Parameters of the Report ................................................................................. 57
Multi-Media Scheduling - Totals Tab ....................................................................................... 62
Scheduling - Radio Tab ............................................................................................................. 63
Scheduling - Television Tab ...................................................................................................... 63
Scheduling - Newspaper Tab..................................................................................................... 64
Global Assign ............................................................................................................................ 66
Weeks ........................................................................................................................................ 67
Printing a Multi-Media Schedule............................................................................................... 67
How to Read a Multi-Media Schedule ...................................................................................... 67
Chapter 7: Demographic Profiles ................................................................... 69
i
Contents
Establishing the Parameters of the Report ................................................................................. 69
The Demographic Profile Display ............................................................................................. 74
Printing a Demographic Profile ................................................................................................. 75
How to read a Demographic Profile .......................................................................................... 76
Chapter 8: Geographic Breakouts .................................................................. 79
Establishing the Parameters of the Report ................................................................................. 79
The Geographic Breakout Display ............................................................................................ 85
Printing a Geographic Breakout ................................................................................................ 86
How to Read a Market Geographic Breakout............................................................................ 87
Mapping..................................................................................................................................... 87
User Strategies ........................................................................................................................... 89
Chapter 9: Cross-Tabs.................................................................................... 91
What is a Cross-Tab?................................................................................................................. 91
Building a Cross-Tab................................................................................................................. 91
Cross-Tab Guidelines ................................................................................................................ 92
Establishing the Parameters of the Report ................................................................................. 92
Identifying the Columns of the Cross-Tab ................................................................................ 95
Identifying the Rows of the Cross-Tab...................................................................................... 96
Combining Categories in Cross-Tabs (Using And/Or/Not options).......................................... 96
The Cross-Tab Display .............................................................................................................. 97
The Different Tabs of Information ............................................................................................ 97
Printing a Cross-Tab .................................................................................................................. 98
How to Read a Cross-Tab.......................................................................................................... 99
User Strategies ......................................................................................................................... 100
Multi-Market Cross-Tab.......................................................................................................... 101
Establishing the Parameters of the Report............................................................................... 102
The Cross-Tab Display ............................................................................................................ 106
The Different Tabs of Information .......................................................................................... 106
Chapter 10: Profiles ..................................................................................... 109
Profile Guidelines .................................................................................................................... 109
Establishing the Parameters of the Report ............................................................................... 109
Selecting the Profile’s Categories (Identifying “what” you wish to know about the target)... 116
The Market Profile Display ..................................................................................................... 117
Printing a Target Profile .......................................................................................................... 118
How to Read a Profile.............................................................................................................. 118
User Stratagies ......................................................................................................................... 119
Multi-Market Profiles .............................................................................................................. 123
Establishing the Parameters of the Report ............................................................................... 124
The Multi-Market Profile Display ........................................................................................... 127
Chapter 11: Printing and Graphing .............................................................. 129
Charting Illustrations ............................................................................................................... 132
Chapter 12: Media Terms and Formulas ...................................................... 135
Media Terms............................................................................................................................ 135
Formulas .................................................................................................................................. 142
ii
Chapter
1
Getting Started
As you work within QUALITAP, on-line help is as close as a click of the mouse. Clicking the Help button, displayed
on the Windows Tool Bar, will bring the Help menu to screen with all available topics from which you may
research. Alternatively, you may press F1 to achieve the same results.
Manual and System User Tips
The following are some other tips that will enable you to move about the system easily and efficiently, and
get the most out of QUALITAP:
•
The setup screen for each program has the option to save the settings by clicking on the Save button.
Give the settings a meaningful description and click OK. To retrieve previously saved settings, click
the Load button.
•
QUALITAP will use the printer selection in Windows. The printer driver must be installed and the
printer must be selected in Windows to be operable within QUALITAP.
•
Options that are grayed-out are not operable.
•
A useful feature of Windows is that you may view several different reports at the same time. This
option, referred to as “Tiling” and “Cascading,” may be accessed on the Windows’ taskbar. Click on
“Windows” and the different options will appear. The following will illustrate the differences in each
option.
Once you click the Windows button, you will see a listing of all viable options. Click on the desired
selection and the results will be displayed on screen.
Cascading option:
This option displays all the different layers of reports available to view. You may click on the on the
header of a report window (the portion which reflects the name of the report and the market/survey being
Qualitap and its designs are marks of Arbitron Inc. Copyright © 2001 Arbitron Inc.
1
QUALITAP User Manual
used) and drag the cursor to move the top report to a different area of the screen.
Tile Vertical Option:
This setting allows you to view all active reports vertically side by side.
Tile Horizontal Option:
This setting allows you to view all active reports horizontally side by side.
Data may be copied to the Windows Clipboard by clicking on a column or the entire report. The
highlighted area can then be copied to the Clipboard by clicking the Edit button, located on the Windows
Tool Bar, then selecting Copy. That information may then be pasted into other software.
Each section in every chapter has a brief walk-through of the basic printing procedure; however, refer to
2
Getting Started
Chapter Eleven for a thorough explanation of the different print options including the “Tag Mode,” “Print
Preview” and graphing options.
You may adjust/resize any report columns by moving the cursor to the column’s header (where the estimate
name is displayed), clicking the mouse button, then dragging the cursor to left or right. (Once the cursor is
in the appropriate position to resize the column, you will see its display change to two vertical lines.) ANY
ADJUSTMENT MADE TO A WORKSHEET’S TABLE WILL BE REFLECTED ON THE
PRINTED REPORT.
Should you have any questions, please contact Customer Service at, 800-543-7300. You may also e-mail
Customer Service at [email protected].
Downloading Data
To download survey into QUALITAP, click Utilities > Download Data. After selecting this option, the Data
Download Wizard opens. This is where you will identify where data will be stored and download all
survey books.
IMPORTANT: If the desired drive is a network drive, the user establishing the data drive for the first time
must have RIGHTS to create files on that drive's root directory.
The Data Download Wizard will walk you through each step of the downloading process.
Identifying Where the Data is…
Step one will be to identify the drive that contains the data disk. Do
this in one of the following ways:
•
•
If the data disk is loaded into drive A, click the Drive A button.
If the data disk is loaded into the B drive, click the Drive B
button.
•
If the data is loaded on a different drive, such as a network drive,
or if downloading from your TAPTEMP download directory, click
the Browse button, identify the drive and directory where the data
resides, then click the OK button.
After you have made the correct response, the system will list all surveys available for downloading in the
middle portion of the Data Download Wizard window. Identify the survey(s) to be downloaded in one of
the following ways:
•
Highlight the survey you wish to download then click the Next button;
•
If more than one survey is listed and you wish to download all, click on Select All, then click Next;
•
If more than one survey is listed and you wish to select multiple books that are listed consecutively
click on the first selection, and while holding down the mouse button, drag the cursor over the other
consecutively listed selections. Click Next once you are done;
•
If more than one survey is listed and you wish to select multiple books that are NOT listed in
consecutive order, click on the first selection, then, holding down the Control key, single-click on
each other desired selection. Afterwards, click the Next button.
The next window is where you identify the type of data being loaded and enter the path where it will be
stored.
3
QUALITAP User Manual
The Store Data portion of the Download Wizard
controls if and, if so, how the data is stored. More
than likely, you will want to keep the default of both
options being selected since this is the most efficient
way to save data and all corresponding files.
Market Organizer
The system installation program defaults to this option being selected. The use of Market Organizer is
strongly recommended for the most successful transfer and organized storage of multiple market’s data.
Market Organizer refers to having all data located in one central directory. Within the TAPSCAN/DATA
subdirectory, each market’s data will be housed in a unique subdirectory identified (named) by the three
unique numerical digits of its market code. If you subscribe to one market, this option should not be used—
remove the check mark.
Store Data
This option lets you store or back-up the actual data file(s) which you are downloading. Using this option
is the exact same as storing data on a data disk; however, instead of using the physical disk, you will be
storing the file(s) onto a drive and directory. Note: This option is for the storage of ratings book files only,
not saved data such as Packages and Orders. Also, these files are stored in the same manner as when they
are shipped (a compressed file). If you use TapConnect and download from the C:\tapcon\download, DO
NOT use that path to store data.
Erase files after download (hard drives only)
This option does not effect you if you are NOT downloading data from another internal drive such as a
network drive or a TapMedia download directory such as TAPTEMP. If this option is activated, upon
completion of downloading data into your TAPSCAN data subdirectory, the system will erase the parent file.
Once you are ready to download the files(s), click Download. The survey(s) will then be copied into your
data subdirectory. Repeat this procedure for all the books and/or markets that you desire to install.
Note: Use the TapMedia button when you want to download new surveys from the TapMedia Web site.
After downloading, click the Refresh button to list the new surveys.
Qualitap Setup
Once you are at the main screen of QUALITAP, click the
QUALITAP:
4
button to enter into the Setup portion of
Getting Started
This area of QUALITAP is where various system settings may be turned-on or off, paths to various data
directories, television and cable programming created and maintained, and several other different options
performed.
You will notice this window has several layers. Click on the tab of the window you wish to be displayed on
the screen.
Download Setup
The Download Setup tab of the Setup portion of QUALITAP is where you will go to download and delete
data.
Downloading Data
To download qualitative data, click the Download button, and the "Download Data Wizard" will appear.
Refer to the previous section (1b.3) in this manual for detailed instructions on using the Download Data
Wizard.
Deleting Qualitative Surveys
To delete a previously loaded qualitative book, click the Delete button. This will bring the “Choose
Market & Survey” menu to screen:
5
QUALITAP User Manual
Highlight the survey that will be deleted by single-clicking on that line, then click the Delete button. The
system will then quickly delete that survey from the data directory.
Mapping Data Path
The mapping data path will be automatically established by the system (example: C:\qtwin\mapdata).
However, if for some reason you need to modify that drive/path, click the Browse button for this field,
then double-click on the desired drive/directory. Afterwards click OK. NOTE: If the mapping data path is
improperly set, you will not be able to generate geographic maps.
User Data Path
This path holds the favorites and saved information for each user. As a rule, you should never have to
change this path. If however, you want to access another user’s directory, click on the Browse button and
then double-click on the desired directory. Afterwards click OK.
Default Settings
Click this tab, and the following options will be displayed:
These options will effect the way some data and system functions are displayed. To activate any of these
options, simply click on the corresponding box. If an “X” appears in a box, the option is activated (turned
on). After changes have been made at this menu, it will be necessary to re-start QUALITAP in order for the
changes to be applied.
Multiple User
Configures the system to accommodate multiple users. This means that upon entering the system, a menu
will be displayed listing all system users. The current user must then select his or her name before being
taken to the QUALITAP Main Menu. Once you turn on this option then click the OK button, the QUALITAP
User Sign On window will appear.
6
Getting Started
At this window, you will perform all maintenance to the user database. Use the corresponding button on
the right of the window to accomplish the different functions.
Add
Allows you to add new users to the system. Click this button and the QUALITAP User Info window appears.
Enter the name of the user, press the tab key, and enter the initials of this user. Once the information is
complete, click the OK button. Clicking Cancel will bring you back to the User Sign On window with no
new information entered.
Change
To edit a previously entered user entry, highlight that line, then click this button. The User Info window
will appear where you will make any needed edits. Highlight the line to be changed, enter the new
information, then click OK. Clicking Cancel will bring you back to the User Sign On window with no
changes made.
Delete
To delete a user from the system, highlight that line and click this button. The system will ask you to
confirm that you wish to delete this user. Select Yes to confirm; clicking Cancel will bring you back to
the User Sign On window without deleting the user from the system.
Once you have finished making all modifications to the User Database, click the OK button. Clicking the
Cancel button will bring you to the QUALITAP Main Menu with no changes, additions or deletions made to
the system.
Use Combos
If you wish to activate radio station combos which may be created throughout the QUALITAP System, click
this button. The result will be the radio roster's default will include all created combos, as well as all "uncomboed" stations.
Exit Message
This option disables the "Are you sure you wish to exit QUALITAP " message which is displayed upon
selecting the Exit option on the QUALITAP Tool Bar. This means that after you select Exit, whether on
purpose or accidentally, you will be taken immediately out of the QUALITAP System; all unsaved work will
be lost.
7
QUALITAP User Manual
Opening Screen
Determines is the QUALITAP “splash” screen is displayed upon initializing the system.
Tip of the day
If this option is turned on, each time the system is initialized, a useful system tip will be displayed.
Chart Mode
If you wish for the system to default to displaying each report's data in a graphical format, click this button.
You may toggle back to the ranker format throughout the system by clicking the Chart option, located on
the Windows' Tool Bar.
Maximize on Startup
If this option is activated, the system will open to a full screen display when initialized, rather than a
smaller window display.
Select All by Default
You can turn off the system's default which selects all media items (radio stations, TV/Cable programming,
newspapers) for inclusion on the report by marketing this box. If this options is turned off (not marked),
when you enter the portion of the report's setup menu where you select what items will be included on the
report, rather than all items being automatically selected, no selection will have been made.
Tool Bar
•
Show text - Controls whether or not text definitions are displayed on each button of the QUALITAP
Tool Bar.
•
Show toolbar - Controls whether the QUALITAP Tool Bar is displayed along with the traditional
Windows' Tool Bar, or if the Windows' Tool Bar is displayed by itself.
Inventory Maintenance
This is the area of the system where you will create, customize, store and maintain all broadcast and cable
programming. Once you click this tab, the following display will appear:
8
Getting Started
Market / Survey
This option lets you re-select the market and/or the qualitative survey being used. Once clicking on this
button the “Choose Market and Survey” menu will then be displayed where you will see the current market
and qualitative survey being used, the current data path, the available markets, and the corresponding
surveys from which you may select.
•
To change the data path, click the Browse button, then double click on the appropriate drive and path
of that new path. Click the OK button once complete, or simply press Enter.
•
To select a market and/or qualitative survey, highlight that line, then click the OK button; alternatively,
you may simply double-click on the market/survey line.
Nielsen Path
If you are using Nielsen data in conjunction with the qualitative data, you may select that survey (book) by
clicking on this button. Selecting a Nielsen book will result in adjusted estimates displayed in addition to
the “pure” qualitative numbers.
After selecting the Nielsen Survey button, the “Choose Market and Survey” window will be displayed. This
screen reflects the current market and qualitative survey being used, the current data path, the available
markets, and the corresponding surveys from which you may select. To change the data path, click the
Browse button, then double click on the appropriate drive and path of that new path. Click the OK button
once complete, or simply press Enter. To select the market and/or Nielsen survey, highlight that line then
click the OK button; alternatively, you may simply double click on the market/survey line.
TV Inventory
This area of QUALITAP is very important since it is here where you will create, store and manage all TV and
Cable programming (inventory) for use throughout the QUALITAP System. If you do not wish other
users to have access to this portion of the system, you should establish a system
password.
The “Inventory Database” will be displayed after you select this button which will list all previously stored
programming:
The programming database is divided into the following four columns, each reflects critical information
about each programming component:
9
QUALITAP User Manual
Station
This field indicates the station on which the program airs. To edit this setting, double-click on the
appropriate line and the Qualitative Stations menu will be displayed:
To re-select the station choice, highlight that station, then click the OK button.
Program
This is the title of the program (label). To edit this setting, double-click on that field, then enter the
appropriate text. You may customize program names of up to 20 characters. Press Enter once the correct
title has been entered.
Time Definition
This box displays the day/time components of the program. To edit this choice, double-click on that line, and
the Time Definition box will be displayed:
If you wish to edit a previously entered time component, highlight that field, then click the Edit button; or
you may double-click on that field. If you have added an additional line(s) of programming to the
program's time definition, but now wish to delete that line, highlight that entry and click the Delete button.
(The Delete button stays dimmed until multiple lines of programming have been entered.) The result in
having multiple time entries will be an AVERAGED (not aggregated) estimate. You may add an additional
"layer(s)" of time to this program by clicking the Add button. (See the following section on a walkthrough of adding a time period.)
Rate
This reflects the cost to an advertiser if a commercial is aired during the program. To edit this entry,
10
Getting Started
double-click on the line, then enter the appropriate rate. Press Enter once the correct edit has been entered.
Buttons on the Programming Database
Use the buttons displayed at the top of the database to perform various functions.
Add Inventory
This is where you will create additional station programming for storage within the TV Database. This
programming will be used throughout the QUALITAP System. After you click this button, the “Add
Qualitative Inventory” box will appear:
Here, you will define all pertinent information about this program. Click on each of the displayed buttons
to accomplish this.
Station
This field indicates the station on which the program airs. To select the stations, double-click on
the appropriate line and the Qualitative Stations menu will be displayed:
To select the station choice, highlight that station, then click the OK button.
Time Definition
This box displays the day/time components of the program. Double-click on this button and the
Time Entry box will be displayed:
11
QUALITAP User Manual
First you will need to identify the day(s) the program airs. To do this, drag the cursor over the
consecutive days of the week until the correct components have been shaded. If this program only
airs on one day of the week, simply highlight that day.
Next you will need to identify the starting and ending times of this program. You may do this in
one of the two following ways:
•
Click on the arrow keys of the Start and End Time boxes, then single-click on the appropriate
choice;
•
Place the cursor in the Start/End Time boxes, then manually enter the correct time. You will
enter this in the following manner:
7a (7am)
830p (8:30pm)
12a or 12m (12 Midnight)
615a (6:15am)
Click the OK button once you have made your entry, and you will be taken to the Time Definition
box:
You may add an additional "layer(s)" of time to this program by clicking the Add button, then add
the additional component as you did the initial entry. The result in having multiple time entries
will be an AVERAGED (not aggregated) estimate. If you have added an additional line(s) of
programming to the program's time definition, but now wish to delete that line, highlight that entry
and click the Delete button. (The Delete button stays dimmed until multiple lines of
programming have been entered.)
Click the OK button once all time entries have been completed, and you will be taken back to the
Add Qualitative Inventory window where all information you have entered will be displayed:
12
Getting Started
If you have multiple lines of time entries, you will see a plus sign (+) to the right of the displayed
time entry, noting that additional time entries are attached.
Now you will be ready to enter the name of the Program. Click the Program button and then
enter the appropriate text. You may customize program names of up to 20 characters. Click OK
once the correct title has been entered and you will be taken back to the Inventory Database
screen. The new entry will be listed at the end of the programming list. You may then attach a rate
to the program's line if desired by double-clicking on that program's Rate column.
Delete
This option allows you to delete previously entered programming from the Inventory Database.
Step one is to highlight the line that is going to be deleted. (It does not matter which column is
highlighted.) Next, click the Delete button. The system will then ask you to confirm that you wish to
delete the specified program. Click Yes to confirm; clicking No will bring you back to the Inventory
Database window without deleting the program.
Save
Automatically saves all modifications that have been made to the TV/Cable Inventory.
Sort Options
Click this button to re-sort the order in which programming/dayparts are listed. After you click this button
the Sorting Options window will appear:
Select the sort choice you wish to activate and click the OK button; or simply double-click on your
selection. You will then be taken back to the Inventory Database.
Re-compute Items
After changes have been made to the Inventory Database, it is important to re-compute the inventory
information so that all edits and modifications are properly stored. Depending on the amount of programs
that you have stored, this process only takes a few seconds.
13
QUALITAP User Manual
Inventory Import
The import inventory feature is useful when you custom create a lot of your own programming in inventory
and you receive a new survey. Instead of having to re-create all of the custom programs again, you can
simply import the inventory from your previous survey to the latest survey.
To import inventory:
1.
Click Setup.
2.
Select the Inventory Maintenance page tab.
3.
Click the Market/Survey button and select the survey containing your custom inventory.
4.
Click the Inventory button to verify that this inventory is the inventory that you want copied.
5.
Click Import Inventory.
6.
Select the survey that you want to copy the inventory to.
Password
This option will allow you to enter a password for your Inventory Database, so that only those users who
have rights to make modifications to the stored programming will have access to this area. The “System
Password” window will appear. Click the Password field, then enter the word you would like to establish
as the system password. Afterwards, click the Confirm Password field, and re-enter the same word. Click
the OK button once you are through. To cancel your entry, click the Cancel button
Click the OK Button once all changes have been made to TV/Cable Inventory Database. The system will
confirm you wish to save your work. Confirm by selecting Yes, and you will be brought back to the TV
Inventory window.
Favorites
This option allows you to select Radio, TV/Cable and Newspaper favorites so that reports will have
customized definitions. Click on this tab and the following window will appear:
This is where you may establish optional system defaults that will customize some of QUALITAP's reports
14
Getting Started
by using the selected or “favorite” radio, TV/Cable station or newspaper as the example used within the
report's definition located in the footer portion of the report. You may select a favorite radio station, time
period/station (TV/Cable) and newspaper.
To establish a favorite, highlight that field. A drop-down menu will then be brought to screen. To select a
favorite, click on that line. To scroll through the different selections, use the up and down arrow keys
located on the right of the drop menu. After you have made your selection, click the Use favorite box.
An “X” in the box indicates the favorite is activated.
Report Setup
This is where you will set system settings that will allow you to customize all report printouts. Click this
tab and the following window will appear:
The default printout
will have all column
headers with a black
background. To change
to a white background,
check the first box in
this section of the
Report Options box
(“ Check this box to
create reports without
black backgrounds” ).
15
QUALITAP User Manual
This report does
not have the
black background
header fields.
Check this box to create reports without black backgrounds
The default printout will have all column headers with a black background.
background, place an "X" in this box.
To change to a white
Non-Graphical Reports
If you wish to print reports in a format where all graphical displays are removed, select this box. This
format promotes clear and clean faxing.
Split Reports
Turning on this option will allow you to display a graph and report table side-by-side on the printout.
NOTE: When this option is activated, you will not see any visible changes on the computer screen; this
report format will only be realized when you Print or Print Preview.
Steps to activate this option:
Generate a report, for example, a Radio Ranker. Once the report is on screen, click Chart, and select the
graph you wish to use. Once the graph is on screen, make any modifications you wish to apply such as
patterns or customized labels and title. Click the Print button. If you wish to see how the report will look
before actually printing the report, select Print Preview.
Landscape
If you want to print a report in a landscape format, mark this box. A printed report in this format has the
space to display more estimates than one generated in the portrait mode.
Logos Data Path
If you wish to use your company’s logo on printed reports, rather than the QUALITAP logo, set the path to
that BMP file by clicking the Browse button.
Report Headers
These two options will allow you to toggle between the standard QUALITAP report header, and your own
customized header.
16
Getting Started
To have the standard header with “QUALITAP” in the upper left corner, click the Standard report
header field. If you wish to customize the header with your own logo, click the Custom header field,
then select the BMP by clicking on the arrow button in the field directly below.
Special Reports
This tab allows you to print a catalog report of your qualitative database or Prizm methodology statements
with any Prizm-based report.
Catalog
This option allows you to print a listing containing all classifications, categories and/or selections available
within the qualitative database. Designate how much of the database labels will be printed by placing an
“X” in the Classifications field (prints only a listing of classifications), Classifications/Categories field
(prints both classifications with the corresponding categories for each) or
Classifications/Categories/Punches (the entire database).
Prizm Methodology Report
If you use Prizm data with national data and would like to include a methodology statement with your
reports, place an “X” for Always print this report option. Whenever you print a report including Prizmbased data, an explanation of how the adjusted numbers were contrived will be printed on a separate sheet
to present with your reports.
17
Chapter
2
What is "Criteria?"
Throughout QUALITAP, screens and printed reports will continually mention “Criteria.” This refers to the targeted
group of people who you are analyzing as the focus of each report. Assigning qualitative criteria will immediately
change and re-define the universe on which data will reflect; therefore, it is imperative that criteria are prepared
properly. The following illustrates the importance of setting-up criteria in the proper manner.
Let’s take a look at the following criteria:
In this example, the criteria being used is “people who live in the DMA and have used either a MasterCard or a Visa
within the past three months.” Any report generated using these criteria will reflect common characteristics of this
group of people only.
Now take a look at the next example:
You will notice that the different lines within the criteria box appear to be identical in the two boxes; however,
notice the respondent count (displayed in the upper right corner) has dropped from 666 in the top box to 122 in the
lower box. The reason for this variance in the respondent count is that the latter box’s criteria has been changed
slightly; we are now focusing on “people who live in the DMA and have used BOTH a MasterCard and Visa within
the past three months.”
Since the QUALITAP System is respondent-base driven, small variances can make crucial differences when preparing
criteria. So read the following for exact instructions on the “hows” and “whys” of building your qualitative target.
Understanding the Criteria Setup Window
Once you enter the criteria setup area of QUALITAP, the Criteria Setup window will appear displaying the
pertinent quadrants of information:
Qualitap and its designs are marks of Arbitron Inc. Copyright © 2001 Arbitron Inc.
19
QUALITAP User Manual
The Criteria box displays all facets of the criteria that have been identified thus far. It is also in this area
that the respondent count will be displayed along with the traffic light that will signal when the respondent
base needs to be broadened. The Criteria box indicates “who” will be the focus of the report.
The Classification window displays the different broad characteristics available such as marital status,
income characteristics and automobile ownership. Think of classifications as the topic of the question
being asked. Classifications contain categories.
The Category portion of the Criteria Setup window is comprised of two components. The top area displays
the question(s) contained within that category. The bottom box displays the answers to the corresponding
question.
When selecting criteria, keep this information in mind: A Classification is the topic of the question, such as
“Shoe stores shopped within the past three months.” The top portion of the Category contains the question
asked about the topic, such as “Which shoe stores did you shop within the past three months?” The bottom
portion of the Category equation contains the answers to the question from which you may choose, such as
Sears, Wal-Mart, K-Mart, JC Penney, and so forth.
Building Qualitative Criteria
The first step in building criteria is to identify the desired classification. Do this by clicking once on that
line to select the classification. To scroll through the various classifications, use the up and down arrow
keys, located on the right side of the classification window.
Once you have made your classification selection, you will see the category fields will reflect those
qualitative aspects that are contained therein. Now select the category question (top portion of the category
box) which contains the qualitative characteristics you wish to include in the qualitative definition. Once
the lower category window displays the desired criteria, you will be ready to make the actual criteria
selections. Do this in one of the following manners:
20
•
Double-click on the desired qualitative line;
•
Drag the cursor over a group of selections, then click the Add button.
What is "Criteria?"
After you have made the initial criteria selection, the Criteria box will reflect that selection. If you are
through defining the target group of people, click the OK button; to continue to define your target, you will
use the “And,” “Or” or “Not” options.
NOTE: When selecting the categories for inclusion on Profiles—or the Rows and Columns in Cross-Tabs,
you can select the total group of categories contained within a classification by simply doubleclicking on the desired classification line. All corresponding selections will then be copied to the
Selected Categories window. For example…if you wanted to select all department stores for
inclusion on the report's categories, simply double-click on the Department Stores classification
line.
The “And,” “Or” and “Not” Options
Three key buttons located at the bottom of the Criteria screen are the “And,” “Or” and “Not” buttons:
When adding additional lines of criteria to the initial selection, these options allows you to properly identify
the target. There are great differences in each so it is imperative you use each correctly.
The “And” Option
Lets you further define your target criteria, reducing the number of respondents. Adding an “And”
statement to existing criteria will make your target more specific; therefore, will reduce the number of
respondents. For example, if I have selected "HH income of $75K or higher" as my first line of criteria
and now wish to add "And owns a home," I am now looking at a more exact group of people since to
be included on the report, the respondent must not only have a household income of $75,000 or higher,
but must also own a home. Keep your eye on the traffic light located in the top right corner of the
screen. (See the following page for a complete explanation of the traffic light’s functions.)
To add an And statement, click the And button, then select the additional criteria in the same manner
as you did the initial line of criteria. You will then see the added qualitative definition(s) displayed in
the criteria box, and the number of respondents (more than likely) reduced.
The “Or” Option
Lets you broaden the qualitative scope, which increases the number of respondents. When you add an
"Or" statement to existing criteria you are broadening your target; therefore increasing the respondent
base. For example, if I have selected "HH income of $75K or higher" as my first line of criteria, and
now wish to add "Or owns a home," I am now looking at three different groups of people:
• People who have a household income of $75,000 or higher;
•
People who own their home;
•
People who have a household income of $75K or higher AND own their home.
To add an Or statement, click the Or button, then select the additional criteria in the same manner as
you did when selecting the initial criteria. You will see the added qualitative definition(s) added to the
criteria box, and the number of respondents (more than likely) increased.
21
QUALITAP User Manual
The “Not” Option
The NOT button allows you to add a line of criteria that you do NOT want your target to achieve. The
following is an example of how this option may be used:
Suppose I wanted to target “people who have bought furniture within the past three months, but not a
Smith’s Furniture.”
Step one would be to identify the first line of criteria. In this circumstance: “People who have
purchase furniture in the past three months.” Next, I would click the NOT button, then select
"Shopped Smith Furniture in the past three months." The criteria would then indicate the group of
people being analyzed as people who bought furniture in the past three months, but, since they have
not shopped at Smith Furniture in the past three months, NOT at furniture at Smith Furniture.
Once again, keep an eye on the traffic light, displayed in the top right corner of the screen.
NOTE: Radio, Television and Newspaper categories may be selected as part of criteria choices. This
means you can select media-focused criteria such as "Viewers of KAAA's 6PM News," or
"People who listen to Radio Station WZZZ." In addition, using the "And," "Or" and "Not"
options will let you build a more targeted criteria base. For example, you can now profile: people
who listen to WZZZ AND subscribe to basic cable, people who watch KBBB Prime Time OR
KBBB Early Morning and people who view KAAA's 6PM News and have NOT watch KBBB's
6PM News”
The Traffic Light
The Traffic Light will be green when your respondent base is large enough to calculate estimates
accurately. The light will change to yellow when the respondent base is low; however, the system will
allow you to continue with the criteria. If the respondent base drops below 35, the light changes to red,
and you will not be allowed to continue until you broaden the respondent base.
Other Criteria Setup Toolbar Options
Other options available on this toolbar will enable you to perform various functions:
Reset clears your selections in the Criteria box.
Load allows you to retrieve previously saved qualitative criteria.
Save allows you to save criteria so that you may use it again. The custom description you assign to the
criteria will print in the header portion of the report.
Geo is where you go to define the geographic area to be analyzed. (See below for a detailed explanation.)
Delete lets you delete a qualitative statement from the defined criteria, highlight the un-needed line in the
criteria box, and then click Delete.
Once you have selected your criteria, click the OK button.
Defining the Target Geography
There are two ways which you may enter the portion of the QUALITAP System where you will establish the
geographic universe for the analysis at hand. It does not matter which way you choose to define the
22
What is "Criteria?"
geography since both have the same effect.
•
At the Criteria Setup window, click on the
•
Click the
(Geography) button;
button listed at the report’s setup screen.
After accessing either of these buttons, you will be brought to the Geographic Definition screen:
In the Available Survey Areas box, double-click on the area you wish to use (i.e. DMA or Metro). If you
wish to select specific counties or zip codes as the report’s geographic benchmark, single-click on the
appropriate button. This will bring the components of that selection to the lower left box, along with the
number of respondents each contains. You are now ready to select which counties or Zip Codes you wish
to include. You may do this in one of the following ways:
•
Double-click on each component;
•
Drag the cursor over a group of selections, then click the Add button.
As you make each selection, you will see that component(s) move to the right box, indicating it has been
selected. If you wish to remove (deselect) a previously chosen component(s), highlight that selection, then
click the Remove button. It will then be moved back to the left box.
The respondent count in the bottom right corner will reflect the number of actual people who live in the
respective county/zip code and participated in the actual survey. The respondent count must be 35 or above
to be operational.
Saving and Retrieving County/Zip Code Groups
If you would like to save a selected group of counties/zip codes, identify all components to be saved, then
click the Save button. The system will then prompt you to enter a description for this geography. Click
the OK button, and you will be brought into the Description field where the cursor will be in the open edit
mode. Now type a description for this geographic area, and press Enter, or click the OK button.
To retrieve saved criteria, click the Load button at the Geography Definition screen. The system will
23
QUALITAP User Manual
display all previously saved geographic definitions. Double-click on the desired area, or highlight that line
and click the OK button.
24
Chapter
3
Impact Reports
Impact Reports allow you to discover duplication and non-duplication for your qualitatively targeted demographic
against any combination of other like media, for a single market. You can analyze the duplication within Radio,
Television, or Newspapers by selecting New > Impact Report from the File Menu.
Note: Unlike other modules, there is no button provided for the Impact Report. To start an Impact Report,
you must select it from the file menu.
After selecting an Impact Report from the File menu, the Radio Impact Report Setup window opens. Click each
button to setup the parameters of your report.
Establishing the parameters of the report
Click on each of the different buttons to establish the Impact Report’s parameters:
Market/Survey
This field will reflect the current market and qualitative survey being used. Clicking on this button will
bring to screen the current data path, the available markets, and the corresponding surveys from which you
may select. To change the data path, click the Browse button, then double-click on the appropriate drive
and path. Click the OK button once complete, or simply press Enter.
To select a market and/or qualitative survey, highlight that line, then click the OK button; alternatively, you
Qualitap and its designs are marks of Arbitron Inc. Copyright © 2001 Arbitron Inc.
25
QUALITAP User Manual
may simply double-click on the market/survey line.
Geography
Here you will define the geographic area (universe) which will be used in the report. The system will
default to the DMA Survey Area. If you wish to keep this setting, you do not need to click the Geography
button. To redefine the geographic focus of the report, click this button. Please refer to Chapter Two for a
complete walk-through of defining a geographic area.
Demo
The system's demographic default is Adults 18+. If you wish to keep this demographic selection, you do
not need re-select it. To set the demographic focus of this report, click this button. The “Demo Selection”
screen will be displayed. Identify the desired demographic in one of the following ways:
•
Click on the desired gender, starting and ending age cells, then click the OK button;
•
Double-click on the demo among the listed demographic targets in the Favorite Demos window.
To save a defined demographic target to the Favorite Demos box so that you may retrieve it at a later time,
define the gender and age, then click the Add to Favorites button.
Combos
To create and maintain station combos, click the Combos button. After activating this option, the “Combo
Maintenance” screen will appear. At this screen, all previously created station combos will be listed in the
Combos box, with the corresponding station components for each combo listed in the Stations box.
To add a combo, click the Add combo button. This will bring the “Create a Combo” box to screen. You
will define the new combo in one of the following ways:
•
Click on the desired station, then click the Add button;
•
Double-click on each desired station;
•
Drag the cursor over a group of stations, then click the Add button.
Once you have identified all of the combo's components, click the OK button. If the station selection is
more than 30 characters long, you will be prompted to enter a Combo name. Type in that text, then click
the OK button. (You may customize any combo's name by clicking on that combo, highlighting the combo
name field and entering the revised name.)
To delete a previously created combo, highlight that combo, then click the Delete combo button. If you
would like to edit a combo, click on that line, then select Edit combo.
Clicking on the Options button will bring the different combo options available: “Display combos and
components,” and “Display combos only.” If you select “Display combos and components,” data will be
displayed for both created combos and each individual combo component (station). Choosing the latter
will result in data displayed for combo and non-combo stations only, suppressing the display of the
individual combo components.
For combos to be displayed on the report, make sure you click “Use Combos for this run.” If the “No
combos for this run” box is selected, combos will be suppressed from the report.
Once all combo maintenance is complete, click the OK button.
26
Impact Reports
Stations
This is where you will select which stations will be included on the report. The system will default to all
stations being selected. If you wish to keep this selection, you need not enter this portion of QUALITAP. If
you would like to narrow the stations to be displayed on the report, click this button, and the “Stations
Selection” menu will be displayed, or you can select the stations while viewing the report.
You will see all stations have been placed in the “Selected” box. To clear the selection, click the Clear
button. To select the stations that will be included on the report, do one of the following:
•
Double-click on the desired selection;
•
Click on the desired selection, then click on the Add button.
•
Drag the mouse over a group of selections, then click the Add button.
As you make each choice you will see each identified station moved from the Available pool into the
Selected pool, indicating each will be included on the ranker. You may use the Search option to search
the station rosters for specific call letters. Select All will quickly move all stations from the Available box
to the Selected box, indicating all have been selected for inclusion on the ranker.
If you have selected a station for inclusion on the report, but would like to remove it from the Selected
pool, simply highlight the station and click Delete. It will then be moved back to the Available box.
Also, you can save groups of radio stations for future retrieval at this screen. To save a media group, after
you have made the desired selection, click Save, give the group a name, then click OK. You will then be
able to retrieve that group with the Load button.
Once your station selection is complete, click the OK button.
Once all the parameters are properly setup, click OK and you will advance to the Radio Impact Report
Display.
The Impact Report’s Display
Once the Impact Report is displayed, the stations you selected are listed to the left and a chart is shown on
the right.
27
QUALITAP User Manual
You can view
the percentages
or persons by
selecting it
here.
Here is the
Target Station.
These are the
selected stations.
Selecting your Target and Non-target Stations or Newspapers
1.
Select the station you want to target from the station dropdown menu. This station is singled out from
your other selected stations to show the Persons who exclusively listen to your target station and meet
your demo, criteria (optional), and daypart requirements.
2.
The station list displays the stations you chose when setting up the impact report. The selected stations
(highlighted in dark blue) are compared to your target station to see if they meet your requirements,
and if each station has a shared audience with the target station. Select the stations that you want to
compare against your target. Each time you select a different set of stations, the Impact Report
recalculates and displays the new information.
Understanding the Impact Report's Graph
The default graph is a pie chart with three separate, colored pieces that display the target, duplicated, and
non-target audiences. The graph can show either Percentages or Persons numbers by selecting the option
from the mode box. To view a different graph, select one from the Chart menu or with the right-click of
your mouse.
28
Impact Reports
Printing an Impact Report
The Impact Report prints similarly to its appearance on your monitor. When your criteria or non-target
station list is longer that what can appear on one page, an additional page is printed. For a detailed walkthrough of all printing and charting options, please refer to the “Printing and Graphing” chapter.
To print the report:
•
Click the Print button, located on the QUALITAP Tool Bar.
•
Click on the File button, located on the Windows Tool Bar and then select the Print option.
You can then choose to preview the report to see how the printout will look once the report is generated by
clicking Print Preview, or directly print the report by clicking Print. Note: In Print Preview, the Options
Dialog is not available.
29
Chapter
4
Quick Reports
Quick Reports save you time by including graphs automatically and presenting them on the screen in the format that
they will appear when you print them out. When you know who you're targeting, you can enter the criteria (who the
report is for): a market, client, category or media audience. With this information, you can determine more about the
people who meet your criteria. For a general overview of the market, leave the Criteria field blank. Each of the
following four modules provides a different insight.
IQP Reports - basic lifestyle characteristics such as sex, age
levels, employment status, occupations, household income,
education, number of children and home ownership
Multi-Media Rankers - media usage rankings for radio and
television stations and newspaper publications by market
Media Quintile - helps determine how much your clients and
prospects' customers use specific media.
Shopped vs. Purchased - where consumers go to shop and how
likely they will be to make a purchase
NOTE: If Qualitap has been configured for an Advertiser, the Multi-Media Rankers and Media Quintile
buttons will not appear on the screen. You can access these reports from the File > New menu.
IQP Reports
Instant Qualitative Profile Reports produce a graphical printed report listing several pre-selected, general
categories profiling the market, radio stations, television/cable programming or newspapers. These reports
produce the same information as with the Profile program, but are quick to access and print and are set up
in an easy-to-read format with eye-catching clipart for key categories.
The categories included are age, sex, income, employment status, occupation, education, number of
children and home ownership.
After clicking the IQP button, the Target Profile Menu will be displayed.
Qualitap and its designs are marks of Arbitron Inc. Copyright © 2001 Arbitron Inc.
31
QUALITAP User Manual
IQP Total Market - profile a specific qualitative group
of people, regardless of media habits. You may also
profile an entire geographic population without setting
any qualitative parameters.
IQP Radio Report - profile a specific radio station's
audience with or without qualitative measures.
IQP TV Report - find common characteristics of a
qualitative or non-qualitative TV/Cable audience.
IQP Newspaper Report - uncover the lifestyle
characteristics of a newspaper's readers.
After you select an IQP Report, you will be taken to the Instant Qualitative Report Setup screen:
Establishing the Parameters of the Report
Here you will establish all the parameters of this report. Click on each button to define the corresponding
setting.
Market/Survey
This field will reflect the current market and qualitative survey being used. Clicking on this button will
bring to screen the current data path, the available markets, and the corresponding surveys from which you
may select. To change the data path, click the Browse button, then double-click on the appropriate drive
and path. Click the OK button once complete, or simply press Enter.
To select a market and/or qualitative survey, highlight that line, then click the OK button; alternatively, you
may simply double-click on the market/survey line.
Geography
Here you will define the geographic area (universe) which will be used in the report. The system will
default to the DMA Survey Area. If you wish to keep this setting, you do not need to enter this portion of
QUALITAP. To redefine the geographic focus of the report, click this button. Please refer to Chapter Two
for a complete walk-through of defining a geographic area.
32
Quick Reports
Criteria
This is where you will define who (what group of people) will be analyzed. See Chapter Two for a
complete walk-through of defining qualitative criteria.
Demo
The system's demographic default is Adults 18+. If you wish to keep this demographic selection, you do
not need to enter this portion of the system. To set the demographic focus of this report, click this button.
The “Demo Selection” screen will be displayed. Identify the desired demographic in one of the following
ways:
•
Click on the desired gender, starting and ending age cells, then click the OK button;
•
Double-click on the demo among the listed demographic targets in the Favorite Demos window.
To save a defined demographic target to the Favorite Demos box so that you may retrieve it at a later time,
define the gender and age, then click the Add to Favorites button.
Estimates
What data will be displayed. You have a choice of Qualifying Persons, Composition and Index. All three
estimates will be displayed on-screen, but the estimate you select will be used on the printed report.
Custom Selection
You may add one category selection of your own which will be added to the end of the pre-selected list of
categories. See the next section for detailed instructions.
IQP Title
You may add a line of text to be added to the top of the printed report.
Click the OK button once you are ready to proceed and you will advance to the Instant Qualitative Report
display.
Custom Selection
You may add one category selection to the list of pre-selected categories. After you select the Custom
Selection button, you will immediately be taken to Categories Setup screen.
NOTE: Although this screen is identical to the screen where you select qualitative criteria, this is NOT
where you identify "WHO" you are profiling, but "WHAT" you wish to know about the target
group.
You will first need to identify the classification that contains the desired category.
The Classification box is displayed on the left portion of the screen. You may scroll through the different
classifications by using the up and down arrow keys located on the right side of the box. To select the
classification, click on that line.
The Category box, located in the middle of the right side of the screen, will display the categories contained
within the selected classification. Click on the desired category, and the different selections contained
within the specified category will be displayed in the box below the Category box.
You are now ready to identify the qualitative aspect you wish to uncover about the group of people you are
analyzing. You may do this in any of the following ways:
33
QUALITAP User Manual
•
Double-click on the desired selection.
•
Click on the desired selection, then click the Add button.
As you select the criterion, you will see the description displayed in the Selected Categories box, located in
the upper portion of the Criteria Setup screen. If you would like to delete the selected criteria, simply
highlight the line and click on the Delete button or you may use the Reset button to clear the selected
criterion.
To search throughout the entire database for a particular category, click the Search button. You will then
be prompted to enter the key word or phrase. Enter that text, click the OK button, and you will be given a
listing of classifications, categories and selections which contain the search criteria.
Once you have selected all desired lines of criteria for the report, click OK and you will be taken back the
Setup Menu or the display screen.
The IQP Report/Display
Once all parameters for the IQP are set properly, click the OK button, and the IQP Report will be
displayed:
Once you advance to the Instant Qualitative Report, the printed report will be displayed in Print Preview
mode. You may either print the report or you may exit Print Preview and a table report will be displayed.
On the printed report, the pre-selected categories are listed in two columns. If you added a custom
selection, it will be listed at the bottom of the right column. The estimate used is that which was selected at
the setup screen.
From the table report you will see the pre-selected categories listed down the left side of the table. Use the
Up/Down arrows, displayed on the right side of the screen, to bring to screen other categories. If you
34
Quick Reports
added a custom selection category at the setup screen, it will be listed as the last item.
You may change any of the pre-set report’s parameters by clicking on the various buttons listed in the
header of the report, or by accessing the Edit button located on the Windows Tool Bar.
To copy information directly from the displayed report to the Windows Clipboard, drag the cursor over the
data to be copied. As you do this, the system will highlight the identified information. After all needed
information has been highlighted, click the Edit button located on the Windows Tool bar, and select
Copy. The information will then be copied immediately to the Clipboard, and may now be placed in
another document.
If you have multiple modules open, don’t forget that the cascading and tiling options which are available
within the Window’s option on the Windows Tool Bar. (See Chapter One for more information on these
options.)
How to Read IQP Reports
The pre-selected categories are listed in two columns. If you added a custom selection, it will be listed at
the bottom of the right column. The estimate used is that which was selected at the setup screen.
Use the following as a guide when interpreting the data on the Market Report. Keep in mind the estimates
on the report are only representative of people who meet the selected geography and demography.
Qualifying Persons
The number of people surveyed who fit the qualitative criteria (if any) and meet the category's criteria listed
directly on the left.
Composition (% top)
This estimate uses the total amount of people who meet the qualitative criteria (if any) as its universe. This
represents the percentage of that group who also meet the category's criteria directly to the left.
Index
The likelihood of the group of people, listed directly to the left, of meeting the qualitative criteria (if any).
35
QUALITAP User Manual
Multi-Media Rankers
With Multi-Media Rankers, you can rank radio stations, television station and newspaper publications
together on one report. Multi-Media Rankers are compatible with all survey types, excluding Simmons
National data. When using Media Audit or Griffin data, the 'Use listened most often' estimate option can be
used on the report for the radio portion only. Unlike standard rankers, no quantitative adjustment surveys
can be used in conjunction with the Multi-Market Ranker.
Things to know...
•
The radio estimates are derived from the Monday through Sunday 6 A.M. to 12 midnight daypart.
•
The television estimates can be for a minimum of one quarter hour daypart, but also by program or any
other daypart that you create for your Inventory. They can include cable programming as well as
network television.
•
The newspaper estimates are based upon respondents who receive at least one daily newspaper in the
last week or one Sunday paper in the last four weeks. No adjustments are applied to help determine the
number of respondents who note certain size advertisements.
Starting Multi-Media Rankers
To start a multi-media ranker:
Click Quick Reports.
1.
2.
Click Multi-Media Ranker.
Setting up Multi-Media Rankers
1.
Verify that the most recent survey is selected (preferably a one-year survey).
2.
Use Adults 18+.
3.
Click the Criteria button to select "who" you would like to run the report for.
• Click the Search button on the upper right of the Setup window and type in the name of the
client you wish to analyze.
•
TIP: This is a text sensitive search. Keep your search as broad as possible. For example, type
in "Miller" instead of "Miller Genuine Draft Light". Do not include "'s" endings in your
search.
4.
Create a title that will appear at the top of the printed report. (Optional)
5.
Click the OK button in the top-right of the Setup window.
How to read Multi-Media Rankers
Each estimate on a Multi-Media Ranker has a specific meaning that tells a different story about the target
audience when it is being compared to the market, demographic or medium (whichever applies). In order
36
Quick Reports
for a respondent to qualify for usage of a medium (radio, television or newspaper), he or she must meet the
minimum requirements for the medium being analyzed.
Minimum Media Usage Requirements
•
listened to the radio station listed to the left for at least five minutes to the daypart specified
•
viewed the television station listed to the left for at least five minutes to the daypart specified
•
received one of the last five issues of the daily newspaper or one of the last four issues of the Sunday
paper listed to the left
Use the following as a guide when interpreting the numbers.
Cume Persons
The total number of different people (unduplicated) (within the specified geography area and demographic)
who meet the qualitative criteria AND the minimum medium usage requirements.
Cume Rating
The percentage of the total qualitative population (unduplicated) within the specified geography and
demographic, who meet the minimum medium usage requirements.
% (Percent) of Media
The percentage of a medium's audience (within the target demographic and geographic area) who meet the
qualitative criteria.
Media Index
The likelihood of the market audience (within the specified demographic and geographic area) meeting the
qualitative criteria for the station or newspaper listed directly to its left.
Average Persons
The number of persons (within the geographic area and target demographic) who meet the qualitative
criteria AND the minimum medium usage requirements.
Average Rating
The percentage of the total qualitative population (within the target demographic and geographic area) who
meet the minimum medium usage requirements.
Market Persons
The total number of different people (unduplicated) within the specified geography area and demographic
who meet the minimum medium usage requirements.
* In order for the most accurate and precise estimate to be derived, calculations are carried out seven digits
past the decimal point. All reports reflect the result of this calculation. Therefore when hand calculating
numbers, keep in mind that the result will more than likely not be identical to the report’s data.
37
QUALITAP User Manual
Media Quintile Reports
Scarborough’s quintile data can help determine how much your clients and prospects’ customers use
specific media. Quintiles are a five-scale measurement, in 20% increments, of an individual’s media usage.
The first quintile measures the heaviest use and the fifth quintile measures the lightest use. Scarborough
provides quintile information for television, radio and newspaper, representing the weight of viewership,
listenership and readership of a given target. When using quintiles, select your client’s customer as the
criteria (or “Who”). Look at the following example.
TARGET: Shopped at Good Food Grocery in the past week
Radio
Television
Newspaper
% Comp
Index
% Comp
Index
% Comp
Index
1st Quintile
27
145
18
97
13
80
2nd Quintile
25
130
20
104
15
85
3rd Quintile
20
110
24
120
15
85
4th Quintile
15
80
19
100
25
138
5th Quintile
13
75
19
100
32
157
From this report we can conclude Good Food grocery shoppers are more likely to spend more time with
radio than with television, and they read newspapers rarely. Good Food Grocery Store is a great prospect
for radio and television advertising. These are the media that will be most effective at reaching Good Food
customers.
Another way to utilize the quintile data is to target a demographic group. If you are trying to reach Men,
Age 18-49, use this group as your target to determine their propensity to use certain media.
Starting Media Quintile Reports
1.
Click Quick Reports.
Click Media Quintile.
2.
Setting up Media Quintile Reports
1.
Verify that the most recent survey (preferably a one-year survey) is selected.
2.
Use Adults 18+.
3.
Click the Criteria button to select "who" you would like to run the report for.
• Click the Search button on the upper right of the Setup window and type in the name of the client
you wish to analyze.
•
38
TIP: This is a text sensitive search. Keep your search as broad as possible. For example, type in
"Miller" instead of "Miller Genuine Draft Light". Do not include "'s" endings in your search.
Quick Reports
4.
Create a title that will appear at the top of the printed report. (Optional)
5.
Click the OK button in the top-right of the Setup window.
How to read Media Quintile Reports
The five quintiles are determined based on different criteria for each medium. Viewership, readership, and
listenership levels will vary by market and by survey period.
Newspaper
For newspaper, the number of different issues or newspapers bought each week is the base that determines
the five quintile groups. For example, if a respondent bought three issues of the Daily News and one issue
of the Wall Street Journal last week, their total issues received would equal four.
Now lets assume that the most issues any one respondent received in our survey period were 15. And the
least number of issues received by any one respondent was zero. The quintiles would represent something
like the following:
1st Quintile
13-15 issues
2nd Quintile
10-12 issues
3rd Quintile
7-9 issues
4th Quintile
4-6 issues
5th Quintile
0-3 issues
Our respondent who received a total of 4 issues last week would be placed in the 4th Quintile.
Television
For television, the number of half-hours that a respondent has viewed television determines their quintile
placement.
Radio
For radio, the number of quarter-hours listened to radio determines quintile placement for a respondent.
39
QUALITAP User Manual
Shopped vs. Purchased Reports
Shopped vs. Purchased reports can tell you a lot about your client's competitors. The report displays a
unique graphic that identifies shoppers visually. The blue horizontal bar represents the number of people
who shopped at the business and the green bar represents the total number of people who made a purchase.
The Closing Ratio represents the likeliness of consumers making purchases when they patronize a business.
The Shopped vs. Purchased categories are:
•
Department Stores (month)
•
Clothing Stores (3 months)
•
Furniture Stores (year)
•
Carpet/floor covering Stores (year)
•
Stores with Audio/video equipment (year)
•
Stores with large appliances (year)
•
Hardware/Software stores (year)
•
Stores with hardware/paint/lawn/garden items (year)
Starting Shopped vs. Purchased Reports
1.
2.
Click Quick Reports.
Click Shopped vs. Purchased.
Setting up Shopped vs. Purchased Reports
1.
Verify that the most recent survey (preferably a one-year survey) is selected.
2.
Use Adults 18+.
3.
Only enter criteria if you have already defined the persons you are targeting. Otherwise, skip this
option.
4.
Create a title that will appear at the top of the printed report. (Optional)
5.
Click the OK button in the top-right of the Setup window.
How to read Shopped vs. Purchased Reports
Persons Shopped - the number of people who meet the qualitative criteria (if any) and visited the business
listed directly to the left.
Persons Purchased - the number of people who meet the qualitative criteria (if any) and made a purchase
at the business listed directly to the left.
40
Quick Reports
Percent Shopped - the percentage of the population who meet the qualitative criteria (if any) and visited
the business listed directly to the left.
Percent Purchased - the percentage of the population who meet the qualitative criteria (if any) and made a
purchase at the business listed directly to the left.
Closing Ratio - The people who meet the Qualitative Criteria that have purchased, compared to the number
of people who have shopped, expressed as a percentage.
Total Population - the number of people who live in the geographic area selected for the report.
Qualitative Population - the number of people who meet the specified demography and the qualitative
criteria, who also live in the geographic area specified.
Percent of Total Population - the number of persons meeting the specified demography, qualitative
criteria and geography, compared to the total number of persons living in the geographic area specified,
expressed as a percentage (Qualitative Population divided by the Total Population).
Total Respondents - the total number of people meeting the specified demographic and geography that
were surveyed, but who do not necessarily meet the qualitative criteria.
Qualitative Respondents -The number of people surveyed who meet a specified demography, geography
and criteria.
Printing Quick Reports
Quick Reports are displayed in the Print Preview window automatically. To print the report as it appears on
the screen, click
.
Selecting a different graph
With most Qualitap reports, you can include a graph to help gain a better understanding of the data
visually. The Chart menu contains eight graphs to choose from. When the Chart menu is not accessible, a
graph cannot be included on that report. To select a different graph for a Quick Report, close the Print
Preview window and select a graph from the Chart menu.
Printing the 'How to read' information
By default, the Effective Media is printed on the Multi-Media Ranker and Quintile reports. You can replace
the Effective Media with the 'How to read' information by following these steps:
1.
Click Exit to close the Print
Preview window.
2.
Clear the 'Quick Reports Mode'
box.
3.
Select a graph from the Chart
menu.
4.
Click the Print button.
41
QUALITAP User Manual
Printing Quick Reports without graphs
To print the table without a graph:
1.
Click Exit to close the Print
Preview window.
2.
Click the lower "X" in the upper
right-hand corner to close the
graph window.
3.
Click Print.
Saving Printed Reports
You can save Qualitap reports to your computer from the Print Preview window. First, run the report that
you want to save. You will have to preview the report before saving. Click Print then Preview. (When
running Quick Reports, the report is displayed in preview mode automatically.) Once the preview is
displayed, click
42
Save.
Quick Reports
Opening Saved Reports
You can view or print any saved report.
1.
Select File > Open.
2.
Choose Preview or Print.
3.
Select the saved file.
43
Chapter
5
Rankers
A Ranker will allow you to uncover media habits of a qualitative group of people. Within the Rankers portion of
QUALITAP, you may analyze Radio listening, TV/Cable viewing or Newspaper reading characteristics for the
defined target.
After clicking the Rankers button the “Ranker Menu” will be displayed:
Radio Ranker - uncover radio listening habits among
a qualitative group of people.
TV Ranker - find TV and Cable viewing
characteristics of the targeted group of people.
Newspaper Ranker - displays reading habits among
the qualitative group of people.
Establishing the Parameters of the Report
Select one of the Rankers and its setup window will open.
Market/Survey
This field will reflect the current market and qualitative survey being used. Clicking on this button will
bring to screen the current data path, the available markets, and the corresponding surveys from which you
may select. To change the data path, click the Browse button, then double-click on the appropriate drive
and path. Click the OK button once complete, or simply press Enter.
Qualitap and its designs are marks of Arbitron Inc. Copyright © 2001 Arbitron Inc.
45
QUALITAP User Manual
To select a market and/or qualitative survey, highlight that line, then click the OK button; alternatively, you
may simply double-click on the market/survey line.
Nielsen Survey
If you are using Nielsen data in conjunction with the qualitative data, you may select that book by clicking
on this button. Selecting an Nielsen book will result in adjusted estimates displayed on the ranker in
addition to the “pure” qualitative numbers. Once you select this button, the “Choose Market and Survey”
menu will be brought to screen displaying the current Nielsen data path, the available markets, and the
corresponding Nielsen books from which you may select. To change the data path, click the Browse
button, then double click on the appropriate drive and path of that new data. Click the OK button once
complete, or simply press Enter. To select a market and/or survey, highlight that line, then click the OK
button; alternatively, you may simply double-click on the market/survey line.
Adjustment Survey
If you are using Arbitron data in conjunction with the qualitative data, you may select that book by clicking
on this button. Selecting an Arbitron book will result in adjusted estimates displayed on the ranker in
addition to the “pure” qualitative numbers. Once you click this button, the “Choose Market and Survey”
menu will be brought to screen that will display the Arbitron data path, the available markets and the
corresponding Arbitron books from which you may select. To change the data path, click the Browse
button, then double-click on the appropriate drive and path of that new data. Click the OK button once
complete, or simply press Enter. To select a market and/or survey, highlight that line, then click the OK
button; alternatively, you may simply double-click on the desired market/survey line.
Prizm® Survey
If you are using a national survey, you will need to select a Prizm® survey to run a Radio Ranker. To
select a survey, click on this button and the “Choose Market and Survey” menu will be brought to screen
that will display the Prizm® data path (usually the same as your Arbitron data) and the available markets
from which you may select. To change the data path, click the Browse button, then double-click on the
appropriate drive and path of that new data. Click the OK button once complete, or simply press Enter.
To select a market and/or survey, highlight that line, then click the OK button; alternatively, you may
simply double-click on the desired market/survey line.
Use Listened Most Often Estimates
This option is only available with certain data such as Media Audit and Griffin Data, and only pertains to
radio listening. If this field is grayed-out, the option is not available.
The question asked on the survey which determines Listened Most Often Estimates is: “To which (one)
radio station did you listen most often during the past week?” Therefore, using Listen Most Often
Estimates will result in smaller Cume and Average Persons ratings. Although this does not reflect listening
“exclusivity,” these estimates may be used as an indicator of listener loyalty.
Qualitative Daypart
Since the Radio Ranker focuses on one specific daypart, you must define the daypart to be used. The
system will default to the Monday-Sunday 6am-12midnight daypart. If you wish to keep that time period,
you do not need to enter this part of the system. To re-define the daypart, click this button, and the
“Qualitative Daypart Selection” window will open. Now you will identify the starting/ending days and
times by clicking on the appropriate selection for each. Once your selection is complete, click the OK
button. To save the daypart selection for future use, click the Add to Favs button prior to selecting OK.
46
Rankers
Quantitative Daypart
If you are using adjusted Arbitron estimates with your ranker, you may elect to show a different daypart
than that of the qualitative data. The system will default the daypart selection to that of the qualitative data.
If you wish to keep that time period, you do not need to enter this part of the system. To re-define the
daypart, click this button. The “Daypart Selection” window will then be brought to screen where you will
identify the starting/ending days and times by clicking the appropriate selection for each. Click the OK
button once your selection is complete. To save the daypart selection for future retrieval, click the Add to
Favs button before you select OK.
Criteria
This is where you will define the who (what group of people) will be analyzed. See Chapter Two for a
complete walk-through of defining qualitative criteria.
Geography
Here you will define the geographic area (universe) which will be used in the report. The system will
default to the DMA Survey Area. If you wish to keep this setting, you do not need to enter this portion of
QUALITAP. To redefine the geographic focus of the report, click this button. Please refer to Chapter Two
for a complete walk-through of defining a geographic area.
Demo
The system's demographic default is Adults 18+. If you wish to keep this demographic selection, you do
not need to enter this portion of the system. To set the demographic focus of this report, click this button.
The “Demo Selection” screen will be displayed. Identify the desired demographic in one of the following
ways:
•
Click on the desired gender, starting and ending age cells, then click the OK button;
•
Double-click on the demo among the listed demographic targets in the Favorite Demos window.
To save a defined demographic target to the Favorite Demos box so that you may retrieve it at a later time,
define the gender and age, then click the Add to Favorites button.
Combos
To create and maintain station combos, you will enter into this portion of the system. After activating this
option, the “Combo Maintenance” screen will appear. At this screen, all previously created station combos
will be listed in the Combos box, with the corresponding station components for each combo listed in the
Stations box.
To add a combo, click the Add combo button. This will bring the “Create a Combo” box to screen. You
will define the new combo in one of the following ways:
•
Click on the desired station, then click the Add button;
•
Double-click on each desired station;
•
Drag the cursor over a group of stations, then click the Add button.
Once you have identified all of the combo's components, click the OK button. If the station selection is
more than 30 characters long, you will be prompted to enter a Combo name. Type in that text, then click
the OK button. (You may customize any combo's name by clicking on that combo, highlighting the combo
name field and entering the revised name.)
47
QUALITAP User Manual
To delete a previously created combo, highlight that combo, then click the Delete combo button. If you
would like to edit a combo, click on that line, then select Edit combo.
Clicking on the Options button will bring the different combo options available: “Display combos and
components,” and “Display combos only.” If you select “Display combos and components,” data will be
displayed for both created combos and each individual combo component (station). Choosing the latter
will result in data displayed for combo and non-combo stations only, suppressing the display of the
individual combo components.
For combos to be displayed on the report, make sure you click “Use Combos for this run.” If the “No
combos for this run” box is selected, combos will be suppressed from the report.
Once all combo maintenance is complete, click the OK button.
Stations
This is where you will select which stations will be included on the report. The system will default to all
stations being selected. If you wish to keep this selection, you need not enter this portion of QUALITAP. If
you would like to narrow the stations to be displayed on the report, click this button, and the “Stations
Selection” menu will be displayed:
You will see all stations have been placed in the “Selected” box. To clear the selection, click the Clear
button. To select the stations that will be included on the report, do one of the following:
•
Double-click on the desired selection;
•
Click on the desired selection, then click on the Add button.
•
Drag the mouse over a group of selections, then click the Add button.
As you make each choice you will see each identified station moved from the Available pool into the
Selected pool, indicating each will be included on the ranker. You may use the Search option to search
the station rosters for specific call letters. Select All will quickly move all stations from the Available box
to the Selected box, indicating all have been selected for inclusion on the ranker.
If you have selected a station for inclusion on the report, but would like to remove it from the Selected
pool, simply highlight the station and click Delete. It will then be moved back to the Available box.
Also, you can save groups of radio stations for future retrieval at this screen. To save a media group, after
you have made the desired selection, click Save, give the group a name, then click OK. You will then be
able to retrieve that group with the Load button.
48
Rankers
Once your station selection is complete, click the OK button.
Estimates
If you wish to “hand-pick” the estimates to be displayed on this report, you will access this button. This
will bring you to the “Estimate Selection” menu:
You will see the pre-selected estimates displayed in the “Include” box. (The default estimate choice will
vary, depending upon whether or not you are using adjusted Arbitron numbers.) If you wish to keep these
default estimates, you need not make any modifications; simply click the OK or Cancel button.
To clear the estimate selection, click the Clear button, and all pre-selected estimates will be moved into the
“Available” box. To select the estimates that will be included on the ranker, do one of the following:
•
Double-click on the desired selection;
•
Click on the desired selection, then click on the Add button;
•
Drag the mouse over a group of selections, then click the Add button.
As you make each selection you will see that estimate move from the Available pool into the Include box.
To de-select identified estimates, highlight that line then click the Delete button. The estimate will then be
moved back to the Available box.
Once your estimate selection is complete, click the OK button and you will be brought back to the Radio
Ranker Setup screen.
TV/Cable Inventory
This is where you will identify what programming will be included on the ranker. *For instructions on how
to setup and maintain the programming inventory database, please refer to Chapter One. After clicking this
button the TV/Cable Selection window will appear:
49
QUALITAP User Manual
You will see all programs/networks have been placed in the “Selected” box. To clear the selection, click
the Clear button. To select the programs/networks to be included on the report, do one of the following:
•
Double-click on the desired selection;
•
Click on the desired selection, then click on the Add button;
•
Drag the mouse over a group of selections, then click the Add button.
As you make each selection you will see each identified program/station move from the Available pool into
the Selected pool, indicating each will be included on the ranker. You may use the Search option to
search the TV/Cable database for a specific string of text. Select All will quickly move all
programs/networks from the Available box to the Selected box, indicating all have been selected for
inclusion on the ranker.
If you have selected a program/station for inclusion on the report, but would now like to remove it from the
Selected pool, simply highlight that line, and click Delete. It will then be moved back to the Available
box.
Also, you can save groups of television/cable programs for future retrieval at this screen. To save a media
group, after you have made the desired selection, click Save, give the group a name, then click OK. You
will then be able to retrieve that group by accessing the Load button.
You can sort the listing of television/cable programs for easier selection. Click on the Sort by… button
and you will be given several sort options:
•
Day/Time sorts the programs first by the day of the week (Mon - Sun) and then by the time of day
(starting at 6am), regardless of station/network.
•
Time/Day sorts the programs first by the time of day (starting at 6am) and then by the day of the week
(Mon - Sun), regardless of station/network.
•
Program Title sorts the programs alphabetically by the titles.
•
Station, Day & Time sorts the programs alphabetically by the station/network names, then by the day
of the week (Mon - Sun) and then by the time of day (starting at 6am).
•
Station, Time & Day sorts the programs alphabetically by the station/network names, then by the time
of day (starting at 6am) and then by the day of the week (Mon - Sun).
To invoke the sorting, you may click on the desired sort order and then click OK, or you may simply
50
Rankers
double-click on the sort order of your choice.
NOTE: This sort applies to stations/programs as listed in the AVAILABLE box, not the Selected box. So if
you have all programs selected and choose to sort, you will not see a change.
Once your programming/station selection is complete, click the OK button.
Newspaper
This is where you will identify which newspapers will be included on the ranker. After clicking this button
the “Newspaper Selection” window will appear:
You will see all newspapers have been placed in the “Selected” box. To clear this selection, click the
Clear button. To select the newspapers for inclusion on the ranker, you will do one of the following:
•
Double-click on the desired selection;
•
Click on the desired selection, then click on the Add button.
•
Drag the mouse over a group of selections, then click the Add button.
As you make each selection you will see each identified newspaper moved from the Available pool into the
Selected pool, indicating its inclusion on the ranker. You may use the Search option to search the
Newspaper database for a specific string of text. Select All will quickly move all newspapers from the
Available box to the Selected box, indicating all have been selected for inclusion on the ranker.
If you have selected a newspaper for inclusion on the report, but would like to remove it from the Selected
pool, simply highlight that line, and click Delete. It will then be moved back to the Available box.
Also, you can save groups of newspapers for future retrieval at this screen. To save a media group, after
you have made the desired selection, click Save, give the group a name, then click OK. You will then be
able to retrieve that group with the Load button
Once your newspaper selection is complete, click the OK button.
The Ranker Display
Once all parameters for this report are set properly, click the OK button, and the Ranker will be displayed:
51
QUALITAP User Manual
You have the ability to change any of the report’s parameters (i.e. criteria, geography, etc.) “on the fly.”
Do this by clicking on the various buttons listed in the header of the ranker, or by accessing the Edit button
on the Windows Tool Bar. Also, you may re-rank the report’s data based upon a different estimate with
one-click of the mouse! Simply click on that estimate’s column header. The system will then
automatically adjust accordingly the stations’ ranking order.
To copy information, directly from the displayed report to the Windows Clipboard, drag the cursor over the
data to be copied. As you do this, the system will highlight the identified information. After all needed
information has been highlighted, click the Edit button located on the Windows Toolbar, and select Copy.
The information will then be copied immediately to the Clipboard, and may now be placed in another
document.
If you have multiple modules open, don’t forget that the cascading and tiling options are available within
the Window’s option on the Windows Tool Bar. (See Chapter One for more information on these options.)
Printing a Ranker
You have several printing options available to you. For a detailed walk-through of all printing and charting
options, please refer to Chapter Eleven, “Printing and Graphing.”
If you want to print specific lines of a report, you must identify these lines PRIOR to entering the print
routine. You may do this in one of two ways:
1.
Click Options, highlight the Tag option, then select one of the pre-configured selections;
2.
Place the cursor in the first column of the spreadsheet, then simply single-click on each line you wish
to select. As each line is marked, you will see an asterisk placed in its first column.
To print the basic report (what you see on the screen), do one of the following:
•
Click the Print button, located on the QUALITAP Tool Bar;
•
Click on the File button, located on the Windows Tool Bar, then select the Print option.
The “Print Options” Menu will then be brought to screen:
52
Rankers
Here, all print settings will be displayed. This display may vary depending upon the printer being used. If
you need to change the printer selection, click the Setup button, then perform all printer maintenance as
normally done within any Windows’ environment.
Print Range
Where you will determine what is printed. This will default to all pages of the report being printed. If you
would like to print only a specific range (number of pages), click on the Pages field, and enter the page
range to be printed in the From and To fields.
Assembly
Where you establish how many copies of the report will be printed. The system will default to one copy.
To modify this, highlight the Copies field, then enter the desired number of copies to be printed. If you
are printing multiple copies of this report, and wish the copies to be collated, click the Collate copies box.
When you are ready for QUALITAP to begin the print routine, select OK, and your report will be generated.
To exit the Radio Ranker, select File, then click on the Close setting.
How to Read a Ranker
Each different estimate on a Radio Ranker has a specific meaning. Use the following as a guide when
interpreting the numbers. Remember, all estimates are only representative of the current demography and
geography.
Cume Persons
The total number of different people (unduplicated) (within the specified geography area and demographic)
who meet the qualitative criteria, AND listen to the station listed directly to the left for at least five minutes
during the specified daypart.
Cume Rating
The percentage of the total qualitative population (unduplicated) within the specified geography and
demographic, who listen to the station listed directly to the left for at least five minutes during the specified
daypart.
% (Percent) of Station
53
QUALITAP User Manual
The percentage of a station's audience (within the target demographic and geographic area) who meet the
qualitative criteria.
% (Percent) of Paper
The percentage of the newspaper's total circulation (within the specified geography and demographic) who
meet the qualitative criteria.
Station Index
The likelihood of the station's audience (within the specified demographic and geographic area) of meeting
the qualitative criteria.
Average Persons
The number of persons (within the geographic area and target demographic) who meet the qualitative
criteria AND listen to the station listed directly to the left for at least five minutes during any of the quarter
hours contained within the selected daypart.
Average Rating
The percentage of the total qualitative population (within the target demographic and geographic area) who
listen to the station listed directly to the left, for at least five minutes, during any of the quarter hours
contained within the specified daypart.
Average Reader
The number of people (within the selected demographic and geography) that meet the qualitative criteria
who received the most recent edition of this newspaper.
Adjusted Average Persons
The “pure” Average Persons (directly from quantitative ratings data) multiplied by the Percent of Station.
This estimate reflects those people within the demographic and geographic universe who meet the
qualitative criteria and listen to the immediate station (listed directly to the left) for at least five minutes
during any of the quarter hours contained within the selected daypart. *
Adjusted Average Rating
The “pure” Average Rating (directly from quantitative ratings data) multiplied by the Percent of Station.
The percentage of the total ARBITRON qualitative population who listen to the station listed directly to the
left during any of the quarter hours contained within the displayed daypart for at least five minutes. *
Adjusted Cume Persons
The “pure” Cume Persons (directly from quantitative ratings data) multiplied by the Percent of Station. The
total number of people (unduplicated) within the geographic area who meet the qualitative criteria and
listen to the current station (listed directly to the left). *
Adjusted Cume Rating
The “pure” Cume Rating (directly from quantitative ratings data) multiplied by the Percent of Station. The
percentage of the total ARBITRON qualitative population who listen to the immediate station, listed
directly to the left. *
* In order for the most accurate and precise estimate to be derived, calculations are carried out seven digits
past the decimal point. All reports reflect the result of this calculation. Therefore when hand calculating
numbers, keep in mind that the result will more than likely not be identical to the report’s data.
54
Rankers
User Strategies
The media portion of QUALITAP offers you multiple ways to position your station. Use the following as a
guide for suggestions on how to best use the Rankers portion of the system.
Utilizing the Various Ranking Options
For this example, we will use a Radio Ranker; however, this example may be used with television stations
and cable networks in the same manner. In the Ranker display below, the sort order is Cume Persons (the
system default):
In this example, if I represent stations WGGG-FM (#1), KZZZ-AM (#2) or, station KDDD-FM (#3), this
would be a positive report to take to a prospective client. However, if the prospective client is only going
to buy three stations deep? The remaining stations need to find an alternative way of promoting their
station to this prospect.
An excellent alternative would be to change the perspective of the report by changing the ranking order of
the data. The following is the same report, only now it is ranked upon Percent of Station.
55
QUALITAP User Manual
Now we see a completely different order of information since Percent of Station focuses on which stations
have the highest concentration of people who meet the qualitative criteria within their audience. So this
ranking order would reflect which station has the “most qualified” audience.
Remember you may turn estimates on and off by accessing the Edit button, then selecting Estimates. Also,
you may choose to isolate Percent of Station in a graph, such as in the following example. (Please refer to
Chapter Eleven, Printing and Graphing, for a complete walk-through of charting.)
56
Chapter
6
Multi-Media Scheduling
Create schedules for radio, television and newspapers based on qualitative criteria. After clicking the Schedule
button, the Multi-Media Scheduler Setup screen will be displayed where you will define all parameters upon
which the reach and frequency will be based. To edit any of the settings, click the corresponding button, then make
the appropriate change. You may modify any of the following:
Establishing the Parameters of the Report
Here you will establish all the parameters of this report. Click on each button to define the corresponding
setting.
Market/Survey
This field will reflect the current market and qualitative survey being used. Clicking on this button will
bring to screen the current data path, the available markets, and the corresponding surveys from which you
may select. To change the data path, click the Browse button, then double-click on the appropriate drive
and path. Click the OK button once complete, or simply press Enter.
To select a market and/or qualitative survey, highlight that line, then click the OK button; alternatively, you
may simply double-click on the market/survey line.
Qualitative Daypart
Since the Radio Ranker focuses on one specific daypart, you must define the daypart to be used. The
system will default to the Monday-Sunday 6am-12midnight daypart. If you wish to keep that time period,
you do not need to enter this part of the system. To re-define the daypart, click this button, and the
“Qualitative Daypart Selection” window will be brought to screen. Now you will identify the
starting/ending days and times by clicking on the appropriate selection for each. Once your selection is
complete, click the OK button. To save the daypart selection for future use, click the Add to Favs button
Qualitap and its designs are marks of Arbitron Inc. Copyright © 2001 Arbitron Inc.
57
QUALITAP User Manual
prior to selecting OK.
Demo
The system's demographic default is Adults 18+. If you wish to keep this demographic selection, you do
not need to enter this portion of the system. To set the demographic focus of this report, click this button.
The “Demo Selection” screen will be displayed. Identify the desired demographic in one of the following
ways:
•
Click on the desired gender, starting and ending age cells, then click the OK button;
•
Double-click on the demo among the listed demographic targets in the Favorite Demos window.
To save a defined demographic target to the Favorite Demos box so that you may retrieve it at a later time,
define the gender and age, then click the Add to Favorites button.
Criteria
This is where you will define who (what group of people) will be analyzed. See Chapter Two for a
complete walk-through of defining qualitative criteria.
Geography
Here you will define the geographic area (universe) which will be used in the report. The system will
default to the DMA Survey Area. If you wish to keep this setting, you do not need to enter this portion of
QUALITAP. To redefine the geographic focus of the report, click this button. Please refer to Chapter Two
for a complete walk-through of defining a geographic area.
Combos
To create and maintain station combos, you will enter into this portion of the system. After activating this
option, the “Combo Maintenance” screen will appear. At this screen, all previously created station combos
will be listed in the Combos box, with the corresponding station components for each combo listed in the
Stations box.
To add a combo, click the Add combo button. This will bring the “Create a Combo” box to screen. You
will define the new combo in one of the following ways:
•
Click on the desired station, then click the Add button;
•
Double-click on each desired station;
•
Drag the cursor over a group of stations, then click the Add button.
Once you have identified all of the combo's components, click the OK button. If the station selection is
more than 30 characters long, you will be prompted to enter a Combo name. Type in that text, then click
the OK button. (You may customize any combo's name by clicking on that combo, highlighting the combo
name field and entering the revised name.)
To delete a previously created combo, highlight that combo, then click the Delete combo button. If you
would like to edit a combo, click on that line, then select Edit combo.
Clicking on the Options button will bring the different combo options available: “Display combos and
components,” and “Display combos only.” If you select “Display combos and components,” data will be
displayed for both created combos and each individual combo component (station). Choosing the latter
58
Multi-Media Scheduling
will result in data displayed for combo and non-combo stations only, suppressing the display of the
individual combo components.
For combos to be displayed on the report, make sure you click “Use Combos for this run.” If the “No
combos for this run” box is selected, combos will be suppressed from the report.
Once all combo maintenance is complete, click the OK button.
Radio Stations
This is where you will select which stations will be included on the report. The system will default to all
stations being selected. If you wish to keep this selection, you need not enter this portion of QUALITAP. If
you would like to narrow the stations to be displayed on the report, click this button, and the “Stations
Selection” menu will be displayed:
TV Stations
This is where you will identify what programming will be included on the ranker. *For instructions on how
to setup and maintain the programming inventory database, please refer to Chapter One. After clicking this
button the TV/Cable Selection window will appear:
You will see all programs/networks have been placed in the “Selected” box. To clear the selection, click
the Clear button. To select the programs/networks to be included on the report, do one of the following:
•
Double-click on the desired selection;
59
QUALITAP User Manual
•
Click on the desired selection, then click on the Add button;
•
Drag the mouse over a group of selections, then click the Add button.
As you make each selection you will see each identified program/station move from the Available pool into
the Selected pool, indicating each will be included on the ranker. You may use the Search option to
search the TV/Cable database for a specific string of text. Select All will quickly move all
programs/networks from the Available box to the Selected box, indicating all have been selected for
inclusion on the ranker.
If you have selected a program/station for inclusion on the report, but would now like to remove it from the
Selected pool, simply highlight that line, and click Delete. It will then be moved back to the Available list.
Also, you can save groups of television/cable programs for future retrieval at this screen. To save a media
group, after you have made the desired selection, click Save, give the group a name, then click OK. You
will then be able to retrieve that group by accessing the Load button.
You can sort the listing of television/cable programs for easier selection. Click on the Sort by… button
and you will be given several sort options:
•
Day/Time sorts the programs first by the day of the week (Mon - Sun) and then by the time of day
(starting at 6am), regardless of station/network.
•
Time/Day sorts the programs first by the time of day (starting at 6am) and then by the day of the week
(Mon - Sun), regardless of station/network.
•
Program Title sorts the programs alphabetically by the titles.
•
Station, Day & Time sorts the programs alphabetically by the station/network names, then by the day
of the week (Mon - Sun) and then by the time of day (starting at 6am).
•
Station, Time & Day sorts the programs alphabetically by the station/network names, then by the time
of day (starting at 6am) and then by the day of the week (Mon - Sun).
To invoke the sorting, you may click on the desired sort order and then click OK, or you may simply
double-click on the sort order of your choice.
NOTE: This sort applies to stations/programs as listed in the AVAILABLE box, not the Selected box. So if
you have all programs selected and choose to sort, you will not see a change.
Once your programming/station selection is complete, click the OK button.
Newspapers
This is where you will identify which newspapers will be included on the ranker. After clicking this button
the “Newspaper Selection” window will appear:
60
Multi-Media Scheduling
You will see all newspapers have been placed in the “Selected” box. To clear this selection, click the
Clear button. To select the newspapers for inclusion on the ranker, you will do one of the following:
•
Double-click on the desired selection;
•
Click on the desired selection, then click on the Add button.
•
Drag the mouse over a group of selections, then click the Add button.
As you make each selection you will see each identified newspaper moved from the Available pool into the
Selected pool, indicating its inclusion on the ranker. You may use the Search option to search the
Newspaper database for a specific string of text. Select All will quickly move all newspapers from the
Available box to the Selected box, indicating all have been selected for inclusion on the ranker.
If you have selected a newspaper for inclusion on the report, but would like to remove it from the Selected
pool, simply highlight that line, and click Delete. It will then be moved back to the Available box.
Also, you can save groups of newspapers for future retrieval at this screen. To save a media group, after
you have made the desired selection, click Save, give the group a name, then click OK. You will then be
able to retrieve that group with the Load button.
Once your newspaper selection is complete, click the OK button.
Estimates
If you wish to "hand-pick" the estimates to be displayed on the schedule, click this button and the MultiMedia Estimates Menu will be displayed.
61
QUALITAP User Manual
The menu has four displays (or tabs) for each of the displays available at the Multi-Media Scheduling
window – Totals, Radio, Television and Newspaper. You will need to select the estimates for each display.
Access each set of estimates by clicking on the appropriate tabs at the top of the window.
All pre-selected estimates are displayed in the Include box. The default estimate choice will vary,
depending upon the medium. If you wish to keep these default estimates, you need not make any
modifications; simply click the OK button or the Cancel button. To clear the estimate selection, click the
Clear button. This will move all estimates into the Available box. To select the estimates that will be
included on the ranker, do one of the following:
•
Double-click on the desired selection;
•
Click on the desired selection, then click on the Add button.
•
Drag the mouse over a group of selections, then click the Add button.
As you make each selection you will see that estimate moved from the Available pool into the Include pool.
Remove selected estimates from the Include pool by highlighting that line, then clicking the Delete button.
Once your estimate selection is complete, click the OK button.
Once all specifications are properly set, click OK and you will advance to the Multi-Media Scheduling
Totals Tab.
Multi-Media Scheduling - Totals Tab
Once you have set all the parameters at the setup screen, you will advance to the scheduling screen. This
screen is split into four displays (or tabs) – Totals, Radio, Television and Newspaper – that are accessed by
clicking on the tabs at the bottom of the screen.
The display defaults to the Totals Tab that lists the schedule results for each medium and for all media
combined. The information available is dependent upon the estimates you selected.
To create a schedule, switch to each medium by clicking on the appropriate tab at the bottom of the screen
for Radio, Television or Newspaper and enter spots and rate information if desired.
The Copy Option, located by clicking on the Edit option of the Windows Toolbar, will allow you to
transfer information directly to the Windows Clipboard so that it may be placed in a document. If you have
multiple modules open, do not forget the cascading and tiling options are also found within the Windows
62
Multi-Media Scheduling
Toolbar under the Window option.
To exit the Multi-Media Scheduler, select File and then click on the Close setting.
Scheduling - Radio Tab
From this display you schedule spots and enter rates (if desired) for the radio portion of your campaign.
The schedule results will be listed for each station and for all stations combined as well as the campaign
totals. The information available is dependent upon the estimates you selected.
Spots
You may schedule spots by either of two methods: you can enter them directly or have QUALITAP
schedule the appropriate number of spots to attain certain goals.
•
To schedule spots directly, simply click on the appropriate line for each station under the Weekly
Spots column and enter the desired number of spots. To assign the same number of spots to each
station, click on the Radio line and type in the number of spots you want for each station, or right click
and select Global Assign.
•
To have QUALITAP schedule spots for you, you may enter a goal for any of the following estimates:
Reach %
Effective Reach %
Net Reach
GRP's
Frequency
Gross Impressions
Effective Net Reach
You may enter these goals per station by entering the desired level on each station's line in the appropriate
column. To assign the same goal for all stations, enter the desired level on the Radio line or right click and
select Global Assign. The system will then calculate the necessary number of spots to attain your goal.
Rates
You may either enter rates directly or have the system calculate the rate by assigning a CPP/CPM or Total
Cost goal.
•
To enter rates directly, you may click on each station's line under the Rate column and enter the rate.
•
To have QUALITAP calculate the rates by entering a desired CPP or CPM, you may enter a separate
CPP/CPM for each station, or you may enter a CPP/CPM on the Radio line and the same CPP/CPM
will be assigned to each station. The rates will then be calculated for each station. You can enter a
Total Cost goal once spots have been assigned by typing in the budget for each station in the Total
Cost column. You may also assign CPP/CPM or Total Cost goals to all stations by right clicking and
selecting Global Assign.
Scheduling - Television Tab
From this display you schedule spots and enter rates (if desired) for the television portion of your
campaign. The schedule results will be listed for each program/time period and for all programs combined
as well as the campaign totals. The information available is dependent upon the estimates you selected.
63
QUALITAP User Manual
Spots
You may schedule spots by either of two methods: you can enter them directly or have QUALITAP
schedule the appropriate number of spots to attain certain goals.
•
To schedule spots directly, simply click on the appropriate line for each program under the Weekly
Spots column and enter the desired number of spots. To assign the same number of spots to each
program, click on the Television line and type in the number of spots you want for each program or
right click and select Global Assign.
•
To have QUALITAP schedule spots for you, you may enter a goal for any of the following estimates:
Reach %
Effective Reach %
Net Reach
GRP's
Frequency
Gross Impressions
Effective Net Reach
You may enter these goals per program by entering the desired level on each program's line in the
appropriate column. To assign the same goal for all programs, enter the desired level on the Television
line or right click and select Global Assign. The system will then calculate the necessary number of spots
to attain your goal.
Rates
You may either enter rates directly or have the system calculate the rate by assigning a CPP/CPM
or Total Cost goal.
•
To enter rates directly, you may click on each program's line under the Rate column and enter the rate.
To have QUALITAP calculate the rates by entering a desired CPP or CPM, you may enter a separate
CPP/CPM for each program, or you may enter a CPP/CPM on the Television line and the same CPP will
be assigned to each program and then the rates will be calculated for each program. You can enter a Total
Cost goal once spots have been assigned by typing in the budget for each program in the Total Cost
column. You may also assign CPP/CPM or Total Cost goals to all programs by right clicking and selecting
Global Assign.
Scheduling - Newspaper Tab
From this display you schedule spots and enter rates (if desired) for the newspaper portion of your
campaign. The schedule results will be listed for each newspaper and for all newspaper combined as well
as the campaign totals. The information available is dependent upon the estimates you selected.
Spots
You may schedule spots by either of two methods: you can enter them directly or have
QUALITAP schedule the appropriate number of spots to attain certain goals.
•
64
To schedule spots directly, simply click on the appropriate line for each newspaper under the # Inserts
column and enter the desired number of spots. To assign the same number of spots to each newspaper,
click on the Newspaper line and type in the number of inserts you want for each newspaper or right
Multi-Media Scheduling
click and select Global Assign.
•
To have QUALITAP schedule spots for you, you may enter a goal for any of the following estimates:
Reach %
Effective Reach %
Net Reach
GRP's
Frequency
Gross Impressions
You may enter these goals per newspaper by entering the desired level on each newspaper's line in the
appropriate column. To assign the same goal for all newspapers, enter the desired level on the Newspaper
line or right click and select Global Assign. The system will then calculate the necessary number of spots
to attain your goal.
Rates
You may either enter rates directly or have the system calculate the rate by assigning a CPP/CPM
or Total Cost goal.
•
To enter rates directly, you may click on each newspaper's line under the Rate column and enter the
rate.
•
To have QUALITAP calculate the rates by entering a desired CPP, you may enter a separate CPP for
each newspaper, or you may enter a CPP on the Newspaper line and the same CPP will be assigned to
each newspaper and then the rates will be calculated for each newspaper. You can enter a Total Cost
goal once spots have been assigned by typing in the budget for each newspaper in the Total Cost
column. You may also assign CPP/CPM or Total Cost goals to all newspapers by right clicking and
selecting Global Assign.
Column Inches/Ad Size
Newspaper sizes are based on standard advertising units (SAU's) which vary in size, depending on the
paper. The sizes are measured in columns (width) and inches (length). Each column measures 2 1/16
inches wide. The inches (length) can vary by ¼ increments. The total column inches are the columns
multiplied by the inches. For example, an ad is 6 columns by 10 inches. The ad would be called a 6 x 10
(columns are always listed first) and the total column inches would be 60.
The two most common sizes are:
•
Full-Page: 6 x 21
•
Half-Page: 6 x 10.5
No matter what the column inches is, the system defaults to one hundred percent noting. Every person that
reads the newspaper will note the ad making for an extremely high reach. To lower the reach, right-click
the mouse on the worksheet, select Noting Scores, and complete the worksheet.
Ad Size
You may enter this information in any format you wish (1/4, QTR). If you want to have more than one ad
size in your campaign for the same newspaper, you will need to add a duplicate line for the newspaper then
change the ad size.
To add duplicate lines of a newspaper, move the cursor to any column of the desired newspaper, then rightclick and select Duplicate Newspaper. The new line will be listed below the highlighted line. Edit the Ad
65
QUALITAP User Manual
Size for the new line. To delete a duplicated line, move the cursor to that line, right click and select Delete
Newspaper.
Noting Scores
Noting scores are the percent of men, women, and adults, who read the newspaper and actually note, or see,
the ad. For example, men note more ads in the sports section while women note more ads in the fashion
section, but neither note all the ads.
There are different noting scores for each ad size and demo. They default to one hundred percent; the same
as if 'Use Noting' was not selected.
Change the percentages for each ad size, men women, and adults. Select the 'Use Noting' boxes to use your
noting scores. Once you have made your changes, click OK to return to the Newspaper Scheduling screen.
Global Assign
You may assign global scheduling or rate goals to each station, program or newspaper with this option.
When you select this option, the Global Assign window will come up.
Choose one of the following Spot Based goals by clicking on the appropriate button and then entering the
desired level in the field provided.
Spots
Reach Percent (Reach Pct)
Frequency (Freq)
Effective Reach Percent (Eff Rch Pct)
Gross Rating Points (GRP)
Effective Net Reach (Net Eff Rch)
Net Reach
Choose one of the following Rate Based goals by clicking on the appropriate button and then entering the
desired level in the field provided.
Rate
66
CPP
Multi-Media Scheduling
Total Cost
CPM
After you have selected the type of goal and entered the value, click OK and you will return to the
scheduling screen. Your goals will be implemented and the system will make the appropriate calculations
based on those goals.
Weeks
You may change the number of weeks the schedule covers – the system defaults to one week. To change
the number of weeks, select the Weeks option from the right click menu and the Schedule Weeks window
will come up. Type in the desired number of weeks for your schedule and then click OK. When you
return to the scheduling screen, the system will re-calculate your reach and frequency computations to
reflect your change.
Printing a Multi-Media Schedule
You have several printing options available to you. For a detailed walk-through of all printing and charting
options, please refer to Printing and Graphing. To print the basic report (what you see on the screen), do
one of the following:
•
Click the Print button, located on the QUALITAP Tool Bar.
•
Click on the File button, located on the Windows Tool Bar and then select the Print option.
You can then choose to preview the report to see how the printout will look once the report is generated by
clicking Print Preview, or directly print the report by clicking Print.
How to Read a Multi-Media Schedule
Each different estimate on the Multi-Media Schedule report has a specific meaning. Use the following as a
guide when interpreting the numbers.
Average Rating
The percentage of the total qualitative population (within the target demographic and geographic area) who
listen to/view the station/program listed directly to the left, for at least five minutes, during any of the
quarter hours contained within the specified daypart or received the most recent edition of the paper to the
left.
NOTE: If you are analyzing TV estimates, and are using Scarborough data, estimates are based upon half
hour increments rather than quarter hour increments.
Cume Rating
The percentage of the total qualitative population (unduplicated) within the specified geography and
demographic, who listen to/view the station/program listed directly to the left for at least five minutes
during the specified daypart or received one of the last five issues of daily papers or the last four Sunday
papers.
Reach Percent (%)
The percentage of the targeted demo population exposed to the message one or more times. [formula –
Gross Rating Points (GRP's) divided by Frequency]
67
QUALITAP User Manual
Net Reach
The number of people who are exposed to a message one or more times. Net Reach is expressed in persons
rather than as a percentage.
Frequency
The average number of times the target demographic population will be exposed to the message. [formula –
Gross Rating Points (GRP's) divided by Reach %; or Gross Impressions divided by Net Reach]
Effective Net Reach
The number of people who are exposed to a message three or more times. Net Effective Reach is expressed
in persons rather than as a percentage.
Effective Reach Percent (%)
The percentage of the targeted demographic population that is exposed to the message three or more times.
Gross Rating Points (GRP’s)
The total accumulation of average rating points a schedule will yield, each rating point representing one
percent of the population. [formula – Reach multiplied by Frequency]
Gross Impressions
The total amount of exposures an advertising message will receive. This does NOT indicate the number of
different people the message will be exposed to. [formula – Average Persons multiplied by the Number of
Spots]
Cost per Point (CPP)
The cost of achieving one rating point, which represents one percent of the demographic population.
[formula – Total Cost divided by Gross Rating Points (GRP's)]
Cost Per Thousand (CPM)
The cost of achieving 1000 exposures within the target demographic one or more times. [formula – Total
Cost divided by Gross Impressions expressed in thousands (000's)]
68
Chapter
7
Demographic Profiles
Demographic Profiles allows you to analyze the composition, broken out by individual age cell per gender, of the
targeted group of people. You may analyze a qualitative group, a specific media’s audience, or combination of
both!
After clicking on the Demo button, the “Demographic Profile Menu” will appear displaying the following options:
Market Profile - uncover the age and sex makeup of a
geographic area, regardless of media habits
Radio Profile - analyze a radio station's audience to
find the age and sex composition.
TV Profile - find TV and Cable composition
characteristics for specific programming.
Newspaper Profile - uncover the composition of a
specific newspaper's readers.
Click the corresponding button of the Profile you wish to use, and you will be taken to the respective setup window.
To analyze a specific geographic area’s demographic composition, you will use this version of Profiles. Qualitative
characteristics may be applied if desired.
After selecting a Profile, its setup screen will be displayed.
Establishing the Parameters of the Report
Here, you will establish all of the parameters of this report. Click on each button to define the
corresponding setting.
Qualitap and its designs are marks of Arbitron Inc. Copyright © 2001 Arbitron Inc.
69
QUALITAP User Manual
Market/Survey
This field will reflect the current market and qualitative survey being used. Clicking on this button will
bring to screen the current data path, the available markets, and the corresponding surveys from which you
may select. To change the data path, click the Browse button, then double-click on the appropriate drive
and path of that new data. Click the OK button once complete, or simply press Enter.
To select a market and/or qualitative survey, highlight that line, then click the OK button; alternatively, you
may simply double-click on the market/survey line.
Use Listened Most Often Estimates
This option is only available with certain data such as International Demographics (Media Audit) and
Griffin Data. This option only pertains to radio listening. If this field is grayed-out, the option is not
available.
The question asked on the survey which determines Listened Most Often Estimates is: "To which (one)
radio station did you listen most often during the past week?"
Therefore, using Listen Most Often Estimates will result in smaller cume and average persons numbers.
Although this does not reflect listening exclusivity, these estimates may be used as an indicator of listener
loyalty.
Prizm® Survey
If you are using a national survey, you will need to select a Prizm® survey to produce local market data.
To select a survey, click on this button and the “Choose Market and Survey” menu will be brought to
screen that will display the Prizm® data path (usually the same as your Arbitron data) and the available
markets from which you may select. To change the data path, click the Browse button, then double-click
on the appropriate drive and path of that new data. Click the OK button once complete, or simply press
Enter. To select a market and/or survey, highlight that line, then click the OK button; alternatively, you
may simply double-click on the desired market/survey line.
Combos
To create and maintain station combos, you will enter into this portion of the system. After activating this
option, the “Combo Maintenance” screen will appear. At this screen, all previously created station combos
will be listed in the Combos box, with the corresponding station components for each combo listed in the
Stations box.
To add a combo, click the Add combo button. This will bring the “Create a Combo” box to screen. You
will define the new combo in one of the following ways:
•
Click on the desired station, then click the OK button;
•
Double-click on each desired station, then click the Add button;
•
Drag the cursor over a group of stations, then click the Add button.
Once you have identified all of the combo's components, click the OK button. If the station selection is
more than 30 characters long, you will be prompted to enter a Combo name. Type in that text, then click
the OK button. (You may customize any combo's name by clicking on that combo, highlighting the combo
name field and entering the revised name.)
To delete a previously created combo, highlight that combo, then click the Delete combo button. If you
would like to edit a combo, click on that line, then select Edit combo.
70
Demographic Profiles
Clicking on the Options button will bring the different comboing options available: “Display combos and
components,” and “Display combos only.” If you select “Display combos and components,” data will be
displayed for both created combos and each individual combo component (station). Choosing the latter
will result in data displayed for combo and non-combo stations only, suppressing the display of the
individual combo components.
For combos to be displayed on the report, make sure you click “Use Combos for this run.” If the “No
combos for this run” box is selected, combos will be suppressed from the report.
Once all combo maintenance is complete, click the OK button.
Stations
This is where you will select which stations will be profiled. *You may only profile one station at a time.
The system will default to all stations being selected. If you wish to keep this selection, you need not enter
this portion of QUALITAP. If you would like to narrow the stations to be displayed on the report, click this
button, and the “Stations Selection” menu will be displayed:
You will see all stations have been placed in the “Selected” box. To clear the selection, click the Clear
button. To select the stations that will be included on the report, do one of the following:
•
Double-click on the desired selection;
•
Click on the desired selection, then click on the Add button.
•
Drag the mouse over a group of selections, then click the Add button.
As you make each selection you will see each identified station move from the Available pool into the
Selected pool, indicating each will be included on the report. You may use the Search option to search
the station rosters for specific call letters. Select All will quickly move all stations from the Available box
to the Selected box, indicating all have been selected for inclusion on the breakout.
If you have selected a station for inclusion on the report, but would now like to remove it from the Selected
pool, highlight that station, and click Delete. It will then be moved back to the Available box.
Also, you can now save groups of radio stations for future retrieval at this screen. To save a media group,
after you have made the desired selection, click Save, give the group a name, then click OK. You will then
be able to retrieve that group with the Load button.
Once your station selection is complete, click the OK button.
71
QUALITAP User Manual
TV/Cable Inventory
This is where you will identify what program/station will be profiled. *You may only profile one
program/station at a time. After clicking this button the “TV/Cable Selection” window will appear:
You will see all programs/networks have been placed in the “Selected” box. To clear the selection, click
the Clear button. To select the programs/networks that will be included on the report, do one of the
following:
•
Double-click on the desired selection;
•
Click on the desired selection, then click on the Add button;
•
Drag the mouse over a group of selections, then click the Add button.
As you make each selection, you will see each identified program/station move from the Available pool
into the Selected pool, indicating each will be included on the breakout. You may use the Search option
to search the TV/Cable database for a specific text string. Select All will quickly move all
programs/networks from the Available box to the Selected box.
If you previously selected a program/station for inclusion on the report, but would like to remove it from
the Selected pool, highlight that line and click Delete. It will then be moved back to the Available box.
Also, you can save groups of TV/Cable Programs for future retrieval at this screen. To save a media group,
after you have made the desired selection, click Save, give the group a name, then click OK. You will then
be able to retrieve that group with the Load button.
You can sort the listing of television/cable programs for easier selection. Click on the Sort by… button
and you will be given several sort options:
72
•
Day/Time sorts the programs first by the day of the week (Mon - Sun) and then by the time of day
(starting at 6am), regardless of station/network.
•
Time/Day sorts the programs first by the time of day (starting at 6am) and then by the day of the week
(Mon - Sun), regardless of station/network.
•
Program Title sorts the programs alphabetically by the titles.
•
Station, Day & Time sorts the programs alphabetically by the station/network names, then by the day
of the week (Mon - Sun) and then by the time of day (starting at 6am).
•
Station, Time & Day sorts the programs alphabetically by the station/network names, then by the time
Demographic Profiles
of day (starting at 6am) and then by the day of the week (Mon - Sun).
To invoke the sorting, you may click on the desired sort order and then click OK, or you may simply
double-click on the sort order of your choice.
NOTE: This sort applies to stations/programs as listed in the AVAILABLE box, not the Selected box. So if
you have all programs selected and choose to sort, you will not see a change.
Once your programming/station selection is complete, click the OK button.
Newspaper
This is where you will identify which newspaper will be included on the profile. Keep in mind that only one
newspaper may be profiled at a time. After clicking this button the “Newspaper Selection” window will
appear:
You will see all newspapers have been placed in the “Selected” box. To clear the selection, click the Clear
button. To select the newspapers for inclusion on the report, you will do one of the following:
•
Double-click on the desired selection;
•
Click on the desired selection, then click on the Add button;
•
Drag the mouse over a group of selections, then click the Add button.
As you make each selection you will see each identified newspaper moved from the Available pool into the
Selected pool, indicating each will be included. You may use the Search option to search the Newspaper
database for a specific string of text. Select All will quickly move all newspapers from the Available box
to the Selected box, indicating all have been selected for inclusion on the ranker.
If you previously selected a newspaper for inclusion on the report, but would now like to remove it from
the Selected pool, highlight that line and click Delete. It will then be moved back to the Available box.
Also, you can save groups of newspapers for future retrieval at this screen. To save a media group, after
you have made the desired selection, click Save, give the group a name, then click OK. You will then be
able to retrieve that group with the Load button.
Once your newspaper selection is complete, click the OK button.
73
QUALITAP User Manual
Criteria
This is where you will define who (what group of people) will be analyzed. See Chapter Two for a
complete walk-through of defining qualitative criteria.
Geography
Here you will define the geographic area (universe) which will be used on the report. The system will
default to the DMA Survey Area. If you wish to keep this setting, you do not need to enter this portion of
QUALITAP. To redefine the geographic focus of the report, you will click this button. Please refer to
Chapter Two for a complete walk-through of defining a geographic area.
Estimates
If you wish to “hand-pick” the estimates to be displayed on this report, you will access this button. This
will bring you to the “Estimate Selection” menu:
You will see the pre-selected estimates displayed in the “Include” box. If you wish to keep these default
estimates, you need not make any modifications; simply click the OK or Cancel button.
To clear the estimate selection, click the Clear button, and all pre-selected estimates will be moved into the
“Available” box. To select the estimates that will be included on the profile, do one of the following:
•
Double-click on the desired selection;
•
Click on the desired selection, then click on the Add button;
•
Drag the mouse over a group of selections, then click the Add button.
As you make each selection you will see that estimate move from the Available pool into the Include box.
To de-select identified estimates, highlight that line then click the Delete button. The estimate will then be
moved back to the Available box.
Once your estimate selection is complete, click the OK button, and you will be brought back to the Profile
Setup screen.
The Demographic Profile Display
Once all parameters for this report are set properly, click the OK button, and the Demographic Profile will
74
Demographic Profiles
be displayed:
You have the ability to change any of the report’s parameters (i.e. criteria, geography, etc.) “on the fly.”
Do this by clicking on the various buttons listed in the header of the ranker, or by accessing the Edit button
on the Windows Tool Bar. Also, you may re-rank the report’s data based upon a different estimate with
one-click of the mouse! Simply click on that estimate’s column header. The system will then
automatically adjust accordingly the stations’ ranking order.
To copy information directly from the displayed report to the Windows Clipboard, drag the cursor over the
data to be copied. As you do this, the system will highlight the identified information. After all needed
information has been highlighted, click the Edit button located on the Windows Toolbar, and select Copy.
The information will then be copied immediately to the Clipboard, and may now be placed in another
document.
If you have multiple modules open, don’t forget that the cascading and tiling options are available within
the Window’s option on the Windows Tool Bar. (See Chapter One for more information and illustrations
of these options.)
Printing a Demographic Profile
You have several printing options available to you. For a detailed walk-through of all printing and charting
options, please refer to Chapter Eleven, “Printing and Graphing.” To print the basic report (what you see
on the screen), do one of the following:
•
Click the Print button, located on the QUALITAP Tool Bar;
•
Click on the File button, located on the Windows Tool Bar, then select the Print option.
The “Print Options” Menu will then be brought to screen.
75
QUALITAP User Manual
Here, all print settings will be displayed. This display may vary depending upon the printer being used. If
you need to change the printer selection, click the Setup button, then perform all printer maintenance as
normally done within any Windows’ environment.
Print Range
Where you will determine what is printed. This will default to all pages of the report being printed. If you
would like to print only a specific range (number of pages), click on the Pages field, and enter the page
range to be printed in the From and To fields.
Assembly
Where you establish how many copies of the report will be printed. The system will default to one copy.
To modify this, highlight the Copies field, then enter the desired number of copies to be printed. If you are
printing multiple copies of this report, and wish for the copies to be collated, click the Collate copies box.
When you are ready for QUALITAP to begin the print routine, select OK, and your report will be generated.
To exit the Demographic Profile, select File, then click on the Close setting.
How to read a Demographic Profile
Each different estimate on a Demographic Profile has a specific meaning. Use the following as a guide
when interpreting the numbers. All estimates are only valid for the current geographic area.
Target Persons - The number of people in the geographic area who fit the gender and age reflected
directly to the left AND meet the qualitative criteria.
Target Coverage - The percentage of the demographic group (listed directly to the left) in the geographic
area who meet the qualitative criteria.
Target Percent (%) of 18+ - Of the total geographic population (18+) who meet the qualitative criteria,
this is the percentage who meet the current demographic characteristics (listed directly to the left).
Geographic Persons - The total amount of people in the geographic area who meet the age/gender criteria
listed directly to the left, regardless if they meet the qualitative criteria.
Geographic Coverage
76
Demographic Profiles
This is the percentage of the total number of people in the geographic are who fit the demographic criteria
(listed to the left) and meet the qualitative criteria, regardless of radio listening habits.
Geographic Percent (%) of 18+ - Of the total geographic population (18+), this is the percentage that
meets the current demographic characteristics (listed to the left), regardless if they meet the qualitative
criteria.
77
Chapter
8
Geographic Breakouts
Geographic Breakout allows you to find out where targeted groups of people live. It is also here that you may
generate graphical maps to enhance your research. You may use counties or Zip Codes as the geographic bases of
each report.
After clicking on the Geo-Break button, the “Geographic Breakout Menu” will appear showing you the following
options:
Market Breakout - uncover geographic information
for the entire market, regardless of media habits.
Radio Breakout - analyze a radio station's audience to
find the counties and/or Zip Codes in which they live.
TV Breakout - analyze a TV or Cable program's
residential characteristics.
Newspaper Breakout - find the geographic
characteristics common to a specific newspaper's
readers.
Click on the button of the version of Geographic Breakout you want to use, and you will be taken to its
corresponding setup window. To analyze a specific area’s population characteristics, per county or Zip Code, you
will use this version of Geographic Breakout.
After selecting a Geographic Breakout, its setup screen will be displayed:
Establishing the Parameters of the Report
Here you will establish all parameters for this report. Click on each button to define the corresponding
setting.
Qualitap and its designs are marks of Arbitron Inc. Copyright © 2001 Arbitron Inc.
79
QUALITAP User Manual
Market/Survey
This field will reflect the current market and qualitative survey being used. Clicking on this button will
bring to screen the current data path, the available markets, and the corresponding surveys from which you
may select. To change the data path, click the Browse button, then double-click on the appropriate drive
and path of that new data. Click the OK button once complete, or simply press Enter.
To select a market and/or qualitative survey, highlight that line, then click the OK button; alternatively, you
may double-click on the market/survey line.
Counties/Zip Codes
This is where you will establish the benchmark of the Geographic Breakout. Click on the geographic
definition that will be the report’s focus. A darkened circle in a geographic definition indicates that
selection has been designated as the report’s base.
Use Listened Most Often Estimates
This option is only available with certain data such as International Demographics (Media Audit) and
Griffin Data. This option only pertains to radio listening. If this field is grayed-out, the option is not
available.
The question asked on the survey which determines Listened Most Often Estimates is: "To which (one)
radio station did you listen most often during the past week?"
Therefore, using Listen Most Often Estimates will result in smaller cume and average persons numbers.
Although this does not reflect listening exclusivity, these estimates may be used as an indicator of listener
loyalty.
Prizm® Survey
If you are using a national survey, you will need to select a Prizm® survey to produce local market data.
To select a survey, click on this button and the “Choose Market and Survey” menu will be brought to
screen that will display the Prizm® data path (usually the same as your Arbitron data) and the available
markets from which you may select. To change the data path, click the Browse button, then double-click
on the appropriate drive and path of that new data. Click the OK button once complete, or simply press
Enter. To select a market and/or survey, highlight that line, then click the OK button; alternatively, you
may simply double-click on the desired market/survey line.
Combos
To create and maintain station combos, you will enter into this portion of the system. After activating this
option, the “Combo Maintenance” screen will appear. At this screen, all previously created station combos
will be listed in the Combos box, with the corresponding station components for each combo listed in the
Stations box.
To add a combo, click the Add combo button. This will bring the “Create a Combo” box to screen. You
will define the new combo in one of the following ways:
•
Click on the desired station, then click the OK button;
•
Double-click on each desired station, then click the Add button;
•
Drag the cursor over a group of stations, then click the Add button.
Once you have identified all of the combo's components, click the OK button. If the station selection is
80
Geographic Break-outs
more than 30 characters long, you will be prompted to enter a Combo name. Type in that text, then click
the OK button. (You may customize any combo's name by clicking on that combo, highlighting the combo
name field and entering the revised name.)
To delete a previously created combo, highlight that combo, then click the Delete combo button. If you
would like to edit a combo, click on that line, then select Edit combo.
Clicking on the Options button will bring the different comboing options available: “Display combos and
components,” and “Display combos only.” If you select “Display combos and components,” data will be
displayed for both created combos and each individual combo component (station). Choosing the latter
will result in data displayed for combo and non-combo stations only, suppressing the display of the
individual combo components.
For combos to be displayed on the report, make sure you click “Use Combos for this run.” If the “No
combos for this run” box is selected, combos will be suppressed from the report.
Once all combo maintenance is complete, click the OK button.
Stations
This is where you will select which stations will be profiled. *You may only profile one station at a time.
The system will default to all stations being selected. If you wish to keep this selection, you need not enter
this portion of QUALITAP. If you would like to narrow the stations to be displayed on the report, click this
button, and the “Stations Selection” menu will be displayed:
You will see all stations have been placed in the “Selected” box. To clear the selection, click the Clear
button. To select the stations that will be included on the report, do one of the following:
•
Double-click on the desired selection;
•
Click on the desired selection, then click on the Add button.
•
Drag the mouse over a group of selections, then click the Add button.
As you make each selection you will see each identified station move from the Available pool into the
Selected pool, indicating each will be included on the report. You may use the Search option to search
the station rosters for specific call letters. Select All will quickly move all stations from the Available box
to the Selected box, indicating all have been selected for inclusion on the breakout.
If you have selected a station for inclusion on the report, but would now like to remove it from the Selected
pool, highlight that station, and click Delete. It will then be moved back to the Available box.
Also, you can now save groups of radio stations for future retrieval at this screen. To save a media group,
81
QUALITAP User Manual
after you have made the desired selection, click Save, give the group a name, then click OK. You will then
be able to retrieve that group with the Load button.
Once your station selection is complete, click the OK button.
TV/Cable Inventory
This is where you will identify what program/station will be profiled. *You may only profile one
program/station at a time. After clicking this button the “TV/Cable Selection” window will appear:
You will see all programs/networks have been placed in the “Selected” box. To clear the selection, click
the Clear button. To select the programs/networks that will be included on the report, do one of the
following:
•
Double-click on the desired selection;
•
Click on the desired selection, then click on the Add button;
•
Drag the mouse over a group of selections, then click the Add button.
As you make each selection, you will see each identified program/station move from the Available pool
into the Selected pool, indicating each will be included on the breakout. You may use the Search option
to search the TV/Cable database for a specific text string. Select All will quickly move all
programs/networks from the Available box to the Selected box.
If you previously selected a program/station for inclusion on the report, but would like to remove it from
the Selected pool, highlight that line and click Delete. It will then be moved back to the Available box.
Also, you can save groups of TV/Cable Programs for future retrieval at this screen. To save a media group,
after you have made the desired selection, click Save, give the group a name, then click OK. You will then
be able to retrieve that group with the Load button.
You can sort the listing of television/cable programs for easier selection. Click on the Sort by… button
and you will be given several sort options:
82
•
Day/Time sorts the programs first by the day of the week (Mon - Sun) and then by the time of day
(starting at 6am), regardless of station/network.
•
Time/Day sorts the programs first by the time of day (starting at 6am) and then by the day of the week
(Mon - Sun), regardless of station/network.
Geographic Break-outs
•
Program Title sorts the programs alphabetically by the titles.
•
Station, Day & Time sorts the programs alphabetically by the station/network names, then by the day
of the week (Mon - Sun) and then by the time of day (starting at 6am).
•
Station, Time & Day sorts the programs alphabetically by the station/network names, then by the time
of day (starting at 6am) and then by the day of the week (Mon - Sun).
To invoke the sorting, you may click on the desired sort order and then click OK, or you may simply
double-click on the sort order of your choice.
NOTE: This sort applies to stations/programs as listed in the AVAILABLE box, not the Selected box. So if
you have all programs selected and choose to sort, you will not see a change.
Once your programming/station selection is complete, click the OK button.
Newspaper
This is where you will identify which newspaper will be included on the profile. Keep in mind that only one
newspaper may be profiled at a time. After clicking this button the “Newspaper Selection” window will
appear:
You will see all newspapers have been placed in the “Selected” box. To clear the selection, click the Clear
button. To select the newspapers for inclusion on the report, you will do one of the following:
•
Double-click on the desired selection;
•
Click on the desired selection, then click on the Add button;
•
Drag the mouse over a group of selections, then click the Add button.
As you make each selection you will see each identified newspaper moved from the Available pool into the
Selected pool, indicating each will be included. You may use the Search option to search the Newspaper
database for a specific string of text. Select All will quickly move all newspapers from the Available box
to the Selected box, indicating all have been selected for inclusion on the ranker.
If you previously selected a newspaper for inclusion on the report, but would now like to remove it from
the Selected pool, highlight that line and click Delete. It will then be moved back to the Available box.
83
QUALITAP User Manual
Also, you can save groups of newspapers for future retrieval at this screen. To save a media group, after
you have made the desired selection, click Save, give the group a name, then click OK. You will then be
able to retrieve that group with the Load button.
Once your newspaper selection is complete, click the OK button.
Demo
The system's demographic default is Adults 18+. If you wish to keep this demographic selection, you do
not need to enter this portion of the system. To redefine the demographic focus of this report, you will click
this button. The “Demo Selection” screen will then be displayed. Identify the desired demographic in one
of the following ways:
•
Click on the desired gender, starting and ending age cells, then click the OK button;
•
Double-click on the demo among the listed demographic targets in the Favorite Demos window.
To save a defined demographic target to the Favorite Demos so that it may be retrieved at a later time,
define the gender and age, then click the Add to Favorites button.
Estimates
If you wish to edit the estimates to be displayed on this report, you will access this button. This will bring
you to the “Estimate Selection” menu:
You will see the pre-selected estimates displayed in the “Include” box. If you wish to keep these default
estimates, you need not make any modifications; simply click the OK or Cancel button.
To clear the estimate selection, click the Clear button, and all pre-selected estimates will be moved into the
“Available” box. To select the estimates that will be included on the report, do one of the following:
•
Double-click on the desired selection;
•
Click on the desired selection, then click on the Add button;
•
Drag the mouse over a group of selections, then click the Add button.
As you make each selection you will see that estimate move from the Available pool to the Include box.
To de-select identified estimates, highlight that line and then click the Delete button. The estimate will
then be moved back to the Available box.
84
Geographic Break-outs
Once your estimate selection is complete, click the OK button, and you will be brought back to the Market
Geographic Breakout setup screen.
Criteria
This is where you will define who (what group of people) will be analyzed. See Chapter Two for a
complete walk-through of defining qualitative criteria.
Geography
Here you will define the geographic area you wish to analyze. Although this is a geographic-based report,
you still must define the area you wish to analyze (i.e. DMA, Metro, or specific counties/zip codes). This
system will then use that specified area as its universe.
The system will default to the DMA Survey Area. If you wish to keep this setting, you do not need to enter
this portion of QUALITAP. To redefine the geographic focus of the report, you will click this button. Please
refer to Chapter Two for a complete walk-through of defining a geographic area.
The Geographic Breakout Display
Once all parameters for this report are set properly, click the OK button, and the Geographic Breakout
Profile will be displayed:
You have the ability to change any of the report’s parameters (i.e. criteria, geography, etc.) “on the fly.”
Do this by clicking on the various buttons listed in the header of the ranker, or by accessing the Edit button
on the Windows Tool Bar. Also, you may re-rank the report’s data based upon a different estimate with
one-click of the mouse! Simply click on that estimate’s column header. The system will then
automatically adjust accordingly the stations’ ranking order.
To copy information directly from the displayed report to the Windows Clipboard, drag the cursor over the
data to be copied. As you do this, the system will highlight the identified information. After all needed
information has been highlighted, click the Edit button located on the Windows Toolbar, and select Copy.
The information will then be copied immediately to the Clipboard, and may now be placed in another
document.
If you have multiple modules open, don’t forget that the cascading and tiling options are available within
the Window’s option on the Windows Tool Bar. (See Chapter One for more information on these options.)
85
QUALITAP User Manual
Printing a Geographic Breakout
If you want to print specific lines of a report, you must identify these lines PRIOR to entering the print
routine. You may do this in one of two ways:
1.
Click Options, highlight the Tag option, then select one of the pre-configured selections;
2.
Simply place the cursor in the first column of the spreadsheet, then simply single-click on each line
you wish to select. As each line is marked, you will see an asterisk placed in its first column.
You may print this report in one of the following ways:
•
Click the Print button, located on the QUALITAP Tool Bar;
•
Click on the File button, located on the Windows Tool Bar, then select the Print option.
The “Print Options” Menu will then be brought to screen.
Here, all print settings will be displayed. This display may vary depending upon the printer being used. If
you need to change the printer selection, click the Setup button, then perform all printer maintenance as
normally done within any Windows’ environment.
Print Range
Where you will determine what is printed. This will default to all pages of the report being printed. If you
would like to print only a specific range (number of pages), click on the Pages field, and enter the page
range to be printed in the From and To fields.
Assembly
Where you establish how many copies of the report will be printed. The system will default to one copy.
To modify this, highlight the Copies field, then enter the desired number of copies to be printed. If you are
printing multiple copies of this report, and wish for the copies to be collated, click the Collate copies box.
When you are ready for QUALITAP to begin the print routine, select OK, and your report will be generated.
To exit the Market Geographic Breakout, select File, then click on the Close setting.
86
Geographic Break-outs
How to Read a Market Geographic Breakout
Use the following as an aid when interpreting the numbers. Keep in mind all estimates are only valid for
the selected target demographic.
Percent (%) of County/Zip Code - Reflects the percentage of the county's/zipcode's residents (within the
selected demographic) who meet the qualitative criteria.
County/Zip Code Index - Indicates how likely the residents (who fit the selected demographic) of the
county/zipcode are of meeting the qualitative criteria.
Coverage Persons - This estimate could also be referred to as "qualifying persons;" this is the number of
people (within the selected demographic) who live in the specified county/zipcode and meet the qualitative
criteria.
Coverage Rating - The percent of the total geographic area who meet the demographic/qualitative criteria
and live in the specified county/zipcode.
Total Persons in County/Zip Code - Reflects the total demographic population for the county/zipcode,
regardless if the qualitative criteria are met.
Mapping
This feature allows you to generate desktop-quality maps detailing the geographic composition of specific
qualitative criteria. In addition, you may customize the aesthetic qualities of the map in multiple ways.
You must first bring to screen the Geographic Breakout report table. Once at this display, click on
Options (on the Windows taskbar), select Mapping then click on Map. The map will then be generated
and displayed. Once the map is displayed on screen, you may customize the look of the map. Do this by
clicking Options and selecting Mapping Options. This will bring the Map Configuration window to screen
where you will make all aesthetic modifications. This window contains four sections, each represented by a
tab:
Options Tab
Display Polygon Names:
Where you can toggle on/off the actual names
of the map’s counties or zip codes.
Display Polygon Values:
Where you can toggle on/off each counties/zip
code’s estimate.
Display Grid:
Places a grid behind the map’s display.
Color Scheme:
Choose between a Quintile (five color) or
Turtile (three color) based display. You will
define the actual colors for the chosen display
at the Colors window.
Choose Polygon Font:
Where you will choose the font in which each
item and estimate of the map’s data will be
displayed.
Percentage
This determines the amount of space between
the map and its legend.
Once you have made all modifications on this tab, click Apply, then click on the next tab you wish to go
87
QUALITAP User Manual
to, or click OK to go back to the Map display.
Colors Tab
This is where you will establish the actual colors used on the map.
Set the colors of the color scheme (chosen at the Options Tab) you are using only. Note that the colors
within the Quintile and Turtile boxes are segregated from Cold to Hot; Cold being the lowest ranking
county/zip code, Hot being the highest ranking.
The Other Colors box:
Text = color in which the names and estimates are displayed
Background = color of the body of the map and legend
Polygon Pen = color separating each county/zip code from the next
Frame Pen = color of the map frame
Grid Pen = color in which the map’s grid (if turned on) is displayed
Once you have made all modifications on this tab, click Apply, then click on the next tab you wish to go
to, or click OK to go back to the Map display.
Features
This is where you may turn on or off the map’s legend and/or title. Once finished, click Apply and click on
the next tab you wish to go to. Click OK to go back to the Map display.
Title
This tab holds the settings that control the design of the map’s title:
Text Field
Houses the map’s title text. To input a title, place the
cursor in this field and type-in that text.
Placement
Controls where the title will be displayed: either on the
top of the map’s display or at the bottom of the map.
Justification
How the title text will be justified.
Foreground
Controls the color in which the title text will be
displayed.
Background
Where you will select the color in which the title will be
displayed.
Window
proportion
The amount of spacing allotted for the title box.
Choose Font
Where you will select the font in which the title will be
displayed.
Once you have made all modifications, click OK to go back to the Map display. To close the map and
return to the Geographic Report, do one of the following:
88
Geographic Break-outs
•
Click on the X in the top right corner of the mapping window (Windows 95 users),
•
Press Control and the F4 key simultaneously
•
Click on Options, Mapping
User Strategies
This section focuses on the application of the information contained within this section of the system to
specific sales situations. The examples used refer to a medium (i.e. cable, radio, television). However, the
referenced medium was selected randomly, and other media may be used in its place. TAPSCAN clearly
does not mean this to imply that the immediate report, or Qualitap, is made specifically for that medium.
Let Geographic Profiles geographically qualify your audience to be considered for participation in an
advertising buy. It’s very simple!
Uncover Common Geographic Characteristics between the Target Group and Your
Audience
Scenario: A buy is up and the target is households with an annual income of $75 or higher. You are a
cable system… You want to get in on a buy but are being beat-up by other media. How can you get
consideration to get in on the buy?
Step one will be to find out where the target group of people lives. In this circumstance, we would run a
Market Geographic Profile using the criteria of “Household Income Level of $75K or higher.”
After you have found where people that meet the qualitative criteria live, and the resident allocation per
county/zip code, an easy but effective tactic would be to find how many of these people view or listen to
your station. In this situation, you could simply add “subscribes to cable” to the criteria:
89
QUALITAP User Manual
After comparing the two, we can clearly see that most of the households which have an income of $75K or
more in this market subscribe to cable; thus clearing showing how and why cable would be a viable
advertising vehicle for an advertiser!
Other ways to use Geographic Profiles in this or similar selling situation would be to profile your audience
(using no qualitative criteria) to show equal or similar resident allocation per county or zip code.
90
Chapter
9
Cross-Tabs
This portion of the QUALITAP System will allow you to identify several unique groups of people, then compare to
each other to discover duplication between each. Cross-tabs are an excellent way to uncover exclusivity of a specific
broadcast audience, and is also a valuable source for uncovering duplication between same and different media!
What is a Cross-Tab?
Think of a Cross-Tab as an upside-down
This side of the
“ L” is referred to
as the “ Rows” of
the Cross-Tab. Rows
are always displayed
vertically (along
the left side) of
the Cross-Tab table.
L:
This area is known as
the “ Columns” of the
Cross-Tab. Columns are
displayed horizontally
along the top of the
Cross-Tab table.
Both Rows and Columns represent different specific groups of people. For example, the Columns area on
the Cross-Tab could include “People who listen to KRRR Radio station and have a household income of
$50,000 or higher,” or “Residents of a Jefferson County who watch KJJJ’s 5pm News.” The Rows portion
could then contain “People who own a home and have two+ cars,” or “Viewers of CNN Headline News.”
After the Rows and Columns have been established for the Cross-Tab, you will be able to analyze each
from several different perspectives to discover information only available from cross-tabulations!
Building a Cross-Tab
After clicking the Cross-Tab button, the Cross-Tab Setup Screen will be displayed:
Qualitap and its designs are marks of Arbitron Inc. Copyright © 2001 Arbitron Inc.
91
QUALITAP User Manual
Cross-Tab Guidelines
This is where you will set all parameters of the report. As you set the different areas of Cross-Tabs, keep in
mind that, because of the different layers of information offered in Cross-Tabs, careful attention must be
paid when setting the different fields displayed at this screen. Here are a few tips to help guide you:
Selecting qualitative criteria (Criteria) IS NOT the same as selecting Rows or Columns. When you
set qualitative criteria, you are further defining your universe, thus immediately narrowing the scope of the
universe.
If qualitative criteria are selected, the Cross-Tab comparison will be limited only to those people
who first meet the qualitative criteria. People who meet either or both of the Column and Row criteria will
then be extrapolated from that group. This may, at times, cause the respondent count to be depleted to an
insufficient level.
If qualitative criteria is not selected, you will be analyzing the total population; thus giving you a
"purer" analysis of duplication between the two groups. This is because the Column and Row respondents
include ALL the people of the geographic universe who meet either or both of their criteria.
Establishing the Parameters of the Report
Click on each of the different buttons to establish the Cross-Tab's parameters.
92
Cross-Tabs
Survey
This field will reflect the current market and qualitative survey being used. Clicking on this button will
bring to screen the current data path, the available markets, and the corresponding surveys from which you
may select. To change the data path, click the Browse button, then double-click on the appropriate drive
and path of that new data. Click the OK button once complete, or simply press Enter.
To select a market and/or qualitative survey, highlight that line, then click the OK button; alternatively, you
may simply double-click on the market/survey line.
Prizm® Survey
If you are using a national survey, you will need to select a Prizm® survey to produce local market data.
To select a survey, click on this button and the “Choose Market and Survey” menu will be brought to
screen that will display the Prizm® data path (usually the same as your Arbitron data) and the available
markets from which you may select. To change the data path, click the Browse button, then double-click
on the appropriate drive and path of that new data. Click the OK button once complete, or simply press
Enter. To select a market and/or survey, highlight that line, then click the OK button; alternatively, you
may simply double-click on the desired market/survey line.
Use Listened Most Often Estimates
This option is only available with certain data such as International Demographics (Media Audit) and
Griffin Data, and only pertains to radio listening. If this field is grayed-out, the option is not available.
The question asked on the survey which determines Listened Most Often Estimates is: “To which (one)
radio station did you listen most often during the past week?” Therefore, using Listened Most Often
Estimates will result in smaller cume persons numbers. Although this does not reflect listening
“exclusivity,” these estimates may be used as an indicator of listener loyalty.
Multi-Market Crosstab
Check this box to open the Multi-Market Cross-Tab Setup window. See the section, Multi-Market CrossTab, later in this chapter.
Criteria
This is where you will define the qualitative aspects of the radio station’s audience, if any. Keep in mind
you may not wish to include qualitative criteria (see section 6a.2, Cross-Tab Guidelines). See Chapter
Two for a complete walk-through of defining qualitative criteria.
Geography
Here you will define the geographic area (universe) which will be used on the report. The system will
default to the DMA Survey Area. If you wish to keep this setting, you do not need to enter this portion of
QUALITAP. To redefine the geographic focus of the report, you will click this button. Please refer to
Chapter Two for a complete walk-through of defining a geographic area.
Demo
The system's demographic default is Adults 18+. If you wish to keep this demographic selection, you do
not need to enter this portion of the system. To set the demographic focus of this report, you will click this
button. The “Demo Selection” screen will then be displayed:
93
QUALITAP User Manual
Identify the desired demographic in one of the following ways:
•
Click on the desired gender, starting and ending age cells, then click the OK button;
•
Double-click on the demo among the listed demographic targets in the Favorite Demos window.
To add a demographic to the Favorite Demos box for future retrieval, define the gender and age, then click
the Add to Favorites button.
Combos
To create and maintain station combos, you will enter into this portion of the system. After activating this
option, the “Combo Maintenance” screen will appear where all previously created station combos will be
displayed in the Combos box. Each combo’s corresponding station components will be listed in the
Stations box.
To add a combo, click the Add combo button. This will bring the “Create a Combo” box to screen. You
will define the new combo in one of the following ways:
•
Click on the desired station, then click the OK button;
•
Double-click on each desired station, then click the Add button;
•
Drag the cursor over a group of stations, then click the Add button.
Once you have identified all of the combo's components, click the OK button. If the station selection is
more than 30 characters long, you will be prompted to enter a Combo name. Type in that text, then click
the OK button. (You may customize any combo's name by clicking on that combo, highlighting the combo
name field and entering the revised name.)
To delete a previously created combo, highlight that combo, then click the Delete combo button. If you
would like to edit a combo, click on that line, then select Edit combo.
Clicking on the Options button will bring the different combo options available: “Display combos and
components,” and “Display combos only.” If you select “Display combos and components,” data will be
displayed for both created combos and each individual combo component (station). Choosing the latter
will result in data displayed for combo and non-combo stations only, suppressing the display of the
individual combo components.
94
Cross-Tabs
For combos to be displayed on the report, make sure you click “Use Combos for this run.” If the “No
combos for this run” box is selected, combos will be suppressed from the report.
Once all combo maintenance is complete, click the OK button.
Identifying the Columns of the Cross-Tab
Now you will select the qualitative categories and/or media that will be included on the Columns portion of
the Cross-Tab.
After clicking the Columns button, you will be taken to the Categories Setup Screen where you will
identify those aspects you wish to include on the Cross-Tab’s Column area. You may select qualitative
lifestyle information, geographic residency, or media habit information for radio, television or newspaper.
(Note: If you are using a database in which you define your television inventory and wish to make changes
or additions, you will need to go to the Inventory Maintenance section of Setup to make those changes)
Much like when you are building qualitative criteria, the first step in selecting qualitative aspects for the
Cross-Tab is to identify the classification that contains the desired category. You may scroll through the
different classifications by using the up and down arrow keys displayed on the right side of the box. To
select the classification, single-click on that line.
After you have clicked on a Classification, the Category box will display the categories contained therein.
Click on the desired category, and the different lines of criteria contained within the specified
category will be displayed in the box below the Category box.
You are now ready to identify what qualitative aspects you wish to include within this Cross-Tab’s
Columns. Do this in one of the following ways:
•
Double-click on the desired selection;
•
Click on the desired selection, then click the Add button;
•
Drag the mouse over a group of selections, then click the Add button.
As you identify the different lines of criteria to be included, you will see each line displayed in the
“Selected Categories” box. If you would like to delete any selected criteria, simply highlight that line(s)
and click the Delete button.
Combining Categories in Cross-Tabs (Using And/Or/Not options)
When selecting the categories to be included on the Columns and Rows on a Cross-Tab, you may combine
qualitative characteristics using the “And,” “Or” and “Not” options. This means you can cross-reference
“People who own a home AND the value of the owned home is $200K or higher” with “People who have
NOT purchased furniture within the past year.”
To successfully combine criteria:
1.
Make your initial category selection by double-clicking on that category selection.
2.
After that criterion appears in the Selected Categories box, single-click on that line IN THE
SELECTED CATEGORIES BOX so that it is highlighted (shaded).
3. Click the And/Or/Not button (whichever one is applicable).
Locate the category to be combined with the initial selection, then double-click on the desired category
95
QUALITAP User Manual
selection.
Once you have selected all categories, click OK, and you will be taken back to the Cross-Tab Setup screen.
Use the up/down arrow keys to review your Column selections.
Identifying the Rows of the Cross-Tab
Here you will establish what will be the focus of the horizontal side of the Cross-Tab. Just as with the
Columns portion of the Cross-Tab, you may use a combination of different criteria, and each of the
category’s individual entities will comprise a “unit” of the Rows area. Use the following buttons to
establish the focus of the Rows:
After clicking the Rows button, you will be taken to the Categories Setup Screen where you will identify
those aspects you wish to include on the Cross-Tab’s Row area. You may select qualitative lifestyle
information, geographic residency, or media habit information for radio, television or newspaper. (Note: If
you are using a database in which you define your television inventory and wish to make changes or
additions, you will need to go to the Inventory Maintenance section of Setup to make those changes)
Much like when you are building qualitative criteria, the first step in selecting qualitative aspects for the
Cross-Tab is to identify the classification that contains the desired category. You may scroll through the
different classifications by using the up and down arrow keys displayed on the right side of the box. To
select the classification, single-click on that line.
After you have clicked on a Classification, the Category box will display the categories contained therein.
Click on the desired category, and the different lines of criteria contained within the specified
category will be displayed in the box below the Category box.
You are now ready to identify what qualitative aspects you wish to include within this Cross-Tab’s Rows.
Do this in one of the following ways:
•
Double-click on the desired selection;
•
Click on the desired selection, then click the Add button;
•
Drag the mouse over a group of selections, then click the Add button.
As you identify the different lines of criteria to be included, you will see each line displayed in the
“Selected Categories” box. If you would like to delete any selected criteria, simply highlight that line(s)
and click the Delete button.
Combining Categories in Cross-Tabs (Using And/Or/Not options)
When selecting the categories to be included on the Columns and Rows on a Cross-Tab, you may combine
qualitative characteristics using the “And,” “Or” and “Not” options. This means you can cross-reference
“People who own a home AND the value of the owned home is $200K or higher” with “People who have
NOT purchased furniture within the past year.”
To successfully combine criteria:
1.
96
Make your initial category selection by double-clicking on that category selection.
Cross-Tabs
2.
After that criterion appears in the Selected Categories box, single-click on that line IN THE
SELECTED CATEGORIES BOX so that it is highlighted (shaded).
Once you have selected all categories, click OK, and you will be taken back to the Cross-Tab Setup screen.
Use the up/down arrow keys to review your Row selections.
The Cross-Tab Display
Once all parameters for the Cross-Tab are set properly, click the OK button, and the report will appear.
You will see the criteria you selected for Columns will be displayed across the top of the Cross-Tab. Use
the Left/Right arrows, displayed in the bottom corners of the screen, to scroll through the different
columns of information.
The selected criteria for Rows will be displayed down the left side of the table. Use the Up/Down arrows,
displayed on the right side of the screen, to bring to screen the other lines of the Rows' information.
You may change the geographic focus, the qualitative criteria, or the target demographic of the Cross-Tab
by clicking on the corresponding button displayed in the header of the report. To copy information directly
from the displayed report to the Windows Clipboard, drag the cursor over the data to be copied. As you do
this, the system will highlight the identified information. After all needed information has been
highlighted, click the Edit button, located on the Windows Toolbar, and select Copy. The information
will then be copied immediately to the Clipboard, and may then be place in another document.
If you have multiple modules open, don’t forget that the cascading and tiling options which are available
within the Window’s option on the Windows Tool Bar. (See Chapter One for more information and
illustrations of these options.)
The Different Tabs of Information
At the bottom of the table the different tabs of information are displayed:
Each of these tabs represents a specific estimate. You will see there are five layers of information which
may be displayed. The system defaults to Persons. To switch to another estimate, simply click on that tab.
It is very important to have a clear understanding what each estimate on this screen means. Refer to section
97
QUALITAP User Manual
8 of this chapter for a complete definition of each. Keep in mind that if you set qualitative criteria at the
setup window, data reflected on this screen has met that criteria as well as the criteria of the Columns and
Rows.
Printing a Cross-Tab
You have several printing options available to you. For a detailed walk-through of all printing and charting
options, please refer to Chapter Eleven, “Printing and Graphing.”
If you wish to select which estimates print on the report:
•
Right click with your mouse, select Estimates, then place only those estimates you wish to print in
the "Include" box. Click OK once all desired estimates have been selected.
•
Click on the Edit button located on the Windows Tool Bar, select Estimates, then place only those
estimates you wish to print in the "Include" box. Click OK once all desired estimates have been
selected.
To print the basic report (what you see on the screen), do one of the following:
•
Click the Print button, located on the QUALITAP Tool Bar;
•
Click on the File button, located on the Windows Tool Bar, then select the Print option.
The “Print Options” Menu will then be brought to screen.
Here, all print settings will be displayed. This display may vary depending upon the printer being used. If
you need to change the printer selection, click the Setup button, then perform all printer maintenance as
normally done within any Windows’ environment.
Print Range
Where you will determine what is printed. This will default to all pages of the report being printed. If you
would like to print only a specific range (number of pages), click on the Pages field, and enter the page
range to be printed in the From and To fields.
98
Cross-Tabs
Assembly
Where you establish how many copies of the report will be printed. The system will default to one copy.
To modify this, highlight the Copies field, then enter the desired number of copies to be printed. If you are
printing multiple copies of this report, and wish the copies to be collated, click the Collate copies box.
When you are ready for QUALITAP to begin the print routine, select OK, and your report will be generated.
To exit the Cross-Tab, select File, then click on the Close setting.
How to Read a Cross-Tab
As with all QUALITAP reports, it is very important to have a clear understanding of what each estimate
means. Use the following as a guide when reading a Cross-Tab report. Keep in mind that if you set
qualitative criteria at the setup window, data reflected on this screen has met the criteria as well as the
criteria of the Columns and Rows. Also, all estimates on the Cross-Tab are only valid for the current demo
and geography.
Total Persons
Represents the total number of people who meet the immediate Rows' criteria (listed directly to the left),
regardless if they do or do not meet the immediate Columns' criteria (listed at the top).
Headline Totals
The total number of people who meet the immediate Columns' criteria (listed directly at the top of the
column), regardless if they do or do not meet the Rows' criteria (listed on the immediate left).
Persons
Represents the number of people who meet BOTH of the following:
1.
The Column's criteria (listed directly above).
2.
The specified Rows' criteria (listed directly to the left).
Non-Qualifying Persons
Represents the number of people who do BOTH of the following:
1.
Meet the Rows' criteria (listed directly to the left).
2.
DO NOT meet the specified Columns' criteria (listed directly up top).
Coverage
Of the total demographic population (qualitative population if you are using qualitative criteria) that meet
the Rows' criteria (listed directly to the left), this estimate represents the percentage that also meets the
immediate Columns' criteria (displayed at the top of the table).
Composition
Of the total demographic population (qualitative population if you are using qualitative criteria) that meet
the Columns' criteria (listed directly to the top of the table), this estimate represents the percentage that also
meets the immediate Rows' criteria (displayed to the left).
99
QUALITAP User Manual
Index
The likelihood of those people who meet the current Rows' criteria (listed directly to the left) of meeting
the criteria of the current Columns' criteria (listed directly to the top).
User Strategies
This section focuses on the application of the information contained within this section of the system to
specific sales situations. The examples used refer to a medium (i.e. cable, radio, television). However, the
referenced medium was selected randomly, and other media may be used in its place. TAPSCAN clearly
does not mean this to imply that the immediate report, or QUALITAP, is made especially for that medium.
Since Cross-Tabs are so versatile in that a great deal of information may be derived, use this portion of the
QUALITAP System to uncover duplication between like and different media, duplication between qualitative
groups of people, as well as duplication between a medium’s audience and a qualitative group of people.
Find Duplication Between Like and Unlike Media
Cross-Tabs has several different layers of information which are displayed on screen one at a time;
therefore, we will use the following table of data which has been extrapolated from Cross-Tab rather than
looking at the entire Cross-Tab report display:
Cable
Cable
Program A
Program B
Television
Persons
463,770
416,180
Program X
Coverage
35%
80%
Composition
67%
33%
Index
95
135
Looking at this portion of the report, we
uncover beneficial information from the
Television
Program
X’s
perspective:
Television Program X shares 35% of its
audience with Cable Program A; however,
Cable Program A shares 67% of its
audience with Television Program X.
If
the potential advertiser is only going to
buy
one
station
(either
Television
Program X or Cable Program A) Television
Program X has the advantage since there
is
less
duplication/higher
viewer
loyalty.
Now looking at this area, we
uncover
a
different
story:
Television Program X shares 80%
of its audience with
Cable
Program B; while Cable Program
B
only
shares
33%
of
its
audience.
Therefore,
this
would be more beneficial for
Cable Program B since it has
higher
viewer
loyalty/less
duplication.
And don’t forget … If you want to isolate one specific estimate for the printed report, activate the graphing
100
Cross-Tabs
options by clicking Chart on the Windows Tool Bar!
Use Cross-Tabs to Find Similarities Between Two Groups of People
A buy is up. This advertising campaign will be targeting are people who shop at Smith’s Department Store.
Your audience has a high concentration of people who shop at this store; however, on a ranker your station
places number ten. What other options do you have in order to qualify your station for this buy?
Solution: Since Cross-Tabs give you many different perspectives from which you may analyze data, use it
to accent the high concentration of these people which are included in your audience. In this circumstance,
we have graphed the Index estimate from the Cross-Tab:
Multi-Market Cross-Tab
The Multi-Market Cross-Tab is similar to a single market Cross-Tab with a few exceptions that we will
review later in this section. First, to open the Multi-Market Cross-Tab Setup window, start a regular CrossTab then select the ‘Multi-Market Cross-Tab’ box. Here is a closer look at the necessary steps:
Click the Cross-Tab button to open the Cross-Tab Setup window.
101
QUALITAP User Manual
Click this box to open the
Multi-Market Cross-Tab
Setup window.
Once the Multi-Market Cross-Tab window opens, you will set all parameters of the report. Note the
differences between the single and multi-market setup windows.
This button is now
used to select surveys
for multiple markets
and save them to a list.
Each survey is used as
a row in the final
Cross-Tab report.
The Categories are
now used as your
columns of the report.
Select as many
categories you want to
analyze.
After creating your
market lists, you can
select them from here.
One survey is used as
a template for the
other markets’
classifications and
categories. If the
same classifications
and categories are not
available for a market,
“N/A” is entered in its
column and row.
Establishing the Parameters of the Report.
Click on each of the different buttons to establish the parameters of your Multi-Market Cross-Tab:
Market/Survey
To use your saved multi-market list, select it from the drop down menu. To create a new market list, click
the Market/Survey button. The Multi-Market List Maintenance window opens:
102
Cross-Tabs
Here is the
list of
markets you
subscribe to.
The surveys for the
highlighted market
are listed here.
Click on the Market and the Survey to include, then click the Add button (or simply double click each survey to
add). Your selected surveys are added to the Current Multi-Market list box. Repeat the process until you
have made all your selections. You can also delete, save, or load a survey or list:
•
To remove a Market/Survey that you have already included in the Multi-Market List, highlight the
Market/Survey then click the Delete button.
•
To save your Market List, click the Save button, then choose your Criteria Survey.
•
To load a saved Multi-Market List, click the Load button. If there are no saved Multi-Market lists, the
load button will not be available until you create a Multi-Market List and save it.
Click OK or Criteria Survey to advance to the Criteria Survey Selection Screen.
Criteria Survey
A Survey Selection Market must be chosen after completing the Multi-Market List. Each survey you
selected for your Cross-Tab is listed.
103
QUALITAP User Manual
Select a market and survey based on the particular Criteria you want to profile.
•
The respondents are asked different questions resulting in different Criteria for each Survey. One
Survey may have the Criteria you need while another may not.
•
If the Category is not available for your additional market(s), no qualitative information will be
provided for them.
Click OK or press Enter after selecting the Criteria Survey.
Estimates
Select what data will be available for analysis. NOTE: This selection determines what estimates will be
printed on the report; however, you can change this selection after the Cross-Tab is displayed.
Demo
The system's demographic default is Adults 18+. If you wish to keep this demographic selection, you do
not need to enter this portion of the system. To set the demographic focus of this report, you will click this
button. The “Demo Selection” screen will then be displayed:
Identify the desired demographic in one of the following ways:
•
Click on the desired gender, starting and ending age cells, then click the OK button;
•
Double-click on the demo among the listed demographic targets in the Favorite Demos window.
To add a demographic to the Favorite Demos box for future retrieval, define the gender and age, then click
the Add to Favorites button.
Geography
Here you will define the geographic area (universe) which will be used on the report. The system will
default to the DMA Survey Area. If you wish to keep this setting, you do not need to enter this portion of
QUALITAP. To redefine the geographic focus of the report, you will click this button. Please refer to
Chapter Two for a complete walk-through of defining a geographic area.
104
Cross-Tabs
Criteria
This is where you will define the qualitative aspects of the audience, if any. Keep in mind you may not
wish to include qualitative criteria (see section 6a.2, Cross-Tab Guidelines). See Chapter Two for a
complete walk-through of defining qualitative criteria.
Categories (Identifying “what” you wish to know about the target)
After you select this button, you will immediately be taken to Categories Setup screen.
DON'T GET CONFUSED HERE! Although this screen is identical to the screen where you select
qualitative criteria, this is NOT where you identify "WHO" you are profiling, but "WHAT" you
wish to know about the target group.
Much like when you are building qualitative criteria, the first step in selecting qualitative aspects to be used
in this profile is to identify the classification that contains the desired categories. You may scroll through
the different classifications by using the up and down arrow keys displayed on the right side of the box. To
select the classification, single-click on that line.
After you have clicked on a Classification, the Category box will display the categories contained therein.
Click on the desired category, and the different lines of criteria contained within the specified categories
will be displayed in the box below the Category box.
You are now ready to identify what qualitative aspects you wish to uncover about the targeted group of
people. Do this in one of the following ways:
•
Double-click on the desired selection;
•
Click on the desired selection, then click the Add button;
•
Drag the mouse over a group of selections, then click the Add button.
As you identify the different lines of criteria to be included, you will see those displayed in the “Selected
Categories” box. If you would like to delete any selected criteria, simply highlight that line(s) and click the
Delete button.
Combining Categories (Using And/Or/Not options)
T
I
P
When selecting the categories for profiling, you may combine qualitative characteristics using
the “And,” “Or” and “Not” options. This means you can cross-reference “People who own a
home AND the value of the owned home is $200K or higher” with “People who have NOT
purchased furniture within the past year.”
To successfully combine criteria:
Make your initial category selection by double-clicking on that category selection.
After that criterion appears in the Selected Categories box, single-click on that line IN
THE SELECTED CATEGORIES BOX so that it is highlighted (shaded).
Click the And/Or/Not button (whichever one is applicable).
Locate the category to be combined with the initial selection, then double-click on the
desired category selection.
You will see that line in the Selected Categories box note the combined criteria.
105
QUALITAP User Manual
Once you have selected all needed lines of criteria for the report, click OK, and you will be taken back to
the Multi-Market Cross-Tab Setup window.
Once all of the Cross-Tab's criteria is properly set, click the OK button and you will be taken to the CrossTab display.
The Cross-Tab Display
Once all parameters for the Cross-Tab are set properly, click the OK button, and the report will appear.
You will see the categories you selected displayed across the top of the Cross-Tab, as columns. Use the
Left/Right arrows, displayed in the bottom corners of the screen, to scroll through the different columns of
information.
The selected markets and surveys are displayed down the left side of the table. Use the Up/Down arrows,
displayed on the right side of the screen, to bring to screen the other lines of the Rows' information.
You may change the geographic focus, the qualitative criteria, or the target demographic of the Cross-Tab
by clicking on the corresponding button displayed in the header of the report. To copy information directly
from the displayed report to the Windows Clipboard, click and drag the cursor over the data to be copied.
As you do this, the system will highlight the identified information. After all needed information has been
highlighted, click the Edit button, located on the Windows Toolbar, and select Copy. The information
will then be copied immediately to the Clipboard, and may then be place in another document.
If you have multiple modules open, don’t forget that the cascading and tiling options which are available
within the Window’s option on the Windows Tool Bar. (See Chapter One for more information and
illustrations of these options.)
The Different Tabs of Information
At the bottom of the table the different tabs of information are displayed:
These are your
markets and surveys
selected from Setup.
106
Cross-Tabs
Each of these tabs represents a specific estimate. You will see there are five layers of information which
may be displayed. The system defaults to Persons. To switch to another estimate, simply click on that tab.
It is very important to have a clear understanding what each estimate on this screen means. Refer to section
8 of this chapter for a complete definition of each. Keep in mind that if you set qualitative criteria at the
setup window, data reflected on this screen has met those criteria as well as the criteria of the Columns
and Rows.
107
Chapter
10
Profiles
An essential part of the QUALITAP System is the ability to learn different lifestyle characteristics of a particular
group of people; in other words, the ability to “profile.” Shopping habits, product consumption and media usage are
just a sampling of different areas of information you may learn about a targeted group of people.
After clicking on the Profile button from the QUALITAP Tool Bar, the “Target Profile Menu” will appear (Market
Profile Setup appears when configured as an agency) giving the following options:
Market Profile - profile a specific qualitative group of people
in one or more markets, regardless of media habits, in one
report. You may also profile an entire geographic population
without setting any qualitative parameters.
Radio Profile - profile a specific radio station's audience with
or without qualitative measures.
TV Profile - find common characteristics of a qualitative or
non-qualitative TV/Cable audience.
Newspaper Profile - uncover the lifestyle characteristics of a
newspaper's readers.
Select the version of Profiles you wish to use, and you will then be taken to its corresponding setup window.
Profile Guidelines
Here, you will set the parameters of this report; however, before you begin setting up these parameters,
please review the following Profile Guidelines:
Selecting qualitative criteria (Criteria) IS NOT the same as selecting "what" you wish to find out
about the target group of people. When you set qualitative criteria, you are further defining who you are
profiling. For example, if I select station WXXX-FM as who I want to profile, but then set “Income level of
$75K or higher” as the qualitative criteria, I will only be profiling those WXXX-FM listeners who have a
household income of $75K or higher. In many cases, qualitative criteria will not be needed unless you are
performing a Market Profile.
If qualitative criteria are selected, the Profile will be limited only to those people who first meet the
qualitative criteria. This may, at times, cause the respondent count to be depleted to an insufficient level.
Establishing the Parameters of the Report
To set the parameters for this report, use the various buttons displayed on the Target Profile Setup window:
Qualitap and its designs are marks of Arbitron Inc. Copyright © 2001 Arbitron Inc.
109
QUALITAP User Manual
Market/Survey
This field will reflect the current market and qualitative survey being used. Clicking on this button will
bring to screen the current data path, the available markets, and the corresponding surveys from which you
may select. To change the data path, click the Browse button, then double-click on the appropriate drive
and path of that new data. Click the OK button once complete, or simply press Enter.
To select a market and/or qualitative survey, highlight that line, then click the OK button; alternatively, you
may simply double-click on the desired market/survey.
Adjustment Survey
If you are using Arbitron data in conjunction with the qualitative data, you may select that book by clicking
on this button. Selecting an Arbitron book will result in adjusted estimates displayed on the ranker in
addition to the “pure” qualitative numbers. Once you click this button, the “Choose Market and Survey”
menu will be brought to screen that will display the Arbitron data path, the available markets and the
corresponding Arbitron books from which you may select. To change the data path, click the Browse
button, then double-click on the appropriate drive and path of that new data. Click the OK button once
complete, or simply press Enter. To select a market and/or survey, highlight that line, then click the OK
button; alternatively, you may simply double-click on the desired market/survey line.
Prizm® Survey
If you are using a national survey, you will need to select a Prizm® survey to produce local market data.
To select a survey, click on this button and the “Choose Market and Survey” menu will be brought to
screen that will display the Prizm® data path (usually the same as your Arbitron data) and the available
markets from which you may select. To change the data path, click the Browse button, then double-click
on the appropriate drive and path of that new data. Click the OK button once complete, or simply press
Enter. To select a market and/or survey, highlight that line, then click the OK button; alternatively, you
may simply double-click on the desired market/survey line.
Multi-Market Profile
When you select this option, you will be taken to the Multi-Market Target Profile Setup window. This
window is identical to the other Profile setup windows, except for the way you select surveys. The MultiMarket List screen appears when you click on the Market/Survey button. The Markets list box displays
the markets you subscribe to. The Surveys list box shows the surveys available for the highlighted market.
Click on the Market and the Survey to include, then click the Add button (or just double click the surveys).
Your selected surveys are added to the Current Multi-Market list box. Repeat the process until you have
made all your selections. You can also delete, save, or load a survey or list:
A Survey Selection Market must be chosen after completing the Multi-Market List.
110
Profiles
Choose the Market/Survey based on the particular Criteria you want to profile.
•
The respondents are asked different questions resulting in different Criteria for each Survey. One
Survey may have the Criteria you need while another may not.
•
If the Category is not available for your additional market(s), no qualitative information will be
provided for them.
Click OK or press Enter after choosing the Criteria Survey.
Aggregate Profile
Aggregate Profiles let you combine different markets on one report. In order to combine markets, the
survey periods must match. For example, markets using the Feb. 2000 to Jan. 2001 survey can be
combined. To start an Aggregate Profile, select the "Aggregate Profile" box from Market Profile Setup.
This window is identical to the other Profile setup windows, except for the way you select surveys. The
Multi-Market List screen appears when you click on the Market/Survey button. The Markets list box
displays the markets you subscribe to. The Surveys list box shows the surveys available for the highlighted
market.
Click on the Market and the Survey to include, then click the Add button (or just double click the surveys).
Your selected surveys are added to the Current Multi-Market list box. Repeat the process until you have
made all your selections. You can also delete, save, or load a survey or list:
Index Limit
This feature offers a unique option; you may limit the amount of information that will be displayed on the
report by narrowing the upper and lower indices of each category. For example, if I set my lower index at
90 and the upper index at 300, only categories with indices between 90 and 300 will be included on the
report. You will notice this box is comprised of two different fields: Low and High.
111
QUALITAP User Manual
The "Low" Window
Here you will enter the lowest index allowed for the category to be included on the report. This box
will default to “0” (zero). If you wish to keep this setting, you do not need to make any modifications.
Otherwise, highlight this field to enter the lowest index to be used.
The "High" Window
This box is where you will enter the upper-most index limit for this report. The upper limit will default
to "9999," which is the highest index available. If you wish to keep this setting, you do not need to
make any changes to this field. Otherwise, click on that field and enter the desired upper-most index to
be used.
Use Listened Most Often Estimates
This option is only available with certain data such as International Demographics (Media Audit) and
Griffin Data, and only pertains to radio listening. If this field is grayed-out, the option is not available.
The question asked on the survey which determines Listened Most Often Estimates is: “To which (one)
radio station did you listen most often during the past week?” Therefore, using Listen Most Often
Estimates will result in smaller cume and average persons numbers. Although this does not reflect listening
“exclusivity,” these estimates may be used as an indicator of listener loyalty.
Stations
Station selection has two functions: selecting the list of stations available for profiling and selecting the
specific station to be profiled (You may only profile one station at a time).
Click on the Stations button to select which stations will be available for profiling. The system will
default to all stations being selected. If you wish to keep this selection, you need not enter this portion of
QUALITAP. If you would like to narrow the stations to be displayed on the report, click this button, and the
“Stations Selection” menu will be displayed:
You will see all stations have been placed in the “Selected” box. To de-select this selection, click the
Clear button. To select the stations that will be included on the report, do one of the following:
•
Double-click on the desired selection;
•
Click on the desired selection, then click on the Add button;
•
Drag the mouse over a group of selections, then click the Add button.
As you make each selection you will see each identified station move from the Available pool into the
Selected pool, indicating each will be included on the profile. You may use the Search option to search
112
Profiles
the station rosters for specific call letters. Select All will quickly move all stations from the Available box
to the Selected box, indicating all have been selected for inclusion on the report.
If you have selected a station for inclusion on the report, but would like to remove it from the Selected
pool, simply highlight that station and click Delete. It will then be moved back to the Available box.
Once your station selection is complete, click the OK button.
To select the specific station to be profiled, click on the arrow button and then click on the desired station
from the drop down list.
Combos
To create and maintain station combos, you will enter into this portion of the system. After activating this
option, the “Combo Maintenance” screen will appear listing all previously created station combos in the
Combos box. The corresponding station components for each combo are listed in the Stations box.
To add a combo, click the Add combo button. This will bring the “Create a Combo” box to screen. You
will define the new combo in one of the following ways:
•
Click on the desired station, then click the OK button;
•
Double-click on each desired station, then click the Add button;
•
Drag the cursor over a group of stations, then click the Add button.
Once you have identified all of the combo's components, click the OK button. If the station selection is
more than 30 characters long, you will be prompted to enter a Combo name. Type in that text, then click
the OK button. (You may customize any combo's name by clicking on that combo, highlighting the combo
name field and entering the revised name.)
To delete a previously created combo, highlight that combo, then click the Delete combo button. If you
would like to edit a combo, click on that line, select Edit combo, then make the appropriate change.
Clicking on the Options button will bring the different combo options available: “Display combos and
components,” and “Display combos only.” If you select “Display combos and components,” data will be
displayed for both created combos and each individual combo component (station). Choosing the latter
will result in data displayed for combo and non-combo stations only, suppressing the display of the
individual combo components.
For combos to be displayed on the report, make sure you click “Use Combos for this run.” If the “No
combos for this run” box is selected, combos will be suppressed from the report.
Once all combo maintenance is complete, click the OK button.
TV Inventory
Inventory selection has two functions: selecting the programs/networks available for profiling and selecting
the specific program/network to be profiled (You may only profile one program at a time).
Click on the TV Inventory button to select which programs/networks will be available for profiling. After
clicking this button the TV/Cable Selection window will appear:
113
QUALITAP User Manual
All programs/networks have been placed in the “Selected” box. To clear the selection, click the Clear
button. To select the programs/networks to be included on the report, do one of the following:
•
Double-click on the desired selection;
•
Click on the desired selection, then click on the Add button.
•
Drag the mouse over a group of selections, then click the Add button.
As you make each selection you will see each identified program/network move from the available pool
into the Selected pool, indicating each will be included on the profile. You may use the Search option to
search the TV/Cable database for a specific string of text. Select All will quickly move all
programs/networks from the Available box to the Selected box, indicating all have been selected for
inclusion on the report.
If you have selected a program/network for inclusion on the report but would like to remove it from the
Selected pool, simply highlight that line and click Delete. Once your program/network selection is
complete, click the OK button.
To select the specific program/network to be profiled, click on the arrow button and then click on the
desired program/network from the drop down list.
Newspapers
Newspaper selection has two functions: selecting the list of papers available for profiling and selecting the
specific paper to be profiled (You may only profile one paper at a time).
Click on the Newspapers button to select which newspapers will be available for profiling. Click this
button and to access the Newspaper Selection window:
You will see all newspapers have been placed in the “Selected” box. To clear the selection, click the Clear
button. To select the newspapers for inclusion on the report, you will do one of the following:
114
Profiles
•
Double-click on the desired selection;
•
Click on the desired selection, then click on the Add button;
•
Drag the mouse over a group of selections, then click the Add button.
As you make each selection, each identified newspaper moves from the Available pool into the Selected
pool, indicating each will be included on the profile. Use the Search option to search the Newspaper
database for a specific text string. Select All will quickly move all newspapers from the Available box to
the Selected box, indicating all have been selected for inclusion on the report.
If you selected a newspaper for inclusion on the report, but would like to remove it from the Selected pool,
simply highlight that line, and click Delete. It will then be moved back to the Available box.
Once your newspaper selection is complete, click the OK button.
To select the specific paper to be profiled, click on the arrow button and then click on the desired
newspaper from the drop down list.
Estimates
To edit the estimate selection for this report, click this button. The “Estimate Selection” menu will then be
displayed:
You will see the pre-selected estimates displayed in the “Include” box. If you wish to keep these default
estimates, you need not make any modifications; simply click the OK or Cancel button.
To clear the estimate selection, click the Clear button, and all pre-selected estimates will be moved into the
“Available” box. To select the estimates that will be included on the report, do one of the following:
•
Double-click on the desired selection;
•
Click on the desired selection, then click on the Add button;
•
Drag the mouse over a group of selections, then click the Add button.
As you make each selection you will see that estimate move from the Available pool into the Include box.
To de-select identified estimates, highlight that line, and click the Delete button. The estimate will then be
moved back to the Available box.
Once your estimate selection is complete, click the OK button, and you will be brought back to the Total
Market Profile Setup screen.
115
QUALITAP User Manual
Demo
The system's demographic default is Adults 18+. If you wish to keep this demographic selection, you do
not need to enter this portion of the system. To redefine the demographic focus of this report, you will click
this button. The “Demo Selection” screen will then be displayed. Identify the desired demographic in one
of the following ways:
•
Click on the desired gender, starting and ending age cells, then click the OK button;
•
Double-click on the demo among the listed demographic targets in the Favorite Demos window.
To save a defined demographic target to the Favorite Demos so that it may be retrieved at a later time,
define the gender and age, then click the Add to Favorites button.
Criteria
This is where you will define the qualitative aspects of the radio station’s audience, if any. Please refer to
Chapter Two for a complete walk-through of defining qualitative criteria.
Geography
Here you will define the geographic area (universe) which will be used on the report. The system will
default to the DMA Survey Area. If you wish to keep this setting, you do not need to enter this portion of
QUALITAP. To redefine the geographic focus of the report, you will click this button. Please refer to
Chapter Two for a complete walk-through of defining a geographic area.
Selecting the Profile’s Categories (Identifying “what” you wish to know
about the target)
After you select this button, you will immediately be taken to Categories Setup screen.
NOTE: Although this screen is identical to the screen where you select qualitative criteria, this is NOT
where you identify "WHO" you are profiling, but "WHAT" you wish to know about the target
group.
Much like when you are building qualitative criteria, the first step in selecting qualitative aspects to be used
in this profile is to identify the classification that contains the desired categories. You may scroll through
the different classifications by using the up and down arrow keys displayed on the right side of the box. To
select the classification, single-click on that line.
After you have clicked on a Classification, the Category box will display the categories contained therein.
Click on the desired category, and the different lines of criteria contained within the specified categories
will be displayed in the box below the Category box.
You are now ready to identify what qualitative aspects you wish to uncover about the targeted group of
people. Do this in one of the following ways:
•
Double-click on the desired selection;
•
Click on the desired selection, then click the Add button;
•
Drag the mouse over a group of selections, then click the Add button.
As you identify the different lines of criteria to be included, you will see those displayed in the “Selected
116
Profiles
Categories” box. If you would like to delete any selected criteria, simply highlight that line(s) and click the
Delete button.
Combining Categories (Using And/Or/Not options)
When selecting the categories for profiling, you may combine qualitative characteristics using the “And,”
“Or” and “Not” options. This means you can cross-reference “People who own a home AND the value of
the owned home is $200K or higher” with “People who have NOT purchased furniture within the past
year.”
To successfully combine criteria:
1.
Make your initial category selection by double-clicking on that category selection.
2.
After that criterion appears in the Selected Categories box, single-click on that line IN THE
SELECTED CATEGORIES BOX so that it is highlighted (shaded).
3.
Click the And/Or/Not button (whichever one is applicable).
4.
Locate the category to be combined with the initial selection, then double-click on the desired category
selection.
You will see that line in the Selected Categories box note the combined criteria.
Once you have selected all needed lines of criteria for the report, click OK, and you will be taken back to
the Market Profile Setup screen.
The Market Profile Display
Once all parameters for this report are set properly, click the OK button, and the Market Profile will be
displayed:
You will see the previously selected categories listed down the left side of the table. Use the Up/Down
arrows, displayed on the right side of the screen, to bring to screen other categories.
You may re-rank the report’s ranking order based upon another estimate by clicking on that estimate’s
117
QUALITAP User Manual
column header. The system will then automatically adjust the data’s ranking order accordingly. You may
change any of the pre-set report’s parameters by clicking on the various buttons listed in the header of the
report, or by accessing the Edit button located on the Windows Tool Bar.
To copy information directly from the displayed report to the Windows Clipboard, drag the cursor over the
data to be copied. As you do this, the system will highlight the identified information. After all needed
information has been highlighted, click the Edit button located on the Windows Tool bar, and select
Copy. The information will then be copied immediately to the Clipboard, and may now be placed in
another document.
If you have multiple modules open, don’t forget that the cascading and tiling options which are available
within the Window’s option on the Windows Tool Bar. (See Chapter One for more information on these
options.)
Printing a Target Profile
You have several printing options available to you. For a detailed walk-through of all printing and charting
options, please refer to Chapter Eleven, “Printing and Graphing.” To print the basic report (what you see
on the screen), do one of the following and the “Print Options” Menu will then be brought to screen.
•
Click the Print button, located on the QUALITAP Tool Bar;
•
Click on the File button, located on the Windows Tool Bar, then select the Print option.
At the Print Options menu, all print settings will be displayed. This display may vary depending upon the
printer being used. If you need to change the printer selection, click the Setup button, then perform all
printer maintenance as normally done within any Windows’ environment.
Print Range
Where you will determine what is printed. This will default to all pages of the report being printed. If you
would like to print only a specific range (number of pages), click on the Pages field, and enter the page
range to be printed in the From and To fields.
Assembly
Where you establish how many copies of the report will be printed. The system will default to one copy.
To modify this, highlight the Copies field, then enter the desired number of copies to be printed. If you are
printing multiple copies of this report, and wish for the copies to be collated, click the Collate copies box.
When you are ready for QUALITAP to begin the print routine, select OK, and your report will be generated.
To exit the Market Profile, select File, then click on the Close setting.
How to Read a Profile
Use the following as a guide when interpreting the data on the Market Profile. Keep in mind the estimates
on the report are only representative of people who meet the selected geography and demography.
Respondents - the number of actual survey participants who:
118
•
Fit the qualitative criteria (if any), and live in the specified geographic area.
•
Meet the specified media criteria (i.e. Radio, TV/Cable station, Newspaper) (if any).
Profiles
•
Meet the category's criteria listed directly on the left of the table.
Qualifying Persons - the number of people surveyed who fit the qualitative criteria (if any) and meet the
category's criteria listed directly on the left.
Cume Persons - the total number of people who meet the qualitative criteria (if any), the category's criteria
(listed directly to the left) AND listen to/view/read the specified medium.
Cume Rating - the percent of all the people in the geographic area who meet the qualitative (if any) and
current category's criteria (listed directly to the left) that listen to/view/read the specified medium.
Percent (%) of Station - the percent of all the people in the geographic area who listen to/view the
profiled medium and meet the qualitative criteria (if any) that meet the current category's criteria (listed
directly to the left).
Percent (%) of Left - This estimate uses the total amount of people who meet the category's criteria, listed
directly to the left, as its universe. This represents the percentage of that group of people who also meet the
qualitative criteria (if any).
Percent (%) of Top - This estimate uses the total amount of people who meet the qualitative criteria (if
any) as its universe. This represents the percentage of that group who also meet the category's criteria
directly to the left.
Index - The likelihood of the group of people, listed directly to the left, of meeting the qualitative criteria
(if any).
Station Index - The likelihood of people who meet the qualitative criteria (if any) and the immediate
category's criteria (listed directly to the left) of listening to or viewing the specified station/program.
User Stratagies
This section focuses on the application of the information contained within this section of the system to
specific sales situations. The examples used refer to a medium (i.e. cable, radio, television). However, the
referenced medium was selected randomly, and other media may be used in its place. TAPSCAN clearly
does not mean this to imply that the immediate report, or QUALITAP, is made especially for that medium.
Maximize the different information ascertained within Profiles by using the following as templates when
various selling situations are encountered.
Break or Confirm Stereotypes
One of the most powerful ways to use the Profiling module of QUALITAP is to break or confirm typical
stereotypes of different groups of people. Lets take a look at one case-in-point where a Profile report
would be helpful:
Scenario: A buy is up for an upscale car dealership (we’ll say a Lexus dealership). The buyer
has mandated the target at Males 45-64 with Household income levels of $75,000+.
Unfortunately, your station tends to attract females 18 to 54. How can you get consideration
for this opportunity?
Solution: Use Profiles to find if the buyer is “on-target” with who he/she is focusing the
advertising efforts.
119
QUALITAP User Manual
Step One: Run a Market Profile on the targeted group of people (i.e. who you wish to learn about). In
this example, we will identify those people who tend to buy/lease upscale cars.
Step Two: Identify pertinent categories that will reveal information about this group of people. In this
example, we will identify age, sex and income levels.
Step Three: Review the information:
The display below is the Market Profile showing the Age Breakout. Since the Percent of Top estimates
focuses on tendencies of the targeted group of people, we have turned off all other estimates except that for
this example.
120
Profiles
Question: Should the buyer focus his/her advertising on the 45 to 64 age cells?
Keep in mind that the number of categories which you can add the Percent of Top
column to obtain a full allocation of 100 percent is limited to only those categories in
which duplication is not possible (i.e. Age & Sex).
23.6 Percent of those people
in this market who own or
lease an upscale car are
between the ages of 35 and 44.
That’s almost one out of every
four!
32 Percent of the people in
this market that own or lease
an upscale car fall into the
targeted demographic.
Does
this mean the advertiser does
not care about reaching the
other 68 percent?
Answer: Based upon the above information, would this dealership’s advertising efforts reach
more potential clients if target age was broadened to 35+, rather than concentrating on the 45-64
age cells?
Next question: Is a complete focus on Males a smart advertising decision?
To answer this question, let’s examine the gender composition of this same group of people:
52.4 Percent of all the upscale car owners are male.
However, 47.6 percent are females
… that’s almost half. Does the
dealership wish to exclude that
much of its clientele from its
advertising efforts?
Answer: Advertising efforts would probably be better spent on a less male-skewing message.
121
QUALITAP User Manual
Question: Is it a correct assumption that only households of $75K or more own up-scale cars?
22.9 Percent have a
household income of $50k to
74K … that’s more than the
$75K or higher level!
Only 22 percent (21.9%) of
upscale car owners have a
household income of $75,000
or higher.
Answer: Perhaps the advertising campaign would yield better results if focused more towards
more middle-income households.
Summary: Going into this selling situation, the pre-set target of advertising was Males, 45-64 with a
household income of $75K or higher.
After reviewing the information that you provided from Profiles, the advertiser should have a more
enhanced understanding of different lifestyle characteristics common among his/her clientele.
(Providing the “non-bias” information will automatically lend to your credibility.) The logical
assumption and final conclusion will more than likely be the buyer widening his or her target to reflect
what the data has shown he/she should target; thus opening the door for your station to get in on the
buy!
An excellent complement to this profile report is to profile your station (Radio, TV, Cable Profile) with
no criteria, and using the same categories you used when profiling the target group of people. Once
that information is derived, you can highlight the similarities between the targeted group of people and
your audience. This will give you the statistics necessary for a more powerful presentation.
122
Profiles
Highlight Media Usage or Non-Usage
Profiles can be extremely powerful when wanting to accent media habits of a targeted group of people.
Viewing the data from various angles can add a strategic spin on your presentation! Lets look at the
following scenario:
Scenario: You are attempting to persuade an advertiser to move dollars from print to invest them on
your station … You need more ammunition than just, “People don’t read newspaper advertisements.”
How can QUALITAP help?
Answer: Use Profiles to uncover newspaper readership.
The following is a Market Profile of households with income levels of $75K or higher. The category
displayed shows the estimates of that group that did NOT read the specified newspapers. Lets see how
this information would be beneficial for you in this selling situation. (Once again, since Percent of
Top reflects the characteristics of the targeted group of people, we have isolated only that estimate.)
Use the profile to
highlight media usage …
In this example, we see a
large percentage of our
target group does NOT
read daily newspapers …
However, Profiles may
also be used to accent
the high percentage of
radio listeners, cable
subscribers and TV
viewers!
Multi-Market Profiles
To start a Multi-Market Profile, click the Profile button then Market Profile to open the Market Target
Profile Setup window (if you are an agency, only click the Profile button).
123
QUALITAP User Manual
Select this box to open
the Multi-Market Profile
Setup window.
Establishing the Parameters of the Report
After you select Multi-Market Profile, the Multi-Market Target Profile Setup window opens. Here, you will
set the parameters of this report.
Market/Survey
To use your saved multi-market list, select it from the drop down menu. To create a new market list, click
124
Profiles
the Market/Survey button. The Multi-Market List Maintenance window opens:
The Markets list box displays the markets you subscribe to. The Surveys list box shows the surveys
available for the highlighted market.
Click on the Market and the Survey to include, then click the Add button (or just double click the surveys).
Your selected surveys are added to the Current Multi-Market list box. Repeat the process until you have
made all your selections. You can also delete, save, or load a survey or list:
•
To remove a Market/Survey that you have already included in the Multi-Market List, highlight the
Market/Survey then click the Delete button.
•
To save your Market List, click the Save button, then choose your Criteria Survey.
•
To load a saved Multi-Market List, click the Load button. If there are no saved Multi-Market lists, the
load button will not be available until you create a Multi-Market List and save it.
Click OK or Criteria Survey to advance to the Criteria Survey Selection Screen.
Criteria Survey
A Survey Selection Market must be chosen after completing the Multi-Market List.
125
QUALITAP User Manual
Choose the Market/Survey based on the particular Criteria you want to profile.
•
The respondents are asked different questions resulting in different Criteria for each Survey. One
Survey may have the Criteria you need while another may not.
•
If the Catagory is not available for your additional market(s), no qualitative information will be
provided for them.
Click OK or press Enter after choosing the Criteria Survey.
Estimates
Select what data will be available for analysis. NOTE: This selection determines what estimates will be
printed on the report; however, you can change this selection at the Cross-Tab display.
Demo
The system's demographic default is Adults 18+. If you wish to keep this demographic selection, you do
not need to enter this portion of the system. To set the demographic focus of this report, you will click this
button. The “Demo Selection” screen will then be displayed:
Identify the desired demographic in one of the following ways:
•
Click on the desired gender, starting and ending age cells, then click the OK button;
•
Double-click on the demo among the listed demographic targets in the Favorite Demos window.
To add a demographic to the Favorite Demos box for future retrieval, define the gender and age, then click
the Add to Favorites button.
126
Profiles
Geography
Here you will define the geographic area (universe) which will be used on the report. The system will
default to the DMA Survey Area. If you wish to keep this setting, you do not need to enter this portion of
QUALITAP. To redefine the geographic focus of the report, you will click this button. Please refer to
Chapter Two for a complete walk-through of defining a geographic area.
Criteria
This is where you will define the qualitative aspects of the audience, if any. Keep in mind you may not
wish to include qualitative criteria (see section 6a.2, Cross-Tab Guidelines). See Chapter Two for a
complete walk-through of defining qualitative criteria.
Once you have selected all needed lines of criteria for the report, click OK, and you will be taken back to
the Multi-Market Target Profile Setup window. Click the OK button once you are ready to proceed and
you will advance to the Market Profile display.
The Multi-Market Profile Display
Once all parameters for this report are set properly, click the OK button, and the Multi-Market Profile will
be displayed:
You will see the selected markets listed down the left side of the table. Use the Up/Down arrows,
displayed on the right side of the screen, to bring to screen other markets.
You may re-rank the report’s ranking order based upon another estimate by clicking on that estimate’s
column header. The system will then automatically adjust the data’s ranking order accordingly. You may
change any of the pre-set report’s parameters by clicking on the various buttons listed in the header of the
report, or by accessing the Edit button located on the Windows Tool Bar.
To copy information directly from the displayed report to the Windows Clipboard, drag the cursor over the
data to be copied. As you do this, the system will highlight the identified information. After all needed
information has been highlighted, click the Edit button located on the Windows Tool bar, and select
Copy. The information will then be copied immediately to the Clipboard, and may now be placed in
another document.
127
QUALITAP User Manual
If you have multiple modules open, don’t forget that the cascading and tiling options which are available
within the Window’s option on the Windows Tool Bar. (See Chapter One for more information on these
options.)
128
Chapter
11
Printing and Graphing
There are two basic ways to enter the print queue in Qualitap for Windows; both will allow you to print out
the report. To print the basic report (what you see on the screen), simply click the Print button, located on
the Qualitap for Windows' Toolbar; alternatively, you may click on File, then select Print.
Qualitap’s flexible graphing options are available to you so that you can enhance your sales or media
presentations and make them more effective and illustrative. Also, the Print Preview option allows you to
see how any report or graph will look when printed, before you print the actual printout.
To access graphing, print preview and the tag mode, you will use the Windows Tool Bar that is located
directly above the Qualitap for Windows Tool Bar. Clicking on each of the various options will bring the
corresponding window listing the corresponding function. Several of the options listed are traditional
Windows options, available with any Windows-based application; however, some are exclusive to the
Qualitap for Windows System.
Click on the File button of the Windows Tool Bar, and a drop-down menu will appear offering the
following print options:
Print: Will enter you into the print queue. (Same as clicking the Qualitap Tool Bar’s Print button.
Print All: If you have multiple modules open, this option allows you to batch print.
Preview: Will display the print process’ finished product without printing out the report.
Preview All: If you have multiple reports open, you may see how each will look when printed before you
print.
Print
Clicking this option on the File Menu will immediately send the current report’s data to the print queue.
You will see the system processing this information. After it has been sent, the Print Options Menu will be
brought to screen displaying the different options available to you. This menu’s information will vary
depending upon the type of printer you are using.
OK Button - Click the OK button once you are ready to print the report.
Cancel Button - Takes you back to the report display and cancels the print job.
Setup - Allows you to perform more detailed printing adjustments.
Print Range - This is where you will determine is the entire report will be printed, or only a specific
number of pages. The system will default to Entire Document selected. To change this and print only a
specific number of pages (range), click on the Pages field, then enter the page range to be printed in the
From and To boxes.
Assembly - Where you establish how many copies of the report will be printed. The system will default to
one copy. To modify this, highlight the Copies field and then enter the desired number of copies to be
printed. If you are printing multiple copies of this report, and wish for the copies to be collated, click the
Collate copies box.
Special Instructions - If you are using a color printer, you may suppress the color from the printed report
by clicking on this box’s option.
Qualitap and its designs are marks of Arbitron Inc. Copyright © 2001 Arbitron Inc.
129
QUALITAP User Manual
Print All
If you have several different reports open, this option will let you batch print them at one time. This means
you can send all to the printer queue, then leave the computer unattended. After clicking this option, the
Reports Selection window will be displayed offering the following options:
Available Reports Field: This area will list all reports that are available to be printed. Single-click on each
report you would like to print. As you do this, you will see each identified report highlighted.
Print: After you identify which reports to print, click this button, and you will be taken to the Print Options
menu. (See previous section.)
Preview: If you click this button, the system will display the finished product of all displayed reports,
without actually printing the reports. (See the next section for a more detailed explanation.)
Select All: Clicking this button will quickly identify all reports for printing.
Cancel: This will bring you back to the report without sending any information to the printer.
Maximize Preview: When selected, this option will enlarge the preview window to a full-screen display.
Preview
These options let you see what the printed report will look like before entering the print routine. There are
on-screen buttons, as well as other options accessed by right-clicking.
The first of the Preview options is Preview. This option will let you see the current report’s printed results.
After selecting this option, the system will quickly generate the report, and will then display it on the
screen. Use the Preview Toolbar, displayed in the upper left corner of the screen, to achieve the desired
action.
Preview's Toolbar
Exit: Takes you back to the report display without sending any of the report’s information to the
printer.
Open: Let’s you open printed reports that you saved.
Save: Let’s you save any report in its printed format.
Options: This is where you can customize the report by changing its layout and “How to Read”
statement that prints on the bottom of the report.
Print: Send the report information to the print queue. The Print Options menu will then be displayed.
Close Up: This option lets you toggle the perspective of the display from full screen to a closer view.
Select the Current Page: Marks the report with a check meaning that it is ready to be printed. This is
helpful when previewing several different reports at the same time.
130
Printing and Graphing
Toggle Between Title Sheets and Individual Reports: Lets you toggle on and off the report’s title.
This setting will not affect the outcome of the printed report.
Preview All:
The other preview option is Preview All. This option will display all open module reports simultaneously.
. These options are used in conjunction with each
Its toolbar will display a few extra options:
other since they let you toggle from report to report, and view each at a full screen perspective.
Right Click Options:
Right click when at the Print Preview window, and you will be presented with the option to Exit (leave the
Print Preview environment), Print (print the report as is), or Options.
Select Options and the Options window will appear. This is where you may customize the “How to Read”
box that prints out at the bottom of the printed report.
When the Options window first opens you will see the following options. Place an “X” in each option’s
corresponding check box to activate the options:
Landscape Report - Allows you to change from a Portrait formatted report to a Landscape oriented layout.
Non-Graphical Report - Selecting this option will help if the printer which you are using does not have an
ample amount of RAM. This option will simply strip-out all graphical aesthetics of the report.
Overwrite Existing Report - If you wish this report to overwrite the report’s original format, make sure
this option is marked.
How to Read tab options:
Title Text -If you want this area of the printed report to be titled something other than the default, enter
that new next in this field.
Text Body - This is where you may customize the report explanation. You may not use more than 500
characters.
Use default “How to Read” - Clicking this option will insert the default “How to Read” explanation,
regardless if new text has been entered.
Hide “How to Read” - If this option is selected, the “How to Read” box will be omitted from the printed
report.
131
QUALITAP User Manual
Charting Illustrations
2D Bar Vertical Graph
2D Bar Horizontal Graph
132
Printing and Graphing
3D Bar Vertical
3D Bar Horizontal
2D Pie
133
QUALITAP User Manual
3D Pie
2D Pie Exploded
3D Pie Exploded
134
Chapter
12
Media Terms and Formulas
Media Terms
population.)
Affiliate
A station associated contractually with a network
for the purpose of broadcasting network
programs.
Audience Composition
The demographic breakout of a specific station's
audience.
Audience Duplication
The portion of a station's audience that is
exposed to more than one media vehicle. In
other words, a station's “shared” audience.
Availability
A specific period of unsold air time that is
available for sale to an advertiser.
Average Issue Readership
A newspaper's average amount of readers for one
issue, both primary and pass-along.
Average Share
The percentage of all people listening to radio
during any given quarter hour of a specified
daypart who are listening to a particular station.
Barter
An agreement between a station and advertiser
where goods and/or services are exchanged for
airtime rather than cash.
Billboarding
The capability to increase or decrease the
Average Rating by giving credit for promotional
and news sponsorship spots.
Bonus Spot
An additional radio or television commercial
given to an advertiser at no cost.
Cable TV Penetration
The percentage of a specific market that is
connected to cable TV systems.
Average Quarter Hour Persons
The average number of people who listen to a
station for at least five minutes during a quarter
hour.
Average Rating
The percentage of a particular demographic
population that tune-in to a specific station
during any quarter hour of a defined daypart, for
at least five minutes. (The Average Persons
expressed as a percentage of the demographic
Column Inch
A newspaper term referring to the unit of space
one column wide and one inch deep (14 agate
lines).
Co-op Advertising
Retail Advertising run by a retailer and a
manufacturer with shared costs for the mutual
benefit of both.
Qualitap and its designs are marks of Arbitron Inc. Copyright © 2001 Arbitron Inc.
135
QUALITAP User Manual
Cost Per Point (CPP)
The cost of achieving one rating point, which
represents one percent of the demographic
population.
Cost Per Thousand (CPM)
The cost of achieving 1000 exposures within the
target demographic one or more times.
Cost Per Thousand Effective Net
Reach (CPM EFF NR)
The cost of reaching 1000 persons of a specified
demographic target effectively (3 or more times).
Cost Per Thousand Net Reach (CPM
NR)
The cost of reaching 1000 (unduplicated) people
within a specified demographic
Cume Composition (% 12+)
The percentage of a station's cume audience that
meets the target demographic.
Cume Composition Index (% 12+)
The likelihood of a station's audience to be
between the ages of the target demographic. 100
is the average or benchmark. If a station has a
Cume Composition Index of 124, that audience
is 24 percent MORE likely to fit the target
demographic. A Cume Composition Index of 90
would indicate that specific audience is 10
percent less likely to meet the target
demographic.
Cume Persons
The total number of different (unduplicated)
people within a specific demographic category
that tune-in to a station for at least five minutes
within a specified daypart.
Cume Rating
The cume persons expressed as a percentage of
the demographic population.
136
Daily Time Spent Listening (TSL) in
Hours:Minutes
The amount of time, expressed in hours and
minutes, the average listener will listen to a
station per day.
Daypart
The different specific time period breakouts of a
broadcast day for which audience estimates are
reported.
Designated Market Area (DMA)
Nielsen's geographic definition of exclusive TV
Markets broken into counties in which home
market stations receive the predominant share of
viewing.
Direct Mail Advertising
Letters, folders, brochures and other advertising
materials sent through the mail directly to
prospective customers.
Direct Response Advertising
An advertising message that calls for a prompt
purchase commitment by the reader or
listener/viewer directly to the manufacturer.
Drive Time
The weekday commuting hours of 6:00AM 10:00AM (Morning Drive) and 3:00PM 7:00PM (Afternoon Drive).
Effective Frequency
The minimum level of frequency, or number of
exposures, determined to be affective in
achieving the goals of an advertising campaign.
This level will vary with individual products or
services and the marketing objectives of the
campaign but is usually a frequency of 3 or more
exposures.
Media Terms and Formulas
Effective Rating Points (ERP's)
Effective Reach expressed as a percentage of the
target demographic population.
Effective Reach
The percentage of the targeted demographic
population that is exposed to the message three
or more times.
Estimate
Measurements such as Average Persons, Cume
Persons, Time Spent Listening, etc.. used to
analyze the potential effectiveness of specific
stations.
Exclusivity
The right given to the advertiser to where no
competitor would be permitted to advertise in a
specific media vehicle. This usually calls for a
major commitment by an advertiser.
Exposure
An individual's contact with an advertising
message or medium.
Flighting
To input a multiple week schedule in which all
weeks' spot levels are not consistent throughout
the campaign. (This option is not available
within QUALITAP.)
Frequency
The average number of times the target
demographic population will be exposed to the
message.
Frequency Distribution
Fringe
A television term referring to the period of time
surrounding the prime time broadcast hours.
Gross
The cost of advertising before agency
commission and any discounts are applied.
Gross Impressions
The total amount of exposures an advertising
message will receive. This does NOT indicate
the number of different people the message will
be exposed to.
Gross Rating Points (GRP's)
The total accumulation of average rating points a
schedule will yield, each rating point
representing one percent of the population.
Hiatus
A scheduled period of time in which advertising
activity ceases.
Households Using Television (HUT's)
The number of homes in a particular market that
use at least one television set during a specific
period of time.
Index
A ratio in percentage terms which indicates the
likelihood of a particular medium to meet a
specified goal or criteria. An index score is
“graded” using 100 as the benchmark. An index
of 123 indicates a 23 percent more likelihood of
meeting specified criteria. An index score of 88
shows a 12 percent less likelihood of that
medium to meet the specified criteria.
A tabulation separating those reached by a
schedule, according to their minimum levels of
frequency: 2 or more times, 3 or more times, 4 or
more times, etc.
137
QUALITAP User Manual
Insert
A preprinted advertisement supplied by the
advertiser. An insert is usually printed on
different
paper
and/or
different
color
reproduction that is superior in quality to that of
the rest of the publication. An insert is bound or
tucked into a publication.
Insertion Order
A written order from an advertising agency that
authorizes a publication to print a specified
advertisement.
In-Tab Sample
The actual number of usable diaries or interviews
used by research organizations to produce
audience estimates.
Make-Good
Comparable commercial time or space given to
an advertiser at no additional cost when
advertising is pre-empted, omitted or airs in an
unfit condition.
Net Cost
The cost of advertising after the agency
commission or any discounts have been
deducted.
Net Effective Reach
The number of people who are exposed to a
message three or more times. Net Effective
Reach is expressed in persons rather than as a
percentage.
Net Reach
The number of people who are exposed to a
message one or more times. Net Reach is
expressed in persons rather than as a percentage.
Orbit
The broadcast term used to define commercials
that are rotated throughout the different
138
programs and/or time periods.
O.T.O.
Stands for “one time only.” This is a spot that
runs only once and is usually bought outright or
is a make-good for a discrepancy.
Overnights
A service provided by Nielsen that measures
Prime Time viewing the day after broadcasting.
Pass-Along Audience
Those readers of a publication that did not
purchase the publication, nor did other members
of his/her household.
Penetration
The degree to which a medium has obtained area
coverage. Also referred to as the “effectiveness”
of an advertising schedule.
Percent of Cume
The percentage of a station's total unduplicated
audience that is reached by a particular schedule.
Persons Using Radio (PUR)
The percentage of an area's population (Persons
12+) listening to radio during a specified time
period.
Persons Using Television (PUT's)
The number of people viewing all television
stations including network, independent, public
broadcast and cable channels during a given time
period. This reflects the total amount of people
tuned to TV in general rather than to a specific
program.
Primary Circulation
The number of home subscriptions and
newsstand sales of a particular publication.
Primary Circulation does not include pass-along
readership.
Media Terms and Formulas
Prime Access
The half-hour time period immediately preceding
network prime time.
Promo
A brief announcement encouraging listeners or
viewers to tune to a program on the station or
network.
Rate
The cost of advertising on/in a media vehicle as
defined by that media source. Usually a rate is
given to one unit such as one spot of air-time,
one ad for a publication, or one outdoor
billboard.
Rate Card
A listing distributed by a medium containing
advertising cost, issue dates, closing dates,
mechanical requirements, cancellation dates and
circulation data.
Rating
An estimate of the size of an audience expressed
as a percentage of the total demographic or
household population within a market. One
rating point represents one percent of the
targeted population.
Reach
The percentage of the targeted demo population
that is exposed to the message one or more
times.
Readers Per Copy
The average number of readers of one copy of a
newspaper or magazine.
Retail Trading Zone
Rotation
Spots that rotate throughout the various days
during the duration of the schedule.
Run of Paper/Press (R.O.P.)
A newspaper insertion for which a position is left
to the discretion of the publisher and not
specified.
Run of Schedule/Station (R.O.S.)
A broadcast commercial for which a specific
time or day has not been requested but will be
aired at the discretion of the radio or television
station.
Satellite
A station dependent upon another station for
most of its programming.
Sets In Use
The number or percent of radio/television sets
that are tuned in to the same program at any
given time within a coverage area.
Share
The percentage of the total broadcast audience
tuned to a specific station during a specific time
period.
Simulcast
Broadcast of the same programming on two
radio stations at the exact same time. This also
refers to a radio station broadcasting the audio
portion of a TV program simultaneously.
Sponsorship
The purchase of all or part of the air-time during
a radio or TV program.
The newspaper circulation area including the city
line and beyond from which retailers draw
sufficient customers to justify including this area
in the coverage area.
139
QUALITAP User Manual
Spots
A commercial; one unit of air-time.
Standard Newspaper
A large-sized newspaper that is usually eight (8)
columns wide.
Sweeps
The different times Nielsen conducts the actual
surveying of a market's TV viewing habits.
Syndicated Program
A program that is purchased by an advertiser or
station from an independent organization that is
not a network.
Tabloid
A tabloid is usually about half the size of a
standard newspaper and measures about 5 to 6
columns wide and 200 lines deep.
Tag
An identification of the advertiser which is
usually added to the end of a commercial to
advise listeners/viewers where the product that is
advertised can be purchased.
Tear Sheets
Pages that are removed from a publication to
provide proof that an advertisement was run.
Time Spent Listening
The number of quarter-hours spent listening to a
particular station by the population group being
analyzed.
Total Audience Plan (TAP)
A radio schedule consisting of announcements
which air in all major dayparts.
140
Traffic
The department in radio/television stations,
publications and advertising agencies that
handles schedule instructions and commercial
materials.
Turnover
The ratio that indicates the frequency with which
an audience of a media vehicle changes (turns
over) over a period of time.
Vehicle
Anything capable of exposing an advertising
message to consumers.
Viewers Per Household (VPH)
The average number of persons viewing a
broadcast per viewing household.
Viewers Per Viewing Household
(VPVH)
The average number of persons viewing a
broadcast or viewing during a specific period of
time per viewing household.
Weekly Time Spent Listening (TSL)
in Hours:Minutes
The total amount of time expressed in hours and
minutes spent listening to a particular station by
the population group being analyzed in a one
week period of time.
Weekly Time Spent Listening (TSL)
in Quarter Hours
The number of quarter-hours spent listening to a
particular station by the population group being
analyzed in a one week period of time.
Media Terms and Formulas
Formulas
Average Composition Formula
Demographic Audience divided by the Total Audience
Average Rating Formula
Average Quarter Hour Persons divided by Population
Average Share Formula
Average Persons divided by the Average Persons Using Radio
Cost Per Thousand Effective Net Reach Formula
Total Cost divided by Effective Net Reach expressed in thousands (000's)
Cost Per Thousand Net Reach (CPM NR) Formula
Total Cost divided by Net Reach expressed in thousands (000's)
Cost Per Point (CPP) Formula
Total cost divided by Gross Rating Points (GRP's)
Cost Per Thousand Formula
Total cost divided by Gross Impressions expressed in thousands (000's)
Cume Composition Formula
Demographic Audience divided by Total Persons 12 + Audience
Cume Composition Index Formula
Cume Rating divided by Total Demographic Population Percentage
Cume Rating Formula
Cume Persons divided by the Total Population of that same Demographic
Coverage (Newspaper/Magazine) Formula
Demographic Audience divided by the Demographic Universe
Daily Time Spent Listening (TSL) Hours:Min Formula
Total Time Spent Listening divided by the number of days within the daypart
Qualitap and its designs are marks of Arbitron Inc. Copyright © 2001 Arbitron Inc.
142
Media Terms and Formulas
Effective Rating Points (ERP's) Formula
Effective Reach divided by the Target Population
Frequency Formula
Gross Rating Points (GRP's) divided by Reach; or Gross Impressions divided by Reach (in persons)
Gross Impressions Formula
Average Persons multiplied by the Number of Spots
Gross Rating Points (GRP's) Formula
Reach multiplied by Frequency
Household Rating (TV) Formula
Household Audience divided by the Household Universe
Households Using Television (HUT's) Formula
Households Rating divided by Share
Index Formula
Variable divided by the Base, such as a station’s Cume Composition divided by the Total Demographic
Population Composition
Percent of Cume Formula
Reach divided by Cume
Reach (Radio) Formula
Gross Rating Points (GRP's) divided by Frequency
Readers Per Copy Formula
Publication Readers Audience divided by Publication Circulation
Time Spent Listening (TSL) Formula
Average Quarter Hour Persons multiplied by the Quarter Hours of the specified daypart divided by Cume
Persons
Total Audience (Newspaper/Magazine) Formula
Readers Per Copy multiplied by the Circulation
Turnover (Radio) Formula
Cume Persons divided by Average Persons
143
QUALITAP User Manual
Viewers Per Viewing Household (VPVH) Formula
(Demographic Universe divided by Household Universe) x Conversion Factor; or Demographic Audience
divided by Household Audience
144