1
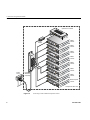
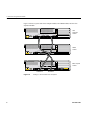
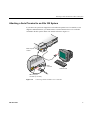
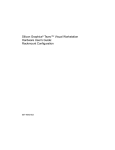
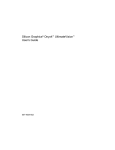
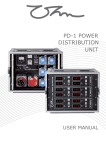
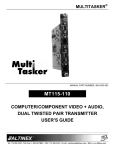
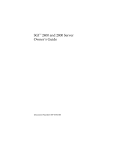
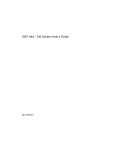
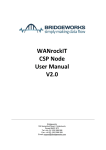
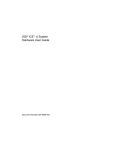
SGI® Altix™ 350
Quick Start Guide
007-4417-002
CONTRIBUTORS
Written by Dick Brownell
Illustrated by Dick Brownell, Dan Young and Chrystie Danzer
Production by Karen Jacobson
Additional contributions by Paul Pedersen., Lyle Stoll, Michael T Brown, Galen Flunker, Gary Meyer
COPYRIGHT
© 2004, Silicon Graphics, Inc. All rights reserved; provided portions may be copyright in third parties, as indicated elsewhere herein. No
permission is granted to copy, distribute, or create derivative works from the contents of this electronic documentation in any manner, in whole
or in part, without the prior written permission of Silicon Graphics, Inc.
LIMITED RIGHTS LEGEND
The electronic (software) version of this document was developed at private expense; if acquired under an agreement with the USA government
or any contractor thereto, it is acquired as "commercial computer software" subject to the provisions of its applicable license agreement, as
specified in (a) 48 CFR 12.212 of the FAR; or, if acquired for Department of Defense units, (b) 48 CFR 227-7202 of the DoD FAR Supplement; or
sections succeeding thereto. Contractor/manufacturer is Silicon Graphics, Inc., 1500 Crittenden Lane, Mountain View, CA 94043-1351.
TRADEMARKS AND ATTRIBUTIONS
Silicon Graphics, SGI, the SGI logo,are registered trademarks and NUMAlink, and XIO are trademarks of Silicon Graphics, Inc., in the United
States and/or other countries worldwide.
Record of Revision
Version
Description
001
January 2004
Original publication
002
007-4417-002
March 2004
Installed corrections on page 10.
iii
Contents
Figures .
1.
.
.
.
.
.
.
.
.
.
.
.
.
.
.
.
.
.
.
.
.
.
.
.
.
. vii
SGI Altix 350 Quick Start Guide
.
.
.
.
.
.
.
.
.
.
.
.
.
.
.
.
.
.
1
.
.
.
.
.
.
.
.
.
.
.
.
.
.
.
.
.
.
.
.
.
.
.
.
.
.
.
.
.
.
.
.
.
.
.
.
.
.
.
.
.
.
.
.
.
.
.
.
.
.
.
.
.
.
.
.
.
.
.
.
.
.
.
.
.
.
.
.
.
.
.
.
.
.
.
.
.
.
.
.
.
.
.
.
.
.
.
.
.
.
.
.
.
.
.
.
.
.
.
2
2
3
5
7
9
9
11
13
13
13
Positioning and Powering an Altix 350 System . . . . .
Positioning an Altix 350 System. . . . . . . . .
Powering an Altix 350 System . . . . . . . . .
NUMAlink™ Cabling for an Altix 350 System . . . . . .
Attaching a Serial Terminal to an Altix 350 System . . . .
Powering and Booting an Altix 350 System from a Serial Terminal
Powering and Booting From an L1 System Controller . .
Powering and Booting From an L2 System Controller . .
Troubleshooting an Altix 350 System . . . . . . . .
Obtaining Documentation . . . . . . . . . .
Contacting the SGI Customer Service Center . . . . .
007-4417-002
v
Figures
Figure 1-1
Figure 1-2
Figure 1-3
Figure 1-4
Figure 1-5
Figure 1-6
007-4417-002
Connecting an Altix 350 Non-Racked System to Power
Connecting an Altix 350 Racked System to Power . .
.
.
.
.
.
.
.
.
3
4
Cabling in a Two-module Altix 350 System . .
Cabling in a Three-module Altix 350 System .
Connecting a Serial Terminal to an L1 Controller
Connecting a Serial Terminal to an L2 Controller
.
.
.
.
.
.
.
.
.
.
.
.
.
.
.
.
5
6
7
8
.
.
.
.
.
.
.
.
vii
Chapter 1
1. SGI Altix 350 Quick Start Guide
This book guides a knowledgeable user through the installation, setup, and simple configuration
of most SGI Altix 350 systems.
For more detailed information, or for setup instructions for more complex Altix 350 systems,
please refer to the SGI Altix 350 User’s Guide.
007-4417-002
1
1: SGI Altix 350 Quick Start Guide
Positioning and Powering an Altix 350 System
Depending on the system ordered, your Altix 350 system may have been shipped as a number of
individual chassis or mounted in a rack. This section describes positioning and powering your
system in either of these instances.
Positioning an Altix 350 System
If your Altix 350 system was shipped as a number of individual chassis, they may be placed on a
flat surface, as shown in Figure 1-1 on page 3, or placed in a rack. For instructions on mounting
Altix 350 chassis in a rack, and for information about rack positioning, refer to the SGI Altix 350
User’s Guide.
2
007-4417-002
Positioning and Powering an Altix 350 System
Powering an Altix 350 System
Plug your Altix 350 system into a suitable power outlet, as shown in Figure 1-1 (for non-racked
chassis) or Figure 1-2 (for racked chassis). Refer to the Altix 350 User’s Guide for detailed power
requirements.
Expansion compute module
Base compute module
Figure 1-1
007-4417-002
Connecting an Altix 350 Non-Racked System to Power
3
1: SGI Altix 350 Quick Start Guide
Optional L2 controller
Power
adapter
CMPX
G2N-brick
module
CMPX
G2N-brick
module
CMPX
G2N-brick
module
CMPX
G2N-brick
module
CMPX
module
CMPX
module
Power
source
Power
distribution
unit (PDU)
CMPX
module
Base Compute
module
Components within rack
Figure 1-2
4
Connecting an Altix 350 Racked System to Power
007-4417-002
NUMAlink™ Cabling for an Altix 350 System
NUMAlink™ Cabling for an Altix 350 System
If your system was shipped from SGI® with the modules already mounted in a rack and the
NUMAlink cables preinstalled, you should proceed to “Attaching a Serial Terminal to an Altix
350 System” on page 7.
This section describes the NUMAlink cabling for some simple configurations. For instructions to
cable more complex systems, see the SGI Altix 350 User’s Guide.
Figure 1-3 shows a system with a base compute module and a CMPX module.
CMPX
module
NUMAlink 0
NUMAlink 1
Base compute
module
NUMAlink 0
Figure 1-3
007-4417-002
NUMAlink 1
Cabling in a Two-module Altix 350 System
5
1: SGI Altix 350 Quick Start Guide
Figure 1-4 shows a system with a base compute module, one CMPX module, and one CPU
expansion module.
CPU
expansion
module
NUMAlink 0
NUMAlink 1
CMPX
module
NUMAlink 0
NUMAlink 1
Base compute
module
NUMAlink 0
Figure 1-4
6
NUMAlink 1
Cabling in a Three-module Altix 350 System
007-4417-002
Attaching a Serial Terminal to an Altix 350 System
Attaching a Serial Terminal to an Altix 350 System
If your Altix 350 system was shipped in a rack without an optional Level 2 controller, or was
shipped as individual chassis, you should connect a serial terminal to the Level 1 controller
contained in the host system master CPU module as shown in Figure 1-5.
Base compute
module
DB-9
connector
Serial terminal
DB-9 serial port
connector (L1 console)
Figure 1-5
007-4417-002
Connecting a Serial Terminal to an L1 Controller
7
1: SGI Altix 350 Quick Start Guide
If your Altix 350 system was shipped in a rack with an optional Level 2 controller, you should
connect a serial terminal to that Level 2 controller, which is located in the top of the rack as shown
in Figure 1-6 (this view shows the back of the rack).
L2 controller
Console port
Serial terminal
Figure 1-6
8
SGI Altix 350
system
Connecting a Serial Terminal to an L2 Controller
007-4417-002
Powering and Booting an Altix 350 System from a Serial Terminal
Powering and Booting an Altix 350 System from a Serial Terminal
The power up procedure varies, depending on whether your serial terminal is connected directly
to an L1 system controller or the optional L2 system controller. Refer to the appropriate section
below.
Powering and Booting From an L1 System Controller
Use the following steps to connect your Altix 350 system via serial cable to the L1 controller (see
Figure 1-5):
1.
Attach a serial cable to the lowest compute node in the system using the following:
• Serial DB9 Female to Female cable P/N 018-0691-001
• The settings for the L1 serial port are as follows:
Baud rate 38400
8 data bits
1 stop bit
No parity
RTS/CTS flow control (hardware flow control)
2. Attach the other end of the cable to a PC serial port with “cu” or other similar terminal
emulation program.
3. On the PC enter the following command.
cu -l ttyS0 -s 38400
This assumes the tty device on the PC is ttyS0.
There should be a “connected” response.
Hit return again and you should get a L1 prompt:
001c01-L1>
007-4417-002
9
1: SGI Altix 350 Quick Start Guide
4. From the L1 prompt enter the command “cfg”
This should return a list of all the modules in the system.
001-c01-L1>cfg
- 001c01
- 001c03
- 001c05
001c01-L1>
5. If all the modules in your system are not seen, check the NUMAlink cabling, also insure that
the L1 is powered on all modules.
6. To power up the system, enter the L1 command “pwr u”
001c01-L1>* pwr u
001c01-L1>
7. When the L1 prompt returns, enter a “cntrl d” to break in to the console.
This will show the output of the power on boot process.
This will get you to a EFI SHELL prompt.
10
007-4417-002
Powering and Booting an Altix 350 System from a Serial Terminal
Powering and Booting From an L2 System Controller
Use the following steps to connect your Altix 350 system via serial cable to an optional L2
controller (see Figure 1-6):
1.
Attach a serial cable to the console port of the L2 controller using the following:
• Serial DB9 Female to Female cable P/N 018-0691-001
• The settings for the L2 serial port are as follows:
Baud rate 38400
8 data bits
1 stop bit
No parity
RTS/CTS flow control (hardware flow control)
2. Attach the other end of the cable to a PC serial port with “cu” or other similar terminal
emulation program.
3. On the PC enter the following command.
cu -l ttyS0 -s 38400
This assumes the tty device on the PC is ttyS0.
There should be a “connected” response.
Hit return again and you should get a L2 prompt:
001-L2>
1.
From the L2 prompt enter the command “cfg”
This should return a list of all the modules in the system.
001-L2>cfg
:0 - 001c01
:1 - 001c03
:5 - 001c05
001-L2>
2. If all the modules in your system are not seen, check the NUMAlink cabling, also insure that
the L1 is powered on all modules. Check the USB cable from the L2 to the lowest compute
node L1 port.
007-4417-002
11
1: SGI Altix 350 Quick Start Guide
3. To power up the system, enter the L2 command “pwr u”
001-L2>pwr u
001-L2>
4. When the L2 prompt returns, enter a “cntrl d” to break in to the console.
This will show the output of the power on boot process.
This will get you to a EFI SHELL prompt.
Connecting the L2 Controller to a Local Ethernet Network
The L2 controller can be configured with a static IP address or the L2 controller will obtain an IP
address from a DHCP server on the network.
Use the following steps to configure your optional L2 controller with a static IP address:
Step 1 can be omitted if the L2 controller will use DHCP.
1.
From the L2 prompt, enter the command “ip”
001-L2>ip aaa.bb.cc.ddd 255.255.255.0 aaa.bb.cc.255
The first sting is the system IP address. Contact your network administrator for your system
IP address. The second string is netmask, and the third string is the broadcast address. The
first three sections of the broadcast address are the same as the system IP address.
2. Assign the system name using the command “sysname”
001-L2>sysname (your system name)
3. To prevent L2s from different systems from communicating with each other, enable the multi
system option “msys”
001-L2>msys on
4. Finally, reboot the L2 controller.
001-L2>reboot_l2
12
007-4417-002
Troubleshooting an Altix 350 System
Troubleshooting an Altix 350 System
If you are experiencing problems with your Altix 350 system, you can follow the steps detailed in
the SGI Altix 350 User’s Guide to help isolate and correct the problem.
If the problems are with your host system you should refer to the user’s manual for that host
system.
For problems not addressed in the above locations, please contact your SGI authorized support
representative.
Obtaining Documentation
You can obtain SGI documentation in the following ways:
•
See the SGI Technical Publications Library at http://docs.sgi.com. Various formats are
available. This library contains the most recent and most comprehensive set of online books,
release notes, man pages, and other information.
•
If it is installed on your SGI system, you can use InfoSearch, an online tool that provides a
more limited set of online books, release notes, and man pages. With an IRIX OS based
system, select Help from the Toolchest, and then select InfoSearch. Or you can type
infosearch on a command line.
•
You can also view release notes by typing either grelnotes or relnotes on a command
line.
•
You can also view man pages by typing man <title> on a command line.
Contacting the SGI Customer Service Center
To contact the SGI Customer Service Center, call 1-800-800-4SGI, or visit
http://www.sgi.com/support/customerservice.html.
From outside the United States contact your local SGI sales office.
007-4417-002
13