1
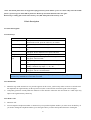
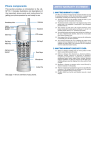
Table of Contents 1 General Information ...................................................................... 3 1.1 Brief............................................................................................................................................................................... 3 1.2 Safety Precautions .......................................................................................................................................................... 4 1.3 General precautions ........................................................................................................................................................ 4 1.4 Precautions for mobile phone use .................................................................................................................................... 4 1.5 Precautions for battery usage .......................................................................................................................................... 5 1.6 Precautions for usage of charger ..................................................................................................................................... 6 1.7 Cleaning and Maintenance .............................................................................................................................................. 6 1.8 General Precautions ........................................................................................................................................................ 6 2 Before Use ............................................................................... 7 2.1 SIM card ........................................................................................................................................................................ 7 2.1.1 Insert and pull out the SIM card ................................................................................................................................... 7 2.2 Battery ........................................................................................................................................................................... 7 2.2.1 Pull out and install the battery ...................................................................................................................................... 8 2.2.2 Charge the Battery ....................................................................................................................................................... 8 2.3 Power on ........................................................................................................................................................................ 8 2.4 The use of USB data route .............................................................................................................................................. 9 2.5 Install and pull out T-flash card ....................................................................................................................................... 9 3 Basic Description ....................................................................... 10 3.1 About the Keypads ....................................................................................................................................................... 10 3.1.1 Basic Keys ................................................................................................................................................................ 10 3.2 Call functions ............................................................................................................................................................... 10 3.2.1 Make a call ................................................................................................................................................................ 10 3.2.2 Answer a call ..............................................................................................................................................................11 3.2.3 Reject a call ................................................................................................................................................................11 3.2.4 Menu available during a call ...................................................................................................................................... 12 3.3 Hand-free function ....................................................................................................................................................... 12 4 Menu Introduction ....................................................................... 12 4.1 Call Center ................................................................................................................................................................... 12 4.1.1 Call history ................................................................................................................................................................ 12 4.1.2 Call settings............................................................................................................................................................... 13 4.2 Phone book .................................................................................................................................................................. 14 4.3 Messaging .................................................................................................................................................................... 15 4.3.1 Write message ........................................................................................................................................................... 15 4.3.2. Inbox ........................................................................................................................................................................ 15 4.3.3 Drafts ........................................................................................................................................................................ 16 4.3.4 Outbox ...................................................................................................................................................................... 16 4.3.5 Sent messages............................................................................................................................................................ 17 1 4.3.6 Blacklist .................................................................................................................................................................... 17 4.3.7 Message settings ........................................................................................................................................................ 17 4.4 Camera......................................................................................................................................................................... 17 4.5 Camera Shortcut Keys ................................................................................................................................................ 17 4.6 Multimedia ................................................................................................................................................................... 17 4.6.1 Audio Player .............................................................................................................................................................. 18 4.6.2Image Viewer ............................................................................................................................................................. 18 4.6.3 Video Recorder .......................................................................................................................................................... 18 4.6.4 Video Player .............................................................................................................................................................. 19 4.6.5 Sound recourder ........................................................................................................................................................ 19 4.6.6 FM radio ................................................................................................................................................................... 19 4.6.7 File manager .............................................................................................................................................................. 20 4.7 User profiles ................................................................................................................................................................. 20 4.8 Organizer ..................................................................................................................................................................... 21 4.8.1 Torch ......................................................................................................................................................................... 21 4.8.2 Bluetooth................................................................................................................................................................... 21 4.8.3 Calculator .................................................................................................................................................................. 21 4.8.4 Calendar .................................................................................................................................................................... 22 4.8.5 Alarm ........................................................................................................................................................................ 22 4.8.6 SIM toolkit ................................................................................................................................................................ 22 4.9 Settings ........................................................................................................................................................................ 22 4.9.1 Dual SIM settings ...................................................................................................................................................... 22 4.9.2 Phone settings............................................................................................................................................................ 23 4.9.3 Network settings ........................................................................................................................................................ 23 4.9.4 Security settings ........................................................................................................................................................ 23 4.9.5 Restore factory settings .............................................................................................................................................. 24 5 Operation Instructions on Chinese and English Input ....................................... 24 6 Common Problems. ........................................................................ 25 6.1 When the mobile phone displays “Insert SIM”?............................................................................................................. 25 6.2 Checking and precautions of PIN, PIN2, PUK, PUK2 and password: ............................................................................ 25 6.3 Network connection fails .............................................................................................................................................. 25 6.4 You can’t be heard ........................................................................................................................................................ 25 6.5 Can’t charge the battery ................................................................................................................................................ 25 6.6 Weak signal .................................................................................................................................................................. 26 6.7 Can’t make a call .......................................................................................................................................................... 26 6.8 Standby time becomes short.......................................................................................................................................... 26 2 1 General Information 1.1 Brief Thank you for selecting this series colored screen mobile phone. Before installing and using the product, be sure to carefully read all the materials accompanying the mobile phone. This will help you to better use the mobile phone, get an overall idea about the use, and understand the perfect functions and the short-cut operating methods. This colored screen mobile phone is designed for the GSM network environment. In addition to the basic call function, it also provides you many practical functions for your work and leisure, such as Dual Card Mode , name card phone book, chord ring, clock/ alarm clock, Bluetooth , FM, unit conversion, calculator, games, Mp3 player, Mp4 player, the mobile phone adopts the personalized human-machine interface and the perfect function design can satisfy your different requirements. *Note: Take the mobile phone as standard if the contents in this manual are different from those in your mobile phone. Our Company shall reserve all the rights to modify the content of the manual without any notice in advance. 3 1.2 Safety Precautions If your mobile phone is lost or has bug, please inform the telecommunication department or the distributor to prevent use of your mobile phone or SIM Card without authorization. Thus you avoid the economic loses brought by the false phone call. When you contact the telecommunication department or the distributors, they need to know the IMEI code of your mobile phone (the label stickled on the back of your mobile phone. You can get it after pulling down the battery). Please keep the code with care for future use. Please adopt the preventive measures to avoid the misuse of the mobile phone, for instance: -Properly set your mobile phone’s SIM card and the PIN code and change the codes on time before others know them. -When you leave your car, DO NOT leave your mobile phone at the place that is easily to be seen. You’d better take it along with yourself or lock it in the luggage. -Set up the call barring. 1.3 General precautions Your mobile phone can only use the battery and charger specified by our Company. Any other products may cause a battery leakage, overheat, burst or fire. DO NOT impact, shake or toss your mobile phone violently so as to avoid the malfunction and fire occurring to the mobile phone. DO NOT leave your battery, mobile phone or charger in the oven or the high voltage equipment; otherwise, accidents, such as circuit damage or a fire may take place to your mobile phone. DO NOT use your mobile phone at the place with inflammable and explosive gases; otherwise, malfunction and fire may take place to your mobile phone. DO NOT place your mobile phone in the places with high temperatures or a great deal of dust; otherwise, your mobile phone failure may happen. Please leave your mobile phone at place out of the children’s reach, because the children may regard it as a toy and cause physical injury. DO NOT leave your mobile phone on uneven or unsteady surfaces so as to prevent it from falling, causing a failure or a damage. 1.4 Precautions for mobile phone use Please power off your mobile phone where mobile phone use is forbidden, e.g. on the plane or in the hospital. The mobile phone may influence the normal working of the electronic equipment or the medical equipment. In case of using the mobile phone at those places, please follow the relevant rules or regulations. The headset has a time power on/off function and you are required to ensure that the mobile phone will never time power on automatically during the course of the flight. DO NOT use your mobile phone near the weak signal equipment or the highly sophisticated electronic equipment. Radio wave interference may cause malfunction of the electronic equipment or other failures. Attentions should be paid especially to the following equipment: hearing aid, pacemaker & other medical electronic equipment, fire detector and other automatic control equipment. Please consult the equipment manufacturer or the local distributor for the influence of the mobile phone to the pacemaker or other medical electronic equipment. 4 DO not press the LCD screen or strike any other objects with it, otherwise, a damage and leakage may take place to the LCD. If the liquid comes to your eyes, there will be a danger of blindness. In such a case, wash your eyes with water (Note: DO NOT rub your eyes) and then go to the hospital for medical treatment. DO NOT dissemble or remount your mobile phone; otherwise, a damage, creepage and circuit failure will be likely to occur to your mobile phone. In a few circumstances, when the mobile phone is used in the cars of some models, the electronic equipment in the auto will affected by it. In such cases, DO NOT use your mobile phone so as to ensure the safety. Please DO NOT press the keys with sharp things, such as needle or stylus; otherwise damage or mis-operation may occur to the mobile phone. If the antenna is damaged, DO NOT use your mobile phone; otherwise, it may cause a physical injury. Keep the mobile phone far away from the magnetic objects, such as the magcard, for the radiation may clear the information on the floppy disk, store value card and credit card. Please keep the tiny things, such as thumb pin away from the handset of the mobile phone. During working the speaker has magnetism, which may magnetize those tiny metal pieces and therefore causes a physical injury to human or damage to the mobile phone. Keep the mobile phone from wetting, for water and other liquids coming to your mobile phone may cause overheat, leakage or malfunction to the mobile phone. 1.5 Precautions for battery usage DO NOT throw the battery into the fire; or it may cause a fire and burst. When installing the battery, DO NOT press the battery forcibly; or it may cause a leakage, overheat, burst or fire. DO NOT use the electric wire, needle or other metals to make a short circuit or do not leave the battery with such metals as necklace; otherwise it may cause a battery leakage, overheat, burst or fire. DO NOT weld the ends of the battery; or it may cause a leakage, overheat, burst or fire. If the battery electrolyte enters the eyes, there is a possibility of blindness. In such case, DO NOT rub your eyes. Please wash the eyes with clear water and then go to the hospital for medical treatment. DO NOT dissemble or remount the battery or it may cause a leakage, overheat, burst or fire to your mobile phone. DO NOT use or place your mobile phone in the high-temperature places, such as by the side of the fire or the heater; or it may cause a leakage, overheat, burst or a fire to your mobile phone. If there is a temperature rise, color change or a deformation during the course of the usage, charging or storage, please stop using the battery and change for a new battery. If the battery electrolyte comes into contact with skin or clothes, it may cause the skin burnt. In such a case, wash the skin and clothes immediately and then go to the hospital at once. If the battery electrolyte leaks or sends off an odd smell, please take it away from the flammable fire so as to avoid fire or burst. Keep the battery from wetting; or it may cause overheat, smoke or erosion to the battery. DO NOT use or keep the battery where the sunlight shoots from a right angle or near the car; or it may cause overheat or leakage to the battery, which may lower the performances and shorten the service life of the mobile phone. DO NOT continuously charge the battery for more than 24 hours. 5 1.6 Precautions for usage of charger Please use 220V alternative current; or it may cause leakage, fire or damage to the charger. Short circuit of the charger is forbidden; or it may cause an electric shock, smoke or damage to the charger. DO NOT use the charger when the power supply wire is damaged; or it may cause a fire or an electric shock. Please clean the accumulated dust covering the power socket. DO NOT leave the water container near the charger so as to avoid water from spilling to cause overheat, leakage or failure to the charger. If the charger contacts water or any other liquids, pull out the power plug from the socket immediately so as to avoid overheat, fire or failure to the charger. DO NOT dissemble or remount the charger or it may cause a physical injury, an electric shock, a fire or damage to the charger. DO NOT use the charger in the bathroom or it may cause an electric shock, fire or charger to the charger. DO NOT touch the charger, wire or power supply socket with a wet hand; or it may cause an electric shock. DO NOT place the heavy object on the power supply wire or refit the wire; or it may cause an electric shock or fire. Before cleaning and maintenance, pull out the plug from the power supply socket. Hold the charger when pulling out the plug from the socket, for pulling the cable may cause damage to the wire, an electric shock or fir 1.7 Cleaning and Maintenance The mobile phone, battery and charger have no waterproof performance, so please DO NOT use them in the environment with a high temperature, such as bathroom, and avoid being damped by rain as well. Please use the soft and dry cloth to clean the mobile phone, battery and charger. DO NOT use solvents, such as alcohol, thinner or benzene to clean the mobile phone. The plug with dirt is most likely to cause contact failure and power down so that the mobile phone can not be recharged. Hence please clean the mobile phone regularly. 1.8 General Precautions Mobile phone Please use the mobile phone under the temperature ranging from 50C to 400C with a humidity ranging from 35% to 85%. When using the mobile phone, keep as far as possible away from the general phone, TV,radio and office automatic equipment so as to avoid affecting the normal performance of the equipment and the mobile phone. Battery The battery should be left in place where the sunlight shoots from indirect angles and the ventilation is good. The service life of the battery is limited. The service time of the battery is shortened with the frequent charging. When it is of no effect to charge for several times, it only means that the battery is exhausted and the mobile phone should be replaced with a new battery of the specified mode. DO NOT throw the old battery into the domestic rubbish. Dispose the exhausted battery according to provisions specified by relevant authorities. Charger 6 DO NOT charge the battery in the places where the sunlight shoots from right angles; the ambient temperature is lower than 50C or higher than 400C; the place is damp or dusty or of too much vibration (failure may occur); the location is near the electronic appliances, such as TV, radio etc.(image or sound may be probably affected) 2 Before Use 2.1 SIM card Before using the mobile phone, you should insert the valid SIM card, which is the key for you to enter the GSN network. All the information related to the creation of the connection to the network and initial call records will be recorded in the metal plane area of the SIM card as well as the names, telephone numbers and SMS stored in the phone book on the SIM card. The SIM card can be taken out from your mobile phone and can be placed in any one of the GSM mobile phones for use (the new mobile phone will read the SIM card automatically). To prevent losing and damaging of the information in the SIM card, please DO NOT touch the metal plane area and the SIM card should be kept far away from electromagnetism. Once the SIM card is damaged, you can not enter into the GSM network. *Note: Please do power off your mobile phone before pulling out the SIM card. It is forbidden to insert or pull out the SIM card with the mobile phone connected to the external power supply; otherwise, the SIM card is most likely to be damaged. 2.1.1 Insert and pull out the SIM card The SIM card is generally placed in a card. Before installation, take cautions to take out the SIM card. Power off your mobile phone and then remove the battery and other external power supply. Insert the SIM card into the SIM card slot. When you need to pull out your SIM card, please power off your mobile phone firstly, remove the battery, pull out your SIM card 2.2 Battery The initial battery is of 50% charge, so it can be used right after being unpacked. The new battery should be charged at least for 14 hours. Only when the initial battery is exhausted thoroughly (the electricity quantity runs out and the mobile phone can not power on) can the battery be fully recharged for use, so does the second time charging. Only when recycled for three times in this way can the battery works in the best condition easily. 7 2.2.1 Pull out and install the battery Follow the following steps to pull out the battery: ① Open the back cover; ② Pull the battery upwards and get it out. Follow the following steps to install the battery: ①Insert the battery into the battery slot; ②The back cover until it fastens. 2.2.2 Charge the Battery Connect the batter charger to a power supply; USB interface at the bottom of the charger plug into the phone. Then the power quantity indicator in the upper right corner of the mobile phone screen will flicker. If the phone has been powered off, the screen will display “charging” and this indicates that the battery is being charged. If the phone is still in use despite of lack of power, the power indicator may take some time to appear on the screen. If the power indicator is full and stops to flicker, this means that the charge has been finished. This process often takes 3 to 4 hours. It is normal that, during charge, the battery, mobile phone and battery charger become hot. After the charge is completed, please disconnect the AC power supply socket and the mobile phone with the battery charger. *Note: --During the charge, the handset should be placed where the ventilation is good and the temperature is between +50C to +400C. In addition, you should use the charger provided by the manufacturer, for the unauthenticated chargers may cause danger and disobey the recognition and maintenance clauses of this mobile phone. --When your mobile phone automatically powers off or displays the warning of “Low Power”, you should charge the battery in time. In case the battery has not run out before charge, the mobile phone will shorten the charge time automatically. --The standby time and call time provided by the manufacturer is based on the ideal working environment. During the practical use, the battery’s service time changes with the network condition, working environment and use mode used. --Before charging the battery, please make sure that the battery is properly inserted and it is forbidden to take it down during charging. . --When charge is over, please disconnect the charger with the mobile phone and the battery. If you do not disconnect the charger with the power supply and the mobile phone, after a long time (about 5 to 8 hours), the power of the battery will drop to a certain level and the mobile phone will resume charge once again. We do not recommend you to do so, for this will affect the performance and service life of the battery. --This mobile phone does not support USB port, so you can not connect your mobile phone with PC through USB, it just use to charging the battery. 2.3 Power on Long press Hang Up key to power on the mobile phone and also long press the Hang Up key to power off your mobile phone. 8 If you power on the mobile phone without inserting the SIM card, the mobile phone will prompt you to insert the SIM card. After the SIM card is inserted, the mobile phone will automatically check whether the SIM card is ready for use or not. Then the screen will give the following prompts: -Input PIN (If you have set password for SIM card) (Please refer to the section 4.8.5. “security settings” for detail operations) -Input the mobile phone’s password (if you have set the lock-code) (Please refer to the section 4.8.5. “security settings” for detail operations) When the SIM card is successfully decoded, the mobile phone will automatically search the available network (the screen displays “search network”) Once established connection, the name of the network supplier will appear on the top of the screen. This means that the mobile phone is in “standby” mode and it is available for used. *Note: If the screen prompts “Emergency”, this means that you are out of the normal network scope (service scope), but you can still make the emergency call according to the signal intensity. 2.4 The use of USB data route The method of using USB data route: Input one of the port into the computer, and then input the other port to the phone, after that you can transfer the data between the computer and the phone. When you are charging, the icon for the charge is moving. If the charging is finished, the icon will stop moving. You can use the phone as a U disk after the phone power off. The phone supports the USB, you can copy and move the file between the phone and the computer after you link the USB with the computer. You can view the information in the T-Flash card. *Note: --Please power off the phone before you connect the phone with the computer, after the phone connecting up, you will find information of the USB on the computer, and then you can read the file into my computer. If there is not information, you must check your phone’s USB port and insert it again. --If you connect the phone with computer when the phone is powering on, there are three items displaying on the phone, you should select the “mass storage”, and then you can copy or move the file between the phone and the computer. --After that, you need double click the USB icon in the right corner of the computer, and then select “stop”, now you can withdraw the USB from the computer and the phone. DO not withdraw the USB from the computer directly, or the date in the T-flash card will be lost, and it can also damage the phone. You must do it on the computer which is the Windows2000 or SP2. 2.5 Install and pull out T-flash card This mobile phone supports T-flash card, which is a kind of multimedia memory card used to increase memory of the mobile phone. It is so small that you should take cautions to install or pull it out in order to avoid damage. The method to install/ pull out T-flash card: 1. Power off the mobile phone, set memory card with the metal face downward to the memory card slot. To pull out the memory card, power off the mobile phone, take out the T-flash. 9 *Note: The mobile phone does not support hot-plug function of T-FLASH in “power on” mode. Only when the mobile phone is powered off can T-FLASH be pulled out. Restart up and T-FLASH will come into effect. When using or editing files stored in the memory card, DO NOT pull out the memory card. 3 Basic Description 3.1 About the Keypads 3.1.1 Basic Keys Name Center key SIM1 dial key SIM2 dial key End key Navigation keys Numeric 1 keys 0~9 * # Functions Standby interface, when the cursor shortcut icon to the bottom of the screen, press the center key to confirm. SIM1 dial keys under the standby, enter SIM1 call history list. SIM2 dial keys under the standby, enter SIM2 call history list. Short press: return to standby interface in any mode Long press: Power off(Power on in power off state) Induction mobile navigation by finger. Short press: go to number input screen and input number 1 Long press: Call voicemail. Short press: go to number input interface and input numbers 0~9. Short press: go to number input screen and shift input *. Standby continuous key input "+", "P", "W". Short press: go to number input screen and input # Long press: turn on / off silent mode. Note: In this manual, “short press” a key means press then quickly release the key; “long press” a key means press the key and hold for not less than 2 seconds 3.2 Call functions When the logo of the network service provider appears on the screen, you then may make or answer a call. The info bar implicates the signal intensity on the top left screen (the 4-scale info bar means the signal is the strongest). Call quality performs variedly under the influence of the obstacles. Therefore the movement in a small scope may improve the signal intensity effectively. 3.2.1 Make a call Domestic call: You can input the telephone number via numeric keys to input the telephone number you want. Press the dial key. If you need to change the telephone number, press the right soft key to delete the inputted characters. During the 10 dialing, the screen will display a “dialing” cartoon. The screen will display the call status information. If the answering tone is switched on, there will be a warning tone. When then call ends, please press Hand-up key to end the call. zone code + dial number + Dial key Dial the extension to a fixed phone: Because some of the extensions to the fixed phones can not be got through directly, you need to dial the switchboard and then the extension to the fixed phone. When you input the telephone number, if insert character “P” between the switchboard number and the extension number, the mobile phone will complete all the dialing for you, i.e. automatically dial the extension and get through. Input character “P” as below: Long press “*” key (“P” will appears on the screen). Zone code+ switchboard number+ P + extension number + dial key International call: To make an international call, long press “*”key until the international long distance call prefix symbol “+”appears on the screen. This allows you dial in any country even if you do not know the local international call prefix (e.g. it is 00 in China). After the prefix is input, enter the zone code of the country you want and the complete dial number. The zone code is usually subject to conventions, 49 for Germany, 44 for U.K. and 46 for Sweden, etc. Like dialing a long distance call, “0” in the city code should be dropped when dialing. E.g. To dial the service hot line of other countries, you should dial: +86 21 114 +country code+ the complete dial number+ dial key Emergency call If your mobile phone is within the network coverage (you can check the network signal intensity bar on the top left corner of the screen), you will be able to make an emergency call (the emergency call can be made without the SIM card). If the network supplier provides no roaming service in the region, “Emergency Call” will appear on the screen to tell you that you can only make this kind of calls. 3.2.2 Answer a call In a normal condition, when there is an incoming call, press the dial key to answer the call. If the “any key for answer” is set on, then you can press any key to answer the call. If the handset is inserted, you can also press the keys on the handset to answer a call. If it is not convenient, you can set “auto answer” to on and make sure that the handset is inserted. The call will be automatically got through after two seconds’ ringing or vibration. 3.2.3 Reject a call When there is an incoming call, press Hang-Up key to reject the call. 11 3.2.4 Menu available during a call During a call, you can press Option key to enter call menu. The operation method of the call menu is the same with that of the function menu. The call menu can only be seen during a call. Besides, functions, such as call waiting, holding on a call, and multiparty meeting, need to be supported by the network. Please contact with your network provider. In the call menu, you can do the operations as follows: Hold single call: hold on the current call or restore the held call. End single call: end the current call. Phonebook: enter the phone book menu. Call history: enter the call history. Messaging: enter the Message menu. Sound recorder: record the call voice. Mute: do not send/ restore sending of local voice. Volume: adjust the call volume. *Note. Some of the menus only appear in the specific circumstances, e.g. “Swap” only appears “during a call” and “hang up” call. 3.3 Hand-free function When you make a call, press the Right Soft Key to have a Hand-Free call. 4 Menu Introduction 4.1 Call Center Call center include the following sub-menus: Call history and General call settings 4.1.1 Call history In standby mode, press the center key to go to the main menu, and then select the call center to view the phonebook and call log. Or in the standby interface SIM1/SIM2 dial key, to enter into the call log. In the Call history, select a call log, you can carry out the following operations: ------ Missed calls: view last 20 missed calls. ------ Dialed calls: view last 20 dialed numbers. ------ Received calls: view last 20 answered calls. ------ Delete call logs: delete missed calls, received calls, dialed the phone records, and delete all call records. The call log interface to enter the option to do the following: View: view details of call records Call: call the number. 12 Send text message: edit text message and send it to this number. Send multimedia message:edit multimedia message and send it to this number. Save to Phonebook: add the record to Phonebook. Add to Blacklist: add the number to blacklist. Edit before call:edit this number and call it. Delete:delete this entry. Delete all:delete all call entry. View the details of the record, including date, calling time, name, number and call times. In details interface, you can press Option to perform following operation on selected record. Call: call this number. Send text message: edit text message and send it to this number. Send multimedia message: edit multimedia message and send it to this number. Save to Phonebook: Add the record to Phonebook. Add to Blacklist: Add this record to Blacklist. Edit before call: edit this number and call it. Delete: delete this entry. 4.1.2 Call settings Call settings include the following sub-menus: SIM1 call settings and SIM2 call settings and Advanced settings,The specific menu operation is as follows: SIM1 call settings ------ Call Waiting : select Enable, Disable or Check. ------ Call divert: Divert all voice calls: enable this option and all the incoming calls are diverted to the specified number. Divert if unreachable: enable this option and all the incoming calls are diverted to the specified number if the other party can’t dial through your number. Divert if no answer: enable this option and the incoming calls are diverted to the number you set if your mobile phone isn’t answered. Divert if busy: enable this option and all the incoming calls are diverted to the specified number when you are busy. Divert all data calls: Transfer if it is data call.(Need network support) Cancel all diverts: cancel all settings of call diverting. ------ Call barring: set Call barring. Outgoing calls: bar outgoing calls. Incoming calls: bar incoming calls. Cancel all: cancel barring (need to input the PIN2 code). Change barring password: change the password. ------ Line switching: select Line 1 or Line 2. SIM2 call settings ------ Call waiting: select Enable, Disable or Check. ------ Call divert: Divert all voice calls: enable this option and all the incoming calls are diverted to the specified number. 13 Divert if unreachable: enable this option and all the incoming calls are diverted to the specified number if the other party can’t dial through your number. Divert if no answer: enable this option and the incoming calls are diverted to the number you set if your mobile phone isn’t answered. Divert if busy: enable this option and all the incoming calls are diverted to the specified number when you are busy. Divert all data calls: Transfer if it is data call.(Need network support) Cancel all diverts: cancel all settings of call diverting. ------ Call barring: set Call barring. Outgoing calls: bar outgoing calls. Incoming calls: bar incoming calls. Cancel all: cancel barring (need to input the PIN2 code). Change barring password: change the password. ------ Line switching: select Line 1 or Line 2. Advance settings ------Blacklist: set Blacklist and save the numbers that you don’t want to answer. The incoming call is rejected automatically if it is from the number in the Blacklist. Reject number in blacklist: Switch on / off refused to blacklist the number of calls. Blacklist numbers: set Blacklist and save the numbers that you don’t want to answer.( You can save up to 20 telephone numbers in Blacklist) ------Auto redial: enable or disable Auto Redial when the other party is busy or the call isn’t answered. ------Call time reminder: enable or disable Call Time Alert (beep) in the calling process and set the alert period. ------Answer mode: set any key answering and headset mode automatically answer. 4.2 Phone book You may make full use of phone book to store some name, mobile phone number, family number, company number and so on. Please choose “phone book” from main menu, and then enter it. ------Quick search: choose this option to enter into the phone book browse interface. On the lower part of the screen there is a search box, and you can input relevant information to filter the telephone record. You can press “#” to switch the search method. * Note: You can save up to 500 telephone numbers in mobile phone and 200 numbers in SIM (depends on the capacity of SIM card). You can see the following options in phone book detailed: View: view the details of the contact. Send text message: edit text message and send it to this number. Call: call this number. Edit: edit this number and then save it to phone book. Delete: choose this function to delete the contact. Copy: Copy the contact. Add to Blacklist: Add the number to blacklist. Phonebook settings: 14 ------Preferred storage: choose the priority for the storage location- the mobile SIM1or SIM2 or phone or All. ------Extra numbers: You can set your phone number, fixed dialing, SOS number (This feature requires operator support). ------Memory status: Choose this option to check the phonebook information in the SIM card and in the mobile phone ------Copy contacts: copy all the records in the mobile phone or the SIM card: both SIM card to mobile phone and phone to SIM card are workable. ------Move contacts: move all the records in the mobile phone or the SIM card : both SIM card to mobile phone and phone to SIM card are workable ------Delete all contacts: choose this function to delete phone record all from SIM card or mobile phone. 4.3 Messaging The message services can only be used if they are supported by your network or your service provider and you have subscribed to them. Also appropriate settings need to be in place. *Note: When sending messages, your phone may display the words Message sent. This is an indication that the message has been sent by your device to the message centre number programmed into your device. This is not an indication that the message has been received at the intended destination. For more details about messaging services, check with your service provider. 4.3.1 Write message Text message First input the contents of the short message, and insert special marks when the punctuation simulation keypad is activated (all punctuation marks are available when the input method of capital and small letters is selected). Select “Option” and carry out the following operations: Send to: Enter number or Add from phonebook. Can add multiple recipients here. Input method: change input method. Advanced: Insert number, Insert name from the phonebook or Insert bookmark from WAP bookmark Save to Drafts: By SIM1or SIM2; save the sms to SIM1 or SIM2. 4.3.2. Inbox View received messages . When the messages list of Inbox appears, you can press OK to read the message. You can press Option to perform the following operations. ------ Reply: reply the sender. ------ Call sender: call the number of the sender. ------ Forward: forward this message. ------ Delete: delete this message. ------ Add to Blacklist: Add the number to blacklist. ------Advanced Use number: pick up the number with call or save to phonebook or send text message. Use USSD: pick up the numbers with 1 or 2 digits in the messages. Press Option to perform the following operations. ------View: View the details of the message. 15 ------Reply: reply the sender with SIM1 or SIM2. ------Call sender: call the number of the sender. ------Forward: forward this message with SIM1 or SIM2. ------Delete: delete this message. ------Add to Blacklist: Add the number to blacklist. ------ Delete same number: choose to delete the information sent by the same number in the list ------Delete all: delete all the messages in Inbox. 4.3.3 Drafts Save messages which will be sent later. When the messages list of Drafts appears, you can press OK to read the message. You can press Option to perform the following operations: ------ Send: send the message. ------ Edit: pick up and edit the contents of the message. ------ Delete: delete the message. ------Advanced: Use number: pick up the number with call or save to phonebook or send text message. Use USSD: pick up the numbers with 1 or 2 digits in the messages. Press Option to perform the following operations. ------View: View the details of the message. ------Send: add contact send this message. ------Edit: pick up and edit the contents of the message. ------Delete: delete the message. ------Delete all: delete all the messages in Drafts. 4.3.4 Outbox View sent messages. When the messages list in Outbox appears. You can press OK to read the messages. You can press Option to perform the following operations: ------Resend: resend this message. ------Edit: pick up and edit the contents of the message. ------Delete: delete the message. ------ Advanced: Use number: pick up the number with call or save to phonebook or send text message. Use USSD: pick up the numbers with 1 or 2 digits in the messages. Press Option to perform the following operations. ------View: View the details of the message. ------Resend: resend this message. ------Edit: pick up and edit the contents of the message. ------Delete: delete the message. ------Delete all: delete all the messages in Drafts. 16 4.3.5 Sent messages You can access the information has been sent 4.3.6 Blacklist Phone SMS blacklist, turn on this feature, and add a number in the blacklist, the phone will not receive less than the list of numbers to send SMS. Status: set open and close the SMS blacklist. Blacklist numbers: setting adds SMS blacklist numbers 4.3.7 Message settings SIM1 Store or modify the number of the SMS center necessary for sending a short message, or get the number from the network operator, or set short message storage time limit.And set the voicemail number. SIM2 Store or modify the number of the SMS center necessary for sending a short message, or get the number from the network operator, or set short message storage time limit.And set the voicemail number. Save sent message Can be set on / off to save the sent message function. 4.4 Camera In the camera preview screen, enter the option to do the following: Switch to video recorder: switch to the video interface. Photos: switch to the photo list. Camera Settings: set the parameters of camera. Image Settings: set the size and quality of pictures. White balance: select the brightness of pictures. Scene Mode: select shooting mode. Restore default: Restore all camera settings to factory default. 4.5 Camera Shortcut Keys Enter camera preview screen, press the 0 key to quickly switch to the video interface, press a button to switch photo size, press the 2 key to switch the picture quality, adjust the white balance, press the 4 key, press the 6 key to set the delay the timer, press the 7 key to set the shooting. Recording the photos stored in the file manager in the "Photo " file folder by default . 17 4.6 Multimedia Enter the mobile navigation of multimedia, left, right induction to select menu. 4.6.1 Audio Player In the playlist interface, press the left soft key to access the song list, enter the option to do the following: Play: play the selected track. Details: view the details of the music. Refresh list: update the playing list. Settings: set multimedia playing. 1. List auto gen.: update list automatically or not when power on. 2. Repeat: enable this option to repeat playing music. 3. Shuffle: enable this option to play in random. 4. Background Play: enable this option and the music won’t be stopped if you exit menu. * Note: phone the default music file folder to read the file management, "My music "files; Music player interface, press the joystick left and right to select the playback function sequentially from left to right: a, play, stop, next, press the "*" and "#" buttons to adjust the volume. 4.6.2Image Viewer Save the pictures in mobile phone. View: view saved pictures. Image information. Information can be found in pictures. Browse style: change the view mode of pictures in album, matrix or list. Send: send the selected picture to MMS or Bluetooth. Use as : send the picture to wallpaper, screen saver, power on display, power off display, caller picture. Rename: change the file name of selected picture. Delete: delete the selected picture. Storage: change the default path to access and take pictures. *Note: Phone default picture files in the folder of reading the file under the administration of Photo files, It is supports viewing of JPG、GIF、BMP、PNG picture. 4.6.3 Video Recorder This mobile phone provides video recording function. Select menu “Video Recorder” and press the Center key to record video. Press Option to access: Switch to camera: switch to the camera. Camcorder Settings: select this option to set parameters of recorder. Video settings: set the size, quality, time limit reached and record audio of videos. *Note:The default format is 3GP of video recorder. Recorded video is stored in the file manager in the "Videos" file folder by default. 18 4.6.4 Video Player Play saved video. Available options are: Play: play selected video. Send: send the selected video to Contacts or with Bluetooth. Rename: change the file name of selected video. Delete: delete the selected video. * Note: The video player interface, press the OK button to pause playback; press left, right navigation key operations fast-forward, rewind; press on the navigation key to open a full-screen playback; press the navigation button to stop playing; press "*" and "#" keysadjust the volumeSound recorder。 4.6.5 Sound recourder Into recording interface induction navigation to the left move to the right to select the recording, playback on an audio file, the next recording file button, and accordingly, the lower left corner of the "option" to enter the menu options, do the following: New record: record a new clip of audio. Play:play the selected audio. Append: append new clip of sound to original AMR or AWB audio. Rename: change the name of selected audio file. Delete: delete the selected audio file. List: Play: play the selected audio. Rename: change the name of selected audio file. Delete: delete the selected audio file. Send: send the recording to MMS or Bluetooth. Settings: set the storage position and the file format. Send: send the recording to MMS or Bluetooth. *Note:Recorded audio files are stored in the file manager in the Audio . 4.6.6 FM radio The FM Radio supports auto scan and manual input. If the channel you are listening to provides FM radio service, you can check the channel information on the screen. The FM Radio service uses packet data connection (network service). To use FM Radio service, the following requirements must be satisfied: Both the radio channel and network operator supports this service. You must define the Internet access point to access the FM Radio service provided by the network operator. To input radio channel manually, you need to subscribe FM Radio service and define valid service identity code. Warning: Adjust the volume properly when you listen to the radio. Continuous high volume may damage your hearing. 19 You can make or answer a call when you are listening to radio. If the background playing is activated, the FM Radio is off automatically when you are calling and resumes when the call ends. You can also listen to the radio even without a SIM card. FM interface, function buttons from left to right: scan, play, rewind, forward, specific functions are as follows: Scan: FM Radio interface, press the left and right navigation keys, automatically search for channels. Play: Press the OK button to turn on / off the FM radio. Channel adjustment: Press the up and down navigation keys to manually adjust the broadcast channels. Volume: press “*”and “#” key to adjust the volume. In FM Radio interface, press the Left key to access options: ——Channels List: display the channels list.( Can display up to 30 records ). —— Manual Input: input the identity code of radio channel manually. —— Auto search: scan radio channels automatically and display the radio channels. —— Settings: set the background playing and activate/deactivate the speaker. *Note: Before using the FM radio, you need to plug in your headphones. . 4.6.7 File manager Application Functions ------ Open: display the contents in the folder. ------ Format: format the folder. ------ Delete: delete file or folder. Folder Functions ------Audio: default storage path of record audio you have taken. ------My Music: default storage path of mp3 you have taken. ------Videos: default storage path of videos. ------ Images: default storage path of images. ------ Photos: default storage path of photos you have taken. ------Received: default storage path of document you have received. 4.7 User profiles You can select different modes on different occasions to carry out the personal settings in the environment modes such as ring tone, vibration, volume, etc. This function makes it possible to get adjusted to different situations without changing the ring tone settings at multiple places, and you only need to switch to the pre-set environment mode. General mode: It is ringing alert by default; Silent mode: It does not have ringing and vibrating alert Meeting mode: It is vibrating alert by default; Outdoor mode: It uses the maximum volume, vibration + ringing alert, by default; In every mode, you can edit the following in a separate manner: 20 Activate: start the current profile. Customize: enter the setting profile parameters: —— Alert type: 4 manners are available: ringing only, vibration only, vibration and ringing, and vibration then ringing. —— Ring type: Beep once or Repeat. —— Incoming call: set the tones for incoming calls. —— Ringtone volume: set the incoming ringtone volume. —— message: set the tones for SIM1/2 message. —— Message volume: set the message tone volume. —— Keypad: set the keypad tone. —— Keypad volume: set the keypad tone volume. —— Power on: set the power on tone. —— Power off: set the power off tone. —— System alert: switch on or off the system alert. —— Intelligent call alert: Set to turn on / off the voice broadcast calls function. Rest: restore defaults. 4.8 Organizer 4.8.1 Torch Into the open / close the flashlight. Note: In the standby interface, long press the OK button to open / close the flashlight. 4.8.2 Bluetooth This mobile phone supports Bluetooth wireless connection. You can establish wireless connection between mobile phone and Bluetooth hands-free vehicle communication device, computer or handheld device to realize voice communication, data exchange and synchronization. Available options are: Power: activate/deactivate Bluetooth function. Visibility: enable/disable the authority of Bluetooth being searched. My Device: display current and ever connected Bluetooth devices. Search audio device: search for peripheral Bluetooth devices and connect. My name: change the name of Bluetooth device of this mobile phone Advanced: ------ Audio Path: change the output device of audio. ------ My address: view the address of this mobile phone. 4.8.3 Calculator Press the Direction keys to input the four operators +, -, ×, ÷. Press the Right soft key to clear last number or result; press the Right soft key “Back” to exit calculator and press the Left soft key or OK to calculate. 21 * Note: The precision of the calculator is limited and there are errors, especially when it is indivisible. 4.8.4 Calendar Access the Calendar submenu. Press the Left/Right key to select date, press the Up/Down key to select week and press Option to access submenus. View: view the created memos. View all: View all the created memos. Add event: create new memo. Delete event: Delete the created memos. Jump to Date: jump to specified date. Go to today: view the calendar in today. Go to weekly view: view the calendar in week (month). 4.8.5 Alarm The machine can be set 5 groups of alarm clock: Status: activate/deactivate the alarm clock. Time: set the time of ringing. Repeat: ------Once: the clock alarms only once. ------Everyday: alarm at specified time everyday. ------Custom: set the time that the alarm rings in a week. Alert type: select the alarm mode, e.g. Vibrator and Ring, Ring, Vibrator. 4.8.6 SIM toolkit Based on the SIM card network operators to provide services, to provide the users to use the services provided by the SIM card. 4.9 Settings 4.9.1 Dual SIM settings This mobile phone supports dual-card dual-standby. In dual card mode, you can switch the SIM cards according to requirements. Dual SIM open Insert two SIM cards and they both subscribe to GSM network and stand by. Only SIM1 open 22 Insert two SIM cards, but only SIM1 is activated and in standby. Only SIM2 open Insert two SIM cards, but only SIM2 is activated and in standby. Note: If two cards are activated, the network names are displayed in two lines with SIM1 network in first line and SIM2 network in second line. 4.9.2 Phone settings Time and date: Set city, time and date. ------ Set home City: select a city. ------ Set time / Date: set current time and date ------ Set format: set the displaying format of time and date. Language: set the displaying language of mobile phone menus. Preferred Input Methods: select a default input method. Display : ------ Wallpaper: select standby interface wallpaper. ------ Power on display: select a picture for power on. ------ Power off display: select a picture for power off. ------ Show date and Time: enable/disable displaying current time in standby interface. ------ Show operator name: select the operator name to open or close. Dedicated key: the arrow keys can be set to standby interface functions. Flight mode: set to open the flight mode. UART settings: select SIM1 or SIM2 UART. Misc. Settings ------ LCD backlight: set the brightness and time of backlight. 4.9.3 Network settings ------Network selection: New search: re-subscribe to newly scanned network. Select Network: select network for the SIM card. Selection Mode: select Manual or Auto. ------Preferences: Pre-store several networks. 4.9.4 Security settings You can set up the safety options for your mobile phone via this menu to prevent your mobile phone or SIM card from unauthorized use SIM1 /SIM2 security : ------PIN lock: You can set on / off the SIM card lock. (the PIN code can prevent your SIM card from illegal operation. If the PIN code is disabled, select Enable and you can start PIN code protection. The mobile phone asks you to input the PIN code the next time you switch on the phone. If the PIN code is enabled, select Disable and you can stop PIN code 23 protection.) ------Change PIN: select Change PIN code and you can set new PIN code. Please input old PIN code, new PIN code and repeat new PIN code according to the prompt. ------Change PIN2: select Change PIN2 code and you can set new PIN2 code. Please input old PIN2 code, new PIN2 code and repeat new PIN2 code according to the prompt. *Note: If you input invalid PIN code for three times continuously, the SIM card is locked and you need the PUK code to unlock the SIM card. The PIN code and PUK code may be provided together with SIM card. Please contact your network operator if not. Phone security: Phone lock can prevent your mobile phone from illegal operation. If this function is enabled, you need to enter phone password every time you turn on the mobile phone, then you can unlock the phone and make or answer a call. You can clear mobile phone password, but illegal operation can’t be prevented in this case. *Note: The default phone lock password is 1122. Please change into your own private password as soon as possible. If you have forgotten your mobile phone password, please contact your distributor or local authorized service center to unlock your mobile phone. Auto Keypad Lock: Set the waiting time of keypad lock. After setting, the keypad is locked automatically if the mobile phone hasn’t been used in specified time 4.9.5 Restore factory settings Restore the functions of mobile phone to default. *Note: The default phone password is 1122. 5 Operation Instructions on Chinese and English Input Letter Input Method This mobile phone provides two kinds of input methods, i.e. capital letter input, and lowercase input. What this letter input method differs from the Intelligent English Input Method is that it has no association function. However, you may input the needed letters by pressing keys for multiple times continuously. A corresponding letter will be input by pressing a key once. For instance, press keys of 2 and 3, “A” and “D” will be input; press the key 2 continuously, you will be asked to select among “A”, “B”, “C”, and “2”. Note: This mobile phone provides input methods for capitalized , small English letters and multi- input method. 24 Other language Letters You can press # key to change the different language input methods. Numeric Input Method Input the corresponding numbers under such input method by pressing the figure keys. 6 Common Problems. 6.1 When the mobile phone displays “Insert SIM”? 1. Contact between SIM card and mobile phone is bad or the SIM card is not inserted. 2. Change the SIM card and try again. The SIM card may have fault if the mobile phone operates normally. Please contact your network operator. 3. If there is oxidation on the surface of SIM card or SIM card slot of the mobile phone, please wipe with alcohol or clean cloth. 4. Please contact ××× Service Center or ××× Maintenance Department if the above methods are invalid. 6.2 Checking and precautions of PIN, PIN2, PUK, PUK2 and password: 1. Please consult local network operator. 2. The SIM card is locked if you input invalid PIN code for three times continuously. 3. Please consult SIM card operator for PUK code. 6.3 Network connection fails 1. The signals in your local place are weak or have shielding. Please move to other places and try again. 2. Please contact ××× Service Center or ××× Maintenance Department to do phone test. 6.4 You can’t be heard 1. Make sure whether it is network problem and try again. 2. The communication lines in some places are bad. Please move to other places and try again. 3. The trunk line of network operator is bad. 4. Please contact ××× Service Center or ××× Maintenance Department if the above methods are invalid. 6.5 Can’t charge the battery 1. The contact between charger and mobile phone is bad. Make sure whether the installation is proper. 2. Check whether the battery is valid. The battery performance drops after several years. 25 6.6 Weak signal 1. If the local network signals are unstable, the signals the mobile phone receives won’t be stable. Please move to other places and try again. 2. Please contact ××× Service Center or ××× Maintenance Department if the above method is invalid. 6.7 Can’t make a call 1. The local network signals are weak and please move to places with strong signals and try again. 2. Local network operator is busy. Please try again later. 3. Check whether Hide Number is enabled. You can’t make a call if the local network operator doesn’t support this function and you have enabled it. 4. Please contact ××× Service Center or ××× Maintenance Department if the above methods are invalid. 6.8 Standby time becomes short 1. The standby duration depends on the intensity of local network signal. 2. It is affected by environment temperature, base station distance, etc. Appendix Abbreviation and Explanation GSM Global System for Mobile Communications SMS Short Messaging Service SMS-CB SMS Cell Broadcast WAP FDN SIM Wireless Application Protocol Fixed Dial Number Subscriber Identity Module PC Personal Computer PIN Personal Identification Number. Usually refer to PIN1. It is provided with SIM card and the code to access SIM card. PIN2 Personal Identification Number 2. Provided by network operator. It is used for special functions, e.g. SIM supported FDN. PUK Personal Unlock Key. Provided along with SIM card. It is used to unlock the SIM card if you input invalid PIN code for three times continuously, or used to change PIN code. 26 PUK2 Personal Unlock Key 2. Provided along with specific SIM card and is used to change or enable PIN2. IMEI International Mobile Equipment Identity. It is made up of 15-digit number and one mobile phone corresponds to one unique IMEI. MCC Mobile Country Code, e.g. 460 for China (mainland). MNC Mobile Network Code, e.g. 00 for CMCC and 01 for China Unicom. Call Waiting It is a network service that you can answer a call without ending current call. Different from multi-party conference, you can only talk to one party at the same time. Call Diverting It is a network service that you can divert the incoming calls to specified number. The options include All Call, If not Available, If not Answered, If Busy, and Transfer All Data Calls. Roaming Use the mobile phone beyond the home network. It includes international roaming and roaming, while it refers to international roaming in this manual. domestic STK SIM Tool Kit. It is new GSM service, which provides you flexible information, including stocks, traffic and weather. The functions of STK depend on the network operator. This service needs the support of SIM card and network operator. Dual Card Mode The mobile terminal supports two GSM SIM cards and the cards subscribe to network simultaneously and stand by at the same time. 27