1
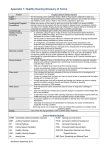
Summary of Potential Result Combinations, Follow-up Actions & Documentation Possible AABR 1 outcomes Result Interpretation Screen Status/Follow up actions Documentation Requirements Pass result in both ears: No High Risk Indicators Bilateral Pass Screening complete No further formal assessment required Parents encouraged to monitor baby’s milestones against Speech & hearing checklist on HH brochure Complete the AABR1 Screening results section of the S&R form o Tick the Pass box for the Right and Left ears o Enter date, screener details, signature and comments if necessary Complete the Follow up Actions section of the Healthy Hearing S&R form o Tick Milestones, monitoring &/or otitis media discussed Record the result in baby’s Personal Health Record Book File the Consent form in the baby’s clinical chart File the Screening and Referral form in the baby’s clinical chart Complete Clinical Pathways (CP) documentation (if used) or record notation in mother’s &/or baby’s charts Pass result in both ears: High Risk Indicator/s present Targeted Surveillance Complete the AABR1 Screening results section of the S&R form o Tick Pass/Refer boxes as appropriate for the Right and Left ears o Enter date, screener details, signature and comments if necessary Complete the Follow up Actions section of the Healthy Hearing S&R form o Tick Milestones, monitoring &/or otitis media discussed o Record location & date of referral to Audiology o Tick Surveillance box o Record appointment details if known Record the result in the baby’s PHR Book & list the risk factors Fax/forward a copy of completed S&R form, including Notes page to Audiology Fax a copy of completed S&R form, including Notes page to the FSF File the Screening and Referral form in the baby’s clinical chart Complete CP documentation (if used)/record notation in mother’s &/or baby’s charts Refer result both ears Bilateral Refer Refer result in one ear: Pass result in other ear Unilateral Refer No result in either ear Screen incomplete (NA) Screening complete Refer to Audiology for follow up assessment before baby’s 1st birthday Do NOT refer surveillance babies to the FSF Parents are to be encouraged to monitor baby’s milestones against Speech & hearing checklist on HH brochure & to contact Audiology for an earlier appointment if they have any concerns Emphasis the importance of attending for diagnostic assessment but remind them that the screen is not diagnostic Encourage parent/s to contact Audiology or FSF if they have any questions prior to appointment Insert reminder slip into baby’s PHR Book AABR2 required o Rescreen as soon as possible but ideally leave a minimum of 12 to 24 hours between screens o If a baby is attending as an outpatient the AABR 2 should be performed within 1-2 weeks o Screening should be completed by 3 mths corrected age, technically babies can be screened up to 6 mths Repeat AABR1 as soon as practical Re-screen both ears If a baby is attending as an outpatient the repeat AABR1preferably should be done within 1-2 weeks Screening should be completed by 3 mths corrected age, although babies can be screened up to 6 mths No result in one ear: Pass result in other ear No result in one ear : Refer in other ear Complete the AABR1 Screening results section of the S&R form o Tick Pass/Refer boxes as appropriate for the Right and Left ears o Enter date, screener details, signature and comments if necessary Record the result in baby’s Personal Health Record Book File the Consent form in the baby’s clinical chart. File the S&R form in accordance with local protocol pending AABR2 result Complete CP documentation (if used)/record notation in mother’s &/or baby’s charts As a complete screen has not been obtained, the AABR 1 Screening Results box should be left blank & outcome of screen recorded on Notes page of S&R form. o The Screen Incomplete box should only be ticked if the baby has been discharged from HH File the Consent form in the baby’s clinical chart File the S&R form in accordance with local protocol pending a repeat AABR1 result Complete CP documentation (if used)/record notation in mother’s &/or baby’s charts NATUS ALGO3 NEWBORN HEARING SCREENER “TROUBLE SHOOTING GUIDE “ Natus ALGO3 NEWBORN HEARING SCREENER “TROUBLE SHOOTING” IMPEDANCE and SENSOR Problems: If impedance reading >99 kOhms, after careful prepping, suspect an equipment problem. “Perform Impedance Check” MYOGENIC: Muscular or Electrical Interference Check Equipment PCA Cable (Sensor cable): • Check Sensor cable is plugged securely into the Preamp • Check cables are securely plugged into back of Algo3 and there is no obvious damage Sensors and clips: • Place the sensors on the baby when you get to “ Baby Preparation Screen” (This allows you to monitor the impedance while preparing the baby) • Handle sensors only by the tab or by the edge & replace on plastic card if re-prepping Place Nape (centred back of neck) then Common (high on front or back of shoulder) Now check the impedance level. (Then Place ear couplers, first the one the infant is lying on and then the upper one) Place the vertex sensor last of all (centre high forehead). • Check correct placement of sensors: White (nape), Green (common), Black (vertex) • If impedance >12 k ohms make sure that none of the sensors have lifted off the skin • Make sure clips are connected to the correct sensor and not loose • • • • • • 24/06/2008 • • • • • Before screening evaluate baby’s skin type as you may need to prep the skin if it is: Oily, dry & flaky or has an abundance of hair or lotion on the skin. First you may need to clean/prep the skin with soap and water, some hospitals prefer to use “Soap free” baby wash. This reduces electrical impedance across the baby’s skin and allows for better conductivity. If impedance does not initially come down, place fingers on sensors and then press gently. If the impedance remains high >12kOhms you may have to prep or reprep the skin. Re-prep site with NuPrep gel, take off sensor, place a very small amount of NuPrep on a gauze pad, hold skin taught and gently rub the skin, remove all the NuPrep with another area of the gauze and replace the sensor Prep area larger then sensor as entire adhesive surface of sensor is conductive. If the baby’s skin is extremely dry or the sensor becomes dry, re-hydrate with a drop of N/Saline May need to use a fresh sensor if site has needed to be prepped more than twice, this is rare. Make sure the sensors have a low impendence value before screening. They should be <10 kOhms and stable preferably lower. If Impedance is >12 kOhms screening cannot proceed. You will need to prep or reprep the skin and try & get lower impedance levels. The most sensitive to this is the Vertex (forehead) sensor. Lower impedances result in faster screening times and fewer false refers. If the impedance is still too high, place the sensor clips in the “Check Kit” (You can do this while in screening mode) Perform” Impedance Check” Impedances should go down to “0” kOhms, If they do not & or fluctuate then there is a problem with the PCA (sensor cable) and it needs to be replaced. Environment: • • • • • • • • Check PCA (sensor and Preamp cable) are properly connected & not damaged. Check PCA cable not too close to the screener display & cables are not crossing over each other. Check Algo is plugged into a hospital grade power outlet Check power cord is not coiled when in use Check clips are attached only to the purple portion of sensors Check correct clips are attached to sensors Common sensor is not too close to the Nape sensor Check all the sensors are adhering to baby’s skin– sometimes the vertex can come loose- press down gently and monitor impedance, reposition and maybe re-prep or use saline to re-hydrate the hydrogel. Do not place your fingers on the sensors during screening, this can cause high myogenic May need to perform “ Impedance Check” to make sure that Myogenic Interference is not due to problems with PCA (sensor cable) & Preamp Check Baby: Check Baby: • Check Equipment • • Make sure the baby is not due for a feed, if so, have the baby fed and then screen Reposition head and neck to relax & ease possible neck tension. Wrap the baby securely. (Be aware of SIDS recommendation) The baby may be in a deep sleep and relaxed but there may be increased myogenic due to wind, bowel movements or other cramps. Try repositioning the baby – incline the crib especially after feeding if appropriate Babies withdrawing from drugs may be jittery or have internal myogenic which may not be obvious. May want to screen baby early (day 1) before withdrawal symptoms increase. To calm a restless baby: Can pat or rub the baby’s back. Gently place your hands on the baby or gently stroke the baby’s head. Place baby in mum or dads arms (a rocking chair can be very effective) Simulate the baby’s foetal position by gently cradling one hand over the top of the baby’s head and placing the other hand to hold the legs against the tummy All of the above can calm an unsettled baby without producing myogenic Check Environment: • On a rare occasion there can be interference from another piece of equipment E.g. Mobile phones/fluorescent lights/ /electric beds/VCR’s. May need to turn them off. May need to move away from monitors/infusion pumps/phototherapy lights in immediate vicinity. • If the baby is quiet and myogenic is still high try another power outlet. • If there is still too much myogenic, go to Equipment check (F10), perform “Artifact Check” this will identify source of myogenic If a “PASS” then you can be sure the myogenic is coming from the baby, stop and rescreen the baby at a later time when he/she is maybe in a more relaxed state If “FAIL” this indicates the myogenic is coming from the environment or there is a problem with the equipment, may want to try and rescreen elsewhere. Not applicable for impedance problems 1 24/06/2008 2 Natus ALGO3 NEWBORN HEARING SCREENER “TROUBLE SHOOTING” Natus ALGO3 NEWBORN HEARING SCREENER “TROUBLE SHOOTING” HOW TO REDUCE YOUR SCREENING TIMES AND LOWER REFER RATES AMBIENT –ENVIRONMENTAL NOISE Check Equipment: • • • • • 1. Choose the right baby well fed/calm/sleeping. Check ATA (transducer) cable is properly attached at back of Algo and not damaged Position each ear coupler so cables emerge towards the top of baby’s head (like horns) Check transducers have a secure connection to ear couplers Make sure the ear couplers are sealed around the baby’s ear. Sometimes if the baby is on his/her side, the shoulder can push up on the coupler allowing ambient noise to intrude. May have to hold ear coupler gently, top and bottom to provide a good seal. Lights flashing in transducers indicate ambient noise 2. Correct placement of the sensors Check Baby: • • (White) – centre and back of the neck. If hard to see, better to place down towards the back rather than towards the skull. Vertex: (Black) centre of forehead as high as possible Common: (Green) high on front or back of the shoulder Is the baby crying, pause screening until baby settles down and ambient noise decreases 3. Impedance Check Environment: • Nape: The lower and closer together the impedance numbers are, will result in faster screening times and lower refer rates. Check the environment – make sure there is not too much environmental noise. Eliminate if possible and if not, try and find a quieter spot. If the ambient noise bar does not go down and all the trouble-shooting has been addressed Go to equipment check (F10), and perform an “Acoustic Check” 4. Reduce Myogenic and Ambient Noise MONITORING EAR COUPLERS AND FLUCTUATING PROGRESS BAR 5. Monitor ear couplers Check if the “progress bar is moving” if not you need to troubleshoot. If the progress bar is constantly fluctuating or does not advance, check the following:- If there are any of the following: • A restless/agitated baby needs to be calmed down as this will cause the progress bar to fluctuate. • Make sure the ear couplers are sealed and close to the baby’s head. • Make sure the ear couplers are over the ear and not pressing on the outer edges of the ear as this can cause a collapsed ear canal. If the baby moves, it can reposition the ear coupler it is lying on and cause a closure of the ear canal; check this if the progress bar for that ear is lagging. Pause the screen, lift the ear coupler and gently massage the skin around the opening of the ear (tragus) to open up the ear canal and displace any debris. Gently hold the top and bottom of the ear coupler and then see if the progress bars goes up in another 500-1000 sweeps 1. High Myogenic • If one ear passes and the other ear is lagging make sure the ear coupler is correctly positioned. • If baby is lying on that ear, pause the screen then turn baby’s head so the ear is” up” adjust the ear coupler and continue screening. 24/06/2008 2. High Ambient Noise 3. High Impedance 4. Slow progress Bar Need to Troubleshoot and “Intervene” One minute of active Intervention can save you several minutes of screening time These Guidelines were developed in conjunction with the user manual and Clinical Practice but do not replace the User Manual or Clinical Judgement 3 24/06/2008 4 Natus ALGO3i NEWBORN HEARING SCREENER “TROUBLE SHOOTING” Natus ALGO3i NEWBORN HEARING SCREENER TROUBLE SHOOTING AND TIPS MYOGENIC: Muscular or Electrical Interference IMPEDANCE and SENSOR Problems: If impedance reading >99 kOhms, after careful prepping, suspect an equipment problem. “Perform Impedance Check” Check Equipment • • • • • • • Check Equipment PCA Cable (Sensor cable): • Check Sensor cable is plugged securely into the Preamp • Check cables are securely plugged into back of Algo3 and there is no obvious damage Sensors and clips: • Handle sensors only by the tab or by the edge & replace on plastic card if re-prepping • After you have ‘Entered Data’ press “OK” then prepare the baby and attach supplies then proceed to screening. • Place Nape (centred back of neck) then Common (high on front or back of shoulder) now check the impedance level. Then Place ear couplers, first the one the infant is lying on and then the upper one Place the vertex sensor last of all (centre high forehead). • Check correct placement of sensors: White (nape), Green (common), Black (vertex) • If impedance >12 k ohms make sure that none of the sensors have lifted off the skin • Make sure clips are connected to the correct sensor and not loose • Check Baby: • • • • Check Baby: • • • • • • • • Before screening evaluate baby’s skin type as you may need to prep the skin if it is: Oily, dry & flaky or has an abundance of hair or lotion on the skin. First you may need to clean the skin with soap and water Some hospitals prefer to use “Soap free” baby wash as this reduces electrical Impedance across the baby’s skin and allows for better conductivity If impedance does not initially come down, place fingers on sensors and then press gently. If the impedance remains high >7kOhms you may have to prep or reprep the skin prior to screening If impedances fall between (8 & 11kOhms) the A3i will display “Impedances Marginal” message you may begin screening at this point but prepping is recommended Re-prep site with NuPrep gel, take off sensor, place a very small amount of NuPrep on a gauze pad, hold skin taught and gently rub the skin, remove all the NuPrep with another area of the gauze and replace the sensor Prep area larger then sensor as entire adhesive surface of sensor is conductive. If the baby’s skin is extremely dry or the sensor becomes dry, re-hydrate with a drop of N/Saline May need to use a fresh sensor if site has needed to be prepped more than twice, this is rare. Make sure the sensors have a low impendence value before screening. They should be <8 kOhms and stable preferably lower. If Impedance is reaches 12 kOhms screening cannot proceed. You will need to prep or reprep the skin and try & get lower impedance levels. The most sensitive to this is the Vertex (forehead) sensor. Lower impedances result in faster screening times and fewer false refers. If the impedance is still too high, place the sensor clips in the “Check Kit” (You can do this while in screening mode) Perform “Impedance Check” Impedances should go down to “0” kOhms, If they do not & or fluctuate then there is a problem with the PCA (sensor cable) and it needs to be replaced. Environment: 24/06/2008 Check PCA (sensor and Preamp cable) are properly connected & not damaged. Check PCA cable not too close to the screener display & cables are not crossing over each other. Ensure A3i display faces away from the baby. Check clips are attached only to the purple portion of sensors Check correct clips are attached to sensors Common sensor is not too close to the Nape sensor Check all the sensors are adhering to baby’s skin– sometimes the vertex can come loose- press down gently and monitor impedance, reposition and maybe re-prep or use saline to re-hydrate the hydrogel. Do not place your fingers on the sensors during screening, this can cause high myogenic May need to perform “ Impedance Check” to make sure that Myogenic Interference is not due to problems with PCA (sensor cable) & Preamp • • Make sure the baby is not due for a feed, if so, have the baby fed and then screen Reposition head and neck to relax & ease possible neck tension. Wrap the baby securely. (Be aware of SIDS recommendation) The baby may be in a deep sleep and relaxed but there may be increased myogenic due to wind, bowel movements or other cramps. Try repositioning the baby – incline the crib especially after feeding if appropriate Babies withdrawing from drugs may be jittery or have internal myogenic which may not be obvious. May want to screen baby early (day 1) before withdrawal symptoms increase. To calm a restless baby: Can pat or rub the baby’s back. Gently place your hands on the baby or gently stroke the baby’s head. Place baby in mum or dads arms (a rocking chair can be very effective) Simulate the baby’s foetal position by gently cradling one hand over the top of the baby’s head and placing the other hand to hold the legs against the tummy All of the above can calm an unsettled baby without producing myogenic Check Environment: • • • • • Not applicable for impedance problems 1 On a rare occasion there can be interference from another piece of equipment E.g. Mobile phones/fluorescent lights/ /electric beds/VCR’s may need to turn them off. May need to move away from large metal sinks/monitors/infusion pumps or Phototherapy lights in the immediate vicinity. If the baby is quiet and myogenic is still high try moving the device to another area. If there is still too much myogenic, go to back to main screen “Device Setup” then “Equipment Check”, perform an “Artifact Check” it will identify source of myogenic If Algo 3i shows a “PASS” during the “Artifact Check” it indicates the myogenic is coming from the baby, then stop and rescreen the baby at a later time when he/she is in a more relaxed state If “FAIL” this indicates the myogenic is either coming from the environment or problems with the equipment you may want to try and rescreen elsewhere. 24/06/2008 2 Natus ALGO3i NEWBORN HEARING SCREENER “TROUBLE SHOOTING” Natus ALGO3i NEWBORN HEARING SCREENER “TROUBLE SHOOTING” AMBIENT –ENVIRONMENTAL NOISE HOW TO REDUCE YOUR SCREENING TIMES AND LOWER REFER RATES Check Equipment: 1. Choose the right baby well fed/calm/sleeping. • • • • • Check ATA (transducer) cable is properly attached at back of Algo and not damaged Position each ear coupler so cables emerge towards the top of baby’s head (like horns) Check transducers have a secure connection to ear couplers Make sure the ear couplers are sealed around the baby’s ear. Sometimes if the baby is on his/her side, the shoulder can push up on the coupler allowing ambient noise to intrude. May have to hold ear coupler gently, top and bottom to provide a good seal. Lights flashing in transducers indicate ambient noise 2. Correct placement of the sensors Check Baby: • Nape: (White) – centre and back of the neck. If hard to see, better to place down towards the back rather than towards the skull. Vertex: (Black) centre of forehead as high as possible Common: (Green) high on front or back of the shoulder Is the baby crying, pause screening until baby settles down and ambient noise decreases 3. Impedance Check Environment: • • The lower and closer together the impedance numbers are, will result in faster screening times and lower refer rates. Check the environment – make sure there is not too much environmental noise. Eliminate if possible and if not, try and find a quieter spot. If the ambient noise bar does not go down and all the trouble-shooting has been addressed Go back to main screen “Device Setup” then “Equipment Check” and perform an “Acoustic Check” 4. Reduce Myogenic and Ambient Noise 5. Monitor ear couplers: Check if the “Progress bar is moving” if not you need to troubleshoot. MONITORING EAR COUPLERS AND FLUCTUATING PROGRESS BAR If there are any of the following: If the progress bar is constantly fluctuating or does not advance, check the following:- 1. High Myogenic • A restless/agitated baby needs to be calmed down as this will cause the progress bar to fluctuate. • Make sure the ear couplers are sealed and close to the baby’s head. • Make sure the ear couplers are over the ear and not pressing on the outer edges of the ear as this can cause a collapsed ear canal. If the baby moves, it can reposition the ear coupler it is lying on and cause a closure of the ear canal; check this if the progress bar for that ear is lagging. Pause the screen, lift the ear coupler and gently massage the skin around the opening of the ear (tragus) to open up the ear canal and displace any debris. Gently hold the top and bottom of the ear coupler and then see if the progress bars goes up in another 500-1000 sweeps • If one ear passes and the other ear is lagging make sure the ear coupler is correctly positioned. • If baby is lying on that ear, pause the screen then turn baby’s head so the ear is” up” adjust the ear coupler and continue screening. 24/06/2008 2. High Ambient Noise 3. High Impedance 4. Slow progress Bar Need to Troubleshoot and “Intervene” One minute of active Intervention can save you several minutes of screening time These Guidelines were developed in conjunction with the user manual and Clinical Practice but do not replace the User Manual or Clinical Judgement 3 24/06/2008 4 Troubleshooting Measures Reducing Screening Times & ‘False Refer’ Results Screening times can be reduced and false Refer results minimised through: Appropriate baby selection Correct baby preparation Active monitoring of the progress of the screen. A hearing screen should take between 4 and 7 minutes. Although a Refer result may take a little longer, it should still take only take 7 to 10 minutes if the baby is well prepared and myogenic and impedance readings are low. Baby Selection The key indicator for successful screening is appropriate baby selection. For best results, babies should be calm, quiet, settled and recently fed. Attempting to screen an unsettled or hungry baby rarely saves time due to longer screening times resulting from: Higher myogenic which slows the screen Frequent pausing of the screen to settle the baby Need to re-screen due to a Refer result Baby Preparation Time taken to prep the baby’s skin and correctly apply sensor tabs and ear couplers will pay dividends in terms of reduced screening times and reduced parental anxiety associated with a false Refer result. Refer to the Algo 3 or Algo 3i manual and Scanmedics’ guides for detailed information on baby preparation and correct application of the sensors and ear couplers. Monitoring Progress of the Screen Once a screen is commenced, it is important to monitor its progress in order to identify any problems that may develop and to rectify them in a timely manner. Important aspects to monitor include: Progress bars for each ear Impedance levels Myogenic level Ambient noise levels Troubleshooting will be required if: No segments have appeared in the progress bar for either ear by around 2000 to 3000 sweeps Segments in the progress bars remain static for any length of time or keep disappearing Screen is taking more than 10 minutes More in-depth troubleshooting will be required if segments in the progress bars have not appeared or progressed by around 7000 sweeps In a situation where the bar is progressing well for one ear but not the other, the recommended procedure is to wait for a result from this ear before undertaking troubleshooting for the other ear. Once all aspects of troubleshooting have been checked, it is then important to allow the Algo to continue and complete the screen without further interference. If baby selection and preparation guidelines have been followed and appropriate troubleshooting measures undertaken, the outcome will be a valid result regardless of whether it is a Pass or Refer. A screen should only be discontinued prior to a result being obtained for both ears if: The baby has become agitated and attempts to settle them have failed It is realized that the equipment is not attached to the baby correctly or is faulty (eg cracked/broken/loose cable; ear coupler dislodged) Consumables have been applied incorrectly (eg ear transducers reversed) A screen should never be discontinued because: The segments on the progress bar/s are not progressing or keep disappearing, despite thorough troubleshooting The progress bars suggest that the baby is about to receive a Pass result for both ears The progress bars suggest that the baby is about to receive a Refer result for 1 or both ears Reasons for continuing a screen for longer than 20 minutes would need careful consideration. However, it is important to assess each situation individually and for the nurse conducting the screen to use their judgment. For example, if the baby is older and more alert and/or the opportunity to perform a screen at another time is unlikely, then it may be worth persevering with the screen despite it taking longer than recommended and/or conditions being less than ideal. And remember … if a baby obtains a Pass in the one ear but becomes unsettled and the screen is discontinued before a result is obtained in the second ear, you will need to re-screen both ears. Troubleshooting Tips Problems encountered during screening may be associated with the: Baby Environment Screening Equipment (Algo) Some questions to ask during a hearing screen if the progress bars are not progressing and/or the screening time is prolonged are listed in the following table. Question Is the sound getting in? o Are earphones placed correctly over the baby’s ears and with a good seal? o Is the ear canal open? o Are the transducers properly inserted into the ear couplers? Action o o o o o Massage the tragus (ear canal opening), preferably prior to applying the ear couplers When applying an ear coupler, roll it on from back of the ear to the front to prevent it from closing the ear canal Check if the LED lights are flashing The screener may need to hold the ear coupler/s gently top and bottom if the ear couplers do not have a good seal Reposition the baby to reduce the risk of the ear canal being pushed closed by the ear coupler/s, mum’s arm, etc Is the baby’s ABR response getting back to Algo? o Check sensors & cables are properly connected o Check cables not cracked or broken Is myogenic, electrical interference or ambient noise preventing the Algo from detecting the signal? o Check that Myogenic, Impedance& Ambient levels are not too high as this will slow screening down & prevent the Algo from detecting the signal For detailed guidance on troubleshooting, please refer to the Scanmedics flowchart Troubleshooting Measures: How to Improve Screening Times & Reduce the “False” Refer Rate. For other information on baby selection, preparation and troubleshooting measures please refer to the Natus Algo 3/3i Newborn Hearing Screener Trouble Shooting and the User Manuals for the Algo 3 and/or Algo 3i. Suspected Equipment Problems If you suspect a problem with the screening equipment as a result of repeated Refer results for the same ear on different babies or ongoing difficulties reducing Impedance or Myogenic levels: Perform the 3 equipment checks as per the equipment manual using the plastic check kit to confirm if the machine if operating correctly Notify your local facility Healthy Hearing coordinator of your concerns Contact the equipment suppliers, Scanmedics (02 9882 2088) and/or your Area Healthy Hearing Coordinator to discuss you concerns Post Screen Where possible, a baby should be left in the same settled state as they were in prior to the screen. To minimise any discomfort for the baby when the ear couplers are removed, a damp wipe may be used to help release the gel on the ear couplers in order to reduce pulling on the hair and/or skin. Any baby wash or gel should be wiped off the baby’s skin on completion of the screen. Possible AABR 2 outcomes Result Interpretation Screen Status/Follow up actions Pass result both ears No High Risk Indicators Bilateral Pass Screening complete No further formal assessment required Parents encouraged to monitor baby’s milestones against Speech & hearing checklist on Healthy Hearing brochure Discuss risk of Otitis Media in the first year due to the higher risk of developing this condition following a Refer result Pass result in both ears: High Risk Indicator/s present Targeted Surveillance Refer in both ears Refer result in same ear as AABR1 and a Pass result in the other ear Bilateral Refer Unilateral Refer Screening complete Refer to Audiology for follow up assessment before baby’s 1st birthday Do NOT refer surveillance babies to the FSF Parents are to be encouraged to monitor baby’s milestones against Speech & hearing checklist on Healthy Hearing brochure & to contact Audiology for an earlier appointment if they have any concerns Emphasis importance of attending diagnostic assessment. remind them that screen is not diagnostic Encourage parent/s to contact Audiology/ FSF if they have questions prior to appointment Insert reminder slip into baby’s PHR Book Immediate diagnostic Audiology assessment required by an approved provider Provide family with a copy of the brochure Your Baby’s Audiology Hearing Test o Note Audiology contact details in space provided on brochure Remind parents of the possible reasons for the Refer result, as listed on the brochure Emphasis the importance of attending for diagnostic assessment Encourage parent/s to contact Audiology or Family Support Service if they have any questions prior to appointment No result in either ear No result in one ear and Pass result in the other ear No result in one ear and Refer in the other Screen incomplete (NA) Repeat AABR2 required Documentation Requirements Complete the AABR2 Screening results section of the S& R form o Tick the Pass box for the Right and Left ears o Enter date, screener details, signature and comments if necessary Complete the Follow up Actions section of the S&R form o Tick Milestones, monitoring &/or otitis media discussed Record the result in the baby’s Personal Health Record Book File the Screening and Referral form in the baby’s clinical chart Complete CP documentation (if used)/record notation in mother’s &/or baby’s charts Complete the AABR1 Screening results section of the S&R form o Tick Pass/Refer boxes as appropriate for the Right and Left ears o Enter date, screener details, signature and comments if necessary Complete the Follow up Actions section of the S&R form o Tick Milestones, monitoring &/or otitis media discussed o Record location & date of referral to Audiology o Tick Surveillance box o Record appointment details if known Record result in the baby’s PHR Book& list the risk factors if not already recorded Fax/forward a copy of completed S&R form, including Notes page to the Audiology Fax a copy of completed S&R form, including Notes page to the FSF File the Screening and Referral form in the baby’s clinical chart Complete CP documentation (if used)/record notation in mother’s &/or baby’s charts Complete the AABR2 Screening results section of the S&R form o Tick Pass/Refer boxes as appropriate for the Right and Left ears o Enter date, screener details, signature and comments if necessary Complete the Follow up Actions section of the S&R form o Tick Milestones, monitoring &/or otitis media discussed o Record location & date of referral to Audiology o Tick Audiology Assessment box o Record appointment details if known o Record date of referral to Family Support Service Record the result in the baby’s Personal Health Record Book Fax/forward a copy of completed S&R form, including Notes page to Audiology Fax a copy of the completed S&R form, including the Notes page to the FSF File the Screening and Referral form in the baby’s clinical chart Complete CP documentation (if used)/record notation in mother’s &/or baby’s charts As a complete screen has not been obtained, AABR2 Screening Results box should be left blank & outcome of screen recorded on Notes page of S&R form o Screen Incomplete box should only be ticked if baby’s discharged from HH File S&R form in accordance with local protocol pending a repeat AABR2 result Complete CP documentation (if used)/record notation in mother’s &/or baby’s charts Possible AABR 2 outcomes (continued) Result Result reversal - Refer result is obtained in an ear that gave a Pass result in a previous screen Interpretation FLIP/FLOP Screen Status/Follow up actions Perform a third screen Reassure parents that the alternating results may reflect fluctuating status within the ear (eg fluid or debris) & not an equipment fault Preferably leave 12 – 24 hours before rescreening Screening should be completed by 3 months corrected age although technically babies can be screened up to 6 months. Documentation Requirements Complete the AABR2 Screening results section of the S&Rl form o Tick Pass/Refer/Not tested boxes as appropriate for each ear o Enter date, screener details, signature and comments if necessary Record the result in the baby’s Personal Health Record Book File the S&R form in accordance with local protocol pending repeat AABR2 result Complete Clinical Pathways documentation (if used) or enter notation in mother’s &/or baby’s charts