1
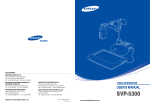
SALES NETWORK
SAMSUNG TECHWIN CO., LTD.
145-3, Sangdaewon 1-Dong, Jungwon-Gu,
Sungnam, Kyungki-Do, Korea 462-703
TEL: +82-31-740-8137~8141 FAX: +82-31-740-8145
SAMSUNG OPTO-ELECTRONICS AMERICA, INC.
ELECTORONIC IMAGING DIV.
40 Seaview Drive, Secaucus NJ 07094, U.S.A
TEL : +1-201-902-0347 FAX: +1-201-902-0429
SAMSUNG OPTO-ELECTRONICS UK LTD.
Samsung House, 1000 Hillswood Drive
Hillswood Business Park Chertsey Surrey KT16 OPS
TEL: +44 (0)1932 455 308 FAX: +44 (0)1932 455 325
SAMSUNG TECHWIN MOSCOW OFFICE
LENNINGRADSDY PR-KT, 37A. KORP.14
RUSSIA, 125167, MOSCOW
TEL: +7-095-258-9296, 9298 FAX: +7-095-258-9297
TIANJIN SAMSUNG OPTO-ELECTRONICS CO., LTD .
7 Pingchang Rd, Nankai Dist, Tianjin, P.R China
Post Code : 300190
TEL : +86-22-2761-4599 FAX: +86-22-2769-7558
http://www.samsungpresenter.com
P/No.: 6806-0547-01A
crecom 04.8
Contents
Installing Program
Installing Program
1
Before installing the Samsung Digital Presenter Program
Before installing the Samsung Digital Presenter Program
1
The supplied Samsung Digital Presenter can save the image which is captured through
System requirements
1
Installing program
2
To control the Digital Presenter on the PC, connect the Samsung Digital Presenter to the PC
Connecting Samsung Digital Presenter to PC
2
through USB interface and install the USB driver and the Samsung Digital Presenter
Installing USB driver
3
Installing Samsung Digital Presenter Program
5
Installation tips
6
Running Program
8
Running the Samsung Digital Presenter Program
8
Using Program
9
Using the Samsung Digital Presenter Capture Program
9
presenter lens as illustration file or AVI file, and can be controlled on the PC.
program using the supplied program CD.
System requirements
● CPU : Pentium 4, 2.4GHz or higher recommended
● Windows 2000 pro or later
- Supporting window list : Window 2000 pro / XP / 2003
Capturing the still picture and AVI capturing
13
Digital Imaging Effect Processing (DIP)
16
Digital Imaging Effect Processing (DIP) functions
18
Using Samsung Digital Presenter TWAIN Driver
26
Troubleshooting
30
Specification
33
● RAM : 256MB or higher recommended
● USB2.0 interface port (On-board type USB chipset recommended)
● Graphic card : 65,536 colors or higher, SVGA (800 X 600) resolution or higher
(Video RAM 16MB or higher)
● CD-ROM drive
Caution
This program is available in USB2.0 mode only.
VIDEO PRESENTER
1 Software Manual
Installing Program
Installing program
Installing USB driver
To install the program
1. Download the latest DirectX version from Microsoft Windows Update site.
2. Connect the Samsung Digital Presenter to your PC with USB cable, and turn on the
power of Digital Presenter.
3. Install the USB driver. (See page 3 for details.)
4. Install the Samsung Digital Presenter control program. (See page 5 for details.)
1. After the Digital Presenter is connected properly and the power is turned on, Found New
Hardware Wizard dialog box will appear (in case of Windows XP).
Connecting Samsung Digital Presenter to PC
Connect the one end of USB cable to the USB port on computer and the other end to the
USB port on Digital Presenter, respectively. Make sure the power cable is connected and
turn on the power.
2. Select Install from a list or specific location (Advanced) box and click Next (in case of
Windows XP).
USB cable
Connect to
SVP-5300
Connect to PC
S-VIDEO OUT
POWER IN
DC12V IN
VIDEO
AUDIO
IN
1
IN
2
1
2
1
OUT
1
2
OUT
2
Caution
We recommend you to connect the USB cable to the USB port on computer main board.
(It can make troubles when using extended front-side port or USB hub without power
depending on computers.)
Use the USB cable between the presenter and the PC with length of 5.0m or less.
VIDEO PRESENTER
2 Software Manual
VIDEO PRESENTER
3 Software Manual
Installing Program
3. Insert the Samsung Digital Presenter program CD into your CD-ROM drive, and select the
Search removable media (floppy, CD-ROM ) box and Include this location in the
search box, and then type E:\ (where E is the drive letter for the CD-ROM drive).
Installing Samsung Digital Presenter program
1. Insert the Samsung Digital Presenter program CD into your CD-ROM drive, and the
install program will be auto run. Select for setup language.
2. When Installshield Wizard window opens, click Next .
3. Choose installing MPEG-4 Video Codec for compressing AVI file in USB Capture Program. If you
do not install MPEG-4 Codec, You cannot compress AVI file. We recommend to install codecs.
4. Click Next . The USB driver will be installed by clicking Finish .
4. When Install MPEG-4 codec, Hardware Installation dialog box appears. Click [Continue
Anyway] to complete setup.
Caution
When you use it through PCI/PCMCIA type USB 2.0 port in Windows 98(SE), ME it may
require to install the Windows 98 original CD.
- Windows 98 : ₩Win98_se₩setup₩Win98
- Windows 98SE : ₩Win98_se
- Windows ME : ₩Win_me
When you can’t find KS*.* files : Your system is not installed the latest DirectX version
After Installing DirecX, try to install USB driver.
VIDEO PRESENTER
4 Software Manual
5. After the Samsung Digital Presenter program is properly installed, you can see the
Samsung Digital Presenter icon in the desktop and Software manual shortcut in the
[Start] menu. Also, following shortcut will be installed.
VIDEO PRESENTER
5 Software Manual
Installing Program
How can I remove the USB driver and the Samsung Digital Presenter program?
Installation tips
How can I check if the USB 2.0 port in my computer is enabled?
To remove USB driver:
1. We will explain on the base of Windows XP. Please find the Device Manager in other
We will explain on the base of Windows XP. Please find the Device Manager in other
Windows versions for yourself.
Windows versions for yourself.
2. Select [Control Panel] → [System] → [Device manager] on Windows XP.
Select [Control Panel] → [System] → [Device manager] on Windows XP.
3. If you see the USB Universal Host Controller and the USB root hub installed, USB
Click the plus(+) icon in front of [Image device] to display the list.
Select the installed Samsung Digital Presenter SVP 5300, and click Remove . Follow
interface is properly enabled.
4. If you see the USB Enhanced Host Controller listed, USB2.0 mode is properly enabled.
the instructions on the View panel.
To remove Samsung Digital Presenter program:
Select [Control Panel] → [Add/Remove programs]. Select Samsung Digital Presenter
SVP- 5300 in the list, and click Add/Remove . Follow the instructions on the View panel.
Run the Samsung Digital Presenter Install Program again as you ve installed before.
Follow the instructions on the View panel.
VIDEO PRESENTER
6 Software Manual
VIDEO PRESENTER
7 Software Manual
Running Program
Using Program
Running the Samsung Digital Presenter Program
Using the Samsung Digital Presenter Capture Program
1. Make sure that the Samsung Digital Presenter is connected to your PC and both are turned on.
2. Double click the Samsung Digital Presenter viewer icon (automatically placed on
Windows desktop when you install), or select [Start] → [Program] → [Samsung Digital
Presenter SVP-5300 Capture Program] on Windows XP.
3. The Samsung Digital Presenter Capture program starts to run, and the images from
Samsung Digital Presenter are displayed on Windows XP.
Caution
If the program does not run, check if your PC supports SVGA (800X600) resolution.
While viewing captured images on the Digital Presenter program or TWAIN driver, do not
Capture Viewer
Snap window.
It shows the latest captured
still images.
turn off the presenter nor remove the USB cable from the PC. It may cause the presenter
and the PC to make troubles.
Menu
1. [Capture] menu
1) Capturing still picture : The picture is captured and automatically stored. When you
press shortcut key [Ctrl+Q], image quick storing can be accomplished. See page 13
for details.
2) AVI capture : The AVI image is captured. See page 14 for details.
3) Stop AVI capture : It will be activated when AVI capture is started. When you press
[Stop] button, AVI capture will be completed and the captured file will be stored.
4) Exit : The program is closed.
VIDEO PRESENTER
8 Software Manual
VIDEO PRESENTER
9 Software Manual
Using Program
2. [View] menu
3. [Option] menu
1) Fit to window : You can see the image fitted to the window width. The ratio in length
of image will be automatically adjusted according to the ratio in width,
regardless of window size.
2) Stretch to window : You can see the image fitted to the window size.
3) 50% : You can see the image in 50% of original size.
4) 75% : You can see the image in 75% of original size.
5) 100% : You can see the image in original size.
6) Full Screen : You can see the selected image on full screen.
Full Screen Normal window short cut key : [Ctrl+F]
7) Tool Bar : You can make the Tool bar visible or invisible.
8) Status Bar : You can make the Status bar visible or invisible. When you capture a
image, captured time, loss frame number will be displayed on Status bar.
9) Snap Window : You can see the 3 still pictures recently captured. When you double
click the picture, you can save it with another name.
Caution
Even though you adjust the window size, the original image size in Digital Presenter will
not be changed.
VIDEO PRESENTER 10 Software Manual
1) Video device : Only SVP-5300 can recognize it. If it cannot be recognized, the
program will be automatically closed.
2) Video Capture size : You can select the resolution of input image; 160x120, 320x240,
640x480.
3) Video Compression : You can choose one of the compression modes (3-type).
No-compression :
- You can save the captured image without compressed
- You can capture the most definition image without damage to image quality
- To save the image for 1 hour, 62GB storage will be required (based on 640x480,
30frame/s)
- As the resolution gets higher and the time limit is longer, the capacity will get bigger.
- When the HDD speed of your PC is low, frame loss may occur more frequently.
- The frame rate is fixed as 30frame/s.
Compression (MPEG-4, high quality)
- Compress the captured image by use of MPEG4 Codecs and save it.
- You can select this option when you want to save the image with a lot of motion
or the high definition image.
- To save the image for 1 hour, 495MB storage will be required. (base on 640x480
30frame/s)
VIDEO PRESENTER 11 Software Manual
Using Program
Compression (MPEG-4, low quality)
- Compress the captured image by use of MPEG4 Codecs and save it.
Capturing the still picture and AVI capturing
Capturing the still picture
- You can select this option when you want to save the image with little motion
such as script or still picture.
- To save the image for 1 hour, 138MB storage will be required (based on
You can capture the image currently displayed and save it as a JPG or BITMAP format
image file onto the hard disk of your PC or the diskette. The basic folder to save the
image will be Digital Presenter installed folder plus QuickCap folder and the image is
640x480, 30frame/s)
saved as JPG format.
Caution
1. When you want to save the image currently presented from Samsung Digital
When you save the compressed AVI file, if the CPU speed of your PC is low, frame loss
Presenter by use of SVP-5300 Capture program, select [Capture] → [Capturing still
may occur frequently or the image reconstruction time may not be matched.
picture]. Press shortcut key [Ctrl+Q] for easier capturing.
2. When the capturing is properly completed, a snap window will be displayed on left
side to show the currently captured image as small scale. When you double click the
4) Digital effect
image in snap window, you can save the image as a specified name.
Video Filter : The image on Digital Presenter can be converted by use of digital
effect . See 16 page for details.
Preview Original Source : When you want to see the original image after applying
the digital effect, select the Preview Original Source .
3. The JPG format image file will be saved in the QuickCap folder under the program
installed directory.
4. You cannot specify the saved file name as you please. It will be saved as
YYYYMMDDHHMMSS.jpg with reference to the present time of day.
Caution
4. [Help] menu
You can see the SVP-5300 Capture version and copyright.
VIDEO PRESENTER 12 Software Manual
If the capturing still image isn t completed or AVI capturing is now under way, it will
not work.
It will be captured as specified image size set on capture card. (640x480/320x240/160x120)
In the full screen mode, it will work only by use of shortcut key [Ctrl+Q] or [ESC].
VIDEO PRESENTER 13 Software Manual
Using Program
2) Setting the AVI capturing time
AVI Capturing
You can capture the image currently displayed on Samsung Digital Presenter as a rate
You can capture the AVI image for a specified time by use of timer, and input the
of 30 frames per second by use of SVP-5300 AVI Capture program.
time in the unit of minute. The estimated capacity according to input time will be
1. When you select [AVI Capture] menu, it will show the following dialog box.
displayed for both compressed and non-compressed modes.
For proper operation, Windows 2000/XP or higher will be required.
Caution
The captured file capacity may be different from the estimated value according to the
moving amount of image from the Digital Presenter and the frame loss while capturing.
3) Starting capture
When you select [Confirm] button, the AVI capturing will start.
If the capturing is started, [Capture] → [Stop Capturing] button will be activated,
and capturing time, loss frame number will be displayed on Status Bar .
Caution
2. Function
In case of FAT32 file system of your PC, the single file size limited by maximum 4 GB.
When you select [Capture] → [AVI Capture], a dialog box to input the default setting
Check your Windows file system in volume property dialog.
for capturing will be displayed.
1) Capturing file path
Specify the file path which you want to capture. The basic folder is program
installed folder.
640 x 480, 30fps setting.
“No limit” of NTFS system means “File size limited only by size of volume”
VIDEO PRESENTER 14 Software Manual
VIDEO PRESENTER 15 Software Manual
Using Program
Digital Imaging Effect Processing (DIP)
DIP produces an impressionistic effect on the transferred image through USB cable from
Digital Presenter. The original image of presenter doesn t change. The DIP image is
transformed just on the PC.
Using DIP for digital image effect
1. While the image from Samsung digital presenter is displayed on PC, if you click
[Option] → [Digital Effect] button, Video Processors dialogue box will open.
(In case of capturing, this function is available only after stopping the capture.)
3. Click [Remove All] to return to original image status. Click [Option] → [DIP] button to
only preview the original image.
Caution
As many digital image effect processing are applied, the program running speed gets
slower or the more drop frames will be occurred while capturing.
2. [Insert Before] : When you want to apply some else effect before currently selected effect.
[Insert After] : When you want to apply some else effect after currently selected effect.
[Move Up/Down] : When you want to move the currently selected effect up or down.
Double-Click [Properties] to reset the applied image status.
VIDEO PRESENTER 16 Software Manual
We recommend to apply 1~2 effect while capturing.
When you select [Option] →[Digital Effect] →[Preview Original Source] button, the digital
image effect processing has been applied to captured image even though original image
is displayed.
VIDEO PRESENTER 17 Software Manual
Using Program
Digital Imaging Effect Processing (DIP) functions
※Tip : In [Properties] dialogs, the [OK] button means that the setting values are applied
and saved.
the [Cancel] button means that the setting values are not applied and returned to
previous status.
the [Apply] button means that the setting values are only applied and the
[properties] dialog is not closed.
LEAD Video Edge Enhance Filter
Draws the edges (outlines) of an image and emphasizes the edges. When you release
[Enable], this effect will not be applied.
[Enable Multiplier] can be applied from 50 as minimum to 1000 as maximum.
LEAD Video Crop Filter
Crops the specified area of current image. You can select the lowercase area from the unit
of 1x1 as minimum. You can use Automatically stop the graph when needed function
to stop the video graph when changing the captured image size, and then to adjust the
image size automatically fit to the specified area.
VIDEO PRESENTER 18 Software Manual
VIDEO PRESENTER 19 Software Manual
Using Program
LEAD Video Emboss Filter
LEAD Video Mosaic Filter
Makes the current image appear raised or stamped. You can use [Light Angle], [Elevation]
Makes the current image as if it were made up of small chips and tiles. You can set the
and [Depth] to apply the digital effect. When you click [R] button, it will return to default
value from 1 to 64. As the number gets higher, the mosaic size will be larger. The default
value, and you can adjust the value by mouse or [←], [→] keys. When you click
value is 1 and you can adjust the value by mouse or [←], [→] keys. Mosaic effect can be
[Bumpmap] button, color effect will be applied to the embossed image and mosaic effect
applied to the partial of image.
will be also applied to the partial of image.
VIDEO PRESENTER 20 Software Manual
VIDEO PRESENTER 21 Software Manual
Using Program
LEAD Video Rotation Filter
LEAD Video Text Overlay Filter
You can rotate the image easily as degrees of 90, 180 and 270. The default value is No
You can overlay the text on current image. Several options such as font, text location, text
Rotation . When rotating the image 90 or 270 degrees, the image will not be reduced
location when rotation filter is applied, transparency etc. can be applied.
fitting to the lengthwise size. When you click [Reverse], the current image will make a
turn over right and left, and click [Flip], the current image will make a reverse up and
OverLay Settings Page 1
down.
Font Options : [Font options
] Sets the font and size of text
[Font BK color ] Sets the background color of text
[Rotate angle] Sets the rotation degree of text
[Rotation center] References the center of rotation
View rectangle : It is a tab to set the area on which the text is overlaid. If the capture
size of current image is changed, reset the size in order to overlay the text properly.
Outline options : It is a tab to set the outline of font.
VIDEO PRESENTER 22 Software Manual
VIDEO PRESENTER 23 Software Manual
Using Program
LEAD Video Unsharp Mask Filter
OverLay Settings Page2
Express the current image more clearly.
[Amount] sets the degree of definition, and the default value is 2 and you can set to 0~500.
[Radius] sets the radius. If the radius gets bigger, the blur will be excessive.
[Threshold] is higher, the noise is less introduced.
Text alignment : As reference of the specified area by View rectangle in Overlay
Settings Page 1, the text alignment will be set. It will be set on center as reference of
right, left and landscape, or on center as reference of up, down and longitudinal.
Text options : You can adjust the transparency of text by use of [Enable Opacity]. It can
be set to 0~100%, and the bigger number the more transparent. If you choose [View
background], the background color of text will disappear. If you choose [Enable XY
position], the coordinate of text will be fixed, and the entire tap in
Text alignment
and the [Rotation center] in Overlay setting Page 1 will be deactivated.
Text overlay : It is a tab to input the user text. You can input a text by calling out the
XML file.
DIP function
LEAD Video Crop
LEAD Video Rotation
LEAD Unsharp Mask
LEAD Video Text OverLay
LEAD Video Edge Enhance
LEAD Video Emboss
LEAD Video Mosaic
Save
O
O
O
O
O
O
O
Text direction : Selects the direction of text taken from XML file.
VIDEO PRESENTER 24 Software Manual
VIDEO PRESENTER 25 Software Manual
Processing time
Quick
↑
↑
↓
↓
Slow
Using Program
Using Samsung Digital Presenter TWAIN Driver
1. If you want to use TWAIN driver, your PC had been installed the following system.
Samsung Digital Presenter USB device driver (It will be automatically installed when
the USB driver is installed.)
Graphic application program supporting TWAIN 1.6 or higher (ex: Photoshop,
ACDSEE, etc.)
To run the TWAIN driver, USB device driver should be installed in advance. You
cannot use TWAIN driver itself to the device.
2. Select the TWAIN driver in graphic application program.
1) Adobe Photoshop:
[File] → [Import] → [USB 2829 Video]
2) JASC Paintshop Pro:
[File] → [Import] → [TWAIN] → [Select Source ] Select USB 2820 TWAIN, and then
[File] → [Import] → [TWAIN] → [Acquire ]
3) Microsoft Office :
[Insert] → [Image] → [Scanner or Digital camera ]
Select USB 2820 Video and then click [Customer Insert].
3. Scan images through Digital Presenter TWAIN driver
TWAIN driver operates only the Still Capture functions of Samsung Digital Presenter USB
program.
Caution
In Samsung Digital Presenter TWAIN driver, you can capture and scan the image with
640x480/320x240/160x120 sizes under the preview condition (320x240 size).
4) In the other application programs supporting TWAIN, refer to the relevant application
manual.
VIDEO PRESENTER 26 Software Manual
VIDEO PRESENTER 27 Software Manual
Using Program
Scanning Images
Keyboard map
Key
[Ctrl+F]
Description
Toggle full screen mode and normal window mode.
[ESC]
Return to normal size mode.
[Ctrl+Q]
Capture the still picture. The image will be stored in ‘QuickCap’
folder under the program installed folder. While the image is
captured, the other functions will be deactivated.
[Ctrl+W]
Make the ‘Snap window’ appear/disappear. If there is activated
window, it will be hidden, and if there isn t, the window will
appear.
[Alt+F4]
Exit this program.
1. The images from presenter are displayed on the View panel through TWAIN driver.
Select the image size which you want to scan through TWAIN driver.
2. After selecting the size, press [Capture] button to scan it.
3. When [Capture] is completed, the captured image is transferred to the graphic
application program.
4. Depending on the graphic application program, TWAIN driver may be closed or
maintained after transferring the image in order to scan the image continuously. Refer
to the graphic application program manual for details.
VIDEO PRESENTER 28 Software Manual
VIDEO PRESENTER 29 Software Manual
Troubleshooting
Troubleshooting
Fail to run the Samsung Digital
Presenter program
There is a problem for USB connection
between the Digital presenter and your
PC.
If other application programs run on
The AVI display is too slow.
Close the other programs. In general,
Make sure the USB cable is properly
connected.
make your PC restart and remove the
programs occupying lots of system
Exit the program which may obstruct
the Digital Presenter program (ex. the
program related to USB or the
program occupying lots of system
resources.)
Turn off the Digital Presenter, and turn
it on again after 10 seconds, then run
the program again.
There is no image displayed on View
panel
resources, and run this program only.
PC is turned down
ownload the latest DirectX version or
higher version from Microsoft
Windows Update site.
VIDEO PRESENTER 30 Software Manual
PC may be turned down due to
collision with specific peripheral
device.
Select [Start] → [Setting] → [Control
Panel]→ [Display], and select
Advanced menu in Setting item.
Choose the Troubleshooting in
sub-menu, and change the Hardware
acceleration .
While the USB is connected, check
there is USB2820 in image device
by selecting [System] → [Device
Manager].
Check there is USB Controller by
selecting [System registration data] →
[Device Manager]. If there isn t USB
Controller, USB port will not be used.
When you make booting your PC,
enter Environment set-up and
adjust that USB port can be used.
the system, the speed may be slower.
The screen is stopped
Make sure the connection condition of
USB cable.
If the USB cable is disconnected
before exiting the program, it may
occur.
Make sure to close the program, and
then disconnect the USB cable.
VIDEO PRESENTER 31 Software Manual
Troubleshooting
Specification
·Try to restart after rebooting the
Windows. If the troubles remain even
after that, remove the device (see page
7) and install the device driver (see
page 3) again.
The device cannot be found
In case of USB 2.0 controller installed
PC, the following error message
appears (Windows XP) HI-SPEED
USB device is connected to Non HISPEED Hub.
Standard
USB 2.0
Power
OC USB 5.0V DC
Capture Size
640x480 / 320x240 / 160x120
Frame Rate
maximum 30 fps
Video Format
AVI (MPEG4 Codec compression)
In OS environment of your PC, check
the USB2.0 is ‘ON’ condition.
Applied OS
SVP-5300 Capture : Windows 2000Pro, XP, 2003
TWAIN Driver : Windows 2000Pro, XP, 2003
In case of Windows XP, download the
latest patch (KB822603) related to
USB and install it.
PC Requirement
(Recommended)
In this case, it will work as USB1.1
mode.
Release the [Power control] in USB
hub list of Control Panel so PC cannot
turn off this device to save the power.
When using this device, release the
Power control (S3) function of your
PC
In case of USB Controller Bandwidth
Exceeded error message prompted.
Item
Interface
Pentium 4, 2.4GHz / Memory 256MB / USB 2.0 terminal
USB2.0 mode cannot perform at regular speed when you use it through
PCI/PCMCIA type USB2.0 card on your PC.
The Microsoft doesn't officially support USB2.0 mode in the Windows 98/SE/ME.
·The error can occur when you remove
USB plug illegally.
·Remove the USB2820 device in
control panel or reboot the systems.
·This error occur rarely if you update
the latest service pack from Microsoft
Update site.
VIDEO PRESENTER 32 Software Manual
VIDEO PRESENTER 33 Software Manual