1
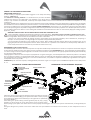
AIMING and SUSPENDING INSTRUCTIONS
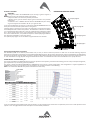
PREDICTION: EASE Focus 1
To aim correctly a complete system PROEL suggests to use always the Aiming
So ware - EASE Focus 1:
The EASE Focus 1 Aiming So ware is a two-dimensional, acous c simula on
so ware that serves for the configura on and modelling of Line Arrays close to
reality. It only considers the direct field, created by the complex addi on of the sound contribu ons of the individual loudspeakers or array
components.
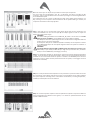
The design of EASE Focus is targeted at the end user. It allows the easy and quick predic on of the array performance in a given venue. The scien fic
base of EASE Focus stems from EASE, the professional electro- and room acous c simula on so ware developed by AFMG Technologies GmbH. It
is based on the EASE Focus 1 system defini on files (Proel_AXIOM_AX2010P.EFO) required for its use. The EFO file contains the data that defines
the Line Array with regard to its possible configura ons as well as to its geometrical and acous cal proper es. For detailed explana on of how to
use the so ware and how to obtain a correct aiming refer to EASE Focus documenta on and other on-line manuals (h p://focus.afmg.eu/index.
php/Focus_1.html).
WARNING! CAREFULLY READ THE FOLLOWING INSTRUCTIONS AND CONDITION OF USE:
• This loudspeaker is designed exclusively for Professional audio applica ons. The product must be installed by qualified personal only.
• Proel strongly recommends that this loudspeaker cabinet be suspended taking into considera on all current Na onal, Federal, State and
Local regula ons. Please contact the manufacturer for further informa on.
• Proel do not accept any liability for damage caused to third par es due to improper installa on, lack of maintenance, tampering or
improper use of this product, including disregard of acceptable and applicable safety standards.
• During assembly pay a en on to the possible risk of crushing. Wear suitable protec ve clothing. Observe all instruc ons given on the
rigging components and the loudspeaker cabinets. When chain hoists are in opera on ensure that there is nobody directly underneath or
in the vicinity of the load. Do not under any circumstances climb on the array.
KPTAX2012P Fly Bar and accessories
The AX2010 Systems are built to allow the suspension of array with variable shape and dimensions. Thanks to a suspension mechanism designed
to be func onal, flexible and safe, each system must be suspended or stacked using the KPTAX2012P fly bar. The loudspeakers are linked together
in a column using a series of couplers integrated in the frame of each enclosure. Each system is set up properly both acous cally and mechanically
only using the aiming so ware.
Coupling system in the front does not require any adjustment: using two locking pins, each loudspeaker box is fixed to the previous. The slo ed
bar in the back is inserted in a U-shaped frame which features a series of numbered holes. Sliding the slo ed bar in the U-shaped frame of the
next loudspeaker and inser ng a locking pin in one of the numbered holes, it is possible to adjust the rela ve splay angle between two adjacent
loudspeakers in the array column.
KPTAX2012P fly bar maximum capacity is 700 Kg (1540 lbs) with the 0° angle. It can support up to 12 AX2010 loudspeakers with a safety factor
of 7:1.
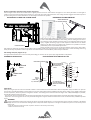
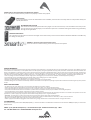
KPTAX2012P FLY BAR AND ACCESSORIES
M10 FOOT FOR
STACKED INSTALLATION
(OPTIONAL)
KPTAX2012P FLY BAR ASSEMBLY SEQUENCE
STRAIGHT SHACKLE 16mm
1
IDENTIFICATION AND
DATA LABEL
5
1
2
FRONT BOX
PIN ATTACHMENT
3
SUSPEND HOLE
INDICATOR
SUSPEND HOLES
2
FRONT BOX
PIN ATTACHMENT
REAR BOX
PIN ATTACHMENT
4
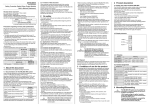
Follow the sequence in the figure for fixing the fly bar at the first box. Usually
this is the first step before li ing up the system. Be careful to insert properly
all the locking pins (2)(3) and the shackle (5) in the right holes as specified by
the aiming so ware.
When lifting the system always proceed gradually step by step, paying
a en on to secure the fly bar to the box (and the box to the other boxes)
before pulling up the system: this makes easier to insert properly the locking pins. Also when the system is released down, unlock gradually the
pins.
During the li ing be very careful to not let the cables enter the space between one enclosure and the other, as their compression could cut
them.