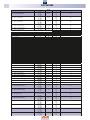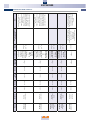
1
EWCM9900
COMMERCIAL REFRIGERATION
User manual
GB
release 12/08
Invensys Controls Europe
An Invensys Company
2
EWCM9900
3
EWCM9900
CONTENTS
GENERAL DESCRIPTION
Characteristics...
Using the manual...
Warnings...
AVAILABLE MODELS...
NOTES ON PARAMETERS...
INSTALLATION...
Base/keyboard connection...
ELECTRICAL HOOKUP PRECAUTIONS...
PCInterface connection...
WIRING DIAGRAM...
EWCM9900 wiring diagram...
EWCM9900 terminals description...
page 4
page 4
page 4
page 5
page 5
page 6
page 6
page 7
page 7
pages 8-9
page 8
page 9
BASIC FUNCTIONS
POWER UP...
KEYS AND COMPONENTS...
LEDs...
QUICK MENU...
SHORTCUTS...
Keypad lock
Setpoint and control band modification
Reduced Menu
Probes Menu
Value displays
Compressor/fans status
Modifying the display unit of measurement
Displaying and acknowledging alarms
Advanced navigation
page 10
page 10
page 11
page 11
pages 12-15
page 12
page 12
page 12
page 13
page 13
page 14
page 15
page 15
page 15
ADVANCED FUNCTIONS
CONFIGURING THE MACHINE...
QuickStart
Automatic I/O assignment
Manual I/O assignment
COMPRESSOR CONTROL...
FAN CONTROL...
CLOCK AND TIME BANDS MENU...
FUNCTIONS MENU..
Energy saving...
Suction setpoint...
Discharge setpoint...
Liquid return control...
Auxiliary control...
Heat recovery...
Hot gas defrost...
SERVICE MENU...
PARAMETERS...
Description of administrator parameters...
Parameters table...
ALARMS...
Alarms...
Alarms log and codes list...
Utility alarms table...
Analogue alarms table...
Probe errors table...
USB COPYCARD...
KEYBOARD TECHNICAL DATA...
EWCM9900 POWER BOARD TECHNICAL DATA...
PARAM MANAGER • WEBADAPTER...
ACCESSORIES...
PROPER AND IMPROPER USE...
RESIDUAL RISKS AND RESPONSIBILITIES...
LIABILITY CLAUSE...
NOTES...
page 16
page 16
page 17
page 17
pages 18-24
pages 25-28
pages 29
pages 30-33
page 30
page 31
pages 31-32
page 32
page 32
page 32
page 33
page 33
pages 34-44
pages 35-39
pages 40-44
pages 45-55
pages 45-46
page 47
pages 48-49
pages 50-52
pages 53-55
pages 56-57
pages 58
pages 58
page 59
page 60
page 61
page 61
page 61
pages 62-63
4
EWCM9900
EWCM9900
Electronic controller for compressor packs on 18-Din Rail
GENERAL DESCRIPTION • USING THE MANUAL • WARNINGS
EWCM9900 18DIN are a family of controllers dedicated to the control of
the machine room of a refrigeration plant, with simple, multistage or
variable power compressors.
Characteristics
• Up to 19 completely configurable relay outputs for controlling simple,
multistage or various power compressors and condenser fans
• Up to 3 analogue outputs for controlling INVERTER compressors and
INVERTER fans
• Up to 3 inputs with pressure transducers for the compressor section and
the fan section
• Up to 4 temperature inputs for NTC probes configurable as voltage free
digital inputs.
• Up to 14 voltage digital inputs and 6 voltage free digital inputs
configurable for plant diagnostics and Energy Saving functions.
• Compatibility with a vast range of refrigerants.
• Built-in clock (RTC).
Functions
• INVERTER control of compressors and fans
• Proportional Control, PID and Dead Band.
• Selection of homogenous power compressors and fan rotation policies
• Algorithms for Energy Saving.
• Two programmable Setpoints: normal and reduced regime.
• Dynamic suction and delivery setpoints
• Time band management.
• Management of probe alarms and minimum and maximum pressure
switch alarms both for the compressors section and for the fans section
• Full alarm handling (self-diagnostics and alarms log).
• Operational log handling.
• Upload/download parameters, alarms log, operational logs and glossaries
with USB Copy Card.
• Safety system which, in case of EWCM failure, activates an alarm output
to deviate machine room control to an emergency system which ensures
minimum operation until technical service is possible.
Navigation and programming
• User-friendly LCD graphic keyboard.
• Menu navigation.
• Quick access menu for immediate status display and setting main
operating parameters.
• Display and setting of programmable parameters in Bar, PSI, °C or °F.
• Reduced set of parameters.
• 3 levels of access to programming parameters.
• Quick Start Menu for quick and easy configuration.
• Keystroke function activation
from Remote control
• Connections for TelevisSystem or Modbus RTU remote control systems.
• Display (and modification with the correct privileges) online, with an
internet browser, of parameters, states and alarms.
Mounting
• Mounts to 18DIN rail (power board) and panel (keypad).
All machine status control and configuration operations can be performed
using the supplied LCD keypad. Menu navigation is user-friendly: two
languages are available as standard (English + local language) defined
according to the product code.
The configuration and maintenance of the device is protected by several
levels of passwords which hide/protect access, for authorised persons only.
The Administrator Menu is dedicated to the System Administrator and
permits access to the Quick Start Menu and all configuration and
operational parameters: the Administrator will also manage the access
passwords for the users and experts (installers and technicians).
The Quick Start Menu is dedicated to initial configuration of the
machine/system and permits quick and efficient assignment of the system’s
resources.
The Service Menu is typically intended for use by the Administrator and
Technical Service and allows use of the USB Copy Card (see appropriate
chapter) and utilities diagnostics and control.
However, any user can use the function keys and navigation keys to
monitor the status of the system, display alarms, activate functions, etc.
without the aid of passwords.
The Clock and Time Bands Menu also allows the user to set the date and
time and to control use of the plant, using a weekly calendar.
IMPORTANT WARNINGS
The availability and access to information is determined by the model in
use and the settings made by the Administrator.
The System Administrator is responsible for enabling access to the various
menus for qualified staff who are charged with installing and servicing the
system.
The high degree of configurability of the system requires that the system
and its applications be thoroughly studied for the device and system to
operate at their best.
For any doubts/information, contact Eliwell Technical Service.
5
EWCM9900
AVAILABLE MODELS
Standard type system
1 suction circuit
FACTORY DEFAULT CONFIGURATION
[501- tyPE = 0]
Single delivery shared drain system
2 suction circuits
501- tyPE = 1]
*NOTE: Configure SIG2 correctly as
circuit 2 suction pressure 2.
Set parameter [624- H402] = ±2.
EWCM9900
EWCM9900
4 Stepped
Compressors
Relay outputs
19
4 Stepped
Compressors
8 Capacity steps
(2 capacity steps x
4 Compressors)
5A SPDT
4 Full Compressors
5 Configurable
Relay outputs
19
1 Alarm
Analogue outputs
3
5 Configurable
8A SPDT
1 Refrigerant level
alarm
5A SPDT
8 Capacity steps
(2 capacity steps x 4
Compressors)
1 Alarm
1 INVERTER fan
4…20mA
2 Configurable
4…20mA
1 Refrigerant
level alarm
1 INVERTER fan
Analogue outputs
3
1 Economy
Suction circuit 1
6 Voltage Free
8A SPDT
1 Refrigerant level
alarm
4…20mA
2 Configurable
4…20mA
6 Voltage Free
6 Configurable
8 Compressor
shutdown
1 Economy Delivery
3 Configurable
Digital Inputs
4 Compressor
shutdown
20
1 Refrigerant
level alarm
Digital Inputs
20
1 Refrigerant
level alarm
14 High voltage
1 Suction pressure
switch alarm circuit 1
1 Delivery pressure
switch alarm
1 Delivery pressure
switch alarm
Internal Temperature
2 Configurable
7 Configurable
External Temperature
Analogue inputs
External Temperature
4 - NTC
Internal Temperature
4 - NTC
2 Suction pressure
switch alarms
circuit 1/2
14 High voltage
Analogue inputs
Sub-temperature
7
1 Configurable
Sub-temperature
7
Suction Pressure
1 Configurable
3 - 4...20mA
Delivery Pressure
Suction Pressure
3 - 4...20mA
1 Configurable
Connections
Menu Languages
Power Supply
*1 Configurable
Delivery Pressure
RS485
YES
Ethernet
YES (optional)
USB CopyCard
YES
2
ENG/ITA - ITA/ENG - SPA/ENG - GER/ENG
FRE/ENG
Connections
RS485
YES
Ethernet
YES (optional)
USB CopyCard
YES
2
ENG/ITA - ITA/ENG - SPA/ENG - GER/ENG
FRE/ENG
Menu Languages
Power Supply
100-240Va
100-240Va
NOTE ON PARAMETERS
Parameters menu
The parameters menu is accessed from the main display as indicated in the
chapter on the Parameters Menu and described in the Keys and
Components section.
Structure of the parameters
The parameters have been subdivided into folders (i.e. Quick Start folder).
The value of the individual parameter can be displayed and modified in each
folder. The parameter is identified by a three-figure number followed by an
acronym (i.e. 501 - tyPE)
Reduced parameters menu
Access to the ‘reduced’ parameters Menu takes place via the Main Display
by pressing and holding down the function key F2.
Only a few parameters are visible (that is a ‘reduced’ set of parameters) of
the Parameters Menu:
• Operating
• Configuration
In the description of the parameters, the reduced parameter set is shown
in bold.
NOTE
• Some parameters can be displayed and modified not just via the
Parameters Menu, but also via other Menus (i.e. parameter 133 - SEt
Suction Set Point can be displayed and modified via the SET/BAND menu.
• Some parameters can be displayed not just via the Parameters Menu, but
also via other Menus (i.e. parameter 646 - SIG12 Probe Type 1/2 can be
displayed, but not modified, via the Probe Menu. In order to configure the
SIG12 pressure transducers correctly, you need to access the Parameters
Menu, Configuration folder.
6
EWCM9900
INSTALLATION
IMPORTANT! Always make sure the device is switched OFF before
operating on the connections. The operations must be carried out
by qualified personnel.
Do not install the devices in places subject to high humidity and/or dirt:
in fact, they are suitable for use in places with normal or ordinary
pollution levels.
Make sure the area near the cooling slots is ventilated.
Move the four spring docking devices to their standby position (use a
screwdriver, see figure 3).
Install the ‘BASE’ on the DIN RAIL, then press the ‘spring docking devices’
which will go to the closing position.
NB: With the ‘BASE’ assembled on the DIN RAIL, the ‘Spring docking
devices’ must be turned downwards.
Keyboard mounting
The keyboard is designed for panel-mounting.
Make a 138x68mm hole.
Remove the front panel (figure 1) and make 6 holes in the panel
(figure 2 points A/B/C/D/E/F) of dia. 2.7 mm at the specified spacing
(figure 2). Insert the device, fixing it with the screws. Close the front of
the keyboard by pressing with fingers.
FIG 2 - CUTout
138
Power board mounting
To install the BASE on DIN RAIL, proceed as follows:
A
B
E
F
84
68
FIG 1
Keyboard
Mounting
D
C
7
2. 6)
(x
90
150
FIG 3 CAP
BASE - KEYPAD CONNECTION
ELIWELL
EWCM keyboard
rear
max length 3m
For the connection between the base and the
keypad, use the supplied 3 m 6-wire microfit
cable. Only use the cable supplied, respecting the
maximum distance of 3m.
The cable must be wired separately from the
power cables.
7
EWCM9900
ELECTRICAL HOOKUP PRECAUTIONS
IMPORTANT! Make sure the machine is switched
off before working on the electrical connections.
The operations must be carried out by qualified
personnel.
To ensure proper connections, comply with the following:
• Power supplies other than those specified can seriously damage the
system.
• Use cables of suitable section for the terminals used.
• Separate (as much as possible) the cables of probes and digital inputs
from inductive loads and power connections to prevent electromagnetic
interference. Do not place the probe cables near other electrical
equipment (switches, meters, etc.).
• Make connections as short as possible and do not wind them around
electrically connected parts. Use shielded cables for the probe
connections.
• To avoid causing static discharges, do not touch the electronic
components on the boards.
For all electrical connections, refer to the provided wiring diagrams.
The device is provided with screw-in terminals for wires of maximum cross
section 2.5 mm2 (only one wire per terminal for power cables).
The relay outputs are voltage free.
Do not exceed the maximum permitted current; for higher loads, use a
contactor with sufficient power capacity.
Make sure that power supply is of the correct voltage for the device.
The temperature probes have no characteristic insertion polarity and can
be extended using standard bipolar cable (note that extending cables can
affect the performance of the device in terms of electromagnetic
compatibility: great care must be exercised in making the wiring
connections). The pressure probes have an insertion polarity which must
be observed.
For the installation of the RS-485 network, refer to the provided
documentation. See Annex - Accessories.
USB CopyCard
Fit the USB Copy Card TTL side into the slot and up/download the
parameters as described in the Copy Card chapter.
On termination of the procedure, disconnect the USB Copy Card.
WebAdapter
The WebAdapter module enables display (and modification, given the
required permissions) with an internet browser, of parameters, states and
alarms.
The controller can be connected to the internet with the WebAdapter
module, to display the controller’s resources via an internet browser
without the need for any further software on the pc.
The connection between the controller and the WebAdapter is made with
a direct RS-485 and software license.
Notes:
• If the module is internally integrated, there is no need for recognition or
configuration of the module.
• If the module is external, it must be configured.
For the connection, refer to the WebAdapter 8MA*0202 manual.
SUPERVISION
The connection:
• to the TelevisSystem / Modbus RTU remote control systems
• to the ParamManager fast parameter setting software
can be made with a direct RS-485 connection using the RS485/TTL-RS232
PCInterface converter and the required software license.
The PCInterface device must be used with:
1) ParamManager versions 5.2 or later;
2) versions of OS on PC Win XP, Home or Professional or more recent.
Software Licence
For the device to be recognised by the ParamManager software, the BlueCard
module supplied with the software license must be inserted in its slot.
Files with extensions .DAT, .HIS, .REC are in text format and can be read with any
word processor (e.g. WordPad / Notepad).
PC - RS-232/USB
cable
PCINTERFACE CONNECTION
230V~
1
RS-232
Files with extension .dat can be used by Param Manager version 5.2 or following.
EWCM 18DIN
base board
EWCM connected to the PC INTERFACE 2150/2250 with a RS 485 line.
For monitoring, managing and programming the parameters of the instrument
• NOTE 1: instrument powered independently.
• NOTE 2: pay particular attention to the polarity of the RS-485 line (+, - and GND).
2
RS - 485 cable
8
EWCM9900
EWCM9900 WIRING DIAGRAM
DEFAULT CONFIGURATION
• plant with 4 stepped compressors (2 Capacity Steps x 4 Compressors) +
INVERTER fan
• pressurised suction and delivery control (bar)
A
POSSIBLE CONFIGURATIONS
• management of two suction circuits
• management of suction circuit 1 and/or circuit 2 via INVERTER or INVERTER
+ digital compressors
• management of suction circuit 1 and/or circuit 2 via INVERTER
• non-homogeneous digital compressor management
• full and/or stepped digital compressor management
B
V-I
-
ALARM ALARMALARM ALARM ALARM
COMP1 COMP2 COMP3 COMP4 FAN
INVERTER
CNF CNF
CNF CNF CNF
LINE
CNF CNF
Pb1 Pb2 Pb3 Pb4 DI1 DI2
NEUTRAL
+
-
HP
+12V
V-I
+
-
+
GND
I
V
GND
I
V
GND
I
V
V-I
CNF
+12V
LP
+12V
FAN
CNF
CNF
INVERTER INVERTER INVERTER
Sub
Ext. cooling Int.
Temp CNF
Temp
C1 I1 V1 C2 I2 V2 C3 I3 V3 CI1 SIG1+12V CI2 SIG2+12V CI3 SIG3+12V
CPB PB1 PB2 CPB PB3 PB4 CDI DI1 DI2
DIH1 DIH2 DIH3 DIH4 DIH5 DIH6 DIH7 DIH8 DIH9 DIH10
LINE
CNF
CNF
HP
LP
Refrig.
CNF Level
NEUTRAL
DIH11
EWCM9900
DIH12
DIH13
DIH14
Eco Eco
HP LP
CDI DI3 DI4 CDI DI5 DI6
out19 out18 out17 out16 out15
A
out14
B
Alarm
Refrigerant
Level
LINE
NEUTRAL
COPY CARD
USB CopyCard
Power Supply
100...240Vac
RS485
-
+ GND
485485+
GND
VAC IN a
out13 out12 out11 out10 out9 out8
out7 out6 out5 out4 out3 out2
out1
KEYBOARD
Keyboard
34 2 4 1 4 3 3 2 3 1 3
2
2
2 31 2 1 11
LINE
NEUTRAL
COMPRESSOR
3
2
1
STEP 3 STEP 2 STEP 1
9
EWCM9900
EWCM9900 TERMINALS DESCRIPTION
EWCM 9900
TERMINALS BLOCK SIDE A
LABEL
DESCRIPTION
TERMINALS BLOCK SIDE B
FUNCTION
VOLTAGE FREE DIGITAL INPUTS [DEFAULT CONFIGURATION]
DI1
Configurable digital Inputs
CNF - none
DI2
Configurable digital Inputs
CNF - none
DI3
Configurable digital Inputs
CNF - none
DI4
Refrigerant level Alarm
Refrig. level
DI5
Discharge Economy
Eco HP
DI6
Suction Economy
Eco LP
HIGH VOLTAGE DIGITAL INPUTS [DEFAULT CONFIGURATION]
DIH1
Block Compressor 1
ALARM COMP1
DIH2
Block Compressor 2
ALARM COMP2
DIH3
Block Compressor 3
ALARM COMP3
DIH4
Block Compressor 4
ALARM COMP4
DIH5
Alarm Fan INVERTER
ALARM FAN
INVERTER
DIH6
Configurable
CNF - none
DIH7
Configurable
CNF - none
DIH8
Configurable
CNF - none
DIH9
Configurable
CNF - none
DIH10
Configurable
CNF - none
DIH11
Configurable
CNF - none
DIH12
Configurable
CNF - none
DIH13
Configurable
CNF - none
DIH14
Configurable
CNF - none
ANALOGUE INPUTS [DEFAULT CONFIGURATION]
[CI1] [SIG1] [+12V]
LP
Suction pressure probe in current 4…20mA*
Configurable
CNF - none
[CI2] [SIG2] [+12V]
[CI3] [SIG3] [+12V]
HP
Delivery pressure probe in current 4…20mA*
PB1
Analogue Input External Temperature NTC**
Ext. Temp.
PB2
Analogue input Subtemperature**
Subcooling
Analogue Input Internal Temperature NTC**
Int. Temp.
PB3
Analogue Input Configurable**
none
PB4
*4...20mA / 0-5V / 0-10V Settable by parameter
** NTC/PTC/ Digital input Settable by parameter
ANALOGUE OUTPUTS [DEFAULT CONFIGURATION]
INVERTER
Inverter Fan Analogue Output in Current**
FAN INVERTER
[C1] [I1] [V1]*
INVERTER
Configurable Analogue Output in Current**
CNF - none
[C2] [I2] [V2]*
INVERTER
Configurable Analogue Output in Current**
CNF - none
[C3] [I3] [V3]*
*GND [-], I [I+], V [V+]
**voltage-current settable by parameter
LABEL
VAC IN a
USB CopyCard
RS-485 [ - + GND ]
Keyboard
DESCRIPTION
Power supply 100-240Va
USB Copycard
RS485 TelevisSystem connection
Power board / keypad connection
OUT1
OUT2
OUT3
OUT4
OUT5
OUT6
OUT7
OUT8
OUT9
OUT10
OUT11
OUT12
OUT13
RELAYS [DEFAULT CONFIGURATION]
relay SPDT Alarm
relay N.O. Compressor 1 Step 1
relay N.O. Compressor 1 Step 2
relay N.O. Compressor 1 Step 3
relay N.O. Compressor 2 Step 1
relay N.O. Compressor 2 Step 2
relay N.O. Compressor 2 Step 3
relay N.O. Compressor 3 Step 1
relay N.O. Compressor 3 Step 2
relay N.O. Compressor 3 Step 3
relay N.O. Compressor 4 Step 1
relay N.O. Compressor 4 Step 2
relay N.O. Compressor 4 Step 3
OUT14
relay SPDT Refrigerant level Alarm
OUT15
OUT16
OUT17
OUT18
OUT19
relay N.O. Configurable
relay N.O. Configurable
relay N.O. Configurable
relay N.O. Configurable
relay N.O. Configurable
- [NO] Normally open; [NC] Normally closed; [C] Common
FUNCTION
Power supply
100…240 Vac
COPYCARD
RS485
Connessione a
Tastiera
Alarm
COMP1 STEP 1
COMP1 STEP 2
COMP1 STEP 3
COMP2 STEP 1
COMP2 STEP 2
COMP2 STEP 3
COMP3 STEP 1
COMP3 STEP 2
COMP3 STEP 3
COMP4 STEP 1
COMP4 STEP 2
COMP4 STEP 3
Alarm Refrigerant
Level
none
none
none
none
none
10
EWCM9900
POWER UP
The device is operated with the EWCM KEYBOARD which is
equipped with an LCD display, 3 LEDs, 8 keys divided into
3 function keys and 5 menu navigation/editing keys (parameters,
function, etc.).
The display and the LEDs are used to monitor the parameters,
machine status and operating modes, as well as configuring the
parameters.
When the machine is switched on, the LCD display shows
‘ELIWELL’. The system information (SYSTEM INFO) is given below,
including Hardware (HW), Firmware (FW) and Date versions.
Always save and print out this information for use by technical
service in case of need.
The instrument will lastly show the main menu (that is the main
view). All menus are available in 2 languages (for example Italian
(local language) and English (default)) according to the product
code.
Check feasibility and availability of codes with Sales Department.
KEYS AND COMPONENTS
Programming
Alarm
Economy
4
5
6
7
8
Main Display
Navigation Menu
Edit Mode
Nr.
Key
Press and release
Press and hold
(around 5 seconds)
Press And Release
Press and release
1
F1
Opens the
Compressors/fans Menu
No Function
No function
No function
2
F2
Opens the set/band Menu
Opens The Reduced
Parameters
Configuration Menu
No function
No function
No function
No function
3
F3
Alarm acknowledgment
• Opens The Alarms
Menu
•Upload Glossaries
(from reset)
4
UP
No function
No Function
Scrolls through Menu
items
Increase Vvalue
5
Rh
(Right hand)
Change display discharge
value
°C -> °F -> Bar -> PSI
Opens the Probes
Menu
Opens the next Menu
Save and confirm value
6
Ok
(Enter)
No function
Opens the
Navigation Menu
• Opens the next Menu
• Enters Edit Mode
• Activate function
Save and confirm value
7
DOWN
No function
No function
Scrolls through Menu
items
Decrease value
8
Lh
(Left hand)
Change display suction value
°C -> °F -> Bar -> PSI
No function
Return to previous
Menu
Quit Edit Mode
11
EWCM9900
The keypad has 3 LEDs. See the table.
• The LEDs can be off / on steady / flashing.
• The Programming LED (PRG) is off or flashing in the Operation /
Configuration / Administrator menus (see above).
• The Economy LED (third from left) can be never flashing.
LEDs
off
Permanently on
blinking
Alarm
no alarm
alarm active
(at least one)
alarm
acknowledgment
PRG
(Programming)
Main menu
N.A.
Operational /
Configuration /
Administrator
Parameters menu
Service menu
Economy
Economy function off
Economy function on
N.A.
QUICK MENU
The display is used to monitor the parameters, machine status and
operating modes, as well as configuring the parameters.
The Main Menu has 5 sections:
E
Compressors/Fans INVERTER
suction/discharge side INVERTER compressor
• an out icon is displayed
- the number indicates the percentage output of the INVERTER
A
‘arrow’ icon
• associated with key F1 for access to the Compressors/Fans menu.
PS: the percentage is indicated only by the value %: the icon doesn’t
identify the power delivered, that is it is the same for all the
percentages.
‘key’ icon
• associated with key F2 (if so programmed)
- indicates the state of Keypad lock (LoCK)
- visible only if the keyboard is locked
‘thermometer’ icon
• associated with the F2 key to access the Menu SET/BAND.
‘alarm’ icon
• associated with the F3 key for
- access to the Alarms Menu
- acknowledge the alarms
Visible only when there are alarms / probe errors
suction/discharge side INVERTER fan
• an out icon is displayed
- the number indicates the percentage output of the INVERTER
- no output in the case of digital fans
Note: in the case of digital fans, the corresponding icon is shown
in section B
PS: the percentage is indicated only by the value %: the icon doesn’t
identify the power delivered, that is it is the same for all the
percentages.
The described icons are visible only in the Main View. During Menu
navigation they are not present.
B
Compressors/FansDIGITAL
• compressor icon followed by a number to indicate the number of
active compressors
• active compressor power steps icon followed by the appropriate
number
• digital fan icon followed by a number to indicate the number of
active digital fans
A
C
D
LP suction side
• the first number indicates the value read by the suction probe
• the second number indicates the value of the suction setpoint
B
C
HP discharge side
• the first number indicates the value read by the discharge probe
• the second number indicates the value of the discharge setpoint
E
D
12
EWCM9900
SHORTCUTS
Specific submenus can also be accessed directly from the main display
using the following keypad shortcuts (also see Keys and Components):
• Key F1* Compressor and Fans Status
• Key F2** Unlock keypad (if locked by a parameter)
• Key F2* Set / Band (Setpoint and control band menu)
• Key F2** Parameters > Operation/Configuration (Reduced menu)
• Key F3* ** Acknowledge / Diagnostics > Active Alarms (Alarms Menu)
• Key DX** Probes menu
• Keys SX*/DX* Modify main discharge/suction display
• Key OK Advanced Navigation (Menu)
* Press and release / ** hold for about 5 seconds
The setpoint and band values visible in the Set / Band menu
can also be set with the Parameters > Compressors menu or
Parameters > Fans menu
The menus:
• Menu Set / band
• Compressors / fans menu
• Probes menu
are only accessible from the Main Display and not from the navigation menu.
LOCK KEYPAD
Parameter 549 - LoCK (see parameters description) allows you to lock the
keypad to prevent inadvertent operation.
The keys are immediately disabled.
When the keypad is locked, the key icon
is displayed
(see Quick Menu) and it is not possible to operate the device until it is
unlocked again.
To unlock the keypad, hold down F2 (default).
Parameter 550-HKUnL allows you to chose which key to use for unlocking
the keypad.
SETPOINT AND CONTROL BAND MODIFICATION
Access to the SET/BAND Menu takes place via the Main Display by pressing
function key F2.
This menu displays the suction and discharge setpoints and bands
Change setpoint
For example, the suction setpoint is 0.09 bar.
To modify it select Set Asp and press the OK key.
The parameter 133 - Set displays
The corresponding discharge parameter is 333 - Set
Both can be modified as described in the Parameters chapter.
SET/BAND
Suc Set
Suc Band
Del Set
01/02
0.09 Bar
0.25 Bar
14.4 Bar
SET/ SUC
001/001
133 - SEt
Suction setpoint
0.09 bar
Modify band
Similar to setpoint modification. the suction band is 0.25 Bar and the
associated parameter is 134-Pbd (334-Pbd for discharge).
NOTES:
• The setpoint displayed by default is a relative pressure value (absolute
pressure - 1 bar). In the example, 0.09 bar = 1.09 - 1 bar.
• To display the absolute pressure value, set parameter 543-rELP.
• The unit of measure shown on the display may differ from the control
unit (this is determined by 548-UMFn).
• The setpoint may be lateral or central depending on the value of
parameter 551-Stty.
REDUCED MENU
Access to the ‘reduced’ parameters Menu takes place via the Main Display
by pressing and holding down the function key F2.
If a password has been enabled, you will first be presented with the label
‘PASSWORD’.
In the description of the parameters, the reduced parameter set is shown in
bold.
Note: The configuration folder includes the folder and the QuickStart
parameters described in the Advanced Functions chapter
Only a few parameters are visible (that is a ‘reduced’ set of parameters) of
the Parameters Menu:
• Operating
• Configuration
PARAMETERS
Operating
Configuration
01/01
13
EWCM9900
PROBES MENU
Access to the Probes Menu takes place via the Main Display by pressing
and holding down the RH function key.
This Menu shows the values of the pressure transducers and the probes in
the plant.
Display of the values of the probes
Scroll through the probe values with the UP and DOWN keys.
PROBES
SIG1
SIG1
SIG2
01/05
13.4 Bar
13.4 PSI
3.61 Bar
PROBES
SIG2
SIG3
SIG3
02/05
3.61 PSI
13.4 Bar
13.4 PSI
PROBES
PB1
PB1
PB2
03/05
15.6 °C
32.4 °F
Err
PROBES
PB2
PB3
PB3
04/05
Err
Err
Err
Note that each input has two separate values.
SIG1/2/3 in Bar and PSI, PB1..4 in °C and °F.
Configuration of analogue inputs
The Probes Menu only allows you to view the analogue input values. To
configure them, use the Configuration folder in the Parameters menu.
The analogue inputs are configurable in pairs, with the following
parameters:
• 646 - Sig12
Probe Type SIG1/2
• 647 - Sig34
Probe Type SIG3
SIG4 is NOT present
• 648 - Pb12
Probe Type PB1/2
• 649 - Pb34
Probe Type PB3/4
EWCM9900 default configuration:
• The SIG1 transducer is used as a current suction transducer
• The SIG2 transducer is not used
• The SIG3 transducer is used as a current delivery transducer
• PB1 is an NTC probe for measuring the internal temperature for the
suction dynamic setpoint
• PB2 is an NTC probe for measuring the external temperature for the
delivery dynamic setpoint
• PB3 is an NTC probe for measuring the internal subtemperature for the
delivery dynamic setpoint
• PB4 is an NTC probe - Not used
Model EWCM9900 - configuration [501-tyP=501]
• The SIG2 transducer is used as a suction transducer for circuit 2 when
powered (place [654 - H402] =2)
NOTE:
• SIG1 and SIG2 are ALWAYS of the same type* (e.g. 4...20mA)
• PB1 and PB2 are ALWAYS of the same type* (e.g. NTC)
• PB3 and PB4 are ALWAYS of the same type* (e.g. digital input)
* in other words, configurable in pairs. See the wiring diagrams.
Pressure transducers resolution
The resolution of transducers SIG1 and SIG2 is settable by parameter:
• 650 - HSig1
SIG1 High Precision (0= No, 1 = Yes)
• 651 - HSig2
SIG2 High Precision (0= No, 1 = Yes)
The default setting is High Precision (1 = Yes):
• Suction: in hundredths of bar / tenths of PSI
• Delivery: in tenths of bar / tenths of PSI
Also see the table at the bottom of the Value Displays page.
Analog inputs calibration
Analog inputs calibration can be set by parameters:
655 - CALSIg1
Calibration SIG1 bar
655 - CALSIg1
Calibration SIG1 PSI
656 - CALSIg2
Calibration SIG2 bar
656 - CALSIg3
Calibration SIG3 PSI
656 - CALSIg3
Calibration SIG3 bar
656 - CALSIg2
Calibration SIG2 PSI
659 - CALPb1
Calibration PB1 °C
659 - CALPb1
Calibration PB1 °F
...
662 - CALPb4
Calibration PB4 °C
662 - CALPb4
Calibration PB4 °F
Note that each parameter can be given a double calibration depending on
the unit of measurement.
The calibration is significant when analogue inputs are configured as digital.
Probe errors
If the pressure probe/transducer is in error, the message Err appears in
place of its value.
VALUE DISPLAYS
resolution of the regulation and accordingly the display is
determined by the following table:
Example
Case of two suction circuits, shared drainage system
Unit of
measurement
Bar
PSI
Resolution
Suction*
0,01
0,1
Resolution
Discharge**
0,1
1
Range
-1999...1999
-1999...1999
Unit of measurement Resolution
Suction 1*
Bar
3.69
PSI
53.5
Resolution
Suction 2*
3.69
53.5
Resolution
Delivery**
13.7
198
°C
°F
0,1
0,1
0,1
0,1
-1999...1999
-1999...1999
°C
°F
0.1
0.1
0.1
0.1
Range
Note:
* SIG1 Circuit suction 1; SIG2 Circuit suction 2 - if present - see
par. [501-tyPE]=2 and [654 - H402] =2
**SIG3 delivery
Note:
If • 650 - HSig1 = 0
Unit of
measurement
Bar
PSI
we have
Resolution
Suction
0,1
1
Resolution
Discharge
0,1
1
-1999...1999
-1999...1999
0.1
0.1
14
EWCM9900
COMPRESSORS/FANS STATUS
This Menu shows the state of the compressors and the fans.
The first screen displays the status of the compressors:
Compressors
The display shows:
upper side for compressors/fans of the main menu • fig. A
• compressor symbol
• LP Low Pressure symbol (suction side)
• value read by the suction probe in the unit of measurement defined in
the main display (e.g. 9.55 Bar)
lower side for the compressor and analogue outputs • fig. B
left side
• the state of the compressors present* and the number of steps* (e.g.
2 compressors / 4 steps) - see the two boxes highlighted by a double frame
- the first one indicates the compressors, the second one steps.
In the example, in fact, there are 2 compressors present and turned on.
Both are active; the first one has 1 active step, the second one all 4 steps
active.
right side
• the presence or otherwise** of the analog outputs and their percentage of
use identified by a vertical bar divided into 6 ‘notches’ (in sixths, or 1 ‘notch’
corresponds to 1/6 of power) - see box with dotted frame ** in the case of an INVERTER compressor on circuit 1 / circuit 2
not visible otherwise.
To view the state of the fans it is necessary to press the DOWN key. A
second screen will display: Fans Menu.
plant, even if off (in the example 10 steps / power steps (5 for each
compressor) while the number of compressors (2) coincide).
Note that from the main display you can see the percentage of power
delivered by the INVERTER output (compressor). In this example, the
percentage is 70%.
From this Menu it is possible besides to know the approximate power
delivered in 6/6. In this example, the approximation is 4/6 so that there may
be a discrepancy with the main display due to the approximation itself.
The length of the ‘notch’ is fixed: the notches graphically display the
minimum/average/maximum speeds.
The ‘notch’ turned on indicates power 1/6.
----------------------------------------------------Note:
• In case of probe not configured, the display reads ‘- - -’.
• In case of probe failure/error, the display reads ‘Err’.
AB
CD
Depending on the type of fans configured two types of menu will display
(Fig C or D)
The display shows:
• Fan symbol
• HP - High Pressure symbol (condensation / discharge side)
• value read by the discharge probe in the unit of measurement defined in
the main display (e.g. 45.6 Bar)
• discharge setpoint value in the unit of measurement defined in the main
display congruent with the value read by the probe (e.g. 34.5 Bar) - box
with dotted frame -
Compressors Menu • fig. A
Compressors Menu • fig. B
Fans • Digital type • fig. C
The display shows:
Menu for compressors/fans of the main menu • fig. C
• the state of the digital fans (ON or OFF) identified by a rectangular symbol
- see legend (in the example 5 out of 8 fans on)
Fans • Continuous control • fig. D
Menu for analogue output of the main menu • fig. D
• the presence** of the analogue output and its percentage of use identified
by a vertical bar divided into 6 ‘notches’ (in sixths, or 1 ‘notch’ corresponds
to 1/6 of power) - see box with dotted frame ** analogue output always present if this menu appears; otherwise the
displayed menu is that of the digital fans.
Note: unlike the compressors menu both values read by the discharge probe
and discharge SetPoint are displayed
Fig. C • Note that in the main display you can only read the number of active
fans and active power steps (in this case, 5 fans). From this Menu it is besides
possible to know how many relays are configured as digital fans (8 that also
represents the maximum number that can be set).
Fig. D • Note that from the main display you can see the percentage of
power delivered by the INVERTER output. In this example, the percentage is
70%.
From this Menu it is possible besides to know the approximate power
delivered in 6/6. See Compressors Menu Notes.
Notes
Notice that from the Main View it is possible to read only the number of
active compressors and the active segmentations (in the example 2 active
compressors - 7 steps / power steps on - see legend).
From this Menu it is possible besides to know how many segmentations
there are for each compressor and the real number of compressors in the
Fans Menu • digital • fig. C
Fans Menu • proportional
• fig. D
• full symbol: indicates utility active (power step on)
• empty symbol: indicates utility present but not active (power step off)
• flashing symbol: indicates that there are safety times for utility activation
* digital fans
• full symbol: indicates utility active (fan on)
• empty symbol: indicates utility not active (fan off)
** proportional fan
• full symbol: indicates % 1/6 active
• empty symbol: indicates % 1/6 not active
15
EWCM9900
MODIFYING THE DISPLAYED UNIT OF MEASUREMENT
IT is possible to modify the displayed unit of measurement for suction (all
models) and discharge
Note that, if using temperature control and the control probe is a pressure
transducer, control is a function of the value converted into temperature
of the selected gas, of the control probe.
Behaviour is dual if the control probe is a temperature probe and the
control selected with 547-UMCP / 548-UMFP is pressure control.
Note: The unit of measure shown on the display may differ from the
control unit.
• Suction: Press the LH key
• Discharge: Press the RH key
The display toggles between Bar >PSI > °C > °F
The default display and control is pressure (bar).
Compressor control is a function of the LP control probe.
Use parameter 547-UMCP to select both pressure control (bar/PSI) and
temperature control (°C/°F).
Fan control is a function of the HP control probe.
Use parameter 548-UMFP to select both pressure control (bar/PSI) and
temperature control (°C/°F).
DISPLAYING AND ACKNOWLEDGING ALARMS
Alarms are notified by the red LED on the keypad.
The alarm is also indicated by the activation of the corresponding alarm
relay if so configured.
2. access the Alarms Menu to determine which type of alarm is in question.
Press and hold down F3:
In this case you can:
1. acknowledge the alarm by pressing and releasing F3
The Alarms menu displays with the first alarm.
to display the other alarms, use the UP and DOWN keys.
• The LED configured as alarm LED will blink
• The relay configured as an alarm relay will be deactivated.
• In case of new alarms/probe errors, the LED changes from flashing to
steady on and the alarm relay is reactivated.
ALARMS
01/03
Err. Ambient Temp
Plant
Active
The example shows 3 alarms.
For details, see the Diagnostics chapter.
If there are no alarms and/or probe /generic errors the display will show
EMPTY.
ADVANCED NAVIGATION
Access to the Advanced Navigation Menu takes place via the Main Display
by pressing and holding down function key OK.
The Navigation Menu (headed MENU) contains the following folders:
• Diagnostics - See Alarms section
• Service - see Service Menu
• Clock and Time Bands - see Clock and Time Bands chapter
• Functions - see Functions menu
• Parameters - See Parameters chapter
Scroll with the DOWN key through the various folders (items) and select
the desired folder (item) with the OK key.
16
EWCM9900
ADVANCED FUNCTIONS
CONFIGURING THE MACHINE
The EWCM18DIN can be configured in two ways:
• Automatic configuration (using the Quick Start Menu)
• Manual configuration
QUICK START PARAMETERS
Quick Start parameters menu
To access the Quick Start parameters menu select the Quick Start folder
with UP and DOWN and press OK: this opens the Quick Start menu which
contains two items/folders:
• Enable
• Parameters
Enable
Unlike the other parameters the Quick Start parameters should be ‘enabled’
for writing to be able to be modified:
Select Enable with the UP and DOWN keys and press OK to enable
modification (No—>Yes on the display).
To disable parameter editing, repeat the procedure.
NB: If Enable =Yes the EWCM behaves as follows:
• all the outputs are deactivated (that is the machine doesn’t adjust)
• the Functions menu is disabled
• Manual resource assignment is disabled
Parameters (Quick Start)
Select the Parameters menu with UP and DOWN and press OK to display the
Quick Start parameters themselves.
If Enable=No in the Quick Start menu, the parameters will be displayed but
not modifiable.
QUICKSTART
Enable
Parameters
01/01
No
If Enable=Yes in the Quick Start menu, the parameters will be displayed
and modifiable. To change the value of a parameter follow the procedure
described in ‘Display and modification of parameters’.
QUICKSTART
Enable
Parameters
01/01
Yes
QUICK START PARAMETERS
• 501 - tyPE Type of plant
Defines the type of plant
0 = plant with standard type compressors
1 = plant with single delivery shared drain compressors
2 = chiller. Analogous to the case 0. In this case, it is controlled in
temperature (in reference to the water)
Note: If 501 - tyPE = 1, the parameters from the Compressors folder will
be displayed [2]
• 502 - PC1 Power COMP 1
Defines the:
- value proportional to the power
- number of compressor steps (COMP) 1:
PC1= 1: whole compressor
PC1 = 2: compressor 2 steps (1 segmentation)
...
PC1 = 6: compressor 5 steps (4 segmentations)
if • 522 - CtyP = 0 or 2
PC1 must be less than 6
NOTE: a maximum of 12 compressors are permitted per system.
...
• 503 - PC2 Power COMP 2- as above
• 504 - PC3 Power COMP 3- as above
• 505 - PC4 Power COMP 4- as above
• 506 - PC5 Power COMP 5- as above
• 507 - PC6 Power COMP 6- as above
• 508 - PC7 Power COMP 7- as above
• 509 - PC8 Power COMP 8- as above
• 510 - PC9 Power COMP 9- as above
• 511 - PC10 Power COMP 10- as above
• 512 - PC11 Power COMP 11- as above
• 513 - PC12 Power COMP 12- as above
• 514 - EAAL Enable DO Alarms
Defines whether to assign the cumulative alarm automatically to a digital
output on relay. 0= No; 1= Yes
• 515 - EACI Enable COMP INV
Defines whether to automatically assign the INVERTER compressor 1 and 2
to the analogue outputs. 0= No; 1= Yes
• 516 - EAFI Enable INV FANS
Defines whether to assign the INVERTER fan automatically to an analogue
output. 0= No; 1= Yes
• 517 - EACIE Enable ERR COMP INV
Defines whether to automatically assign the INVERTER compressor 1 and 2
thermal switch to the digital inputs. 0= No; 1= Yes
• 518 - EAFIE Enable ERR INV FANS
Defines whether to assign the INVERTER fan thermal switch automatically
to a digital input. 0= No; 1= Yes
• 519 - EAgA Enable DI Alarm
Defines whether to assign the generic alarm automatically to a digital
input. 0= No; 1= Yes
• 520 - Fnty Fan mode
0 = condensation control disabled;
1= INVERTER control
2= digital
• 521 - nFn Fan number
Defines the number of fans in fan coil. Range 1...8 (a maximum of 8 digital
fans).
Parameter significant if 520 - Fnty = 2
• 522 - CtyP Type Circuit 1
Defines the type of circuit 1, the suction section:
0= HOMOGENEOUS STEPS
1= NON-HOMOGENEOUS STEPS
2 = HOMOGENEOUS STEPS + INVERTER / INVERTER*
• 523 - CPnU Num. COMP circuit 1
Defines the number of segmented compressors. Range 0...12 (a maximum
of 12 compressors per system**).
*Note: value 0 (no segmented compressors) is only allowed if 522-CtyP = 2.
In this case, the type of circuit 1 is INVERTER
**Note: The sum [523-CPnU] + [525 - CPnU2] must be less than or equal to
12.
• 524 - CtyP2 Type Circuit 2
Defines the type of circuit 2, the suction section:
See 522 - CtYP
• 525 - CPnU2 Num. COMP circuit 2
See 523 - CPnU
*Note: value 0 (no segmented compressors) is only allowed if 524-CtyP2 =
2. In this case, the type of circuit 2 is INVERTER
17
EWCM9900
CONFIGURING THE MACHINE
AUTOMATIC I/O ASSIGNMENT
Set the QuickStart parameters as follows:
They are assigned automatically in the order:
Digital outputs
They are assigned automatically in the order:
• OUT1 ALARM cumulative alarm digital output
- only if 514-EAAL = 1
• OUT2 Enable INVERTER compressor - only if
515-EACI = 1
• OUT3 Switch on compressor N
• OUT... Switch on Segmentation 1 Compressor N
(in case of SEGMENTED COMPRESSORS)
• OUT... Switch on Segmentation 2 Compressor N
...
• OUT... Switch on Compressor N+1
• OUT... Switch on Segmentation 1 Compressor N+1
...
• OUT... Enable INVERTER fan - only if 516-EAFI
=1
Digital Inputs
The automatic order is high voltage digital inputs
followed by voltage free inputs:
• DIH1 INVERTER Compressor shut-down
• DIH2 Compressor N shut-down
• DIH3 Compressor N+1 shut-down
...
• DIH... INVERTER fan shut-down
• DIH... Digital fan 1 thermal switch
• DIH... Digital fan 2 thermal switch
...
• DIH... Suction pressure switch
• DIH... Discharge pressure switch
• DI1... INVERTER compressor error - only if
517-EACIE =1
• DI1... INVERTER fan error - only if 518-EAFIE
=1
• DI1... INVERTER compressor error - only if
519-EAgA =1
Analogue outputs
They are assigned automatically in the order:
• INVERTER Switch on INVERTER compressor
• INVERTER Switch on INVERTER fan
NOTE: Analogue inputs are NOT assigned
automatically.
Once the Quick Start parameters have been set
quit the Quick Start Parameters menu and select
Enable with the UP and DOWN keys and press
OK:
• if the word No appears the parameter setting that is the automatic assignment of resources
according to the new configuration parameters has been successful.
Modification of the Quick Start parameters
implies that the Resource Allocation parameters
have been forced to the automatic I/O resource
assignment.
• if the word Yes remains the setting is wrong
and in the Alarms menu the I/O Config. Err.
alarm appears (see Alarms Menu).
Configuration Error
ALARMS
01/01
IO Config. Err
Active
The I/O Config. Err. alarm appears if:
• the number of assigned digital outputs exceeds
those available
• the number of assigned analog outputs
exceeds those available
• the number of assigned digital inputs (high
voltage or voltage free) exceeds those available
In addition:
• there may not be more than 12 compressors
• in refrigeration units with HOMOGENEOUS
STEP or NON-HOMOGENEOUS STEP
compressors, at least one compressor must be
present
• in refrigeration units with HOMOGENEOUS
STEP or HOMOGENEOUS STEP + INVERTER
compressors, the number of steps per
compressor must be less than 6.
EXAMPLE: AUTOMATIC I/O ASSIGNMENT
EWCM8400 default configuration:
machine room with 4 full homogeneous
compressors
Digital outputs
They are assigned automatically in the order:
• OUT1 ALARM cumulative alarm digital output:
514-EAAL = 1
Note: No INVERTER compressor is enabled - 515EACI = 0
• C1-OUT2 Switch on compressor 1
Note: 502-PC1=1
• C2-OUT3 Switch on compressor 2
Note: 503-PC2=1
• C3-OUT4 Switch on compressor 3
Note: 504-PC3=1
• C4-OUT5 Switch on compressor 4
Note: 505-PC4=1
Digital inputs
The high voltage inputs will be assigned
automatically in order.
Note:
• there are no voltage free digital inputs:
• there is no INVERTER compressor shut-down
• ALIN1-DIH1 Compressor 1 shut-down
• ALIN2-DIH2 Compressor 2 shut-down
• ALIN3-DIH3 Compressor 3 shut-down
• ALIN4-DIH4 Compressor 4 shut-down
• LP-DIH5 Suction pressure switch
Note: 519-EAgA = 0
Analogue outputs
Not configured.
MANUAL I/O ASSIGNMENT
Manual assignment allows you to modify the
default configuration or the outcome of
automatic I/O assignment.
NOTE: automatic I/O assignment is also allowed
during normal operation of the device.
Manual assignment of digital outputs
To assign the relay outputs OUT1...OUT13 set
parameters
584-H201...596-H213.
Manual digital input assignment
• To assign high voltage digital inputs
DIH1...DIH10 set parameters 603 - H101...612 H110
• To assign voltage free digital inputs DI1...DI4
set parameters 617 - H301...620 - H304
Manual assignment of analogue outputs
To assign analogue outputs
V1/I1...V2/I2 set parameters
631 - H501 and 632 - H502.
Manual assignment of analogue inputs
• To assign analogue inputs SIG1 and SIG2 set
parameters 623 - H401 and 624 - H402.
• To assign analogue inputs PB1...PB4 set
parameters 627 - H405...630 - H408.
Note: analogue inputs PB1...PB4 can also be
configured as digital: to do this you must
configure parameters 648 - Pb12 and 649 - Pb34.
EXAMPLES
EWCM9900 default configuration:
• add refrigerant level alarm,
• add refrigerant leak alarm
• move fan relay 4 from OUT13 to OUT11.
Configuring the refrigerant level alarm
Configure DI1 and refrigerant level by setting
617 - H301=10.
depending on the value of parameter
571 - gtSAE, the actuation of digital input DI1
will either result in an alarm signal or shut down
the plant.
Configuring the refrigerant leak alarm
Configure DI2 as refrigerant leak by setting
parameter 618 - H302=12 while, to configure the
central gas expulsion output (for example on
OUT8) set 591 - H208=5. Depending on the
value of parameter 572 - gLSAE, actuation of DI2
may result in an alarm signal or also actuate the
central gas expulsion relay.
Moving fan relay 4 from OUT13 to OUT11.
To deactivate OUT13 set 596 - H213=0 and to
activate OUT11 as fan 4 set 594-H211=13.
18
EWCM9900
COMPRESSOR CONTROL
COMPRESSORS FOLDERS
• Case Quick Start parameter [501-tyPE=0]: Default configuration.
Standard system with 1 suction circuit. The Compressors folder displayed
(relative to the first and only circuit) and the relative parameters are
displayed;
• Case Quick Start parameter [501-tyPE=1]: System with 2 suction circuits,
single delivery. The Compressors folder (relative to the first circuit) and
Compressors folder [2] (relative to the second circuit) and the relative
parameters are displayed;
• Case Quick Start parameter [501-tyPE=2]: System with 1 suction circuit.
See case [501-tyPE=0].
SHARED COMPRESSOR PARAMETERS
• 551 - Central Stty Set
Adjustment enablement with central or lateral set
• 552 - PoLI Activation Policy
Fixed or rotation sequence enablment depending on the compressor
activation operating time
• 553 - SEr COMP time limit
Limit on using compressors. In hours.
These parameters are shared by both the suction circuits and are only
displayed in the Compressors folder
COMPRESSOR PARAMETERS
The parameters:
• 101 - CCFn COMP control type
...
• 130 - InLt INV time at min speed.
• 145 - AtdS Set dynamic amb Tp
• 146 - AtdS differential
• 131 - LSE Minimum setpoint
...
• 144 - InLPt INV min pot limit
relative to the first suction circuit (circuit 1 or C1) and always displayed.
COMPRESSOR PARAMETERS [2]
The parameters:
• 201 - CCFn COMP control type
...
• 230 - InLt INV time at min speed.
• 245 - AtdS Set dynamic amb Tp
• 246 - AtdS differential
• 231 - LSE Minimum setpoint
...
• 244 - InLPt INV min pot limit
relative to the second suction circuit (circuit 2 or C2) and only displayed if
the Quick Start 501 - tyPE parameter = 1 (plant with single delivery shared
drain compressors).
Their meaning is analogous to those in the Compressor Menu (see for ref.).
The correspondence between the Compressors and Compressors [2]
parameters is as follows: 1xx -> 2xx
Example: 133 - SEt suction set point corresponds to 233 - SEt suction
set point.
The following chapter always refers to the first circuit C1, but the
points made are completely analogous for the second circuit C2
19
EWCM9900
COMPRESSOR CONTROL
ENABLING
HOMOGENEOUS STEPS + INVERTER
• Control is activated after a delay of 565-odo
• a temperature probe or pressure probe must be configured for suction
control (control probe LP)
The circuit is composed of a combination of an INVERTER compressor and
523-CpnU step compressors, segmented or not segmented, with steps of
the same power.
In this configuration the INVERTER compressor varies its output from 0%
to 100% depending on the type of control selected by parameter 101 CCFn.
• If 101-CCFn=0 the INVERTER varies its output from 0% to 100% by
switching on/off two successive power steps
• If 101-CCFn=1 the INVERTER modulates its power within the dead band
of the ZN controller.
One of the following types of circuits can be selected by parameter:
1.
2.
3.
4.
522-CtyP=0: circuit composed of step compressors, segmented or not
segmented, with steps of the same power (HOMOGENEOUS STEPS);
522-CtyP=1: circuit composed of step compressors, not segmented,
with steps of different power (NON-HOMOGENEOUS STEPS);
522-CtyP=2: circuit composed of a combination of a single compressor
controlled by INVERTER + type 1 system (HOMOGENEOUS STEPS +
INVERTER);
522-CtyP=2: circuit composed of a single compressor controlled by
INVERTER (INVERTER).
NOTE: This system is derived from case 3 by setting the number of
step compressors to 0, 523-CpnU=0);
Compressor control is a function of the LP control probe.
Use parameter 547-UMCP to select both pressure control (bar/PSI) and
temperature control (°C/°F). Note that, if using temperature control and
the LP control probe is a pressure transducer, suction control is a function
of the value converted into temperature of the selected gas, of the LP
control probe.
Behaviour is dual if the LP control probe is a temperature probe and the
control selected with 547-UMCP is pressure control.
Parameter 547-UMCP can be modified during normal operation.
The default suction control is pressure (bar).
Note: The unit of measure shown on the display may differ from the
control unit.
Three controls can be selected with parameter 101-CCFn:
0 = Proportional band control (BP)
1 = Dead band control (ZN)
2 = P.I.D. control (PID)
In case of proportional band control, parameter 551-Stty controls the
lateral and central setpoint relative to the control band.
HOMOGENEOUS STEPS
The circuit is composed of 523-CpnU step compressors, segmented or not
segmented, with steps of the same power (max. 12 compressors).
The number of steps of each compressor is defined by parameters 502-PC1
to 513-PC12 (if 502-PC1=1 the first compressor is of the full type).
HOMOGENEOUS STEP compressors are controlled by the switch on relays
and, if required, buy the segmentation relays.
Parameters 502-PC1 to 513-PC12 define the number of steps of each
compressor.
Step compressors are controlled by the switch on relays and, if required,
buy the segmentation relays.
The INVERTER compressor is controlled by an analogue output and digital
INVERTER enabling output (optional).
INVERTER
The circuit is composed of a single continuous control compressor.
This is obtained from a HOMOGENEOUS STEPS + INVERTER circuit by
setting 523-CpnU=0.
The INVERTER compressor is controlled by an analogue output and digital
INVERTER enabling output (optional).
Parameters 502-PC1 to 513-PC12 and 120-nCPC are ignored.
Each compressor, including the continuous control unit, has its own digital
shut-down input.
The following may also be present as options, which are common to all
compressors on the same circuit:
• differential pressure switch digital input;
• digital input HP
• digital input LP
• thermal switch digital input.
The shut down input immediately stops the affected compressor and sends
a compressor shut down alarm signal, while the optional inputs only deliver
an alarm signal. Given the matrix handling of optional alarms, the cause of
the alarm may not be uniquely identifiable.
The continuous control compressor also has, if so desired, a digital
INVERTER error input (optional).
With the exception of the circuit controlled by a single INVERTER
compressor, you can define a compressor to be the ‘Master’ of the step
compressors by setting parameter 120-nCPC > 0. For example, if 120nCPC=1 then the first step compressor on the circuit is the master. If 120nCPC = 0 no compressor is the Master.
NON-HOMOGENEOUS STEPS
The circuit is composed of 523-CpnU compressors of variable power, nonsegmented (set no more than 4 compressors although the nominal
maximum is 12).
Parameters 502-PC1 to 513-PC12 define the power of each compressor on
the circuit.
NON-HOMOGENEOUS STEP compressors are controlled by their switch
on relays.
The compressor oil level digital input is the same for all compressors on
the same circuit.
20
EWCM9900
COMPRESSOR CONTROL
TIMINGS FOR STEP COMPRESSORS
Example of step activation in the case of four homogeneous step
compressors with 126-FdLy =0:
The switching on/off of a compressor must satisfy the following
requirements:
Power steps requested
4
3
• Minimum off-on time 121-oFon.
This is the minimum delay between switching off and switching on;
• Minimum on-off time 122-donF.
This is the minimum delay between switching on and switching off;
• Minimum on-on time 123-onon.
This is the minimum delay between switching on and switching on again;
2
1
0
Time
Time between steps
Time
Compressor 1
Activating and deactivating power steps must respect the activation/release
times for resources 124-don and 125-doF and is a function, not only of the
type of compressors (HOMOGENOUS STEPS or NON-HOMOGENEOUS),
but also of parameters 126-FdLy and 127-FdLF.
Time
Compressor 2
HOMOGENEOUS STEPS - activation
Time
Compressor 3
• if 126-FdLy=0 is NO it is sufficient that the increment interstep time 124don be observed, which starts when each resource is activated;
• if 126-FdLy=1 we have two cases:
- If the increment interstep time count was already underway due to a
previous step being activated, then this delay must expire before
another resource can be activated;
- If the increment interstep time count has already expired, the
increment interstep time is reloaded when a resource is called by the
controller;
HOMOGENEOUS STEPS - deactivation
• If 127-FdLF=0 it is enough that the decrement interstep time 125-doF be
observed, which starts when a resource is switched off;
• If 127-FdLF=1 we have two cases:
- If the decrement interstep time count was already underway due to a
previous step being deactivated, then this delay must expire before
another resource can be deactivated;
-If the decrement interstep time has already expired, then it is
reloaded when the controller calls for another resource to be
deactivated;
Time
Compressor 4
Time
NON-HOMOGENEOUS STEPS - activation
• If 126-FdLy=0 it is sufficient that the increment interstep time 124-don be
observed, which starts when each resource is activated;
• If 126-FdLy=1 the increment interstep time is reloaded when a resource is
called by the controller only if the activation would result in quitting the
dead band;
NON-HOMOGENEOUS STEPS - deactivation
• If 127-FdLF=0 it is enough that the decrement interstep time 125-doF be
observed, which starts when a resource is switched off;
• If 127-FdLF=1 then the decrement interstep time is reloaded when the
controller calls for another resource to be deactivated, if this would
result in quitting the dead band.
SEGMENTATION OF HOMOGENEOUS STEP COMPRESSORS
Example of step activation in the case of three homogeneous step
compressors with 126-FdLy =1:
The configuration of a circuit with segmented compressors is done with
parameters 502-PC1 to 513-PC12 which define the number of steps of each
compressor (number of segmentations plus one).
Up to 5 segmentation relays can be handled.
Parameter 118-PtSE defines the mode of actuation of the segmentations
(see table).
• If, for example, 502-PC1 = 1 segmentation is not available, hence the
compressors are full and can deliver 0% or 100% of their power only.
Power steps requested
3
• If, for example, 502-PC1 = 4 (4 power steps), 3 segmentations are
available, hence the compressors are full and can deliver 0%, 25%, 50%,
75% or 100% of their power.
2
1
0
Time
Time between steps
Power
118 - PTSE = 0
118 - PTSE = 1
118 - PTSE = 2
Segmentation
Segmentation
Segmentation
ACC
Time
1
Compressor 1
Time
100%
ON
75%
ON
50%
ON
25%
ON
0%
ON
2
3
1
2
ON
3
ON
1
2
3
ON
ON
ON
ON
ON
Compressor 2
Time
Compressor 3
Time
ON
ON
ON
ON
ON
ON
ON
ON
21
EWCM9900
COMPRESSOR CONTROL
INVERTER COMPRESSOR TIMINGS
The diversity of behaviour between BP and PID control is linked to the fact
that in PID control of power steps hysteresis is ignored.
The On and Off times of a compressor must meet the following
requirements:
BP control
• Minimum off-on time 121-oFon.
This is the minimum delay between switching off and switching on;
• Minimum on-off time 122-donF.
This is the minimum delay between switching on and switching off;
• Minimum on-on time 123-onon.
This is the minimum delay between switching on and switching on again;
The figure shows the relation between power discharge in suction and the
value of the LP probe when the controller request differs by ±1 step from
that actuated. Note the following by the INVERTER compressor to achieve
fine control inside the step.
INVERTER COMPRESSOR - max. speed
Power delivered by circuit
If the suction controller requires a power greater than 116-InSSP, the
INVERTER will nonetheless be controlled at 116-InSSP.
Equivalent to
power step N+1
INVERTER COMPRESSOR - min. speed
• If 114-InLSP= 0 the INVERTER is controlled at the speed defined by the
suction controller;
• If 114-InLSP is non-zero, there are two options:
- the suction controller request is less than 114-InLSP but non-zero: the
INVERTER is forced to the minimum speed set in 114-InLSP.
In this case if the LP control probe < 144-InLPt and delay 565 - PAo
(alarm de-activation at switch on) has expired, the INVERTER switches
off and the enabling digital output is de-activated.
- the suction controller request =0; the INVERTER continues to be
controlled at the minimum speed defined by 114-InLSP for the period
229-Ino after which the INVERTER is switched off and the enabling
digital output is de-activated.
c
d
b
Equivalent to
power step
e
a
Equivalent to p
ower step N-1
VAL4
VAL3
VAL1
Control probe
VAL2
The following table illustrates this in relation to time:
Inverter compressor power
SAT
Suction controller request
c
a
e
d
b
114 InLSP
MIN
t@VAL1
Suction controller actuation
Steps
Time
(t@VAL1 + DELAY)
t@VAL3
t@VAL4
Time
t@VAL2
(t@VAL3 + DELAY)
N
114 InLSP
i
d
N-1
Timer
129 - Inot
Consent relay
Timer not expired
Timer expired
Time
t@VAL1
DELAY
Time
i
ON
d
OFF
Time
t@VAL4
Time
This time is a minimum of 130-InLt and is in the range from
124-don to 125-doF
Logical request for increment of one step of the step
controller
Logical request for decrement of one step of the step
controller
Speed flag forced to minimum
YES
NO
Time
INVERTER COMPRESSOR - modulation in HOMOGENEOUS STEP systems
The on/off timings and dynamics of the Inverter compressor for a circuit
composed of homogeneous step + Inverter compressors are a function of
the chosen control mode (parameter 101 - CCFn).
In the case of dead band (ZN) control, the INVERTER modulates its power
inside the dead band of the dead band controller.
Instead, in the case of proportional band control (BP) or P.I.D. control
(PID), the INVERTER modulates its power from 0% to 100% between
successive power step on/offs
If the power request from the controller exceeds by more than one step
the actuated power, the INVERTER compressor immediately runs at
maximum speed 116-InSSP and the steps are activated according to the
selected policy. Only when the request is 1 step away from the actuated
power does the INVERTER compressor resume modulation within the step.
If the power request from the controller is more than one step below the
actuated power, the INVERTER compressor immediately runs at minimum
speed 114-InLSP and the steps are deactivated according to the selected
policy. Only when the request is 1 step away from the actuated power does
the INVERTER compressor resume modulation within the step.
PID control
In this situation the section indicated as c) in the figures above does not
exist. Sections a) and b) overlap with sections d) and e).
Modulation within the step persists, but without hysteresis in this case also.
22
EWCM9900
COMPRESSOR CONTROL
RESOURCE SELECTION POLICIES
The resource selection policies are generally employed to optimise the use
of the compressors so as to increase their service life and reduce
maintenance. They are also used to emphasise dynamic behaviours of the
plant such as saturation and balancing.
The policies apply to all types of circuit which have step compressors.
HOMOGENEOUS STEPS and HOMOGENOUS STEPS + INVERTER
The selection policies come into play when the controller requests the
activation/deactivation of a step. This request is distributed to the most
suitable compressor in terms of the policy in force.
The selection policies are based mainly on the hours of operation of the
compressors. Parameter 552-PoLI selects one of the following policies:
• 552-PoLI = 0: fixed sequence;
• 552-PoLI = 1: balancing;
• 552-PoLI = 2: saturation 1
• 552-PoLI = 3: saturation 2 (also called saturation algorithm);
Fixed sequence (552-PoLI = 0)
The fixed sequence policy distributes all resources starting from the
compressor with the lowest index, so far as this is compatible with other
requirements, such as compressor safety timings. the resulting allocation is
such as to obtain, at any given time, a maximum discharge of the
compressors with lower indexes.
Note that:
• on request for a step increment, the components which may increment
are considered and that with the lowest index is selected;
• on request for a step decrement, the components which may decrement
are considered and that with the highest index is selected;
Balancing (552-PoLI = 1)
The balancing policy distributes all resources equally over the largest
possible number of compressors, so far as this is compatible with other
requirements, such as compressor safety timings. The resulting allocation is
intended to have the greatest possible equalization of power output levels
in the compressors at any one time.
Note that:
• on request for a step increment, the components which may increment
are considered and that with the smallest distance from the minimum
number of deliverable steps at that time is selected; If more than one
compressor is at the same distance, the one with the least hours of
operation is chosen;
• on request for a step decrement, the components which may decrement
are considered and that with the largest distance from its minimum
number of deliverable steps at that time is selected. If there are more
than one at equal distance, the component with the highest hours of use
is selected;
Saturation 1 (552-PoLI = 2)
The saturation 1 policy distributes all resources equally over the smallest
possible number of compressors, so far as this is compatible with other
requirements, such as compressor safety timings. The resulting allocation is
intended to have the largest possible number of compressors switched off
at any one time.
Note that:
• on request for a step increment, the components which may increment
are considered and that with the smallest distance from the maximum
number of deliverable steps at that time is selected. If more than one
compressor is at the same distance, the one with the least hours of
operation is chosen;
• on request for a step decrement, the components which may decrement
are considered and that with the smallest distance from the minimum
number of deliverable steps at that time is selected. If more than one
compressor is at the same distance, the one with the greatest hours of
operation is chosen;
Saturation 2 (552-PoLI = 3)
Like saturation 1, except that when a decrement request occurs, before
switching off the last step to be turned on of a compressor it is wise to
switch off a step of another compressor, to avoid requests for switching
the same compressor back on.
NON-HOMOGENEOUS STEPS
When the delivered power is varied, the selection criteria for the new
active compressor configuration are as follows:
• In the case of increased power, the configuration which results in the
smallest increase is given priority;
• In the case of decreased power, the configuration which results in the
smallest decrease is given priority;
• For a given delivered power, the configuration which requires switching
the smallest number of compressors is given priority; if more than one
configuration meets this requirement, then that which requires the use of
the smallest number of compressors is chosen, and after that, the
configuration which has least hours of operation.
• If the delivered power is stable, and an alarm shutting down one or more
of the active compressors occurs, a power increase request is issued to
obtain the maximum power which does not exceed the initial discharge.
Once the new situation obtains, the actuated power is considered to be
stable.
MASTER COMPRESSOR
For all systems with step compressors, independently of the type of control
and policy, one of the step compressors may be defined to be the master.
It is selected with parameter 120-nCPC.
The master compressor is the one which turns on first and switches off
last. In the case of segmented compressors, in response to power step
increment requests the master compressor will always be augmented
before the other compressors on the circuit are considered to be available.
The compressor activation policy (parameter 552-PoLI) influences the way
in which the master compressor is used. In detail:
If the policy is Fixed Sequence (552-PoLI=0) the master compressor is
always turned on first and taken to saturation, after which the other
compressors are turned on and saturated in sequence without reference to
the master unit. When decrementing, the sequence excluding the master is
switched off (as per saturation policy) and the master is the last to be
deactivated.
If the policy is Balancing (552-PoLI=1) the master is activated first and
then all the others in balancing mode, including the master. In deactivation,
all compressors including the master are switched off in balancing mode,
but the master is the last to be turned off.
If the policy is Saturation 1 (552-PoLI=2) the master compressor is always
turned on first and taken to saturation, after which the other compressors
are turned on and saturated. In deactivation, all compressors including the
master are switched off in saturation mode, except for the master which is
the last to be turned off.
The Saturation 2 policy (552-PoLI=3) differs in deactivation, in which all
compressors, except for the master, are decremented until they are
providing only one step, then they are switched off, after which the master
is decremented until it switches off.
23
EWCM9900
COMPRESSOR CONTROL
Non nominal cases
• If the master compressor has an alarm or is deselected when it is active it
is switched off and the selection of successive power steps follows the
selected policy as if the master compressor did not exist.
• If the circuit to which the master compressor belongs is switched off and
the master compressor is in alarm or deselected then if the controller for
the circuit in question requests power, the available compressors are
activated according to the current policy. In substance, if the master
compressor cannot be used due to an alarm or deselection, this does not
make it impossible to activate resources.
• If the circuit to which the master compressor belongs is switched off and
the master compressor is not in alarm and is selected but its safety
timing is counting down, then if the controller for the circuit in question
requests power the master compressor is switched on first as soon as its
safety timing has expired. In the meantime, the other compressors are
kept switched off.
• If the master compressor quits an alarm condition when some of the
compressors on its circuit are already active, it loses its privileges when
the controller requests power steps. If the controller requests
deactivation of steps, then the master compressor gets its privileges back.
Note that for HOMOGENEOUS STEP+INVERTER systems, while the
number of power steps is actuated on the basis of the difference between
the value of the LP and the setpoint, the power at which the continuously
controlled compressor is driven varies from 0% to 100% between the
activation/deactivation of a power step on the step compressors.
For setpoint + proportional band < LP control probe < setpoint the
continuously controlled compressor is switched off.
INVERTER - proportional band
Example with 551 - Stty = 0 (lateral setpoint) and 117-CoIE = 1 (enable cutoff)
Speed %
Saturation cutoff
116 InSSP
SAT
115 InMSP
MAX
114 InLSP
MIN
B
Minimum cutoff
A
TYPE OF CONTROL
Control probe
0
Proportional band
Digital compressors
x (Steps)
INVERTER compressors
x (Continuous)
PROPORTIONAL BAND CONTROL
PID
x
x
Dead band
x
x
Enabling
SET
142 - Cod1
142 - Cod1
134 - Pbd
Note that in the absence of a cutoff, with parameter 117-CoIE=0 the graph
loses the cutoff hysteresis:
143 - Cod2
143 - Cod2
• minimum cut-off: the speed of the INVERTER goes from 0 to MIN when
the LP control probe reaches ‘A’ from below. If the LP control probe
reaches ‘A’ from above, the speed changes from MIN to 0.
• 101 - CCFn=0
The power request from the suction controller is proportional to the
difference between the setpoint and the control probe LP.
STEP COMPRESSORS - proportional band
The controller activates a number of power steps to reach the setpoint
given in parameter 133-SEt. The number of resources required is linked to
the difference between the value measured by the control probe LP and
the setpoint; the greater this difference, the greater the number of
resources required to reach the setpoint.
The temperature or pressure interval between power steps is a function of
the proportional band 134-Pbd and the number of resources present.
Example with 551 - Stty (lateral setpoint)
• saturation cut-off: the speed of the INVERTER goes from continuous
control to MAX when the LP control probe reaches ‘B’.
If the LP control probe reaches ‘B’ from above, we have continuous
control from MAX to MIN.
DEAD BAND CONTROL
Enabling
• 101 - CCFn = 1
The suction controller power request is proportional to the time the LP
control probe stays outside the proportional band.
The proportional band is symmetrical relative to the setpoint value.
Control probe
BP1: 135 -PbdE
124-don/2 124-don/2
124-don
Steps
BP: 134 - Pbd
12
Example: 4 compressors*
∆ = 124-Pbd / Σ Compressor
power
Σ = 502-PC1 + ...+ 504-PC4
+1
SET
-1
*1 full compressor
*3 power stage
compressors
6
+1
-1
Time
+1
124-don
4
125-doF
125-doF/2
125-doF/2
125-doF
2
125-doF
0
SET
Control probe
134 -Pbd
24
EWCM9900
COMPRESSOR CONTROL
Two dead bands are expected: 134 – Pbd and 135 - PbdE.
The latter one typically is larger than the former one and indicates the
region outside which increment interstep time could be faster.
HOMOGENEOUS STEPS - dead band
When the LP control probe value exceeds the threshold SET+BP/2 but is
still below the value SET+BP1/2, if the increment interstep time 124-don
has already expired a step is immediately (*) actuated and the interstep
time starts again. If the value of the LP control probe stays in this band, a
further power step is actuated every 124-don seconds. When the LP
control probe value exceeds the threshold SET+BP1/2 and if the increment
interstep time has already expired a step is immediately (*) actuated and
the time 124-don/2 starts again. In order for the LP control probe value to
stay above this latter threshold, the power steps are incremented every
124-don/2 seconds.
The same applies to power step decrements, with the times set in 125-doF.
Power variations are not requested inside the proportional band. In this
Algorithm there is no hysteresis.
All interstep times are resycnhronised at the activation/deactivation of a
new step.
The step to be activated/deactivated is determined by the selection policy
for the circuit in question set in parameter 552-PoLI.
(*) In relation to timings, see also TIMINGS FOR STEP COMPRESSORS, in
particular as regards parameters 126-FdLy and 127-FdLF.
NON-HOMOGENEOUS STEPS - dead band
When the LP control probe value exceeds the threshold SET+BP/2 but is
still below the value SET+BP1/2, if the increment interstep time 124-don
has already expired a step is immediately (*) actuated and the interstep
time starts again. If the value of the LP control probe stays in this band, a
further power step is actuated every 124-don seconds. When the LP
control probe value exceeds the threshold SET+BP1/2 and if the increment
interstep time has already expired a step is immediately (*) actuated and
the time
124-don/2 starts again. In order for the LP control probe value to stay
above this latter threshold, the power steps are incremented every 124don/2 seconds.
The same applies to power step decrements, with the times set in 125-doF.
Power variations are not requested inside the proportional band. In this
Algorithm there is no hysteresis.
All interstep times are resycnhronised at the activation/deactivation of a
new combination of compressors.
In relation to the amount of actuatable increment/decrement of power see
RESOURCE SELECTION POLICIES for NON-HOMOGENEOUS STEP
systems.
(*) In relation to timings, see also TIMINGS FOR STEP COMPRESSORS, in
particular as regards parameters 126-FdLy and 127-FdLF.
INVERTER - dead band
Operation is analogous to the case of HOMOGENEOUS STEPS, note that
for INVERTER systems the number of continuous power steps is defined
by parameter 128-InPC.
P.I.D. CONTROL
Enabling
• 101 - CCFn = 2
This applies to any type of circuit except for NON-HOMOGENEOUS
STEPS.
The power request from the suction controller is a function of the
difference between the LP control probe and the setpoint and is equal to
the sum of three terms:
P proportional to the error: considers the divergence between the LP
control probe value and the setpoint, it inserts an action which is directly
proportional to it; the action of the proportional component decreases as
the error approaches zero;
I proportional to the integral of the error: integrates the measured
error over time, reducing the final divergence from the setpoint; this
function tracks the previous control values, providing a corrective action
capable of adding/subtracting power gradually so as to reach the setpoint
value.
D proportional to the derivative of the error: considers the speed with
which it varies the process control value; this provides a faster response in
system control, inasmuch as the correction is greater the greater the rate
of change of the error;
The control signal applied to the actuator is thus:
P + I + D = Kp•(error) + Ki•(integral of error) + Kd•(derivative of error)
Where:
Kp = 1000/Bp
Ki = Kp•Tc/Ti
Kd = Kp•Td/Tc
You can set the following with parameters:
• enable integral component Ki (102-ItEn=1)
• enable proportional component Kp (104-PbEn=1)
• enable derivative component Kd (105-dtEn =1)
• the integrative time constant Ti
• the proportional band constant Bp
• the derivative time constant Td
Correspondence of parameters
Note: For NON-HOMOGENEOUS STEP systems, +1 indicates a request for
a power increment, while -1 indicates a request for a power decrement.
Bp
Ti
Td
Tc
134 - Pbd
103 - It
106 - dt
Application cycle time (1.0 sec)
HOMOGENEOUS STEPS - PID
The control signal u(t) results in the activation of a number of power steps
which is proportional to u(t) itself.
HOMOGENEOUS STEPS + INVERTER - PID
The number of actuatable power steps is proportional to the signal u(t)
while the power at which the INVERTER is driven varies linearly from 0% to
100% between two discrete compressor power step
increments/decrements.
INVERTER - PID
The control signal u(t) represents the power actuated directly by the
INVERTER.
25
EWCM9900
FAN CONTROL
ENABLING
• Control is activated after a delay of 565 - odo
• Parameter 520-Fnty must be non-zero
• a temperature probe or pressure probe must be configured for discharge
control (control probe HP)
YOU can select digital output fan control by setting 520-Fnty = 2 (max. 8
fans).
If 520-Fnty = 1 the fan battery will be controlled by a single analogue
output (control by means of INVERTER).
Fan control is a function of the HP control probe.
Use parameter 548-UMFn to select both pressure control (bar/PSI) and
temperature control (°C/°F). Note that, if using temperature control and
the HP control probe is a pressure transducer, discharge control is a
function of the value converted into temperature of the selected gas, by
the HP control probe.
Behaviour is dual if the HP control probe is a temperature probe and the
control selected with 548-UMFn is pressure control.
Parameter 548-UMFn can be modified during normal operation.
The default discharge control is pressure (bar).
Note: The unit of measure shown on the display may differ from the
control unit.
Three controls can be selected with parameter 301 - FCFn:
0 = Proportional band control (BP)
1 = Dead band control (ZN)
2 = P.I.D. control (PID)
In case of proportional band control, parameter 551-Stty controls the
lateral and central setpoint relative to the control band.
Fans can be activated by reference to 302-FACt:
0 = independently of compressor status;
1 = if at least 1 compressor is on.
INVERTER FAN
To configure fan control by a single analogue output, set parameter 520Fnty = 1:
• Analogue output fan control
• Digital output to activate INVERTER (optional)
• Digital output for INVERTER error (optional)
• Error conditions are signalled by digital inputs (fan thermal switch with
continuous control).
Note: Parameter 521-nFn (number of fans) is not significant in this case
inasmuch as the INVERTER analogue output is used.
INVERTER fan - max. speed
If the discharge controller requires a power greater than 311-InSSP, the
INVERTER will nonetheless be controlled at 311-InSSP.
INVERTER fan - min. speed
• If 309-InLSP = 0 the INVERTER is controlled at the speed defined by the
discharge controller;
• If 309-InLSP is non-zero, there are two options:
- the discharge controller request is less than 309-InLSP but non-zero:
the INVERTER is forced to the default minimum speed set in 309-InLSP.
In this case if the control probe HP < 345-InLPt and delay 565-PAo
(alarm de-activation at switch on) has expired, the INVERTER switches
off and the enabling digital output is de-activated.
- the discharge controller request = 0 the behaviour of the INVERTER is
determined by 330 - InoS:
• If 330-InoS =0 the INVERTER continues to be controlled at the
minimum speed defined by 309-InLSP for the period 328-Inot after
which the INVERTER is switched off and the enabling digital output
is de-activated.
• If 330-InoS =1 the INVERTER contrinues to be controlled at the
minimum speed defined by 309-InLSP
Suction controller request
DIGITAL FANS
To control the fans by digital outputs, set parameter 520-Fnty =2:
309 - InLSP
Digital output fan control
Error conditions are signalled by digital inputs (digital fan thermal switch).
Suction controller actuation
Digital fans - timings
• Parameter 324-don defines the delay, in seconds, between the calls for
two different steps (activation of two different fans).
• Parameter 325-doF defines the delay, in seconds, between the release of
two different steps (de-activation of two different fans).
Time
309 - InLSP
Timer
Timer not expired
Timer expired
Time
328 - Inot
Digital fans - rotation
Parameter 322-rot defines the rotation of fans during calls and releases to
obtain the same number of hours of operation.
• 0 = fixed sequence: the activation sequence is fan 1, 2, 3... with deactivation in the inverse order.
• 1 = rotation: during activation, the fan with least hours of operation is
chosen; during de-activation, the fan with the most hours of
operation. The aim is balance out the hours of operation between all
fans.
Consent relay
Time
ON
OFF
Time
Speed flag forced to minimum
YES
NO
FAN PICKUP
Time
When first switched on, the fans are forced to maximum power for the
time defined by 323-Clt:
• Maximum power is 100% for digital fans
• Maximum power is determined by parameter 311 - InSSP for INVERTER
fans.
If 323 - Clt = 0 there is no pickup.
After pickup, the fans are run as required by the discharge controller.
In case of an alarm which locks out the fan battery, the fans are switched
off in any case.
26
EWCM9900
FAN CONTROL
Digital fans
• Pickup with constant controller request greater than 309-InLSP.
After the pickup period the fans are forced to the value REQ:
• Digital fan pickup with discharge controller request stable at the end of
pickup:
LEGEND
• tr = ventilation request
• MAX = max. number of
available steps
• REQ = number of steps
requested
Power requested by controller
MAX
REQ
Power requested by controller
MAX
REQ
MIN
0
Time
Tr
Actuated power
MAX
• Power requested by
controller
• Actuated power
0
Time
Tr
Actuated power
MAX
REQ
REQ
MIN
0
Time
Tr
0
324 324 324
don don don
Tr
Time
324 - don
323 - Clt
• Digital fan pickup with discharge controller request increasing at the end
of pickup:
MAXIMUM FANS STOP TIME
Power requested by controller
Parameter 326-FStt defines the maximum fans off time
(in other words, fans not running). After this time, the fans are forced to
maximum speed for time 323-Clt
• if 326 - FStt = 0 the fans can stay off indefinitely.
• if 326 - FStt is non-zero and 323 - Clt = 0 the fans stay off until 323 - Clt
is set to a non-zero value.
MAX
REQ 2
REQ 1
0
Tr
Actuated power
Time
MAX
TYPE OF CONTROL
Digital fans
INVERTER fan
Proportional band
x (Steps)
x (Continuous)
PID
x
x
Dead band
x
x
REQ 2
REQ 1
PROPORTIONAL BAND CONTROL
0
Tr
Time
324 324 324
don don don
Enabling
• 301 - FCFn = 0
323 - Clt
The power request from the discharge controller is proportional to the
difference between the setpoint and the control probe HP.
Inverter fan
• INVERTER fan pickup with discharge controller request zero during
pickup. After the pickup time, the fans are forced to the minimum for the
period 328 - Inot after which they switch off:
Power requested by controller
MAX
MIN
0
Time
Tr
Actuated power
MAX
MIN
0
Tr
324 - don
323 - Clt
Time
Digital fans - proportional band
The controller activates a number of power steps to reach the setpoint
given in parameter 333-SEt. The number of resources required is linked to
the difference between the value measured by the control probe HP and
the setpoint; the greater this difference, the greater the number of
resources required to reach the setpoint.
The temperature or pressure interval between power steps is a function of
the proportional band 334 - Pbd and the number of resources present.
27
EWCM9900
FAN CONTROL
Example: with 551 - Stty (lateral setpoint)
DEAD BAND CONTROL
Enabling
• 301-FCFn = 1
Power Steps
The discharge controller power request is proportional to the time the HP
control probe stays outside the proportional band.
The proportional band is symmetrical relative to the setpoint value.
4
Control probe
2
324 - don
0
Control Probe
SET
Pbd/2
334 - Pbd
SET
Pbd/2
+1
-1
+1
-1
TIME
334 -Pbd
INVERTER fan - proportional band
325 - doF
Speed %
325 - doF
Saturation cutoff
311 InSSP
SAT
310 InMSP
MAX
Digital fan - dead band
The principal function of the controller consists in activating a number of
power steps in proportion to the time since the moment in which the LP
control probe has exceeded the threshold SET + BP/2.
The proportional band is symmetrical relative to the setpoint value.
When the LP control probe has exceeded the threshold a new resource is
activated every 324 - don seconds until the LP control probe enters the
half band. The same holds for resource deactivation every 325 - dof
seconds.
B
Minimum cutoff
A
309 InLSP
MIN
INVERTER fan - dead band
Control probe
0
Operation is analogous to that of digital fans, the number of discrete steps
is given in 329-InPC
SET
335 - Cod1
336 - Cod2
334 - Pbd
335 - Cod1
336 - Cod2
Note that in the absence of a cutoff, with parameter 303 - CoIE = 0 the
graph loses the cutoff hysteresis:
• minimum cutoff: the speed of the fans goes from 0 to MIN when the
control probe HP reaches ‘A’ from below.
If the control probe HP reaches ‘A’ from above, the speed changes from
MIN to 0.
• saturation cutoff: the speed of the fans goes from continuous control to
MAX when the control probe HP reaches ‘B’.
If the control probe HP reaches ‘B’ from above, we have continuous
control from MAX to MIN.
P.I.D. CONTROL
Enabling
• 301 FCFn = 2
The power request from the discharge controller is a function of the
difference between the control probe HP and the setpoint and is equal to
the sum of three terms:
P proportional to the error: considers the divergence between the LP
control probe value and the setpoint, it inserts an action which is directly
proportional to it; the action of the proportional component decreases as
he error approaches zero;
P proportional to the integral of the error: integrates the measured
error over time, reducing the final divergence from the setpoint; this
function tracks the previous control values, providing a corrective action
capable of adding/subtracting power gradually so as to reach the setpoint
value.
D proportional to the derivative of the error: considers the rate of
change of the process control value; this provides a faster response in
system control, inasmuch as the correction is greater the greater the rate
of change of the error;
28
EWCM9900
FAN CONTROL
The control signal applied to the actuator is thus:
P + I + D = Kp•(error) + Ki•(integral of error) + Kd•(derivative of error)
Where:
Kp = 1000/Bp
Ki = Kp•Tc/Ti
Kd = Kp•Td/Tc
Parameters allow you to set:
• enable integral component (304 - ItEn=1)
• enable proportional component (306 - PbEn=1)
• enable derivative component (307 - dtEn=1)
• the integrative time constant Ti
• the proportional band constant Bp
• the derivative time constant Td
Correspondence of parameters:
Bp
Ti
Td
Tc
334 - Pbd
305 - It
308 - dt
Application cycle time (1.0 sec)
The discrete control signal applied to the actuator is thus:
Digital fans - PID
The control signal u(t) results in the activation of a number of power steps
which is proportional to u(t) itself.
INVERTER fan - PID
the control signal u(t) represents the power actuated directly by the
INVERTER.
29
EWCM9900
CLOCK AND TIME BANDS MENU
The Clock and Time Bands Menu is used to set the date/time and the
device’s operational time bands.
NB: check that the parameter 640 - rtCE is set to ‘Yes’ (RTC present). if it is
not, the correct display and the change of the date/time will not be
guaranteed.
Menu composed of 2 folders:
• Date and Time: sets the device’s date and time
• Time Bands: each week can be divided into 6 periods in which controls
can be set, such as dynamic suction setpoint, energy saving, and so on.
The calendar is weekly: the week can also be divided into two periods
(week and weekend) with separate controls.
Date and Time
DATE/TIME
24/05/08
Change Date
Change Time
01/01
14:30
The current date and time will be displayed and the two folders for the modification:
• Change Date
• Change Time
Change Date
CHANGE DATE
DD
MM
YY
01/01
24
May
8
Open the Change Date menu, select which setting to change - day (DD),
month (MM), year (YY)- and make the change.
Note: The year is displayed as a two digit integer (2008 is displayed as 8,
2010 as 10)
Change Time
As described above for the date, set the time (HH) and minutes (MM).
The hour is in the format HH:0...23: MM:0...59. The time can be specified to
within a minute.
Leap years are contemplated. For example: February 2008 will have 29
days. The change from GMT to BST and vice versa is not contemplated.
Clock not active
If the clock is not active (parameter 640 - rtCE =No) the indicated date and
time will not be accurate.
Whenever the machine is switched off and on again, the time will display
as 00/00/00 00:00. Re-setting the parameter 640 - rtCE=Yes will return to
the correct display.
The clock in fact has a buffer battery to prevent interruptions in power
and/or blackouts.
Clock error (RTC error)
If the battery is drained or the clock is faulty, an RTC error will be signalled
by the Alarms Menu.
Time Bands
Menu composed of 3 folders:
• Enable
• Mode
• Settings
Enable
Click on OK to enter the Time Bands menu.
Enable F.O. appears (Time Bands): Click on OK or Right to enter Edit Mode:
change the value from No to Yes with the UP key. Confirm with the OK
key; To quit press the Left key.
Mode
Menu for selecting the method of using the Time Bands
The weekly mode (indicated with 24H) indicates that every day will have
the same settings. Mode 1 indicates that from Monday to Friday there will
be one setting and at the weekend another. Mode 2 requires Sunday to
have a different setting to the rest of the week.
To access and change the F.O. (Time Bands) mode, proceed as described
above. The values are:
• 0 = weekly mode
• 1= weekdays + Saturday / Sunday or Monday -> Friday plus Saturday ->
Sunday
• 2= weekdays including Saturday plus Sunday or Monday -> Saturday plus
Sunday
Settings
Menu for changing the parameters of each single band. To access and
change the F.O. (Time Bands) mode, proceed as described above. The
display is determined by what is set in the Mode Menu.
In the example, the F.O mode is set to 1.
For each group of days it is possible to set 6 independent and separately
activatable time bands.
One function can be enabled/disabled for each time band.
Example
Mode We have selected mode 1, week divided into Monday ->Friday and
Saturday -> Sunday
In the settings menu, we access Mon-Fri
Days Mon-Fri
• We consider the first time band NOT active - ‘Band 1 No’.
- the start time is nonetheless determined by ‘Band 1 hours’ and ‘Band 1
minutes’ (default 0:00 i.e. midnight)
• We consider the first time band active - ‘Band 2 Yes’.
• With Band 2 hours’ we set the starting time in hours of time band 2 (e.g. 8
o’clock)
• With ‘Band 2 minutes’ we set the starting time in minutes of time band 2 (e.g. 30
minutes). Note that the settings for time band 1 terminate when time band 2 starts
• Use ‘Energy Saving No’ to de-activate energy saving during time band 2.
Days Sat-Sun
• We consider the first time band active - ‘Band 1 Yes’.
• We use ‘Band 1 hours’ and ‘Band 1 minutes’ to set the start of time band
1 as described above for Mon->Fri.
• We use ‘Suc. Dynamic set 1’ to enable the dynamic suction setpoint
during time band 1.
Notes:
• The duration of the time band runs from its starting time to the starting
time of the next time band.
• The functions enabled for the time band are activated when the time
band starts (the same applies to disabled functions).
• The status of the functions may be modified within the time band by:
- dedicated digital input for the function in question;
- key;
- Functions menu;
- remote (supervision system or web);
• if the parameter ‘Band 1’ is also enabled for the days Mon-Fri (‘Band 1
Yes’) we have 2 offset controls on the setpoint for the weekdays and the
weekend.
• if the Energy Saving function is enabled, the setpoint offset settings will
be ignored
• if the Heat Recovery function is enabled the settings of the offsets on the
condensation setpoint will be ignored
By default all time bands are enabled at intervals of 4 hours (Band 1->
0:00, band 2 ->04:00, ... Band 6-> 20:00) and all functions are enabled.
30
EWCM9900
FUNCTIONS MENU
The Functions Menu allows manually setting and checking by keyboard
some of the functions that can be associated with the Function keys.
By default the functions are all disabled.
To activate the desired function move onto the function with the UP and
DOWN keys and press the OK key. The function will activate and the word
No related to the function will be updated to Yes.
Active only when the compressors (on the same circuit) are off.
Recovery (Heat)
Function used for exploiting the heat developed by the condenser (for
instance to heat water for sanitary use, water for rooms, etc)
The function can be enabled in the Time Bands menu.
If you modify the Eco. Cond function, the Recovery function will be deactivated if active (Yes ->No)
AVAILABLE FUNCTIONS
Mute
If the displayed value is On, following an alarm condition, the alarm will
immediately be acknowledged.
Eco. Asp (Suction Economy function)
Eco. Cond (Discharge Economy function)
Function that enables / disables the reduced set for the sections
respectively of suction and discharge.
Note: activation/de-activation of these functions is also determined by the
En function. Saving (°):
En. Saving (Energy Saving)
The energy saving function controls all suction and discharge economy
functions.
The activation mode is defined by parameter 556 - ESFn (Menu Parameters
> Functions).
If the displayed value is On the Energy Saving LED will be on steady.
See dedicated paragraph.
Funzioni Aux (Auxiliary functions) Aux1...Aux4
The device can control up to 4 auxiliary relay outputs.
CTRitLiq (Liquid Return Control)
SbGasCa (Hot Gas Defrosting)
Function enabled after digital input activation appropriately configured
NB
The state of the functions:
• Recovery
• CTRitLiq
• Hot gas defrost
can be displayed but not modified in this menu.
(°) Example En. Saving (Energy Saving)
If parameter 556 - ESFn = 5 which means Suction Economy +
Discharge Economy
activating En. Saving will also enable:
• Suction Economy
• Discharge Economy
in other words, the 2 functions will be automatically enabled (No
—> Yes)
ENERGY SAVING
En. Saving (Energy Saving)
The energy saving function controls all suction (circuit 1 and circuit 2) and
discharge economy functions.
The function is enabled as shown in the table and depending on the
setting of parameter 556 - ESFn.
The activation request may come from:
• scheduled time band;
• dedicated digital input for the function in question;
• key;
• functions menu;
• remote (supervision system or web);
Note: If the heat recovery function is active and the activation of the
Energy Saving function results in a change in the state of the discharge
economy function, the recovery function is de-activated.
The de-activation occurs as per the exclusion table for disabling via time
bands (°).
Energy Saving is disabled also when the status of a function indicated in
the table as being ‘with economy function active’ (symbol) is modified
(for example, by a keystroke).
Example: If Discharge Economy is disabled and 556-ESFn = 5 the Energy
Saving function is disabled in Suction Economy (circuit 1) (further to
Discharge Economy itself, naturally). Suction Economy (circuit 2) will
undergo no change.
Note: The Energy saving LED will go out.
If the request originates from a digital input, the Energy Saving function
will be activated/de-activated by changing the status of the digital input
(active with contact open).
Keystroke, Functions menu and remote requests toggle (activate/deactivate) the funtion.
(°) Time Bands
• If time band control is already active, the status specified for the current
time band is forced when the time band itself starts.
• If, during a given time band, other requests from keystrokes, the function
menu or remote controls occur, these are considered by the system.
• If they are disabled by time bands, the discharge and suction economy
functions are determined by the time band settings.
Example: if at 18.30 band 2 starts, in which the Energy Saving function is
disabled, the discharge and suction economy functions are determined by
their respective settings within the time band itself.
Economy
Discharge
556 - ESFn
Economy
Suction C1
Economy
Suction C2
0
disabled
disabled
disabled
1
//
//
a
2
//
//
3
//
a
a
4
a
a
a
a
5
6
7
a
//
//
//
a
a
a
//
a
Economy function active
//
no changes
a
Table legend
• Economy function active symbol indicates that the
corresponding function will be activated (e.g. 556 - ESFn = 1
Suction Economy circuit 1 will be activated)
• // indicates that there will be no change for the corresponding
function (e.g. 556 - ESFn = 1 if Discharge Economy is active, it stays
active, and if inactive it stays inactive)
31
EWCM9900
ECONOMY FUNCTION • SUCTION SET POINT
The Economy function controls the regulation SetPoint
The function allows obtaining control on the suction regulation SetPoint
depending on the ambient temperature (for instance the temperature of
the display area of the supermarket)
The activation request may come from:
• scheduled time band;
• dedicated digital input for the function in question;
• key;
• functions menu;
• remote (supervision system or web);
• Energy Saving function;
The Set can be fixed or variable (function of a differential) defined by:
• 107 - dSS Mode Set Dyn. Suc. =0 indicates that the suction SetPoint will
be dynamic, that is a function of a differential.
• 107 - dSS Mode Set Dyn. Suc. =1 indicates that the suction SetPoint will
be fixed
If the internal ambient temperature probe is in error or not configured,
the function is not enabled and the correction is always =0.
• If the request originates from a digital input, the Energy Saving function
will be activated/de-activated by changing the status of the digital input
(active with contact open).
• If the request originates from the Energy Saving function, the economy
will be activated/de-activated by changing the status of the Energy Saving
function. It will be activated if the Energy saving function requires it, and
de-activated otherwise.
• Keystroke, Functions menu and remote requests toggle (activate/deactivate) the funtion.
(°) Time Bands
• If time band control is already active, the status specified for the current
time band is forced when the time band itself starts.
• If, during a given time band, other requests from keystrokes, the function
menu or remote controls occur, these are considered by the system.
Case 107=0 dynamic setpoint
• 145 - AtdS Set dynamic amb Tp
• 146 - dAtdS AtdS differential
SetPoint
145 -AtdS
Offset
Case 107=1 fixed setpoint
• If the activation request is determined by a time band, the correction is
added to the setpoint (fixed offset):
• 136 - dSPo1 offset 1 for dyn set (24h /Mon-Fri / Mon-Sat)
• 137 - dSPo2 Offset 2 for dyn set (Sat-Sun / Sun) depending on the
time band mode setting.
• In all other cases the setpoint is added to 136 - dSPo1.
If 146-dAtdS=0 the correction is equal to 136-dSP01 (137 - dSP02) for
ambient temperature values < SET, for higher values there is no correction.
136 - dSPo1
(137 - dSPo2)
0
ambient
temperature
temperatura
ambiente
146 - dAtdS > 0
ECONOMY FUNCTION • DISCHARGE SET POINT
The Economy function manages the control of the regulation SetPoint
The function allows obtaining control on the discharge regulation SetPoint
depending on the external ambient temperature (for instance the
temperature of the condenser).
The activation request may come from:
• scheduled time band;
• dedicated digital input for the function in question;
• key;
• functions menu;
• remote (supervision system or web);
• Energy Saving function;
Condensation dynamic setpoint
349-LdSP
CR
B
External ambient temperature on condenser
The Set can be fixed or variable (function of a differential) defined by:
• 314 - dSd Mode Set Dyn. Del.=0 indicates that the discharge SetPoint will
be dynamic, that is a function of a differential.
• 314 - dSd Mode Set Dyn. Del. =1 indicates that the discharge SetPoint
will be fixed
Case 314=0 dynamic setpoint
The function can be enabled only if the external temperature is < 348dSMEt Max Ext Temp Set dyn.
The condensation setpoint is derived by summing the external temperature
to the CR factor (see drawing), where:
CR=346-dSdo * power % delivered by the system/100.
Notes:
• The CR factor is limited below by 347-dSLdo.
• The effective value of the fluctuating setpoint is limited below by 349LdSP (areas A and B)
To prevent fluid returns to the condenser, prevent the gas subcooling.
Subcooling UCtemp (see diagram) is calculated by using the subtemperature probe value, positioned upstream of the liquid receiver, and
that of the discharge probe:
A
Time
Correction to condensation setpoint due to undercooling
351-SCt2
350-SCt1
354-SCd2
355-SCoF2
UCtemp
0
353-SCoF1
352-SCd1
32
EWCM9900
ECONOMY FUNCTION • DISCHARGE SET POINT
• If the control is by temperature:
UCtemp = discharge gas temperature - subcooling probe
• If the control is by pressure:
UCtemp = value converted to temperature (discharge gas pressure) subcooling probe
In accordance with the second diagram, a further correction is applied to
the fluctuating setpoint (summed to the actual setpoint).
Note:
• 350-SCt1 and 351-SCt2 represent the two minimum and maximum
subcooling values.
• If 350-SCt1<UCtemp<351-SCt2 there will be no correction
• For external values:
- the correction is proportional with divergences < to 352-SCd1 or 354-SCd2.
- the correction is fixed for divergences greater than or equal to 353-SCoF1 or
355-SCoF2
No correction is made to the setpoint if:
• the external temperature probe on the condenser is in error or not
configured;
• the discharge probe is in error or not configured;
• the subcooling probe is in error or not configured;
• the temperature measured by he subcooling probe > external
temperature probe on condenser + 356-EtPr Tp Ext protection if 356-EtPr
not equal to 0;
Case 314=1 fixed setpoint
from the setpoint is subtracted 339 - dSFo.
• If the request originates from a digital input, the Energy Saving function
will be activated/de-activated by changing the status of the digital input
(active with contact open).
• If the request originates from the Energy Saving function, the economy
will be activated/de-activated by changing the status of the Energy Saving
function. It will be activated if the Energy saving function requires it, and
de-activated otherwise.
• Keystroke, Functions menu and remote requests toggle (activate/deactivate) the funtion.
LIQUID RETURN CONTROL
compressors OFF
Control active after delay 565-odo and if not active, the configuration mode
(QuickStart Menu: enable=No).
The liquid return relay control is determined by 584 - H201 Relay OUT1, ...,
596 - H213 Relay OUT13 if at least one of these = 6.
Activation with delay in relation to turning off the compressors defined by:
• 559 - LrCd Liq Ret Ctrl Delay
The ON/OFF times are defined by:
• 560 - Lron d.c. ON time. Liq Ret
• 560 - LroF d.c. OFF time. Liq Ret
If at least one of the compressors on which the function is active turns on,
the control deactivates.
560 - LrOn
ON
OFF
Time
561 - LrOF
559 - LrCd
• If 560-Lron = 0 and 561-LroF = 0 the output is always deactivated
• If 560-Lron = 0 and 561-LroF is not equal to 0 the output is always
deactivated
• If 560-Lron is not equal to 0 and 561-LroF = 0 the output is always active
HEAT RECOVERY
The heat recovery control is determined by parameters
627 - H405... 630 - H408 if at least one of these = 7 (recovery water
temperature).
The function can be enabled only in the Time Bands menu and is defined by
• 557 - Hrto Max Tp OUT Recovery
• 558 - Hrdt Delta Tp Recovery
The discharge Economy function will be deactivated if the recovery water
temperature is less than 557 - Hrto.
The Discharge Economy function returns to active in the current time band
if the recovery water temperature is greater than 557+558.
recovery
557 - Hrto
ON
Eco Cond. ON
OFF
558 - Hrdt
The function will not be active in case of recovery probe failure.
Eco Cond.
OFF
Recovery
water temperature
the function is disabled when the discharge economy function is modified.
AUXILIARY CONTROL (AUX)
Controls directly up to digital auxiliary outputs.
The AUX activation request may come from:
• scheduled time band;
• dedicated digital input for the function in question;
• key;
• functions menu;
• remote (supervision system or web);
If the request originates from a digital input, the AUX output will be
activated/de-activated by changing the status of the digital input (active
with contact open).
Keystroke, Functions menu and remote requests toggle (activate/deactivate) the function.
• If time band control is already active, the status specified for the current
time band is forced when the time band itself starts.
• if other requests occur during the time band they are always considered.
Auxiliary control is active immediately after the device is switched on (no
delay 565-odo).
33
EWCM9900
HOT GAS DEFROST
Control active after delay 565-odo.
When a hot gas defrost is required for a refrigerated counter (or set of
counters) on a single circuit, the controller must have at least one
compressor on the circuit in question which remains active during
defrosting to ensure a supply of gas.
On activation of the digital input configured as ‘Hot Gas Defrosting
Request’ for a circuit, the compressors on the circuit are controlled so as
to deliver a power equal, or as close as possible in excess, to the minimum
power given by 109-PoPr.
If the system is already delivering a power greater than 109-PoPr, the
situation remains unchanged.
In particular, for systems with UNEQUAL STEPS the system will attempt to
guarantee a power as close as possible in excess relative to that requested,
in line with the available resources at the time of the decision.
SERVICE MENU
The Service Menu is dedicated to personnel cleared for maintenance of the
device.
Access to the Service Menu requires a password.
Access Password
When you attempt to access the Service Menu, the text ‘PASSWORD’
displays: press ‘OK’ and set the password with the ‘UP’ and ‘DOWN’ keys. If
the password is correct, pressing ‘OK’ opens the parameters menu.
The password ‘637 - PSW4 Password 4’ is composed of 5 alphanumeric
characters.
The default password is ‘*****’.
Note: The default password ‘*****’ immediately accesses the Service Menu,
so that it is not necessary to enter it.
The Service Menu folders are shown here; Select the folder you require with
the UP and DOWN keys and press OK to enter.
Recordings Menu
Menu composed of 2 folders:
• Upload to Copy Card: allows ‘uploading’ the operating log to Copy Card see Copy Card chapter.
• Reset recordings: cancels (resets) all the recordings - log of the
recordings of operation. Confirmation for deletion will be requested
(Confirm Del.). Confirm with the OK / RH (right) key; To quit press the LH
(left) key.
Loads Status Menu
Menu composed of 2 folders:
• Compressors
• Fans
Menu that allows displaying the state of the compressors / fans and to
delete (Res) the hours of operation. Move onto the selected utility with the
UP and DOWN keys and confirm resetting with the OK / RH (right) key.
For example:
Compressors
Comp1 Res
0 hour
Fans
VInv Res
0 hour
In the Compressors Menu it will besides be possible to select/deselect each
single compressor:
Compressors
...
Comp1 Sel
YES
Comp2 Sel
NO
...
Reset alarm history
Menu to clear (reset) the alarm log. Confirmation for deletion will be
requested (Confirm Del.). Confirm with the OK / RH (right) key; To quit
press the LH (left) key.
Copy Card Menu
See Copy Card chapter
IO Test menu
Menu that allows manual management (test) of the present outputs: the
Menu is composed of 3 folders
• Manual Mode
To test the outputs it is necessary to enable manual mode:
Access the menu by pressing OK, press the RH key and press UP to change
from No to Yes. Exit the Menu with the LH (left) key. The display will show:
Manual YES
At this stage, access the folders:
• Outx Test
From this folder it will be possible to set (Set) in a similar way to what was
described above the digital outputs from No to Yes.
Example (On corresponds to the setting Yes, Off to the setting No):
Out1
On
Out2
On
Out3
Off
• Vx/Ix Test
Similarly to what was described above, the analogue outputs will be
activated in a percentage:
with the OK key, use the RH (right) key and with the UP/DOWN keys to
increase or decrease the percentage of the analog output.
Exit the Menu with the LH (left) key.
Example:
V1/I1
0%
V2/I2
100%
IO State menu
Menu which displays the inputs/outputs:
• SIGx/PBx - displays the values read by the analogue inputs (see Probes
menu)
• Vx/Ix - displays the values read by the analogue outputs (see IO Test
menu)
• DIx/DIHx - displays the values read by the digital inputs (which may be
On or Off). Example:
DIH1
Off
...
DIH14 Off
DI1
On
...
• Outx - displays the values read by the digital outputs (which may be On
or Off)- see IO Test menu.
34
EWCM9900
MENU PARAMETRI
MENU
Diagnostics
Service
Clock and bands
PARAMETERS
Operating
Configuration
Administrator
01/02
MENU
Functions
Parameters
02/02
01/01
ADMINISTRATOR • CONFIGURATION • OPERATIVE PARAMETERS
Parameters menu
The parameters menu is accessed from the main display as indicated in the
figure and described in the Keys and Components section.
If a password has been enabled, you will first be presented with the label
‘PASSWORD’.
Enabling the programming and access password
When you attempt to access the parameters menu, the label ‘PASSWORD’
displays: press ‘OK’ and set the password with the ‘UP’ and ‘DOWN’ keys. If
the password is correct, pressing ‘OK’ opens the parameters menu.
The password is composed of 5 alphanumeric characters.
The default password is ‘*****’.
Note: the password ‘*****’ provides immediate access to the parameters
Menu (that is without requesting the password).
Access and structure of the parameters
Select the desired folder (if the folder is Quick Start see the Quick Start
Parameters Description chapter) with the ‘UP’ and ‘DOWN’ keys and press
‘OK’ to display the parameters.
After entering the selected folder (example Compressors folder) the display
will show in the heading the name of the folder in lowercase followed by two
numbers that identify the number of the parameter / total number of the
parameters of the folder (example 002/047 indicates the second parameter
of 47 parameters in the Compressors folder).
The acronym of the parameter will follow preceded by a univocal number
that identifies the parameter (example 552 - PoLI, the second in the list)
Display and modification of parameters
Scroll through the parameters with the UP and DOWN keys; To modify a
value press OK; to modify the value use the UP and DOWN keys; to confirm
the change press OK again. To exit without saving, press LH.
Reduced parameters menu
Access to the ‘reduced’ parameters Menu takes place via the Main Display
by pressing and holding down the function key F2.
Only a few parameters are visible (that is a ‘reduced’ set of parameters) of
the Parameters Menu:
• Operating
• Configuration
If a password has been enabled, you will first be presented with the label
‘PASSWORD’.
In the description of the parameters, the reduced parameter set is shown
in bold.
Access the Administrator Parameters Menu from the Main Display as
follows (example with Password disabled - see the successive paragraph for
password management):
• Press and hold the OK function key
• accesses the Navigation Menu (MENU): scroll DOWN through the various
folders until you reach the Parameters folder: select the folder with the
OK key.
• you access the Parameters Menu (PARAMETERS): Scroll with the DOWN
key through the various folders and select the ‘Administrator’ folder with
the OK key.
The sequence to access the Operational and Configuration Parameters is
entirely analogous.
The parameters are managed in ‘folders’ that group a substantial set of
programming parameters.
Administrator Parameters
This menu contains all the parameters folders:
• Quick Start
The Quick Start parameters are described in a separate chapter
• all the other folders (Compressors, Fans, etc)
• Operating passwords
• Config. password.
• Amministr. Password.
All parameters in the folder are described in the Administrator Parameters
section and the Parameters Table
There will besides be the possibility of accessing and changing the 3
Passwords indicated making it possible to protect the system from
unwanted access.
Configuration Parameters
In this Menu there are the folders and the related parameters:
• Quick Start
• Configuration
• Resource allocation
• Files Setup
• Config. password.
There will besides be the possibility of accessing and modifying only the
Configuration Password.
Operational parameters
In this Menu there are the folders and the related parameters:
• Compressors
• Fans
• Safety measures
• Display
• Functions
• Operating passwords
There will besides be the possibility of accessing and modifying only the
Operating Password.
Note that the Administrator Menu is composed of the Configuration Menu
+ Operational Menu + Administrator Password
Note that the Operational Menu does not allow you to enable the
QuickStart.
35
EWCM9900
ADMINISTRATOR PARAMETERS DESCRIPTION
COMPRESSOR PARAMETERS
• 551 - Central Stty Set
Enables suction/delivery control with central
(Yes)/ lateral (No) set
• 552 - PoLI Activation Policy
Used to enable the fixed sequence or rotation
according to the hours of operation in activating
the compressors (including the compressor set
as ‘Master’ - see 120 - nCPC).
0 = fixed sequence;
Policy of distribution of resources starting from
the compressors with a smaller index that is the
principle must prevail of activating the first
compressor in the sequence - turning on the
steps of the first compressor (if applicable) activating the second compressor, etc.
1 = rotation of compressors;
Policy of distribution of resources starting from
the compressors with a smaller index that is the
principle must prevail of activating the first
compressor in the sequence - turning on the
steps of the first compressor (if applicable) activating the second compressor (in terms of
operation), etc.
The aim is to balance the hours of operation
between the various resources.
2 = saturation 1;
Policy of distribution of resources over the
smallest possible number of compressors that is
the principle must prevail of having the greatest
number of compressors off.
3 = saturation 2 (also called saturation
algorithm);
When turning on steps in a segmented
compressor system, the principle must prevail of
completely saturating a compressor before
switching on another one.
When turning off a step in systems of the same
type, the logic is modified because before
switching off the last step to be turned on of a
compressor it is wise to switch off a step of
another compressor, to avoid requests for
switching the same compressor back on.
• 553 - SEr COMP time limit
Limit on using compressors. In hours.
• 101 - CCFn COMP control type
Selection of type of compressor control:
0=Proportional; 1=Dead band; 2= PID
Note: The following parameters 102-ItEn...106-dt
are significant when 101 - CCFn =2 (PID).
• 102 - ItEn Full control
Use of the full component of PID setting (0=No;
1 = Yes)
• 103 - It Full time
Time in seconds of the full component of PID
setting
• 104 - PbEn Proportional control
Use of the proportional component of PID
setting (0=No; 1 = Yes)
• 105 - dtEn Derivative control
Use of the derivative component of PID setting
(0=No; 1 = Yes)
• 106 - dt Derivative time
Time in seconds of the derivative component of
PID setting
• 107 - dSS St Din. mode. Suc.
Selection of dynamic setpoint
0= dynamic set; 1= fixed set
See Economy Function section
• 108 - CPP Enable ERR-control
Enable power to activate with faulty suction
probe. 0 = No; 1 = Yes
• 109 - PoPr ERR power value
Power to activate with faulty suction probe. In
percentage.
• 111 - PEn High alarm. LPr times
Number of errors of the suction pressure switch
which must occur in the time 112-PEI for the
alarm to change from automatic to manual
If = 0 the alarm is always automatic.
• 112 - PEn interval
Time interval for the calculation of the number
of errors of the suction pressure switch 111-PEn.
• 113 - byPS HPr-LPr bypass time
Suction pressure switch high/low pressure trip
bypass time.
• 114 - InLSP minimum speed
Minimum speed (%) INVERTER
• 115 - InMSP top speed
Maximum speed (%) INVERTER at end of ramp
• 116 - InSSP saturation speed
Maximum speed (%) INVERTER
• 117 - CoIE Enable INV cut-off
Enable cutoff INVERTER. 0 = No; 1 = Yes.
If = 0 the cutoff hysteresis is ignored (parameter
142 - Cod1 not significant)
• 118 - PtSE Part. sequence.
Defines the activation / deactivation sequence of
the relays associated with compressor
segmentation:
0 = increasing sequence;
1= single segmentation;
2 = decreasing sequence.
See section on Compressor Management
• 120 - nCPC Selection COMP Master Selects
the Master compressor: this compressor will
always be the first one to be turned on and the
last one to be released according to the
activation policy (see 552 - PoLI).
The number identifies the compressor that will
act as Master. Range 0...[number of compressors
defined by parameter 523 - CPnU Num. Compr.
Circuit 1];
0 = function disabled.
Compressor Protection
• 121 - oFon COMP OFF - ON time
Minimum time, in minutes, between turning the
same compressor off and back on again.
• 122 - donF COMP ON-OFF time
Minimum time of compressor operation before a
new release.
The ‘called’ compressor stays on at least for the
time set by this parameter.
• 123 - onon COMP ON-ON time
Minimum time, in minutes, between turning the
same compressor on and on again.
• 124 - don ON steps time
Delay time, in seconds, between the calls of two
different steps.
• 125 - doF OFF steps time
Delay time, in seconds, between releasing two
different steps.
• 126 - FdLy Enable dON 1’ Ins.
Enables operation of the delay for parameter
124 - don even for the first step request after an
equilibrium condition.
0 = No; 1 = Yes.
• 127 - FdLF Enables dOF 1’ Ins.
Enables operation of the delay for parameter
125 - doF even for the first step off request
after an equilibrium condition.
0 = No; 1 = Yes.
• 128 - InPC % var. INVERTER
INVERTER power percentage
increment/decrement step
• 129 - Inot INV max. time a 0%
INVERTER maximum operating time at minimum
power
• 130 - InLt INV time at min speed.
Time between INVERTER reduction to minimum
and activation of a new power step
• 145 - AtdS Set dynamic amb Tp
Fluctuating control of the suction setpoint according to the ambient temperature - used to
calculate the suction setpoint correction (133 SEt).
• 146 - dAtdS AtdS differential
Suction dynamic Set differential.
See above.
Note: the parameters 145 - AtdS and 146 dAtdS are significant if 107 - dSS = 0
• 131 - LSE Minimum setpoint
• 132 - HSE Maximum setpoint
Minimum / maximum limit on programming the
suction set
• 133 - SEt Suction setpoint
• 134 - Pbd proportional band
Proportional suction band.
Parameter has significance if 101 - CCFn = 0.1
- Case 101 - CCFn = 0: within the band the
control is proportional, actuating or removing a
resource (only EVEN STEPS or EVEN STEPS +
INVERTER) according to the power request.
- Case 101 - CCFn = 1: outside the band the
adjustment takes place by turning a resource on
or off according to the required power.
• 135 - PbdE Extended proportional band
Extended proportional suction band
Parameter significant if 101 - CCFn = 1
(dead band)
Note: typically set to 135 - PbdE > 134 - Pbd.
• 136 - dSPo1 offset 1 for din set
Correction applied to suction setpoint (133 - SEt)
if 146 - dAtdS =0 and the ambient temperature
is < 145 - AtdS
• 137 - dSPo2 offset 2 for din set
Correction applied to suction setpoint (133 - SEt)
during weekends if 983- Tbtyp =1.2 (se Time
Bands chapter)
The parameters 136 - dSPo1, 137 - dSPo are
significant if 107 - dSS = 0.
See Economy Function section
• 138 - dLAL Delta LAL
• 139 - LAL Minimum alarm.
Value of pressure that subtracted from the Set
determines the minimum alarm limit.
• 140 - dHAL Delta HAL
• 141 - HAL Maximum alarm
Value of pressure that added to the Set
determines the maximum alarm limit.
• 142 - Cod1 cut-off delta 1
Cutoff hysteresis INVERTER - temperature value
to be added to 133 - SEt. If the value exceeds
this sum the control passes from ON/OFF to
continuous after the time set by 143 - Cod2.
• 143 - Cod2 cut-off delta 2
Cutoff differential INVERTER - temperature
value relative to 142 - Cod1 at which modulating
conrol starts.
The speed (%) is defined by the parameter 114 InLSP
• 144 - InLPt INV min pot limit
36
EWCM9900
COMPRESSOR PARAMETERS [2]
Folder with only the Quick Start 501 - tyPE = 1
parameter displayed (plant with single delivery
shared drain compressors).
The parameters displayed in the folder are*:
• 201 - CCFn COMP control type
...
• 230 - InLt INV time at min speed.
• 245 - AtdS Set dynamic amb Tp
• 246 - AtdS differential
• 231 - LSE Minimum setpoint
...
• 244 - InLPt INV min pot limit
*Their meaning is analogous to those in the
Compressor Menu (see for ref.).
The correspondence between the Compressors
and Compressors [2] parameters is as follows:
1xx -> 2xx
Example: 133 - SEt suction set point
corresponds to 233 - SEt suction set point
FAN PARAMETERS
• 301 - FcFn FAN control type
Selects the type of fan control:
0=Proportional; 1=Dead band; 2= PID
• 302 - FACt Activation mode
If = 0 the fans run independently of the
compressors.
If = 1 at least one compressor must be on.
• 303 - CoIE Enable INV cut-off
Cutoff enable (0=No; 1=Yes)
• 304 - ItEn Full control
Use of full component PID (0=No; 1=Yes)
• 305 - It Full time
Time in seconds of the full component of PID
setting
• 306 - PbEn Proportional control
Use of proportional component PID (0=No;
1=Yes)
• 307 - dtEn Derivative control
Use of derivative component PID (0=No; 1=Yes)
• 308 - dt Derivative time
Time in seconds of the proportional / derivative
component of PID setting
• 309 - InLSP minimum speed
Value (%) of minimum fan speed.
• 310 - InMSP top speed
Value (%) of maximum fan speed.
• 311 - InSSP saturation speed
Value (%) of saturation fan speed.
• 312 - FPP Enable ERR-control
Enablement of condenser power default value
for delivery probe error (0=No; 1=Yes)
• 313 - FPr ERR power value
Condenser power default value for delivry probe
error. In percentage.
• 314 - dSd St Din. mode. Suc.
Selection of dynamic setpoint
0= dynamic set; 1= fixed set
• 315 - PEn High alarm. LPr times
Number of delivery pressure switch errors which
must occur within the interval defined by
parameter 316 - PEI in order to trigger the
alarm.
0 = function off.
• 316 - PEn interval
Time interval for the calculation of the number
of errors of the delivery pressure switch 315PEn.
• 317 - byPS HPr-LPr bypass time
Delivery pressure switch high/low pressure trip
bypass time. In minutes.
• 318 - HPPE Enable prev. HP
Activation of general delivery alarm prevention.
(0=No; 1 = Yes)
• 319 - HPPP Red. Pow. prev. HP
Case INVERTER. Continuous reduction of power
in the proportional band 342 - HPPd equal to
the value of this power parameter activated in
W1 (see chapter on Alarms, General delivery
alarm prevention)
• 320 - HPPd Max duration prev. HP
General delivery alarm maximum duration.
(0=disabled, time-out output). In minutes.
• 321 - HPPI Interval prev. HP
Minimum interval between two successive
delivery preventions. In hours.
• 322 - rot Activation policy
Parameter defines the rotation of fans during
calls and releases to obtain the same number of
hours of operation.
0 = fixed sequence; 1 = rotation.
• 323 - CIt pick-up time
Time for which the fans run at 100% when the
fan battery is switched on.
• 324 - don ON steps time
Delay time, in seconds, between the calls of two
different steps.
• 325 - doF OFF steps time
Delay time, in seconds, between releasing two
different steps.
• 326 - FStt max OFF time.
Maximum time fans are off. In hours.
• 327 - SEr FAN time limit
Maximum time fans are on. In hours.
• 328 - Inot INV max. time a 0%
Maximum time fans INVERTER run at minimum.
In percentage.
• 329 - InPC % var. INVERTER
INVERTER increment/decrement step
• 330 - InoS Activ. Mode INV 0%
INVERTER minimum activation mode
• 346 - dSdo Dyn Offset. Dyn Set
Floating point condensation dynamic set offset.
• 347 - dSLdo Min. Dyn. Offset Dyn Set
Minimum floating point condensation dynamic
set offset.
• 348 - dSMEt Max. Ext Temp Set dyn
Maximum external temperature for enablement
of floating point condensation dynamic set.
• 349 - LdSP Min. Dynamic Set
Minimum floating point condensation dynamic
set.
• 350 - SCt1 Min Subcooling
Minimum subcooling for condensation dynamic
set.
• 351 - SCt2 Max Subcooling
Maximum subcooling for condensation dynamic
set.
• 352 - SCd1 Delta1 subcooling
Lower proportional correction for condensation
dynamic set due to subcooling.
• 353 - SCoF1 Offset1 subcooling
Lower fixed correction for condensation dynamic
set due to subcooling.
• 354 - SCd2 Delta2 subcooling
Higher proportional correction for condensation
dynamic set due to subcooling.
• 355 - SCoF2 Offset2 subcooling
Higher fixed correction for condensation
dynamic set due to subcooling.
• 356 - EtPr TP Ext safety
Minimum value for subtemperature probe to be
added to the external temperature for
condensation dynamic set enablement
• 331 - LSE Minimum setpoint
• 332 - HSE Maximum setpoint
Minimum / maximum limit on programming the
delivery set
• 333 - SEt delivery setpoint
• 334 - Pbd proportional band
Proportional delivery band
• 335 - Cod1 cut-off delta 1
Fan cutoff hysteresis
• 336 - Cod2 cut-off delta 2
Fan cutoff differential
• 337 - dHAL Delta HAL
Maximum alarm threshold differential
• 338 - HAL Maximum alarm
Value of pressure that added to the Set
determines the maximum alarm limit.
• 343 - dLAL Delta LAL
Minimum alarm threshold differential
• 344 - LAL Minimum alarm.
Value of pressure that subtracted from the Set
determines the minimum alarm limit.
• 345 - InLPt INV min pot limit
SAFETY PARAMETERS
• 565 - odo Output Delay Pw-On.
Duration, in seconds, for cutting off the
compressor outputs from switching on the
instrument.
• 566 - PAO Al cut-off. power-on.
Alarm exclusion at power-on. Pressure alarm
exclusion time from powering on the instrument,
in minutes.
• 567 - tAo HP-LP bypass time
Delay for signaling the minimum or maximum
alarm, in minutes.
• 568 - Aro Ack duration. Alarms
Alarm acknowledgment time.
• 569 - PrSAE HPr/LPr Suct.
AlarmSuction pressure switch alarm activation
for low/high pressure.
0=Disables alarm handling;
1=Enables alarm notification only;
2=Enables notification and control actions;
3=Enables notification, control actions and
activates a dedicated relay for the blocking
alarm;
• 570 - PSAE HP/LP Suct.
Suction probe max/min alarm control Analogous
to 569 - PrSAE
• 571 - gtSAE Gas Level Alarm
Refrigerant level alarm control. Analogous to 569
- PrSAE
• 572 - gLSAE Gas leak alarm
Refrigerant leak alarm control. Analogous to 569
- PrSAE
• 573 - PrdAE HPr/LPr Man Alarm
Delivery pressure switch alarm activation for
low/high pressure. Analogous to 569 - PrSAE
• 574 - PdAE HP/LP Man Alarm
Delivery probe max/min alarm control
Analogous to 569 - PrSAE
• 575 - FtAE fans thermal alarm. Fans thermal
alarm control. Analogous to 569 - PrSAE
• 576 - FInAE Fan Inv Prot Alarm
Probe max/min alarm control Analogous to 569 PrSAE
• 577 - SFAE Fan Maint. Alarm
Fan/fan inverter maintenance alarm control
Analogous to 569 - PrSAE
• 578 - CSAE Block comp. alarm
Compressor block alarm control Analogous to
569 - PrSAE
• 579 - CInAE Comp Inv Prot Alarm
Compressor inverter error alarm
37
EWCM9900
management. Analogous to 569 - PrSAE
• 580 - SCAE Comp Maint Alarm
Compressor maintenance alarm management.
Analogous to 569 - PrSAE
• 581 - oLAE Oil Level Alarm
Lubricant oil level alarm management. Analogous
to 569 - PrSAE
• 582 - gAAE General alarm
Generic alarm management. Analogous to 569 PrSAE
• 583 - rtCAAE RTC Alarm
Real Time Clock alarm control (clock)
Analogous to 569 - PrSAE
• 701 - HPPAE Saf.Meas.Timeout Alarm.
Delivery maximum alarm safety timeout Alarm
Management
0=Disables alarm handling;
1=Enables alarm notification only;
CONFIGURATION PARAMETERS
• 639 - tAb TAB
Configuration index for default parameters;
cannot be modified by the User.
• 640 - rtCE RTC Enabling
Yes = RTC enabled; No = RTC disabled.
If = No the Time Bands Menu is not significant
Freon Type
• 641 FtyP Type of Gas
Type of freon used in the system.
The selection of the type of freon is necessary
for correct system operation.
Value
0
1
2
3
4
5
6
7
8
9
10
11
12...15
Description
R22
R134a
R502
R404 A
R407 C
R 507
R717
R410A
R417a
R744
R-402A
R-402B
not used
default
Analog inputs type
• 646 - Sig12 Probe Type SIG1/2
Configurable in pairs 0-10V / 0-5V / 4-20mA
• 648 - Pb12 Probe Type PB1/2
• 649 - Pb34 Probe Type PB3/4
Configurable in pairs NTC / PTC / Digital input:
3 = D.I. Digital Input
4 = NTC103AT
5 = PTC KTY81
6 = NTC NK103C1R1
Pressure transducers resolution
• 650 - HSig1 SIG1 High Precision
• 651 - HSig2 SIG2 High Precision
The default is in hundredths of a bar / tenths of
PSI or high precision.
Analogue outputs type
• 652 - AoS1 Selection V1 or I1
• 653 - AoS2 Selection V2 or I2
Selectable as voltage (V) or current (I)
Analog inputs calibration
• 655 - CALSIg1 Calibration SIG1 bar
• 655 - CALSIg1 Calibration SIG1 PSI
• 656 - CALSIg2 Calibration SIG2 bar
• 656 - CALSIg2 Calibration SIG2 PSI
• 659 - CALPb1 Calibration PB1 °C
• 659 - CALPb1 Calibration PB1 °F
...
• 662 - CALPb4 Calibration PB4 °C
• 662 - CALPb4 Calibration PB4 °F
Calibrations are always indicated in double units
of measurement.
Setting full scale values
• 663 - LtSIg1 Lower limit SIG1 bar
• 663 - LtSIg1 Lower limit SIG1 PSI
• 664 - UtSIg1 Upper limit SIG1 bar
• 664 - UtSIg1 Upper limit SIG1 PSI
• 665 - LtSIg2 Lower limit SIG2 bar
• 665 - LtSIg2 Lower limit SIG2 PSI
• 666 - UtSIg2 Upper limit SIG2 bar
• 666 - UtSIg2 Upper limit SIG2 PSI
Fullscale values (upper and lower limits) of the
SIG1/2 analogue inputs settable as bar/PSI
DISPLAY PARAMETERS • 541 - LAng Language
selection
0 = local language (ITA, GER, SPA, FRE according
to the product code)
1= English
Note: Check product code and availability of
languages with Sales department.
• 542 - tout Time out menu.
Time after which the system quits the current
menu and returns to the previous one.
In seconds. Default 300 sec.
• 543 - rELP Relative pressure
Selects display in absolute or relative pressure.
0 = absolute; 1 = relative.
• 544 - AbS Relative alarms
Defines if the alarms are to be considered in a
relative way (Yes) or absolute way (No)
• 547 - UMCP UM Suction
• 548 - UMCP UM delivery
Measurement Unit suction / delivery section
0=°C; 1=°F; 2= bar; 3= PSI
If the setting is in temperature and the suction
input is a transducer the read value will
automatically be converted into pressure
according to the refrigerant (641 - FtyP).
The unit of measure shown on the display may
differ from the control unit. The display depends
on the LH (suction) and RH (delivery) buttons.
• 549 - LoCK Keypad lock
Locks the keyboard disabling the following
functions: modifies parameters, modifies the
Sets, resets the hours of work of the various
compressors and maintenance; the parameter
579 - LoCK in any case can be modified.
Value
Description
0
1
2
3
4
5
6
7
8
9
10
11
12
no key
F1 single press
F2 single press
F3 single press
LH single press
RH single press
OK single press
F1 press and hold
F2 press and hold
F3 press and hold
LH press and hold
RH press and hold
OK press and hold
• 550 - HKUnL Unlock Keypad Hotkey.
It defines the function key for unlocking the
keyboard: pressing the set function key accesses
the ‘reduced Menu’ to unlock the keyboard.
FUNCTION PARAMETERS
• 554 - drEn Record Data
Enable data logging
• 555 - HIEn Record history
Enable alarm history
ENERGY SAVING
• 556 - ESFn Energy Saving Type
Energy Saving activation mode.
See Functions / Energy Saving chapter
Economy
Discharge
556 - ESFn
Economy
Suction C1
Economy
Suction C2
0
disabled
disabled
disabled
1
//
//
a
2
//
3
//
a
a
a
4
a
a
a
a
5
6
7
//
//
//
//
a
a
a
a
a
Economy function active
//
no changes
//
Heat Recovery
• 557 - Hrto Max Tp OUT Recovery
SetPoint Maximum outlet water temperature for
heat recovery
• 558 - Hrdt Delta Tp Recovery
Outlet water delta (differential) temperature in
heat recovery
Liquid Return Test
Significant parameters for compressors of the
same circuit switched off.
• 559 - LrCd Liq Ret Ctrl Delay
Liquid return control activation delay
• 560 - Lron d.c. ON time. Liq Ret
• 561 - LroF d.c. OFF time. Liq Ret
Duty cycle liquid return control ON/OFF time
ADDRESSING PARAMETERS • 671 - FAA
Family address
Selects the family in the TelevisSystem network.
• 672 - dEA Device Address
Selects the address in the TelevisSystem
network.
• 673 - PtStLV Protocol selection
Selects the Micronet (Televis) or Modbus RTU
comms protocol.
If selecting the Modbus RTU protocol it is wise
38
EWCM9900
to configure the parameters:
• 674 - bdrttLV Baud rate
Values that can be set: 9600 /19200 / 38400 b/s
• 675 - PtytLV Parity Bit
If selecting the Televis protocol, parameters 674675 are not significant.
RESOURCE ALLOCATION PARAMETERS
Relay outputs
Note: OUT1,8 SPDT; OUT2...7, OUT9...13 SPST)
• 584 - H201 Relay OUT1
• 585 - H202 Relay OUT2
...
• 596 - H213 Relay OUT13
Configuration of outputs on relays
OUT1...OUT13: positive values indicate direct
polarity, negative indicate reverse polarity.
0= Disabled
±1=Digital output AUX1
±2=Digital output AUX2
±3=Digital output AUX3
±4=Digital output AUX4
±5=Digital output central gas expulsion (gas
leak)
±6=Liquid return control digital output C1
±7=Liquid return control digital output C2
±8=Safety relay digital output
±9=Cumulative alarm digital output
±10=Power-on digital fan 1
±11=Power-on digital fan 2
±12=Power-on digital fan 3
±11=Power-on digital fan 4
±12=Power-on digital fan 5
±15=Power-on digital fan 6
±16=Power-on digital fan 7
±17=Power-on digital fan 8
±18=Enable INVERTER fan
±19=Power-on compressor 1
±20=Power-on compressor 2
±21=Power-on compressor 3
±22=Power-on compressor 4
±23=Power-on compressor 5
±24=Power-on compressor 6
±25=Power-on compressor 7
±26=Power-on compressor 8
±27=Power-on compressor 9
±28=Power-on compressor 10
±29=Power-on compressor 11
±30=Power-on compressor 12
±31=Enable INVERTER compressor C1
±32=Enable INVERTER compressor C2
±33=Segmentation 1 compressor 1
±34=Segmentation 2 compressor 1
±35=Segmentation 3 compressor 1
±36=Segmentation 4 compressor 1
±37=Segmentation 5 compressor 1
±38=Segmentation 1 compressor 2
±39=Segmentation 2 compressor 2
±40=Segmentation 3 compressor 2
±41=Segmentation 4 compressor 2
±42=Segmentation 5 compressor 2
±43=Segmentation 1 compressor 3
±44=Segmentation 2 compressor 3
±45=Segmentation 3 compressor 3
±46=Segmentation 4 compressor 3
±47=Segmentation 5 compressor 3
±48=Segmentation 1 compressor 4
±49=Segmentation 2 compressor 4
±50=Segmentation 3 compressor 4
±51=Segmentation 4 compressor 4
±52=Segmentation 5 compressor 4
±53=Segmentation 1 compressor 5
±54=Segmentation 2 compressor 5
±55=Segmentation 3 compressor 5
±56=Segmentation 4 compressor 5
±57=Segmentation 5 compressor 5
±58=Segmentation 1 compressor 6
±59=Segmentation 2 compressor 6
±60=Segmentation 3 compressor 6
±61=Segmentation 4 compressor 6
±62=Segmentation 5 compressor 6
±63=Segmentation 1 compressor 7
±64=Segmentation 2 compressor 7
±65=Segmentation 3 compressor 7
±66=Segmentation 4 compressor 7
±67=Segmentation 5 compressor 7
±68=Segmentation 1 compressor 8
±69=Segmentation 2 compressor 8
±70=Segmentation 3 compressor 8
±71=Segmentation 4 compressor 8
±72=Segmentation 5 compressor 8
±73=Segmentation 1 compressor 9
±74=Segmentation 2 compressor 9
±75=Segmentation 3 compressor 9
±76=Segmentation 4 compressor 9
±77=Segmentation 5 compressor 9
±78=Segmentation 1 compressor 10
±79=Segmentation 2 compressor 10
±80=Segmentation 3 compressor 10
±81=Segmentation 4 compressor 10
±82=Segmentation 5 compressor 10
±83=Segmentation 1 compressor 11
±84=Segmentation 2 compressor 11
±85=Segmentation 3 compressor 11
±86=Segmentation 4 compressor 11
±87=Segmentation 5 compressor 11
±88=Segmentation 1 compressor 12
±89=Segmentation 2 compressor 12
±90=Segmentation 3 compressor 12
±91=Segmentation 4 compressor 12
±92=Segmentation 5 compressor 12
±93=Blocking alarm digital output
Digital Inputs
- High voltage
• 603 - H101 IN Digital HV DIH1
...
• 612 - H114 IN Digital HV DIH10 - Voltage
free
• 617 - H301 IN Digital LV DI1
...
• 620 - H304 IN Digital LV DI4 Configuration of
digital inputs on high voltage DIH1...DIH10 and
low voltage DI1...DI4: positive values indicate
direct polarity, negative indicate reverse polarity.
0=Disabled
Settings for voltage-free digital inputs
±1=Generic alarm
±2=Digital input AUX1
±3=Digital input AUX2
±4=Digital input AUX3
±5=Digital input AUX4
±6=Suction economy digital input C1
±7=Suction economy digital input C2
±8=Delivery economy digital input
±9=Energy saving digital input
±10=Refrigerant level
±11=Refrigerant leak
±12=Hot gas defrosting request C1
±13=Hot gas defrosting request C2
±14=Circuit lubricating oil level C1
±15=Circuit lubricating oil level C2
±16=Compressor differential pressure switch C1
±17=Compressor differential pressure switch C2
±18=HP Compressor C1
±19=HP Compressor C2
±20=LP Compressor C1
±21=LP Compressor C2
±22=Compressor thermal switch C1
±23=Compressor thermal switch C2
±24=Error INVERTER compressor circuit C1
±25=Error INVERTER compressor circuit C2
Settings for high voltage digital inputs
±26=Enable INVERTER fan
±27=Circuit suction gas pressure switch C1
±28=Circuit suction gas pressure switch C2
±29=Delivery gas pressure switch
±30=Digital fan thermal cut-out 1
±31=Digital fan thermal cut-out 2
±32=Digital fan thermal cut-out 3
±33=Digital fan thermal cut-out 4
±34=Digital fan thermal cut-out 5
±35=Digital fan thermal cut-out 6
±36=Digital fan thermal cut-out 7
±37=Digital fan thermal cut-out 8
±38=Fan thermal switch regulated continuously
±39=Compressor block 1
±40=Compressor block 2
±41=Compressor block 3
±42=Compressor block 4
±43=Compressor block 5
±44=Compressor block 6
±45=Compressor block 7
±46=Compressor block 8
±47=Compressor block 9
±48=Compressor block 10
±49=Compressor block 11
±50=Compressor block 12
±51=Compressor block regulated continuously
C1
±52=Compressor block regulated continuously
C2
±53=Power limit NU
Analogue inputs
Pressure transducers
• 623 - H401 IN Analog SIG1 • 624 - H402 IN
Analog SIG2 Configuration of analogue inputs
(transducers) SIG1/SIG2
0=Disabled
±1=Circuit suction gas pressure switch C1
±2=Circuit suction gas pressure switch C2
±3=Delivery gas pressure
• 627 - H405 IN Analog PB1
• 630 - H408 IN Analog PB4 Configuration of
analogue inputs (probes) PB1...PB4
These inputs can be configured as low voltage
digital inputs: in this case positive values indicate
direct polarity, negative ones the contrary.
0=Disabled
±1=Suction gas temperature C1
±2=Suction gas temperature C2
±3=Delivery gas temperature
±4=Internal ambient temperature
±5=External ambient temperature
±6=Subtemperature sensor
±7=Recovery water temperature
±8=Generic alarm
±9=Digital input AUX1
±10=Digital input AUX2
±11=Digital input AUX3
±12=Digital input AUX4
±13=Suction economy digital input C1
±14=Suction economy digital input C2
±15=Delivery economy digital input
±16=Energy saving digital input
±17=Refrigerant level
±18=Refrigerant leak
±19=Hot gas defrosting request C1
±20=Hot gas defrosting request C2
±21=Circuit lubricating oil level C1
39
EWCM9900
±22=Circuit lubricating oil level C2
±23=Compressor differential pressure switch C1
±24=Compressor differential pressure switch C2
±25=HP Compressor C1
±26=HP Compressor C2
±27=LP Compressor C1
±28=LP Compressor C2
±29=Compressor thermal cut-out C1
±30=Compressor thermal cut-out C2
±31=Error INVERTER compressor circuit C1
±32=Error INVERTER compressor circuit C2
±33=Error INVERTER fan
±34=Circuit suction gas pressure switch C1
±35=Circuit suction gas pressure switch C2
±36=Delivery gas pressure switch
±37=Digital fan thermal cut-out 1
±38=Digital fan thermal cut-out 2
±39=Digital fan thermal cut-out 3
±40=Digital fan thermal cut-out 4
±41=Digital fan thermal cut-out 5
±42=Digital fan thermal cut-out 6
±43=Digital fan thermal cut-out 7
±44=Digital fan thermal cut-out 8
±45=Fan thermal switch regulated continuously
±46=Compressor block 1
±47=Compressor block 2
±48=Compressor block 3
±49=Compressor block 4
±50=Compressor block 5
±51=Compressor block 6
±52=Compressor block 7
±53=Compressor block 8
±54=Compressor block 9
±55=Compressor block 10
±56=Compressor block 11
±57=Compressor block 12
±58=Compressor block regulated continuously
C1
±59=Compressor block regulated continuously
C2
±60=Power limit NU
• 631 - H501 OUT Analog V1/I1 • 632 - H502
OUT Analog V2/I2 • 633 - H503 OUT Analog
V3/I3 Configuration of analogue inputs (for
INVERTER) AO1...AO3:
0=Disabled
±1=Switch on INVERTER fan
2=Switch on INVERTER compressor circuit C1
3=Switch on INVERTER compressor circuit C2
SETUP FILES PARAMETERS
• 452 - USId1 User string 1
• 453 - USId2 User string 2
String composed of 20 alphanumeric characters
(max. length).
• 459 - rECF File name REC
• 459 - HISF File name HIS
• 459 - dAtF File name DAT
• 459 - gLoF File name GLO
Names that will be assigned to the various log
files on operation/alarms
log/parameters/glossary
PASSWORD
Operating passwords
• 634 - PSW1 Password 1
Sets the Operational Parameters Menu password
The password is composed of 5 alphanumeric
digits.
The default password is ‘*****’.
Note: The default password set to ‘*****’
provides direct access to the Menu.
Visible from Operational Parameters Menu and
Administrator Parameters Menu.
Configuration Password
• 635 - PSW2 Password 2
Sets the Configuration Parameters Menu
password.
Visible from Configuration Parameters Menu and
Administrator Parameters Menu.
See also parameter 634. Administrator
Password
• 636 - PSW3 Password 3
Sets the Menu password.
Administrator parameters Visible from
Administrator Parameters Menu.
See also parameter 634.
Visible parameters from other Menus /
Param Manager
Service Password
• 637 - PSW4 Password 4
Sets the Service Menu password.Visible from the
Service Menu.
See also parameter 634.
Password 5
• 637 - PSW5 Password 5
Not used
See also parameter 634.
40
EWCM9900
PARAMETERS TABLE
Parameter
Range
Default
U.o.M.
Notes
0 ... 2
1 ... 255
1 ... 255
1 ... 255
1 ... 255
1 ... 255
1 ... 255
1 ... 255
1 ... 255
1 ... 255
1 ... 255
1 ... 255
1 ... 255
0 ... 1
0 ... 1
0 ... 1
0 ... 1
0 ... 1
0 ... 1
0 ... 2
DEFAULT
[501 - tYPE] = 0
0
3
3
3
3
1
1
1
1
1
1
1
1
1
0
0
0
0
0
1
number
number
number
number
number
number
number
number
number
number
number
number
number
flag
flag
flag
flag
flag
flag
number
0=Standard compressor plant
521 - nFn - Fan number
1 ... 8
5
number
522 - CtyP - Type Circuit 1
0 ... 2
0
number
523 - CPnU - Num. COMP circuit 1
0 ... 12
4
number
524 - CtyP2 - Type Circuit 2
0 ... 2
0
number
525 - CPnU2 - Num. COMP circuit 2
0 ... 12
4
number
0...1
0...3
0...32000
0...2
0...1
0,1...90
0...1
0...1
0,1...90
0...1
0...1
0...100
0...20
1...15
0...999
0...100
0...100
0...100
0...1
0...2
0...[523 - CPnU]
0...999
0...999
0...999
0...999
0...999
0...1
0...1
1...100
0...999
0...999
-100...600
-150...999,9
-1...68
-14.5...999,9
-100...600
-150...999,9
-1...68
-14,5...999,9
1
2
32000
0
0
60
0
0
60
1
0
50
3
15
2
20
80
90
1
0
0
5
15
5
15
5
1
1
10
999
0
131 - LSE...132 - HSE
1,09
flag
number
hours
number
flag
secs
flag
flag
secs
number
flag
%
number
mins
mins
%
%
%
flag
number
number
mins
secs
mins
secs
secs
flag
flag
%
mins
secs
°C
°F
bar
PSI
°C
°F
bar
PSI
°C
°F
bar
PSI
°C
°F
bar
PSI
°C
°F
bar
PSI
°C
°F
bar
PSI
°C
°F
bar
PSI
QUICKSTART folder
501 - tyPE Type of plant
502 - PC1 - Power COMP 1
503 - PC2 - Power COMP 2
504 - PC3 - Power COMP 3
505 - PC4 - Power COMP 4
506 - PC5 - Power COMP 5
507 - PC6 - Power COMP 6
508 - PC7 - Power COMP 7
509 - PC8 - Power COMP 8
510 - PC9 - Power COMP 9
511 - PC10 - Power COMP 10
512 - PC11 - Power COMP 11
513 - PC12 - Power COMP 12
514 - EAAL - Enable DO Alarms
515 - EACI - Enable COMP INV
516 - EAFI - Enable FANS INV
517 - EACIE - Enable ERR COMP INV
518 - EAFIE - Enable ERR FANS INV
519 - EAgA - Enable DI Alarm
520 - Fnty - Fan mode
COMPRESSORS folder
551 - Stty - Central Set
552 - PoLI - Activation Policy
553 - SEr - COMP time limit
101 - CCFn - COMP control type
102 - ItEn - Full control
103 - It - Full time
104 - PbEn - Prop. control
105 - dtEn - Derivative control
106 - dt - Derivative time
107 - dSS - Suction Dyn. set mode.
108 - CPP - Enable ERR-control
109 - PoPr - ERR power value
111 - PEn - Max. time LPr alarm
112 - PEI - PEn interval
113 - byPS - HPr-LPr bypass time
114 - InLSP - Minimum speed
115 - InMSP - Top speed
116 - InSSP - Saturation speed
117 - CoIE - Enable INV cut-off
118 - PtSE - Part. sequence.
120 - nCPC - Select Master COMP
121 - oFon - COMP OFF - ON time
122 - donF - COMP ON-OFF time
123 - onon - COMP ON-ON time
124 - don - ON steps time
125 - doF - OFF steps time
126 - FdLy - Enable dON 1’ On.
127 - FdLF - Enables dOF 1’ Off.
128 - InPC - % inverter. variation
129 - Inot - Max. time INV a 0%
130 - InLt - INV time at min speed
131 - LSE - Minimum setpoint
132 - HSE - Maximum setpoint
133 - SEt - Suction setpoint
134 - Pbd - Proportional Band
135 - PbdE - Extended proportional band
136 - dSPo1 - Offset 1 for dyn set
137 - dSPo2 - Offset 2 for dyn set
-100...600
-150...999,9
-1...68
-14.5...999,9
-100...600
-150...999,9
-1...68
-14,5...999,9
-100...600
-150...999,9
-1...68
-14,5...999,9
-100...600
-150...999,9
-1...68
-14,5...999,9
0,37
4,6
0,25
0,51
0,1
0,1
3 steps / 2 capacity steps
max 12 compressors in a system
0=No; 1=Yes
0=No; 1=Yes
0=No; 1=Yes
0=No; 1=Yes
0=No; 1=Yes
0=No; 1=Yes
1=continuous fan (analogue)
max. 8 digital fans
Significant if
520 - Fnty = 2
0= HOMOGENEOUS STEPS
1= NON-HOMOGENEOUS STEPS
2=HOMOGENEOUS STEPS + INVERTER
0 only permitted if
522 - CtyP = 2
The sum (523 - CPnU) + (525 - CPnU2) <=12
0= HOMOGENEOUS STEPS
1= NON-HOMOGENEOUS STEPS
2=HOMOGENEOUS STEPS + INVERTER
0 only permitted if
524 - CtyP2 = 2
The sum (523 - CPnU) + (525 - CPnU2) <=12
1=Central Set
0=No; 1=Yes
0=No; 1=Yes
0=No; 1=Yes
0=No; 1=Yes
0=No; 1=Yes
See QUICKSTART folder
0=No; 1=Yes
0=No; 1=Yes
bar
bar
bar
bar
bar
bar
bar
41
EWCM9900
Parameter
138 - dLAL - Delta LAL
139 - LAL - Minimum alarm
140 - dHAL - Delta HAL
141 - HAL - Maximum alarm
142 - Cod1 - Cut-off delta 1
143 - Cod2 - Cut-off delta 2
144 - InLPt - INV min pot limit
145 - AtdS - Set dynamic amb Tp
146 - dAtdS - AtdS differential
COMPRESSORS folder [2]
cartella visibile solo se 501 - tyPE = 1
201 - CCFn - COMP control type
202 - ItEn - Full control
203 - It - Full time
204 - PbEn - Prop. control
205 - dtEn - Derivative control
206 - dt - Derivative time
207 - dSS - Suction Dyn. set mode.
208 - CPP - Enable ERR-control
209 - PoPr - ERR power value
211 - PEn - Max. time LPr alarm
212 - PEI - PEn interval
213 - byPS - HPr-LPr bypass time
214 - InLSP - Minimum speed
215 - InMSP - Top speed
216 - InSSP - Saturation speed
217 - CoIE - Enable INV cut-off
218 - PtSE - Part. sequence.
220 - nCPC - Select Master COMP
221 - oFon - COMP OFF - ON time
222 - donF - COMP ON-OFF time
223 - onon - COMP ON-ON time
224 - don - ON steps time
225 - doF - OFF steps time
226 - FdLy - Enable dON 1’ On.
227 - FdLF - Enables dOF 1’ Off.
228 - InPC - % inverter. variation
229 - Inot - Max. time INV a 0%
230 - InLt - INV time at min speed
231 - LSE - Minimum setpoint
232 - HSE - Maximum setpoint
233 - SEt - Suction setpoint
234 - Pbd - Proportional Band
235 - PbdE - Extended proportional band
236 - dSPo1 - Offset 1 for dyn set
237 - dSPo2 - Offset 2 for dyn set
238 - dLAL - Delta LAL
239 - LAL - Minimum alarm
240 - dHAL - Delta HAL
Range
-100...600
-150...999,9
-1...68
-14.5...999,9
-100...600
-150...999,9
-1...68
-14.5...999,9
-100...600
-150...999,9
-1...68
-14.5...999,9
-100...600
-150...999,9
-1...68
-14.5...999,9
-100...600
-150...999,9
-1...68
-14,5...999,9
-100...600
-150...999,9
-1...68
-14,5...999,9
-100...600
-150...999,9
-1...68
-14,5...999,9
-100...600
-150...999,9
-100...600
-150...999,9
0...2
0...1
0,1...90
0...1
0...1
0,1...90
0...1
0...1
0...100
0...20
1...15
0...999
0...100
0...100
0...100
0...1
0...2
0...[525 - CPnU2]
0...999
0...999
0...999
0...999
0...999
0...1
0...1
1...100
0...999
0...999
-100...600
-150...999,9
-1...68
-14.5...999,9
-100...600
-150...999,9
-1...68
-14,5...999,9
231 - LSE...232 - HSE
-100...600
-150...999,9
-1...68
-14.5...999,9
-100...600
-150...999,9
-1...68
-14,5...999,9
-100...600
-150...999,9
-1...68
-14,5...999,9
-100...600
-150...999,9
-1...68
-14,5...999,9
-100...600
-150...999,9
-1...68
-14.5...999,9
-100...600
-150...999,9
-1...68
-14.5...999,9
-100...600
-150...999,9
-1...68
-14.5...999,9
Default
0,1
5,47
0,1
5,47
0,1
0
0,99
15
2
0
0
60
0
0
60
1
0
50
3
15
2
20
80
90
1
0
0
5
15
5
15
50
1
1
10
999
0
0,37
4,6
3,44
0,7
1,41
0,28
0,28
0,28
5,47
0,28
U.o.M.
°C
°F
bar
PSI
°C
°F
bar
PSI
°C
°F
bar
PSI
°C
°F
bar
PSI
°C
°F
bar
PSI
°C
°F
bar
PSI
°C
°F
bar
PSI
°C
°F
°C
°F
number
flag
secs
flag
flag
secs
number
flag
%
number
mins
mins
%
%
%
flag
number
number
mins
secs
mins
secs
secs
flag
flag
%
mins
secs
°C
°F
bar
PSI
°C
°F
bar
PSI
°C
°F
bar
PSI
°C
°F
bar
PSI
°C
°F
bar
PSI
°C
°F
bar
PSI
°C
°F
bar
PSI
°C
°F
bar
PSI
°C
°F
bar
PSI
°C
°F
bar
PSI
Notes
bar
bar
bar
bar
bar
bar
bar
°C
°C
See QUICKSTART folder
bar
bar
bar
bar
bar
bar
bar
bar
bar
bar
42
EWCM9900
Parameter
241 - HAL - Maximum alarm
242 - Cod1 - Cut-off delta 1
243 - Cod2 - Cut-off delta 2
244 - InLPt - INV min pot limit
245 - AtdS - Set dynamic amb Tp
246 - dAtdS - AtdS differential
FANS folder
301 - FcFn - FAN control type
302 - FACt - Activation mode
303 - CoIE - Enable INV cut-off
304 - ItEn - Full control
305 - It - Full time
306 - PbEn - Prop. control
307 - dtEn - Derivative control
308 - dt - Derivative time
309 - InLSP - Minimum speed
310 - InMSP - Top speed
311 - InSSP - Saturation speed
312 - FPP - Enable ERR-control
313 - FPr - ERR power value
314 - dSd - Del. Dyn. Set. Mode
315 - PEn - Max. time LPr alarm
316 - PEI - PEn interval
317 - byPS - HPr-LPr bypass time
318 - HPPE - Enable HP. saf.
319 - HPPP - Red. Pow. HP. Saf.
320 - HPPd - Max duration HP. Saf
321 - HPPI - Interval HP. Saf
322 - rot - Activation policy
323 - CIt - Pick-up time
324 - don - ON steps time
325 - doF - OFF steps time
326 - FStt - Max OFF time
327 - SEr - FAN time limit
328 - Inot - Max. time INV a 0%
329 - InPC - % inverter. variation
330 - InoS - INV. activation. mode 0%
346 - dSdo - Dyn Offset. Dyn Set
347 - dSLdo - Min Offs.Dyn.Set dyn
348 - dSMEt - Max Ext Temp Set dyn
349 - LdSP - Min. Dynamic Set
350 - SCt1 - Min Subcooling
351 - SCt2 - Max Subcooling
352 - SCd1 - Subcooling Delta1
353 - SCoF1 - Subcooling Offset1
354 - SCd2 - Subcooling Delta2
355 - SCoF2 - Subcooling Offset2
356 - EtPr - TP Ext safety
331 - LSE - Minimum setpoint
332 - HSE - Maximum setpoint
333 - SEt - Delivery set
334 - Pbd - Proportional Band
335 - Cod1 - Cut-off delta 1
336 - Cod2 - Cut-off delta 2
337 - dHAL - Delta HAL
338 - HAL - Maximum alarm
Range
-100...600
-150...999,9
-1...68
-14.5...999,9
-100...600
-150...999,9
-1...68
-14,5...999,9
-100...600
-150...999,9
-1...68
-14,5...999,9
-100...600
-150...999,9
-1...68
-14,5...999,9
-100...600
-150...999,9
-100...600
-150...999,9
Default
5,47
0,28
0
3,19
15
2
0...2
0...1
0...1
0...1
0,1...90
0...1
0...1
0,1...90
0...100
0...100
0...100
0...1
0...100
0...1
0...20
1...15
0...999
0...1
1...100
0...999
0...999
0...1
0...120
0...999
0...999
0...999
0...32000
0...999
1...100
0...1
-100...600
-150...999,9
-100...600
-150...999,9
-100...600
-150...999,9
-100...600
-150...999,9
-100...600
-150...999,9
-100...600
-150...999,9
-100...600
-150...999,9
-100...600
-150...999,9
-100...600
-150...999,9
-100...600
-150...999,9
-100...600
-150...999,9
-100...600
-150...999,9
-1...68
-14.5...999,9
-100...600
-150...999,9
-1...68
-14.5...999,9
0
0
0
0
60
0
0
60
20
80
90
0
50
1
3
15
2
0
30
15
10
0
30
015
5
24
32000
15
20
1
331 - LSE...332 - HSE
15,4
-100...600
-150...999,9
-1...68
-14.5...999,9
-100...600
-150...999,9
-1...68
-14,5...999,9
-100...600
-150...999,9
-1...68
-14,5...999,9
-100...600
-150...999,9
-1...68
-14.5...999,9
-100...600
-150...999,9
-1...68
-14.5...999,9
5
3
30
30
3
5
6
1
1
1
0
5,6
19,7
3,2
0,4
0,4
0,8
6,6
U.o.M.
°C
°F
bar
PSI
°C
°F
bar
PSI
°C
°F
bar
PSI
°C
°F
bar
PSI
°C
°F
°C
°F
number
flag
flag
flag
secs
flag
flag
secs
%
%
%
flag
%
number
number
mins
mins
flag
%
mins
hours
flag
secs
secs
secs
hours
hours
mins
%
number
°C
°F
°C
°F
°C
°F
°C
°F
°C
°F
°C
°F
°C
°F
°C
°F
°C
°F
°C
°F
°C
°F
°C
°F
bar
PSI
°C
°F
bar
PSI
°C
°F
bar
PSI
°C
°F
bar
PSI
°C
°F
bar
PSI
°C
°F
bar
PSI
°C
°F
bar
PSI
°C
°F
bar
PSI
Notes
bar
bar
bar
bar
°C
°C
0 = fans independent from the compressors
0=No; 1=Yes
0=No; 1=Yes
0=No; 1=Yes
0=No; 1=Yes
0=No; 1=Yes
0=No; 1=Yes
1=Rotation
°C
°C
°C
°C
°C
°C
°C
°C
°C
°C
°C
bar
bar
bar
bar
bar
bar
bar
bar
43
EWCM9900
Parameter
339 - dSFo - Dyn Set Fixed Offset
340 - HPP1 - HP Saf. Limit 1
341 - HPP2 - HP Saf. Limit 2
342 - HPPb - HP Safety. alarm band
343 - dLAL - Delta LAL
344 - LAL - Minimum alarm
345 - InLPt - INV min pot limit
SAFETIES folder
565 - odo - Output Delay Pw-On.
566 - PAO - Pw-On Al. Exclusion
567 - tAo - HP-LP bypass time
568 - Aro - Alarm sil. duration
569 - PrSAE - HPr/LPr Suct. Alarm
570 - PSAE - HP/LP Suct. Alarm
571 - gtSAE - Gas Level Alarm
572 - gLSAE - Gas leak alarm
573 - PrdAE - HPr/LPr Man Alarm
574 - PdAE - HP/LP Man Alarm
575 - FtAE - Fans thermal alarm
576 - FInAE - Fan Inv Prot Alarm
577 - SFAE - Fan Maint. Alarm
578 - CSAE - Comp shutdown alarm
579 - CInAE - Comp Inv Prot Alarm
580 - SCAE - Comp Maint Alarm
581 - oLAE - Oil Level Alarm
582 - gAAE - General alarm
583 - rtCAE - RTC Alarm
701 - HPPAE - Saf.Meas.Timout Alarm.
CONFIGURATION folder
639 - tAb - TAB
640 - rtCE - RTC Enabling
641 - FtyP - Type of Gas
646 - SIg12 - Probe Type SIG 1/2
647 - SIg34 - Probe Type SIG 3/4
648 - Pb12 - Probe Type PB 1/2
649 - Pb34 - Probe Type PB 3/4
650 - HSIg1 - SIG1 High Precision
651 - HSIg2 - SIG2 High Precision
652 - AoS1 - Selection V1 or I1
653 - AoS2 - Selection V2 or I2
654 - AoS3 - Selection V3 or I3
655 - CALSIg1 - Calibration SIG1
655 - CALSIg1 - Calibration SIG1
656 - CALSIg2 - Calibration SIG2
656 - CALSIg2 - Calibration SIG2
657 - CALSIg3 - Calibration SIG3
657 - CALSIg3 - Calibration SIG3
659 - CALPb1 - Calibration PB1
659 - CALPb1 - Calibration PB1
660 - CALPb2 - Calibration PB2
660 - CALPb2 - Calibration PB2
661 - CALPb3 - Calibration PB3
661 - CALPb3 - Calibration PB3
662 - CALPb4 - Calibration PB4
662 - CALPb4 - Calibration PB4
663 - LtSIg1 - Lower Limit SIG1
663 - LtSIg1 - Lower Limit SIG1
664 - UtSIg1 - Upper Limit SIG1
665 - LtSIg2 - Lower Limit SIG2
665 - LtSIg2 - Lower Limit SIG2
665 - LtSIg2 - Lower Limit SIG2
666 - UtSIg2 - Upper Limit SIG2
666 - UtSIg2 - Upper Limit SIG2
667 - LtSIg3 - Lower Limit SIG3
668 - UtSIg3 - Upper Limit SIG3
668 - UtSIg3 - Upper Limit SIG3
667 - LtSIg3 - Lower Limit SIG3
DISPLAY folder
541 - LAng - Language Selection
542 - toUt - Time out menu
543 - rELP - Relative pressure
544 - AbS - Relative alarms
547 - UMCP - UM Suction
548 - UMFn - UM delivery
549 - LoCK - Keypad lock
550 - HKUnL - Unlock Keypad Hotkey.
FUNCTIONS folder
Range
-100...600
-150...999,9
-1...68
-14,5...999,9
-100...600
-150...999,9
-1...68
-14,5...999,9
-100...600
-150...999,9
-1...68
-14,5...999,9
-100...600
-150...999,9
-1...68
-14,5...999,9
-100...600
-150...999,9
-1...68
-14.5...999,9
-100...600
-150...999,9
-1...68
-14.5...999,9
-100...600
-150...999,9
-1...68
-14,5...999,9
Default
0,8
6,2
6,4
0,4
0,8
6,6
15
U.o.M.
°C
°F
bar
PSI
°C
°F
bar
PSI
°C
°F
bar
PSI
°C
°F
bar
PSI
°C
°F
bar
PSI
°C
°F
bar
PSI
°C
°F
bar
PSI
0...999
0...999
0...999
0...9999
0...3
0...3
0...3
0...3
0...3
0...3
0...3
0...3
0...3
0...3
0...3
0...3
0...3
0...3
0...3
0...1
1
15
0
15
2
2
3
1
2
2
2
2
1
2
2
1
1
2
1
1
secs
mins
mins
mins
number
number
number
number
number
number
number
number
number
number
number
number
number
number
number
number
0...32767
0...1
0...15
0...2
0...3
3...6
3...6
0...1
0...1
0...1
0...1
0...1
-10...10
-145...145
-10...10
-145...145
-10...10
-145...145
-10...10
-18...18
-10...10
-18...18
-10...10
-18...18
-10...10
-18...18
-1...1
-14,5...14,5
1...10
-14,5...14,5
-1...1
-14,5...14,5
1...10
-14,5...14,5
-1...1
-14...14
1...100
14...1450
1
1
4
0
0
4
4
1
1
1
1
1
0
0
0
0
0
0
0
0
0
0
0
0
0
0
0,5
-7,2
8
116
0,5
-7,2
8
116
1
14
31
449
number
flag
number
number
number
number
number
flag
flag
number
number
number
bar
PSI
bar
PSI
bar
PSI
°C
°F
°C
°F
°C
°F
°C
°F
bar
PSI
bar
PSI
bar
PSI
bar
PSI
bar
PSI
bar
PSI
0...1
0
flag
10...1000
0...1
0...1
0...3
0...3
0...1
0...12
300
1
1
2
2
0
8
secs
flag
flag
number
number
flag
number
Notes
bar
bar
bar
bar
bar
bar
bar
0=No; 1=Yes
4-20mA
4-20mA
NTC 103AT
NTC 103AT
1=High Precision
1=High Precision
Current
Current
Current
always displayed as an absolute value
Not dependent on parameter
543 - rELP
always displayed as an absolute value
Not dependent on parameter
543 - rELP
0=First language
1= Second language
0=No; 1=Yes
0=No; 1=Yes
0=No; 1=Yes
44
EWCM9900
Parameter
554 - drEn - Record Data
555 - HIEn - Record history
556 - ESFn - Energy Saving Type
557 - Hrto - Max Tp OUT Recovery
558 - Hrdt - Delta Tp Recovery
559 - LrCd - Liq Ret Ctrl Delay
560 - Lron - Liquid Return d.c. ON time
561 - LroF - Liquid Return d.c. OFF time
562 - LrCd2 - Liq Ret Ctrl Delay
563 - Lron2 - Liquid Return d.c. ON time
564 - LroF - Liquid Return d.c. OFF time
ADDRESSING folder
671 - FAA - Family Address
672 - dEA - Device Address
673 - PtStLV - Protocol selection
674 - bdrttLV - Baud rate
675 - PtytLV - Parity Bit
Range
0...1
0...1
0...7
-100...600
-150...999,9
-100...600
-150...999,9
0...999
0...999
0...999
0...999
0...999
0...999
0...14
0...14
2...3
0...2
0...2
Default
U.o.M.
Notes
0=No; 1=Yes
0=No; 1=Yes
15
60
60
15
60
60
flag
flag
number
°C
°F
°C
°F
mins
secs
secs
mins
secs
secs
0
0
2
0
1
number
number
number
number
number
0
0
0
40
10
RESOURCE ALLOCATION folder
584 - H201 - Relay OUT1
585 - H202 - Relay OUT2
586 - H203 - Relay OUT3
587 - H204 - Relay OUT4
588 - H205 - Relay OUT5
589 - H206 - Relay OUT6
590 - H207 - Relay OUT7
591 - H208 - Relay OUT8
592 - H209 - Relay OUT9
593 - H210 - Relay OUT10
594 - H211 - Relay OUT11
595 - H212 - Relay OUT12
596 - H213 - Relay OUT13
-93...93
-93...93
-93...93
-93...93
-93...93
-93...93
-93...93
-93...93
-93...93
-93...93
-93...93
-93...93
-93...93
9
19
33
34
20
38
39
21
43
44
22
48
49
597 - H214 - Relay OUT14
-93...93
93
number
598 - H215 - Relay OUT15
599 - H216 - Relay OUT16
600 - H217 - Relay OUT17
601 - H218 - Relay OUT18
602 - H219 - Relay OUT19
603 - H101 - IN Digital HV DIH1
604 - H102 - IN Digital HV DIH2
605 - H103 - IN Digital HV DIH3
606 - H104 - IN Digital HV DIH4
607 - H105 - IN Digital HV DIH5
608 - H106 - IN Digital HV DIH6
609 - H107 - IN Digital HV DIH7
610 - H108 - IN Digital HV DIH8
611 - H109 - IN Digital HV DIH9
612 - H110 - IN Digital HV DIH10
613 - H111 - IN Digital HV DIH11
614 - H112 - IN Digital HV DIH12
615 - H113 - IN Digital HV DIH13
616 - H114 - IN Digital HV DIH14
617 - H301 - IN Digital LV DI1
618 - H302 - IN Digital LV DI2
619 - H303 - IN Digital LV DI3
620 - H304 - IN Digital LV DI4
621 - H305 - IN Digital LV DI5
622 - H306 - IN Digital LV DI6
623 - H401 - IN Analog SIG1
-93...93
-93...93
-93...93
-93...93
-93...93
-53...53
-53...53
-53...53
-53...53
-53...53
-53...53
-53...53
-53...53
-53...53
-53...53
-53...53
-53...53
-53...53
-53...53
-53...53
-53...53
-53...53
-53...53
-53...53
-53...53
0...3
0
0
0
0
0
39
40
41
42
38
0
0
0
0
0
0
0
27
29
0
0
0
10
8
6
1
number
number
number
number
number
number
number
number
number
number
number
number
number
number
number
number
number
number
number
number
number
number
number
number
number
number
624 - H402 - IN Analog SIG2
625 - H403 - IN Analog SIG3
627 - H405 - IN Analog PB1
628 - H406 - IN Analog PB2
629 - H407 - IN Analog PB3
630 - H408 - IN Analog PB4
631 - H501 - Analog OUT V1/I1
632 - H502 - Analog OUT V2/I2
633 - H503 - Analog OUT V3/I3
FILES SETUP folder
452 - USId1 - User string 1
453 - USId2 - User string 2
number
number
number
number
number
number
number
number
number
number
number
number
number
°C
°C
Micronet
9600 b/s
Odd numbers
DEFAULT
[501 - tYPE] = 0
9=ALARM
19=COMP1 STEP1
33=COMP1 STEP2
34=COMP1 STEP3
20=COMP2 STEP1
38=COMP2 STEP2
39=COMP2 STEP3
21=COMP3 STEP1
43=COMP3 STEP2
44=COMP3 STEP3
22=COMP4 STEP1
48=COMP4 STEP2
49=COMP4 STEP3
93=ALARM
REFRIGERANT LEVEL
0=CNF
0=CNF
0=CNF
0=CNF
0=CNF
39
40
41
42
38
0
0
0
0
0
0
0
27
29
0
0
0
10
8
6
1
0...3
0
number
0
-56...56
-60...60
-60...60
-60...60
-60...60
0...3
0...3
0...3
3
5
6
0
4
1
0
0
number
number
number
number
number
number
number
number
3
5
6
0
4
1
0
0
0...20
0...20
’‘
’‘
string
string
459 - rECF - File name REC
0...10
’‘
string
460 - HISF - File name HIS
461 - dAtF - File name DAT
462 - gLoF - File name GLO
PASSWORD
0...10
0...10
0...10
’‘
’‘
’‘
string
string
string
634 - PSW1 - Password 1
0...5
’*****’
string
635 - PSW2 - Password 2
0...5
’*****’
string
636 - PSW3 - Password 3
0...5
’*****’
string
637 - PSW4 - Password 4
0...5
’*****’
string
638 - PSW5 - Password 5
0...5
’*****’
string
DEFAULT
[501 - tYPE] = 1
9=ALARM
19=COMP1 STEP1
33=COMP1 STEP2
34=COMP1 STEP3
20=COMP2 STEP1
38=COMP2 STEP2
39=COMP2 STEP3
21=COMP3 STEP1
43=COMP3 STEP2
44=COMP3 STEP3
22=COMP4 STEP1
48=COMP4 STEP2
49=COMP4 STEP3
23=COMP5
24=COMP6
25=COMP7
26=COMP8
0=CNF
0=CNF
39
40
41
42
43
44
45
46
38
27
28
29
0
0
0
0
0
0
0
0
1
0 (set = 2 for
circuit 2 suction)
3
5
6
0
4
1
0
0
max 20 characters
max 8 characters
ALL CAPITALS
max 5 characters
’*****’ indicates
Password not present
visible from Service Menu
max 5 characters
NOTE: ALL the values in bar / PSI are expressed in Absolute Pressure and are dependent on parameter 543 - rELP where not expressly indicated
45
EWCM9900
ALARMS
The EWCM device is able to perform complete diagnostics of the system
signalling any operating trouble with specific alarms, both to signal on LCD
and via LED particular events, defined by the user to have greater control
over the system.
Alarm are always indicated with the red Alarm LED on the keyboard. The
alarm is also indicated by the activation of the corresponding alarm relay if
so configured.
The alarms can be of 3 types:
Automatic alarm
Alarm active if the cause of the alarm is present, otherwise not.
Manual alarm
Alarm active if the cause of the alarm is present, otherwise resettable in
the alarms menu.
Semi-automatic alarm (timed/event)
Behaves like an automatic alarm so long as the number of events in the
unit of time is less than a number set in a parameter, otherwise like a
manual alarm.
Probe Errors / Generic Errors
The probe errors / generic errors are all automatic.
ALARM ACKNOWLEDGEMENT
Alarms can be acknowledged in the main display by pressing key F3 once
(see Keys and Components section). The alarm LED flashes.
The relay configured as an alarm relay will be deactivated.
The duration of the acknowledgement is defined by parameter 568-Aro.
if 568-Aro=0, acknowledgement is not enabled.
In case of new alarms/probe errors, the LED changes from flashing to
steady on and the alarm relay is reactivated.
If during the acknowledgement period all alarms automatically reset, the
LED turns off and the alarm relay is deactivated.
If at the end of the acknowledgement period there is at least one active
alarm, the alarm relay is re-activated and the alarm LED turns back on.
ENABLING ALARMS
In general all alarms and probe errors are immediately controlled from
when the machine is switched on, if enabled. The LP/HP control probe
maximum and minimum alarms are distinguished inasmuch as they are
controlled, if enabled, after the delay 566-Pao after the device is switched
on.
The handling of each alarm can be configured (see parameters 569-PrSAE
to 701-HPPAE) so as to:
Values attributable to alarm parameters 569-PrSAE...701-HPPAE
0=Disables alarm handling;
1=Enables alarm notification only;
2=Enables notification and control actions;
3=Enables notification, control actions and activates a dedicated relay for
the blocking alarm;
This does not apply to probe errors and compressor alarms which are in
the always enabled matrix.
Access to the Alarms Menu takes place via the Main Display by pressing
and holding down the function key F3.
if there are no active alarms/probe errors, the display will read EMPTY.
SAFETY RELAY
The safety relay digital output is activated when the board is powered up.
It is deactivated when the board is powered down.
The actuation of the safety relay depends on the correct allocation of the
output itself.
BLOCKING ALARM RELAY
This relay is activated if at least one of 569-PrSAE...701-HPPAE
is set to 3 and the corresponding alarm is active.
The actuation of the relay depends on the correct allocation of the output
itself.
COMPRESSOR ALARMS IN MATRIX
Each compressor is equipped with a blocking digital input.
The activation of this input, depending on parameter
578-CSAE, results on an alarm signal and, potentially, the immediate
stopping of the compressor.
The following digital inputs may also be present as options, which are
common to all compressors on the same circuit:
• differential pressure switch digital input;
• HP digital input;
• LP digital input;
• thermal switch digital input;
Note
• If a compressor block actuates, the activation of one or more of these
inputs allows us to easily identify the cause. The compressor block input
may also stop the compressor, while the matrix inputs can only give an
alarm notification.
• If more than one compressor is blocked at the same time, the cause of
the block will not unequivocal.
ALARMS LOG
The alarms log is enabled by 555-HIEn (= 1).
The log contains a maximum of 50 alarms. A new alarm, after this limit is
reached, will result in the loss of the oldest alarm.
When a new alarm is activated, it is immediately entered in the alarms
history. This does not apply to automatic pressure switch alarms which are
only notified on the display.
If the alarm is already present in the history and it has occurred within the
same hour, the hourly frequency of the alarm is incremented. The
maximum value of the hourly frequency is 99.
Each alarm is represented as follows:
- nn Exyzw-hh-mm-dd/mm/yy-ff
• -nn Nr. Alarm [1...50]
• Exyzw: ‘E’ followed by alarm code (xy) and system index (zw)
• hh: hour of activation
• dd/mm/yy: date of activation
• ff: hourly frequency - the number of times the alarm has occurred in an
hour (max. 99)
Example: E0102-13-12/06/08-02
Alarm 0102 at 13h on 12 June 2008; 2 activations in the hour
See table ALARMS LOG AND CODES LIST
UPLOADING THE ALARMS LOG
See USB Copy Card chapter
DISCHARGE HIGH ALARM PREVENTION
The discharge high alarm is prevented by limiting the number of
resources the suction controller would normally ask for when the
HP control probe approaches the alarm activation threshold. This
function is activated by parameter 318-HPPE.
This prevention algorithm is based on the definition of two
thresholds W1 and W2 relative to the HP control probe, which can
be defined absolutely or relatively depending on parameter 544AbS:
• Se 544-AbS=0 (absolute):
- W1 = (340-HPP1)
- W2 = (341-HPP2)
• Se 544-AbS=1 (relative):
- W1 = (333-Set)+(340-HPP1)
- W2 = (333-Set)+(341-HPP2)
46
EWCM9900
ALARMS
When the value of the HP control probe exceeds W1 resources
can no longer be actuated by the suction controller. In this phase,
compressors on call wait for equalisation of the discharge
pressure/temperature value.
If W2 is also exceeded, resources will be deactivated progressively
in proportion to the divergence between the HP probe value and
the threshold W2 itself.
Note that once the HP probe value drops to between W1 and W2,
the subtracted power is restored in observance of the compressor
safety timings.
For values below W1, the suction controller returns to normal
control.
Releasing resources
HOMOGENEOUS STEPS AND HOMOGENOUS STEPS +
INVERTER
A number of power steps will be released in the proportional band
342-HPPb equal to the percentage 319-HPPP of steps actuated in
W1. If the INVERTER compressor is present, its power is forced to
0.
Power steps to exclude
6
4
2
Discharge Probe
0
SET
Example: 6 steps
∆ = 124-Pbd / Σ Compressor
power
Σ = 502-PC1 + ...+ 506-PC6
334 Pbd
INVERTER
There will be a continuous decrease in power in the proportional
band 342-HPPb equal to the percentage 319-HPPP of power
actuated in W1.
NON-HOMOGENEOUS STEPS
There will be a request for a continuous decrease in power in the
proportional band 342-HPPb equal to the percentage 319-HPPP of
power actuated in W1. There is thus no hysteresis inasmuch as it is
not determinable in systems with compressors of different powers.
The only hysteresis will be temporal, due to the increase/decrease
timing parameters.
The system will attempt to guarantee a power as close as possible
in excess relative to that requested, in line with the available
resources at the time of the decision.
Parameter 320-HPPd, if not equal to 0, defines the maximum
duration of the prevention algorithm. When the algorithm remains
active for longer than 320-HPPd (counted from when W1 is
exceeded) the algorithm is disabled for the time set in parameter
321-HPPI.
If enabled by parameter 701-HPPAE the alarm message ‘Discharge
prevention timeout’ will display.
Once delay 321-HPPI has expired and if the conditions obtain,
maximum discharge alarm prevention can be re-enabled.
The alarm automatically resets when the HP control probe value
drops below W1 and the algorithm was active.
The control of the algorithm timeout output is not active if 320HPPd=0.
If the HP control probe is in error, this algorithm is not enabled.
47
EWCM9900
ALARMS LOG AND CODES LIST
Alarm code
(xy)
Alarms list
System index
(zw)
LP suction pressure switch trip alarm (manual)
00
01...02
HP suction pressure switch trip alarm (manual)
01
01...02
Maximum suction probe alarm
02
01...02
Minimum suction probe alarm
03
01...02
Refrigerant level alarm
04
00
Refrigerant leak alarm
05
00
LP delivery pressure switch trip alarm (manual)
06
00
HP delivery pressure switch trip alarm (manual)
07
00
Delivery probe maximum alarm
08
00
Delivery probe minimum alarm
09
00
Digital fan thermal switch alarm
10
01…08
Continuous control fan thermal switch alarm
11
00
Fan inverter error alarm
12
00
Digital fan 1 maintenance alarm
13
01...08
Continuous control fan maintenance alarm
14
00
Compressor oil differential pressure alarm
15
01...02
Compressor HP alarm
16
01...02
Compressor LP alarm
17
01...02
Compressor thermal switch alarm
18
01...02
Compressor maintenance alarm
19
01
Compressor maintenance alarm
19
12
Notes
01 circuit 1
02 circuit 2
01 digital fan 1
...
08 digital fan 8
01 digital fan 1
...
08 digital fan 8
01 circuit 1
02 circuit 2
...
Compressor inverter shutdown alarm
20
01...02
Inverter compressor maintenance alarm
21
01...02
Compressor shutdown alarm
22
01
Compressor inverter error alarm
23
01...02
Compressor lubricating oil level alarm
24
01...02
General plant alarm
25
00
Internal ambient temperature alarm
26
00
Suction gas probe error alarm
27
01...02
00
Delivery gas probe error alarm
28
External ambient temperature alarm
29
00
Recovery water temperature alarm
30
00
Subcooling temperature alarm
31
00
Error opening logged data file
32
00
Error writing logged data file
33
00
Error closing logged data file
34
00
Logged data memory full error
35
00
IO Configuration Error
36
00
EEPROM Bios error
37
00
EEPROM User error
38
00
RTC batt exhausted
39
00
RTC connection error
40
00
RTC Value Error
41
00
Delivery HP alarm prevention timeout
42
00
01 circuit 1
02 circuit 2
01 compressor 1
...
12 compressor 12
01 circuit 1
02 circuit 2
01 circuit 1
02 circuit 2
48
EWCM9900
UTILITIES ALARMS TABLE 1/2
Display
Description
Type
Parameter.
Compressor
shutdown
Fan
shutdown
Notes
System refrigerant
level
Refrigerant Level
Manual
571 - gtSAE
x
x
Plant shutdown
Refrigerant Leak
Manual
572 - gLSAE
Digital fan
1 thermal switch
Automatic
575 - FtAE
Refrigerant Leak
Plant
Thermal switch Fan 1
...
Activates central
gas expulsion digital
output
x
if all the digital
fans are in thermal
switch mode
(°) fan 1
...
Plant shutdown if all
the digital fans are in
thermal switch mode
Thermal switch
Fan 8
Digital
fan 8 thermal switch
Automatic
575 - FtAE
Cont Fan Thermal
switch Delivery
Continuous control fan
thermal switch
Automatic
575 - FtAE
x
x
Plant shutdown
Delivery
inverter error
Fan inverter error
Automatic
576 - FInAE
x
x
Plant shutdown
Maintenance
Fan 1
Maintenance
digital fan 1
Manual
577 - SFAE
...
(°) fan 8
(°) fan 1
x
if all the digital
fans are in maintenance
...
Plant shutdown if all
the digital fans are in
maintenance
Maintenance
Fan 8
Maintenance
digital fan 8
Manual
577 - SFAE
Cont. delivery fan
maintenance
Maintenance
Continuous control fan
Manual
577 - SFAE
Suction Comp.Oil.
Press.Diff.
Compressor oil pressure
differential circuit 1
Automatic
Alarm display
in matrix only
Suction [2]
Comp.Oil.Press.Diff.
(*)
Compressor oil pressure
differential circuit 2
Automatic
Alarm display
in matrix only
HP suction
compressor
HP circuit 1 compressor
Automatic
Alarm display
in matrix only
HP suction
compressor (*)
HP circuit 2 compressor
Automatic
Alarm display
in matrix only
LP suction
compressor
LP circuit 1 compressor
Automatic
Alarm display
in matrix only
LP suction
compressor (*)
LP circuit 2 compressor
Automatic
Alarm display
in matrix only
Cont. suction comp.
thermal switch
Circuit 1 compressor
thermal switch
Automatic
Alarm display
in matrix only
Cont. suction comp.
thermal switch (*)
Circuit 2 compressor
thermal switch
Automatic
Alarm display
in matrix only
Maintenance
compressor 1
Maintenance
compressor 1
Manual
Maintenance
compressor 12
Maintenance
compressor 12
Manual
580 - SCAE
Shutdown
Comp. Cont.
Circuit C2 compressor
inverter shutdown
Automatic
578 - CSAE
Cont. suction comp.
shutdown (*)
Circuit C2 compressor
inverter shutdown
Automatic
578 - CSAE
Cont. suction comp.
maintenance
Circuit 1 inverter compressor maintenance
Manual
580 - SCAE
(°) Cont. suction
compressor
Cont. suction comp.
maintenance (*)
Circuit C2 inverter compressor maintenance
Manual
580 - SCAE
(°) Cont. suction
[2] compressor
580 - SCAE
(°) fan 8
x
(°) compressor 1
...
(°) compressor 12
Plant shutdown
49
EWCM9900
UTILITIES ALARMS TABLE 2/2
Display
Description
Type
Parameter.
Compressor
shutdown
Shutdown
Compressor 1 shutdown
Automatic
578 - CSAE
(°) compressor 1
Shutdown
Compressor 12 shutdown
Automatic
578 - CSAE
(°) compressor 12
Suction inverter error
Circuit C1 compressor
inverter error
Automatic
579 - CInAE
(°) inverter
compressor C1
Inverter Error
Suction (*)
Circuit C2 compressor
inverter error
Automatic
579 - CInAE
(°) inverter
compressor C2
Oil level
Circuit C1 lubricating oil
level
Manual
581 - oLAE
compressors C1
Oil level
Circuit C2 lubricating oil
level
Manual
581 - oLAE
Timeout Prevention
Output for general delivery
alarm timeout prevention
Automatic
701 - HPPAE
compressors C2
(°) Simultaneous tripping of the thermal switches of all digital fans results in a shutdown alarm
Fan
shutdown
x
if all the
system
compressors
are in
maintenance
+
parameter
302 - FACt
= Yes
+
alarm LP
suction
pressure
switch or
Maximum
suction
probe on
circuit C1 or
C2 but not on
both
x
if all the
system
compressors
are in oil level
alarm mode
+
parameter
302 - FACt
= Yes
+
alarm LP
suction
pressure
switch or
Maximum
suction
probe on
circuit C1 or
C2 but not on
both
Notes
see table
Analogue alarms
see table
Analogue alarms
display only
Suction pressure switch
triggered due to high
pressure in circuit 2
HP suction
pressure
switch [2]
(*)
Events
HP suction pressure
switch trip
Events
Events
Events
LP suction pressure
switch trip
Suction pressure switch
triggered due to low
pressure in circuit 2
Type
Description
LP suction
pressure
switch [2]
(*)
HP suction
pressure switch
LP suction
pressure switch
Display
569 - PrSAE
569 - PrSAE
569 - PrSAE
569 - PrSAE
Parameter.
LP control
proble
> [233-Set]
LP control
probe
<= [233-Set]
LP control
probe
> (133-Set)
LP control
probe
<= (133-Set)
(Set)
activation
Hysteresis
x circuit 2 if
manual
x circuit 2 if
manual
x circuit 1 if
manual
x circuit 1 if
manual
Compressor
shutdown
Bypass
113 - byPS
113 - byPS
213 - byPS
213 - byPS
Fan shutdown
x
if manual case
of standard machine, otherwise
if shared drain
only in presence
of LP suction
pressure switch
[2]
or
Minimum suction probe [2]
fans at 100% if
manual case
of standard
machine, otherwise if shared
drain only in
presence of HP
suction pressure
switch [2]
or
Maximum suction probe [2]
x
if manual only in
presence of LP
suction pressure
switch
or
Minimum
suction probe
fans at 100% if
manual only in
presence of HP
suction pressure
switch [2]
or
Maximum suction probe [2]
212 - PEI (no. events)
211 - PEn (time window)
Automatic if No. interventions in
time window <= PEn
(indicator only),
if >PEn manual. If PEn=0 always
automatic
212 - PEI (no. events)
211 - PEn (time window)
Automatic if No. interventions in
time window <= PEn
(indicator only),
if >PEn manual.
If Pen=0 always automatic
112 - PEI (no. events)
111 - PEn (time window)
Automatic if No. interventions in
time window <= PEn
(indicator only),
if >PEn manual.
If Pen=0 always automatic
112 - PEI (no. events)
111 - PEn (time window)
Automatic if No. interventions in
time window <= PEn
(indicator only),
if >PEn manual.
If Pen=0 always automatic
Reset / No. interventions
in time window
The bypass is loaded at every
power variation applied to the
plant not due to the alarm itself.
In case of suction probe error,
a minimum alarm is always
notified
The bypass is loaded at every
power variation applied to the
plant not due to the alarm itself.
In case of suction probe error,
a minimum alarm is always
notified
Notes
50
EWCM9900
ANALOGUE ALARMS TABLE 1/3
Maximum
suction probe
Minimum
suction probe
circuit 2
Maximum
suction probe
circuit 2
Maximum
suction probe
Minimum
suction
probe [2]
(*)
Maximum
suction
probe [2]
(*)
LP delivery
pressure
switch trip
Minimum
suction probe
Minimum
suction probe
LP delivery
pressure switch
Description
Display
Events
AUTO
AUTO
AUTO
AUTO
Type
573 - PrdAE
570 - PSAE
570 - PSAE
570 - PSAE
570 - PSAE
Parameter.
241 - HAL
239 - LAL
141 - HAL
139 - LAL
(Set)
activation
240 - dHAL
238 - dLAL
140 - dHAL
138 - dLAL
Hysteresis
x
if manual
x
circuit 2
x
circuit 2
x
circuit 1
x
circuit 1
Compressor
shutdown
[566 - PAO]
+
[567 - tAo]
[566 - PAO]
+
[567 - tAo]
[566 - PAO]
+
[567 - tAo]
fans at 100% case
of standard machine, otherwise
if shared drain
only in presence
of HP suction
pressure switch
[2]
or
Maximum suction probe [2]
x
only in presence
of LP suction
pressure switch
or
Minimum
suction probe
fans at 100% only
in presence of HP
suction probe
or
Maximum
suction probe
317 -byPS
[566 - PAO]
+
[567 - tAo]
x
case of standard machine,
otherwise if
shared drain only
in presence of LP
suction pressure
switch [2]
or
Minimum
suction
probe [2]
x
if manual
Bypass
Fan shutdown
315 - Pen.(no. events)
316 - PEI (time window)
Automatic if No. interventions in
time window <= PEn
(indicator only),
If >PEn manual.
If Pen=0 always manual
Reset / No. interventions
in time window
The bypass is loaded at every
power variation applied to the
plant not due to the alarm itself.
In case of delivery probe error,
a minimum alarm is always
notified
Alarm bypassed at power-on for
time 566 - Pao.
Alarm disabled in case of suction probe error
Bypass 567 - tAo loaded when
activation threshold exceeded
Activation setpoint relative to
setpoint if 544 - AbS=1 (setpoint is added to 141 - HAL)
Alarm bypassed at power-on for
time 566 - Pao.
Alarm disabled in case of suction probe error
Bypass 567 - tAo loaded when
activation threshold exceeded
Activation setpoint relative to
setpoint if 544 - AbS=1 (139 LAL is subtracted from setpoint)
Notes
51
EWCM9900
ANALOGUE ALARMS TABLE 2/3
Delivery probe
maximum
Delivery probe
minimum
HP delivery pressure
switch trip
Description
(*) if Circuit 2 present [501 - TyPE =1]
x = compressor / fan shutdown
Delivery Probe
Maximum
Delivery probe
minimum
HP delivery
pressure switch
Display
AUTO
AUTO
Events
Type
574 - PdAE
574 - PdAE
573 - PrdAE
Parameter.
338 - LAL
344 - LAL
(Set)
activation
337 - dLAL
343 - dLAL
Hysteresis
x
x
x
if manual
Compressor
shutdown
100%
x
fans at 100% if
manual
Fan shutdown
567 - tAo
[566 - PAO]
+
[567 - tAo]
[566 - PAO]
+
[567 - tAo]
317 -byPS
Bypass
315 - Pen.(no. events)
316 - PEI (time window)
Automatic if No. interventions in
time window <= PEn
(indicator only),
If >PEn manual.
If Pen=0 always manual
Reset / No. interventions
in time window
Alarm bypassed at power-on for
time 566 - Pao.
Alarm disabled in case
of delivery probe error
Bypass 567 - tAo loaded when
activation threshold exceeded
Activation setpoint relative to
setpoint if 544 - AbS=1 (setpoint is added to 338 - HAL)
Alarm bypassed at power-on for
time 566 - Pao.
Alarm disabled in case
of delivery probe error
Bypass 567 - tAo loaded when
activation threshold exceeded
Activation setpoint relative
to setpoint if 544 - AbS=1 (344 LAL is subtracted from setpoint)
The bypass is loaded at every
power variation applied
to the plant not due to the
alarm itself.
In case of delivery probe error,
a minimum alarm is always
notified
Notes
52
EWCM9900
ANALOGUE ALARMS TABLE 3/3
none
none
Internal ambient
temperature
Circuit C1 suction
gas probe
Circuit C2 suction
gas probe
Plant ambient
temp. error
Suction Regulat.
Probe Err.
Suction [2] Regulat.
Probe Err.
(*)
none
582 - gAAE
General
General plant
alarm
Parameter.
Description
Display
Effect (°)
from par. 582
Suction dynamic
set point disabled
Maximum/minimum
suction alarm
management disabled
●
Suction pressure switch alarm
management minimum alarm
always announced
Maximum/minimum
suction alarm
management disabled
●
Suction pressure switch alarm
management minimum alarm
always announced
Cause
general alarm digital
input activation
measured values are outside
the nominal range
●
probe faulty
measured values
are outside
the nominal range
●
probe faulty
measured values
are outside
the nominal range
●
probe faulty
if 208 - CPP = Yes resources activated according to 209 - PoPr, if 208 - CPP = No
active resources at time of fault kept active
check wiring
●
replace probe
check wiring
●
replace probe
●
wait for the read temperature value
to come back
if 108 - CPP = Yes resources activated according to 109 - PoPr, if 108 - CPP = No
active resources at time of fault kept active
check wiring
●
replace probe
check wiring
●
replace probe
●
wait for the read temperature value
to come back
check wiring
●
replace probe
●
wait for the read temperature value
to come back
Notes /
Troubleshooting
53
EWCM9900
PROBE ERRORS TABLE 1/3
none
none
none
none
none
Error opening
logged data file
Error writing
logged data file
Error closing
logged data file
Logged data memory
full error
Error Opening File
Error Writing File
Error Closing File
No Space Error
none
Recovery water
temperature
Subcooling
temperature
Plant Subcooling
Probe Err.
Plant H20 recov.
probe err.
none
none
Parameter.
External ambient
temperature
Delivery gas probe
Delivery Regulat.
Probe Err.
Plant Ext.
temp. error
Description
Display
Maximum/minimum
delivery alarm
management disabled
●
In case of delivery
pressure switch error,
a minimum alarm
is always notified
●
Delivery dynamic
set point disabled
●
Maximum delivery
alarm prevention disabled
Delivery dynamic
set point disabled
Heat recovery
function disabled
Delivery dynamic
set point disabled
measured values
are outside
the nominal range
●
probe faulty
measured values
are outside
the nominal range
●
probe faulty
measured values
are outside
the nominal range
●
probe faulty
measured values
are outside
the nominal range
●
probe faulty
***
***
***
***
Effect (°)
Cause
check wiring
●
replace probe
●
wait for the read temperature value
to come back
check wiring
●
replace probe
●
wait for the read temperature value
to come back
check wiring
●
replace probe
●
wait for the read temperature value
to come back
check wiring
●
replace probe
If 312 - FPP = Yes
resources activated on the basis of 313 - FPr,
if 312 - FPP = No
resources kept active at the time of failure
check wiring
●
replace probe
●
wait for the read temperature
value to come back
Notes /
Troubleshooting
54
EWCM9900
PROBE ERRORS TABLE 2/3
none
none
none
583 - rtCAE
583 - rtCAE
583 - rtCAE
IO Configuration
Error
EEPROM Bios
error
EEPROM User
error
RTC batt
exhausted
RTC connection
error
RTC Value
Error
IO Config. Err
EEPROM Bios error
EEPROM User error
RTC Batt Exhausted
RTC Communication. Err
RTC Value Error
(*) if Circuit 2 present [501 - TyPE =1]
(°) if parameter so configured
Parameter.
Description
Display
RTC batt exhausted
RTC does not respond
RTC batt exhausted
QuickStart Parameters
wrong setting
Cause
Time Bands if blocked
Time Bands/data
logging disabled
Time Bands disabled
if blocked
Plant shutdown
Plant shutdown
QuickStart enabled
Effect (°)
Set date/time
Set date/time
Configure the Quickstart parameters
and quit Configuration mode
Notes /
Troubleshooting
55
EWCM9900
PROBE ERRORS TABLE 3/3
56
EWCM9900
USB COPY CARD
The USB CopyCard is an accessory which enables quick parameter
programming, glossary updates and alarms log, records etc.
management.
the USB CopyCard is equipped with a TTL connector for
connection to the TTL serial port of the EWCM and a USB
connector which connects to the USB port of a PC.
During use the LED on the CopyCard will start flashing.
TTL Side
to connect to
the EWCM
USB side
to connect to a
PC
The Copy Card menu is accessible via the Service Menu.
Access to the Service Menu requires a password.
Service Menu folder 02/03 is shown here; move onto the Copy Card
folder with the UP and DOWN keys and enter the desired folder
with the OK key.
Copy Card Menu
Menu composed of 5 folders; access to each folder is analogous to
what is described above:
• Download to EWCM: it allows ‘downloading’ on EWCM
information of various types
• Upload to Copy Card: it allows ‘uploading’ to Copy Card
information of various types
SERVICE
Copy Card
IO Test
IO State
02/03
COPY CARD
Download
Upload Map
Upload Glossaries
01/02
COPY CARD
Upload Alarm History
Format CopyCard
02/02
Upload Map
UPLOAD MAP
01/01
Operation State:
<Operation State>
Upload
Menu that allows uploading the whole parameters map to the USB
Copy Card.
The name of the exported file is set in parameter 461 - dAtF(°)
(see parameters description). The file extension is .DAT
Upload Glossaries
Menu that allows uploading the whole glossary to the USB Copy
Card.
The name of the exported file is set in parameter 462 - dgLoF (°)
(see parameters description). The file extension is .GLO
Alarm Upload History
Menu that allows uploading the whole alarm log to the USB Copy
Card.
The name of the exported file is set in parameter 460 - HISF (°)
(see parameters description). The file extension is .HIS
To upload the file, select <Upload> and press OK. The message
that will appear will be:
Operation status - see Format
or an error message can appear:
Error Messages
• Err [No Copy Card] -> the CopyCard is not connected*
• Err [Write File]
*check you have correctly inserted the CopyCard into the slot
Service Menu
Upload Logged Data
SERVICE
Recordings
Utilities state
Reset Alarm History
01/03
RECORDINGS
Upload to Copy Card
Reset recordings
01/01
Format
FORMAT CCARD
Operation State:
<Operation State>
Format
01/01
The Format menu formats (cancels all information from) the USB
CopyCard.
You are recommended to perform this operation every time
before making an Upload.
To format the key, press the OK key. The message that will appear
will be:
Operation State
The state of the operation can be:
• No operation
• Operation in progress (°)
• Operation terminated - Operation terminated successfully.
(°) N.B! wait: it can take a few minutes.
If the operation is not finished successfully an error message is
displayed:
Error Messages
• Err [No CopyCard] -> the Copy Card is not connected*
UPLOAD LOGGED DATA
01/01
Operation State
<Operation State>
Upload
The Copy Card menu is accessible via the Service Menu (see).
Access to the Service Menu requires a password.
Service Menu folder 01/03 is shown above; move onto the
Recordings folder with the UP and DOWN keys and enter the
desired folder with the OK key. Move onto the folder Upload On
Copy Card with the UP and DOWN keys and enter with the OK key
The Recordings Menu uploads the operating log into the device.
The name of the exported file is set in parameter 459 - rECF (°)
(see parameters description). The file extension is .rec
Operation status - see Format
Error Messages
• Err [No Copy Card] -> the CopyCard is not connected*
• Err [Write file]
• Err [No File]
57
EWCM9900
Copy Card Menu
Download
DOWNLOAD
File.xxx
<Operation State>
Next
01/01
Download
The Download menu allows ‘downloading’ various types of file onto the
instrument - moving onto the Next item and pressing the RH (right) key
scrolls through the various types of file to download (the indicated names
are the default ones - to modify them see description of parameters Folder
Files setup).
NOTE: Filenames are at most 8 UPPERCASE characters.
• FILE.X8M —>
applications + menu descriptors
• PARAM.DAT —> parameters map file
• GLOSSARY.GLO —> glossaries file
once selected, to download the file use the UP and DOWN keys to select
<Download> and press OK. At this stage, the download starts:
Operation status - see Format
or an error message can appear:
Error Messages
X8M
DAT
GLO
Err [Read file]
Err [Read file]
Err [Read file]
Err [No CopyCard]
Err [No CopyCard] Err [No CopyCard]
Err [File NoCompat.] Err [File NoCompat.]
Err [WriteData]
Err [WriteData]
NOTE
• When the application and parameters map downloads have completed,
the device automatically reboots.
• After glossaries download: switch off and turn on the device, by pressing
hold F3 key in order to save new glossaries in LCD keyboard.
• Navigation is not possible while the glossaries are downloading.
• Files with extension .DAT are compatible with the Param Manager .dat
format.
• If the USB CopyCard is already connected when the device boots,
you can still download the application/menu descriptors (.X8M)
from the Copy Card.
This must be a single file, present in the USB CopyCard main
directory. If the USB CopyCard contains two .X8M files (or no .XM8
file) when the device boots, no download will be executed from the
USB CopyCard.
For map files (.DAT) the download can be done at boot time even in
case of normal startup, under the same rules described above.
LPSET2
LTSET2
HP
LP1
LP2
HPR
LPR1
LPR2
HPE
LPE1
LPE2
ALL
[Bar]
[C]
[%]
[%]
[%]
[Num]
[Num]
[Num]
[Num]
[Num]
[Num]
[Num]
xx.xx
xxx.x
xxx
xxx
xxx
xxxxx
xxxxx
xxxxx
xxxxx
xxxxx
xxxxx
xxxxx
xxx
xxx
xxx
DD/MM/YY HH:MM xxx
DD/MM/YY HH:MM xxx
DD/MM/YY HH:MM xxx
DD/MM/YY HH:MM
DD/MM/YY HH:MM
DD/MM/YY HH:MM
The field DD/MM/YY-HH:MM in the header indicates the export date, while
MB_USERID1 and MB_USERID2 represent 2 20 character strings which can
be set with parameters.
The column Avg contains the average value of the daily or weekly values.
the Min and Max columns contain the minimum and maximum values
respectively.
Notes:
• In weekly registrations, the two fields ‘DD/MM/YY-HH:MM’ represent the
week start and end dates.
• daily registrations have only one date field.
• To import the .REC file into EXCEL, use the ‘Delimited’ option with fields
separated by spaces.
Use the point as decimal separator and set the 2 ‘HH:MM’ columns to
text format.
The log can be cancelled in the Service Menu.
UPLOADING THE ALARMS LOG
All data will be saved to a single text file with extension .HIS in the
following order:
HIS REPORT
DD/MM/YY HH:MM
USER ID 1
USER ID 2
——————————————————————————
- 01 E0102-13-12/04/05-01
- 02 E0101-13-14/04/05-01
If the log contains no alarms the format will be as follows:
HIS REPORT
DD/MM/YY HH:MM
MB_USERID1
MB_USERID2
——————————————————————————
EMPTY
EXPORTING OPERATING LOGS TO THE USB COPY CARD
Exporting operating logs to the USB Copy Card can be done from the
keypad via the Service Menu.
This is possible only if the parameter 640-rtCE Enable RTC = 1 and there is
no RTC Communications Error.
All data will be saved to a single text file with extension .REC in the
following order:
• weekly records from the oldest to the most recent
• daily records.
The data is formatted as follows:
Legend
• DD/MM/YY HH:MM is the export date.
• USER ID 1 and USER ID 2 are two 20 character strings set by the user in
parameters 452-USId1 and 453-USId2.
The file extension is .HIS and the name corresponds to the first 8
characters of the string set with parameter 460-HISF.
if 460-HISF contains only spaces, the file is given the default name
HISTORY.HIS.
Note that alarms notified during the export are ignored.
REC-REPORT
DD/MM/YY-HH:MM
MB_USERID1
MB_USERID2
———————————————————————————
Desc
HP
HP
LP1
LT1
LP2
LT2
TEXT
TINT
HPSET
HTSET
LPSET1
LTSET1
UM
[Bar]
[C]
[Bar]
[C]
[Bar]
[C]
[C]
[C]
[Bar]
[C]
[Bar]
[C]
Avg
xxx.x
xxx.x
xxx.x
xxx.x
xxx.x
xxx.x
xxx.x
xxx.x
xxx.x
xxx.x
xx.xx
xxx.x
Min
xxx.x
xxx.x
xxx.xx
xxx.x
xxx.xx
xxx.x
xxx.x
xxx.x
DD/MM/YY-HH:MM
dd/mm/yy hh:mm
DD/MM/YY HH:MM
DD/MM/YY HH:MM
DD/MM/YY HH:MM
DD/MM/YY HH:MM
DD/MM/YY HH:MM
DD/MM/YY HH:MM
DD/MM/YY HH:MM
DD/MM/YY HH:MM
Max
xxx.x
xxx.x
xxx.xx
xxx.x
xxx.xx
xxx.x
xxx.x
xxx.x
DD/MM/YY-HH:MM
dd/mm/yy hh:mm
DD/MM/YY HH:MM
DD/MM/YY HH:MM
DD/MM/YY HH:MM
DD/MM/YY HH:MM
DD/MM/YY HH:MM
DD/MM/YY HH:MM
DD/MM/YY HH:MM
DD/MM/YY HH:MM
(°) NOTE
if the parameter contains only spaces, the file is given the default
name:
• RECORD.REC for operating logs
• HISTORY.HIS for the alarms log file
• PARAM.DAT for the parameters map file
• GLOSSARY.GLO for the glossaries file
58
EWCM9900
KEYBOARD TECHNICAL DATA
Housing
Insulation class
Dimensions
Mounting
Operating temperature
Storage temperature
Ambient humidity in use
and in storage
Display
Keys
LEDs
Power supply
Connector for base-keyboard connection
max. distance base-keyboard
PC+ABS plastic resin casing, UL94 V-0, polycarbonate window, thermoplastic
resin keys
II (the device must NOT be accessible in normal conditions)
160x96x10mm (Lxhxd)
panel mounting with 138x68mm template,
See INSTALLATION
-5…55 °C
-20…85 °C
10...90% RH (non-condensing)
LCD graphic display 128x64 pixels backlit with LEDs
8
3
from the power board
microfit 6-way quick connector, length 3m
3m
TECHNICAL DATA BASE BOARD 9900
Housing
Insulation class
Dimensions
Mounting
Operating temperature
Storage temperature
Ambient humidity in use
and in storage
Analogue inputs
Digital inputs
• voltage free
• high voltage
Analogue output
Digital outputs
Serial
Power
Power supply
Terminals and connectors
Connector for base-keyboard connection
max. distance base-keyboard
PC+ABS plastic resin casing, UL94 V-0, polycarbonate window, thermoplastic
resin keys
II (the device must NOT be accessible in normal conditions)
315x110x60mm (Lxhxp)
on DIN 18 rail
–5…55 °C
–20…85 °C
10...90% RH (non-condensing)
7
• 4 NTC/PTC/voltage free digital inputs,
configurable by parameter
• 3 0-5V/0-10V/4-20 mA input configurable by parameter
20 (+4 analogue inputs configurable as digital)
• 6 voltage free inputs
• (+4) voltage free inputs (analogue if configured as digital)
(contact current referred to ground 0.5mA)
• 14 high voltage inputs 100-240 Va
3
• voltage: 0-10 Vc with 500Ohm minimum load
• current: 4…20mA with max. load (max. load resistance) 500Ohm
with 2% precision and max. resolution (f.s.).
19 relay outputs
• 2 SPDT 8(3)A 250Va
• 17 SPST 5(2)A 250Va
• RS-485 connection to TelevisSystem - Modbus RTU
• TTL for connection to USB Copy Card
20W
100-240Va ±10% 50/60 Hz
extractable, pitch 5.08 insertion 90°
microfit 6-way quick connector, length 3m
3m
59
EWCM9900
PARAM MANAGER
Special ParamManager release 5.2 functions for EWCM 18DIN rail
models
Version 5.2 has a section named Special Functions composed of two keys:
• CFG: this key enters the EWCM Configuration mode, thus enabling Quick
Start parameter editing.
To modify the Quick Start parameters, the EWCM 13/18DIN must be in
configuration mode, Enable = Yes:
QUICKSTART
Enable
Parameters
01/01
Yes
If the modification is not done correctly, the above error message will
display
• Lock: This key enables lock mode to allow for modification of
parameters which have various units of measurement.
Some EWCM 18DIN parameters are duplicated/quadruplicated depending
on the unit of measurement shown on the display.
For example, the parameter for the 131 - LSE Compressors minimum
setpoint folder is quadrupled as:
• 131 - LSE minimum setpoint °C
• 131 - LSE minimum setpoint °F
• 131 - LSE minimum setpoint bar
• 131 - LSE minimum setpoint PSI
In the ParamManager parameters table, the parameter is repeated 4 times
on 4 separate lines. If you edit and select one (or more) lines or just edit
one or more measurement units of the same parameter and you want to
update the parameter map, the following occurs:
Case A Lock disabled
On the instrument, for example, the value 131-LSE in °C will be edited; the
instrument will automatically recalculate all the measurement units on the
basis of the current type of setting.
Despite the fact that the parameter specified in °C has been modified, the
device, which is controlling the system with another unit of measurement,
will recalculate all four parameters on the basis of its current type of
control, thus modifying both the °C and °F values (highlighted in red),
independently of the operator’s setting:
Consult the 8MA0006 ParamManager release 2/08 or later manual for
further details.
Saving .DAT files
To save the .DAT file the program will display this window:
PCH value
Enter value 100
N.B.:
If you enter a value other
than 100 the .DAT file will be
saved in any case but the
USB key will not be
recognised by the EWCM
18DIN.
Message
No message
If no value is entered the
corresponding message
appears
In case of cancellation,
no .DAT file is saved
WEBADAPTER
The controller can be connected to the internet with the WebAdapter
module, to display the controller’s resources via an internet browser
without the need for any further software on the pc.
With the WebAdapter, depending on permissions, the operator is able to:
• Display the controller parameter values;
• Modify the controller parameter values;
• Display the controller state;
• Display the controller alarms;
• Modify the controller date and time.
Case B Lock enabled
On the instrument, for example, the value in °C of parameter 131-LSE will
be edited and the instrument will NOT recalculate the other measurement
units, i.e. it will save the changes made by the operator.
If the device is setting in °C, the setting will be edited on the basis of the
changes.
If the device is setting in another measurement unit, the setting will be
independent and will not take into account the changes unless the setting
is changed manually on the device.
Note: usually, the operator prepares the map that he/she intends to load
into the device, inclusive of the doubled/quadrupled parameters that
involve the assigning of different default values on the basis of the
different measurement units.
With the Lock function, therefore, it is guaranteed that the values assigned
in this session will be written accurately.
60
EWCM9900
ACCESSORIES
Temperature probes
Description
• Probe NTC 103AT, 1.5m (plastic cap, 2-wire cable);
• Probe NTC 6x40, 1.5m (metal cap, silicon or PVC cable);
• Probe NTC 6x50, IP68, 1,5m (cap in TPE Steel, PVC cable);
Pressure transducers
• EWPA030, Pressure transducer 4..20mA/0..30bar;
• EWPA007, Pressure transducer 4..20mA/-0.5..7bar;
code
SN691150
SN8S0A1500
SN8T6N1502
other items available
contact Sales Department
connection
male
female
TD200130
TD200030
TD200107
TD300008
other items available
contact Sales Department
Fan modules
• CFS: single phase speed regulators for currents from 2A to 9A
• CFS05 TANDEM: TRIAC 5A+5A/230V~
• DRV 300: 3 phase 12…20A/420V~ (IP22 or IP55)
various codes
available
other items available
• USB CopyCard programming key for:
• up/downloading parameters
• up/downloading glossaries
• downloading alarms log
CCA0BUI02N000
• PCInterface USB
• PCInterface RS232
PCI6A3000000
PCI5A3000000
other items available
contact Sales Department
• ParamManager
• WebAdapter
SLP05XX000100
WA0ET00X700
USB COPY CARD
Interface modules
Software Tools
61
EWCM9900
PROPER AND IMPROPER USE - RESIDUAL RISKS AND RESPONSIBILITIES
CONDITIONS OF USE - Proper use
For safety reasons, the device must be installed and used
according to the instructions provided. In particular, parts carrying
dangerous voltages must not be accessible in normal conditions.
The device must be adequately protected from water and dust
with regard to the application, and must only be accessible using a
tool (except the front panel).
It is classified:
• according to construction, as an electronic automatic command
device for temperature control, to be incorporated;
• according to the characteristics of automatic operation, as a type
1 B controller;
• according to the software class and structure, as a class A device.
• as a device with class D fire resistance
• device made with class IIIa material
• device with pollution grade 2
• overvoltage category grade II
• ball test temperature: 75°C
Improper uses
Any use other than that expressly permitted is prohibited.
The relay contacts provided are of a functional type and subject to
failure: any protection devices provided for by the product
standards or suggested by common sense for obvious safety
requirements must be installed externally to the device.
RESPONSIBILITY AND RESIDUAL RISKS
Eliwell Controls srl declines any liability for damage due to:
• installation/uses other than those expressly specified and, in
particular, failure to comply with the safety requirements of
established standards and/or specified in this document;
• use on panels that do not provide adequate protection against
electric shock, water or dust when assembled;
• use on panels allowing access to dangerous parts without having
to use tools;
• tampering with and/or modification of the product;
• installation/use on panels not complying with the current
standards and regulations.
LIABILITY CLAUSE
This document is the exclusive property of Eliwell and cannot be reproduced or circulated unless expressly authorised by Eliwell. Every
care has been taken in preparing this document; nevertheless Eliwell declines any liability due to its use. The same applies to any person
or company involved in the creation and preparation of this document. Eliwell reserves the right to make aesthetic or functional changes
at any time without notice.
62
EWCM9900
63
EWCM9900
Eliwell Controls Srl
Via dell’ Industria, 15 Z. I. Paludi
32010 Pieve d’ Alpago (BL) - Italy
Telephone +39 0437 986 111
Facsimile +39 0437 989 066
www.eliwell.it
Sales: +39 0437 986 100 (Italy)
+39 0437 986 200 (other countries)
[email protected]
Technical helpline: +39 0437 986 300
9MA10012 • rel 12/08 • GB
[email protected]
Invensys Controls Europe
An Invensys Company
© Eliwell Controls s.r.l. 2008 All rights reserved.