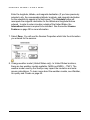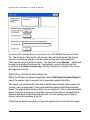
1
SOLMETRIC Solar Test and Measurement Equipment Solmetric SunEye User’s Guide TM Version 2.8 SOLMETRIC SOLAR TEST AND MEASUREMENT EQUIPMENT Solmetric SunEye User’s Guide TM Solmetric Corporation www.solmetric.com Phone 877-263-5026 • Fax 877-263-5026 Document revision date: 1/13/2009 S O L M E T R I C S U N E Y E T M U S E R ’ S G U I D E Limited Hardware and Software Warranty This Solmetric software and the Solmetric SunEyeTM hardware (“Hardware”) are warranted against defects in materials and workmanship for a period of one year when purchased in the United States or two years when purchased outside the United States. During the warranty period, Solmetric will, at its option, either repair or replace products which prove to be defective. The warranty period begins on the date of shipment. For warranty service or repair, this product must be returned to the appropriate authorized repair center listed in the Solmetric SunEye User’s Guide. No returns will be accepted without an RMA (obtain from Technical Support). For products returned for warranty service, the Buyer shall pay for shipping charges to send the product to the repair center, and the repair center shall pay for shipping charges to return the product to the Buyer. However, the Buyer shall pay all shipping charges, duties, and taxes for products returned to the repair center from a country outside of the United States. The forgoing warranty shall not apply to defects resulting from improper or inadequate maintenance by the Buyer, unauthorized modification or misuse, or operation outside of the environmental specifications for the product. Unauthorized modification includes disassembly of the Solmetric SunEye hardware, removal of any part of the Solmetric SunEye hardware, modification to the operating system or operating system settings of the Solmetric SunEye, or the installation of software on the device other than Solmetric SunEye software. The design and construction of any system or building by the Buyer is the sole responsibility of the Buyer. Solmetric does not warrant the Buyer’s system, products, or malfunction of the Buyer’s system or products. In addition Solmetric does not warrant any damage that occurs as a result of the Buyer’s system, product, or the Buyer’s use of Solmetric products. To the extent permitted by applicable law, THE FOREGOING LIMITED WARRANTY IS IN LIEU OF ALL OTHER WARRANTIES OR CONDITIONS, EXPRESS OR IMPLIED, AND WE DISCLAIM ANY AND ALL IMPLIED WARRANTIES OR CONDITIONS, INCLUDING ANY IMPLIED WARRANTY OF TITLE, NONINFRINGEMENT, MERCHANTABILITY OR FITNESS FOR A PARTICULAR PURPOSE, regardless of whether we know or had reason to know ii S O L M E T R I C S U N E Y E T M U S E R ’ S G U I D E of your particular needs. No employee, agent, dealer or distributor of ours is authorized to modify this limited warranty, nor to make any additional warranties. SOME STATES OR COUNTRIES DO NOT ALLOW THE EXCLUSION OF IMPLIED WARRANTIES, SO THE ABOVE EXCLUSION MAY NOT APPLY TO YOU. THIS WARRANTY GIVES YOU SPECIFIC LEGAL RIGHTS, AND YOU MAY ALSO HAVE OTHER RIGHTS WHICH VARY FROM STATE TO STATE OR COUNTRY TO COUNTRY. Limited Remedy Our entire liability and your exclusive remedy shall be the replacement or repair of any Solmetric hardware or software not meeting our Limited Hardware And Software Warranty which is returned to an authorized repair center with a copy of your receipt. IN NO EVENT WILL WE BE LIABLE TO YOU FOR ANY DAMAGES, INCLUDING ANY LOST PROFITS, LOST SAVINGS, OR OTHER INCIDENTAL OR CONSEQUENTIAL DAMAGES ARISING FROM THE USE OF OR THE INABILITY TO USE THE SOLMETRIC SOFTWARE OR HARDWARE (EVEN IF WE OR AN AUTHORIZED DEALER OR DISTRIBUTOR HAS BEEN ADVISED OF THE POSSIBILITY OF THESE DAMAGES), OR FOR ANY CLAIM BY ANY OTHER PARTY. SOME STATES OR COUNTRIES DO NOT ALLOW THE LIMITATION OR EXCLUSION OF LIABILITY FOR INCIDENTAL OR CONSEQUENTIAL DAMAGES, SO THE ABOVE LIMITATION MAY NOT APPLY TO YOU. PLEASE CONTACT TECHNICAL SUPPORT BEFORE RETURNING ANY PRODUCT. iii S O L M E T R I C S U N E Y E T M U S E R ’ S G U I D E Table of Contents LIMITED HARDWARE AND SOFTWARE WARRANTY LIMITED REMEDY II III UNDERSTANDING THE SOLMETRIC SUNEYETM 1 SOLAR PANEL DESIGN AND INSTALLATION PASSIVE SOLAR HOUSE DESIGN AND GREEN ARCHITECTURE HOME AND PROPERTY INSPECTION 1 1 2 GETTING FAMILIAR WITH THE SOLMETRIC SUNEYETM 3 THE SOLMETRIC SUNEYETM INSTALLING THE SOLMETRIC SUNEYETM DESKTOP COMPANION SOFTWARE MINIMUM SYSTEM REQUIREMENTS: INSTALLATION PROCEDURE SYSTEM CONTROLS AND SETTINGS POWER BUTTON TOUCH SCREEN FIVE-WAY NAVIGATION BUTTON NECK STRAP COVER THE SUNEYE™ GPS GPS CONTROLS LED DISPLAY POWER SWITCH SETTING UP THE SUNEYE™ GPS CHARGING THE BATTERY CREATING A BLUETOOTH PARTNERSHIP 4 5 5 5 7 7 7 8 8 9 10 10 10 11 11 11 12 USING THE SOLMETRIC SUNEYETM 13 CHARGING THE BATTERY POWER-UP THE SOLMETRIC SUNEYETM 13 14 iv S O L M E T R I C S U N E Y E T M U S E R ’ S G U I D E SET CORRECT DATE AND TIME CREATE A SESSION CAPTURE A SKYLINE VIEW THE SKYLINE MEASUREMENT DATA ANNUAL SUNPATHS VIEW MONTHLY SOLAR ACCESS VIEW OBSTRUCTION ELEVATION VIEW FULL FISHEYE VIEW SESSION SOLAR ACCESS AVERAGES TOOLS EDIT TOOL ZOOM AND PAN TOOLS MANAGING SESSION AND SKYLINE FILES BROWSING FOR DATA UTILITY FEATURES ALIGN TOUCH SCREEN GPS SETUP SET DATE AND TIME LICENSES SELECT LOCALE ABOUT SOLMETRIC SUNEYETM LICENSE FEATURES 14 15 20 24 25 27 27 29 30 30 30 35 36 36 37 37 38 38 38 39 39 39 USING THE SOLMETRIC SUNEYETM DESKTOP COMPANION SOFTWARE 41 TRANSFERRING AND STORING YOUR DATA VIEWING AND ANALYZING YOUR DATA BROWSING SESSION DATA MANAGING LICENSES EXPORTING AND GENERATING REPORTS PRINT THE REPORT SAVE IMAGES FROM THE REPORT CONVERT REPORT TO OTHER FORMATS EMAILING OR SHARING THE REPORT ELECTRONICALLY EXPORTED DATA FILES 42 42 42 43 44 47 47 47 48 48 SOLAR ACCESS AND INTERPRETATION OF DATA 58 SOLAR IRRADIANCE SHADING WEATHER, AIR QUALITY AND CLOUDS SURFACE ORIENTATION NUMERICAL CALCULATIONS 58 60 60 62 62 MAINTENANCE AND TROUBLESHOOTING 64 v S O L M E T R I C S U N E Y E T M U S E R ’ S G U I D E UPGRADING OR DOWNGRADING SOFTWARE RESET CONTACT INFORMATION FOR SERVICE, TECHNICAL ASSISTANCE, AND SALES vi 65 66 67 S O L M E T R I C S U N E Y E T M U S E R ’ S 1 Chapter G U I D E Understanding the Solmetric SunEyeTM The Solmetric SunEyeTM (patent pending) provides complete solar access and shade analysis in an integrated powerful hand-held tool for the following uses: Solar panel system design and installation Passive solar house design and green architecture Landscape design and landscape architecture Home and property inspection Solar Panel Design and Installation The Solmetric SunEyeTM is an invaluable tool for the professional solar installer, saving time and money and helping to design the highest performance systems. Home and business owners who care about the performance and payback of their systems hire installers that use the Solmetric SunEyeTM. It’s equally useful for PV, passive hot water, roof mount or ground-mount systems. The Solmetric SunEyeTM can help: Optimize new systems for maximum production. Analyze existing installations to solve problems of under production. Identify specific shade-causing obstructions and know instantly how much additional energy would be produced if the obstructions were removed. Passive Solar House Design and Green Architecture The Solmetric SunEyeTM is the right tool for the job when you need accurate sitespecific solar access data for a new home or renovation. Optimize the orientation of a structure by identifying where and when the sun will shine. The Solmetric 1 S O L M E T R I C S U N E Y E T M U S E R ’ S G U I D E SunEyeTM helps you answer many different questions. For example, “Will there be enough sun in the winter for passive heating of the house given the site-specific shading?”, or “How will removing the large oak tree on the south-west corner affect the warming and cooling of the building?” Furthermore, by collecting data inside an existing structure, you can identify the amount of direct sunlight that will enter a window or skylight or identify the perfect location for a new window or skylight. Home and Property Inspection The Solmetric SunEyeTM gives professional home and property inspectors a way to provide their clients with important information about the solar access of a property. This information can be useful for: Identifying potential sites for solar panels, gardens, or new windows. Determining the amount of passive solar heating or cooling a particular building will experience. Determining how much direct sunlight will enter a particular window or skylight. 2 S O L M E T R I C S U N E Y E T M U S E R ’ S 2 Chapter G U I D E Getting Familiar with the Solmetric SunEyeTM The Solmetric SunEyeTM (patent pending) includes features that make it easy and efficient to use. Point-and-click data gathering Instant measurement results: Plots sunpaths for the latitude and longitude of the site Determines annual, seasonal, monthly, and quarter-hourly shading percentages Automatically adjusts data for magnetic declination for a specific location Store more than 50 site readings on the hand-held unit Transfer data to desktop PC for later review Desktop Companion software for desktop PC automatically generates reports and exported data files Hand-held, all-in-one tool with Integrated fish-eye camera and processing software Easy-to-use finger-driven touch screen interface 3 S O L M E T R I C S U N E Y E T M U S E R ’ S G U I D E The Solmetric SunEyeTM 1 Fisheye lens and digital camera 7 Device/USB and charge port 2 Compass 8 5-way navigation button 3 Bubble level 9 Soft reset pin-hole 4 Power on/off button 10 Neck strap attachment points 5 Touch screen and LCD 11 Tripod mount 6 Protective cover 4 S O L M E T R I C S U N E Y E T M U S E R ’ S G U I D E Installing the Solmetric SunEye Desktop Companion Software TM Before you start using your Solmetric SunEyeTM it is recommended that you install the Solmetric SunEyeTM Desktop Companion Software. Although you won’t have any data to analyze on the desktop yet, this will allow you to view the User’s Guide. Minimum system requirements: Windows Vista, Windows XP SP2 (Professional, Home, or Media Center), Windows 2000 SP4, 700 MHz, 256 MB RAM, 20 MB hard drive space, MS Internet Explorer. Systems that do not meet these requirements may not operate correctly. Installation Procedure 1. Insert the CD-ROM that came with the Solmetric SunEye into the CD drive on your Windows desktop computer. TM 2. If the welcome screen does not automatically open, click Start then My Computer and double-click on the CD drive. Then double-click on setup.exe. 3. Follow the instructions in the welcome screen to install the Solmetric SunEye Desktop Companion Software and update the software on the Solmetric SunEye device. If not already installed, the installation will install Microsoft ActiveSync (for Windows XP and Windows 2000) or Windows Mobile Device Center (for Windows Vista) which is needed to communicate with the Solmetric SunEye device. TM TM TM 4. You can view the Users Guide from the welcome screen by clicking on the “View Solmetric SunEye Users Guide” link in the welcome screen. You will need a PDF reader to view the Users Guide. You can install Adobe Reader by clicking on the “Install Adobe Reader” link. TM If at any time the Solmetric welcome screen is not showing, click on the Solmetric installer icon in the task bar at the bottom of your screen. If the welcome screen is accidentally closed, click on setup.exe from the CD-ROM as described in step 2 or re-insert the CD-ROM to automatically launch. 5. During the installation, the device connectivity software will try to connect to the Solmetric SunEye device. TM 5 S O L M E T R I C S U N E Y E T M U S E R ’ S G U I D E For Windows 2000 and Windows XP, and Solmetric SunEye devices labeled with “SunEye-100N v2”, ActiveSync will automatically start the “Synchronization Setup Wizard”. TM Select “Cancel” to exit this dialog. 6. You can now launch the Solmetric SunEye Desktop Companion from the Solmetric SunEye icon on your desktop or from the start button: > All Programs > Solmetric SunEye > Solmetric SunEye TM TM If this is the first time launching the Solmetric SunEye Desktop Companion, or there has never been data transferred from the Solmetric SunEye hand-held device, then there is nothing that can be done on the desktop at this point other than view the User’s Guide. The screen you will see looks like this: TM 7. You can view the User’s Guide by selecting Help > Solmetric SunEye User‟s Guide… 6 S O L M E T R I C NOTE S U N E Y E T M U S E R ’ S G U I D E You must have Adobe Reader® installed in order to view the User’s Guide. Adobe Reader can be installed from the CD-ROM welcome screen (setup.htm). Simply click on “click here to install Adobe Reader”. 8. You can exit the application by selecting File > Exit. System Controls and Settings Power Button Pressing the power button switches on or off the Solmetric SunEyeTM device. Pressing the power button and holding it for 4 seconds when the device is on, switches off the backlight without powering down. Pressing and holding the power button again for 4 seconds switches the backlight back on. NOTE For proper operation it is important to maintain the charge of the battery even when not in use. Prolonged storage will result in the slow discharge of the battery. When the SunEyeTM is not in use, it should be connected to AC power or to a computer with the Device/USB cable. It is not harmful to the device to be continuously connected to AC power or to a computer Touch Screen The touch screen is the main interface that you will use to interact with the Solmetric SunEyeTM. Although a stylus has been included, it is not necessary for general operation. The user interface has been carefully designed to allow easy control using your finger alone. Touching your finger tip to the screen is similar to moving a mouse cursor or other input device on a personal computer screen. Tapping your finger on the screen is similar to clicking a mouse. NOTE You will find that your fingernail works better than the fingertip on the touch screen. 7 S O L M E T R I C S U N E Y E T M U S E R ’ S G U I D E Five-Way Navigation Button The five-way navigation button can also provide input to many of the navigation features displayed on the Solmetric SunEyeTM screen. For example, you can use the five-way navigation button to scroll through menus: Pressing the center button brings up the main menu. Pressing the left, right, up, or down button changes the selected menu item. The menu selection is highlighted in blue. Pressing the center button again selects the highlighted menu option. Small arrows show possible directions that can be pressed on the button to move to the next menu. There are other specific uses of the 5-way navigation button that are described in the following sections and chapters. NOTE The Solmetric SunEyeTM uses an HP iPAQ as the processor and user interface. However, this iPAQ may not be removed from the device, and there is no access to the operating system of the iPAQ. Attempts to remove the HP iPAQ, modify the operating system settings, or install software other than the Solmetric SunEyeTM software will void the warranty. Neck Strap Your Solmetric SunEyeTM came with a neck strap. You may attach the strap as follows: 1. The ends of the strap webbing are run twice through buckles on each end of the strap. Open one of the loops by removing the strap webbing from the buckle so that the webbing only passes once through the buckle. 2. Insert the webbing through one of the neck strap attachment points on the base of the Solmetric SunEyeTM. 3. Pass the webbing back through the buckle. 4. Repeat for the other end of the strap. 5. There is a small elastic loop on the strap to place the SunEye™ GPS. 8 S O L M E T R I C S U N E Y E T M U S E R ’ S G U I D E Cover Your Solmetric SunEyeTM has a protective cover that folds open when in use. When you are capturing data, open the cover entirely so that the compass is level. The cover can also be used as a visor to shade the sun from the LCD display and improve visibility. 9 S O L M E T R I C S U N E Y E T M U S E R ’ S G U I D E The SunEye™ GPS The SunEye™ GPS can acquire your current location when creating or modifying a session and when acquiring skylines. GPS Controls 5 2 4 3 6 1 1 Power jack (mini USB) 4 Bluetooth status LED (blue) 2 Power switch 5 GPS status LED (orange) 3 Battery status LED (red/green) 6 Internal antenna LED Display The Solmetric GPS has three LED lights, one for the Bluetooth status, the second for the battery status, and the third for the GPS status. Color Status Function 10 S O L M E T R I C S U N E Y E T M U S E R ’ S Bluetooth Status Blue LED (4) Battery Status LED (3) GPS Status LED (5) G U I D E Always on Bluetooth not connected Slowly blinking Bluetooth is in sleep mode for low power consumption Quickly blinking Bluetooth is connected Red Blinking Battery is low, charge the GPS Green Always on Battery is charging Green Blinking Battery is fully charged Orange Always on Acquiring satellites, GPS position not fixed Blinking GPS position is fixed Power Switch Sliding the power switch (2) toward the center will turn the GPS on. Setting up the SunEye™ GPS Charging the Battery Before using your SunEye™ GPS, you will need to fully charge the battery. Plug in the GPS power cable and connect it to the GPS power jack, this will begin to charge the battery. When the battery is charging, the battery status LED will be solid green. When the battery is fully charged, the battery status LED will blink green. When fully charged, the GPS will operate approximately 24 hours. When the battery status LED is red, the battery is critically low, and the GPS will need to be charged again. Low battery power for the GPS or the Solmetric SunEye™ may affect signal reception. 11 S O L M E T R I C S U N E Y E T M U S E R ’ S G U I D E Creating a Bluetooth Partnership The Solmetric SunEye™ communicates with the GPS using Bluetooth. Before using your SunEye™GPS, you will need to create a Bluetooth partnership between the Solmetric SunEye™ and the GPS. Turn on the Solmetric SunEye™ and the GPS. Select then to access the utility features. Select GPS Setup… , from the GPS Setup dialog, select New GPS. The Solmetric SunEye™ will search for a SunEye™ GPS, this may take a while since it is locating all Bluetooth devices in the area. A partnership will be created when the SunEye™ GPS is found. If you want to use a different SunEye™ GPS with your Solmetric SunEye™, you will need to create a new Bluetooth partnership with the new GPS. See the section Create a Session on page 15 for using the GPS to acquire the session location. See the section GPS Setup on page 38 for automatically acquiring the location for each new skyline. NOTE If when trying to create a Bluetooth partnership, a SunEye™GPS was found with an invalid ID, you may need to upgrade the SunEye™ software to validate the GPS. Recent software is available at: www.solmetric.com/support. GPS Usage For best performance: Make sure the GPS has been powered on for at least 40 seconds before taking your first measurement In general any GPS receiver performs best in open space where it can see open sky. 12 S O L M E T R I C S U N E Y E T M U S E R ’ S 3 Chapter G U I D E Using the Solmetric SunEyeTM This chapter contains step-by-step instructions for the basic use of the Solmetric SunEyeTM, including the collection of solar access data. Charging the battery The battery in the Solmetric SunEyeTM is not removable. It may be recharged by attaching the device to a PC via the Device/USB cable or by using the AC wall-plug or the car charger. All cables are connected to the Solmetric SunEyeTM via the Device/USB port on the right side of the device. If the battery is completely discharged, you must use the AC charger if you want to operate the device while it is charging. The Device/USB cable and the car charger do not supply enough current to both charge a completely discharged battery and operate the device. Charging the battery can take up to 4 hours. Once the battery has been charged, the device will operate without the external power connection for approximately 3 hours of continuous use. When the battery is charging, the orange LED to the left of the screen will blink. When the battery is fully charged the LED will be solid on. When the AC cable or Device/USB cable is disconnected, the LED will be off. To see the current battery level of your Solmetric SunEyeTM, select the menu icon , then the utility icon TM SunEye . ,and then select About Solmetric For proper operation, it is important to maintain the charge of the battery, even when not in use. Storage in the off state without the AC power or Device/USB cable attached will result in the slow discharge of the battery. In this off state, the battery will last approximately 9 days. Therefore, when the 13 S O L M E T R I C S U N E Y E T M U S E R ’ S G U I D E SunEyeTM is not in use, it should be connected to AC power or to a computer that is on via the Device/USB cable. It is not harmful to the device to be continuously connected to AC power or to a computer. It is also not harmful to the device or to your data for the battery to fully discharge, however, if this happens, you may be forced to go through a series of steps including a touchscreen alignment and tutorial. Power-Up the Solmetric SunEye TM 1. If the battery has not been fully charged as described above, connect the power cable to the Device/USB port, located on the right side of the Solmetric SunEyeTM. 2. Press the Power button. Set correct Date and Time 3. Select the menu icon at the bottom-left of the screen. You will see the TM Solmetric SunEye menu. Alternatively, press the center navigation button to bring-up the menu. 4. Select to access the utility features 5. Select Set Date and Time… 6. Enter correct date, time, and time zone. 14 S O L M E T R I C S U N E Y E T M U S E R ’ S G U I D E Create a Session A session is like a site visit. You would generally create a new session for each new client. Each session will generally consist of multiple skyline data sets. The Session menu selections are as follows: Properties – shows information about the current session. Browse – allows you to view and select a previously created session. New – creates a new session. 1. Select the menu icon then Session to see the session menu. 2. Select New. You will see the New session dialog box. 3. You can accept the default session name (for example, Session 1), or you can select the keyboard icon next to the Session Name text box on the display and enter a different name. 15 S O L M E T R I C S U N E Y E T M U S E R ’ S G U I D E 4. If you pressed the keyboard icon, next select the characters from the keyboard to name the session. Then select Enter. For example, if you were creating a session for Roger Smith’s house, you could enter the name to appear as shown. The keyboard entry dialog has a few features that make entering and modifying text quick and easy. Select the button to switch between an alphabetical keyboard and a QWERTY style keyboard. Also, as you type text, the Solmetric SunEyeTM predicts the words you are typing. To select the predicted word, click on the word where it appears above the text area, as shown in the example below. This feature reduces the amount of typing required to enter text. Click inside the text box (where the typed letters appear) to bring up the scroll control. The scroll control allows you to move the cursor inside the text area to delete or add letters. Use the arrow buttons to move the cursor. Press Clear Text to clear all text. Click anywhere outside the scroll control box to close the scroll control. 16 S O L M E T R I C S U N E Y E T M U S E R ’ S G U I D E Additionally, you can select the keyboard icon next to the Session Note text box and enter a description of the session. For example, you could enter the address of the site or the client’s contact information. 5. Select Next to advance to the Location dialog box to enter the site location information. 6. Select the location of the site using one of the following methods: Select a city from a list of cities. In the Location dialog, select List of cities for the current region, then Next. Select the state where your site is located. 17 S O L M E T R I C S U N E Y E T M U S E R ’ S G U I D E Click on Next and select the nearest city to the site. The Solmetric SunEyeTM will automatically determine the correct latitude, longitude, and magnetic declination for the city you select. It is not necessary to select the exact city since the latitude and longitude will be very similar for nearby cities. The lists of states and cities available depend on the currently selected region; see section Select Locale on page 39. The city latitude and longitude data was obtained from www.geonames.org. Use the SunEye™ GPS to acquire your current location. In the Location dialog box, select SunEye™ GPS, then Next. Make sure your GPS is on, click on Acquire Session Location and the latitude, longitude and calculated magnetic declination will be acquired. If you would like the GPS to acquire the location for each new skyline, check Get new GPS location for each skyline. In order to use coordinates outside of the United States, the International license is required to be installed. See the section License Features on page 39 for more information. Alternatively, enter the location manually. In the Location dialog box, select Manual Entry. 18 S O L M E T R I C S U N E Y E T M U S E R ’ S G U I D E Enter the longitude, latitude, and magnetic declination. (If you have previously selected a city, the corresponding latitude, longitude, and magnetic declination for the selected city appear in the text boxes.) The Calculate button will recompute the magnetic declination for the latitude and longitude that are entered. In order to enter a location outside of the United States, the International license is required to be installed. See the section License Features on page 39 for more information. 7. Select Done. You will see the Session Properties which lists the information you entered for the session. 8. Change weather model (United States only). In United States locations, there are two weather models available: NASA and NREL – TMY3. The weather model used by the SunEye may impact the insolation and solar access calculations. To learn more about the weather models, see Weather, Air quality and Clouds on page 60. 19 S O L M E T R I C S U N E Y E T M U S E R ’ S G U I D E To select the most appropriate weather model for each session, select Session then Weather Properties menu. Select NREL – TMY3 or NASA. If NREL – TMY3 is selected, then information about the selected NREL weather station is displayed. By default, the SunEye selects the weather station that is closest in geographical distance to the session location entered by the user. The name, WBAN identification number, and latitude and longitude of the station are displayed, as well as the distance from the session location to the station location. To change the weather station, for example, to better match weather patterns at the selected location, select “Change Weather Model” select the US state or territory, then pick the desired weather station from the list. 9. Change any information, as necessary. NOTE The time zone associated with a session is whatever the time zone setting was last set to (via the Set Date and Time… dialog box) at the time the session is created. Changing the time zone (via the Set Date and Time… dialog box) does not change the time zone of any existing session(s). It is not possible to change the time zone of an existing session. Capture a Skyline A skyline is the basic data set representing the solar access for a particular location within a session or site visit. You will generally capture multiple skylines for each session. For example, if you were analyzing a roof site for a new solar installation, you might capture a skyline at each corner and at the center of the 20 S O L M E T R I C S U N E Y E T M U S E R ’ S G U I D E roof. A skyline consists of a fisheye image, superimposed sunpaths, and the calculated solar access numbers. 1. Select > Skyline > New. Before capturing the first skyline in a new session, you will need to set the default skyline panel orientation for the session from the Panel Orientation dialog box. You can change the default skyline panel orientation by tapping on the Panel Azimuth and Panel Tilt numeric boxes. If the True azimuth radio button is selected, then the panel azimuth entered is the true azimuth. If the Magnetic azimuth radio button is selected, the panel azimuth entered is magnetic. NOTE For panel azimuth; 0° is north, 90° is east, 180° is south, and 270° is west. For panel tilt, 0° is flat, 90° is vertical. Tap the Set Tilt = latitude, Azim = 180°(S) button to set the orientation to the default, which is tilt = latitude, azimuth = 180° (in northern hemisphere) or 0° (in southern hemisphere). NOTE When the first skyline in a new session is created, the skyline’s panel orientation is set to the default skyline panel orientation. The panel azimuth and panel tilt of a skyline can later be changed from Skyline > Properties. When a new skyline is created, the panel orientation always defaults to the orientation of the last skyline. See the section Surface Orientation on page 62 for more information. Set the default skyline panel azimuth and panel tilt, then select OK. 21 S O L M E T R I C S U N E Y E T M U S E R ’ S G U I D E You will now see a live preview of the skyline through the fisheye lens with the correct sunpaths for that location superimposed on top. 2. Be sure the protective cover is completely open so that the compass is level. 3. For northern hemisphere SunEyeTM devices (100N and 110N), orient the Solmetric SunEyeTM toward the magnetic south by lining up the white end of the compass needle with S. This orientation is for a location in the northern hemisphere. For a location in the southern hemisphere, line up the white end of the compass needle with N to orient the device magnetic north. For the southern hemisphere SunEyeTM device (110S), orient the Solmetric SunEyeTM toward the magnetic north by lining up the red end of the compass needle with N. This orientation is for a location in the southern hemisphere. For a location in the northern hemisphere, line up the red end of the compass needle with S to orient the device magnetic south. NOTE The Solmetric SunEyeTM automatically accounts for the magnetic declination, based on the location you entered for the session. 4. Hold the instrument level by adjusting the position and observing the bubble level. It is level when the bubble is inside the center circle. 22 S O L M E T R I C NOTE S U N E Y E T M U S E R ’ S G U I D E The accuracy of the measurement is directly related to how close to magnetic south the compass points and to how level the unit is held at the time the skyline is captured. Care should be used during these critical steps. 5. Press Snap or press the center navigation button. The Solmetric SunEyeTM performs the following tasks: Captures the entire horizon with the built-in fisheye lens and digital camera. Plots the sunpaths on top of the captured digital image of the skyline. Acquires the location using the GPS if this property is set in > >GPS Setup…. Analyzes the image and attempts to identify unobstructed open sky and shade-causing obstructions. Calculates the monthly, seasonal, and annual solar access percentages. 6. Verify that the software has correctly identified the open sky and obstructions. You can verify that the yellow and green annotation is correct by looking at the image through the annotation colors to make sure obstructions are green and open sky is yellow. Incorrect identification will affect the accuracy of the calculations. Correct the annotation if needed with the edit tool as described below. NOTE Skylines are automatically saved every time they are captured. NOTE To delete the skyline data that you just captured, press the navigation button to the left. Alternatively, to immediately capture another skyline, press the navigation button to the right. 7. Tap your finger on the top-right corner of the screen to enter a note for the captured skyline. The note could include a description of where the skyline was captured. For example, you could enter “Southeast corner of roof.” You can also enter a skyline note via the skyline properties dialog, described in the next step. 8. You can view and change the properties of a skyline by selecting >skyline>skyline properties…. 23 S O L M E T R I C S U N E Y E T M U S E R ’ S G U I D E The skyline properties dialog had two tabs, Panel and General. The panel orientation for a skyline can be modified in the Panel tab. The panel orientation is changed in a method similar to setting the default skyline panel orientation in the Panel Orientation dialog box, see page 20 for details. Other skyline properties can be accessed in the General tab. You can enter or change the note for the skyline by tapping on the SkyXX Note text box. If a GPS was used to make a measurement at the time the skyline was created, then the GPS location will be displayed. View the Skyline Measurement Data You can choose from three main views of your skyline data, and one average data view of all skylines in your session: 24 S O L M E T R I C S U N E Y E T M U S E R ’ S G U I D E Annual sunpaths view Monthly solar access view Obstruction elevation view Full fisheye view Session solar access averages Annual Sunpaths View The first display that you see after you capture a new skyline is the annual sunpath view. You can also access this view by selecting >View>Annual Sunpaths. This view shows the annual sunpaths drawn on top of the captured skyline. The detected open sky is shown in yellow. The detected shade-causing obstructions are shown in green. The results panel in the lower center portion of the display can be configured to show solar access percentages or solar resource percentages. Solar Access. The annual and seasonal solar access is shown in the results panel. The seasonal month ranges, May-Oct and Nov-Apr, represent the common peak and off-peak rate seasons. Your local utility may use a different set of months. Solar Resource. . Tilt Orientation Factor (TOF) and Total Solar Resource Fraction (TSRF) are used to compare the actual site characteristics to the optimal characteristics at that site. TOF and TSRF can only be displayed when the NREL – TMY3 weather model is selected. See Weather, Air quality and Clouds on page 60 for more information. To toggle between solar access and solar resource, select: Current View, and select Solar Access or Solar Resource. 25 >View>Define S O L M E T R I C NOTE S U N E Y E T M U S E R ’ S G U I D E You can magnify the screen using the zoom tool. See Zoom and Pan Tools below. The results panel with the solar access/solar resource numbers and edit button can be lowered to see the image behind it by pressing the down arrow. It can be raised again by pressing the up arrow. The sunpaths are shown in “clock time”, meaning the hour lines represent actual clock time. This is in contrast to “solar time”. Solar time is based solely on the location of the sun in the sky and can differ from clock time by +/- 20 minutes. NOTE The sunpath hour lines do not take into account daylight savings adjustments. Month labels. The month lines represent the path of the sun on the 21st day of that month. Because the sunpaths show clock time, it is not possible to clearly display all 12 months of the year. The sunpaths will always display the summer and winter solstices (June 21st and December 21st). To select which months are shown in between the solstices, select: >View>Configure Current View and select Jun-Dec or Dec-Jun for the month labels. 26 S O L M E T R I C S U N E Y E T M U S E R ’ S G U I D E Monthly Solar Access View Select >View>Monthly solar access. You will see the bar chart of the monthly solar access for the location where you captured data. The height of the bars and the numbers at the top of each bar, indicate the percentage of solar energy available each month for the site-specific shade conditions. If there were no shade obstructions, the bars would all indicate 100%. If the location were shaded all year round the bars would all indicate 0%. Obstruction Elevation View Select >View>Obstruction elevation. You will see the graph showing elevation angle of the highest obstruction at each azimuth. The Obstruction elevation view can be configured for a range of azimuth values to display the elevation data trace every 1 degree, bars showing maximum (or average) data within specified azimuth windows, and sunpaths. 27 S O L M E T R I C NOTE S U N E Y E T M U S E R ’ S G U I D E Some information from the SunEye may be lost in Obstruction elevation view.The elevation data shows the highest obstruction elevation data, open sky that is below an obstruction will not be visible in the Horizon view. This is common when there are overhanging obstructions, such as a tree branch or light post. To configure the display for Horizon view, select Configure or >View>Configure Current View. The Obstruction Elevation Properties dialog is displayed. In the Display tab, select what data will be displayed on the graph: Obstruction is the elevation data with one degree resolution; Azimuth window is the section of azimuth values for which the maximum (or average) data will be displayed; and Sunpaths. Also select which month labels will be displayed on the sunpaths, Jun-Dec or Dec-Jun. 28 S O L M E T R I C S U N E Y E T M U S E R ’ S G U I D E In the Azim Range tab, select the Azimuth Center, in degrees, eg. 180 for south, This value is the center of the x-axis in the graph. Next, select the Number of windows that will be displayed and the Azimuth window size in degrees. Note that there must be an odd number of Azimuth windows, since there is one center window centered around the Azimuth center, and an equal number of Azimuth windows on each side of that center window. The Start and Stop azimuth values will be automatically computed from the above values. Lastly, select whether the Maximum or Average elevation value will be displayed for each Azimuth window. Press OK, and the graph will be modified with the new settings. Select Elevation Table to show a table of the specified Elevation values in the Azimuth windows specified, for example, as shown below. Select OK to return to the graph. Full Fisheye View Select >View>Full Fisheye. This display option shows the full view of the site captured through the fisheye lens of the camera. 29 S O L M E T R I C NOTE S U N E Y E T M U S E R ’ S G U I D E You can magnify the screen using the zoom tool. See Zoom and Pan Tools below. Session solar access averages Select >Session>Session Solar Access Averages. After selecting the skylines in the session you would like to average, the Session Solar Access Averages will be displayed. This view calculates the average annual, seasonal, and monthly solar access values for the selected skylines in the currently opened session. Tools This section describes the Edit Tool and Zoom and Pan Tools. Edit Tool The edit tool allows you to modify the annotated open sky and shade-causing obstructions for the following uses: 30 S O L M E T R I C S U N E Y E T M U S E R ’ S G U I D E See the effects of adding or removing shade-causing obstructions. For example, a tree or part of a tree can be removed to see the effect of cutting down or trimming the tree. Or, the area in between story poles can be filledin to see the effect of a new proposed building. Correct the open sky annotation if the software incorrectly detects the open sky or obstructions. When your edits to the annotated open sky and obstructions are applied, the Solmetric SunEyeTM recalculates the solar access numbers. The new calculations allow you to see the difference in solar access between current conditions versus hypothetical conditions. Editing on the Hand-Held Device 1. Open the edit tool by pressing the button in the bottom right corner of the results panel in the annual sunpaths view. If you are not already there, you can get to the annual sunpaths view by selecting Sunpaths. 2. To add open sky, select the yellow open sky paint brush open sky portion of the captured image: >View>Annual to edit the a. Click in the image where you want to add open sky. NOTE b. You can only draw within the sunpath region on the hand-held device. In the desktop software there is the option to edit outside of the sunpath region as described below. Paint by moving your finger around in the image. Your finger nail provides the best control for painting. Try to maintain contact with the screen when moving the brush around the image. You can hold the paint brush anywhere in the large box that surrounds the small yellow square. Only the yellow square actually paints. 31 S O L M E T R I C S U N E Y E T M U S E R ’ S G U I D E 3. To add obstructions, select the green obstruction paint brush to draw in shade-causing obstructions. For example, you may want to determine what the solar access will be when a fast-growing tree is a few feet taller or when a new structure is built. You can do this by painting-in the new obstruction. 4. To cover a large area on the screen with the paint brush, select the brush icon again to increase the size of the brush. You will see two squares on the tool icon, indicating the large brush: . 32 S O L M E T R I C S U N E Y E T M U S E R ’ S G U I D E If you want to return to the smaller brush size, select the brush tool again to decrease the size of the brush. You will see one square on the tool icon, indicating the small brush. 5. To enable the editing of the outside sun paths, select “Show shading outside sunpaths” from within the edit tool. The screen will change to show the entire image as opposed to just in the sunpath region as shown below: 6. Select the X icon and then select Apply Changes to apply the edits to the annual solar access calculation. If you want to keep the current annotation of the open sky and obstructions, select Cancel Changes. NOTE You can magnify the image using the zoom tool as described below in the section Zoom and Pan Tools. Editing in the Desktop Companion Software Editing in the Desktop Companion software is identical to editing on the hand-held device, as described above. The edit tool in the Desktop Companion software is shown below: 33 S O L M E T R I C S U N E Y E T M U S E R ’ S G U I D E To enable the editing outside sun paths, select “Show shading outside sunpaths” from within the edit tool. The screen will change to show the entire image as opposed to just in the sunpath region as shown below: 34 S O L M E T R I C S U N E Y E T M U S E R ’ S G U I D E NOTE Setting the editor to edit outside of sunpath region will cause the exported report to show the annotations outside of the sunpaths as well. NOTE Editing outside of the sunpath region has no effect on the solar access values reported by the SunEye. Zoom and Pan Tools You can magnify the skyline image using the zoom tool and pan the screen using the pan tool. These tools are available in the following display modes and views: Annual Sunpaths View Full Fisheye View Edit mode While in the Annual Sunpaths or Full Fisheye views, you can access the zoom and pan tools by selecting >View > Zoom. In Edit mode, the zoom and pan tools are part of the tool bar on the right side of the display. Use the zoom-in the displayed image. and zoom-out tools to magnify or de-magnify Pan around the image of skyline data by sliding your finger across the screen. Using your fingernail, as opposed to fingertip, works best. NOTE If you are in the edit tool, you will need to select the pan tool before you can pan the image. 35 S O L M E T R I C S U N E Y E T M U S E R ’ S G U I D E Managing Session and Skyline Files The Solmetric SunEyeTM organizes the solar access data in Sessions and Skylines. Session A “Session” is a collection of measurement data that was taken for a particular site visit. You will generally create a new session for each client or site you visit. An example of a session name might be “Roger Smith’s House”. One session will generally contain multiple skyline data sets. You can add notes to the session to help identify the session in the future. For example, you could include client contact information or other information about the particular site being analyzed. Skyline A “Skyline” is a single set of solar access data captured at a specific location within a site. For example, one skyline might be captured at the north side of the roof of Roger Smith’s house. Another skyline might be captured at the center of the roof of Roger Smith’s House. A skyline includes a fisheye image, a sunpath diagram, and solar access calculations. Every time a new skyline is captured, the data is stored under the current session. One session can hold many skylines. You can add notes to a skyline to help identify the skyline in the future. For example, you could include the location of the captured data such as “north side of roof.” NOTE The Solmetric SunEyeTM can store more than 50 skylines (the actual number depends on the particular images captured and can get up to 200 in some cases). The number of sessions does not matter. You can have one session with 50 skylines or 50 sessions with one skyline each. Browsing for Data You can view previously saved session and skyline data by browsing the stored sessions or skylines. 36 S O L M E T R I C S U N E Y E T M U S E R ’ S G U I D E To Access the Sessions Select >Session>Browse… to see a list of currently stored sessions. Select a session from the list. Select Open to make the selected session the currently open session. Select Delete to erase the selected session and all of the associated skylines from memory. Select >Session>Properties to see the session name, notes, and location information for the currently open session. To Access the Skylines of the Currently Open Session Select >Skyline>Browse… to see a list of stored skylines that make up the currently open session. Select a skyline from the list. Select Open to make the selected skyline the currently open skyline. Select Delete to erase the selected skyline from memory. Select NOTE >Skyline>Skyline Note… to see or change the skyline note. You can also use the Solmetric SunEyeTM Desktop Companion Software to transfer the sessions and skyline data through USB to your PC to store, further analyze the data, or add or modify notes. See the next chapter, Using the Solmetric SunEyeTM Desktop Companion Software. Utility Features Select then to access the utility features. The utility features are: Align Touch Screen Use this to re-align the touch screen if the touch screen appears to respond to clicks offset from where you touch. When performing a touch screen alignment, use the stylus or a pointed (but not sharp) implement. It is important to hit the targets accurately and to not slide off the targets. The procedure will repeat until a set of valid touch points have been recorded. 37 S O L M E T R I C S U N E Y E T M U S E R ’ S G U I D E GPS Setup Use this dialog to setup the SunEye™ GPS. Click on Test GPS to test the GPS by acquiring the current location. Click on Change GPS to create a new Bluetooth partnership with a different SunEye™ GPS. You will need to create a Bluetooth partnership between the Solmetric SunEye™ and the GPS before trying to acquire a location. If this is the very first time using a GPS with your Solmetric SunEye™ click on New GPS rather than Change GPS to create the initial partnership. Check Get new GPS location for each skyline to get the GPS location with each new skyline. Set Date and Time Use this to set the current date, time, and time zone. Licenses Use this dialog to show which licenses are currently installed on your Solmetric SunEyeTM. Licenses are required to unlock additional functionality that is not included with the basic software. For more information about licenses see the section License Features on page 39. 38 S O L M E T R I C S U N E Y E T M U S E R ’ S G U I D E Select Locale Use this dialog select the language and region of your device. Selecting the region will change the list of cities available for setting the session location. The selected region will also change the formatting of numbers and time/dates to be region specific. The International license is required to select language or region to anything other than English and United States. See the section License Features on page 39 for more information about licenses. About Solmetric SunEyeTM Use this to get information about the Solmetric SunEyeTM, including software version and battery level. License Features The Solmetric SunEyeTM software can be enhanced with additional sets of features by purchasing licenses. Currently, the only additional license available for purchase is the International license. For information on how 39 S O L M E T R I C S U N E Y E T M U S E R ’ S G U I D E to see which licenses are installed or to install new licenses on your Solmetric SunEyeTM device, see the section Managing Licenses on page 43. For information on how to purchase licenses, go to www.solmetric.com. International License – This license provides international support by allowing selection of the language and region. See the section titled Select Locale on page 39 for more information. 40 S O L M E T R I C S U N E Y E T M U S E R ’ S 4 Chapter G U I D E Using the Solmetric SunEyeTM Desktop Companion Software The Solmetric SunEyeTM desktop companion software has a similar user interface to the hand-held device. Once your Solmetric SunEyeTM has been “synched” with the companion software through the Device/USB cable, you can transfer your data from the Solmetric SunEyeTM to your desktop PC. The data on your desktop PC is archived for later viewing and analysis. The same data views and tools available from the hand-held device are also available from the desktop software. The companion software also allows you to export the measurement data to a single report and a variety of file formats. This chapter is a reference for the Solmetric SunEyeTM desktop companion software operation and includes the following sections: Transferring, Storing and Viewing Your Data Viewing and Analyzing your Data Exporting and Generating Reports If you have not yet installed the Solmetric SunEye Desktop Companion software, please refer to the instructions in the section Installing the Solmetric SunEyeTM Desktop Companion Software on page 5. TM Launch the Solmetric SunEye Desktop Companion from the Solmetric SunEye icon on your desktop or from the Windows start button: TM >All Programs>Solmetric SunEye>Solmetric SunEye. 41 S O L M E T R I C S U N E Y E T M U S E R ’ S G U I D E Transferring and Storing Your Data Within the Desktop Companion application, select File>Transfer from Device. The data transfer moves all sessions and skylines from your hand-held device to your desktop PC. The data files are no longer available on the hand-held device after the data transfer takes place. The data is stored on your PC in the location “My Documents/Solmetric/SunEye/Sessions.” The directory name for each transferred session is a combination of the session name and the time and date the session was created. For example, “2006_08_16.222016;Session 1.” This way multiple sessions with the same name do not get overwritten. Viewing and Analyzing your Data The Solmetric SunEyeTM desktop companion software has a similar user interface to the hand-held device. Once you have transferred your data from the hand-held device to the desktop PC, you can: Browse sessions by selecting session>browse… (See below) Browse skylines in the currently open session by selecting skyline>browse… View the data for the currently open skyline via the view menu. Modify or add session or skyline notes. Edit the open sky regions of a skyline. Browsing Session Data You can browse sessions by selecting session>browse… You will see the following dialog box: 42 S O L M E T R I C S U N E Y E T M U S E R ’ S G U I D E By default sessions are stored in: My Documents\Solmetric\SunEye\Sessions You can display sessions from a different directory by selecting , then selecting Change „Look In‟ location… If you select Set „Look in‟ location to default it will automatically display sessions from the default sessions directory. NOTE The Session browse dialog orders sessions with the most recently created session at the top. You can re-order the list of sessions based on other column values by clicking on the column heading that you would like to sort by. Managing Licenses Select Tools>Device Licenses… to view installed licenses and to install new licenses on the currently connected SunEyeTM device. For more information on licenses, see the section License Features on page 39. 43 S O L M E T R I C S U N E Y E T M U S E R ’ S G U I D E A license will be provided to you via email or on a CD-ROM in the form of a text file. The contents of this text file will contain a key which will identify the license named on a particular SunEye with the serial number that it was created for. There are two ways to install a license. You can click on the Browse… button and browse for and select the license file. Alternatively, you can directly enter the license key in the Enter License Key: field by entering the numerical key exactly as it appears in the file. Exporting and Generating Reports Within the Desktop Companion application, select File>Export Session Report to export the session data to a report and to generate exported data files. The export tool combines all of the skyline data for the currently open session into a single, easy-to-read report. It also generates the exported data files described below. The original data remains stored on your computer in the location described above. Exported reports are in an HTML document format that is viewable with a Web browser such as MS Internet Explorer®. You can quickly jump to data of interest using the hyperlinks in the file. At the time the data is exported, you have the opportunity to customize the report. 44 S O L M E T R I C S U N E Y E T M U S E R ’ S G U I D E First, enter client information that will appear in the report, as shown below. You can customize the report further by entering information about your company, including name and address. 45 S O L M E T R I C S U N E Y E T M U S E R ’ S G U I D E Next, select the skylines that will be used in session averages and session related output calculations and files. Next, define the Azimuth scale for the Windowed Obstruction Elevation data file, as shown below. By default, the values previously entered in the Obstruction elevation view are loaded automatically, but they can be changed for the report. For more information about these values, see Obstruction Elevation View Obstruction elevation view on page 27. Next the export wizard gives you the opportunity to specify a specific location to store the report and the ability to select your company logo which will appear in the report. An HTML document is automatically created consolidating the data for a single session. The document contains the notes, and annual sunpath and bar chart images for each skyline in the session. The report can be immediately viewed by selecting the “View report now” button. Or it can be viewed later by selecting 46 S O L M E T R I C S U N E Y E T M U S E R ’ S G U I D E File>Browse Exported Session Reports…, or by navigating with Windows File Explorer to the location where the report was saved. By default, reports are saved in My Documents\Solmetric\SunEye\Exported Reports. Print the Report The report contains a hyperlink to an “importable and printable” version of the report that does not include the hyperlinks and can be imported into other software programs such as MS Word® or Adobe Acrobat®, or it can be printed and given to clients. Print the report by selecting “print” from your browser. Save Images from the Report Images in the report can be saved for use elsewhere by right clicking on the image and selecting “save picture as…”. Images in the report can also be found wherever the report was specified to be saved in the sub-directory “Exported Files”. These images can be used to create your own custom report. Convert Report to Other Formats The HTML report generated by the desktop companion software can be converted to other formats such as .doc or .pdf by opening it in the appropriate editor (for example MS Word® or Adobe Acrobat®) and then saving it as the file type you prefer. In MS Word, there is a specific procedure that must be followed in order to convert HTML documents to .doc documents in which the images show up as permanent elements of the document rather than as links: 1. Open the .htm report in MS Word 2. Go to the “Edit” menu and choose “Select all.” This will select everything in the document. 3. On your keyboard, press the key combination Ctrl-Shift-F9 together. This will convert all external links to embedded content. 4. Go to the “File” menu and choose “Save As.” Under “Save as type” select Word Document (*.doc). Click “Save”. 47 S O L M E T R I C S U N E Y E T M U S E R ’ S G U I D E Emailing or Sharing the Report Electronically Since the report is in an HTML format, you cannot simply send the .htm file to someone electronically because the images and data files are separate files that have hyperlinks pointing to them. The files that make up the report are all located in the subdirectory “ExportedFiles” where your report is located. The easiest way to share the report with someone else is to either convert it to a single file format (such as .doc, or .pdf) as described in the section above, Convert Report to Other Formats, and send that single file, or to compress the entire report directory into a single .zip file and send the .zip file. In Windows XP, you can compress the report by right clicking on the top folder of the report name (e.g. “Smith House Report”) and selecting send to>compressed (zipped) Folder. Exported Data Files The report also includes a table of hyperlinks to a number of data files, including comma-separated-value (.csv) files. These CSV files can be opened directly in MS Excel® or other software for further analysis. Each CSV file has a header section at the beginning of the file that includes information such as the session and skyline names. The end of the header information and beginning of the data is always marked by the text “begin data”. The first line of the file describes the type of data and includes a version number. For example, “Daily Solar Access 1.0” indicates that the file is the daily solar access file and the file format is version 1.0. A description and example of each file type is given below. In each file name the XX would be replaced by the skyline number (e.g. 01, 02, etc for Sky01, Sky02, etc). 48 S O L M E T R I C S U N E Y E T M U S E R ’ S G U I D E SkyXXDailySolarAccess.csv – This table gives the solar access percentage for every day of the year. It also includes the monthly, seasonal, and annual solar access percentages. An example of the header and part of the data is shown below: Daily Solar Access 2.1 Session Name: Session1 Skyline: Sky01 Creation Date: 11/3/2006 10:43:00 AM Latitude: 37 Longitude: -122 Mag Dec: 14 Panel Tilt: 37 Panel Azimuth: Time Zone: 180 GMT-8:00 Month begin data Day Jan Feb Mar Apr May Jun Jul Aug Sep Oct Nov Dec 1 35.16 36.72 38.16 55.61 64.65 85.11 95.29 77.34 54.97 47.97 40.07 29.13 2 35.16 36.72 38.16 55.61 64.65 85.11 95.29 77.34 54.97 47.97 40.07 29.13 3 35.16 36.72 38.16 55.61 64.65 85.11 95.29 77.34 54.97 47.97 40.07 29.13 4 35.16 36.72 38.16 55.61 64.65 85.11 95.29 77.34 54.97 47.97 40.07 29.13 5 29.36 40.23 41.05 55.11 67.64 85.14 92.22 69.85 54.87 45.17 36.68 29.35 6 29.36 40.23 41.05 55.11 67.64 85.14 92.22 69.85 54.87 45.17 36.68 29.35 7 29.36 40.23 41.05 55.11 67.64 85.14 92.22 69.85 54.87 45.17 36.68 29.35 49 S O L M E T R I C S U N E Y E T M U S E R ’ S G U I D E SkyXXShading.csv – This table shows a 1 or a 0 every 15 minutes of every day of the year. A 1 indicates that that time and date is not shaded and a 0 indicates that it is shaded. This table is particularly useful for time-of-use (TOU) analysis. NOTE Note this data is in standard time and does not include adjustments for daylight savings. NOTE This data is not affected by panel tilt or azimuth orientation. This data file can be imported into different analysis software programs, including OnGrid (see: http://www.ongrid.net), and PVOptimize (see: http://www.PVOptimize.com). An example of the header and part of the shade data is shown below: Shading 1.1 Session Name: Session 1 Skyline: Creation Date: Sky01 11/3/20 06 10:43:0 0 AM Latitude: 37 Longitude: -122 Mag Dec: 14 Panel Tilt: 37 Panel Azimuth: Time Zone: 180 GMT8:00 A value of "1" implies that the time interval is exposed to open sky. A value of "0" implies that the time interval is shaded. These values are not affected by panel tilt or azimuth. begin data 7:30 7:45 8:00 8:15 8:30 8:45 9:00 1-Jan 5:00 5:15 5:30 5:45 6:00 6:15 6:30 6:45 7:00 7:15 0 0 0 0 0 0 0 2-Jan 0 0 0 0 0 0 0 3-Jan 0 0 0 0 0 0 0 4-Jan 0 0 0 0 0 0 0 5-Jan 0 0 1 1 0 0 0 6-Jan 0 0 1 1 0 0 0 7-Jan 0 0 1 1 0 0 0 8-Jan 0 0 1 1 0 0 0 9-Jan 0 0 1 1 1 0 0 10-Jan 0 0 1 1 1 0 0 11-Jan 0 0 1 1 1 0 0 12-Jan 0 0 1 1 1 0 0 50 S O L M E T R I C S U N E Y E T M U S E R ’ S G U I D E SkyXXInsolation.csv – This table gives the weather-corrected insolation in Wh/m2 every 15 minutes for every day of the year for the specific panel tilt and azimuth specified for the skyline. For the NASA weather model, weather corrections are based on historical average monthly clearness indexes from NASA. For the NREL – TMY3 weather model, corrections are based on the hourly NREL data for the weather station specified in the session. NOTE This data is in standard time and does not include adjustments for daylight savings. NOTE These values are not affected by shading (ie they assume no shading). An example of the header and part of the data is shown below: Insolation 1.1 Session Name: Session 1 Skyline: Creation Date: Sky01 11/3/2006 10:43:00 AM Latitude: 37 Longitude: -122 Mag Dec: 14 Panel Tilt: 37 Panel Azimuth: 180 GMT8:00 Time Zone: Numbers along each data row are quarter-hour insolation contributions (Wh/m²) of that time period assuming no shading and the panel tilt and azimuth specified above. Monthly clearness indexes have been applied. Clearness indexes: Jan begin data Feb Mar Aug Sep Nov Dec 0.53 0.6 0.6 Apr 0.6 May 0.6 Jun 0.6 Jul 0.6 0.6 0.7 Oct 0.6 0.6 0.5 5:00 5:15 5:30 5:45 6:00 6:15 6:30 6:45 7:00 7:15 7:30 7:45 8:00 8:15 8:30 8:45 9:00 1-Jan 20 36 48 59 70 80 90 2-Jan 20 36 48 59 70 80 90 3-Jan 20 36 48 59 70 80 90 4-Jan 20 36 48 59 70 80 90 5-Jan 19 36 47 58 69 80 90 6-Jan 19 36 47 58 69 80 90 7-Jan 19 36 47 58 69 80 90 8-Jan 19 36 47 58 69 80 90 9-Jan 19 35 47 58 69 80 90 51 S O L M E T R I C S U N E Y E T M U S E R ’ S G U I D E SkyXXObstructionElevations.csv – This table reports the elevation of the highest shade-causing obstruction for every 1 of azimuth (i.e. compass heading). The azimuth is given in two different range formats: 0 to 360 and -180 to +180 . In the -180 to +180 format, 0 is south when in the northern hemisphere and north when in the southern hemisphere. The data includes information about the entire sky and horizon, including obstructions that appear outside of the sunpath region. The region outside of the sunpaths may be important for ambient light analysis. The obstruction elevation data in this file is also useful for importing into other design analysis software. An example of the header and part of the data is shown below: Obstruction Elevations 1.1 Session Name: Skyline: Creation Date: Latitude: Longitude: Mag Dec: Panel Tilt: Session 1 Sky01 12/12/2006 0:16 39 -123 15 37 Panel Azimuth: Time Zone: 180 GMT-8:00 The elevation given for each azimuth represents the highest point a shade causing obstruction occurs at that azimuth. begin data Compass Heading (0-360deg; North=0; East=90) 0 1 2 3 4 5 6 7 8 9 10 11 Southernly Oriented Azimuth (-180 to +180; south=0; East=-90) -180 -179 -178 -177 -176 -175 -174 -173 -172 -171 -170 -169 52 Elevation (0 to 90) 55 56 56 56 56 56 56 56 57 57 57 57 S O L M E T R I C S U N E Y E T M U S E R ’ S G U I D E SkyXXObstructionElevation.xml – This file is an XML version of the SkyXXObstructionElevations.csv file described above. This file can be imported into the Clean Power Estimator and Quick Quotes analysis software (see: http://www.clean-power.com). SkyXX_PV_SOL.hor – This is a shading file that is importable by PV*SOL and T*SOL (Valentin Energy Software). SkyXX_PVSYST.hor – This is a shading file that is importable by PVSYST (GROUPE ENERGIE (CUEPE), University of Geneva) . 53 S O L M E T R I C S U N E Y E T M U S E R ’ S G U I D E SkyXXWindowedObstructionElevations.csv - This file contains elevation values, either average or maximum, within user-specified Azimuth windows. It can be considered as a specific view of the data contained in the SkyXXObstructionElevation.csv file described above. An example of the header and data is shown below: Windowed Obstruction Elevations 1.0 Session Name: Skyline: Creation Date: Latitude: Longitude: Mag Dec: Panel Tilt: Panel Azimuth: Time Zone: Session 1 Sky01 12/1/2008 15:48 38.4 -122.7 14.7 0 180 GMT-08:00 Azimuth center: Azimuth window size: Number of windows: 180 22.5 11 The elevation given for each azimuth window center is the maximum of all of the elevations in that window. begin data Maximum Azimuth Window Center (North=0; East=90) Elevation (0-90) 67.5 90 112.5 135 157.5 180 202.5 225 247.5 270 292.5 54 22 19 27 36 50 55 52 51 51 48 37 S O L M E T R I C S U N E Y E T M U S E R ’ S G U I D E AverageSolarAccess.csv – There is only one of these files per session. It contains the solar access averages of all the skylines contained in the session. An example of the header and data is shown below: Average Solar Access 1.0 Session Name: Creation Date: Latitude: Longitude: Mag Dec: Time Zone: Number of skylines: Session 1 2/16/2007 17:02 39 -123 15 GMT-8:00 3 The values reported are average percentages of all the skylines(3) contained in this session. begin data Annual: May-Oct: Nov-Apr: Jan: Feb: Mar: Apr: May: Jun: Jul: Aug: Sep: Oct: Nov: Dec: 67 76 54 40 48 56 76 84 87 84 82 60 56 39 49 55 S O L M E T R I C S U N E Y E T M U S E R ’ S G U I D E AverageShading.csv – There is only one of these files per session. This file contains the average shading information of all the skylines contained in the session. The format of this file is similar to that of the SkyXXShading.csv shading files, however each data entry contains the average shading for that time increment for all skylines in the session. The values are in the range of 0 to 1. ObstructionElevations.csv – There is only one of these files per session. This file contains a session summary of Obstruction Elevations for all skylines in the session. Elevation is shown for the highest shade-causing obstruction for every 1 of azimuth (i.e. compass heading). The Maximum and Average elevations for all skylines in the session are displayed for every one degree spacing. The azimuth is given in two different range formats: 0 to 360 and -180 to +180 . In the -180 to +180 format, 0 is south when in the northern hemisphere and north when in the southern hemisphere. The data includes information about the entire sky and horizon, including obstructions that appear outside of the sunpath region. The region outside of the sunpaths may be important for ambient light analysis. The obstruction elevation data in this file is also useful for importing into other design analysis software. WindowedObstructionElevations.csv – There is only one of these files per session. This file contains a session summary of Windowed Obstruction Elevations for all selected skylines in the session, with the Azimuth Window definitions defined by the user. If the maximum elevation is selected for each Azimuth Window, then the Maximum elevation for all skylines in the session, that is, the maximum maximum elevation is displayed for each Azimuth Window. If the average elevation is selected for each Azimuth Window, then the Average elevation for all skylines, then the average elevation is displayed for each Azimuth Window. GoogleEarthGeotags.kmz – There is at most one of these files per session report. This file will only be created if at least one skyline that has been selected to be included in the report was created using the option to get a new GPS location for each skyline. This is described in the GPS Setup section on page 38. It is therefore required that the Solmetric GPS option is used to access this feature. To view this KMZ file it is required that you have Google Earth installed. This can be obtained at http://earth.google.com. Each of the skylines in the report with GPS coordinates will show up as interactive placemarks within Google Earth. The location of each placemark will be determined by the GPS coordinate of the 56 S O L M E T R I C S U N E Y E T M U S E R ’ S G U I D E skyline. Clicking on a skyline placemark will open a window with report information and images about the skyline. The GPS coordinates for a skyline can be edited in the Desktop Companion software in the Skyline Property dialog. A placemark location may also be edited within Google Earth by right clicking on it, selecting Properties, and then dragging the placemark to a new location. You may then save any new locations to a new KMZ file from within Google Earth by going to the File menu and selecting “Save Place As”. 57 S O L M E T R I C S U N E Y E T M U S E R ’ S 5 Chapter G U I D E Solar Access and Interpretation of Data This chapter gives an overview of the different variables involved in solar access and details about how the Solmetric SunEyeTM calculates solar access. Solar access is defined as the amount of available solar energy or insolation in a particular location. The reported solar access percentages are the amount of site-specific solar insolation available at the location where the data was captured given the shadecausing obstructions, divided by the solar insolation if there were no shading. If all trees, buildings, and other obstructions were theoretically removed, the solar access percentages would be 100%. If the measured site were completely shaded all year, the solar access percentages would be 0%. In order to have an accurate estimate of the amount of insolation that will strike a specific surface over time, four variables need to be considered. Solar irradiance Shading Air quality and clouds Surface orientation Solar Irradiance The sun is a tremendous source of energy for the earth and is, in fact, the only significant net input of energy the earth has. Irradiance is the solar power incident on a surface, and is usually expressed in watts per square meter. Irradiance 58 S O L M E T R I C S U N E Y E T M U S E R ’ S G U I D E multiplied by time equals insolation. The average irradiance arriving on the planet after passing through the atmosphere is commonly approximated to be 1000 W/m2. The irradiance above the atmosphere is 1367 W/m2. Due to the tilt of the earth’s axis, the sun is higher above the horizon in the summer months and lower in the winter months. The sun will also appear higher in the sky when the observer’s latitude is closer to the equator (0° latitude) and it will appear lower in the horizon as the observer’s latitude is closer to the north or south poles (±90° latitude). The height of the sun in the sky is not affected by the longitude or the east-west location of the observer on earth. The sun’s elevation is the angle formed between the observer, the horizon, and the sun above the horizon. The azimuth is the angle created by the sun’s deviation from true north in relation to the observer. The sun follows a predictable path through the sky based on the time-of-day, day-of-year, and latitude of the observer. Therefore, the elevation and azimuth angle of the sun can be calculated for any time, date, and latitude. The collection of sun trajectories for the entire year is called a sunpath diagram. For example, a sunpath for San Francisco, California that was generated by the Solmetric SunEyeTM is shown below: 59 S O L M E T R I C S U N E Y E T M U S E R ’ S G U I D E The Solmetric SunEyeTM automatically generates the sunpath diagram for the particular latitude where the data is collected. This sunpath chart is superimposed on top of the captured skyline image. NOTE The annual sunpaths are drawn in standard time and the exported *.csv data files are also in standard time. Daylight savings adjustments must be applied manually where appropriate. Shading Shading is a serious design parameter to consider with regard to the performance of a solar system, placement of a building, or in landscaping. The Solar Living Source book by John Schaeffer, comments on shading of crystalline PV collectors, “Short of outright physical destruction, hard shadows are the worst possible thing you can do to a PV module output.” Shading may be produced by geological formations, vegetation, and human-made structures, such as buildings. Minor shading can result in a significant loss of energy. This is because the solar cell with the lowest illumination determines the operating current of the series string in which it is connected. The voltage output may remain the same, but the current will be significantly reduced. The Solmetric SunEyeTM automatically gives an accurate analysis of the shading for the specific location. Weather, Air quality and Clouds Moisture, pollution, clouds, and particles in the atmosphere block a portion of the sun’s energy from reaching the earth. This can impact the insolation and solar access calculations provided by the SunEye. Two weather models are incorporated into the SunEye: NASA and (in the US only) NREL – TMY3. NASA Weather Model. The Clearness Index (KT) is a number from 0 to 1 that describes the amount of solar radiation that passes through the atmosphere. Historical clearness index data by region and solar insolation data is available from NASA at http://earth-www.larc.nasa.gov/cgi-bin/cgiwrap/solar/sse.cgi. When the NASA weather model is selected, the Solmetric SunEyeTM uses the NASA Clearness Index data. The SunEye contains an internal database of 60 S O L M E T R I C S U N E Y E T M U S E R ’ S G U I D E clearness indices by latitude and longitude for the entire world. The Solmetric SunEyeTM software automatically accounts for the approximate average clearness index for the region you specify for your session when calculating the solar access. NREL – TMY3 Weather Model. The United States National Renewable Energy Laboratory (NREL) publishes weather data for 1,020 locations in the United States. Each station has a Weather Bureau Army Navy (WBAN) Identification Numbers. This data shows “Typical Meteorological Year” (TMY3) data, and it contains insolation during all hours of the year. For more information, please see http://rredc.nrel.gov/solar/old_data/nsrdb/1991-2005/tmy3/. The SunEye uses TMY3 hourly insolation data when the NREL – TMY3 weather model is selected. When using this model, the NREL weather station must be selected, normally the one closest to where the SunEye session is being created. In addition, when the NREL – TMY3 weather model is used, the SunEye has precomputed values for the optimal panel orientation (tilt and azimuth) for maximum annual insolation for all of the selected weather stations. The optimal orientation is dependent on weather, and allows calculation of TOF and TSRF which are defined as follows: Tilt and Orientation Factor (TOF). TOF is the solar insolation at the actual tilt and orientation divided by the insolation at the optimal tilt and orientation, expressed in percent. Total Solar Resource Fraction (TSRF). TSRF is the ratio of insolation available accounting for both shading and the specific tilt and orientation of the surface, divided by the total insolation available assuming no shade and assuming the surface is at the optimal tilt and orientation. TRSF is expressed in percent, according to the following equation: TSRF = Solar Access x TOF. When the NREL – TMY3 weather model is selected, the SunEye can compute and display TOF/TSRF for each skyline. The average TSRF for all selected skylines in a session is also display in the exported reports. To obtain Wh/m2 or peak-sun-hours, take the solar access percentages from the Solmetric SunEyeTM and multiply them by the average solar insolation for your region. 61 S O L M E T R I C S U N E Y E T M U S E R ’ S G U I D E Surface Orientation The amount of energy absorbed from the sun depends on the angle and orientation of the surface receiving the irradiation. For example, the magnetic orientation and tilt of solar panels affect the energy collected by those panels. The difference in solar energy collected by a solar panel at 38.07 North with a 0 tilt versus a tilt of 35 is about 11%. By default, solar access results in the Solmetric SunEyeTM are based on the following assumed configuration: The receiving surface (a solar panel, for example) is oriented south if you are in the northern hemisphere, and oriented north if you are in the southern hemisphere. The tilt is equal to the latitude of the site location. For example, if the latitude of the site that is being evaluated is 37, then by default the solar access calculations performed in the Solmetric SunEyeTM are assuming a surface tilt of 37 from horizontal. This panel tilt and azimuth can be adjusted by the user for optimizing energy production and/or conforming to a roof structure. The orientation used to calculate solar access can be changed via the skyline properties dialog. See step 8 of section Capture a Skyline on page 20 for more information. Shading can have a greater effect on energy output than the tilt and orientation of a system. Shifting a panel array in order to avoid shade or orienting panels to optimize collection during the un-shaded times of day and year is one of the most important steps in solar system design. For more information about designing and installing a solar system, see: http://www.sandia.gov/pv/docs/Design_and_Installation_of_PV_Systems.htm Numerical Calculations When using the NREL - TMY3 data, the hourly insolation data is taken directly from the database for the weather station specified. When using the NASA data, the following numerical assumptions are made by the Solmetric SunEyeTM software when calculating results: 62 S O L M E T R I C S U N E Y E T M U S E R ’ S G U I D E Solar constant (above-the-atmosphere solar irradiance): 1367 W/m2 Atmospheric pressure: 1013 mBars Atmospheric temperature: 15°C Panel orientation: south with tilt equal to latitude Clearness index (KT): NASA historical monthly averages by latitude and longitude For either weather model, the solar access numbers reported by the Solmetric SunEyeTM are percentages that are calculated by first calculating insolation (Wh/m2) for every 15 minute time interval, every 4 days, for the entire year. This insolation value includes either average historical weather data for the latitude and longitude set in the session (NASA model), or hourly TMY3 weather data for the closest NREL station (NREL – TMY3 model, US only). Next, the skyline data is analyzed to determine which 15 minute intervals throughout the year are shaded. The sum of the un-shaded 15 minute insolation values for a given period (for example 1 month) divided by the total insolation possible (assuming no shading) for the same period times 100 gives the solar access percentage for that time period. 63 S O L M E T R I C S U N E Y E T M U S E R ’ S 6 Chapter G U I D E Maintenance and Troubleshooting The Solmetric SunEyeTM is an electronic device, please follow these guidelines to maintain its functionality and performance: The Solmetric SunEyeTM device has an operating temperature range of 32°F to 104°F. Do not operate the device outside of this temperature range. The Solmetric SunEyeTM device should never be exposed (e.g. stored or transported) to a temperature below -4°F or above 140°F. Avoid leaving the device in the direct sun for an extended period of time. Even though the ambient temperature may be 80ºF, the temperature of the device left in sun for half an hour can easily reach 130ºF or more. Do not expose to moisture or dust. Keep the software up to date by downloading the latest installation software from the Solmetric web site at: www.solmetric.com/support. Periodically clean the lens with a lint free lens cleaning cloth Maintain the battery charge level and avoid allowing the battery to go completely dead even when not in use. NOTE Storage in the off state without the AC power or Device/USB cable attached will result in the slow discharge of the battery. It is not harmful to the device to be continuously connected to AC power or to a computer. It is also not harmful to the device or to your data for the battery to fully discharge, however you may be forced to go through a series of steps including a touchscreen alignment and tutorial. 64 S O L M E T R I C S U N E Y E T M U S E R ’ S G U I D E Upgrading or Downgrading Software Solmetric periodically publishes free updates to the software. You can find the latest version of the Solmetric SunEyeTM software at: www.solmetric.com/support. The software on the hand-held unit and the Desktop Companion are simultaneously installed from the same installation file. To upgrade your software, simply run the installer by double clicking on the new setup executable file obtained from the web site. To downgrade your software version to an earlier version, you must first un-install the current version as follows: 1. On the desktop computer go to >Control Panel. 2. Double click on Add or Remove Programs 3. Locate and select Solmetric SunEye 4. Click Remove 5. Close the Add or Remove Programs window 6. Install the older version as you would any version, by double clicking on the .msi file for the version you wish to install or inserting the CDROM with the old software and install as usual. NOTE Upgrading software will not affect your stored session and skyline data. All data will continue to be available. Downgrading software will not affect your stored session and skyline data, however, the sessions or skylines created in the newer software version may not be viewable in the older version. 65 S O L M E T R I C S U N E Y E T M U S E R ’ S G U I D E Reset A “soft reset” restarts the Solmetric SunEyeTM application. Under normal use, this reset is not needed. To initiate a soft reset, press the stylus provided or the end of a bent-open paperclip into the pin hole on the right side of the Solmetric SunEyeTM, next to the Device/USB port. A “hard reset” restores the device to factory settings. Under normal use, this reset is not needed. The hard reset is different for different versions of the Solmetric SunEyeTM device. Check the back of your device to see what version you have, and see the following instructions for performing a hard reset on your device. To initiate a hard reset, you will need the stylus provided or bent-open paperclip. Simultaneously press and hold the following buttons for four seconds. Hard Reset Buttons for “SunEye-100” devices Top-right button Bottom-right button Pin-hole soft reset button, as described above. Hard Reset Buttons for “SunEye-100 v2”, “SunEye-110” and “SunEye-110 v2” devices Power on/off button Mail button, second from the top-right 66 S O L M E T R I C S U N E Y E T M U S E R ’ S G U I D E button Bottom-right button Pin-hole soft reset button, as described above. To restart the device, either attach the Device/USB cable or initiate a soft reset. The device will walk you through a series of steps, including a touch screen calibration and a practice cut-and-paste task. Use the stylus provided to perform these tasks. The Solmetric SunEyeTM application launches automatically at the end of the tasks. Please ignore the message regarding the unrecognized SD card. This is normal. NOTE For “SunEye-100N v2” and “SunEye-110N” devices, please ignore the “Formatting PS…” message in the initial screen, this is normal. If in the initial screen, the progress bar is complete and the hard reset does not continue, do a soft reset. When asked to set up a password, select “Skip” to not set a password. NOTE For “SunEye-100N” devices, a hard reset automatically occurs if the battery is completely depleted. NOTE No session or skyline data is lost during either a hard or soft reset, however the date, time, and time zone state will be lost during a hard reset. NOTE The battery in the Solmetric SunEyeTM is not removable. It may be recharged by attaching the device to a PC via the Device/USB cable or by using the wall-plug. For proper operation it is important to maintain the charge of the battery. Prolonged storage will result in the slow discharge of the battery. After a prolonged period of storage, connect the charger or Device/USB cable before powering on the device. It is preferable to leave the device always plugged in to maintain charge when not in use. Contact Information for Service, Technical Assistance, and Sales At Solmetric we constantly strive to improve our products. If you have experienced problems with your Solmetric SunEyeTM, we would greatly appreciate your feedback. 67 S O L M E T R I C S U N E Y E T M U S E R ’ S G U I D E For 24 hour self-help technical support, visit our online Knowledge Base at http://www.solmetric.com/knowledgebase.html. If you experience a software issue please report any messages you received from the software and a list of steps leading up to the problem as well as the battery level of the device and the version number of the software. The version number can be found in the utility menu >About Solmetric SunEye… If you experience problems with the automatic open sky detection incorrectly identifying the open sky, please send us the original full fisheye image by exporting the session, and locating the image called SkyXXFullFishEye.jpg in the Exported Files subdirectory. XX is the skyline name (for example 01, 02…). Please also report the version number of the software. The version number can be found in the utility menu > About Solmetric SunEye… 68 S O L M E T R I C S U N E Y E T M U S E R ’ S G U I D E Corporate Contact Information: Solmetric Corporation 825 Olema-Bolinas Rd Bolinas, CA 94924 USA Tel: +1-415-868-9950 Fax: +1-877-263-5026 Toll-free in US: +1-877-263-5026 email: [email protected] Web: www.solmetric.com Distribution Partners In the United States and Canada: In the United Kingdom and Republic of Ireland: DC Power Systems 103 West North Street Healdsburg, CA 95448 USA Tel: +1-707-433-5824 Fax: +1-707-433-5698 Toll-free in US: 1-800-967-6917 Email: [email protected] Web: www.dcpower-systems.com Encraft, Ltd. 6b Park Street Leamington Spa CV32 4QN United Kingdom Tel: +44 1926 312159 Fax: +44 1926 882636 Email: [email protected] Web: www.encraft.co.uk In France: SJC Consulting 54 rue Alphonse Daudet 84120 Pertuis, France Tel +33 6.19.69.56.74 Email: [email protected] Web: www.solaire-mesure.com In Southeast Asia: Renewpower Technologies PTE LTD 141 Kaki Bukit Avenue 1 #04-00 Shun Li Industrial Park Singapore 416005 Tel: +65 6741 7123 Fax: +65 6441 7379 Email: [email protected] Web: www.renewpowers.com In Germany: Soleg GmbH Fachschulstr. 13 D-94227 Zwiesel, Germany Tel: +49 9922 5007-0 Fax: +49 9922 5007-29 Email: [email protected] Web: www.soleg.de In Australia and New Zealand: Solar Inverters Pty Ltd 30 Osprey Drive Urunga NSW 2455 Australia Tel: +61 2 6655 3930 Fax: +61 2 6655 3940 Email: [email protected] Web: http://solarinverters.com.au/ In Spain and Portugal: Ecoesfera Renovables, S.L. Malvasia 14, Nave 2 - Polígono El Clot de Moja 08734 Olèrdola (Barcelona) Spain Tel: +34.93.817.46.67 Fax: +34.616.10.41.10 Email: [email protected] Web: www.ecoesfera.net 69 S O L M E T R I C S U N E Y E T M U S E R ’ S G U I D E Index about Solmetric SunEye, 39 capture a skyline, 21 accuracy, 23 charging battery, 13 ActiveSync, 4 Clean Power Estimator, 53 ActiveSync/USB port clear all text, 16 applying power via, 14 clearness index, 19, 25, 60, 63 charging battery via, 13 clouds, 60 add comma-separated-value data, 48 obstruction, 31 average shading, 56 open sky, 31 average solar access, 55 air quality, 19, 25, 60 daily solar access, 49 align touch screen, 37 importing, 48 annual solar access, 25 insolation, 51 annual sunpath obstruction elevations, 52 clock time, 26 reading into other software, 48 options, 25, 26 shading, 50 solar time, 26 compass, 22 view, 25 magnetic declination, 22 assumptions orientation, 22 in calculations, 62 cover, 9 atmospheric pressure, 63 daily solar access, 49 atmospheric temperature, 63 data file, 49 average solar access, 30 data azimuth, 59 export, 44 backlight, 7 skyline measurement, 24 bar chart, 27 date battery setting, 14, 38 capacity, 13 Desktop Companion software, 41 charging, 13 export, 44 level, 13, 64 installation, 5 removal, 13 launching, 41 browse menu, 42 session, 36 minimum system requirements, 5 skyline, 36 transfer data, 42 bubble level, 22 update, 64 orientation, 22 viewing data, 42 button downgrade software, 65 five-way navigation, 8 edit 70 S O L M E T R I C S U N E Y E T M U S E R ’ S G U I D E edit tool, 30 keyboard, 16, 17 obstruction paint brush, 32 latitude obstructions, 30 automatic look up, 18 open Sky, 30 manual entry, 19 open sky paint brush, 31 level, 22 outside sunpath region, 33 logo, 46 paint brush size, 32 longitude zoom & pan, 35 automatic look up, 18 elevation, 27 manual entry, 19 elevation table, 29 magnetic declination, 22 export, 44 automatic look up, 18 Clean Power Estimator, 53 manual entry, 19 comma-separated-value data, 48 magnify, 35 data, 44 maintenance, 64 data tables, 48 manual and user's guide, 5, 6 OnGrid, 50 menu, 8, 14 PVOptimize, 50 monthly solar access view, 27 Quick Quotes, 53 multi-skyline averages, 30 report, 44 NASA, 60 features, 3 navigation button, 8 feedback, 67 neck strap, 8 file managment, 36 new skyline, 21 fish-eye view, 29, 30 northern hemisphere, 22 five-way navigation button, 8 obstruction full fish-eye image, 29, 30 add, 31 GPS, 10 identification, 23 acquire session location, 18 remove, 31 acquire skyline location, 23 verification, 23 battery, 11 obstruction elevations Bluetooth Partnership, 12 data file, 52 controls, 10 XML file, 53, 55 LED display, 10 OnGrid, 50 power switch, 11 open sky setup, 38 add, 31 hard reset, 66 identification, 23 help, 6 remove, 31 home and property inspection, 2 verification, 23 horizon view, 27 options HP iPAQ, 8 annual sunpath months, 25, 26 images, saving, 47 orientation of compass, 22 import orientation of surface or panel, 62 Clean Power Estimator, 53 pan tools, 35 OnGrid, 50 panel orientation, 62, 63 PVOptimize, 50 passive solar, 1, 2 Quick Quotes, 53 power button, 7, 11, 14 insolation, 58, 60, 63 power cable, 14 data file, 51 print report, 47 installation of software, 5 property inspection, 2 irradiance, 58 PVOptimize, 50 71 S O L M E T R I C S U N E Y E T M U S E R ’ S G U I D E PVSYST, 53 data file, 50 Quick Quotes, 53 shoulder strap, 4 remove sites, 2 obstruction, 31 skyline open sky, 31 averages, 30 report browse, 37 browse, 46 browse in Desktop Companion, 42 client information, 44 capture, 21 comma-separated-value data, 48 definition, 36 company logo, 46 delete, 23, 37 company name, 45 edit, 30 convert to other formats, 47 measurement data, 24 customize, 44 new, 21 emailing, 48 note, 23, 37 exporting & generating, 44 open, 37 name of report, 44 save, 23 printing, 47 Snap, 23 raw data, 48 soft reset, 4, 66 save images, 47 software downgrade, 65 reset, 66 software update, 64, 65 Sandia, 62 software upgrade, 65 save images, 47 solar access scroll text, 16 annual, 25 session averages, 30 browse, 37 comma-separated-value data, 48 browse in Desktop Companion, 43 daily, 49 change info, 19 export data, 44 change location, 19 monthly, 27 definition, 36 percentage, 27 delete, 37 raw data, 48 export data, 44 seasonal, 25 export report, 44 variables that affect, 58 latitude, 19 solar constant, 63 location, 17 solar energy, 58 longitude, 19 solar irradiance, 58 magnetric declination, 19 solar panel, 1, 2 name, 15 solar panel orientation, 62 new, 15 solar resource, 25 note, 17 Solmetric SunEye features, 3 open, 37 southern hemisphere, 22 properties, 19, 37 storing data, 42 skyline averages, 30 SunEye features, 3 time zone, 20 sunpath shade-causing obstruction, 1 clock time, 26 add, 31 options, 25, 26 identification, 23 solar time, 26 remove, 31 sunpath diagram, 59 verification, 23 view, 25 shading, 60 support, 67 72 S O L M E T R I C S U N E Y E T M U S E R ’ S G U I D E technical support, 69 GPS setup, 38 surface, 21, 62 set time and date, 38 system Valentin Energy Software, 53 time zone, 14, 20 version technical l support, 69 Solmetric SunEye, 39 tilt orientation factor, 25, 61 view time annual sunpath, 25 setting, 14, 38 fish-eye, 29, 30 time zone, 14, 20 horizon view, 27 setting, 14 monthly solar access, 27 time-of-use analysis, 50 options, 25, 26 total solar resource fraction, 25, 61 weather, 60 touch screen, 7 effects on solar access, 63 align, 37 weather model transferring data, 42 NASA, 19, 60, 62 troubleshooting, 64 NREL - TMY3, 19, 60, 61, 62 update software, 64, 65 windowed obstruction elevation data file, upgrade software, 65 46 USB Windows XP ActiveSync/USB port, 4, 10, 11 Home, 5 applying power via, 14 Media Center, 5 user’s guide, 5, 6 Professional, 5 user’s manual, 5, 6 XML file utility, 14, 37, 39 obstruction elevations, 53, 55 about Solmetric SunEye, 39 zoom and pan tools, 35 align touch screen, 37 73