1
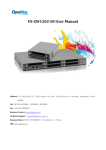
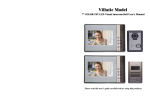
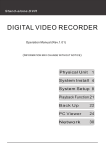
4-WIRED VIDEO DOOR PHONE
—7" COLOR TFT INDOOR MONITOR
E705FC
E705FC-W100
E706FC
E706FC-W100
E705FC Series
E706FC Series
Content
Product Introduction
Parts and Features
Menu Introduction
Main Menu Interface
Function Setup
System Setup
Image Memory Menu
Help Menu
Operation
1.ON/OFF
2.Call Remind
3.Talk/Stop
3.1 Call Transfer To Talk
3.2 Monitor Transfer To Talk
3.3 Standby Transfer To Talk
3.4 Transfer Call
3.5 Hang up
4.Monitor Door Station/CCTV Camera
4.1Monitor Door Station
4.2Monitor CCTV Camera
5.Unlock
6.Intercommunication
7.Talk Volume Adjustment
8.Extension Switch
9.Function Setup
9.1 Away Setup
9.2 Mute Setup
9.3 Keytone
2
Product Introduction
3
4
6
6
7
8
8
9
10
10
10
10
10
10
11
11
11
11
11
12
12
12
13
13
13
14
14
14
9.4 Unlock Time
9.5 CCTV Surveillance Period
9.6 Extension Switch Time
10.System Setup
10.1 2nd Door Calling/Pedal Control For Talk
10.2 Room Number Setup
10.3 Ringtone Setup
10.4 Time Setup
10.5 Reset
10.6 Language Setup
11.Image Memory Interface
11.1 Review Picture
11.2 Delete Picture
11.3 Take Photo
12.Image Adjustment
12.1 Brightness
12.2 Contrast
12.3 Color
12.4 Picture Effect
13.Busy Status
14.Automatically Setup Room Number
15.Alarm Guide
15.1 Room Number Confliction Alarm
15.2 Communication Trouble Alarm
LED\Voice Status Introduction
Trouble Shooting Guide
Specifications
15
15
16
17
17
18
19
21
21
22
22
23
23
24
24
24
25
25
25
26
26
27
27
27
28
29
30
Thank you for purchasing the intercom. Please read instructions carefully and follow directions before
installing products. Any problems regarding this product, please contact your supplier.
General features
Multiple ringtones
Touch button
Door/Gate Release Feature
2 way CCTV camera connectable(Optional)
Brightness,Color and Contrast adjustment
Max.to 4 room stations connectable with
Talk/Ringtone volume adjustment
intercommunication and call transfer function
Do Not Disturb (mute) feature
Record color image, max. to 100pcs photo.
nd
2 door calling/Pedal control for talk (Option)
Time display
Hands free communication (E706FC, E706FC-W100)
Extension switch function (Optional)
CAUTION: To avoid the risk of electric shock, please don’t remove cover or back.
Please seek professional advice.
Important operation and maintenance guidelines are included in the attached user’s manual.
NOTE
*The manufacturer holds the right to change or modify designs and specifications
without any prior notice, for the improvement and promotion of the product quality.
14042801
3
Parts and Features
Parts and Features
LED
LED
MIC.
OFF
OFF
ON
ON
Handset
Storage
Screen
Help
VD-R Switch
Task Icon (correspond with the below buttons)
Touch button
Connection
terminal
AC power cord
(AC power supply)
Speaker(E706FC Series)
NOTE
1.The button function of E705FC Series and E706FC Series are corresponding.
LED
Touch button
Task Icon
Away
Monitor
Confirm
Volume Adjustment
Mute
Menu/Confirm
Left
Mute
Power
Left/Up/Away
Right
Take Photo
Right/Down/Mute
Up
Review Picture
Unlock/Return
Down
Select Menu
Talk/Stop/Power
Return
Delete
2. Touch the center of button to operate the unit (as the finger indicate).
4
5
Menu Function
Menu Function
Main menu
Function Setup
Under standby mode, touch
,then the unit
Under main menu interface, touch
enters into main menu interface.
Storage
Help
/
to
choose the “FUNCTION SET” item, then touch
Storage
AWAY
MUTE
KEY
OPEN
CCTV
AUX.
Help
to enter into function setup interface.
Exit main menu:touch
/
Note: During operation, power LED
keeps lighting.
E705FC-W100
Function Setup (Main function)
AWAY
SET
Away setting (Only available for W100)
MUTE
SET
Do Not Disturb (mute) Setup
KEY
SET
Keytone Setup
OPEN
TIME
Unlock Time Setup
CCTV
TIME
CCTV Surveillance Period Setup
AUX.
TIME
Extension switch time setup
SET
OFF
SET
OFF
SOUND
ON
TIME
3S
TIME
MANUAL
TIME
3S
Help
-Enter into main menu
For example:
System Setup (2nd door calling, pedal control for talk,
-Operation confirm
room number setup, ringtone, time setup)
-Return to last menu
interface. Select “MUTE” item by touching
-Exit the menu
you are able to see the options “ON/OFF”, choose “ON” by touching
E705FC
Image Memory (Review/Delete picture)(Only available for W100)
-Left/Up select
Storage
-Right/Down select
Under main menu interface, touch
/
. Touch
mute mode,
to enter into function setup
/
. Touch
,
to confirm operation. Now the unit is under
LED keeps lighting.
Help Menu (TFT screen version number, MCU, function of shortcut key)
Help
6
7
Menu Function
Menu Function
System setup
Help Menu
Under main menu interface, touch
/
to
choose the “SYSTEM SET” item, then touch
Storage
Help
to enter into system setup interface.
2ND / PEDAL CTRL
ROOM NO. SET
MUSIC
SET
TIME 20XX/01/01 01:00
RESET
2ND
2ND / PEDAL CTRL
1
ROOM NO. SET
MUSIC
SET
TIME 20XX/01/01 01:00
RESET
nd
2 Door Calling / Pedal
Control for Talk Setup
Room Number Setup
Ringtone Setup
Time Setup
Reset
Under main menu interface, touch
/
choose the “HELP SET” item, then touch
to enter into Help Menu.
TFT
MCU
HOLD LEFT
PRESS LEFT
PRESS RIGHT
to
Storage
Help
TFT
MCU
HOLD
PRESS
PRESS
20140222
20140113
LEFT : REVIEW PHOTO
LEFT : AWAY
SETUP
RIGHT : MUTE
SETUP
TFT Screen Version Number
MCU Version Number
Under standby mode, touch and hold
button to review pictures.
Under standby mode, touch
button to setup away mode.
Under standby mode, touch
button to setup mute mode.
Note: The menu is only display the help information, you cannot directly operate the functions in this interface.
Image Memory Interface (W100)
Under main menu interface, touch
/
VIEW
DEL ALL
to
choose the “STORAGE SET” item, then touch
Storage
Help
to enter into image memory interface.
VIEW
DEL ALL
8
Review/Delete Picture
Delete All Pictures
9
Operation
Operation
1. ON / OFF
3.3 Standby Transfer To Talk
a.After connecting the power supply, the unit will sound “DI” with LED flashes, then power LED
Under standby mode, touch
turns red, which means the unit is powering on and in standby mode.
b. Under standby mode, touch and hold
, till it sounds “DI”, then power LED
turns off, which
means the unit is under off mode.
Under off mode, touch
to start talk with Door 1.
3.4 Transfer Call
to directly enter into standby mode.
When the room station is talking with door station, touch and hold
need to transfer the call, then touch
ring, touch
Note: No sound when you have setup the mute mode.
to choose room number you
to transfer call. Now the second room station sounds the
to start talk. Other room stations enter into busy mode.
3.5 Hang up
Under talk mode, touch
2.Call Remind
to exit talk. Or you can wait 90secs , it will automatically exit.
a.When the door station calls in, room station screen will display its image automatically.
b.When the room station is talking with door station, and another door station calls, the screen will
display
icon and no ringing.
4.1 Monitor Door Station
Under standby mode, touch
3.Talk / Stop
to monitor Door 1. The monitoring channel would be DOOR
1/DOOR2/EXIT when you repeatedly touch the button. No image for Door 1 when the system only
3.1 Call Transfer To Talk
When the door station rings, touch
4.Monitor
to start talk. (You need to pickup the handset to talk when
connect with Door 2.
you use E705FC)
3.2 When the room station is in monitor mode, touch
to start talk.
Note:Refer to operation 4.1 for Monitor operation.
10
11
Operation
Operation
7.Talk Volume Adjustment
4.2 Monitor CCTV Camera (Optional)
Under standby mode, touch and hold
to monitor CCTV1. The monitoring channel would be
CCTV1/CCTV2/CCTV1 when you repeatedly touch the button.
to adjust the talk volume and save automatically, which has 9 levels could be
button indicate for
icon. )
8.Extension Switch
Note: 1. Refer to Operation 9.5 for CCTV surveillance period.
2. Under monitor mode, the
During talk, touch
adjustable. (
icon indicate to take photo,
icon indicate to review picture.
The function is invalid.
Under standby mode, touch and hold
meanwhile mute LED
till the unit sounds “DI”,
flashes, it means the extension switch
is triggered. The switch will be automatically turned off after the
5.Unlock
Outer device
E705FC/E706FC-W100
POWER
When the room station is talking with door station, touch
setting time.
to open the door.
(Refer to Operation 9.4 for unlock time.)
Note: 1. You need connect with an external device to achieve the extension switch function.
2. Refer to Operation 9.6 for extension switch time.
6.Intercommunication
When monitor A wants to call monitor B, touch and hold
and the screen will display the room
number (repeatedly press the button to choose monitor B number), then touch
to call. Touch
next step. Or the unit will go back to the standby mode automatically.
/
Under main menu interface, touch
to choose FUNCTION, then touch
, you only have 10secs to operate the
Storage
Help
AWAY
MUTE
KEY
OPEN
CCTV
AUX.
OFF
12
to enter into
function setup interface.
to exit if call failure.
Note:When you see the room number on the screen after touching
9.Function Setup
SET
OFF
SET
OFF
SOUND
ON
TIME
3S
TIME
MANUAL
TIME
3S
ON
13
Operation
Operation
9.1 Away Setup (Only available for W100)
to turn ON/OFF keytone.
Under function setup interface, choose the “AWAY SET” item by touching
, then touch
/
Storage
Help
to turn ON/OFF away mode.
Note: Under away mode,
keeps lighting. When door station rings, the unit will automatically record one
SET
OFF
SET
OFF
SOUND
ON
TIME
3S
TIME
MANUAL
TIME
3S
AWAY
MUTE
KEY
OPEN
CCTV
AUX.
OFF
picture if nobody answer the call after 5s.
ON
9.2 Mute Setup
Under function setup interface, choose the “MUTE SET” item by touching
, then touch
9.4 Unlock Time
/
Under function setup interface, choose the “OPEN TIME” item by touching
to turn ON/OFF mute mode.
Storage
Help
AWAY
MUTE
KEY
OPEN
CCTV
AUX.
OFF
/
, then touch
/
to setup the unlock time between 1/3/5/10secs. The unit is default to 3s.
SET
OFF
SET
OFF
SOUND
ON
TIME
3S
TIME
MANUAL
TIME
3S
Storage
ON
Help
AWAY
MUTE
KEY
OPEN
CCTV
AUX.
1S
Note: Under mute mode,
, then touch
SET
OFF
SET
OFF
SOUND ON
TIME
3S
TIME MANUAL
TIME
3S
3S
5S
10S
LED keeps lighting. When door station rings, the unit will not sound the ring.
9.5 CCTV Surveillance Duration (Optional)
Under function setup interface, choose the “CCTV TIME” item by touching
9.3 Keytone
Under function setup interface, choose the “KEY SOUND” item by touching
14
, then touch
/
to setup, the monitoring period of CCTV camera between 10m, 12h and manually off, and save
by touch
.
15
Operation
Operation
Storage
Help
10.System Setup
SET
OFF
SET
OFF
SOUND ON
TIME
3S
TIME MANUAL
TIME
3S
AWAY
MUTE
KEY
OPEN
CCTV
AUX.
10M
MANUAL
Under main menu interface, touch
/
to choose SYSTEM , then touch
to enter into
function setup interface.
12H
Storage
Help
Note: Please stop monitoring CCTV camera within 24h when you setup the item manually off.
2ND
2ND / PEDAL CTRL
1
ROOM NO. SET
MUSIC
SET
TIME 20XX/01/01 01:00
RESET
LANGUAGE
ENGLISH
2ND
9.6 Extension Switch Time
PEDAL
10.1 2nd Door Calling / Pedal Control for Talk (Optional)
Under function setup interface, choose the “AUX.TIME” item by touching
, then touch
/
to
2nd calling and pedal activity is following the outer switch.
Under system setup interface, choose 2ND/PEDAL CTRL, touch
setup the extension time between 3/10/20/30s. The unit is default to 3s.
to confirm, then you are able to
choose turn on 2nd door calling or pedal control for talk.
Storage
Help
AWAY
MUTE
KEY
OPEN
CCTV
AUX.
3S
SET
OFF
SET
OFF
SOUND ON
TIME
3S
TIME MANUAL
TIME
3S
10S
20S
Note: 1. The 2nd door calling and pedal control for talk function cannot be opened at the same time.
2.The factory setting is defaulted to turn on 2nd door calling function. But you need to connect with a
Calling switch to reach this function.
30S
When you turn on 2nd door calling mode
1. When the room station is under standby mode, it will sound the ringtone when 2nd door calls.
2. When the room station is under talk or monitor mode, it will not sound the ringtone but with
icon
on the screen when 2nd door calls.
16
17
Operation
Operation
Storage
Help
2ND
2ND / PEDAL CTRL
1
ROOM NO. SET
MUSIC
SET
TIME 20XX/01/01 01:00
RESET
LANGUAGE
ENGLISH
1
Calling from 1st door (the outdoor unit)
Calling from 2nd door (equipped with the calling device)
3
4
Note: Please make sure every room has its own room number to avoid confliction.
When you turn on pedal control for talk mode
10.3 Ringtone Setup
1. When the system connects with 2pcs door station, under standby mode, step on the pedal control
Under system setup interface, choose MUSIC SET, touch
switch to monitor Door 1. Step again to monitor Door 2. Step it third time the room station will enter
2
to confirm, then you are able to setup
ringtone/ringing volume/ringing time.
into standby mode.
2.When the system only connects with 1pc door station, under standby mode, step on the pedal
Storage
control switch to monitor door station, step again the room station will enter into standby mode.
3.When door station rings, step on the pedal control switch to talk, step again to stop talk and go back
Help
2ND
2ND / PEDAL CTRL
1
ROOM NO. SET
MUSIC
SET
TIME 20XX/01/01 01:00
RESET
LANGUAGE
ENGLISH
to standby mode.
10.2 Room Number Setup
Under system setup interface, choose ROOM NO., touch
room number between 1 /2/3/4.
18
A. Ringtone
to confirm, then you are able to setup
Ringtone for Door1/Door 2: Under ringtone setup interface, choose MUSIC CH1 or MUSIC CH2, and
touch
to confirm, then you are able to choose your favorite ringtones.
19
Operation
Operation
Storage
Help
2ND
2ND / PEDAL CTRL
1
ROOM NO. SET
MUSIC
SET
TIME 20XX/01/01 01:00
RESET
LANGUAGE
ENGLISH
MUSIC
MUSIC
MUSIC
MUSIC
CH1
CH2
VOLUME
TIME
1 2 3 4 5
1
2
2
20S
Storage
Help
2ND
2ND / PEDAL CTRL
1
ROOM NO. SET
MUSIC
SET
TIME 20XX/01/01 01:00
RESET
LANGUAGE
ENGLISH
MUSIC
MUSIC
MUSIC
MUSIC
5S
6 7 8 9
10S
15S
1
2
2
20S
20S
10.4 Time Setup
B. Ringing Volume
Under ringtone setup interface, choose MUSIC VOLUME, and touch
to adjust the ringing volume in 4 levels by touching
Storage
Help
/
to confirm, then you are able
Under system setup interface, choose TIME, and touch
time. During setup, touch
.
2ND
2ND / PEDAL CTRL
1
ROOM NO. SET
MUSIC
SET
TIME 20XX/01/01 01:00
RESET
LANGUAGE
ENGLISH
MUSIC
MUSIC
MUSIC
MUSIC
CH1
CH2
VOLUME
TIME
1
2
2
20S
2
3
4
Storage
Help
/
to adjust.
2ND
2ND / PEDAL CTRL
1
ROOM NO. SET
MUSIC
SET
TIME 20XX/01/01 01:00
RESET
LANGUAGE
ENGLISH
20XX/01/01 01:00:00
Under system setup interface, choose RESET, and touch
to confirm operation. Successful
operation with a sound DI.
C. Ringing Time
Under ringtone setup interface, choose MUSIC TIME, and touch
to confirm, then you are able to
Storage
adjust the ringing time between 5/10/15/20s by touching
to confirm, then you are able to setup
to choose the item you need to setup, touch
10.5 Reset
1
/
.
Help
2ND
2ND / PEDAL CTRL
1
ROOM NO. SET
MUSIC
SET
TIME 20XX/01/01 01:00
RESET
LANGUAGE
ENGLISH
OK
20
CH1
CH2
VOLUME
TIME
CANCEL
21
Operation
Operation
10.6 Language Setup
CH1
Under system setup interface, choose LANGUAGE ,and touch
20XX/XX/XX 12:00
to confirm, then you can choose
Storage
the language between ENGLISH POLSKI and РУССКИЙ.
Storage
2ND
2ND / PEDAL CTRL
1
ROOM NO. SET
MUSIC
SET
TIME 20XX/01/01 01:00
RESET
LANGUAGE
ENGLISH
Help
Image
11.1 Take Photo
Under monitor/talk mode, touch
to take one photo.
ENGLISH POLSKI РУССКИЙ
11.2 Review Picture
11.Image Memory Interface (Only available for W100)
Under main menu interface, touch
/
to choose STORAGE, touch
Under image memory interface, choose VIEW, and touch
to confirm, the unit will
mode. Touch
to delete one picture, touch
/
to confirm, the unit will enter into review
to review pictures.
enter into image memory interface.
VIEW
DEL ALL
Storage
Note: Under monitor/talk mode, touch
CH1
to choose STORGE, the unit will enter into image memory interface.
Note: 1. Under monitor/talk mode, touch
11 : 25
to enter into review mode.
2. Under standby mode, touch and hold
22
20XX / 01 / 01
Help
to enter into review mode.
23
Operation
Operation
12.2 Contrast
11.3 Delete Picture
Under image memory interface, choose DEL ALL, touch
to confirm, all of the pictures will be
Under image adjustment interface, choose CONTRAST to adjust the contrast, you are able to adjust
in 100 levels.
Deleted.
VIEW
DEL ALL
Storage
Help
OK
12.3 Color
Under monitor/talk mode, touch
CH1
58
58
58
MANUAL
CANCEL
12.Image Adjustment
image, then touch
BRIGHT
CONTRAST
CHROMA
IMPACT
enter into the select interface, and touch
/
to choose
Under image adjustment interface, choose CHROMA to adjust the color, you are able to adjust in 100
levels.
enter into the image adjustment interface.
20XX/XX/XX 12:00
Storage
BRIGHT
CONTRAST
CHROMA
IMPACT
Image
58
58
58
MANUAL
BRIGHT
CONTRAST
CHROMA
IMPACT
58
58
58
MANUAL
12.4 Picture Effect
.
Under image adjustment interface, choose IMPACT to adjust the picture effect between
12.1 Brightness
Under image adjustment interface, choose BRIGHT to adjust the brightness, you are able to adjust in
100 levels.
24
BRIGHT
CONTRAST
CHROMA
IMPACT
58
58
58
MANUAL
MANUAL/STAND/SOFT/BRIGHT.
BRIGHT
CONTRAST
CHROMA
IMPACT
58
58
58
MANUAL
MANUAL STAND SOFT BRIGHT
25
Operation
Operation
13.Busy Status
15.Alarm Guide
When one of the room stations is under talking or monitoring mode, others will enter into busy mode.
15.1 Room Number Confliction Alarm
After finishing talking or monitoring, all of the units will go back to standby mode.
When the system has more than two room station with a same room number, the unit will sound “DI”
at intervals. You need to reset the room number to avoid the alarm. If the alarm is still existed after
Note: When the room station is under busy mode, it cannot operate room number setup and system reset
Function.
reset the room number, you need to restart the power supply.
15.2 Communication Trouble Alarm
14.Automatically Setup Room Number
If the unit sounds “DI DI” every 3s, it means there is communication trouble between room stations.
A.Single Room Station
Please check the wiring and make sure if the main unit is turned on. After resolving the trouble,
Reset the unit, then calls from door station. The room number will be automatically setup after ringing.
press
or
to monitor or talk with door station, the alarm will be automatically canceled.
B.Two Room Stations
Reset the units, then calls from door station. The room numbers will be automatically setup after
ringing.
Note: For the extension room station, you will only hear the sound when you operate the monitor or talk
function more than 6 times.
C.More Than Two Room Stations
Reset all the units, then connect the power supply of main unit and the extension unit which you need
to setup as No.2, then calls from door station. The room numbers will be automatically setup after
Ringing. After that, connect the power supply of the extension unit which you need to setup as No.3,
then calls from door station. The room numbers will be automatically setup after ringing. Do the same
operation for No.4 extension unit.
26
27
Trouble Shooting Guide
LED/Voice Status Introduction
1.LED Status
Problem
LED turns on
The unit is powering on.
LED turns on
The unit is under mute mode.
LED turns on
The unit is under away mode.
LED flashes and the screen displays the image
Door station is ringing.
LED flashes
The extension switch is triggered.
LED flashes
Improper hang up(E705FC, E705FC-W100)
2.Voice Status
”DI” at intervals, it means room number confliction.
“DI DI” at intervals, it means communication trouble.
“DU”, it means the function is not allowed to operate.
Long “DI”, it means the unit is powering on.
Solution
-Power is not connected.
-The unit is OFF.
-Check if the power is on.
-Refer to Operation 1 “ON/OFF”, turn on the unit.
Cannot call from door station.
-The connection between room and door
station is cut off.
-The unit is OFF.
-Check the connection between room and
door station.
-Refer to Operation 1 “ON/OFF”, turn on the unit.
Room station cannot monitor door station.
-The room number has not been setup.
-The connection between room and door
station is short circuit.
-Refer to Operation 10.2 “Room Number
Setup”, setup a new room number.
-Check the connection between room and
door station.
“DI DI” at intervals when the system connects
with more room stations.
-The main unit is OFF.
-The connection between this unit and the
main unit is cut off.
-Refer to Operation 1 “ON/OFF”, turn on the unit.
-Check the connection between this unit and
the main unit.
“DI DI” continuously when the system
connects with more room stations.
Room number confliction.
-Refer to Operation 10.2 “Room Number Setup”,
setup a new room number.
Cannot call from door station, room station
cannot monitor door station and sound
“DI DI” at intervals.
-No main unit in the system.
-The main unit is OFF.
-Refer to Operation 10.2 “Room Number Setup”,
reset the unit then setup the room number.
-Refer to Operation 1 “ON/OFF”, turn on the unit.
Door station can hear the sound from room
normally, but the room station can only hear
very low sound from door station.
When the system only connects with one
room station, it cannot monitor or talk.
28
Possible reason
The unit does not work.
Talk volume is too lower.
Refer to Operation 7“Talk Volume Adjustment”,
adjust the volume.
This unit is not the main unit.
Refer to Operation 10.2 “Room Number Setup”,
reset the unit then setup the room number.
29
Specifications
Model No.
Item
E705FC
E705FC-W100
AC100-240 ~50Hz/60Hz 15VA or DC13.5-15V/1.5A
Connection
Talk mode
E706FC-W100
7’color TFT
Screen
Power voltage and current
E706FC
In series
Handset
Hands free
Power consumption
14V,600mA(MAX.)
CCTV input
Typical 1Vp-p(75ohm)
Operation temperature
-10℃ to +55℃
Optional extension room station
Our room stations (which has intercom function)
Optional door station
Our 4 wired door stations
630101080003
30