1
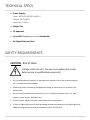
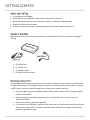
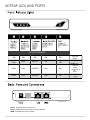
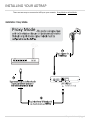
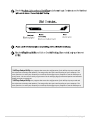
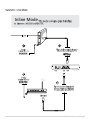
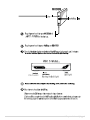
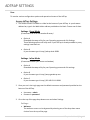
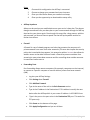
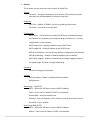
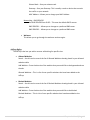
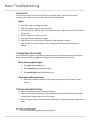
AT1000 User’s Manual Version 2.0 User’s Manual Version 2.0 Table of Contents TECHNICAL SPECS ............................................................................................................................................3 SAFETY REQUIREMENTS ...................................................................................................................................3 GETTING STARTED ...........................................................................................................................................4 About your AdTrap ............................................................................................................................4 What’s in the Box? .............................................................................................................................4 What about Security? ........................................................................................................................4 ADTRAP LEDs AND PORTS ................................................................................................................................5 INSTALLING YOUR AdTrap ................................................................................................................................5 Installation Proxy Mode: ....................................................................................................................6 AdTrap Setup Utility: .........................................................................................................................7 Installation Inline Mode: ....................................................................................................................8 ADTRAP SETTINGS.......................................................................................................................................... 10 Access AdTrap Settings: ...................................................................................................................10 Settings: ...........................................................................................................................................10 AdTrap Rules:...................................................................................................................................13 Reports: ...........................................................................................................................................14 Updates: ..........................................................................................................................................14 AdTrap Anyhere ............................................................................................................................................. 15 Basic Troubleshooting .................................................................................................................................... 17 Factory Reset: ..................................................................................................................................17 I’m not getting on the Internet: .......................................................................................................17 If Internet status light is flashing: .....................................................................................................17 No Internet status light? ..................................................................................................................17 I can get on the Internet, but everything is slow; .............................................................................18 AdTrap User’s Manual | Page 2 TECHNICAL SPECS Power Supply; Input: 100-240v-50/60 Hz @0.5A Output: DC 5v @3A Input Size: 5.5mm Weight 7oz CE Approved Up to 350 Megabits per second Bandwidth 2x Gigabit Ethernet Ports SAFETY REQUIREMENTS CAUTION - Risk of Shock Voltage inside this unit. No user serviceable parts inside. Refer service to qualified personnel only! Do not use product near water (i.e. wet basement, bathtub, sink or near a swimming pool, etc.), to avoid risk of electrocution. Avoid using and/or connecting the equipment during an electrical storm, to avoid risk of electrocution. Do not locate the equipment within 6 feet (1.9 m) of a flame or ignition source (i.e. heat registers, space heaters, fireplaces, etc.). Use only power supply and power cord included with the equipment. In areas of high surge events or poor grounding situations and areas prone to lightning strikes, additional surge protection may be required on the AC and Ethernet. AdTrap User’s Manual | Page 3 GETTING STARTED About your AdTrap Can handle up to 350Mbps Automatically stays updated as advertisers change their ad schemes Blocks advertisements from music and video streams, mobile apps and web pages Works with ANY Internet browser Protects your privacy, prevents tracking and profiling techniques used by advertisers What’s in the Box? Make sure you have the following items before proceeding. Call AdTrap for assistance if anything is missing; (1) AdTrap Unit (1) Power Cord (1) Network Cable (1) Quick Instruction Sheet What about Security? Having a high-speed, always-on connection to the Internet requires a certain amount of responsibility to other Internet users—including the need to maintain a reasonably secure system. While no system is 100% secure, you can use the following tips to enhance your system’s security: Keep your operating system updated with the latest security patches. Run the system update utility at least weekly. Avoid opening email containing attachments, or opening files sent through chat rooms, whenever possible. Install a virus checker and keep it updated. If you connect your AdTrap to a wireless LAN, make sure you enable security and encryption on the wireless router/switch. Consult the documentation and technical support of the wireless equipment provider for help. AdTrap User’s Manual | Page 4 ADTRAP LEDs AND PORTS LED LIGHT SEQUENCE ON ON ON ON ON Flash Flash Off/ON Off ON Flash Flash Off/ON Flash ON Flash Flash Off/ON ON ON Self Test Mode… AdTrap is boo ng up… Internet found, con nuing to boot… AdTrap is ready Power: Connector for the power cord LAN: 1 Gigabit port for the router or home computer WAN: 1 Gigabit port for the modem AdTrap User’s Manual | Page 5 INSTALLING YOUR ADTRAP There are two ways to connect the AdTrap to your network. Proxy Mode or Inline Mode. Installation Proxy Mode: Proxy Mode AdTrap User’s Manual | Page 6 *AdTrap Setup Utility is a program that eases the configuration of the AdTrap in proxy mode and has shortcuts to settings and updates. The setup utility does not install anything on your computer. The main function is to scan your network for an AdTrap and configure your computer to use the AdTrap as a proxy server. You can use this utility to gain access to the settings page for advanced options and whitelist pages you want to see ads on. *AdTrap Setup Utility is a program that eases the configuration of the AdTrap in proxy mode and has shortcuts to settings and updates. The setup utility does not install anything on your computer. The main function is to scan your network for an AdTrap and configure your computer to use the AdTrap as a proxy server. You can use this utility to gain access to the settings page for advanced options and whitelist pages you want to see ads on. AdTrap User’s Manual | Page 7 Installation Inline Mode: Inline Mode AdTrap User’s Manual | Page 8 AdTrap User’s Manual | Page 9 ADTRAP SETTINGS Use: To monitor various configuration options and operational status of the AdTrap Access AdTrap Settings: 1. The Default Access is located on a label at the bottom of your AdTrap. In your browser address bar, type in the Web Admin address provided on the label. Choose one of them. Settings - Proxy Mode (Connected to an all-in-one modem & router) Option A Download the setup utility for your Operating system and click Settings These following options will only work if your AdTrap is already enabled or proxy settings have been set. Option B In your browser type in http://adtrap.local:10001 Settings - Inline Mode (Connected between your router and modem) Option A Download the setup utility for your Operating system and click settings Option B In your browser type in http://setup.getadtrap.com Option C In your browser type in http://192.168.211.1:10001 2. Once you are in the Login page use the default username and password provided on the bottom of the AdTrap. Username = admin Password = password 3. Go to the top of the page drop-down menu and select Settings. Settings: Welcome The welcome screen can be bypassed by selecting one of the drop down menu choices from the top of the page. AdTrap User’s Manual | Page 10 Steps: 1. 2. 3. 4. Choose which configuration the AdTrap is connected Choose to change your password and your time zone Gives you information about your network and setup Gives you the opportunity to download the setup utility AdTrap Anywhere Adtrap can be used on your mobile device over your carrier’s data plan. The phones data get transferred from your data plan to your home network through the AdTrap then back to your phone again. Even though this seems like a long process, with the ads removed, you lose no internet speed. See the AdTrap Anywhere section for further instructions. Firewall A firewall is a set of related programs and rules that protects the resources of a private network from users from other networks. (The term also implies the security policy that is used with the programs.) An enterprise with an intranet that allows its workers access to the wider Internet installs a firewall to prevent outsiders from accessing its own private data resources and for controlling what outside resources its own users have access to. Forwarding Ports Port forwarding allows remote computers (for example, computers on the Internet) to connect to a specific computer or service within a private local-area network (LAN) 1. Log into your AdTrap Settings. 2. Click Settings then Firewall. 3. Click Add Port Forward. 4. Type in the name of the rule in the Rule Comment section. 5. Type in the IP address in the Destination IP. This address is usually the next device after the AdTrap which is your router IP address. ie 192.168.211.xxx. 6. Type in the port or the port series in the Destination TCP port. This works for TCP ports only. 7. Click Create on the bottom of the page. 8. Click Apply Configuration and you are all done. AdTrap User’s Manual | Page 11 General This is where you can setup the main functions of the AdTrap. General Timezone – Set up the Timezone for your location. This will also set up the time when the AdTrap updates for 1am your local time. Hardware CPU Clock – Default is 720MHz. Use this to speed up the processor. LED Status – Use these to turn off LEDS. Configuration DHCP Server – Check this box to enable the AdTrap to automatically assign an IP address to a computer from a defined range of numbers (i.e., a scope) configured for a given network. DHCP Range Start – Starting IP address of your DHCP server. DHCP Range End – Ending IP address of your DHCP server. AdTrap Is Hooked Up - Sets the way the AdTrap is configured in your network. AdTrap Ad Blocking – Enables or disables adblocking for the AdTrap. Web Traffic Logging – Enables or disables the web traffic logging located on the reports page. This does not affect ad blocking. Password Use this to change your password. Updates AdTrap Updates – Enable or disable automatic updates. Ad Signatures – Networking – LAN (ETH1) DHCP – Allows the AdTrap to receive a DHCP IP address. LAN IP – Sets a static IP address if DHCP is not checked. Subnet Mask – Sets your subnet mask. Gateway – Sets your Gateway. This is usually a node or device that controls the traffic on your network. Networking WAN (ETH0) DHCP – Allows the AdTrap to receive a DHCP IP address. WAN IP – Sets a static IP address if DHCP is not checked. AdTrap User’s Manual | Page 12 Subnet Mask – Sets your subnet mask. Gateway – Sets your Gateway. This is usually a node or device that controls the traffic on your network. MAC Address – Allows you to change your MAC Address. Networking – DNS SERVERS Use DNS SERVERS from DHCP – This uses the default DHCP servers. DNS SERVER 1 – Allows you to change to a preferred DNS server. DNS SERVER 2 – Allows you to change to a preferred DNS server. Welcome This allows you to go through the welcome sections again. AdTrap Rules: The AdTrap rules lets you add or remove ad blocking for specific sites. Allowed Websites Search – Use this tool to search the list of Allowed Websites already placed in your allowed websites table Add Website – Enter the domain of the website that you would like to be bypassed and see the ads. Allowed Websites – This is a list of user specific websites that have been added to the AdTrap. Blocked Websites Search – Use this tool to search the list of Blocked Websites already placed in your allowed websites table. Add Website – Enter the domain of the website that you would like to be blocked Blocked Websites – This is a list of user specific websites that have been added to the AdTrap. AdTrap User’s Manual | Page 13 Reports: The AdTrap has an advanced logging system in which you can see which ads are being blocked at any time. Real-time Blocked Ads As you are browsing the internet, you can view this page to see what add links are being blocked in real time. There is a whitelist section of the table in which you can click and save which would be added to the allowed list of your AdTrap History Blocked Ads This allows you to see the History of the blocked ads and allows you to download the data Privacy Blocked Ads This allows you to see which websites that were blocked that tried to take your privacy information. Ad Visualizer This allows you to see all the pictures of the blocked ads in one page. Updates: The AdTrap is set up to check and download updates automatically at 1am local time. This is based on the time zone set up in the General section. AdTrap User’s Manual | Page 14 AdTrap Anywhere Installing AdTrap Anywhere on your iDevices (iPhones, iPads) 1. If you are in proxy mode, you must log into your router and forward TCP port 5555 to the AdTrap IP address. 2. Use iCloud or any other backup program and backup your iPhone. 3. You’ll need to put your phone into supervised mode with Apple Configurator, this is a limitation imposed by Apple. https://itunes.apple.com/us/app/appleconfigurator/id434433123?mt=12 4. Plug in to machine with configurator, flip supervision switch to on, then click prepare. 5. Restore your data once it’s back up. 6. Log into the AdTrap. 7. Click Settings then AdTrap Anywhere. 8. Enable AdTrap Anywhere. 9. Change the username. 10. Change the password and confirm. 11. Copy down the hostname and the port number. 12. Wait 2 hours for DNS to start propagating. a. To test the DNS, copy(Ctrl+C) the AdTrap Anywhere Hostname located on your AdTrap Anywhere settings table; i. Windows – open your command prompt and type in “nslookup ” and paste(Ctrl+V) the previously copied AdTrap Anywhere Hostname next to it, click enter. ii. Mac – Open terminal and type in “nslookup ” and paste(Ctrl+V) the previously copied AdTrap Anywhere Hostname next to it, click enterGo to your idevice 13. Click the “download mobileconfig”; it should offer to install; allow it. 14. You can remove the mobileconfig profile like this: http://www.baylor.edu/its/index.php?id=88047, Just remove the one that says AdTrap Anywhere. Leave the other one. AdTrap User’s Manual | Page 15 Android Devices (Your device must be rooted) 2. If you are in proxy mode, you must log into your router and forward TCP port 5555 to the AdTrap IP address. 3. Log into your AdTrap. 4. Click Settings then AdTrap Anywhere 5. Enable AdTrap Anywhere. 6. Change the username. 7. Change the password and confirm. 8. Copy down the hostname and the port number. 9. Wait 2 hours for Hostname DNS to start reporting on servers. a. To test the DNS, copy(Ctrl+C) the AdTrap Anywhere Hostname located on your AdTrap Anywhere settings table; i. Windows – open your command prompt and type in “nslookup ” and paste(Ctrl+V) the previously copied AdTrap Anywhere Hostname next to it, click enter. ii. Mac – Open terminal and type in “nslookup ” and paste(Ctrl+V) the previously copied AdTrap Anywhere Hostname next to it, click enter. 10. Go to your Android Device. 11. Go to play store and download/install proxyDroid. 12. Open proxy droid and grant permission to open. 13. Click Host and type in your hostname from step 7. 14. Click Port and type in port from Step 7. 15. Enable Authentication. 16. Type in the username and password from step 5 & 6. 17. Enable Proxy and you should be all done. AdTrap User’s Manual | Page 16 Basic Troubleshooting Factory Reset: Use the factory reset to restore the AdTrap to its original state. This will also reset the password. The updates and rules of the AdTrap will not be affected. Steps: 1. Unplug all cables including the power. 2. Plug in the power cable only to the AdTrap. 3. On the front of the AdTrap, look for the green number 1 light to be ON. This will take 1530 seconds. 4. Once the light is on, wait 5 seconds. 5. Unplug the power and plug it in again. 6. Repeat steps 3-5 until you see all 4 lights flashing and wait 5 seconds. 7. Your AdTrap is now successfully reset. Unplug power and continue installing your AdTrap. I’m not getting on the Internet: It may take over 5 minutes to establish a connection the first time you power up your AdTrap. Always leave your AdTrap plugged into AC power and connected to your network. Check the front panel lights: The power light should be on. The heartbeat light should be flashing. The internet light should be flashing or on. Check your cable connections: Connectors should be pushed in all the way and not be pinched, kinked, or bent sharply. If Internet status light is flashing: 1. With everything connected, log into the AdTrap. 2. Click on the update tab and then click the update button. AdTrap will look for updates and also does integrity check of the file system. 3. Wait 2 minutes and the Internet should be working. The 4th Internet light should also be solid. No Internet Status Light? 1. Do you have a blinking Heartbeat light (Light 1)? AdTrap User’s Manual | Page 17 a. No - Unplug and plug in power on AdTrap and wait 30 seconds for Heartbeat light. b. Yes - Continue to Step 2. 2. Turn off modem, Adtrap and router. Reset the modem (Some modems have a battery pack which needs to be removed or a reset button) 3. Wait about 2 minutes for modem to turn on and then turn on AdTrap and router 4. Once you have Internet light, wait about 2 more minutes and check for Internet connectivity. I can get on the Internet, but everything is slow; 1. If the website you are visiting is very popular, that site may be having trouble servicing all the requests. If other sites download quickly, wait for a few minutes and try again. If you notice all network activity is slow. Restart all your devices on the network. 2. If the network still seems slow, go into the AdTrap settings and make sure all the updates are current. 3. Please contact AdTrap technical support if you need any additional help. [email protected] Toll Free (888) 361-8511 www.myLive-Tech.com All information contained in this document is subject to change without notice. AdTrap reserves the right to make changes to equipment design or program components, as progress in engineering, manufacturing methods, or other circumstances may warrant. AdTrap and the AdTrap logo, are trademarks of BluePoint Security, Inc. All other trademarks and registered trademarks in any part of this document are the property of their respective owners. AdTrap User’s Manual | Page 18