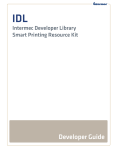
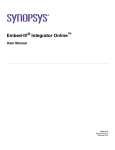
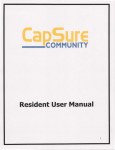
1
Saber View Installation
Guide
Version E-2010.09, September 2010
Saber is a registered trademark of Sabremark Limited
partnership and is used under license.
Copyright Notice and Proprietary Information
Copyright © 2010 Synopsys, Inc. All rights reserved. This software and documentation contain confidential and proprietary
information that is the property of Synopsys, Inc. The software and documentation are furnished under a license agreement and
may be used or copied only in accordance with the terms of the license agreement. No part of the software and documentation may
be reproduced, transmitted, or translated, in any form or by any means, electronic, mechanical, manual, optical, or otherwise, without
prior written permission of Synopsys, Inc., or as expressly provided by the license agreement.
Right to Copy Documentation
The license agreement with Synopsys permits licensee to make copies of the documentation for its internal use only.
Each copy shall include all copyrights, trademarks, service marks, and proprietary rights notices, if any. Licensee must
assign sequential numbers to all copies. These copies shall contain the following legend on the cover page:
“This document is duplicated with the permission of Synopsys, Inc., for the exclusive use of
__________________________________________ and its employees. This is copy number __________.”
Destination Control Statement
All technical data contained in this publication is subject to the export control laws of the United States of America.
Disclosure to nationals of other countries contrary to United States law is prohibited. It is the reader’s responsibility to
determine the applicable regulations and to comply with them.
Disclaimer
SYNOPSYS, INC., AND ITS LICENSORS MAKE NO WARRANTY OF ANY KIND, EXPRESS OR IMPLIED, WITH
REGARD TO THIS MATERIAL, INCLUDING, BUT NOT LIMITED TO, THE IMPLIED WARRANTIES OF
MERCHANTABILITY AND FITNESS FOR A PARTICULAR PURPOSE.
Registered Trademarks (®)
Synopsys, AMPS, Astro, Behavior Extracting Synthesis Technology, Cadabra, CATS, Certify, CHIPit, CoMET, Design
Compiler, DesignWare, Formality, Galaxy Custom Designer, HAPS, HapsTrak, HDL Analyst, HSIM, HSPICE, Identify,
Leda, MAST, METeor, ModelTools, NanoSim, OpenVera, PathMill, Physical Compiler, PrimeTime, SCOPE, Simply Better
Results, SiVL, SNUG, SolvNet, Syndicated, Synplicity, the Synplicity logo, Synplify, Synplify Pro, Synthesis Constraints
Optimization Environment, TetraMAX, UMRBus, VCS, Vera, and YIELDirector are registered trademarks of Synopsys,
Inc.
Trademarks (™)
AFGen, Apollo, Astro-Rail, Astro-Xtalk, Aurora, AvanWaves, BEST, Columbia, Columbia-CE, Confirma, Cosmos,
CosmosLE, CosmosScope, CRITIC, CustomExplorer, CustomSim, DC Expert, DC Professional, DC Ultra, Design
Analyzer, Design Vision, DesignerHDL, DesignPower, DFTMAX, Direct Silicon Access, Discovery, Eclypse, Encore,
EPIC, Galaxy, HANEX, HDL Compiler, Hercules, Hierarchical Optimization Technology, High-performance ASIC
Prototyping System, HSIMplus, i-Virtual Stepper, IICE, in-Sync, iN-Tandem, Jupiter, Jupiter-DP, JupiterXT,
JupiterXT-ASIC, Liberty, Libra-Passport, Library Compiler, Magellan, Mars, Mars-Rail, Mars-Xtalk, Milkyway,
ModelSource, Module Compiler, MultiPoint, Physical Analyst, Planet, Planet-PL, Polaris, Power Compiler, Raphael,
Saturn, Scirocco, Scirocco-i, Star-RCXT, Star-SimXT, StarRC, System Compiler, System Designer, Taurus, TotalRecall,
TSUPREM-4, VCS Express, VCSi, VHDL Compiler, VirSim, and VMC are trademarks of Synopsys, Inc.
Service Marks (sm)
MAP-in, SVP Café, and TAP-in are service marks of Synopsys, Inc.
SystemC is a trademark of the Open SystemC Initiative and is used under license.
ARM and AMBA are registered trademarks of ARM Limited.
Saber is a registered trademark of SabreMark Limited Partnership and is used under license.
All other product or company names may be trademarks of their respective owners.
ii
Saber View Installation Guide
E-2010.09
Contents
Installing Saber View. . . . . . . . . . . . . . . . . . . . . . . . . . . . . . . . . . . . . . . . . . . . . . .
1
Preparing for Installation . . . . . . . . . . . . . . . . . . . . . . . . . . . . . . . . . . . . . . . . .
2
Synopsys Common Licensing (SCL) . . . . . . . . . . . . . . . . . . . . . . . . . . . . . . . .
3
Installing, Administrating, and Troubleshooting SCL . . . . . . . . . . . . . . . .
3
SCL Documentation . . . . . . . . . . . . . . . . . . . . . . . . . . . . . . . . . . . . . . . . .
3
Installing the Software . . . . . . . . . . . . . . . . . . . . . . . . . . . . . . . . . . . . . . . . . . .
4
Installing the Autorendering Software . . . . . . . . . . . . . . . . . . . . . . . . . . .
4
Installing WebUI2 . . . . . . . . . . . . . . . . . . . . . . . . . . . . . . . . . . . . . . . . . . .
5
Initializing Windows 2003 Server for Configuration (Windows 2003 Server Users
Only). . . . . . . . . . . . . . . . . . . . . . . . . . . . . . . . . . . . . . . . . . . . . . . . .
5
Configuring the Autorendering Software for the Web. . . . . . . . . . . . . . . .
Setting and Validating the ASPNET Account Permissions. . . . . . . .
Setting and Validating Permissions on Files and Folders. . . . . . . . .
Setting and Validating COM Component Services. . . . . . . . . . . . . .
Assigning Permissions to Users, Files, and Folders . . . . . . . . . . . .
7
11
12
13
16
Verifying the Installation . . . . . . . . . . . . . . . . . . . . . . . . . . . . . . . . . . . . . . . . . .
18
Uninstalling Saber View . . . . . . . . . . . . . . . . . . . . . . . . . . . . . . . . . . . . . . . . . .
18
Customer Support . . . . . . . . . . . . . . . . . . . . . . . . . . . . . . . . . . . . . . . . . . . . . .
18
Accessing SolvNet . . . . . . . . . . . . . . . . . . . . . . . . . . . . . . . . . . . . . . . . . .
19
Contacting the Synopsys Technical Support Center . . . . . . . . . . . . . . . .
19
iii
Contents
iv
Installing Saber View
This document contains specific information to prepare for and verify installation
of Saber View.
This document includes the following sections:
■
Preparing for Installation
■
Synopsys Common Licensing (SCL)
■
Installing the Software
■
Verifying the Installation
■
Uninstalling Saber View
■
Customer Support
Important:
Saber View is functional starting from Saber
B-2008.09-SP2 release with Saber Harness component
installed.
The installation instructions in this document are the most
up-to-date available at the time of production. For the latest
installation information, see Saber release notes or
documentation on SolvNet at http://solvnet.synopsys.com/.
Saber View Installation Guide
E-2010.09
1
Chapter :
Preparing for Installation
Preparing for Installation
The following points are prerequisites for the installation process.
■
If you have not already done so, retrieve your license keys from the
SmartKeys Web page. To access the SmartKeys webpage, click the
SmartKeys link from the Download Center.
For detailed licensing information, see the Synopsys Licensing QuickStart
Guide.
■
It is essential that your browser supports Scalable Vector Graphics (SVG)
and is enabled for Saber View to render and display netlists. If your browser
does not support SVG, download an SVG Viewer browser plug-in from http:/
/www.adobe.com/svg/viewer/install/.
■
Windows users: You must have administration privileges for installing and
uninstalling the tool. In addition, you must close all running Saber
applications (Sketch or Saber) before starting any Saber installation
processes on Windows.
■
Verify that you have adequate disk space for installing Saber View.
■
Close any open Saber applications before proceeding with the installation.
■
Ensure that you have Saber View Version 2010.2.x.x or higher.
■
Install Microsoft .NET Framework 3.5 with SP1 or higher, if not already
installed.
■
Ensure that the server is set up with the following configuration:
If your server is...
then...
Microsoft Windows Server 2003
■
■
Windows XP Professional
■
■
Ensure SP2 or higher is installed with all other available Microsoft
Updates.
Ensure IIS 6.0 (IIS 5 Isolation Mode) is installed.
Ensure SP3 or higher is installed with all other available Microsoft
Updates.
Ensure IIS 5.1 is installed.
Important: Contact your system administrator in case you have any
issues installing the recommended Microsoft software.
2
Saber View Installation Guide
E-2010.09
Chapter :
Synopsys Common Licensing (SCL)
Synopsys Common Licensing (SCL)
Synopsys Common Licensing (SCL) provides a single method of obtaining
licenses used by all Synopsys tools. SCL reduces licensing administration
complexity, minimizing the effort you expend in installing, maintaining, and
managing licensing software for Synopsys tools.
Note:
It is recommended that you download and install the latest
version of SCL. To download the latest version of SCL, click
"Synopsys Common Licensing" from the Download Center.
The following sections describe:
■
Installing, Administrating, and Troubleshooting SCL
■
SCL Documentation
Installing, Administrating, and Troubleshooting SCL
For information on installing, administrating and troubleshooting SCL see the
Synopsys Licensing QuickStart Guide. The Synopsys Licensing Quick Start
provides information on Downloading & Installing SCL, and other information
that is necessary to administer and troubleshoot SCL.
The Documentation section provides links to the installation readme, release
notes, administration guide and the FLEXnet User Manual.
Note:
Install a single copy of SCL on your license server to be used with
all Synopsys tools. Installation of Synopsys tools and SCL is not
order dependent. That is, you can install SCL before or after you
install your Synopsys tools. However, you cannot use any
Synopsys tools reliant on SCL until you have installed and
configured SCL.
SCL Documentation
The Synopsys Common Licensing Installation Notes, Synopsys Common
Licensing Release Notes, and the Synopsys Common Licensing Administration
Guide, are also available in PDF format in the SCL installation directory at
scl_root/docs/scl.
Saber View Installation Guide
E-2010.09
3
Chapter :
Installing the Software
The FLEXnet End Users Guide and FAQ is also available in PDF format in the
SCL Installation directory at docs/flexlmman.
Installing the Software
This section covers the following topics:
■
Installing the Autorendering Software
■
Installing WebUI2
■
Initializing Windows 2003 Server for Configuration (Windows 2003 Server
Users Only)
■
Configuring the Autorendering Software for the Web
Installing the Autorendering Software
To install Saber View:
1. Download the Saber release to a temporary directory. You can obtain the
latest Saber download instructions from the Release Library, which is
accessible through SolvNet.
2. Select the Saber Harness option for installation while installing Saber, in
addition to other typical Saber components.
For the latest installation information, see the Saber Installation Guide at:
http://www.synopsys.com/Support/LI/Installation/Pages/default.aspx.
Note: C:\Synopsys\Saber\<version> is the default install location
unless you choose a different location.
3. Extract the contents of SaberView_2010.2.x.x available from the
location
<Saber_Install_path>\Synopsys\Saber\<version>\Saber\saberview\ to a
temporary location.
4. Navigate to the <temporary_location>\v2009.2.x.x\webUI2.2009.2 folder
and double-click install.bat. The Saber View installer performs the
following tasks:
4
•
Creates a program installation directory, C:\Program Files\TTA\Netlist.
•
Creates the following icons on the desktop:
Saber View Installation Guide
E-2010.09
Chapter :
Installing the Software
•
WebUI: Web-Based Netlist Converter Application (Admin use only)
•
Netlist: Launches the Saber View rendering application (Users)
Installing WebUI2
To install WebUI2 on a Windows 2003 server:
1. Create a new folder inside the wwwroot directory in the default IIS
installation folder C:\inetpub\wwwroot. For example,
C:\inetpub\wwwroot\NetlistConverter.
2. Navigate to the <temporary_location>\v2009.2.x.x\webUI2\ folder and
extract the contents of WebUI2.zip file to
C:\inetpub\wwwroot\NetlistConverter.
To install WebUI2 on a Windows XP machine, navigate to the
<temporary_location>\v2009.2.x.x\webUI2\ folder and extract the contents of
WebUI2.zip file to C:\inetpub\wwwroot\NetlistConverter.
Initializing Windows 2003 Server for Configuration
(Windows 2003 Server Users Only)
To initialize Windows 2003 Server for configuration:
1. Click Start > Settings > Control Panel > Administrative Tools > Internet
Information Services (IIS) Manager. The Internet Information Services
(IIS) Manager window is displayed:
Saber View Installation Guide
E-2010.09
5
Chapter :
Installing the Software
2. Navigate and expand the tree in the left panel to the location Internet
Information Services > SERVERNAME > Web Sites, then right-click
Default Web Site, and choose Properties. The Default Web Site Properties
dialog box is displayed.
3. Click the Services tab and select the Run WWW Service in IIS 5.0
isolation mode check box.
4. Navigate and expand the tree in the left panel to the location Internet
Information Services > SERVERNAME > Web Service Extensions, then
right-click on ASP.NET v2.0.xxxxx from the list, and click Allow.
5. Navigate and expand the tree in the left panel to the location Internet
Information Services > SERVERNAME, then right-click Web Sites, and
choose New > Web Site. The Web Site Creation Wizard dialog box is
displayed.
6. Enter the name of the web site and click Next.
7. Depending on the network infrastructure and server configuration, provide
the following details and click Next:
Field
Value
Enter the IP address to use for this Web Site
For example, 10.x.x.x.
TCP port this Web site should use (Default: 80)
Use default: 80
Host header for this Web site (Default: None)
For example, www.netlistconverter.com
8. Enter the path where the web site files are located and click Next. For
example, c:\inetpub\wwwroot\NetlistConverter.
9. Select the Read and Read Scripts (such as ASP) check box, then click
Next, and then click Finish.
6
Saber View Installation Guide
E-2010.09
Chapter :
Installing the Software
Configuring the Autorendering Software for the Web
To configure the autorendering software for the web:
Note: Windows 2003 Users should first complete the Initializing the
Windows 2003 Server procedure before continuing with this
procedure.
1. Click Start > Settings > Control Panel > Administrative Tools > Internet
Information Services. The Internet Information Services window is
displayed:
Saber View Installation Guide
E-2010.09
7
Chapter :
Installing the Software
2. Navigate and expand the tree in the left panel to the location local
computer > Web Sites, then right-click Default Web Site, and choose
Properties. The Default Web Site Properties dialog box is displayed:
3. Click the Home Directory tab and configure the options as per the following
table:
8
Option
Value
Local Path
Validate the local path. This path is configured during the IIS installation. For
example, "C:\inetpub\wwwroot".
Read
All check boxes except for "Read" should be deselected.
Application name
Enter the application name. For example, "NetlistConverter"
Execute Permissions
Set to "Scripts only"
Saber View Installation Guide
E-2010.09
Chapter :
Installing the Software
4. Click the Documents tab and then click the Add button. The Add Default
Document dialog box is displayed.
a. Enter "default.aspx" in the Add Default Document Name dialog box
and click OK. The document type is added to the default document list.
b.
Use the
button and move the newly entered document type to the
top of the list.
5. Click the ASP.NET tab and set the ASP.NET version to "2.0.xxxxx".
6. Click the Directory Security tab and then click the Edit button under the
Anonymous access and authentication control group. The
Authentication Methods dialog box is displayed:
7. Deselect the Integrated Windows authentication option and click OK.
8. Click the HTTP Headers tab and then click the File Types button. The File
Types dialog box is displayed.
Saber View Installation Guide
E-2010.09
9
Chapter :
Installing the Software
The following file types must be available in the File Types dialog box for the
SVG to render the netlist correctly:
File Type
Content Type (MIME)
.jsz
application/octet-stream
.svg
image/svg+xml
If the file types are already listed in the File Types dialog box, click Cancel
and proceed with Step 9 else continue with the following steps to add the file
types to the File Types list:
a. Click the New Type button. The File Type dialog box is displayed.
b.
Enter the Associated extension value. For example, ".jsz"
c.
Enter the Content Type (MIME) value. For example, "application/octetstream"
d. Click OK to add file type to the File Types list.
Repeat steps a through d to add the .svg file type to the File Types list.
e. Click OK to accept the specified file types and close the File Types
dialog box.
9. Click OK to close the Default Web Site Properties dialog box.
This section covers the following topics:
10
■
Setting and Validating the ASPNET Account Permissions
■
Setting and Validating Permissions on Files and Folders
■
Setting and Validating COM Component Services
■
Assigning Permissions to Users, Files, and Folders
Saber View Installation Guide
E-2010.09
Chapter :
Installing the Software
Setting and Validating the ASPNET Account Permissions
To validate the existence of an ASPNET account and its permissions:
1. Click Start > Settings > Control Panel > Administrative Tools >
Computer Management. The Computer Management window is displayed:
2. Navigate and expand the tree in the left panel to the location
System Tools > Local Users and Groups > Users. If an ASPNET account
already exists, it is displayed in the right panel in the Computer Management
window.
Saber View Installation Guide
E-2010.09
11
Chapter :
Installing the Software
3. If an ASPNET account does not exist, create a new account and update the
IIS metabase as follows:
a. Click Start > Run, then type cmd, and press the Enter key. A Command
Prompt window is displayed.
b.
Execute the following commands to create a new ASPNET account and
update the IIS metabase:
c:
c:\
cd %SYSTEMROOT%\Microsoft.NET\Framework\v2.0.50727
aspnet_regiis.exe -i
exit
Result: A new account ASPNET with updated IIS metabase is shown in the
right panel of the Computer Management window.
Setting and Validating Permissions on Files and Folders
Permissions on specific files and folders need to be set before invoking Saber
View. The following table lists the specific files and folders for which
permissions need to be set:
File / Folder Location
User
Permissions Purpose
customer.xml
c:\program
files\TTA\Netlist\Kernel\_config
ASPNET
Write - Allow
Stores project, user, and other
information.
Kernel folder
c:\program
files\TTA\Netlist\Kernel
ASPNET
Read - Allow
Stores project data.
c:\program
files\TTA\Netlist\batch
ASPNET
c:\inetpub\wwwroot\SaberView\
cache
ASPNET
batch folder
cache folder
Write - Allow
Write - Allow
Stores batch output.
The location of the folder can
be changed in config.xml
Read - Allow
Write - Allow
Stores cache files send to the
client.
If this folder does not exist, it
must be created.
Temp folder
c:\WINDOWS\Temp
ASPNET
Read - Allow
Write - Allow
The technology
XMLSerialization requires
permissions on the windows
temp folder.
The location can be found in
System Variables, variable
TEMP.
12
Saber View Installation Guide
E-2010.09
Chapter :
Installing the Software
See Assigning Permissions to Users, Files, and Folders.
Setting and Validating COM Component Services
To validate the existence of an ASPNET account and its permissions:
1. Click Start > Settings > Control Panel > Administrative Tools >
Component Services. The Component Services window is displayed:
Saber View Installation Guide
E-2010.09
13
Chapter :
Installing the Software
2. Navigate and expand the tree in the left panel to the location Console Root
> Component Services > Computers, then right-click My Computer and
choose Properties. The My Computer Properties window is displayed:
3. Click the Default Properties tab and configure the options as per the
following table:
Option
Value
Enable Distributed COM on this Computer
Set to "Checked"
Default Authentication Level
Set to "Connect"
Default Impersonation Level
Set to "Identify"
4. Click the COM Security tab, and assign permissions to users as per the
following table:
Group
Users
Permissions
Access Permissions
Anonymous Logon
Local Access - Allow
Remote Access - Allow
14
Saber View Installation Guide
E-2010.09
Chapter :
Installing the Software
Group
Users
Permissions
Everyone
Local Access - Allow
Remote Access - Allow
Interactive
Local Access - Allow
Remote Access - Allow
Network
Local Access - Allow
Remote Access - Allow
System
Local Access - Allow
Remote Access - Allow
Launch and Activation Permissions
Anonymous Logon
Local Launch - Allow
Remote Launch - Allow
Local Activation - Allow
Remote Activation - Allow
Everyone
Local Launch - Allow
Remote Launch - Allow
Local Activation - Allow
Remote Activation - Allow
Interactive
Local Launch - Allow
Remote Launch - Allow
Local Activation - Allow
Remote Activation - Allow
Network
Local Launch - Allow
Remote Launch - Allow
Local Activation - Allow
Remote Activation - Allow
System
Local Launch - Allow
Remote Launch - Allow
Local Activation - Allow
Remote Activation - Allow
See Assigning Permissions to Users, Files, and Folders.
Saber View Installation Guide
E-2010.09
15
Chapter :
Installing the Software
Assigning Permissions to Users, Files, and Folders
To add a user profile and assign permissions to that user for the specific files /
folders:
1. Right-click on the file or folder, then choose Properties, then select the
Security tab, and click the Add button. The Select Users, Computers,
Groups dialog box is displayed:
2. Click the Locations button, then click
OK.
16
(local computer), and then click
Saber View Installation Guide
E-2010.09
Chapter :
Installing the Software
3. Click the Advanced button and then click the Find Now button. A list of user
profiles is populated in the bottom panel of the Select Users, Computers,
Groups dialog box:
4. Select ASPNET, then click OK and then click OK. The user profile ASPNET
is added to the user list in the Security tab.
5. Use the Allow or Deny check box to set the permissions as needed and
click OK. The permissions are applied to the selected user and the file /
folder.
Saber View Installation Guide
E-2010.09
17
Chapter :
Verifying the Installation
Verifying the Installation
Saber View requires only a single license daemon, snpslmd. For additional
information, see Installing Synopsys Tools.
To run Saber View:
1. Check that your SNPSLMD_LICENSE_FILE or LM_LICENSE_FILE variable
is set to a valid licensing server. If you do not have a license, contact
Customer Support to obtain one.
2. Launch a browser and type the URL http://localhost and press the Enter key.
The Saber View login page is displayed:
3. Enter the login credentials supplied by Synopsys Technical Support to start
using Saber View.
If you do not have a valid login credentials, contact Customer Support.
Uninstalling Saber View
To uninstall the software, select and delete the Saber View installation folder
(C:\Program Files\TTA\).
Customer Support
Customer support is available through SolvNet online customer support and
through contacting the Synopsys Technical Support Center.
This section covers the following topics
18
Saber View Installation Guide
E-2010.09
Chapter :
Customer Support
■
Accessing SolvNet
■
Contacting the Synopsys Technical Support Center
Accessing SolvNet
SolvNet includes an electronic knowledge base of technical articles and
answers to frequently asked questions about Synopsys tools. SolvNet also
gives you access to a wide range of Synopsys online services, which include
downloading software, viewing Documentation on the Web, and entering a call
to the Support Center
To access SolvNet:
1. Go to the SolvNet Web page at http://solvnet.synopsys.com.
2. If prompted, enter your user name and password. (If you do not have a
Synopsys user name and password, follow the instructions to register with
SolvNet.)
If you need help using SolvNet, click Help on the SolvNet menu bar.
Contacting the Synopsys Technical Support Center
If you have problems, questions, or suggestions, you can contact the Synopsys
Technical Support Center in the following ways:
1. Open a call to your local support center from the Web by going to http://
solvnet.synopsys.com/EnterACall (Synopsys user name and password
required).
2. Telephone your local support center.
■
North America
Toll Free: 800-245-8005, or send an e-mail message to [email protected]
■
Europe
Central Europe: +49-89-99320-0
Northern Europe:
Scandinavia: +46 8 555 202 20
United Kingdom: +44 (0) 1189 965 1186
Saber View Installation Guide
E-2010.09
19
Chapter :
Customer Support
Southern Europe:
France: +33 (0) 810 810903
Italy: +39 039 6846 700
Israel: +972-9-9719600
■
Asia-Pacific:
China: +8610-68029992
India: 1-800-102-7677
Korea: +82-2-3404-2700
Singapore: +65-62967433
Taiwan: 0800079595
Japan: 03-5746-1117
20
Saber View Installation Guide
E-2010.09