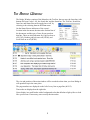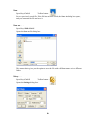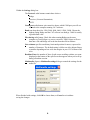
1
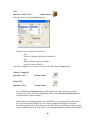
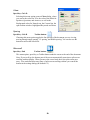
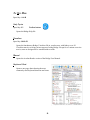
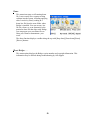
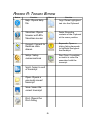
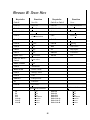
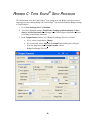
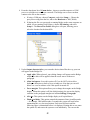
Bridge
Version 2.0
User Manual
925 Central Parkway
Stuart, Florida 34994
www.eclipsecat.com
(772) 288-3266
(800) 800-1759
FAX (772) 288-1737
© 2007 Advantage Software, Inc.
©Copyright 2007 by Advantage Software, Inc.
All Rights Reserved Worldwide
This manual contains information and trade secrets proprietary to Advantage Software, Inc. It is
intended for use by Advantage Software customers only.
No part of this manual may be copied or distributed, transmitted, transcribed, stored in a retrieval
system, or translated into any human or computer language, in any form or by any means,
whether electronic, mechanical, magnetic, manual or otherwise, or disclosed to third parties
without the express written permission of Advantage Software, Inc.
TABLE OF CONTENTS
Table of Contents
TABLE
OF
CONTENTS.................................................................................................I
INTRODUCTION .....................................................................................................1
What is Bridge?.....................................................................................................1
Setup ..................................................................................................................1
Features...............................................................................................................1
Basic Procedure....................................................................................................1
THE BRIDGE WINDOW............................................................................................3
QUICK START & NAVIGATING IN BRIDGE.........................................................................5
SEARCHING IN BRIDGE.............................................................................................7
Using the Search bar.............................................................................................7
Quicksearch..........................................................................................................8
MENUS .............................................................................................................9
The File Menu.......................................................................................................9
New............................................................................................................................9
Open . . . ....................................................................................................................9
Save
.....................................................................................................................10
Save as . . . .............................................................................................................10
Setup . . ...................................................................................................................10
Connect ....................................................................................................................12
Print .........................................................................................................................12
Export
..................................................................................................................12
Exit
......................................................................................................................12
The Edit Menu.....................................................................................................13
Copy..........................................................................................................................13
Paste.........................................................................................................................13
Quick mark................................................................................................................13
Issue Code.................................................................................................................13
Note..........................................................................................................................14
Attachment................................................................................................................14
Delete mark...............................................................................................................14
Manage Issues...........................................................................................................15
The Search Menu ..............................................................................................16
Find...........................................................................................................................16
Find Previous.............................................................................................................16
Find Next...................................................................................................................16
Keywords...................................................................................................................16
Word Index................................................................................................................16
Quicksearch backward and Quicksearch forward .........................................................17
i
Go to.........................................................................................................................17
Play multimedia..........................................................................................................17
The View Menu ..................................................................................................18
Show/Hide.................................................................................................................18
Timecodes Toolbar button:...................................................................................18
Line Numbers Toolbar button: ..............................................................................18
Marks Toolbar button: .........................................................................................18
.............................................................................................................................18
Keywords Toolbar button: .....................................................................................18
Font..........................................................................................................................19
Zoom In (magnify).....................................................................................................19
Zoom Out..................................................................................................................19
Colors........................................................................................................................20
Spacing......................................................................................................................20
Auto-scroll.................................................................................................................20
The Help Menu....................................................................................................21
Help Topics................................................................................................................21
Visualizer...................................................................................................................21
Manual......................................................................................................................21
Keyboard Chart..........................................................................................................21
Demo........................................................................................................................22
About Bridge . . .........................................................................................................22
APPENDIX A: TOOLBAR BUTTONS...............................................................................23
APPENDIX B: SPEED KEYS.......................................................................................25
APPENDIX C: TOTAL ECLIPSEM SETUP PROCEDURE.............................................................26
Beginning a Realtime/Bridge Session....................................................................28
INDEX.............................................................................................................29
ii
INTRODUCTION
WHAT IS BRIDGE?
Bridge is a tool for viewing and interacting with a realtime data stream from CAT software.
SETUP
The Bridge user’s computer is connected to the Court Reporter’s computer by a cable that
connects their serial ports. Multiple Bridge users may connect to a single court reporter by
splitting the cable. Other transmission setups are also possible, and the Bridge user may call
up transcripts from files stored on the user’s own computer (or network).
FEATURES
When following a realtime transcript, the Bridge user may interact with the transcript in a
variety of ways. When the reporter makes editing changes, the program is able to refresh the
transcript in realtime. With little effort or distraction, the user may make a simple mark,
insert a note, attach a file (a word processing document, a graphic file, a spread sheet, etc),
or set a coded issue mark at any point in the transcript.
Files can be saved, and multiple files can be viewed, with each file opening in a separate
Bridge window.
BASIC PROCEDURE
A typical realtime Bridge session might include five general steps:
1. Connect to the court reporter and open Bridge, which creates a new document.
2. Choose preferences for working with the transcript.
3. Connect to the transcript.
4. Follow and interact with the transcript during the proceeding.
5. Print, Export, or Save the file (optional).
1
2
THE BRIDGE WINDOW
The Bridge Window consists of the Menu bar, the Tool bar, the text area, the Issue bar (with
buttons for Issue Codes 1-10), the Search bar, and the Status bar. The Tool bar, Search bar,
Issue bar, and Status Bar can be toggled on or off, by
selecting or de-selecting them in the View menu.
On the Status Bar are indicators of the cursor's
location in the document, the timecodes for that line of
the document, and the type of issue for any mark on
that line. There are also indicators for Caps Lock on or
off (CAP), Number pad lock on or off (NUM), and
Scroll lock on or off (SCRL).
The size and position of the main window will be recorded so that when you close Bridge it
will open back up in the same place.
The page numbers are displayed on the left of every line as page/line (001/15).
Timecodes are displayed on the right side.
Notes display in a small border with a background color that defaults to light yellow to look
like a post-it note. If necessary, notes overlay the timecodes.
3
4
QUICK START & NAVIGATING IN BRIDGE
Using Bridge to follow the creation of a transcript in Realtime, you can move around in the
document using the following keys and commands:
1. The up (↑) and down (↓) arrow keys move the cursor up or down one line.
2. The Page up and Page down keys move the cursor up or down one screen.
3. The Home key moves the cursor to the beginning of the transcript.
4. The End key moves the cursor to the end of the transcript. You can also use the
“Scroll” Tool bar icon. If a Realtime session is in progress, the cursor goes to
the end and continues to follow along as text is created.
Note: If you scroll up, the bottom part of the screen automatically turns into a
split-screen scrolling realtime display. When you move the cursor back down,
the split-screen goes away. You can define how many lines of split-screen
scrolling realtime you want at the bottom in the settings dialog (the default is 5.)
5. Pressing the Enter key opens a Note dialog box and places a mark on the line
containing the cursor when you click OK in the Note dialog box. If there is a
mark already on the line, pressing Enter will re-open the Note dialog box so
you can edit your note.
6. Pressing the Space bar places a General mark on the line containing the cursor.
If there is already a mark on the line, pressing the Space bar removes the mark,
as long as you have not added a note. If there is a specific issue mark without a
note on the line, pressing the Space bar removes the mark. Pressing the Space
bar again will replace the mark.
7. Pressing a letter key places a mark on the line and lets you type in a note directly
in the note area to the right of the transcript window. If several notes overlap
vertically, the active note always displays on top.
Pressing the up (↑) or down (↓) arrow key exits the note area and moves the
cursor up or down one line.
8. You can use the Search bar at the bottom of the window to search for any Text,
Location, Mark, Note, Issue, Attachment, Question, Answer or Speaker, using
the Find Next and Find Previous buttons after specifying what you want to find.
9. Additional buttons on the Search bar let you toggle on or off timecodes,
page/line numbers, marks, and keyword highlighting. Other buttons let you
adjust the line spacing and magnification (zoom in or out).
10. You can do a Quicksearch backward or forward using Speed keys or the
Search menu items to search for the previous or next Note, Mark, Issue,
Attachment, Question, Answer, or Speaker.
Speed keys for these and other features are listed in the Appendix, page .
In addition, clicking on the Help menu/Keyboard Chart opens, in Acrobat Reader, a onepage chart showing the most commonly-used keyboard shortcuts and icons.
5
6
SEARCHING IN BRIDGE
USING THE SEARCH BAR
The Search bar, located near the bottom left corner of the Bridge window, contains a Search
for selection list, so you can search your document for any of the
following:
Text, Location, Mark, Note, Issue, Attachment, Question,
Answer, and Speaker.
Next to the Search for selection list is a combo box where you enter
the item you wish to find. For each type of search, the combo box will
suggest the information you should enter. After specifying the search
information (if needed), hitting enter will move your cursor to the next
occurrence of the item.
●
Text
Speed key: Ctrl+F
You can type text into the combo box and hit Enter to find it. The combo box lists the
text from the last 10 searches.
Text searches are whole-word matches and are case sensitive only if the search text
contains any capital letters.
●
Location (Go to)
Speed key: Ctrl+G or Ctrl+J
You can type a page/line or timecode.
●
Mark
Searches for the next mark of any kind, whether it has a note or not..
●
Issue
Selecting Issue opens the combo
box listing all of the issues for the
current job, and you can select from
that list.
7
●
Note
Searches for the next note, with the cursor in the note ready to edit. You have to option to
type note text to find.
●
Attachment
With Attachment selected, hitting Enter finds the next attachment in the document.
●
Question
With Question selected, hitting Enter finds the next Question paragraph in the document.
You can also enter text to look for in a question.
●
Answer
With Answer selected, hitting Enter finds the next Answer paragraph in the document.
You can also enter text to look for in an answer.
●
Speaker
With Speaker selected, hitting Enter finds the next Speaker in the document.
QUICKSEARCH
You also have the option of doing Quicksearches, which are commands that allow you to
perform searches with single keystrokes without using the search bar. The cursor will move to
the next line containing the selected search item. An exception is a Quicksearch for an issue: you
must select an issue from the drop-down list in the combo box.
Keystrokes for Quicksearch:
Quicksearch backward:
F8
F9
F11
F12
Ctrl+Q
Ctrl+A
Ctrl+R
Note
Mark
Issue
Attachment
Question
Answer
Speaker
Quicksearch forward:
Shift+F8
Shift+F9
Shift+F11
Shift+F12
Shift+Ctrl+Q
Shift+Ctrl+A
Shift+Ctrl+R
Note
Mark
Issue
Attachment
Question
Answer
Speaker
Quicksearches can also be accessed using the Search menu | Search menu | Quicksearch
backward backward and Search menu | Quicksearch forward options.
8
MENUS
There are five drop-down menus in Bridge: File, Edit, Search, View, and Help
THE FILE MENU
Speed key: Alt+F
The File menu controls functions that affect the entire document. Use the File menu to
create (New), Open, Save, Print, rename (Save As), or Export a document. The File menu
also offers the options to Setup your connection settings and Connect to a realtime session.
The File menu also keeps a list of recently opened documents—a handy shortcut for getting
to frequently used files. To open one of the listed files, simply click on the filename
appearing on the recent-documents list.
New
Speed key: Ctrl+N
This option opens a new, blank document. Use this when you want to start a new session. If
you already have a document loaded when you hit the "connect" button it ADDS the new
text to the existing document. You only use New if you want to start with a blank document.
Open . . .
Speed key: Ctrl+O
Toolbar button:
Opens the Open file dialog box:
You use the Open option to view a previously saved file.
9
Save
Speed key: Ctrl+S
Toolbar button:
Saves a previously saved file. If the file has not been saved, the Save As dialog box opens,
and you can name the file and save it.
Save as . . .
Speed key: Shift+Ctrl+S
Opens the Save as file dialog box:
This menu choice gives you the option to save the file with a different name or in a different
folder.
Setup . . .
Speed key: Ctrl+U
Toolbar button:
Opens the Settings dialog box:
10
Within the Settings dialog box:
The Protocol: radio buttons contain these choices:
Bridge
Caseview (Livenote/Summation)
ASCII
Comm port radio button: spin control to choose which COM port you will use
to attach to the computer running CAT software.
Baud rate drop-down list: 1200, 2400, 4800, 9600, 19200, 38400. Choose the
highest setting Bridge and the CAT software can both go. 38400 is usually
a good default value.
File sharing radio button: Check this when running Bridge on the same
computer as Total EclipseM or across a network. Total EclipseM will save
data into a file and Bridge will read data from that file in realtime.
Note column: specifies an arbitrary horizontal position for notes, expressed in
number of characters. The default setting is 60 but can it be adjusted larger
or smaller depending on how wide the margins in your CAT software tend
to be.
Realtime Lines: the number of lines of split-screen scrolling realtime you want
displayed at the bottom of the split-screen that appears when you scroll up
during a Realtime session.
Multimedia: Opens a Multimedia settings dialog to control the settings for the
audio file.
When finished with settings, click OK to choose them, or Cancel to exit without
saving the changes.
11
Connect
Speed key: Ctrl+T
Toolbar button:
This opens the Open file dialog box, where you can choose the bridge file you wish to view.
You will use Connect to view a realtime file, Open to view a previously saved file.
Print
Speed key: Ctrl+P
Toolbar button:
This will print the entire Bridge file exactly as it appears on the screen, including the font
and other display information such as whether or not to show timecodes.
This printout will also include a report at the end, which lists the marks and notes and the
page and line numbers where they appear.
Any notes that are written will appear on the right side of the text. The notes will wrap to
several lines if necessary.
Export
Speed key: Ctrl+E
The Export function will export the contents of a Bridge file to an ASCII file.
Exit
Speed key: Alt+F4
This function will close the program. If you have made changes to an open file, Bridge will
ask if you want to Save your changes before exiting.
12
THE EDIT MENU
Speed key: Alt+E
Contains commands appropriate to the file currently
open.
Copy
Speed key: Ctrl+C
Toolbar button:
You can copy part or all of the document and paste it into any Windows software. Highlight
the portion of the document you wish to copy, using your mouse or Shift plus up or down
arrow keys, and choose Edit | Copy or Ctrl+C. Then open your word processing software
(Notepad, Wordpad, Word, etc.) and choose Paste (Ctrl+V) to insert the selected text.
Whatever is visible when you highlight the text (marks, timecodes, line numbers) will be
included in the copying process. If marks are included, the type of mark will be noted, and
any accompanying notes will also be displayed in the pasted document.
Paste
Speed key: Ctrl+V
Toolbar button:
This option places text from the Windows clipboard into an annotation associated with a
mark in Bridge. First, place text from any source (word processor, spreadsheet, etc.) on the
Windows clipboard, using Ctrl+C. Place your cursor on the line where you want to place
the mark with the information, and choose Edit | Paste or Ctrl+V. A mark will be placed on
that line, with the text in the note.
Quick mark
Speed key: Space
or F5
This option places a General mark at the cursor and lets you type a note without opening the
Note dialog. If you cursor to the line containing the mark, you can type or backspace
directly in the note area. Or you can press Enter to open the note dialog where you can edit
the note.
Note: You can add a mark to any line your cursor is on and type in a note simply by
beginning to type. When finished, the up or down keys will take you to the next or previous
line of text in the transcript.
Issue Code
Speed keys: Color-coded Buttons numbered 1-10 on the Issue bar.
You can stack multiple issues on one line, which will be
represented by stacked colored circles on the display. Issue buttons
toggle on, so when the cursor is on an issue-coded line you can see the toggled-in buttons as
13
well as the colored circles. Any issue can be toggled on or off at any time. The issue coding
can be done on a line whether it has a note or not, but the text of the issue code will appear
before the note text in the note box on the right side.
Note
Speed key: Enter or Insert Toolbar button:
This option opens the Note dialog box. When you are in
the Note box, you can perform complex edits such as
copy/paste, etc.
Clicking OK closes the dialog and adds a General mark,
indicated by a black dot between the line number and the
text.
When the cursor is on the correct line for the note, it becomes the “active” note, and you can
see by the text color and a static cursor at the end of the text when you can type/backspace
into the note.
If several notes overlap vertically, the active note always displays on top.
Attachment
Speed key: Ctrl+Y
If you execute this command on an empty line, it will open a file dialog, and let you attach a
file. If the line already has an attachment, it will open it. To delete an attachment, you can
use the Delete command, just like deleting a note or mark. Eclipse will ask if you are sure
you to wish to delete the mark.
An attachment appears as a note containing the <<filepath>>. If there is a note on the line,
the filepath will be below the text of the note.
Delete mark
Speed key: Delete or F6
This option will delete the mark from the line at the cursor position. It will also delete any
associated notes, and attached files. If the note area is not empty, Eclipse will ask if you are
sure you to wish to delete the mark.
14
Manage Issues
Speed key: Ctrl + I
Use this command to open a list of issue codes, where you can
type in descriptions for 10 different issues, and can also select
issue colors, by clicking on the color to the right of the issue
description field, and selecting a color using the color dialog.
The colors are stored in the global Bridge settings; the issue
descriptions are stored with the document.
15
THE SEARCH MENU
Speed key: Alt+S
Find
Speed key: Ctrl + F
This command places the cursor in the search data field on the search bar.
For the Text search, the combo box lists the text from the last 10 searches. Note allows you
to search for text inside notes. Text searches are whole-word matches and are case sensitive
only if the search text contains any capital letters.
Find Previous
Speed key: Shift+F3
Toolbar button (on Search bar):
This option will move the cursor to the previous instance of the specified search data.
Find Next
Speed key: F3
Toolbar button (on Search bar):
This option will move the cursor to the next instance of the specified search data.
Keywords
Speed key: Ctrl+K
Toolbar button:
This command displays an edit box for typing in keywords. Those keywords are then
highlighted on the screen wherever they appear in the text. All keywords are whole-word
matches and are only case sensitive if they contain any capital letters.
Word Index
Speed key: Ctrl + W
Toolbar button:
16
Quicksearch backward and Quicksearch forward
Speed keys: See graphic
These commands allow you to
perform searches with single
keystrokes without using the
search bar. The cursor will move
to the next line containing the
selected search item.
F8 will take you to the previous Note, with the cursor in the note ready to edit.
F9 will take you to the previous Mark, whether it has a note or not.
F11 will send your cursor to the drop-down list of issues on the Search bar.
Go to..
Speed key: Ctrl+G or Ctrl+J
This keyboard/menu shortcut selects Location in the Search type selection list on the
Search bar, and puts the cursor in the search data field. This field will show a small
prompt to suggest what to do, such as [Type a page/line or timecode].
Play multimedia
Speed key: Ctrl+M
Toolbar button:
This command will play the audio or video file associated with the transcript you are
viewing, if one is available.
17
THE VIEW MENU
Speed key: Alt+V
This menu contains commands appropriate to the file currently open, as well as the visibility
of components of the Bridge window.
Show/Hide
This option toggles on or off the Tool bar, Search bar,
Issue bar, Status Bar, Marks and Keywords.
It also controls the Timecodes and Line numbers.
Timecodes
Toolbar button:
Selecting Show/Hide .. Timecodes cycles the display of timecodes from hours and minutes
(18:30) to hours, minutes and seconds (18:30:46) to off entirely. You can also toggle
through the timecodes options using the Toolbar button on the Search bar.
Note that the display on the Status bar shows Timecodes in hours:minutes:seconds:frames
(18:30:46:09).
Line Numbers Toolbar button:
The Line Numbers On/Off toolbar button on the Search bar toggles the Page and Line
numbers display on and off. Page and Line numbers are displayed on the left of every line
as page/line (001/15).
Marks
Toolbar button:
This option toggles the display of marks and associated notes on or off.
Keywords
Toolbar button:
This option toggles the highlighting of Keywords in the document on or off. The Keywords
themselves remain in the list unless deleted.
18
Font
Speed key: Shift+Ctrl+F
Toolbar button:
This menu choice opens the Font dialog box:
From here you can select preferences for:
Font
Font style ( Regular, Bold, Italic, Bold italic)
Size
Effects (Strikeout and/or Underline)
Script (Western or Hebrew)
Note that to change the color of the text, you use the View menu | Colors dialog.
Zoom In (magnify)
Speed key: Ctrl+ +
Toolbar button:
Zoom Out
Speed key: Ctrl+ -
Toolbar button:
You can Zoom in and Zoom out, which works similarly to using successively stronger
(Zoom in) or weaker (Zoom out) magnifying glasses. The Zoom in and Zoom out buttons
on the Search bar control zooming.
Both buttons use a magnifying glass icon; the difference is that zoom in has a plus sign (+)
on it and zoom out has a minus sign. The zoom-in magnifies the display to show the
document in greater detail. The zoom-out reduces the display to show more of the document
in the available display area. Each click of a zoom button changes the display incrementally.
19
Colors
Speed key: Ctrl+D
Selecting this menu option opens a Colors dialog, where
you can set the colors for Text, the color of the labels for
Speakers, Questions, and Answers, as well as the
Background colors for Normal text, the Current line, the
split realtime window, highlighted Keywords and Notes.
Spacing
Speed key: Ctrl+B
Toolbar button:
Choosing this menu option toggles the line spacing of the document you are viewing,
moving through single spacing, 1.5 spacing, and double spacing. You can also use the
button located on the Search bar.
Auto-scroll
Speed key: End
Toolbar button:
This menu option, speed key or Toolbar button sends the cursor to the end of the document.
Note: If you scroll up, the bottom part of the screen automatically turns into a split-screen
scrolling realtime display. When you move the cursor back down, the split-screen goes
away. You can define how many lines of split-screen scrolling realtime you want at the
bottom in the settings dialog (the default is 5.)
20
THE HELP MENU
Speed key: Alt+H
Help Topics
Speed key: F1
Toolbar button:
Opens the Bridge Help file.
Visualizer
Speed key: Shift+F1
Opens the Introductory Bridge Visualizer file in your browser, with links to over 20
Visualizer movies covering various aspects of using Bridge. Except for a 5-minute overview
movie, most are designed to be watched with no audio.
Manual
Opens the Acrobat Reader version of the Bridge User Manual.
Keyboard Chart
Opens a one-page chart showing the most
commonly-used keyboard shortcuts and icons.
21
Demo
This menu item starts a self-running demo
file. It acts exactly like a reporter writing
realtime into the system, including applying
edits. It works by slowly reading in a
demo.law file from the same folder where
Bridge is installed. You can use any .law
file for a demo, so as an alternative to the
particular demo file that ships with Bridge,
you can prepare your own demo files to
show your clients to demonstrate your
work.
The demo function displays a toolbar along the top with [Stop demo][Pause demo][Faster]
[Slower] buttons.
About Bridge . . .
This menu option displays the Bridge version number and copyright information. This
information may be utilized during troubleshooting by ASI support.
22
APPENDIX A: TOOLBAR BUTTONS
Button
Function
Button
Function
Help: Opens Help
file
Copy: Places highlighted
text into the Clipboard
Visualizer: Opens
browser with 20+
Visualizer movies
Paste: Places the
contents of the Clipboard
at the cursor position
Connect: Connect to
Realtime data
stream
Keywords: Opens a
dialog listing keywords
to highlight throughout
the transcript
Setup: Setup
communications
Play: Plays, if available,
an audio or video file
associated with the
transcript
Scroll: Cursor to end
of transcript
Open: Opens a
previously saved
transcript
Save: Saves the
current transcript
Print: Opens the
Print dialog
23
24
APPENDIX B: SPEED KEYS
Keystroke
Function
Keystroke
Function
Ctrl+N
New file
Ctrl+G or Ctrl+J
Go to ..
Ctrl+O
Open file
Ctrl+M
Play multimedia
Ctrl+S
Save file
Shift+Ctrl+F
Font
Shift+Ctrl+S
Save As..
Ctrl +
Zoom in
Ctrl+U
Setup
Communication
Ctrl -
Zoom out
Ctrl+T
Connect
Ctrl+B
Colors..
Ctrl+E
Export
Ctrl+D
Spacing
Ctrl+P
Print
End
Auto-scroll
Ctrl+C
Copy
F1
Help topics
Ctrl+V
Paste
Shift+F1
Visualizers
Space or F5
Quick Mark
Alt+F4
Exit
Ctrl+1, Ctrl+2 ...
Ctrl+0
Issue codes
Enter or Insert
Note
Ctrl+Y
Attachment
Delete or F6
Delete a mark
Ctrl+I
Manage Issues
Ctrl+F
Find
Shift+F3
Find previous
F3
Find next
Ctrl+K
Keywords
Quicksearch forward:
Quicksearch backward:
F8
F9
F11
F12
Ctrl+Q
Ctrl+A
Ctrl+R
Note
Mark
Issue
Attachment
Question
Answer
Speaker
Shift+F8
Shift+F9
Shift+F11
Shift+F12
Shift+Ctrl+Q
Shift+Ctrl+A
Shift+Ctrl+R
25
Note
Mark
Issue
Attachment
Question
Answer
Speaker
APPENDIX C: TOTAL ECLIPSEM SETUP PROCEDURE
This information is for the Total EclipseM user setting up to run Bridge. In order to send a
transcript to a user running Bridge, the Total EclipseM user must first add the Bridge settings
to Total EclipseM.
1. Go to User Settings (Alt+U) | Realtime.
2. Your basic Realtime settings (Flush Delay, Pending translation display, Follow
always, and Division interval) will apply to the Total EclipseM document, and have
no bearing on the Bridge document.
3. In the Output format list box, see if Bridge/LawBridge/TeleView is listed.
a. If it is, select it, and choose Change.
b. If it is not listed, select Add, and the Output format dialog box will open.
From the drop-down list of Output formats, choose
Bridge/LawBridge/TeleView.
26
4. From the drop-down list of Comm device:, choose to send the output to a COM
port, or to send the text to a file on a network. The Bridge user or users can then
connect to the file on the network.
a. If using a COM port, choose Com port:, and select Setup>>. Choose the
port you are using from the list, and set the Baud rate to 38K (38400).
b. If sharing the file over a network or running Bridge on the same computer on
which you are running Total EclipseM, choose File sharing, and select
Setup>>. The Browse for Folder dialog box will open, allowing you to
select the location for the shared file.
5. Under Output characteristics, you can make choices that affect the way your text
will appear in the Bridge file.
a. Apply edits: When selected, your editing changes will appear on the Bridge
output. The edits will be applied when the cursor moves to the next
paragraph.
b. Allow backspaces: Leave this option off if you do NOT wish to allow
backspace characters to back up over existing text. Note that you can still
delete one word in realtime even if this option is turned off.
c. Force margins: This option allows you to change the margins on the Bridge
display. When this option is off (the default setting), the text on the display
conforms to the paragraph margins set in User Settings | Paragraph.
d. All caps: This option sets the Bridge display to all capital letters.
e. Flush word delay: This option controls the amount of time (in milliseconds
—for example, 2000 milliseconds=2 seconds) the system will wait before
transmitting the very last word written. Each word will wait until the
following space is transmitted before it is displayed. Setting this to zero turns
the option off, and causes the system to wait indefinitely. You can set this
27
delay so that you will have the opportunity to delete a word the viewer has
not yet seen.
f. Header: You can type into this space a piece of text such as
“UNCERTIFIED ROUGH DRAFT” and that text will be transmitted to
Bridge at the beginning of every page.
g. Maximum WPM: This option sets a maximum speed that words are allowed
to display on the screen. If the written rate goes too high, this option will
begin intentionally pausing slightly between each word displayed. When the
written rate slows down, the display will continue and will catch up with the
reporter.
6. When finished with the output settings, close the User Settings dialog boxes.
BEGINNING A REALTIME/BRIDGE SESSION
1. Connect your writer to an available COM (serial) port on your computer. Connect
the Bridge user's computer to yours via serial ports; or log on to network to which
the output file will be transmitted.
2. Press Alt+T to open the Translate notes dialog.
3. Mark the Realtime radio button.
4. Click OK to begin the realtime job.
5. At this point, you or the other user(s) can open Bridge and connect to your output.
The Bridge user simply goes to File | Connect (Ctrl+T). See below for additional
Bridge settings.
6. When you are finished writing realtime, press Shift+Alt+T or use the Production
menu | Stop translation command.
Note: The realtime settings can be
made once and left alone for
subsequent realtime jobs. You do not
need to reset them each time you
open a realtime file.
28
INDEX
All caps......................................................27
Allow backspaces.......................................27
Annotation..............................................5, 14
Answer, searching for..................................8
Apply edits.................................................27
Attachment.................................................14
Attachment, searching for............................8
Auto-scroll.................................................20
Colors.........................................................20
COM port.............................................11, 27
Connect............................1, 9, 12, 23, 25, 28
Copy.....................................................13, 25
Delete mark................................................14
Demo..........................................................22
Eclipse user setup......................................26
Edit Menu...................................................13
Export ........................................................12
File menu.....................................................9
File sharing.................................................11
Find......................................................16, 25
Find Next...................................................16
Find Previous.............................................16
Flush Word Delay......................................27
Font............................................................19
Force margins.............................................27
Go to...........................................................17
Help........................................................9, 21
Help Menu..................................................21
issue....................................................1, 3, 16
Issue Code..................................................13
Issue, searching for......................................7
Issues, managing........................................15
Keyboard Chart......................................5, 21
Keystroke...................................................25
Keywords...................................................16
Line Numbers.............................................18
line spacing................................................20
Location (Go to), Search for........................7
Location indicators.......................................3
Manage Issues............................................15
mark.............................1, 3, 5, 13, 14, 15, 25
Mark...........................................................28
Mark, searching for......................................7
Maximum WPM........................................28
Menu bar......................................................3
Multimedia settings....................................11
network......................................1, 11, 27, 28
New........................................................9, 25
Note............................................................14
Note column...............................................11
Note dialog box............................................5
Note, searching for.......................................8
Open.................................................9, 12, 25
Output..................................................26, 27
Paste.....................................................13, 25
Play multimedia.........................................17
Print............................................................12
Question, searching for................................8
Quick mark.................................................13
Quicksearch backward or forward...............5
realtime.............................1, 9, 11, 12, 27, 28
Realtime Lines...........................................11
Save........................................1, 9, 10, 12, 25
Save as .......................................................10
Scrolling realtime.........................................5
search bar.........................................8, 16, 17
Search bar...............3, 5, 7, 16, 17, 18, 19, 20
Search Menu..............................................16
Setup..........................1, 9, 10, 23, 25, 26, 27
Show/Hide..................................................18
Space bar - General mark.............................5
Spacing.......................................................20
Speaker, searching for..................................8
Split-screen...................................................5
Status Bar.....................................................3
Text, searching for.......................................7
timecodes...............................................3, 13
Timecodes .................................................18
Toolbar....3, 9, 10, 12, 13, 14, 16, 17, 18, 19,
20, 21, 23
View...................................................3, 9, 18
View Menu ................................................18
Visualizers..................................................21
Window........................................................3
Zoom..........................................................19
29