1
User Manual
Advantage Technology and Innovations, Inc.
925 SE Central Parkway
Stuart, FL 34994
(800)800-1759
www.eclipsecat.com
COPYRIGHT
The following are registered trademarks of Microsoft Corporation: Windows XP, Windows
Vista.
PCMCIA is a trademark of the Personal Computer Memory Card International Association.
All other trademarks mentioned herein are the property of their respective owners.
© Copyright 2012 Advantage Technology and Innovations, Inc.
All Rights Reserved Worldwide
No part of this manual may be copied or distributed, transmitted, transcribed, stored in a
retrieval system, or translated into any human or computer language, in any form or by any
means, whether electronic, mechanical, magnetic, manual or otherwise, or disclosed to third
parties without the express written permission of Advantage Technology and Innovations, Inc.
This device complies with Part 15 of the FCC rules.
Operation is subject to the following two conditions:
(1) This device may not cause harmful interference, and
(2) This device must accept any interference received, including interference that may cause
undesired operation.
Advantage Technology and Innovations, Inc
2
Table of Contents
Passport Writer Warranty .........................................................................5
Chapter 1- Setting Up Your Passport ........................................................7
Contents of the Passport package ..............................................................7
Setting up.....................................................................................................7
Note: Power Cord attachment....................................................................7
Key pads ......................................................................................................7
The Passport's Connections........................................................................8
Adjusting the Writer's Key Stroke Depth and Tension............................9
Turning the Writer On and Off:..............................................................10
Installing Passport USB Drivers................................................................................ 11
Charging the Batteries: ............................................................................................. 15
Chapter 2...................................................................................................17
Using the Passport menu system ............................................................................... 17
Adjusting the Passport for your writing style............................................................. 18
Five-minute keyboard registration point adjustment:................................................. 19
Adjusting Stroke Registration Points:........................................................................ 20
WHEN A SINGLE KEY IS OUT OF ADJUSTMENT......................................... 22
WHEN SEVERAL KEYS ARE OUT OF ADJUSTMENT .................................. 23
SHADOW TRACKING ........................................................................................... 24
STENOVISION™ .................................................................................................... 25
Setting the Anti-stacking overlap percentage. ....................................................... 25
Output Settings .........................................................................................26
Setting up Bluetooth output: ..................................................................................... 27
Viewing the Translation ...........................................................................28
Chapter 3 - Optional Settings on Your Passport.....................................29
Selecting optional colors ........................................................................................... 30
Adjusting Font Sizes:................................................................................................ 32
The Show/Hide Transcript option ......................................................................... 32
Adjusting Display Brightness and Contrast: .............................................................. 33
The Input Settings menu ........................................................................................... 34
Anti-stacking/splitting.......................................................................................... 35
The Menu/Setup/System sub-menu .........................................................37
Setting the Date and Time:........................................................................................ 37
Chapter 4 - Using Dictionaries With the Passport ..................................39
Creating a Dictionary on the Passport................................................................... 39
Importing a dictionary in rtf format into your Main dictionary.............................. 40
Creating a Passport dictionary in Total Eclipse..................................................... 42
Installing a Passport dictionary on your Passport .................................................. 43
Loading a dictionary............................................................................................. 44
Exporting a dictionary from the Passport .............................................................. 44
The StenoMagic Keys and Dictionary .................................................................. 45
Selecting Dictionaries to Use in a Job................................................................... 46
To add dictionaries to the current job:................................................................... 46
Chapter 5 - Working with Files................................................................47
3
To Open a File: .................................................................................................... 47
To Delete a File:................................................................................................... 47
To Copy a File: .................................................................................................... 48
Saving Note Files:..................................................................................................... 49
Saving Note Files to External Storage Media:....................................................... 49
Reading notes from the external media ..................................................................... 51
The Search menu ...................................................................................................... 52
Inserting a MARK into steno notes: .......................................................................... 53
Typing text on your Passport..................................................................................... 54
Chapter 6 Working with Audio ...............................................................55
Setting up your Passport to Record and Playback Audio ......................55
The Record button................................................................................................ 55
The Pause button.................................................................................................. 55
The Play button .................................................................................................... 56
Audio Settings .......................................................................................................... 56
WAV recording indicator ..................................................................................... 57
Chapter 7 - Additional settings ................................................................59
Writer setup in Total Eclipse: ..................................................................59
Translation without a laptop, from SD card ...........................................60
Using the Passport with other CAT systems:............................................................. 61
Updates to the Passport software:............................................................62
Installing an Update on the Passport:......................................................62
The Menu/About sub-menu......................................................................63
Caring for your Passport’s LCD Display ................................................64
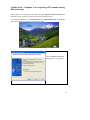
Changing the Splash image on the opening screen .................................64
Low Memory Message at Startup ............................................................65
Troubleshooting and Error Messages......................................................66
“Drive full” .......................................................................................................... 66
“SD card full” ...................................................................................................... 66
“SD card write-protected” .................................................................................... 66
“WARNING: There are no external backup drives present. Plug in a drive or card as soon
as possible” .......................................................................................................... 66
“The system cannot find the path specified.” ........................................................ 67
Chapter 8 - Appendix: Bluetooth Setup ..................................................69
Add New Connection Wizard – Microsoft Bluetooth stack....................69
Setting up Total Eclipse to use the Passport .............................................................. 73
Add New Connection Wizard -Toshiba Bluetooth stack .......................74
Testing a Real-time connection using Hyper Terminal or similar program ................ 78
Toshiba Stack - Computer is not requesting a PIN number during Bluetooth setup.81
Index ..........................................................................................................83
4
Passport Writer Warranty
Congratulations on your purchase of a new Passport Writer. The Passport includes a one-year
parts-and-labor warranty, which includes the following:
Repair or replacement of any necessary electrical or mechanical components
Use of a loaner writer upon request during service (North American U.S. customers only)
Shipment of the loaner writer, to and from customers (North American U.S. customers only)
Unlimited toll-free technical support during the warranty period.
The batteries are warranted for 90 days from the date of purchase.
This warranty does not cover misuse, abuse, accidents, or elective work on the writer such as the
substitution of different-style keycaps.
You are entitled to download software updates to your Passport during the entire lifetime of your
writer.
By using this product, you agree to release Advantage Technology and Innovations, hereinafter
referred to as “ATI,” and Advantage Software, hereinafter referred to as “ASI,” from any and all
liability arising from the use of our products. Under no circumstances shall ATI and/or ASI
be liable for special, indirect, incidental, or consequential damage, (including lost profits) of
Licensee or any third party, even if ATI and/or ASI have been advised of the possibility of such
damages.
This warranty is void if the Passport has been opened, disassembled, or tampered with in any
way.
For general information and technical support, please call: (800) 800-1759 or (772) 288-3266.
5
6
Chapter 1- Setting Up Your Passport
Contents of the Passport package
Your Passport package includes the following:
1.
2.
3.
4.
5.
6.
7.
8.
9.
10.
The Passport writer
Light-weight, carrying case, with padded exterior and interior compartments,
space for all cables and the tripod, and a zippered pocket on the outside for files,
etc.
AC adapter and power cord
USB cable
Serial cable
Tripod with carrying pouch
Main and backup batteries installed
CompactFlash card with PCMCIA adapter
SD Memory card
Passport User Manual
Setting up
Unfold the tripod and adjust to a comfortable height.
First, be sure that the tripod’s shaft is securely tightened so it will not rotate while attaching the
Passport. Place the writer on the tripod, line up the locking mechanism, and rotate clockwise
until it locks in place. Be sure to rotate it until a click is heard.
To remove the tripod, press the lever on the left side of the locking mechanism, rotate the writer
counterclockwise, and lift it off the tripod.
Note: Power Cord attachment
The power cord for the AC adapter is designed to fit loosely in the Passport. This allows the cord
to come out if someone trips over the power cord, reducing the chance of damage to your
machine.
Key pads
If you use key pads, be sure the pads do not touch one another, or they may cause adjacent keys
to stick down. Be sure to turn off your Passport while applying key pads.
7
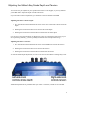
The Passport's Connections
1.
On the right side, there are 5 USB ports: one Type B port to connect your writer to your
computer, and 4 Type A ports to connect flash drives and approved Bluetooth devices.
2.
On the left side, there is a PCMCIA card slot with a CompactFlash card, microphone and
headphone jacks, a DC power jack, and the battery charging indicator light.
Compact flash cards (CF) that have been tested with the Passport:
SanDisk CF 32 MB
SanDisk CF 64 MB
SanDisk CF 1 GB
Lexar 40X professional CF 1 GB
3.
On the back, there is a serial port, and an SD memory card slot.
The SD card slot has a spring-loaded mechanism. To remove the card, push it in, and it will pop
out. NOTE: Do not remove the SD card while recording audio on the Passport.
SD cards that have been tested with the Passport:
Kingston SD 2GB (Kingston part number SD/2GB)
Kingston SDHC class4 4GB (Kingston part number SD4/4GB)
PQI SDHC Class10 16GB
PQI SDHC Class6 4GB
SanDisk SD 1 GB
SanDisk SDHC 8 GB (SanDisk part number SDSDB-8192-A11)
ATI SD 1 GB
PNY SD 2 GB (PNY part number SD-M02G)
An additional note about SD cards: There is a difference between an SD card, and an SDHC
card. It is recommended that you use a 2GB or smaller SD card. To use a larger card, select an
SDHC card, which can be up to 16 GB.
8
Adjusting the Writer's Key Stroke Depth and Tension
Your writer was pre-adjusted to your specifications before it was shipped, so you may find that
you do not need to adjust the depth of stroke and tension.
If you do need to make an adjustment, you should do it with the machine turned off.
Adjusting the Writer’s Stroke Depth:
1. The Turn Knob located underneath the writer on the user’s LEFT side controls the stroke
depth.
2. Rotating the Turn Knob clockwise will increase the stroke depth
3. Rotating the Turn Knob counterclockwise will decrease the stroke depth.
Use care not to force the Turn Knob or damage may result. It is designed to rotate easily. If you
are experiencing difficulty, you have probably reached the end of its adjustment range.
Adjusting the Writer’s Tension:
1. The Turn Knob located underneath the writer on the RIGHT side controls the tension.
2. Rotating the Turn Knob clockwise will increase the tension.
3. Rotating the Turn Knob counterclockwise will decrease the tension.
As with the Stroke Depth adjustment, use care not to force the Turn Knob or damage may result.
Additional adjustments are performed after your writer is turned on, and drivers are installed.
9
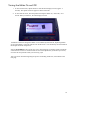
Turning the Writer On and Off:
1. To turn ON the writer, depress button #1 until the LCD display turns on (approx. 3
seconds). The splash screen will appear in about 30 seconds.
2. To turn OFF the writer, from the splash screen depress button #6, “Turn OFF,” for 1
second. When you release it, the LCD display turns off.
In addition to functions assigned to Button #1 as indicated by the menu bar, depressing Button
#1 for approximately 12 seconds will also turn off the writer. You should only use this method if
the Passport becomes unresponsive.
Note the Scroll Wheel to the right of your screen. The Passport's scroll wheel works just like the
scroll wheel on a mouse. You will use this for most of the adjustments you make to your writer,
as well as for many features while you are writing a job.
Turn your writer off before beginning the process of installing the drivers, as described on the
next page.
10
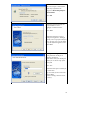
Installing Passport USB Drivers
Do not connect the Passport to the computer via the USB cable or turn the Passport on
until instructed to do so.
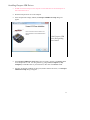
Place the Passport driver CD in the computer.
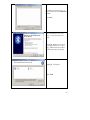
If the computer has autoplay enabled, the Passport USB Driver Setup dialog will
appear.
At the Passport USB
Driver Setup dialog
select Install.
If the Passport USB Driver Setup dialog does not appear, navigate to the Driver folder
on the Passport driver CD. You can get there by going to Start, Computer (or My
Computer), and double-click on your DVD drive, then click on the Driver folder.
Open the file Passport USB Driver Setup.exe (double-click the file name). The Passport
USB Driver Setup dialog will appear.
11
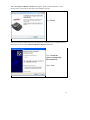
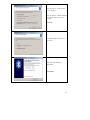
If you receive the Windows
Security dialog choose
“Install this driver software
anyway.”
The Installation of the driver
begins.
Once the installation is
complete choose "Next."
12
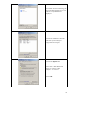
When the Passport USB Driver Setup dialog appears, please read the instructions on the
Passport screen concerning the final steps in the installation process.
Select Finish.
When you connect the USB cable from your Passport to a USB port on your computer and turn
the Passport on, the Windows Add New Hardware Wizard should start.
Select “Install the
software automatically
(Recommended).”
Choose Next.
13
If you receive the Windows
Security dialog choose
"Continue Anyway".
The installation of the device
proceeds.
Once complete, choose
Finish.
Once installed you may
confirm the installation by
checking the Device Manager.
14
Charging the Batteries:
1.
Make sure that AC adapter is plugged into the wall socket before connecting to the
writer.
2.
Insert the AC adapter’s plug into the Passport’s DC power jack. The DC power jack is
located on the left side of the writer near the PCMCIA® slot. Note that it fits loosely to
help prevent the Passport's being knocked over if someone trips on the cord.
WARNING! Only use an Advantage Technology 12 volt, 4 amp AC adapter, or severe damage
may result and void the warranty.
If the main battery is missing, the Passport will display a warning message: “Your main
battery is not inserted.” Click OK if you wish to continue without the main battery.
It takes about five hours to fully charge both the main and backup battery.
The system constantly monitors the state of charge condition of the batteries and will
automatically charge them as necessary if connected to an AC adapter.
The Battery Charging Indicator will blink during the charging process. When charging is
complete the indicator will quit flashing and remain lit until the AC adapter is removed.
The charging routine supports “hot inserting” the main battery during a charging cycle,
but more accurate battery status readings can be achieved with minimal removal of the
main battery during the charging cycle.
Battery run time is greatly affected by the brightness level of the display. At high
brightness levels, one may expect approximately 9 hours of runtime from the main
battery. At lower brightness levels, run time may exceed 16 hours. Run times on the
internal backup battery are approximately one quarter of the main battery.
If the power is plugged in, you will see a graphic in the upper right-hand corner of your
screen, showing a cable/plug attached to a battery. When plugged in, the battery graphic
will always show the main battery and its charge level.
15
While charging, the battery graphic shows a flashing battery
with a plus sign icon. Once charging is complete, the battery
graphic will no longer flash and will display a black battery
icon with no plus sign.
If the AC Adapter is unplugged, the battery graphic will
show the main battery icon (full-size, with a level indicator,
which drops as it discharges) until the main battery is dead.
The icon will turn red as it approaches empty.
If the main battery is removed or dead, it switches to using the backup battery, and will
show a half-size battery graphic with the backup battery level
in it. (The only time you'll see the backup battery graphic is if
the machine is unplugged and the main battery is removed or
drained.) When the Passport switches to the backup battery,
you should plug it in or be prepared to hot-swap the main
battery, if a spare is available.
The auxiliary battery icon will turn red when there is
approximately 45 minutes of run time left. The runtime can be
increased significantly by reducing the brightness of the display.
In order to conserve power, after ten minutes of no keystrokes, the backlight turns off.
Pressing any key will turn it back on. The Passport continues to record audio while the
backlight is off, unless the auto pause has shut the audio off. The backlight turning off
has no effect on the Passport's connection to the computer and CAT software. You can
adjust the time it waits before turning off the backlight, at Start/ Menu/ Setup/ Input.
Setting the time to 0 (zero) will disable the timer and prevent the screen from turning off.
16
Chapter 2
Using the Passport menu system
The Menu options enable you to control how the Passport looks and functions.
In any menu, clicking the OK button will save your settings (as it returns you to the Job screen).
Also, closing any options dialog will save your settings.
On most screens, you will have the choice of moving Back one level in the menu system, or
returning directly to the Job screen. This enables you to make adjustments while in a Job.
With your Passport powered up, pressing the Start button opens a Job screen. From the Job
Screen, you can choose one of the following:
Close
Search
Record
Play
Mark
Menu
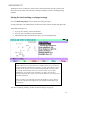
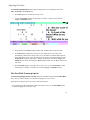
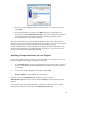
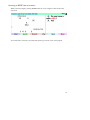
When you select one of these options, a menu path, with a different background color, appears
at the bottom of your screen, above the button labels. This menu path helps you keep track of
where you are in the menu system. For example, after pressing the Search button, you will see
the word >>Search, and below that, Back PrevO PrevA Entry Repeat Other.
Selecting Other takes you to a screen with >>Search >>Other, and below that, the choices
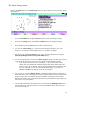
Back Go to top Prev Pgh Prev Paren Prev Mark. In the graphic below, the menu path
shows that you have pressed the Menu, Setup, Display, Font and Steno buttons, and can now
choose whether to make the steno font larger or smaller, or go Back to the Font menu, or choose
OK to return to the Job.
Screen showing menu path: Menu/Setup/Display/Font/Steno.
17
Adjusting the Passport for your writing style
There are several key adjustments you can to make for optimum writing comfort and accuracy.
The following pages offer detailed instructions for adjusting the following:
the stroke registration points – the depth at which you want a stroke to register when
you are writing normally
the baseline for each key – the deepest point to which a given key would travel, given
your particular touch. Note that this is not the absolute bottom to which a key can be
pressed, because your passport's keys have a “soft landing” of felt and rubber. Rather it is
the deepest a key would ever go when you are writing normal strokes consisting of one or
more keys.
the top of each stroke – the point a key raises to when you are not depressing it at all.
You can set the top of the currently selected stroke, or all strokes
It is important that you make these adjustments carefully, so the software in your passport can
differentiate between an actual stroke and a “shadow” stroke, which could result if a finger is
dragged across the top of a key. For this reason, you should be sure the baseline for a key is not
too close to the registration point.
The Passport works by noting the top and bottom (baseline) of the travel of each key, and the
registration point you set, and uses this information to judge whether or not a key is being
depressed as part of a stroke. Note that there is no adjustment for the “top” of a stroke, which is
the point a key raises to when you are not depressing it at all.
Comment: Ck last sentence
18
Five-minute keyboard registration point adjustment:
1. Go to Start/Menu/Setup/Keyboard/Adjust.
2. With a light stroke, simultaneously hit all the keys on the left bank, excluding the vowels
and number bar, and check to see if they all appear on the left side of the Passport screen.
3. If a letter is missing, stroke the missing letter in a normal manner, and push the scroll
wheel forward slightly to raise the registration point (make the key more sensitive).
4. Repeatedly hit the left bank to see if the missing letter consistently appears. If not,
continue to make small adjustments.
5. Repeat this procedure for any additional letters that are missing.
Repeat this procedure with the right side of the keyboard, excluding the vowels. If you do not
use wide keys on your D/Z or T/S keys, adjust those keys separately.
Repeat this procedure by lightly hitting all the vowels at once.
When all keys are registering properly, if you use the number bar, write all the numbers from one
to nine with the number bar. The number bar can also be adjusted for sensitivity if the numbers
do not register for you properly.
Now write a few sentences to make sure that no keys are registering that shouldn't be registering.
If they are, individually adjust those keys by turning the scroll key backwards to make them less
sensitive.
Select Close.
19
Adjusting Stroke Registration Points:
1.
It is important to adjust the stoke depth and tension to your preference BEFORE
adjusting the registration points.
2.
From the writer Job Screen, press the Menu button, followed by the Setup button,
and the Keyboard button. This will bring you to the Key stroke adjustment
dialog.
3.
Depress the steno key that you wish to adjust. A black column will extend
downward from the top of the display as you depress the key. Once the
registration point (the top of the red column rising from the bottom of the display)
has been crossed, the column will change to an aqua color, indicating that a stroke
has been successfully detected.
4.
The registration point may be adjusted by slowly rotating the Scroll Wheel
located on top of the writer on the user’s right side.
5.
To adjust the registration points of all keys simultaneously, select All. Then rotate
the scroll wheel. Pressing Previous or Next returns to individual key adjustment
mode.
20
6.
Once you have the registration points set to your liking, press Close to return to
the job screen (and the top level menu).
When you have the keyboard adjusted to the proper height, wait until the writer recalculates the
keystroke information – approximately 3 seconds. Once this occurs, the keystroke columns will
move back up to the top of the screen and you may adjust the registration points if necessary.
After you have adjusted the keyboard height, select All and Set top. This lets the system know
the tops have changed. It is important to remember that whenever you make a change to the
keyboard's height, you must immediately navigate to Menu/Setup/Keyboard/Adjust, depress
the All button, and then depress the Set Top button.
An example of when you would need to do this: If you have a “shallow” stroke depth, and you
adjust the keyboard to a “deeper” stroke depth without setting the tops, then when you hit keys
on the writer, it will appear as one large stroke containing most or all of the possible letters. You
can resolve this issue by simply going to the Keyboard adjust screen and hitting All and Set top.
Note that you can also set the top for a single key, by hitting Set top and selecting a key to set.
21
WHEN A SINGLE KEY IS OUT OF ADJUSTMENT
1. Select Menu/Setup/Keyboard/Adjust.
2. Press the key you need to adjust.
3. Move the registration-point bar to the position where you want the point to register.
4. Select Baseline.
5. For best results, when asked to press a key, DO NOT press the key by itself. Rather,
position your hands over the keyboard, and hit a common stroke containing multiple keys
that includes that key. For example, if you want to adjust the "G" on the right-hand side,
rather than stroking the "G," stroke an answer symbol (-FRPBLGTS).
Note: Turning on Shadow Tracking, in the Menu/Setup/Input dialog, can greatly assist while
setting individual key registration points. See following page for detailed information on Shadow
Tracking.
IMPORTANT: When you have finished, back up your settings (sensor.txt) using
Menu/Setup/Keyboard/Backup.
22
WHEN SEVERAL KEYS ARE OUT OF ADJUSTMENT
1. Select Menu/Setup/Keyboard/Delete. The screen will go blank for several seconds.
Thereafter, whatever steno was previously on your screen will appear.
2. DO NOT TOUCH ANYTHING UNTIL YOU SEE THE FOLLOWING MESSAGE:
“Press every key to initialize writer.”
3. Write on the keyboard in a natural manner. Make sure you hit every key at least once,
including the StenoMagic keys on the far left, the number bar, and the D/Z keys. When
all the keys have been stroked at least once, the Passport sign-on screen will appear.
4. Write on your Passport for a few moments to confirm that everything is registering
properly. If any keys need further tweaking, follow the instructions under "WHEN A
SINGLE KEY IS OUT OF ADJUSTMENT."
Note for users without StenoMagic keys:
If you are using a Passport without StenoMagic keys, you cannot use the keyboard
initialization procedure described above (activated by Menu/Setup/Keyboard/Delete). You
must use the procedure for adjusting individual keys using Menu/Setup/Keyboard/Adjust, as
described on page 19. If you inadvertently perform the keyboard initialization, cancel the routine
by pressing Button #5. This will return you to the job screen. Go immediately to
Menu/Setup/Keyboard/Adjust and perform a baseline adjustment on every single key.
23
SHADOW TRACKING
To make read-backs easier, the Passport’s LCD can display “shadows” much as they would
appear on steno paper. These shadow strokes appear in the steno windows in varying shades of
red. The darker the shade of red, the closer the key was to the registration point: only slightly
depressed. In the example below, while writing the stroke RAO a finger was dragged over the
asterisk key causing a shadow. The extremely light red color of the asterisk tells us that the
asterisk was very lightly depressed and most likely unintentional.
If you find that you consistently have a shadow stroke that should be a registered key, raise that
key’s registration column.
If you have a stroke that is consistently registering as a valid keystroke when it should not, lower
that key’s registration point to make it less sensitive.
Note: You can turn Shadow Tracking on or off in the Menu/Setup/Input dialog.
24
STENOVISION™
The Passport uses a revolutionary optical sensor system that monitors the exact position and
direction of travel of each key at all times, making it extremely resistant to stacking/splitting
problems.
Setting the Anti-stacking overlap percentage.
Go to the Menu/Setup/Input screen to adjust the overlap percentage.
Overlap percentage is the adjustment that creates the fine line between stacking and split words.
The default percentage is 15.
If you get any stacking, increase the number.
If you get any word splitting, lower the number.
Adjust the percentage one number at a time to avoid overcompensating
How this works: For any stroke, the times that all of the keys were pressed
and the times they were all released are compared. If keys are pressed and
released absolutely simultaneously, then they overlap 100% and are part of
the same stroke. If they were pressed and released totally separately, then
they overlap 0% and will be sent as two strokes. If they were not quite
simultaneous, they might overlap a smaller percentage, such as 80%,
indicating that at the time a key was pressed, the other key was also pressed
only 80% of that time.
If the percentage of overlap falls below the threshold you specify, then the
keys that are only barely overlapped are split off and considered part of a
second stroke.
For more on Splitting, Stacking, and the Overlap Percentage, see page 35.
25
Output Settings
The Menu/Setup/Output choice opens the Output settings dialog, where you can change the
options for how your writer communicates with your CAT system. For additional Output
options, see Additional settings, beginning on page 59.
The Output settings include Serial communications, Serial emulation, USB communications,
USB emulation, Bluetooth communications, Bluetooth emulation, and Data logging.
The settings for Serial, USB and Bluetooth each has its own ON/OFF (Yes/No) setting and its
own emulation mode setting to determine whether it uses Passport communications protocol or
Stentura® communications protocol.
These communications methods can all be used simultaneously to different computers if desired.
For example, you could write bluetooth data to one computer and serial to another. Select "Yes"
for the method or methods of communication that you will be using. For the best performance,
be sure to choose "No" for all the methods you are not using.
If you are using Total Eclipse, set Serial emulation, USB emulation, and Bluetooth emulation
to "No."
If you choose Serial Communications, be sure that you have a serial-to-USB device set up on
your laptop. If so, remove the cable you were using, and attach the serial cable furnished with
the Passport so that you can use the telephone-type serial connection on the back of the Passport,
and the USB end for the laptop. If using serial-to-USB, remember to set the USB and Bluetooth
choices to "No".
If you choose the USB-to-USB, using the cable furnished with the Passport, you must first
download and install the USB-to-USB drivers to your laptop. Note that the furnished USB cable
uses a Type-B connection for the Passport, which looks like a square with beveled edges. This
port is located on the right side of the Passport next to the regular Type –A USB ports.
Remember, if using USB-to-USB, the other two choices should be set to “No.”
For additional Output options, see Additional settings, beginning on page 59.
26
If you choose Bluetooth, select “No” for “Serial” and “USB,” and “Yes” for “Bluetooth.” You
must first pair the Bluetooth from the writer to the laptop.
Setting up Bluetooth output:
For details on setting up a Microsoft Bluetooth Stack, see the Appendix at the end of this
manual, beginning on page 69.
For details on setting up a Toshiba Bluetooth Stack, see the Appendix at the end of this
manual, beginning on page 74.
Note: If you ordered a Bluetooth adaptor with your Passport, it has been installed in the rightmost USB port of your new Passport. Micro-adapters are designed to remain in the devices in
which they are installed at all times. We strongly recommend that you do not remove it from
your Passport unless specifically advised to do so by one of our technicians. Should you need to
send your Passport in for servicing, you will get a loaner with a Bluetooth adapter in place.
To reset the Bluetooth PIN number:
1. Use the Scroll Wheel or the Up and Down buttons to navigate to the setting you want to
change.
2. Use the Plus, Minus, or Change buttons to toggle all the Yes/No choices.
3. With Bluetooth PIN highlighted, pressing the Plus, Minus, or Change buttons opens a
dialog where you can Reset the number, and enter a new number using your writer.
Note that your Bluetooth will start only when you start a job. This eliminates an unnecessarily
long startup time for users who do not have the Bluetooth activated.
When using Bluetooth, note that differences exist among the different versions of Windows (XP,
CE, VISTA) and specifications can change even within the same model. If you are using
Bluetooth devices purchased from Advantage Technology, they have been tested to ensure
compatibility with the Passport. If you have purchased Bluetooth devices elsewhere, we cannot
guarantee compatibility.
The Allow multiple outputs option defaults to off. With this feature turned off, then only one
output at a time is allowed. You will generally want this feature set to YES to avoid issues
caused by multiple outputs enabled but not actively connected.
This will eliminate the lag caused when a you have a communications method turned on other
than the one you're currently using.
27
Viewing the Translation
If you want to see the translation along with your notes, set the Menu/Setup/Input settings
choice "View Translation" to "Yes."
You can also use the Menu/Setup/Display/Font/Transcript/Show/hide button to toggle the
Translation off or on.
If you want to see the translation, you must install your dictionary. Details on working with you
dictionary are in Chapter 4, Dictionaries on your Passport, beginning on page 43.
Also in the Menu/Setup/Input settings, you can choose to have the Steno display on the left or
right, and Delete stroke(s) as an asterisk. Choosing "Yes" for Shadow display will show you
your shadows like on your paper but in red on the screen.
Additional information about Display options is covered in Chapter 3, beginning on page 29.
28
Chapter 3 - Optional Settings on Your Passport
From the Job screen, pressing the Menu button leads to these submenus:
Setup
Dictionary
Files
Audio
About
The Setup menu brings you these choices:
Keyboard
Display
Input
Output
System
When making adjustments in the Setup menu, the easiest way to make changes is by using the
Scroll Wheel. If you prefer to use the buttons, press each button repeatedly until you reach the
value you want.
Menu/Setup/Keyboard brings up these options:
Adjust – which takes you to the dialog where you adjust your keystroke registration. See
page 20 for details
Backup and Restore, which allow you to select a location where your keyboard settings
are stored. In each case, it copies the Sensor.txt file to or from that location. Using this
feature, you can store your keyboard settings on a USB drive, for example, and restore
them if you need to, after making changes with the keyboard adjustments.
Delete
Reset - The Reset button will set registration points to a default level calculated by the
writer. NOTE: Using this feature will change any individual key registration settings that
you may have previously made
Menu/Setup/Display provide options to adjust:
Colors
Fonts
Brightness
Contrast
29
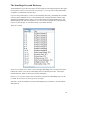
Selecting optional colors
Menu/Setup/Display/Colors opens a dialog where you can select custom colors.
Optional Color Adjustments
Desktop
Status bar text
Button Text
Status bar background
Button background (1 through 6)
Menu path text
Pushed button text
Menu path background
Pushed button background
Dialog text
Key registration bar
Dialog background
Key registration selected
Translated text
Untranslate
Translated background
Conflict
1. To select an item whose color you wish to change, use the Scroll Wheel or the Up and
Down buttons to move up and down the list.
2. When the item is highlighted, press the Change button. A dialog will open in which you
can adjust the RBG (Red, Blue, and Green) component values of the color.
3. Use the Scroll Wheel or the Up and Down buttons to adjust each component of the
color.
4. Press Select to move to the next component, and repeat the adjustment process. A square
box on the screen shows you the changing color.
30
5. When you have a color you like, press OK to return to the Colors dialog. To revert to the
original color, press Cancel before pressing OK.
6. When you have finished adjusting colors, press Close to return to the Job Screen.
31
Adjusting Font Sizes:
The Menu/Setup/Display/Font button opens a dialog where you can adjust the size of the
Steno, Transcript, and General fonts.
The Steno appears on the left side of your screen.
Use the Scroll wheel to make the font larger or smaller, or adjust the size with the
Larger and Smaller buttons.
When finished, press Back to adjust another font, or Ok to return to the root menu.
The General button adjusts the font size for everything else on your screen: The
time/date/job information at the top of the screen, the labels of available button options
along the bottom of your screen, and the menu tree just above the button labels. Use the
Scroll wheel to make the font larger or smaller, or adjust the size with the Larger and
Smaller buttons. When finished, press Back to adjust another font, or Ok to return to the
Job screen.
The Transcript appears on the right side of your screen. Use the Scroll wheel to make
the font larger or smaller, or adjust the size with the Larger and Smaller buttons.
The Show/Hide Transcript option
The Menu/Setup/Display/Font/Transcript dialog has an additional button labeled Show/Hide,
which lets you control whether or not the Transcript appears on your screen.
The Passport can display steno only or steno with translated text.
1. To toggle between the Virtual Paper and the Transcript views, press the Show/Hide button,
which will toggle between the two views.
32
2. You can also turn on or off Transcript viewing in the Menu/Setup/Input menu, by
selecting/deselecting View Transcript.
3. When you have finished adjusting the Transcript font size and appearance, press Back to
adjust another font, or Ok to return to the Job screen.
Adjusting Display Brightness and Contrast:
The Menu/Setup/Display/Brightness button opens a dialog where you can adjust the screen
brightness using the Scroll Wheel, or the buttons labeled Less and More.
When you have finished adjusting the Brightness, press Back to return to the Display menu, or
Ok to return to the Job screen.
The Menu/Setup/Display/Contrast button opens a dialog where you can adjust the screen
brightness using the Scroll Wheel, or the buttons labeled Less and More.
When you have finished adjusting the Contrast, press Back to return to the Display menu, or Ok
to return to the Job screen.
The proper contrast setting is essential to having an easily readable display. The contrast
setting needed will vary depending on the angle from which one is attempting to view the
display. It will also change depending on the environment in which you are working.
As you make an adjustment to the Brightness or Contrast level, the display will briefly show you
the actual value to which it is being set.
When you back out of the Brightness dialog, your changes are saved to the Registry. Note that
the updated registry is only loaded into memory when you restart your passport, so you must
shut down and restart for your changes to be applied.
33
The Input Settings menu
Pressing the Input button in the Menu/Setup sub-menu opens a dialog in which you can choose
Input settings.
1.
Use the Scroll Wheel or the Up and Down buttons to select the setting to change.
2.
Then use the Change button or the Plus and Minus buttons to change the setting.
3.
When finished, press the Close button to return to the Job screen.
You can turn Anti-stacking on or off, and set the Overlap percentage to any value
between 1 and 100. The recommended value is 15. See below for details.
You can choose to View translation or not. This is the same adjustment as using the
Menu/Setup/Display/Font/Transcript/Show/hide button.
You can change the key(s) used for your Delete stroke(s). When you select this, it opens
a separate dialog that allows you to write any number of different delete strokes.
o Note: If you write three strokes, for example, * / *R / R* then each of these
strokes will be considered an allowable alternate form of the delete stroke and
each one will work for deleting. The fact that this feature allows multiple strokes
does not mean that you can use a multi-stroke delete entry, so you can't use
TKHRET TKHRET for deleting one stroke, for example.
You can turn on or off the Shadow display. The Shadow display feature is designed to
make read-backs easier. The Passport’s LCD can display “shadows” much as they would
appear on steno paper. The shadow tracking information can help the CAT software
determine which keys were inadvertently pressed or not pressed hard enough, improving
the accuracy of your translation.
You can adjust the number of minutes (from 1 to 30) before the Backlight Timer turns
off the LCD screen. Setting the timer to 0 (zero) will disable the timer and prevent the
screen from turning off.
34
Anti-stacking/splitting
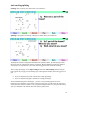
Stacking refers to getting one stroke when you wanted two:
Splitting is the opposite of stacking: Getting two strokes when you wanted one:
The Passport software is designed to eliminate both splits and stacks, by tracking the position,
direction of travel, and speed of each key at all times. Because different people have different
writing styles, it's important for you to fine-tune the aggressiveness of the anti-stacking.
The "Overlap percentage" on the Input settings menu under Anti-stacking tells the Passport
how aggressively to apply its anti-stacking logic. The higher the number, the more aggressive it
gets.
If you are experiencing stacks, increase the overlap percentage.
If you are experiencing splits, decrease the overlap percentage.
We recommend doing this in small steps – just one or two percentage points at a time –
beginning in the mid-teens. Everyone has a unique writing style, so what works for one person
won't necessarily work for another. Once you get the Passport tuned in to your personal writing
style, you should have far cleaner notes than with any other writer.
35
Other settings are:
View Translation:
Yes/No
The default (Yes) allows you to see the translation along with your notes.
Steno display on the right:
Yes/No
You can choose to have the Steno display on the left or right. The default is on the left.
Delete strokes(s):
*
You can show your Delete stroke(s) as a asterisk.
Shadow display::
Yes/No
Choosing "Yes" for Shadow display will show you your shadows like on your paper but in red
on the screen.
Backlight timer:
30
Audio prompts:
Yes/No
This option provides audio prompts for the visually impaired. If you turn it on, you will
hear audio prompts when something important happens.
36
The Menu/Setup/System sub-menu
Setting the Date and Time:
Navigate to Menu/Setup/System/Date-time.
You may press the Up and Down buttons or slowly rotate the Scroll Wheel to select the
proper information in each field.
Use the Previous and Next buttons to move between fields.
Once you have the proper date and time set press OK to save the settings and return to
the job screen and the top level menu.
Pressing Cancel will return to the job screen and the top level menu without saving the
new settings.
The Date will display to the right of the job name in the upper left corner of your screen.
The Current Time will display to the left of the job name, as long as you are at the bottom
of the job. If you scroll up away from the bottom, the timecode for that section of the job
will display.
Menu/Setup/System/View
This dialog is used by Support to view information about your Passport. Only access this area as
directed by Advantage Technology Support.
37
38
Chapter 4 - Using Dictionaries With the Passport
The Passport has the ability to use a main dictionary (which is always named Main
Dictionary.pdx) and multiple job dictionaries to provide a translated display on the writer.
The dictionaries may be created in several ways:
1.
You can create them on the Passport
2.
You can import them from a CAT system dictionary that is in the rich text format (RTF)
3.
You can also create a Passport dictionary using the Convert wizard in Total Eclipse, and
copy it to your Passport.
In any case, the Main dictionary in your Passport will have the name Main Dictionary.pdx
Creating a Dictionary on the Passport
1.
Both Start/ Menu/ Dictionary/ Main and Start/ Menu/ Dictionary/ Job have an Add
button. To add a dictionary entry, click the Add button.
2.
You will be presented with a dialog where you enter the Steno and Text of the entry.
3.
After you have entered the Steno and Text, click OK to add the entry.
4.
If you decide you do not want to keep the entry, you can Delete it.
5.
When finished, click Close to return to your job.
39
Importing a dictionary in rtf format into your Main dictionary.
1.
Go to Menu/Dictionary/Main and press Import.
2.
Use the Up and Down buttons or rotate the Scroll Wheel to highlight the storage device
where the rtf dictionary is located.
3.
After highlighting the file’s location, press OK to view a listing of files on that storage
device.
4.
Highlight the desired rtf file or files. You can use the Mark button to select multiple files.
40
5.
Press Ok to import the dictionary. The selected dictionary or dictionaries will be added to
your Main dictionary.
6.
A progress indicator will appear to inform you of the status while the importation of the
dictionary takes place.
41
Creating a Passport dictionary in Total Eclipse
To convert your Total Eclipse dictionary to the Passport format (.pdx) using the conversion
wizard in Total Eclipse:
1. Place an external media device in the Eclipse computer.
2. In Total Eclipse, go to the Production menu/User Settings/Input tab, and set "Read
from" to the external device in step 1.
3. Click OK to exit User Settings.
4. Go to Tools/Convert. Select "To another system" and click Next.
5. Select "Dictionaries" and click Next.
6. In the next dialog, highlight “Passport” and then click Next.
7. Highlight your main dictionary on the list and click Next.
42
8. When conversion is complete, Eclipse will ask if you want to convert any more files.
Click Finish.
9. The Passport dictionary created from your Main dictionary in Total Eclipse, will
automatically be named Main Dictionary.pdx. If you convert a dictionary which is not
your main dictionary, for example, tranjob.dix, it will keep its filename, and the
converted dictionary will be named tranjob.pdx.
Note: After Total Eclipse's conversion wizard completes the conversion to a Passport native
dictionary, it tries to save the file in two locations on your computer. The first is the jobs folder
and the second location is specified by the path used when reading notes (User
Settings/Input/Read From). Usually “Read From” is pathed to an external media device. The
device must be plugged into the computer during the conversion or you will receive an error
message, “The system cannot find the path specified.”
Installing a Passport dictionary on your Passport
Once you have a dictionary in pdx format, you can either Copy it to a storage location on your
Passport, or Load it (see next page). To Copy your dictionary:
1.
Go to Menu/Files/Copy, navigate to the storage device where the pdx file is located. If
the file is not in Memory, use the Previous button to display a list of storage media on
your Passport.
2.
Use the Scroll Wheel to highlight the filename, and press OK.
3.
Highlight Memory and press OK to copy the dictionary.
Note that if you use the Menu/Files/Copy command to copy a file named
Main Dictionary.pdx from any drive to the Passport's Memory, the main dictionary will be
replaced.
You may also copy in any auxiliary dictionaries you like, however if you want to use them
during a job, you will have to select them in the Dictionary/In Use menu.
43
Loading a dictionary
The Menu/Dictionary/Load option for dictionaries will load a .pdx or .rft dictionary from an
external drive into Memory, converting the .rtf to a a .pdx, if necessary. This does not have any
effect on the Main Dictionary.pdx, even if you are converting your username.rtf.
1. Insert the external media device into the Passport. Note if you are using an SD card you
must do this on the splash screen not while in a job.
2. Start a job on the Passport.
3. Navigate to Menu/Dictionary/Load.
4. A list of external memory devices will appear. Navigate to the Jobs folder on the
appropriate device.
5. Highlight Main Dictionary.pdf and then depress the OK button.
If the dictionary you are loading is named "Main Dictionary.pdx," it will be your main
dictionary. If it has another name, after loading, the Passport will ask if you wish to use the new
dictionary as your main dictionary. Note that if you answer Yes it will overwrite your old main
dictionary entirely.
Exporting a dictionary from the Passport
The Export button allows you to save a dictionary to a card or other storage location. The
Export button asks you to provide a destination folder and will then copy the contents of the
current dictionary to an RTF file in that folder.
1.
With a dictionary open, press the Export button to display a list of storage locations.
2.
Use the Scroll Wheel or the Up and Down buttons to highlight the location where you
want to export your dictionary
3.
Press Ok to copy it to the highlighted location. A progress indicator will appear to inform
you of the status while the exportation of the dictionary takes place.
44
The StenoMagic Keys and Dictionary
The StenoMagic keys are the recessed keys at the left edge of your Passport keyboard. The upper
key registers as a caret (^); the lower key as a plus sign (+). You can press the keys individually
or together, in combination with other keys.
If you are using Total Eclipse, you can use the StenoMagic dictionary, StenoMagic.dix (available
on the Passport installation CD or as a download from the Advantage Software website, under
Support/Downloads/Passport) to make it easier to take advantage of the StenoMagic keys, and
facilitate editing from your steno keyboard. You can convert it in Eclipse into a .pdx dictionary
to use it on your Passport, or include the entries in your Main dictionary.
There are 17 entries:
In this view, sorted by steno, entries 1-10 use the upper StenoMagic key in conjunction with the
number bar to allow you to select an AutoMagic choice in the Eclipse info bar. (See Eclipse
documentation for details on setting up and using AutoMagic.)
Entries 12, 13, 14, and 16 control cursor movements, using the lower StenoMagic key with -R, P, -B and -G to move the cursor left, up, down, and right.
The other 3 entries are examples of using the StenoMagic keys as shortcuts to execute realtime
editing macros.
45
Selecting Dictionaries to Use in a Job
The Menu/Dictionary/In Use button displays the dictionaries, and lets you remove one or more
of them from the list, or select additional dictionaries to be used in the job.
To add dictionaries to the current job:
1.
Press the Menu/Dictionary/In Use button. The dictionaries currently in use are listed
2.
To add other dictionaries, press the Add button
3.
Highlight the dictionary name, and press OK to select it.
4.
You can select more than one dictionary from a location by pressing the Mark button to
mark each dictionary that you want to add.
5.
When finished adding dictionaries, press Close to return to the Job screen.
To remove dictionaries from the current job:
1.
Press the Menu/Dictionary/In Use button. The dictionaries currently in use are listed.
2.
Use the Scroll Wheel to navigate to the dictionary you want to remove.
3.
Press the Delete button
4.
When finished removing dictionaries, press Close to return to the Job screen.
46
Chapter 5 - Working with Files
The Menu/Files menu provides options for you to Open, Delete, or Copy files from and to
any of the storage media on your Passport.
You can Open, Delete, or Copy more than one file at a time. To select multiple files, highlight
the files one at a time, or select multiple files by holding down the Mark button as you roll the
scroll wheel. All the marked files will be opened, deleted, or copied.
The Open and Copy functions list files sorted by name, which is generally in order from newest
to oldest. The Delete function lists the oldest files first, since those are generally the ones you
would be deleting.
When working in the Files menu, the File selection dialog will shows the current path and drive
space. These will appear at the top of the lists of files with a different background color, and it is
not a selectable item.
When reading a directory, the file dialog will show “please wait” on the screen until it's done
reading the folder, since a large number of files can make that function take longer than you
might expect.
To Open a File:
1.
Press Menu/Files/Open. The Passport displays a list of the files in Memory.
2.
Press Previous to display a list of storage media on your Passport.
3.
Use the Scroll Wheel to highlight the location of the file you wish to open, and press OK.
4.
Press OK to open a jobs folder and display a list of the files at that location. Scroll to the
file you want to open, and press OK. The system will return you to the Job screen with
the file open.
To Delete a File:
The Menu/Files/Delete sub-menu can be used to delete files from any storage location on the
Passport.
1.
Press Menu/Files/Delete. Press OK for a list of files in your root directory.
2.
Press Previous to display a list of storage media on your Passport.
47
3.
Use the Scroll Wheel to highlight the location of the file you wish to delete, and press
OK.
4.
Press OK to display a list of the files at that location.
5.
Scroll to the file you want to delete, and press OK.
6.
The Passport will display a warning reading “The selected data will be deleted
permanently. Are you sure?”
7.
Press Yes to delete the file. Pressing No or Close will take you back to the Job screen.
To Copy a File:
The Menu/Files/Copy sub-menu can be used to copy files from and to any storage location on
the Passport.
1. Press Menu/Files/Copy. Press OK for a list of files in your root directory.
2. Press Previous to display a list of storage media on your Passport.
3. Use the Scroll Wheel or the Up and Down buttons to select the file to be copied.
4. To select multiple files to be copied, hold down the Mark button as you roll the scroll
wheel.
5. When you have finished selecting files, press OK.
6. A list of available storage locations appears. Select the location to which you want to
copy your file, and press OK. The file is copied, and you are returned to the Job screen.
7. If the file(s) you want to copy are not in the root directory, use the Previous button to
display a list of storage media on your Passport.
8. The copy function first checks for free space, and will give a “drive full” error if there is
not enough space.
9. Use the Scroll Wheel to highlight the location of the file to copy, and press OK.
10. Press OK to open a list of the files at that location.
11. Scroll to the file you want to copy, and press OK.
12. A list of available storage locations appears. Select the location to which you want to
copy your file, and press OK. The file is copied, and you are returned to the Job screen.
You can then copy from your media to your CAT system. For example, in Total Eclipse,
you can use File Manager to copy your files to your computer.
48
Note that when copying files, it will check for free space first and provide a “drive full” error if
there’s not enough space. This is different from how it functions while writing a job, when the
Passport will delete the oldest file if it runs out of space for the current file.
Note also that if you are copying a group of files, and one file fails, the process is aborted to
avoid multiple errors.
When copying large files, a copy progress indicator appears onscreen.
Saving Note Files:
The Passport always saves the job files to its internal memory.
Note: There is one exception to this. The .wav file generated when recording audio is
ONLY saved to an SD card and no where else. If there is no SD card in the writer then it
will not record audio even if audio recording is turned on in the menu. NOTE: Do NOT
remove the SD card while recording.
In addition to saving the files to the internal memory, the Passport automatically saves
jobs to any and all external media devices as you write whether there is one device or six.
Saving Note Files to External Storage Media:
In addition to always saving the job to the internal memory, the Passport writer
automatically saves note files to all external storage media present in the writer at the
beginning of a job.
Any combination of Compact Flash cards, Secure Digital cards, and USB flash drives
may be used to provide up to 6 backups while working. Please note that while possible to
have a large number of backup files, additional devices such as USB flash drives, draw
the power necessary to operate from the writer and will decrease runtime when the
Passport is powered by battery.
49
If there are no external backup drives present at the beginning of a job the following
warning is displayed:
You may ignore the warning and continue to write with the only copy of the job saved in the
Passport’s internal memory. To remove the warning from the screen press OK.
If there are no backup drives present, the close function will not close the job and will
return to the main screen again. You must plug in a backup drive before closing the job,
otherwise you will not be able to get to the splash screen to turn the writer off.
Whenever a new external media device is inserted into the Passport, notes from the
current job will begin to be saved on the new media devices in addition to any external
media devices that may have already been present.
For your convenience the Passport is shipped with a SD card and a Compact Flash card
with adapter inserted into the writer ready for use.
50
Reading notes from the external media
When the Passport saves jobs to an external media device it does so in two locations of the
device:
1.
As Passport files in the “Jobs” folder.
2.
As Stentura format note files in the root directory of the external memory device.
You can read your notes from the external media into Total Eclipse in one of two ways:
1.
As noted above, the Passport saves native Passport files (including the audio if using an
SD card) in a folder labeled “jobs.”
2.
Remove media from Passport and insert into your computer.
In the User settings/Input tab, you must set the Read from drive or folder path to the
“jobs” folder located on the media device which you have inserted into your computer.
As long as that device receives the same drive letter from Windows each time you insert
the device into your computer, you will only need to set this once.
In addition to saving native Passport files in the jobs folder, the Passport saves Stentura
format note files in the root directory of the external memory device (just as the Stentura
does on a disk).
In this case you would only have to set the User Settings/Input/ Read from drive or
folder path to point to the media device itself and not to a folder located on the media
device.
The writer type on the User settings/Input tab would need to be set to Stentura instead
of Passport.
You can then leave User Settings, and use Alt-I or Read notes and the notes files on the
media device will be listed. Highlight the file you want, rename it anything you like, and
click “Read.”
If you have a .wav file from the Passport, it will be renamed the same as the .not file.
Both the .not and .wav file, as well as the .ecl file after translating, will be in your jobs
folder in Total Eclipse.
51
The Search menu
From the Job screen, press the Search button to access the Search menu.
You can use the Search menu to perform the following search functions:
Prev Q -- jumps to the previous question.
Prev A -- jumps to the previous answer.
Entry -- Allows you to enter text to search for. Note that you can type steno into this dialog and
it will find that location in both the steno and text document.
Repeat -- Repeats the last "Entry" search that was done.
Note: You can use the scroll wheel to move the steno on the left side of the display while the
Search menu is displayed.
Press the Other button to access these additional search functions:
Go to top -- Jumps to the top of the job.
Prev Pgh -- Jump to the beginning of the previous paragraph.
Prev Paren -- Jump to the previous open parenthesis
Note that even if the transcript window is not visible, it will still do a search, and move the steno
window to the appropriate location.
52
Inserting a MARK into steno notes:
While in the steno display, pressing MARK (button #2 or #5) will place a mark stroke in the
steno notes.
You will be able to search for your marks after opening your notes in your CAT program.
53
Typing text on your Passport
Text typing supports many characters, which you can use when typing dictionary entries from
scratch, as well as in some of the menu dialogs. They include not only letters and numbers, but
also spaces and punctuation marks, and a few shortcuts for items such as braces and backslashes
for making commands and conflicts.
Any individual letter or number key will appear as itself.
There are some special keys:
The number bar by itself (#) will insert a space.
The recessed command (StenoMagic) + key (the low key closest to the user) will enter
CAP mode if you press it once. Pressing any typing key will then capitalize the key and
turn CAP mode off. Pressing + twice will enter CAPS lock mode, which will capitalize
everything until you press the + key again.
When typing text into a dialog from the steno keyboard, you can use the * key to delete
the last character.
Special combinations
(uncapped --> capped)
Multi-key letters:
SKWR = j
STKPWHR = { --> "
SR = v
FRPBLGTS = } --> '
TKPW = g
STPHFPLT = \ --> /
TK = d
SKWRRBGS = - --> ~
TPH = n
STPH = ?
TP = f
FPLT = . --> :
KP = x
RBGS = , -->
KWR = y
KW = q
The following mimic the keyboard:
KH=ch
1 --> !
PW = b
2 --> @
PH = m
3 --> #
HR = l
4 --> $
EU = i
5 --> %
PBLG = j
6 --> ^
PB = n
7 --> &
PL = m
8 --> *
BGS = x
9 --> (
BG=k
0 --> )
KR=c
54
Chapter 6 Working with Audio
Setting up your Passport to Record and Playback Audio
Under Menu/Audio there are functions for Record, Pause, Play, Stop, as well as Setup for the
audio functions on the Passport.
Pause is for stopping recording. Stop is for stopping the playback.
You can play back the audio for a job in progress, as long as you play back a portion of the job
more than a few seconds old.
It is possible to re-open an older job from the writer and play synchronized audio from that job.
Because of the large size of WAV files, the jobname.wav file will be stored ONLY in the
"Storage Card\jobs" location, which is the SD card. If the SD card fills up while recording audio
the Passport will immediately begin deleting old files just as it does with all other file types.
If you attempt to start a job with a write-protected SD card, you will get a warning. You will be
able to continue writing without audio, but you'll get errors whenever it tries to write the steno
and text to the SD card. The best way to avoid this error is by changing the write-protect switch.
The WAV files can be copied to the PC and are fully compatible with any program that you can
use to open WAV files.
The audio settings dialog will flash "Microphone" and "Headphones" indicators on the left side
of the screen so you can identify the jacks.
The Record button
The Record button can be used to both pause and resume the recording. It can also be used to
start the recording if you have the audio recording turned off when you start the job. When you
are recording, a horizontal bar appears near the top right-hand corner of your screen. A green bar
shows the sound level as it records, and will display red if the volume is too high.
The Pause button
You can pause the recording at any point during the job by using the Pause command and
resume the recording by using the Record command. The times when the record and pause were
issued are recorded in the job info file, so that the playback procedure can recalculate the
appropriate start time for the current timecode.
55
The Play button
The Play button toggles playback on and off.
Audio Settings
WARNING: It is possible to set the playback volume and the live monitoring so high that YOU
MAY DAMAGE YOUR HEARING. This device is built to be extremely sensitive so that it can
pick up sounds from across the room. If you turn it up too high without checking, you can get
nasty feedback and blown eardrums, even with a tiny pair of headphones.
The Menu/Audio/Setup button opens a dialog to adjust your Audio Settings.
The settings are:
Record audio:
Yes/No
The Passport will remember this setting permanently for all future jobs. You can set this to Yes
before you hit the very first stroke in the job. You can also begin recording while in a job, by
hitting the Record button.
Live monitor:
Yes/No
The monitor YES/NO is rather like LOUD/QUIET. In any case, the audio monitoring that can be
done through the Passport is extremely sensitive and can pick up quiet voices from across the
room.
Input volume
48%
The input level can be set from 0 to 100% and works well with both powered and unpowered
microphones.
Microphone boost
Yes/No
If your volume levels are too high, it is possible to turn the boost so high that you distort your
recordings, in addition to possibly damaging your hearing.
56
Output volume
40 %
This setting determines the level for the headphones.
Auto-pause
Yes/No
The auto-pause setting can be turned on or off. Below that is a pause delay which is indicated as
a number of minutes. If enabled, it will automatically pause the recording if there are no steno
strokes hit within a period of minutes indicated by the pause delay.
Pause delay time
5 (minutes)
Auto-resume
Yes/No
With auto-resume turned on, any stroke on the writer will restart the audio recording. This will
happen whether the recording was paused by the user or by the auto-pause feature.
Audio emulation
Yes/No
If you turn on Audio emulation, it will store the wav files as \AUDIO\FILE###.wav to match the
emulation mode files.
Note that turning on the emulation mode does NOT affect the currently open job. You must close
the current file and start a new file in order to see the change. The audio emulation mode does
get stored permanently in the settings. When using Case Catalyst to read note files from Passport
SD cards created while the Audio Emulation mode is ON, the wav file will be copied along with
the notes and automatically associated with the job in Case Catalyst. In Case Catalyst you should
set your writer type to the Elan Mira. Please be advised that there may be an option in Case
Catalyst to tell it whether you're reading the old-style compatibility mode notes or the newer
style of notes. Please choose the old-style.
WAV recording indicator
Next to the battery icon in the upper-right corner of the screen, a VU meter will appear showing
the recording level. It's a black box with a green bar that moves back and forth. The WAV
recording indicator only appears when recording.
57
58
Chapter 7 - Additional settings
Writer setup in Total Eclipse:
You may connect the Passport writer to your computer’s serial port using the Passport serial
cable or a USB cable.
If you want to use a serial cable, and your computer does not have a built in serial port, you will
need to purchase an appropriate serial converter for your computer to provide a port to which the
Passport serial cable may be connected.
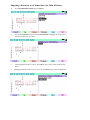
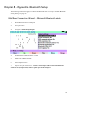
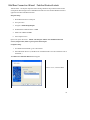
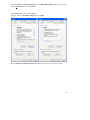
In Total Eclipse’s User settings under the
Input tab you will need to set “Writer” to
Passport and “Realtime From” to COM port.
After setting “Realtime from” to COM port,
choose the Setup.. button to the right.
Enter the appropriate information for your
computer in the COM port setup dialog.
The Passport writer uses the following
communication settings:
baud rate: 38,400
parity: none
data bits: 8
stop bit: 1
Click OK.
59
Be sure to enter the com port number that is appropriate for the computer that the writer
connecting to. In this example the writer was connected to COM2. On other computers
the actual com port available may have different number assigned to it than the above
example. You can use the button for the Windows® Device manager to determine the
available com ports on your compute.
The Passport writer has the ability to interface with any CAT system that supports the
Stenograph® writer protocols.
You have the option of using a USB client port for realtime connections. Please note that
a Passport USB driver must be installed on the host computer before using the USB
connection. The driver, PassportUSBDriverSetup.exe, which is listed as “Passport USB
Drivers” and installation instructions are available on the ASI website under
Support/Downloads/Passport.
Translation without a laptop, from SD card
You can plug the SD card from the Passport into a card reader attached to a computer running
Eclipse.
Browse to the SD card, highlight “jobs” and say OK.
Close that window and hit Alt+I, as if you were going to read files from a Stentura®. You
will see a list of note files.
Pick the file you want to translate and name it. Click Read. When you do that, the audio
file and the note file will be together, with the same name.
Translate the file, and the synched audio will be there with the translation.
Remove the SD card from the reader and put it back in the Passport.
60
Using the Passport with other CAT systems:
Because the Passport writer has the ability to emulate other writers, using the Stentura® protocol,
the Passport can be used with all modern CAT software. By default the Passport saves every
note file in both the Passport’s own format and the Stentura®’s format. When reading note files
using a CAT system other than Total Eclipse, be sure to set that CAT system’s input options up
as if you were using a Stentura® writer.
To use the Passport in real-time using a serial cable with other CAT systems, you must enable
emulation mode on your Passport. Navigate to Menu/Setup/Output and choose an Emulation
mode.
Use the Up and Down buttons to highlight an Emulation mode. The Change button will toggle
between Yes and No. Once you have the proper setting selected pressing Close will return to the
job screen and the top level menu.
Setup your CAT system as if a Stentura® writer is connected. Be sure to use the Stentura®
writer’s communication settings:
baud rate: 9,600
parity: none
data bits: 8
stop bit: 1
When you are using the Passport in Emulation mode, the Passport will support Stentura®-style
timecodes, and when you “read notes,” they will be timecoded correctly.
61
Updates to the Passport software:
In order to receive notification of updates to the Passport software, you must "subscribe" to the
Passports Download page.
1. On the ASI website, www.eclipsecat.com, go to Support/Downloads/Passport
2. Click on the “Subscribe” link, which you will find below the list of available files.
3. Choose “Subscribe to this page” and click Save.
Installing an Update on the Passport:
1.
Copy the file named passport.upd to an external media device, such as a compact flash
card, SD card, or a USB flash drive.
2.
Make sure that the writer is turned off.
3.
Insert the external media device into the Passport
62
4.
Turn the Passport on.
5.
This procedure will reprogram the writer's on board flash memory with the new Passport
application software. The update will take approximately 30 seconds to install during
which the LCD display will appear blank except for a very brief progress indicator.
6.
Once the update installation has completed, the writer will restart, and be ready for use.
When the splash screen appears, verify the version number that is displayed in the lower
left hand of the splash screen. As part of the process, the Passport update file is
automatically deleted from the external media device.
The Menu/About sub-menu
The About dialog box, Menu/About, lists the Passport version number, Operating System
version details, and raw data from the power management system. This information may be
needed if you are consulting with Advantage Technology Support.
63
Caring for your Passport’s LCD Display
1.
Do not use or store the Passport in a high humidity environment for extended periods.
Damage to the LCD display and the internal electronics may result.
2.
The LCD display is easily scratched or damaged. Prevent touching it with any hard
material, and from being pushed or rubbed.
3.
The LCD Display may be cleaned by wiping the screen surface with a soft cloth or cotton
pad using ethanol or other commercially available cleaner designed specifically for LCD
displays
4.
DO NOT USE WATER as it may cause damage or discoloration to the LCD display and
will void the writer’s warranty. Be sure to clean condensation or moisture from any
source immediately.
Changing the Splash image on the opening screen
You can customize the opening screen of your passport. Take any .jpg and put it on a USB drive
or SD card, etc. Name it "mysplash.jpg" (case insensitive.) Insert that into the Passport and use
Menu/Files/Copy and navigate to the mysplash.jpg file. Once you hit OK on that file, you don't
need to select the destination. It will automatically be copied to the appropriate location and will
appear on the splash screen whenever you turn on the writer or close a job to return to the splash
screen.
It will scale the image to a square that fits into the splash screen. Note that if an image is
enormously large, it may refuse to load. It scales the image after loading it, so if there isn't
enough memory in the Passport to even load the image in the first place, it won't bother.
64
Low Memory Message at Startup
After you have been using your Passport for a time, you may get a message, when you first turn
on the machine, which alerts you are that you are running out of available memory. The message
will suggest that you delete files from memory to free up space. All your job files are saved in
memory. Copies are also placed in other available storage locations, but the memory has to have
space for your new files, so if you do not delete files when warned, the Passport will delete files
from memory, beginning with the oldest files first, so that you have space for your current work.
Other copies of the files, if any, will be left in place.
65
Troubleshooting and Error Messages
There are several error messages you may get as you use your Passport:
“Drive full”
Problem: When you are using the Menu/Files/Copy function, the Passport will let you know if
the storage location you have selected does not have enough space for the files you are copying.
Solution: You can choose another location, or delete some of the files from the location you
selected.
“SD card full”
Problem: Audio (.wav) files are very large, and because of their large size, they are only stored
at the “Storage Card\jobs” location, which is the SD card. If the card fills up, you can continue
writing, but it will begin deleting old files.
Solution: Delete older files periodically so the card does not fill up. You can check the amount
of free space and the sizes of the files by going to Menu/Setup/System/View, select the SD card
and press OK. Your audio files are in the [AUDIO] folder. If you are ready to delete some files,
go to Menu/Files/Delete, select the SD card, and mark the file(s) to delete. When you hit OK, it
will warn you that you are about to delete the file(s) permanently.
“SD card write-protected”
Problem: If your SD card is write-protected when you begin a job, you will get this warning.
You will be able to continue writing without audio, but you will get errors whenever it tries to
write the steno and text to the SD card.
Solution: The best way to avoid this error is by changing the write-protect switch.
“WARNING: There are no external backup drives present. Plug in
a drive or card as soon as possible”
Problem: When you are writing a job, the Passport stores it in all possible locations. If there are
no cards or other storage devices plugged in, the Passport will store it in memory, and when you
attempt to close the job, you will get this message.
Solution: Be sure you have at least one backup device plugged in when writing a job. When you
get this message, you can insert a card or other device, click OK, and then when you close the
job, it will be saved to that device, as well as to the internal memory.
66
The following error message occurs in Total Eclipse during the dictionary conversion process.
“The system cannot find the path specified.”
Problem: After Total Eclipse's conversion wizard completes the conversion to a Passport native
dictionary, it tries to save the file in two locations on your computer: the jobs folder and the
location specified by the path used when reading notes (User Settings/Input/Read From).
Usually “Read From” is pathed to an external media device.
Solution: Be sure the external media device is plugged into your computer during the
conversion.
67
68
Chapter 8 - Appendix: Bluetooth Setup
The following instructions apply to a Microsoft Bluetooth stack. To set up a Toshiba Bluetooth
stack, please go to page 74.
Add New Connection Wizard – Microsoft Bluetooth stack
1.
Place Bluetooth device in Passport
2.
Turn power ON
3.
Navigate to Menu/Setup/Output
4.
Set Bluetooth Communications to YES
5.
Make note of Bluetooth PIN
6.
Exit to Splash screen
7.
Open a new job on the writer – NOTE: The Passport will not start the Bluetooth
serial service (Passport SSA) unless a job is open on the Passport.
69
On a Bluetooth enabled PC go to
Control Panel and select Bluetooth
Devices.
Click Add...
Place check mark next to “My
device is setup and ready to be
found”
Click Next. Windows will search
for any Bluetooth devices within
range. Other devices besides
the Passport may be found.
Highlight “Passport.”
Click Next
70
Place dot next to “Let me choose
my own Passkey.”
Enter the Passport’s Bluetooth PIN
as noted above in the text box to
the right.
Click Next.
Wait while Windows connects to
your device.
Make note of the COM port
assignments.
Click Finish.
71
The wizard will close and bring you
back to the Bluetooth device screen
with the newly added device
displayed.
Click on the COM Ports tab and
make note of the COM port
assigned to the Passport.
Click on the Options tab.
Ensure that “Allow Bluetooth
devices to connect to this
computer” is selected.
Choose OK.
72
Setting up Total Eclipse to use the Passport
In Eclipse navigate to the Input tab under User Settings.
Ensure that the Passport writer is selected
“Real-time from” is set to COM
port.
Click the Setup button to the right
of the “Real-time from” selection.
Enter the port number that was
assigned to Passport ‘SSA’ as
noted previously from the COM
port tab of the Bluetooth Device
dialog on the PC.
The Passport uses a baud rate of
38400 (38K), parity set to None, 8
data bits, 1 stop bit.
Select OK.
Both the Passport and Eclipse are now set up to use Bluetooth wireless real-time.
73
Add New Connection Wizard -Toshiba Bluetooth stack
Toshiba Stack - The Fujitsu computers that Advantage Software ships and the install CD that
accompanies the Kensington micro USB Bluetooth make use of the Toshiba Bluetooth stack as
opposed to the Microsoft Bluetooth stack.
Passport Setup:
1. Place Bluetooth device in Passport
2. Turn power ON
3. Navigate to Menu/Setup/Output
4. Set Bluetooth Communications to YES
5. Make note of Bluetooth PIN
6. Exit to Splash screen
Open a new job on the writer – NOTE: The Passport will not start the Bluetooth serial
service (Passport SSA) unless a job is open on the Passport.
Computer Setup:
1. On a Bluetooth enabled PC go to Control Panel
2. Select Bluetooth Devices (or double click on the Bluetooth icon in the notification area of
the taskbar.)
The Add New Connection Wizard should appear.
Select a service, and click Next
74
Select Custom Mode.
Click Next.
The PC will now search for remote devices. If devices are found the Wizard will display the
items. There may be many items other than the Passport or multiple Passports.
Highlight the Passport
Choose
The Add New Connection Wizard will now contact the specified device, in this case the
Passport, and inquire as to which services the specified device offers.
A dialog requesting the Bluetooth Passkey or PIN number appears.
75
Enter the Passport’s PIN number
which may be found on the
Passport in Menu/Setup/Output/
Bluetooth PIN.
Select OK.
The Wizard will then display the
list of available services.
Highlight “Serial Port SSA”
Select Next.
The Wizard will then request a
COM port assignment. Although
you may select a specific COM port
to use, in most cases you can make
use of the default assignment, and
select Next.
A dialog announcing that the setup
of the particular COM port is
complete will appear.
Please make note of the COM port
number for use in the setup of the
CAT sytem
Select Next.
The Wizard will request a name for
the connection.
Type in a name for the connection
Choose Next.
NOTE: Creating a shortcut is not
necessary.
76
The Wizard will display a
registration complete dialog.
Select Finish.
After the Add New Connection
Wizard closes, the Bluetooth
Settings dialog will be revealed (it
had been open during the entire
process just covered by the Add
New Connection Wizard dialogs).
You should see the Passport as an
available connection.
Close this dialog and the pairing of
the Passport and the computer is
complete.
77
Testing a Real-time connection using Hyper Terminal or similar program
A quick and easy way to test the connection between the Passport and the
Computer without using the CAT system is to use a communications program such
as Hyper Terminal or Putty. Begin Hyper Terminal by navigating the start menu Start/ All Programs/ Accessories/ Communications/ Hyper Terminal.
In the Connection Description dialog type in any convenient name for the
connection and select OK.
78
In the Connect To dialog select the
Bluetooth com port in the Connect
using combo box and then select
OK.
Set the proper Passport
communications protocol
information in the Com port’s
properties dialog and select Apply.
79
Hyper Terminal’s terminal window will appear. There are two telephone icons on the tool bar.
One telephone icon is shown with the phone receiver “off hook.” If this is the active of the two
icons, it indicates that there is an active communications path between Hyper Terminal and the
Passport. Any strokes written on the writer should quickly appear in the Hyper Terminal
display. If the “on hook” telephone icon is active, One must click on that icon to initiate the
connection.
80
Toshiba Stack - Computer is not requesting a PIN number during
Bluetooth setup.
If the computer is not requesting a PIN number during the Add New Connection Wizard, the
Bluetooth security options may need to be raised from Standard to High.
On a Bluetooth enabled PC go to Control Panel and select Bluetooth Devices or double click
on the Bluetooth icon in the notification area of the taskbar.
When the Add New Connection
Wizard appears, select Cancel.
81
When the Add New Connection Wizard closes the Bluetooth Settings dialog will be revealed.
From the Bluetooth menu choose Options.
In the Options dialog select the Security tab.
Raise the slider from Standard to High and select Apply.
Run the Add New Connection Wizard again and you should receive a prompt for a PIN.
82
Index
About dialog............................................................................................................................. 63
add dictionaries to the current job ............................................................................................. 46
Additional settings.................................................................................................................... 59
Adjusting Display Brightness and Contrast............................................................................... 33
Anti-stacking............................................................................................................................ 34
Anti-stacking/splitting .............................................................................................................. 35
Audio Settings.......................................................................................................................... 56
Auto-pause............................................................................................................................... 57
Auto-resume............................................................................................................................. 57
Backlight Timer ....................................................................................................................... 34
Battery Charging Indicator ....................................................................................................... 15
battery charging indicator light ................................................................................................... 8
Battery run time ....................................................................................................................... 15
Bluetooth communications ....................................................................................................... 26
Bluetooth emulation ................................................................................................................. 26
Bluetooth PIN number.............................................................................................................. 27
Bluetooth Setup........................................................................................................................ 69
Charging the Batteries .............................................................................................................. 15
Colors ...................................................................................................................................... 30
CompactFlash card..................................................................................................................... 8
Copy ........................................................................................................................................ 47
Data logging............................................................................................................................. 26
Date ......................................................................................................................................... 37
DC power jack ........................................................................................................................... 8
Delete....................................................................................................................................... 47
Delete stroke(s) ........................................................................................................................ 34
Dictionaries .............................................................................................................................. 39
Dictionaries to Use in a Job ...................................................................................................... 46
Display..................................................................................................................................... 29
Emulation mode ....................................................................................................................... 61
Exporting a dictionary from the Passport .................................................................................. 44
Files ......................................................................................................................................... 47
Font Sizes................................................................................................................................. 32
headphone jack........................................................................................................................... 8
Importing a dictionary in rtf format .......................................................................................... 40
In Use button............................................................................................................................ 46
Input Settings ........................................................................................................................... 34
Input volume ............................................................................................................................ 56
Installing an Update on the Passport ......................................................................................... 62
Installing Passport USB Drivers ............................................................................................... 11
Key Registration points, Adjusting ........................................................................................... 20
LCD Display ............................................................................................................................ 64
Live monitor............................................................................................................................. 56
Loading a dictionary................................................................................................................. 44
Low Memory Message at Startup ............................................................................................. 65
Main Dictionary.pdx ................................................................................................................ 39
MARK into steno notes ............................................................................................................ 53
83
Microphone boost..................................................................................................................... 56
Microsoft Bluetooth stack......................................................................................................... 69
Note Files to External Storage Media ....................................................................................... 49
Open ........................................................................................................................................ 47
Output settings dialog............................................................................................................... 26
Output volume.......................................................................................................................... 57
Overlap percentage................................................................................................................... 34
Pause button ............................................................................................................................. 55
Pause delay time....................................................................................................................... 57
Play button ............................................................................................................................... 56
Playback................................................................................................................................... 55
Record...................................................................................................................................... 55
Record audio ............................................................................................................................ 56
Record button........................................................................................................................... 55
remove dictionaries from the current job .................................................................................. 46
Saving Note Files ..................................................................................................................... 49
Scroll Wheel........................................................................................................................10, 29
SD memory card slot.................................................................................................................. 8
Search menu............................................................................................................................. 52
Serial communications ............................................................................................................. 26
Serial emulation ....................................................................................................................... 26
serial port ................................................................................................................................... 8
Setting the Date and Time ........................................................................................................ 37
Setting Up .................................................................................................................................. 7
Setup menu .............................................................................................................................. 29
Shadow display ........................................................................................................................ 34
SHADOW TRACKING ........................................................................................................... 24
Show/Hide Transcript............................................................................................................... 32
Splash image ............................................................................................................................ 64
Splitting ................................................................................................................................... 35
Stacking ................................................................................................................................... 35
StenoMagic .............................................................................................................................. 45
STENOVISION™.................................................................................................................... 25
Stroke Depth............................................................................................................................. 9
Stroke Registration Points ........................................................................................................ 20
Tension...................................................................................................................................... 9
Time......................................................................................................................................... 37
Turn Knob.................................................................................................................................. 9
Turning the Writer On and Off ................................................................................................. 17
Typing text on your Passport .................................................................................................... 54
Updates to the Passport software: ............................................................................................. 62
USB communications ............................................................................................................... 26
USB emulation ......................................................................................................................... 26
User settings under the Input tab............................................................................................... 59
View translation ....................................................................................................................... 34
Virtual Paper ............................................................................................................................ 32
Warranty .................................................................................................................................... 5
WAV recording indicator ......................................................................................................... 57
Writer setup in Total Eclipse .................................................................................................... 59
84
85