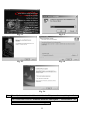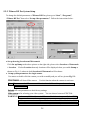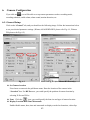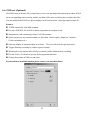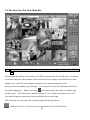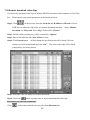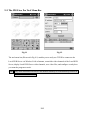
1
FCC Compliance Statement-------------------------------------------------------------------------- 4 FCC WARNING---------------------------------------------------------------------------------------- 4 License Agreement-------------------------------------------------------------------------------------- 5 Trademarks ---------------------------------------------------------------------------------------------- 7 Customer Support -------------------------------------------------------------------------------------- 7 1. System Requirements----------------------------------------------------------------------------- 8 1-1. Local Recording/Transmitter Software (Witness XP)------------------------------- 8 1-2. Remote client (FreeView Pro and AnyView Pro)------------------------------------- 8 2. Software Installation ---------------------------------------------------------------------------- 10 2-1. Witness AS/ASE/DX/HS XP Software Installation -------------------------------- 10 2-2. FreeView Pro Installation (Remote Client PC — TCP/IP viewer) ------------- 12 2-3. AnyView Pro Installation (Remote Client PC --- Modem to modem) --------- 13 2-4. Real time display kit driver Installation (Optional)-------------------------------- 14 3. Uninstalling Witness AS/ASE/DX/HS XP and Device Driver------------------------- 16 3-1. Uninstalling Witness AS/ASE/HS/DX XP-------------------------------------------- 16 3-2. Checking for or Uninstalling the Device Driver ------------------------------------ 17 4. Minimizing System Crash Caused by Windows ----------------------------------------- 21 5. Using Witness AS/ASE/HS/DX XP ---------------------------------------------------------- 22 5-1. General Information ---------------------------------------------------------------------- 22 5-2. Witness AS/ASE/DX/HS XP System Setup ------------------------------------------ 24 5-2-1. Witness AS/ASE/HS XP System Setup --------------------------------------------- 25 5-2-2. Witness DX Pro System Setup ------------------------------------------------------- 28 5-3. Witness AS/ASE/HS/DX XP Tool Bar------------------------------------------------- 30 6. Camera Configuration-------------------------------------------------------------------------- 42 6-1. General Setup ------------------------------------------------------------------------------- 42 6-2. Video and Audio Recording Installation---------------------------------------------- 44 6-3. Motion setting------------------------------------------------------------------------------- 45 6-4. Notification ---------------------------------------------------------------------------------- 47 6-5. Video Loss------------------------------------------------------------------------------------ 50 1 6-6. POS text (Optional)------------------------------------------------------------------------ 51 6-7. Video/Audio Recording Schedule ------------------------------------------------------ 52 6-8. Setting up Emergency Call -------------------------------------------------------------- 54 6-9. Set Up Privileges---------------------------------------------------------------------------- 56 6-10. Playing Back Video Files --------------------------------------------------------------- 58 6-11. Playing back across Local Area Network (LAN) --------------------------------- 62 6-12. Using Dynamic IP Addresses for Internet Access --------------------------------- 64 6-13. How to set notification and trigger devices when alarm------------------------- 67 6-14. Setting Up Notification ------------------------------------------------------------------ 68 6-15. Setting Up a Software Motion Detection Area------------------------------------- 70 6-16. How to Trigger Speed Dome Camera ----------------------------------------------- 71 6-17. Creating an Alarm Wave File---------------------------------------------------------- 72 6-18. Auto-Restart your PC ------------------------------------------------------------------- 73 6-19. Video Matrix (Optional) ---------------------------------------------------------------- 74 6-20. Back up the video clips ------------------------------------------------------------------ 76 6-21. Translate the video clips to VCD format (For CP-400DX Pro only) --------- 78 6-22. Adjust the time clock of DVR automatically--------------------------------------- 79 7. Using FreeView Pro (For TCP/IP viewers) -------------------------------------------------- 80 7-1. General Information ---------------------------------------------------------------------- 80 7-2. The FreeView Pro Tool Menu Bar ----------------------------------------------------- 81 7-3. Connecting to Local DVR Server by FreeView Pro ------------------------------- 83 7-4. Video Window Function Description-------------------------------------------------- 86 7-5. Using the Site Book ------------------------------------------------------------------------ 88 7-6. System Configuration--------------------------------------------------------------------- 89 7-7. Playing Back Video Clips----------------------------------------------------------------- 91 7-8. Remote download video clips------------------------------------------------------------ 94 7-9. Remote control------------------------------------------------------------------------------ 95 8. Connect the Local DVR Server via IE Browser -------------------------------------------- 97 9. Using PDAView Pro (For Pocket PC PDA only)-------------------------------------------- 99 2 9-1. The PDAView Installation---------------------------------------------------------------- 99 9-2. The PDAView Pro Tool Menu Bar ----------------------------------------------------100 9-3. Connecting PDAView Pro to Witness XP DVR site-------------------------------101 9-4. Using the Site Book -----------------------------------------------------------------------101 10. Using AnyView Pro (For Modem to modem viewers)----------------------------------102 10-1. General Information--------------------------------------------------------------------102 10-2. The AnyView Pro Tool Menu Bar ---------------------------------------------------103 10-3. Connecting to Local DVR Server by AnyView Pro -----------------------------103 10-4. Video Window Function Description -----------------------------------------------104 10-5. Using the Site Book----------------------------------------------------------------------104 10-6. System Configuration ------------------------------------------------------------------104 10-7. Playing Back Video Clips --------------------------------------------------------------104 3 FCC Compliance Statement This device complies with part 15 of the FCC Rules. Operation is subject to the following two conditions: This device may not cause harmful interference, and this device must accept any interference received, including interference that may cause undesired operation. FCC WARNING This equipment has been tested and found to comply with the limits for a Class B digital device, pursuant to Part 15 of the FCC Rules. These limits are designed to provide reasonable protection against harmful interference in a residential installation. This equipment generates uses and can radiate radio frequency energy and, if not installed and used in accordance with the instructions, may cause harmful interference to radio communications. However, there is no guarantee that interference will not occur in a particular installation. If this equipment does cause harmful interference to radio or television reception, which can be determined by turning the equipment off and on, the user is encouraged to try to correct the interference by one or more of the following measures: z Reorient or relocate the receiving antenna. z Increase the separation between the equipment and receiver. z Connect the equipment into an outlet on a circuit different from that to which the receiver is connected. z Consult the dealer or an experienced radio/TV technician for help. z Shielded cables and I/O cords must be used for this equipment to comply with relevant FCC regulations. 4 License Agreement Notice to end-user: please read the following legal agreement carefully. Use of the Witness or any of the software provided with this agreement constitutes your acceptance of these terms. If you do not agree with the terms of this agreement, PROMPTLY RETURN the Witness system, Witness, AnyView Pro and FreeView Pro, any related software and the included items (including the Witness video system, written materials and containers) to the location where you purchased them for a full refund. 1. License Grant. I-View grants to you (either as an individual or an entity) a personal, nonexclusive, nontransferable license to use one copy of the executable code of the I-View's Witness, FreeView Pro and AnyView Pro on a single CPU residing on your premises. The term of this Agreement will be for the duration of I-View 's copyright in the Witness, FreeView Pro and AnyView Pro. You may assign your rights under this Agreement to a third party who agrees in writing to be bound by this Agreement prior to the assignment, and provided that you transfer all copies of the Witness, FreeView Pro and AnyView Pro and related documentation to the third party or destroy any copies not transferred. Except as set forth above, you may not assign your rights under this Agreement, nor shall you rent, lease, sell, sublicense or otherwise transfer the Witness, FreeView Pro and AnyView Pro. 2. Reverse Engineering. You may not reverse engineer, decompile or otherwise disassemble the Witness, FreeView Pro and AnyView Pro except to the extent that applicable law expressly prohibits this restriction. 3. Copyright. Title and full ownership rights to the I-View's Witness, FreeView Pro and AnyView Pro will remain the exclusive property of I-View or its suppliers, and you will not acquire any rights to the I-View's Witness, FreeView Pro and AnyView Pro except as expressly set forth above. 4. Maintenance. I-View is not obligated to provide maintenance or updates to you for the Witness system and transport to Witness, FreeView Pro and AnyView Pro. However, any maintenance or updates by I-View shall be covered by the Agreement. 5. Disclaimer of Warranty. I-View warrants that the Witness system, the witness FreeView Pro and AnyView Pro and related software will perform substantially in accordance with the accompanying documentation and that CD-ROM diskettes are free from any defects for a period of 90 days from the date of purchase (limited warranty). Except for the foregoing limited warranty, I-View 5 expressly disclaims any and all other warranties, whether express or implied, including without limitation, the implied warranties of merchantability, fitness for a particular purpose, and non-infringement of third party rights. If law does not permit such disclaimer of any implied warranty, the duration of any such implied warranties is limited to 90 days from the date of purchase. Some countries do not allow the disclaimer of implied warranties, limitations on how long an implied warranty lasts, or the exclusion or limitation of incidental or consequential damages, so such limitation as or exclusions may not apply to you. This warranty gives you specific legal rights and you may also have other rights, which vary, from state to state. 6. Customer Remedies. In the event the Witness system or related software does not meet or conform to the Limited Warranty, I-View 's entire liability and your sole and exclusive remedy shall be, at I-View's option, either to (a) correct the error, (b) help you work around or avoid the error or (c) authorize a refund so long as the Witness system documentation and CD-ROM diskettes are returned to I-View with a copy of your receipt. This Limited Warranty is void if failure of the Witness system has resulted from accident, abuse, or application. Any replacement Witness system will be warranted for the remainder of the original warranty period. 7. No Liability for Consequential Damages. In no event shall its suppliers be liable to you for any incidental, indirect, special or consequential damages of any kind rising out of or related to this agreement or use or inability to use the related software, even if I-View has been advised of the possibility of such damages. 8. Export. You acknowledge that the laws and regulations of the Taiwan R.O.C. restrict the export and re-export of commodities and technical data of Taiwan R.O.C. origin. You may not download or otherwise export or re-export the Witness system or related software or any underlying information or technology except in full compliance with all United States and other applicable laws and regulations. You agree to indemnify and hold I-View harmless from and against any and all liability arising from or relating to your breach of this Manual. 9. Governing Law; attorneys' fees. The laws of the Taiwan R.O.C will govern this agreement. without regard to conflict of law principles. The R.O.C. Convention on Contracts for the International Sale of Goods is specifically disclaimed. The prevailing party shall be entitled to recover its reasonable attorneys' fees in the event of a dispute arising out of or relating to this Agreement. 6 10. Entire Agreement. This is the entire agreement between you and I-View with respect to the use of the Witness, FreeView Pro and AnyView Pro, which supersedes any prior agreement, whether written, or oral, and all other communications between the parties relating to the subject matter of this Agreement. Should you have any questions concerning this Agreement, please contact I-View directly at one of the numbers or addresses listed at the beginning of this manual. Trademarks I-View, e-Witness, @-Witness XP, u-Witness XP, x-Witness, FreeView Pro and AnyView Pro are registered trademarks of I-View Communication Inc. Microsoft, Windows 95, 98, ME and Windows2000, XP are registered trademarks of Microsoft Corporation. All other trademarks are the property of their respective holders. Customer Support If problems arise with the remote surveillance and security system that you are unable to resolve, please try the following: If you have an Internet connection, visit the I-View website http://www.i-view.com.tw/ (Taiwan) for any software or product updates, or email to [email protected] or Tel: 886-3-510-3001 Fax: 886-3-510-3002 (Taiwan). We are dedicated to providing the highest quality support. E-mailing our tech support will give you the chance to document each of the above items in a very clear and concise manner and will give our support team a chance to document any problems and respond with thoroughly researched answers. 7 1. System Requirements 1-1. Local Recording/Transmitter Software (Witness XP) z Operating system: Windows 98 Second Edition, ME, 2000 (Service Pack 2 or above) or XP. z Pentium 4 1.5 GHz CPU minimum; for 2 cards or above, please refer to Table 1-1. z Intel Chipset is strongly recommended (Intel 810, 815, 820, 845, 850, 865 or 875). z 256 MB RAM minimum; 512 MB RAM or better for Windows 2000 or XP. z 7200 RPM hard drive speed or better recommended. z Cooling fan for hard drive is recommended. z Minimum 1 GB free hard drive space. z 24 bit (true-color) VGA card or better. z Sound card and speakers are required for sound alarm/effects. z Microphone with 2Vp-p output required for audio recording. z Available PCI slot for Video Server Card.; USB port for CP-400U Pro Video Server Device. z Modem speed 33.6K or better; external modem that supports Wave files is recommended. 1-2. Remote client (FreeView Pro and AnyView Pro) z Desktop or Notebook PC with Pentium III 500 MHz CPU or better. z Operating system: Windows 98 Second Edition, ME, 2000 or XP. z 128 MB free hard drive space minimum. z Sound card and speakers are required for sound alarm/effects. z 24-bit (true-color) VGA card or better. z Modem speed 33.6K or better. Note: 1.Witness AS (ASE/DX/HS) XP is used for local viewing and recording. There are five models for six different hardware models. It is described as below: Software Witness AS XP Witness 1408ASE XP Witness 1416ASE XP Witness DX Pro Witness HS XP Hardware CP-1400AS XP CP-1408ASE XP CP-1416ASE XP CP-400DX Pro CP-404HS Plus and CP-1404HS-T XP 8 2. FreeView Pro is only for TCP/IP remote viewing. 3. AnyView Pro is only for modem-to-modem remote viewing. 4. The output level of microphone must be over V2p-p and do not use AC97 Sound card for audio recording. 5. The modem must support Wave files; otherwise it will not work when you use “Phone call”. 6. Depending on the speed of the CPU, the software requires using different compressors in conjunction with the video server cards. 7. The file size of compression image depends on resolution, compression method, compression rate and testing environment. Use the following table 1-1 to determine which compressor to use. Compressor VS. Frame size Wavelet MPEG 4 Card no. & Model VS. Optimum CPU 0.7-7K/Frame (320x240) 1400AS XP 0.9-8K/Frame (352x240) 1 card Pentium III 550M 1.3-12K/Frame (640x240) 2 cards Pentium III 866M 1.5-20K/Frame (640x480) 3 cards Pentium 4 1.3G 4 cards Pentium III 1.5G 0.5K/Frame(512K bit rate) 2K/Frame (2M bit rate) MPEG I 1408ASE XP 4/Frame (4M bit rate) 1 card Pentium 4 1.6G 6K/Frame (6M bit rate) 2 cards Pentium 4 2.8G 1.5-5/Frame (352x240) 1404HS & CP-400DX 2-6K/Frame (352x288) 1 card Pentium 4 1.5G (CP-400DX Pro only) 2 cards Pentium 4 1.8G 3 cards Pentium 4 2.0G 4 cards Pentium 4 2.8G 1416ASE XP 1 card Table 1-1 9 Pentium 4 1.5G 2. Software Installation This chapter walks you through the installation and setup process for Witness XP system. The enclosed CD includes “Device Driver & Witness XP”, “FreeView Pro” (TCP/IP), “AnyView Pro” (Modem to modem), “PDAView Pro” (Pocket PC PDA viewing) and “Real time display kit” (RD-800VGA or RD-1600VGA) 2-1. Witness AS/ASE/DX/HS XP Software Installation Please follow these steps to install the device driver and Witness AS/ASE/DX/HS XP software. Note: 1. It is necessary to install Witness XP software before installing hardware into PC. 2. Normally, Windows cannot provide the Database software. Therefore, you must install the “Access Runtime” software included on our CD for storing video clips. 3. There is a bug about 24/32 bits of display when using some versions of Windows XP SP1. It will show error message, “ Please open camera(s) “. You can solve it following below steps: A. Upgrade the newest XP SP1 version from Microsoft’s website. B. Install the “Windows XP SP1 Update” program included on our CD. Please select the language version before installation. Step 1: Insert the Witness CD into CD drive. The software Witness XP installer should come up automatically and list the programs in the CD. Select “Device Driver & Witness XP Software”, as Fig. 2-1. Note: If the Witness XP installer does not appear on your screen automatically clicks “Start” then “Run” and type “E:\Install.exe”, where E represents your CD drive letter. If it is not, replace E with the appropriate letter. Step 2: Select language, which you would like to installation, as Fig. 2-2. Step 3: Select “NEXT” to start the installation process, as Fig. 2-3. Step 4: Click “Browse” to change the destination or click “Next” to continue, as Fig. 2-4. Step 5: Click “Finish” to complete installation, as Fig. 2-6. 10 Fig. 2-1 Fig. 2-2 Fig. 2-3 Fig. 2-4 Fig. 2-6 Note: Generally, device driver should be included in the PC system when completing installation. If PC restarts and OS shows “Find new hardware and request “,〝Device driver″, the device driver should be found at the following path : 11 Model Location of Device driver CP-1400AS XP C:\XPDevice CP-1408ASE XP, CP-1416ASE XP C:\XPDevice CP-400DX Pro C:\DXDevice CP-404HS Plus, CP-1404HS XP C:\HSDevice 2-2. FreeView Pro Installation (Remote Client PC — TCP/IP viewer) Follow these steps to install FreeView Pro Software. Step 1: Click “FreeView Pro Software”, as Fig. 2-7. Step 2: Select language, which you would like to installation, as Fig. 2-8. Fig. 2-7 Fig. 2-8 Step 3: Click “Next” to continue installation, as Fig. 2-9. Step 4: Click “Browse” to change the destination or “Next” to continue, as Fig. 2-10. Fig. 2-9 Fig. 2-10 12 Step 5: Click “Finish” to complete installation. Note: To remotely view the local site via FreeView Pro, you must be connected to the Internet before running FreeView Pro. 2-3. AnyView Pro Installation (Remote Client PC --- Modem to modem) Follow these steps to install AnyView Pro Software. Step 1: Click “AnyView Pro Software”, as Fig. 2-11. Step 2: Follow Chap. 2-2 to complete installation. Fig. 2-11 13 2-4. Real time display kit driver Installation (Optional) If you would like to install Real time display kit (RD-1600VGA or RD-800VGA) on your PC to view real time video display. Follow these steps to install Real time display kit driver. Step 1: Click “Real time display kit driver”, as Fig. 2-12 and then it will show as Fig. 2-13. Fig. 2-12 Fig. 2-13 Step 2: Please install the “ DirectX 9 “ program first. The process as below: Select “ I agree the agreement “ item and then click “Next” to accept the agreement, as Fig. 2-14. Click “Next” to continue installation, as Fig. 2-15. Click “Finish” to complete installation. Fig. 2-14 Fig. 2-15 14 Step 3: Then install the “ VGA driver “. The process as below: Select “ VGA Win 98/ME driver “ or “ VGA Win 2000/XP driver “ item, as Fig. 2-13. It must be matched your O.S. of your PC. Click “Next” to continue installation, as Fig. 2-16. Click “Finish” to complete installation, as Fig. 2-17. Fig. 2-16 Fig. 2-17 Step 4: Install the “ Cap WDM “driver finally. The process as below: Select “ Cap WDM “ driver, as Fig. 2-13. It must be install the VGA card of RD-1600VGA or RD-800VGA Real-time display kit when you install Cap WDM driver. Click “Next” to continue installation, as Fig. 2-18. Click “Finish” to complete installation, as Fig. 2-19. Fig. 2-18 Fig. 2-19 15 3. Uninstalling Witness AS/ASE/DX/HS XP and Device Driver This chapter describes the removal of the software and device driver. 3-1. Uninstalling Witness AS/ASE/HS/DX XP You can uninstall Witness XP software by doing the following steps: Step 1: Click “Start”, “Programs”, “Witness AS/ASE/HS/DX XP”, and then select “Uninstall Witness AS/ASE/HS/DX XP”. Step 2: Click “Yes” to start uninstalling “Witness AS/ASE/HS/DX XP”. Step 3: Click “OK” to complete the removal of the software. 16 3-2. Checking for or Uninstalling the Device Driver You can uninstall or inspect your device driver by doing the following steps: Step 1. Click “Start”, “Settings” and “Control Panel”, as Fig. 3-1. Step 2. Double-click on the “System” icon, as Fig. 3-2. Fig. 3-1 Fig. 3-2 Step 3. Select the “Device Manager” tab. Step 4. As Fig.3-3, select “Sound, video and game controllers”, where you will find “Witness XP PCI 0 (PCI 1, PCI 2, PCI 3) Device Video Server Capture” and “WitnessXP PCI 0 (PCI 1, PCI 2, PCI 3) Device Audio Server Capture” (For CP-1400AS XP), and select “Sound, video and game controllers”, where you will find “CP-400DX Audio/Video Server Capture”(For CP-400DX Pro). Note: 1. If you have more than one Video Server Card, please choose the correct driver shown on Table 3-1 (For CP-1400AS XP), Table 3-2 (For CP-1408ASE XP), Table 3-3 (For CP-400DX Pro), Table 3-4 (For CP-1416ASE XP), Table 3-5 (For CP-1404HS XP). 2. When one CP-400DX Pro card is installed, 4 drivers will appear. Eight drivers will appear if two cards are installed, etc. for up to 4 CP-400DX Pro cards. 17 Driver Name Video Server Card WitnessXP PCI 0 Device Video Server Capture WitnessXP PCI 0 Device Audio Server Capture WitnessXP PCI 1 Device Video Server Capture WitnessXP PCI 1 Device Audio Server Capture WitnessXP PCI 2 Device Video Server Capture WitnessXP PCI 2 Device Audio Server Capture WitnessXP PCI 3 Device Video Server Capture WitnessXP PCI 3 Device Audio Server Capture (Table 3-1) Driver Name CP-1400AS XP 0 CP-1400AS XP 1 CP-1400AS XP 2 CP-1400AS XP 3 Video Server Card WitnessXP PCI0 Device Video Server Capture WitnessXP PCI0 Device Audio Server Capture WitnessXP PCI1 Device Video Server Capture WitnessXP PCI1 Device Audio Server Capture WitnessXP PCI2 Device Video Server Capture WitnessXP PCI2 Device Audio Server Capture WitnessXP PCI3 Device Video Server Capture WitnessXP PCI3 Device Audio Server Capture WitnessXP PCI4 Device Video Server Capture WitnessXP PCI4 Device Audio Server Capture WitnessXP PCI5 Device Video Server Capture WitnessXP PCI5 Device Audio Server Capture WitnessXP PCI6 Device Video Server Capture WitnessXP PCI6 Device Audio Server Capture WitnessXP PCI7 Device Video Server Capture WitnessXP PCI7 Device Audio Server Capture (Table 3-2) Driver Name CP-1408ASE XP 0 CP-1408ASE XP 1 Video Server Card CP-400DX Audio/Video Server Capture (Table 3-3) 18 CP-400DX Pro Driver Name Video Server Card WitnessXP PCI0 Device Video Server Capture WitnessXP PCI0 Device Audio Server Capture WitnessXP PCI1 Device Video Server Capture WitnessXP PCI1 Device Audio Server Capture WitnessXP PCI2 Device Video Server Capture WitnessXP PCI2 Device Audio Server Capture WitnessXP PCI3 Device Video Server Capture WitnessXP PCI3 Device Audio Server Capture WitnessXP PCI4 Device Video Server Capture WitnessXP PCI4 Device Audio Server Capture WitnessXP PCI5 Device Video Server Capture WitnessXP PCI5 Device Audio Server Capture WitnessXP PCI6 Device Video Server Capture WitnessXP PCI6 Device Audio Server Capture WitnessXP PCI7 Device Video Server Capture WitnessXP PCI7 Device Audio Server Capture (Table 3-4) Driver Name CP-1416ASE XP 0 CP-1416ASE XP 1 Video Server Card WitnessHS PCI 0 Device Video Server Capture WitnessHS PCI 0 Device Audio Server Capture WitnessHS PCI 1 Device Video Server Capture WitnessHS PCI 1 Device Audio Server Capture WitnessHS PCI 2 Device Video Server Capture WitnessHS PCI 2 Device Video Server Capture WitnessHS PCI 3 Device Audio Server Capture WitnessHS PCI 3 Device Video Server Capture WitnessHS PCI 4 Device Video Server Capture WitnessHS PCI 4 Device Audio Server Capture WitnessHS PCI 5 Device Video Server Capture WitnessHS PCI 5 Device Audio Server Capture WitnessHS PCI 6 Device Video Server Capture WitnessHS PCI 6 Device Video Server Capture WitnessHS PCI 7 Device Audio Server Capture WitnessHS PCI 7 Device Video Server Capture 19 CP-1404HS XP 0 or CP-404HS Plus 0 CP-1404HS XP 1 or CP-404HS Plus 1 WitnessHS PCI 8 Device Video Server Capture WitnessHS PCI 8 Device Audio Server Capture WitnessHS PCI 9 Device Video Server Capture WitnessHS PCI 9 Device Audio Server Capture WitnessHS PCI A Device Video Server Capture WitnessHS PCI A Device Video Server Capture WitnessHS PCI B Device Audio Server Capture WitnessHS PCI B Device Video Server Capture WitnessHS PCI C Device Video Server Capture WitnessHS PCI C Device Audio Server Capture WitnessHS PCI D Device Video Server Capture WitnessHS PCI D Device Audio Server Capture WitnessHS PCI E Device Video Server Capture WitnessHS PCI E Device Video Server Capture WitnessHS PCI F Device Audio Server Capture WitnessHS PCI F Device Video Server Capture (Table 3-5) CP-1404HS XP 2 or CP-404HS Plus 2 CP-1404HS XP 3 or CP-404HS Plus 3 Fig. 3-3 Step 5. Removal Only, highlight the device you wish to be removed, and then click “Remove” to remove the device driver. Step 6. Click “Ok” to complete the removal of the device driver. 20 4. Minimizing System Crash Caused by Windows Windows 98, ME, Windows 2000 and XP will occasionally crash or fail to run Witness XP. Please change the following settings on Windows. Neglecting to disable or enable the following settings is the cause of the most common problems. (A) Power Management You can change the settings of Power Management by doing the following steps: Step 1. Click “Start”, “Settings”, “Control Panel” and then select the “Power Management” icon. Step 2. Select the “Power Schemes” tab. Step 3. Change the Power Schemes to “Always on”; select “Never” to turn off hard disk and “Never” to turn off monitor. Step 4. Click “Ok” to complete the setup. (B) Setting Optimum Settings for Your Hard Drive You can set optimum hard drive settings by doing the following steps: Step 1. Click “Start”, “Settings”, “Control Panel” and then select “System” icon. Step 2. Select the “Performance” tab and click “File System”. Step 3. Change the typical role of this computer to “Network Server”. Step 4. Click “Ok” to complete the setup. (C) Run “System reboot schedule” on Witness XP program Sometimes the Remote Surveillance System will become unstable. This is caused by the operating system (Windows 98, ME, Windows 2000 and XP). Configuring your PC to auto-restart using Witness XP will minimize non-stability. To auto reboot your PC, consult Chapter 6-18. 21 5. Using Witness AS/ASE/HS/DX XP This chapter will introduce you general information about Witness XP. There are five software models for six different hardware models. It was described as below: Software Witness AS XP Witness 1408ASE XP Witness 1416ASE XP Witness HS XP Witness DX Pro Hardware CP-1400AS XP CP-1408ASE XP CP-1416ASE XP CP-1404HS XP / CP-404HS Plus CP-400DX Pro 5-1. General Information Once you have finished installing the program, a new folder and icons will be created. You can access them by clicking on the “Start” button and then choosing “Programs”. Move onto “Witness AS (ASE/DX/HS) XP” and click on one of the following to launch their respective applications: • Set up Video Parameters - EzSetup– Allows you set up system configuration for Witness XP. • Surveillance Server- Witness AS (ASE/DX/HS) XP – Allows you to record and view cameras. You can also stream the video to a remote user via PSTN, ISDN, LAN or Internet. • Uninstall Witness AS (ASE/DX/HS) XP – This will remove Witness XP from the computer. It will not remove the device driver. To uninstall the driver, consult Chapter 3-2. • System Reboot Schedule- EZReboot – Allows you to set your computer’s reboot schedule to lower system unstability. Please refer chapter 6-18. • IE browse server- EzWebServer – Allows you to view the Local DVR Server via IE browser. The detail setting please refer Chapter 8. • Remote Server- EzRServer – Allows remote client to control the Witness XP server via EzRClient program. The Remote client can set up the Witness XP PC from remote site such as operating at the local. The detail settings please consult Chapter 7-9. • LAN Playback- EzLANPlayback –Allows remote client to playback video clips of Witness XP server via LAN, such as playing back video clips at the Witness XP video server. The detail settings please consult Chapter 6-11. 22 • Playback video clips - EZPlayback –Allows you to playback video clips of Witness XP from any Windows base PC. EZPlayback behaves identically to those of Witness XP please refer Chap 6-10. • Back up system- EzBackup – Allows you to back up the video clips to another storage device. The detail setting please refer Chapter 6-20. • Translate video clip- EzMpegToVCD – Allows you to translate the video clips to VCD format and back up to VCD. The detail setting please refer Chapter 6-21. (For CP-400DX Pro only) • Adjust System Clock- EzcClock – It will synchronize the time clock of DVRs with Standard Time Server. Please refer chapter 6-22. 23 5-2. Witness AS/ASE/DX/HS XP System Setup If you want to change the default parameters before using Witness XP, please go to “Start”, “Programs”, “Witness AS (ASE/DX/HS) XP” then select “Setup video parameters”, finally follow the instructions below: Fig. 5-1 Fig. 5-2 Fig. 5-3 Fig. 5-4 24 5-2-1. Witness AS/ASE/HS XP System Setup Basically, system parameters of Witness AS/1408ASE/1416ASE/HS XP are the same with those of Witness HS XP. But Witness HS XP has one more setting, which could set display and recording rate. z VGA color enhancement : It will make the live video more clear and sharpness when you enable this function, but it will share the power of CPU. So the 2.8EG CPU is minimum request if you want to enable this function. The function will be available when you install the RD-1600VGA or RD-800VGA real-time display kit on your PC. z Set up system parameter for single device Use mouse to double-click on the device to modify its cameras, window will show as Fig. 5-5 to Fig. 5-7, represents for AS/1408ASE/1416ASE/HS respectively. Fig. 5-5 Fig. 5-6 Fig. 5-7 25 Close Device will turn off the selected device if camera connecting to the device is not in use. Close Camera will turn off the selected camera to lower down the system loading. Use this function when the camera is not in use. Default will change the parameters to their original settings. Video system will toggle between NTSC/PAL. Resolution You can select the resolution for preview and recording. There are four options – 640 x 480, 640 x 240, 352 x 240 and 320 x 240. Format will toggle between YUY2/RGB. The YUY2 will reduce the bandwidth of transmission data through the PCI Bus. Copy will copy the parameters from another camera to the current one. OK will accept settings. Cancel will discard changes. Note: 1. Please enable “Close camera” function, if the video port does not connect the camera. 2. As Fig. 5-7 shows, please set display and recording frame rate (default frame rate is 30fps) for each camera. For the bandwidth of PCI reason, please lower down display/recording rate when you are the user of 640*480S, 640*240 or 320 *240 resolution and plug multi CP-1404HS into one PC. Please refer the Tab 1-2 CP-1404/404HS Card No. 1 Card 2 Cards 3 Cards 4 Cards Resolution VS FPS 320 *240/ 30FPS 640 *480S/ 30FPS 320 *240/ 30FPS 640 *480S/ 30FPS 320 *240/ 30FPS 640 *480S/ 15FPS 320 *240/ 30FPS 640 *480S/ 7 FPS Tab 1-2 z Set up system parameters for all cameras Use mouse to double-click on the “Set up all“ button, as shown at the top right of Fig. 5-1 to Fig. 5-4. This setting takes effect on all cameras. z Set up panel postion Enables user to change the position of control panel Use mouse to double click on the “Set up surveillance software control panel “ icon as shown on Fig. 5-1 to 5-4. Select position of Main Panel/ Playback Panel that you want to change. 26 z Capture audio Enables cameras with microphones to record sound and use the audio monitor function. Setting up Audio Recording Use mouse to double click on the “Set up audio recording“ icon as shown on Fig. 5-1 to 5-4. Follow the instructions below to set up audio recording for single camera. Step 1. Please select your sound card from the “Audio device” of drop down menu as the window above. Step 2. Select the port you plugged the audio into at the drop down menu “Audio source”. (Usually Line in or Microphone) Step 3. Select the camera you want to record the audio from drop down menu “Recording Channel”. Step 4. Connect the audio cable to your sound card’s Microphone in or Line in of the PC. Step 5. Click “OK” to complete the setting. Note: 1. The output of microphone must be over 2 Vp-p. 2. Please do not use an AC97 sound card for audio recording. 27 5-2-2. Witness DX Pro System Setup To change the default parameters of Witness DX Pro, please go to “Start”, “Programs”, “Witness DX Pro” then select “Set up video parameters”. Follow the instructions below: z Set up showing Location and Watermark Click Set up Stamp as the above picture on the right side; please select Location or Watermark + Location. If select Location then only location will be displayed when you enable Stamp as shown on Fig. 6-2, otherwise both Location & Watermark will be shown. z Set up system parameters for single camera Use mouse to double-click the camera you wish to modify and you will see picture Fig. 5-9. Close Camera will shut off the camera. Use this function when the camera is not in use. Note : Please ensure the “Close camera” box is selected, if the video port does not have a camera connected. Default will reset parameters to their factory settings. Video system is for selecting your video system. You can choose between NTSC/PAL. WARNING: Each country’s Video System is different. North America generally has NTSC and European countries usually use PAL. Australia and New Zealand use PAL. Video screen will be in black/white or shaky if the video system is set incorrectly. 28 Resolution SIF (352 x 288-PAL; 352 x 240-NTSC) or QSIF (176 x 144-PAL;160 x 120-NTSC) Capture audio will enable cameras with microphones to record sound. For more details, please consult the chapter 6. VBV Size For MPEG1, this is set on MPEG1 standard size. Changing to larger number increases quality, but also size. VBV Init For MPEG1 Video Buffer initial setup. Also used for initial desktop image VBV-Delay setup. This is set on MPEG1 standard size. B Frames This is set on MPEG1 standard size. I Frames This is set on MPEG1 standard size. Bit Rate This is MPEG1 compression size. It can be between 192000 to 1152000 Bits/Sec. The higher the bit rate the larger the image size and quality. OK Click to accept settings. Copy Copy the parameter settings to this camera from a different one. Cancel Discard changes. Fig. 5-9 Setup single camera z Fig. 5-10 Setup All Set up All Camera and System Parameters Click on Setup all, as shown on Fig. 5-10. The operations are the same as explained above. 29 5-3. Witness AS/ASE/HS/DX XP Tool Bar The first time you use Witness XP, please click in the top right of your screen to login. The default settings are as follows: Login name: root Password: 123 Enter these, and then click “OK” to login. To logout, click the same icon and confirm. • Click to modify system time. • Click in the bottom left for Camera Configuration to set up recording, recording schedule, alarm alert, alarm volume, motion detection, etc. For details, please consult Chap. 6. 30 • Click to play back video clips. A new window will appear for you to select video clips based on date recorded. Click “OK” to confirm selection. The clip will play automatically with camera number, site location, recorded date, video file size, etc. For more details, please consult Chapter 6-10. • Click to set Network configuration. Enter ID Code Enter ID Code for your unique IP address. (This function is optional.) Auto connect to IP Identify Server This function automatically registers Witness XP from the current IP address using “Identify Server” provided by I-View Communication, Inc. To solve dynamic IP address problems, please consult Chapter 6-12. Select default LAN card Allows Witness XP server to be installed more than one LAN card to increase transmission speed via LAN or Internet. Enable this fuction, the transmission will execute the default setting of LAN card. TCP/IP port This port mapping function will enable the remote user to access the Witness XP from the remote site when the users that are protected by a Firewall. Note: Please contact the manufacturer of your Firewall and ask them how to create a PORT 31 MAPPING. This will create a hole in your firewall. Connection limit to set the connection time of a remote client. Set up user information Enter local site video server’s information. Once motion is detected, the information can be transferred to a remote client PC via modem or Internet. Remote Users Currently Connected Shows users currently connected via TCP/IP. z Click for System configuration, shown as Fig. 5-11. Fig. 5-11 Enable watch dog timer Enable this function will reboot system and be back to original setting if system shutdown caused by hardware or software problem. Auto run surveillance system Enable this function will start Witness XP when Windows starts up. Logout when window is minimized Enable this function will logout Witness XP when Windows is minimized. 32 Pop-up event notification Enable this function will pop-up the event table on the screen when the device is triggered. Fit video display to window will enlarge the space taken by the sixteen video display window. But it will take a lot power of CPU; so it is not necessary please do not use this function. Note: Please setup resolution at 800*600 for your PC monitor. It will let you get larger image and do not enable the “Fit video display to window “ function. Stop sound alarm when stop trigger Enable this function, the sound alarm will stop when trigger stops. Minimize window when start program To minimize the window when enable Witness XP program. Video file closed and renew when playback Enable this function, the video file will close and renew a new one automatically when you click “ Playback “ icon. You can playback the current video file without waiting till the file close. Enable this function, it will cause the length of video file not same as your setting on some video files. Exit option To select PC status after exiting Witness XP program. Press the arrow buttons to switch among “Exit program”, “ Turn off “, “ Log off “or “ Restart “. For example: Select “Turn off”, the Windows OS will automatically shutdown after exiting Witness XP program. Auto login Enable this function will automatically login by user name and password saved in the system when you reboot. z NC-320AM-I Module: This function will be available when you use the NC-320AM-I NetCom Controller Board. The detail setting as below: Com port selects which Com port of your PC will be used to communicate with the PTZ & I/O Controller Board (NC-320AM-I). This NC-320AM-I device can control extra 16 Sensors in, 3 Relay out, P/T/Z cameras (must come with NC-080AZ) and Speed Dome cameras at the same time. (Optional) Note: The real connecting port of your PC must be same as your settings in the system. 33 Baud rate This function is optional. You need to select a correct Baud rate if your system connects a NetCom Controller Board. For detail please refer NetCom user manual. (Default setting is 9600 bps) Checksum This function is optional. Some of Speed dome camera needs to enable “ Checksum “ code. For detail please refer NetCom user manual. Note: If you use the I-View’s Speed dome camera series, the setting of NC-320AM-I must be Baud Rate: 9600 bps, Enable “ Checksum “ and select “ Peclo P “ protocol from “ Camera configuration “. Select Modem For AnyView Pro user or using Phone/Pager notify function should select which modem will be used and enable “Monitor” below to communicate with Local DVR Server. If user’s modem and fax share one telephone line, user must disable ”monitor” when no more connection required otherwise modem will occupy phone line always. Note: 1. You can select “None” to leave modem open for other communication software or voice calls. 2. You must select which modem will be used and enable “Monitor” for AnyView Pro user and Phone/Pager notify functions. 3. Sometime the modem cannot connect to Local DVR Server when you use the AnyView Pro. You can setup the parameter of Windows 2000 and XP following as below: "Start" > "Setting" > "Control panel" > " Component Services " >"Services (Local)" > "Remote Procedure Call (RPC) Locator" > Enable "Start" > "OK". Screen rotation time regulates the time period of camera rotation by clicking on the main screen. Click on the icon again to disable the rotation function. (Default setting is 5 seconds) Assign camera rotation To rotate the sequence of the assigned cameras, which you want to show on the screen. Follow the instructions below to set up: Step 1. Select the rotation way from the “Splitter” of drop down menu as the window above. 34 Step 2. Choose the camera that will be first image on split screen at the drop down menu “Camera”. Step 3. Enter number into “Stay time” tag. Step 4. Click “Add” icon to save the rotation image. Step 5. Repeat Step 1 to Step 4 for adding other rotation videos. Step 6. Click “OK” to complete the setting. Note: If you add the Real-time display kit (RD-1600VGA/ RD-800VGA) on your PC for real-time viewing. The rotation camera for real-time just supports 1, 4, 8, 9 and 16 splitter screen only and you can not assign which camera be first image on split screen. Enable restart system restarts your computer at a set time. Using this function stabilizes the program after a long period of usage. (If you need more flexible please refer Chap. 6-18 “Restart schedule”) z Click to set up login names and passwords. The administrator will be able to create user account to allow specified user to login/quit system, create remote users account, play back clips etc. To set up passwords, please consult Chapter 6-9. z Click to view user log-in/logout record and alert table. (See picture as below). 35 z Click to set up I/O Configuration. Users will be able to Set up relay, Control NC-320AM-I relay, Set up NC-320AM-I sensor, Set up emergency call, etc. To set up emergency call, please consult Chapter 6-8. The other parameters setting, please consult NetCom module operation manual. (Optional) z Click to stop the alarm when it sounds. z Click to set recorder parameters. (See Fig. 5-13) Fig. 5-13 Fig. 5-14 Set up storage device selects your video storage location (C:\, D:\, …). Since C:\ usually stores O.S., it is best to store the video files on an alternative hard drive if one is available.(see Fig. 5-14) Add/remove storage device This button must be clicked after a drive is removed or added to your system. Otherwise, the program may not find playback video files. Clicking this will close your application. Please remember to restart it. Also, please perform this function if you find playback function work abnormal. Running this function could repair video clip. Set up video compression You can choose three different compression methods (MPEG 4, Motion JPEG or Wavelet) and adjust the compression quality. Different qualities are possible depending on which method you choose. Note: The better the quality the larger the file size. As for the frame size of each compression method please refer to the Table 1-1. 36 Note: 1. You should restart Witness XP before new settings will take effect. 2. Witness DX Pro (CP-400DX Pro) is a real time video/audio system, the task for compression could possible be taken by either hardware or software. If recording frame rate is set to “real time” (25/30fps) means hardware takes charge compression otherwise software takes. The “Image compression quality” setting could take effect only software compression works. Record to hard disk & Frequency of save to disk When you enable “Record to hard disk”, your video clips will be saved to hard disk every few minutes automatically. For example, if Frequency is “5 minutes”, video clips will be saved every 5 minutes. You can choose from anywhere between 5 and 30 minutes. Using this option can minimize video clip loss under abnormal conditions, such as a power outage. If you enable this, it is recommended that you add a fan for the hard disk because of the additional heat that will be generated. If you disable this function, video clips will be saved in memory and saved to disk based on your settings in Camera configuration Æ Recording Æ File (see Chapter 6-2). However, if the system shuts down abnormally, all clips not saved to disk will be lost. Start to erase when free space less than Will start to free space on your hard disk when only a certain amount of space is left on your hard disk. Older files are erased first. Space to erase each time This specifies the amount of disk space to free when the above limit is reached. Older files are erased first. As an example, if 800MB is entered, 800MB will be erased when the limit is reached. z Click for Witness XP copyright and version information. 37 z Click to minimize Witness XP. z Click to close Witness XP. z Click to login/logout of Witness XP software. The first time you login, the default settings are as follows: Login name: root Password: 123 Click “OK” to login. To log out, click the same icon. You will be asked to confirm your desire to logout. • Click to modify system time. • Click to view just one camera’s image. Double-clicking a screen when viewing multiple windows can also do this. Double-click again to go back to multiple modes. • Click to divide the window into 4 split screens. • Click to divide the window into 9 split screens. • Click to divide the window into 6, 8 or 12 split screens. • Click to divide the window into 16 split screens. • Click to rotate cameras views onscreen automatically. Click again and the rotation will stop (This function does not support for 16 split screen). • Click or to rotate camera views onscreen manually (This function does not support for 16 split screen). • Click … to start or stop recording. Red means recording, blue means waiting and view mode is black. You can instantly start recording on a camera by toggling this button to red. • Click to rotate videos or pop-up the video (Belonging to the same TV group) on TV. It is for the TV out of CP-1404HS-T, CP-1400AS-T, CP-1408ASE-T and CP-1416ASE-T only. (Optional) • Click to show the information and map of DVR. If you use the dual monitor to display, the map will be shown on another monitor automatically. • Click to set up I/O sensor of NC-080AZ Receiver module. • Click at the bottom of the toolbar to toggle between non real-time viewing (Recording mode) and real-time viewing (Live view mode) of video displays. If system is toggled to be 38 non-real time viewing the Video Tools shown, the functions as Fig 5-16 will work. (This function will be enabled when system install the RD-1600VGA and RD-800VGA only.) • Focus/Zoom/IRIS: click on or of Fig. 5-15 to adjust the parameters of PTZ camera. Fig. 5-15 Fig. 5-16 • Video Tools: Right click your mouse on the video screen that you could modify the parameters of image. Please see Fig. 5-16. Hide video makes the given camera’s images on your monitor disappear; however all of its other functions keep working. For example, if you select this, the chosen camera’s window section in Witness XP will turn blank, but the camera itself can still continue to record. Clear will clear the red border. Upon detection, the image from the camera that detected it will pop up. Upon multiple detections, the newest detection will pop up. However, you will not lose track of which cameras detected movement, because once you minimize the popped up window, you will see that every camera that detected movement will have a red border. Once you finish viewing, you can clear the red border by right clicking on the appropriate camera and hitting the “Clear”. Adjust Image Colors Right click on the video screen, and you will be able to adjust brightness, contrast, saturation, hue and zoom. : This function is designed to zoom in (amplify) the video display image. After you have screen zoomed in, you can navigate the viewing area by holding down the left mouse key on the screen. 39 : This function is designed to zoom out (shrink) the display image. The video image zooms out at each click of the icon. : This function is designed to return the image to its original and default magnification. Default: Pressing this will change the parameters to their default settings. Exit: Exits the Video Tools setting window. : Takes a picture of the current screen and saves the image in .bmp format. Click icons on the bottom of picture taken by snapshot, will find more functions. : Allow user to adjust the contrast of the picture taken by snapshot. : Allow user to change the picture taken by snapshot to be gray. : Allow user to change the picture taken by snapshot to be its original color. : Allow user to save the picture taken by snapshot in Bmp or JPEG format. : Allow user to print out the picture taken by snapshot. • Hide tool bar: Pressing “ESC” key on keyboard will hide the tool bar of main screen until “ESC” is pressed again. 40 z Note: This is optional. You can read more about this in the Netcom operation manual. Also, on the right side of toolbar, there is a bluish circle as Fig. 5-17, click and you can select a camera to modify its P, S and A settings. If you are using a P-T-Z camera, you can only modify A. Adjust the settings within A to set up your auto scan preferences. (Refer Fig.5-18). Fig. 5-17 Fig. 5-18 If you happen to be using a Speed Dome camera, you can also adjust P (Preset positions) and S (Speed of Motor). Note that pressing “A” when modifying a Speed Dome camera will give different options more than if you were using a P/T/Z. Click on “P” to set preset positions (Refer Fig.5-19). Adjust the camera to where you want it to view, and then press “Set”. You can add as many as there is room. If you want to test settings by moving the camera to the preset position, just press “Goto” and it will move to the position you set it to. Pressing “S” on the menu bar will allow you to set the speed for this camera’s pan, tilt, and zoom. Just slide the bar to your desired speed (Refer Fig.5-20). The above functions are for Speed Dome camera only. Fig. 5-19 Fig. 5-20 41 6. Camera Configuration If you click on , you will be able to set up camera parameters such as recording mode, recording schedule, enable alarm, alarm sound, motion detection, etc. 6-1. General Setup Click on the “General” tab, and you should see the following image. Follow the instructions below to set your desired parameter settings. (Witness AS/ASE/RD/HS/U please refer Fig. 6-1, Witness DX please refer Fig. 6-2) Fig. 6-1 Fig. 6-2 (for Witness DX Pro only) z Set Camera location First choose a camera in the pull-down menu. Enter the location of the camera in the “Location” box. For DX Pro user, you could specify the position of camera location by selecting X-Pos and Y-Pos. z Font Click the “ ” icon, you could specify the font size and type of camera location. z Display Location/Date/Time/Watermark Enable/disable name, date, time and watermark to displays on the local monitor, video clips 42 and/or remote PC. You can change the display position and color of location/date/time by working on the column of Color & Position. Clicking “Image” icon will allow user to impose a self-defined image on the videos. Default image is . The watermark must be less 64*64 pixels and Bmp file. Note: (for Witness DX Pro user only) 1.If user enable MPEG1 stream, as shown on Fig.6-4, it means you want to execute hardware compression then only date, time and watermark could not be shown on remote PC. Neither Local DVR Server nor remote PC can show date, time and watermark on monitor. 2.If user disables MPEG1 stream (software compression), date/time/watermark could be sent to remote PC and saved on video clip (But you need to enable Remote and Video clip). z NetCom module This will allow you to control Speed Dome cameras, P/T/Z cameras and digital I/O device. If Speed Dome or PTZ camera or digital I/O device is applied, please enable this item. However, their ID should set correctly. Otherwise, you cannot use Speed Dome or PTZ camera function. For details, please consult the “The NetCom System Operation Manual”. (Optional) z Audio (Output to speaker) When this option is checked, the sound of the camera’s surrounding will be played on your local speakers. This function is designed for monitoring sound in your camera’s area. For Witness DX Pro user, please refer Chapter 5-2-2. Note: If this option is not selected but you have a microphone on the camera it can still record sound, just not play it to speakers right away. z Copy Use this function to copy the parameters of another camera to this one or all. z Exit Exit “Camera Configuration”. Note: 1. The output of microphone must be over 2 Vp-p. 2. Please do not use an AC97 sound card for audio recording. To obtain a higher quality for recording audio, please adjust recording sampling rate to optimal. 3.If user enables Output to Speaker on multiple cameras at the same time, audio output will make noise. (only for Witness DX Pro users). 43 6-2. Video and Audio Recording Installation Click on the “Recording” tab, and you should see the following window. Follow the instructions below to complete setup. Fig. 6-3 Fig. 6-4 (for Witness DX Pro only) z Video and Audio Settings Select “Enable recording schedule” to set up a schedule. If you select “Enable audio recording” audio will be recorded when the video starts recording. Click to set recording schedule. For details, please consult Chap. 6-7. z After finishing with “Set up schedule”, recorded video filenames will be saved under the starting time. The time length in the “File saving” box decides how long each video file will be. For example, with the settings in the window above, 4 hours of recording will generate 16 video files. z Recording rate: If you would not like to use Preview speed for recording, you also can select a recording rate for each camera. If the preview speed is lower than the recording rate the system will record at the preview speed. If user disables MPEG1 stream, it means software compression will be used. 44 6-3. Motion setting Click on the “Motion setting” tab, and you will see the following. There are two modes for “Motion detection”; one is by software, the other is by hardware. Software detection will save the cost of buying additional hardware (such as sensors) but you are likely to have more false alarms. Hardware detection tends to be more stable but requires extra hardware. Before setting up detection, make sure that “Camera configuration” Æ “Recording” Æ “Set up Schedule” has “Motion detection recording” selected, and also the correct schedule selected, otherwise motion may not be detected. Also, make sure that “Camera configuration” Æ “Recording” has “Enable Recording Schedule” enabled. You can confirm that you’ve properly set up the camera by inspecting the camera button number on the right toolbar – it should now be greenish (waiting). It will turn red (recording) when motion is detected. Software detection Selecting software detection will save you the cost of installing extra devices, but will cause false alarms more easily. 45 z Sensitivity of motion detection – You can adjust the sensitivity of the motion detection. Slide the bar to the right to increase sensitivity or left to decrease sensitivity. Note: The value for sensitivity should be based on unavoidable movement in the area of the camera. For example, if you have a fan blowing, a banner may be moving slightly. Adjusting the sensitivity properly will filter out this movement. z Set up area –Use this button to set area to protect with motion detection. Please consult Chapter 6-15. Hardware detection You can also select hardware detection. After enabling “Hardware detection”, select the specific sensor to use from available port. You need to connect the sensor device to the port of “Sensor in” of “NC-320AM-1”. When the sensor is triggered, it will start to record and trigger the port of relay output. z Tolerance – This function is used to help prevent false alarms by defining acceptable movement. If tolerance is set on 2, video screen must change continuously 3 times before recording begins. z Post recording – This function sets the time to continue recording after motion is no longer detected, the video will be saved into a file. If the time between one motion detection period and a new motion detection period is less than the value in this field, the two recordings will be combined. It will reduce the motion detection video file and notification. Pre-alarm If user runs recording by motion detection and enable “Pre-alarm”, could record videos of last 5 second before event trigger. Please note that CP-400DX Pro does not support this function. WARNING: We do not recommend use of software motion detection if your camera is placed or faces outdoors. 46 6-4. Notification Click on the “Notification” tab, and you will see the below image on right side. If you have enabled motion detection and you would like to have an alarm sounded and notification sent to somebody, please follow the instructions below. However, you will not lose track of which cameras detected movement, because once you minimize the popped up window, you will see that every camera that detected movement will have a red border. z Pop up video window –Upon motion detection, the image from the camera that detected it will pop up. The pop up window will have a red border to remind user alarm. Upon multiple detections, the newest detection will pop up. z Enable sound alarm – You can set each camera to have its own unique alarm sound. For this sound, you can select from our provided sounds or record your own. Use the functions below to customize your settings. 1. Play: Listen to the selected alarm sound. 47 2. Stop: Stop the sound. 3. Source: Click on “Browse’ to search for sounds. 4. Save: Accept the setting and exit “Select sound alarm”. 5. Cancel: Discard changes and exit. 6. Record: Click on this icon to open Windows Sound Recorder. See details on how to use Windows Sound Recorder in Chapter 6-17. • Enable notification – Each camera can have its own unique notification, and you can set up different ways to notify someone. • Set up notification – Use this function to set to notify with Phone call, Pager call or connect to remote PC. Please refer to section “6-14. Setting up Notification”. • Trigger speed dome – Enabling this option will allow you to configure Speed Dome settings upon notification. Speed Dome cameras will move to preset positions when on the alert. • Select positions – Configure Speed Dome setting. Click this button and you will see the following window. At the top of the window you can select a specific camera, then where you wish it to move to 48 when triggered. Click the “Add” to the right to save your settings. Similarly in the lower part of the window, you can select where you want the camera to go after triggering has stopped. Once again, click “Add” to save your settings. If you want to remove a setting, simply highlight the camera and press the corresponding “Delete” button. • Enable TV out – Enable this function will allow you output video signal to TV. User can configure which video signal output to TV by customizes his setting. • Select TV out – User could configure the camera correspondence for TV out function when alarm is triggered. For detail please refer Chapter 6-19. • Trigger relays – You can select the specific trigger relays to use and select from Relay 01 to Relay 03. You also can trigger the relays of each NC-080AZ module. The relay will be triggered when motion is detected. See details on how to set up the relay output in “The NetCom system operation menu”. 49 6-5. Video Loss Click on the “Video Loss” tab, and you will see the window below. If you have video loss you would like to have an alarm sounded and notification sent to somebody, please follow the instructions below. • Enable sound alarm –If you wish your system to give you an audio warning. Please refer select sound alarm in Chapter 6-4. • Enable notification -- Each camera can have its own unique notification, and you can set up different ways to notify someone. To Set up notification please refer Chapter 6-14. • Trigger speed dome – Enabling this option will allow you to configure Speed Dome settings upon notification. Much like in “Notification”, you can have dome cameras move to preset positions when on the alert. • Select position – Please refer Select position in Chapter 6-16. • Trigger relays – like “Notification”, you can set trigger relays at the bottom of the window. Please refer Chapter 6-4. 50 6-6. POS text (Optional) The POS feature in Witness XP system allows you to view superimposed transaction text data of POS on its corresponding camera screen, and this text data will be also overlaid on the recorded video files. You can enable/disable POS text data to displays on the local monitor, video clips and/or remote PC. Features z TCP/IP connectivity with POS terminals. z Provide a POS.DLL file for POS software programmer to integrate easily. z Simultaneous video monitoring of up to 16 POS terminals. z Quick searches by any transaction data (ex: Sales data, Casher register, Employee’s number, Credit card number etc.). z Onscreen display of transaction data in real time. The boss will track the operation easily. z Trigger Start/Stop recording by cashier register terminal. z Watching live cash register data (locally or remotely) while simultaneously recording. z Provide 8 rows, 50 characters per row for keying transaction data. z Change the position of POS text and color. If you need more detail information please contact your local distributor. 51 6-7. Video/Audio Recording Schedule Recording parameters can be set based on your needs. First, select between “Sequence recording” and “Motion detection recording” and then select either “Everyday”, “Every week”, or “Special period” for camera recording. If you select “Motion detection recording”, you need to specify “Software detection” or “Hardware detection” as the trigger. Please also refer to the section 6-4 Notification. Please follow the instructions below to customize your settings: Everyday: 1. Select “Sequence recording” or “Motion detection recording” mode. 2. Select “Everyday”, and then select a “Start time” and an “End Time”. 3. Click “Add” to finish. Every week: 1. Select “Sequence recording” or “Motion detection recording” mode. 2. Select “Every week”, and then select a “Start time” and an “End Time”. 3. Click “Add” to finish. Special Period: 1. Select “Sequence recording” or “Motion detection recording” mode. 52 2. Select “Special Period”, and then select a “Start time” and an “End Time”. 3. Select a “Start date” and an “End date”. 4. Click “Add” to finish. Note: If the time set runs over two days, set them separately. For example if your recording time is from 5:00pm to 7:30am of next day, you should set it as two segments: 7:00 to 23:59 and 00:00 to 7:30. When you set schedules of sequential recording and motion detection recording, please do not schedule overlapping periods. Overlapped periods will be executed improperly. Ex. Sequential recording is scheduled between 3:00 and 5:00 and motion detection recording is from 4:00 to 7:00. Because of overlap, Witness XP will only execute sequential recording from 4:00 to 5:00 and motion detention from 5:01 to 7:00. 53 6-8. Setting up Emergency Call Click on to set up “Emergency call”, and you should see the following window, as Fig. 6-5. Upon pressing a panic button (hardware add-on), you can have the emergency call feature sound an alarm, notify someone, start recording or show live video feeds on linked TV sets. (For CP-1400AS-T XP, CP-400DX-T Pro and CP-1408ASE-T XP and CP-1416ASE-T XP) Please follow the instructions below:" “Emergency call” is pressed; if you would have an alarm sounded, notification sent to somebody, start to recording or show video on TV please follow the instructions below. Fig. 6-5 Fig. 6-5a Fig. 6-6 Fig. 6-6a 54 Note: For information on “Control NC-320 AM-I Module relay” and “Set up NC-320 AM-I Module sensor” please see the Netcom manual (Optional). z Set up emergency call Click on the “Setup emergency call” button, and the window Fig. 6-6 (as Fig 6-6a for CP-400U Pro) will pop up. Follow the instructions below to complete setup. Step 1. Select “Enable recording” and/or “Enable sound alarm” and/or “Enable notification” and/or “Trigger speed dome” and “Enable TV out” configure their corresponding options to the right. Select camera: select camera you want to record when emergency call is pressed. Select sound alarm: You can set each camera to have its own unique alarm sound. For detail please refer Chapter 6-4. Set up notification: See details on how to set up Notification in Chapter 6-13 & Chapter 6-14. Select position: See details on how to set up position in Chapter 6-16. Select TV out: See details on Video Matrix in Chapter 6-19. Step 2. Select the specific trigger relays to use from Relay 01 to Relay 03(NC-320AM-I); Relay 01 to Relay 04 (CP-400U Pro Build in). You also can trigger the relays of each NC-080AZ module. The relay(s) will be triggered upon emergency call. Step 3. Enter ”Post recording” time to continue recording after “emergency call” is triggered. Step 4. Click “OK” to finish. You will be able to Set up relay, Control NC-320AM-I Module relay, Set up NC-320AM-I Sensor, Panic button after installing the NetCom system (Optional). Please refer NetCom operation manual. Step 5. If you use the CP-400U Pro (Witness u Pro), you will be able to Set up relay, Control relay, Set up Sensor after installing the CP-400U Pro on your PC. The CP-400U Pro has an optional function for 4 senor input and 4 replay output. Please refer CP-400U Pro hardware install operation manual for detail setting. 55 6-9. Set Up Privileges Click to Enter “Set up privileges” to create and modify usernames and passwords. Users will have access to different only certain levels. z Supervisor name and password The default supervisor name and password is listed below: Username: root Password: 123 Enter this to login. Please follow the steps below to modify the supervisor’s name and password: Step 1. Enter new supervisor name and your chosen password. Step 2. Press “Select all” (only for supervisor) and also click “>>” to authorize all cameras. 56 Step 3. After completing the steps above, click “Add” to finish setup. Click “Exit” to leave “Set up privileges” Note: Please remember removing the default supervisor “root”, otherwise there will be two supervisors. z Set privilege for additional users Step 1. Enter username. Step 2. Enter user password, Enter password again for confirmation. Step 3. Select privileges. Step 4. Select cameras and authorize use by clicking on “Authorize”. Step 5. After completing the above steps, click “Add” to finish user setup. Step 6. To add more users, repeat steps 1-5. Note: 1. If the supervisor’s password or username is lost, Witness XP must be reinstalled. All previous settings will be lost. However, saved videos will not be erased. 2. Passwords must consist of 0-9 and a-z or A-Z. 3. The password is case sensitive. (PaSsWoRd is not the same as password) z Remove/modify user privileges. Step 1. Select the user in the username list. Step 2. Click “Delete” to remove user or double-click on the username to modify user privileges. 57 6-10. Playing Back Video Files This chapter will show how to play back one or more video files from your saved database. Clicking on the tool bar, will allow you to search your video clips. z Follow the steps below to play back videos: Step 1. Click in the middle of right side to search for videos in database. And you will see below window. Step 2. Select the camera. To play multiple videos, select “00 Camera 00”. Step 3. Decide which recording way will be searched by “Options”. Step 4. Select time and date of the recording period. Click search to find the clips among the selected time. z Follow the steps below to remove a video from your archive: Step 1. Click on right screen to search for videos. Step 2. Decide which recording way for deletion by “Options”. Step 3. Select the videos that need to be removed. Step 4. Select camera and time of the archived video. Step 5. Click “Delete”. z Play back Archived Videos At the playback screen, you can play back videos. Camera number, camera location, time recorded, storage space, etc. will be displayed on the screen. Double click on any video screen to enlarge a single video. Move the mouse to any video screen to show video tool bar 58 and information of single video (see below picture). Double click again to restore the previous viewing screen. z Video tool bar on playback screen Play – Click this icon to play back videos. Pause – Click this icon once to pause videos. Stop – Click this icon to stop videos. Previous frame – Jump to previous frame. Next frame – Jump to next frame. First frame – Jump to the first frame of video clip. Last frame – Jump to the last frame of video clip. Repeat playback –Click this icon once have the videos play back on repeat. Click once more to cancel repeat. Zoom in – Click this icon to zoom in. Zoom out – Click this icon to zoom out. 59 Original – Click this icon to go back original video size. Video copy – This button will copy current video clip to a specific location for archiving. User could enable/disable “Copy audio data”. Delete video – Erase video play back file. Navigation bar – This displays the current position of the video clip and allows users to move to different points within the clip. Left moves backward, right moves forward. Snapshot – Click this icon to capture the video screen as a BMP or JPEG file. Repeat – Click this icon once have the videos of all camera play back on repeat. Click once more to cancel repeat. Resize – Click this icon to resize clip. Next video – Jumps to the next video. Previous video – Jumps to the previous video. Decrease frame rate – Decreases the frame rate. Normal frame rate – Adjusts frame rate back to normal. Increase frame rate – Increases the frame rate. Screen size can be adjusted by selecting different multiple displays. Click screen; click to view videos in 352 x 288; click to view full to view videos in 176 x 144; click to view videos in 160 x 120. Quick search video: Click to list the information of all video clips (see below picture), and you can quickly search and assign a video clip to playback. 60 Note: 1. If you playback on Local Server, as shown on Fig.A-1, please click then you could select if showing date/time/location or not (refer Fig A-2). (For CP-400DX PRO only) 2. Except Witness XP, date/time/watermark won’t be shown when user playback MPEG1 compressed video clip by playback tool, for example Media Player. (For CP-400DX PRO only) Fig A-1 Fig A-2 61 6-11. Playing back across Local Area Network (LAN) This chapter will show you how to use EZLANPlayback program to play back video files across the network (LAN). It provides a fast access to file location and allows playing back the video clips of Witness XP DVR in any PC. Before you start, make sure both your system folder (ClipPro folder, for example) and to-be-view video files are made available to network users, done through proper setups in Windows Sharing and Security. After the folder and files made available, follow these steps to playback video clips of Witness XP DVR via LAN user. Step 1. By clicking on the “Start” button and then choosing “Programs”. Move onto “Witness AS (ASE/RD/DX/HS/U) Pro” and click on LAN Playback- EzLANPlayback program. You will see the picture as below. Step 2. Click icon and below picture will be shown. Click the or to select the folder and click “ Add “ button to setup the path of playback. Repeat and add one more path. Click icon and you can setup the Witness DVR’s HDD become a part of HDD of remote client PC automatically when you turn on the PC. It does not need to setup the link path again when you would like to have the LAN playback. 62 Step 3. Click on “Re-search video clips “ button to complete the setting. Step 4. After above setting, you can playback the video clips of Witness XP server via LAN. The detail process of playback video clips, please refer Chapter 6-10 Note: Enable “ Use default “ icon that you can playback video file without open Witness XP program, but you can not use the LAN playback function. 63 6-12. Using Dynamic IP Addresses for Internet Access The main function of “ID code” is to solve possible problems with connections having dynamic IP addresses. Witness XP has a built-in IP address register function. If you enter the ID code into Witness XP and enable the “ID Identify Server” function, then when you start Witness XP, its built-in IP Identify capability allows others to connect directly to your Witness Video Server from their FreeView Pro software via the Internet. In cases where you do not have a fixed IP address assigned to your computer, the ID Code may use the local site to redirect browsers to your computer by announcing its current IP address to the IP Identify Server. • Set ID code login by doing the following: Step 1: Click in the Tool bar for network configuration. Step 2: Enter an “ID code”. Step 3: Enable “Auto connect to IP identify server”. 64 Step 4: Press “OK” to register your number to an IP identify server. z Enable “Connection limit to”: local server could set the duration time which allows remote users connect to local server. • Remote users currently connected Look up information of remote site currently connected. Note: (For users that are protected by a Firewall) If you are encountering either the error message “Cannot locate IP address” or the error message “Cannot identify server”, please contact the manufacturer of your Firewall and ask them how to create a PORT MAPPING. This will create a hole in your firewall. This Port Mapping will enable the remote user to access the Witness XP from the remote site. z Set up E-Map Enter the information of local site video server and insert a map to arrange the location of device. Once these devices are triggered, the information can be transferred to a remote site PC via modem or Internet. The triggered devices will be flashed on the map at the same time. Follow the instructions below to complete setup. Step 1. Click ” Set up E-Map “ icon and below picture will be shown. Step 2. Enter the DVR name into “ Site name “. Step 3. Select the map of DVR from “ Map source “ and then click “Update” icon. Step 4. Enter “ Contact “, “ Phone “, “ Address “ and “ Note “. Step 5. Select the available devices for decorating on the DVR map from “Select device“. 65 Step 6. Move to the device and then click and drag down to the suitable location with the left mouse key. Repeat this process for another device. Step 7. Click “ Save “ button to complete the setting. What is the IP Identify Service? When the “Auto connect to IP Identify Server” option is enabled, the Witness XP sends a message to the central IP Identify Server each time the program is started. This machine then knows what IP address your computer has for the current session. When other users try to access your computer, they are routed through the IP Identify Server to your computer. Do I need to use the IP Identify Service? No. Ask your ISP about setting up a fixed IP number for your local account. Once you have a fixed IP number, disable the “Auto connect to IP identify server” option. Can I allow only certain people to view my Witness Video Server images? Yes, you can activate Username, Password and IP address (ID code) protection so that only users who know the defined Username, Password and IP address (ID code) can access the Witness Video Server. 66 6-13. How to set notification and trigger devices when alarm Click and select the “Recording” tab and you will see the following window Fig. 6-7. Follow the instructions below: Fig. 6-7 Fig. 6-8 Step 1. Select the appropriate camera. Step 2. Select “Enable recording schedule”. Select “Enable audio recording” if you also wish to record audio. Step 3. Click the icon to set up the recording schedule. See details at Chapter 6-7. Step 4. Select the method of motion detection (“Software detection” or “Hardware detection”) for recording, notification and trigger devices. Step 5. Select the “Notification” tab. The window Fig. 6-8 will appear. See details on how to set up Notification in Chapter 6-13 & Chapter 6-14. Step 6. Repeat Steps 1–5 for other cameras if desired. Note: When you set schedules of sequential recording and motion detection recording, please do not schedule overlapping periods. Overlapped periods will be executed improperly. Ex. Sequential recording is scheduled between 3:00 and 5:00 and motion detection recording is from 4:00 to 7:00. Because of overlap, Witness XP will only execute sequential recording from 4:00 to 5:00 and motion detention from 5:01 to 7:00. 67 6-14. Setting Up Notification Click and select the “Notification” tab (Shown as Fig. 6-8) and then click following functions: to access the • Auto-Launch to remote PC Once motion is detected; the live video can be transferred to a remote site via modem or Internet. Link time: This is the time period that the computer will remain connected with the remote site. To set the Auto-launch function, use the following steps: 1. Enter the phone number or IP address or DNS into the Number/IP box. 2. Specify a Link time in the number box. 3. Enter the TCP/IP port number; the number of “Port” must be matched between FreeView Pro and Witness XP software. FreeView Pro default is 1501. 4. Select transmission camera(s) when it is triggered. Click the Add button. Your information will be saved and shown in the number dialog box. 6. Repeat step 1 to step 5 to add another PC for auto-launch. 68 Note: If you use the Internet to notify the remote site, the remote client PC need to have a fixed IP and connect to the Internet 24 hours a day. FreeView Pro should also be running at the remote site. • Enable phone notification When motion detection is activated, the system will automatically notify the listed phone numbers. Select sound alarm: Selects which warning sound file will be played for notification by phone. 1. Enter the phone number into the Number/IP box. 2. Specify a Sound alarm for phone notify. 3. Click the Add button. Your information will be saved and shown in the number dialog box. 4. Repeat step 1 to step 3 to add one more Phone call. Note: 1. You must enable the modem function to use “Phone call” notification. 2. If you wish to make a Wave file for use with the “Phone notify” function, the file format must be 8000Hz, 16-bit, Mono. You can also select a wave file for “Phone notify” from C:\Program Files\Witness AS/ASE/HS/DX XP, but here you can select “Warn.wav” file only. 3. Each phone notification could be set its unique warning audio; phone connection will be disconnected 1 minute later. 4. If there are extension numbers in the telephone system, use one or several commas (,) to separate the phone number and the extension number. The number of commas required depends on the system, so test it in advance. • Email notify When motion detection is activated, the system will automatically notify the listed email address. To set the email notify function, use the following steps: 1. Enter the email address into the Mail to box which one you want to send the notify message. 2. Enter the mail server address into the SMTP box which mail server you want to use for sending the email. 3. Enter the email address of DVR into the Mail from box. 4. Enter the text into the Subject and Message box which information that you want to send to the other people. 5. Enable Attachment image file function, that the email will attach the image of trigger. 6. Repeat step 1 to step 5 to add another email notification. 69 6-15. Setting Up a Software Motion Detection Area Click , select “Motion setting” tab, as shown on Fig. 6-9. Just enable “software detection” if to setup area for set up motion detection area. you want to detect whole area, otherwise clicks Fig. 6-9 Fig. 6-10 Step 1. On the screen (Shown as Fig. 6-10), click and drag down to the right with the left mouse key to form a highlighted box. Step 2. Click the “Add area” button to add highlighted area. The area will change to a yellow mesh to mark a protected detection area. Step 3. If more than one area is desired, repeat Step 1 and Step 2. Step 4. Click the “OK” button to close the window and save your settings. Note: if no area is selected for detection then full area will be the default. Removal of a detection area Step 1. Select the detection area you wish to remove and then click right button of mouse. Step 2. Click “Delete area” icon and the yellow mesh will disappear. Step 3. Click “OK”. 70 6-16. How to Trigger Speed Dome Camera Enabling this option will allow you to configure Speed Dome camera settings upon notification. To configure Speed Dome camera user could consult the chapter of “Notification”, “Video Loss”, “Set up Emergency Call”, and “Set up NC-320AM-I sensor”. This function allows user to preset multiple positions and have cameras move to preset positions when speed dome is trigger. Speed dome also can move to preset positions when trigger is over. Please refer chapter 6-4. Follow these steps to preset position: Duration of trigger Step 1. Select a specific speed dome camera. At the top of the window. Step 2. Select preset position where you wish it to move to when triggered. To configure the pre setting position of Speed Dome camera, user could consult the chapter of NetCom module operation manual. Step 3. Click the “Add” to the right to save your settings. Step 4. Repeat step 1~3 to add one more preset position. Similarly in the lower part of the window, you can select where you want the camera to go after triggering has stopped. 71 6-17. Creating an Alarm Wave File There is a “Sound Recorder” application included with Windows98, ME, 2000 and XP. This software enables you to record a sound file, which can be used as a warning sound when motion detection is triggered. You can make a warning sound file by doing the following. Play Open the Sound Recorder application by clicking on the Stop Record button. To record a sound Make sure you have sound card and an audio device attached to your computer. Examples of audio devices are CD players and microphones. 1. On the function menu, click “File” and then “New”. 2. To begin recording, click the “Record” button. 3. To stop recording, click the “Stop” button. 4. Click on the “Play” button to listen to what you have recorded. 5. On the File menu, click “Save As” button to save the recorded Wave file. Note: If you wish to make a Wave file for use with the “Phone notification” function, the file format must be 8000Hz, 16-bit, Mono. 72 6-18. Auto-Restart your PC Sometimes the Remote Security and Surveillance System will become unstable. This is caused by the operating system (Windows 98, ME, Windows 2000 and XP). To stabilize the program after a long period of usage, Witness XP provides a “restart system” function to restart at a set time. User can configure one’s PC to have Witness automatically starts every time you reboot. You can set optimum auto-restart settings by doing the following steps: Step 1. Click “Start”, choose “Programs”, “Witness AS/ASE/HS/DX XP”, then “System Reboot Schedule-EZReboot” and you should see the window Fig. 6-11. Fig. 6-11 Step 2. Click “Enable auto run system” to have Witness automatically starts every time you reboot. Step 3. Click “Enable reboot Schedule”, and then click the icon to its left. Here you can set exactly when you want your system to reboot. First click “Everyday”, “Every week” or “Special Period” then chooses the options that are not grayed out to make a schedule. When finished, click “Add” to save your reboot schedule. Step 4. Click for System configuration. You will see Fig. 5-11, enable “Auto run Witness XP” to automatically run Witness XP when Windows starts up. Step 5. Click “Hide window”. Note: To set “Reboot Schedule”, Windows password protection must be disabled. 73 6-19. Video Matrix (Optional) The video matrix can be used with a maximum of sixteen cameras and four (CP-1404AS-T XP, CP-1404HS-T XP and CP-400DX-T Pro ) or two (CP-1408ASE-T XP) or one (CP-1416ASE-T XP) TVs. Cameras are assigned to fixed groups (see example below). You can connect four cameras to one TV, and while that TV will only show one camera’s image at a time, images of any cameras belonging to a given TVs group will pop up on that TV if any alarm is triggered. If you have sixteen cameras and four TVs, cameras connect to card 1(CP-1400AS XP 0 or CP-1404HS XP 0) will be assigned to TV one, cameras connect to card 2 (CP-1400AS XP 1 or CP-1404HS XP 1) will be assigned to TV two and so on. These are fixed. You can choose which camera’s (1-4) image you want to be shown on TV. If motion is detected on a camera in a certain group, all corresponding cameras in other groups will also pop up. The video matrix also allows a camera window you double-click to pop up on TV, or use the remote controller to select camera, which you wish its video to be shown on TV. For example, the camera connects to 1st port of card 1 corresponds to camera connects to 1st port of card 2, card 3 and card 4. Similarly, camera connects to 2nd port of card 1 corresponds with camera connect to 2nd port of card 2, card 3 and card 4. Say if sensor is triggered on camera which connects to 1st port of card 1 then your TV one will show 1st camera, TV two shows camera which connects to 1st port of card 2, TV three shows camera which connects to 1st port of card 3 and TV four show camera which connects to 1st port of card 4. Again, say if sensor is triggered on 2nd camera of card 1 then your TV one will show 2nd camera, TV two shows 2nd camera and so on. Please set the window below to configure the camera correspondence of TV out. 74 Set TV out when triggered: Set which video will be shown on TV for the duration of alert Step 1. Select a specific Witness Video card at the top of the window. Step 2. Select camera, which you wish its video to be shown on TV. Step 3. Click the “Add” to save your settings. Step 4. Repeats step 1~ 3 to add one more setting. Set TV out when stop triggered: Set which video will be shown on TV when no more alert. Similarly in the lower part of the window, you can select which card and which camera you want its video to be shown after triggering has stopped. If “Rotation” for TV out was selected means the given TV will rotate videos those connect to the same Witness video card. 75 6-20. Back up the video clips This chapter will show how to back up video clips to another storage device from your saved database. z Follow the steps below to back up videos Step 1. Click in the top of left side to search for videos in database. And you will see below window. Step 2. Select the camera. To play multiple videos, select “00 Camera 00”. Step 3. Decide which recording way will be searched by “Options”. Step 4. Select time and date of the recording period. Click search to find the clips among the selected time. And you will see below window. Step 5. Select video file, which you would like to have by manual. Or you also can click to select /remove selection all video file. Step 6. Click to back up video clips to another HDD drive. Or you also can click to paste video clips, which has been selected to other storage devices; such as CD-RW or HDD. to burn video clips into CP-RW or DVD-RW. Or you also can click It will show the picture as below when you click icon and then click “ Burn now “ icon to tart burning the video file into the CD. These backup video clips can be searched by I-View’s EZPlayback program. Note: If you want use the CD Burning function, you must install Nero CD-Burning program first and the installation path of Nero CD-Burning must use the default. 76 Step 7. Click to complete backup. z Video tool bar on backup screen Search – Click this icon to search video files. Pause – Click this icon to select/remove all video clips to back up video clips. Create backup shortcut – Click this icon to paste the video clips which has been selected to the other storage devices; such as CD-RW or HDD. Back up video clips – Click this icon to back up video clips into HDD. CD Burning – Click this icon to back up video clips into CD-ROM via Nero CD-Burning program. About - Press to see the program version. Exit –Exit the video backup setting window. 77 6-21. Translate the video clips to VCD format (For CP-400DX Pro only) Tool Menu Bar in EZMpgToVCD program behaves identically to those of EZBackup program, please refer to Chapter 6-20. z Follow the steps below to translate video clips to VCD format Step 1. Click and you will see below window. Step 2. Select the video file from “Video source”. Step 3. Select the audio file from “Audio source”. Note: The video and audio file name must be matched. Step 4. Select the VCD file from “Save file” Step 5. Enter the file name which you would like to save. Step 6. Click “Translate” to translate the file. 78 6-22. Adjust the time clock of DVR automatically Sometimes the DVR’s clock will become slower or faster than standard time. To adjust your DVR’s time clock within a period, Witness XP provides a “EzcClock” program to auto adjust your DVR’s time clock with a Standard Time Server automatically via TCP/IP. This chapter will show how to auto adjust the time clock of DVR with a Standard Time Server . z Follow the steps below to auto adjust the DVR’s time clock. Step 1. Click “Start”, choose “Programs”, “Witness AS/ASE/HS/DX XP”, then click “Adjust System Clock- EzcClock” and you should see below window Fig-22a. Fig 6-22a Fig 6-22b Step 2. Entry the “ Set up EZClock “ icon (refer to Fig 6-22b) to setup the entry the IP address (or DNS) which one you want to check the time clock or use the default Standard Time Server. Step 3. Entry the period to adjust clock period from “ Sync. Every “ box. Step 4. Enable “ Auto Run system “ and “ OK “ icon to complete the setting. 79 7. Using FreeView Pro (For TCP/IP viewers) These sections discuss FreeView Pro and how to use it. The main purpose of FreeView Pro is to provide a way to connect to the Local DVR Server (where you are running Witness XP) to monitor the cameras there if you happen to be far away from it. With FreeView Pro you can begin to use automatic remote video security and surveillance via the Internet. Note: Terminology is relative to the site from where you would be using Witness XP. Thus, the recording location (has Witness XP software) is called “Local DVR Server” and the site from where you use FreeView Pro is called “Remote client PC”. 7-1. General Information Once you have finished installing the software, two icons will be created for you. You may access them by clicking on the “Start” button, the “Programs” folder, then “FreeView Pro” and then clicking on the “Remote Viewer – FreeView Pro” icon. The following icons are available: z Remote Viewer - FreeView Pro: FreeView Pro enables you to remotely patrol your home, office, retail outlet, warehouse, factory, etc. from any place at any time as long as you have the access to an Internet. z Uninstall FreeView Pro: Removes FreeView Pro from your computer. z Remote Control- EZRClient: Allows the Remote client to set up the Witness XP PC from remote site such as operating at the local. The detail setting please refer Chapter 7-9. 80 7-2. The FreeView Pro Tool Menu Bar Note: Many of the functions in FreeView Pro behave similarly or even identically to those of Witness XP. The tool menu bar enables you to easily use TCP/IP to connect to the Local DVR Server via Internet or Intranet, control the video channels of the Local DVR Server, display Local DVR Server video channels, save video files, and configure exactly how you want the program to work. Before you can do anything, you must login. You cannot access any of the functions in FreeView Pro without logging-in. Begin by pressing in the upper right corner and you should see the window below. The initial, factory default username is “root”, and the initial password is “123”. You should change the password as soon as possible after your first login. After you login, you can explore the system through the following buttons. Connect to local site: Use this to set up a connection to the Local DVR Server. 81 Set up site book: The site book allows you to easily keep track of the sites you connect to. Rather than entering the same information every time you connect to a site, you can store it in the site book. Play back video clips: This would allow user to search video clips by site name and play back one or more video files of remote client PC from saved database. System configuration: Press this to set system configuration. Please see chapter 7-6. Set up privileges: Use for setting user privileges. It is very similar to that of Witness XP in Chap6-9. View log: Press this to see the log-in/logout record and alert table. Storage device configuration: To configure storage settings. It is very similar to the one in Chap. 5-3. Remote Control: Allows the remote client to set up the Witness XP PC from remote site such as operating at the local. The detail setting please refer Chapter 7-9. Stop sound alarm: Press this to turn off an alarm (such as a detection alarm) after it sounds. Listen: It will allow remote user listen to the local site DVR. About: Press to see the program version. 82 7-3. Connecting to Local DVR Server by FreeView Pro This chapter shows you how to connect to Local DVR Server. z Make a IP address or ID code connection via Internet Step 1. Connect to the Internet or Intranet with your computer first. Step 2. Click on the bottom Tool bar and you should see below window. Step 3. Connecting to the Local DVR Server via Internet: Local DVR Server has a fix IP 1. Enable “IP address” at the top of the window. 2. Enter the “IP address” (IP address or DNS) 3. Enter the site name that you wish to connect to in the “Local site” box. Its name is up to you. Local DVR Server has a dynamic IP 1. Enable “ID Code” at the top of the window. 2. Enter the “ID Code”. Your vendor could provide the ID code. 3. Enter the site name that you wish to connect to in the “Local site” box. Its name is up to you. Step 4. Select LAN card, if you have installed more than one. Step 5. The number of “TCP/IP Port” must be matched between FreeView Pro and Witness 83 XP software. Witness XP default is 1001. Step 6. Now, choose an option from the “Play with” menu. “Live video” plays the camera which is currently viewing, “Remote Playback” will allow you to play back video clips that had been recorded on Local DVR Server, and “Remote download” will allow you to download video clips that had been recorded on Local DVR Server Step 7. Enter your “Username” and “Password”. The administrator of Local DVR Server must create a specified user account in Local DVR Server before you connect. Without the correct username and password, you cannot log in. Step 8. Choose a “Wavelet” or “MPEG 4” as Compression method for transmitting video. Step 9. Choose an “Image quality”. Like other quality selectors, choosing a higher quality will give a better image, but also take up more space and take longer to transmit. Step 10. Choose an “Image size”. Choosing a Full size will give a better image, but also take up more space and take longer to transmit. Oppositely, choosing a Half size will give a worse quality and faster transmission speed. Step 11. Press the “Connect” button to complete the process. FreeView Pro will connect you to the Local DVR Server. Step 12. “Site book” allows you to set up site information if you have more than one Local Video Server wants to connect. Click “Site book” in the bottom corner of window (you can also use “Set up site book” on the bottom tool bar) and enter the same information as you enter above, then click “Add” to save it. You can click the “Select site” icon in the upper right and decide which site you want to connect with. Step 13. Repeat step 1~11 you can also connect more than one Local DVR Server and choose which one you want to Play with. (Live video, Remote Playback and Remote download) Step 14. Click near the top enter of your FreeView Pro window to disconnect when you finish communicating with the local site. “Save Password”, “Reconnect”, “Record”, “Listen” and “Select cameras” are options on the right side of the window. Save Password if you want this user’s password to be saved. This means that later when you 84 enter this same username, the password will automatically be recalled. Reconnect If you want FreeView Pro to automatically reconnect after the connection is broken. Record It will record videos of the Local DVR Server on remote client computer automatically when the video is connected. Listen It will allow remote user listen to the local site. Select camera It will allow remote user to select, which camera(s) want to remote view. If you enable this function, it will show the available camera(s) for your selection before you connect to the Local DVR Server. z Concurrently monitor multiple Local DVR Servers When user wants to monitor multiple Local DVR Servers at the same time, at first, user should connect all Local DVR Servers he wants to monitor. Click any place on the screen then press or ESC key of keyboard. Below window will be seen. The videos came from multiple Local DVR Servers will be combined and displayed on the screen. User could decide how screen is split by select “Splitter:” (maximum is 25). Click or to rotate camera views on screen manually. Press keyboard again to return to tool bar mode. 85 or ESC key of 7-4. Video Window Function Description The right toolbar contains many useful buttons. Here is an explanation of what they do. z Click z Click to modify system time. to view just one camera’s image. Double-clicking a screen when viewing multiple windows can do this function too. Double-click again to go back to multiple modes. z Click to divide the window into 4/9/16/25 split screens. z Click to divide the window into 6/8/13/22 split screens. z Click to rotate cameras views on screen automatically. Click again and the rotation will stop. Note that this differs from Witness’s camera rotation. For example, if you have 2 cameras at site A, and 4 cameras at site B. FreeView Pro will rotate to site A, showing the 2 cameras of A, then to B, only showing the 4 cameras of B. The rotate time is up to user. z Click or to rotate camera views onscreen manually. z Click … to start or stop recording. Red means recording, blue means waiting and view mode is black. You can instantly start recording on a camera by toggling this button to red if that camera did not set any recording schedule. z Click z Click to disconnect with the Local DVR Server. To listen to the available camera(s) of the Local DVR Server. If you would like to stop to listen the audio; click “Stop Listen” tab. z P/T/Z (optional) PTZ camera or Speed Dome Camera on Local DVR Server is authorized to be played on remote site, remote client can operate Speed Dome/PTZ Camera when connect successfully. Please refer to Chapter 5-3 or NetCom manuals for details on how to operate this. The NetCom manual contains the most detailed description. When viewing camera(s) of Local DVR Server, you can right click on the screen to bring up more options, as below: 86 Hide video This button blanks the portion of the screen devoted to this camera. Fix on camera This button freezes motion on all other cameras, while this camera will continue to play. This button takes a snapshot of the video image as a photograph. A new window will pop up, where you can choose to save this image to disk or choose to print it out. Adjust Image Colors Right click on the video screen, and you will be able to adjust brightness, contrast, saturation and hue. This function is designed to zoom in (amplify) the video display image. After you have screen zoomed in, you can navigate the viewing area by holding down the left mouse key on the screen. This function is designed to zoom out (shrink) the display image. The video image zooms out at each click of the icon. This function is designed to return the image to its original and default magnification. 87 7-5. Using the Site Book The site book will conveniently remember all the necessary information about a site that you wish to connect to so you will not have to type it all over again every time you connect. Begin by clicking in the tool bar or in the lower right corner of the menu. You will see the window below. Please follow steps as below to set up site book. Step 1. Fill in a “No”. If you fill in a “No” that is not taken, you will be able to. The numbers you choose do not matter, as long as they are not already being used – the numbers are only for distinction. Note that if you ever add an enter with the same number as an existing one in the book, the original will be deleted. Step 2. Fill in “Site name” or select the available Local DVR Server in the pull-down menu. Step 3. Click ID code or IP address for “Connection type” and fill ID code or IP address/DNS, respectively. Step 4. Fill in “Port”. The number of “Port” must be matched between FreeView Pro and Witness XP software. Witness XP default is 1001. Step 5. Fill in “Username” and “Password”. The administrator of Local DVR Server must create a specified user account in Local DVR Server before you set up site book. Step 6. Press “Add” button to finish a site book set up. 88 7-6. System Configuration Click and you will see the window below Auto run FreeView Pro automatically starts FreeView Pro whenever your PC starts Windows. Logout when window is minimized automatically logs out the current user whenever the minimize button is pressed. Show DNS/IP address Enable this function, you will be able to see real DNS/IP address instead of “ ******* ”. Multi FreeView Pro Enable this function, the PC will be allowed to run multi FreeView Pro program. Minimize windows when start program automatically minimize the FreeView Pro’s window whenever the FreeView Pro program is started. Exit option To select PC status after exiting Witness XP program. Press the arrow buttons to switch among “Exit program”, “ Turn off “, “ Log off “or “ Restart “. Ex. Select “Turn off”, 89 the Windows OS will automatically shutdown after exiting Witness XP program. Auto login Enable this function will automatically login by user name and password saved in the system. TCP/IP port Enter the port of Witness XP DVR, which you would like to automatically send the live video to remote client PC with the FreeView Pro when camera is triggered. The number of “Port” must be matched between FreeView Pro and Witness XP software. FreeView Pro default is 1501. Select default LAN card It will speed transmission while FreeView Pro PC installs more than one LAN card. Enable this fuction, the system will execute the default setting of LAN card. Select sound alarm FreeView Pro will notify the event via the setting alarm sound directly when the camera is triggered and video loss of Witness XP local server. You can record alarm sound file by yourself. Site rotation time You can set the rotation time for each site. Please see the site rotation section of chapter 7-4 and 5-3. 90 7-7. Playing Back Video Clips FreeView Pro can play both videos stored on your remote client computer and on the Local DVR Server. You can specify your search parameters, as below. Search for recording video files on the remote client computer Step 1. Click on the tool bar, and click in the middle of right side to search the video clips saved on remote client computer (the computer which installs software FreeView Pro). You should see the window below Fig. 7-1. Fig. 7-1 Fig. 7-2 Select the site that you wish to search for videos of DVR site. Step 2. Enter a date and time into After Date, Before Date or both. Step 3. Click the Search button. All videos stored on the specified site during the specified period will be listed as Fig. 7-2. Click the cameras you wish to display and click “Ok”. The videos will play concurrently. Remote playback video files on one Local DVR Server Step 1. Click on the tool bar, enter the site name and IP address or ID code of Local DVR Servers where the video clips you want to play back stored on. Select “Remote Playback “on “Play with” box as Fig.7-3, then click “Connect”. And you will see the Fig.7-4. Step 2. Decide which recording way will be searched by “Options”. Step 3. Enter a date and time into After, Before or both. 91 Step 4. Click the Search button. All files during the specified period will be listed. Click the cameras you wish to display and click “Ok”. The videos will play concurrently. Fig. 7-3 Fig. 7-4 Remote playback video files on multiple Local DVR Servers Please connect to all Local DVR Server on the sites you want to play back and please make sure you already select Remote playback on the Play with box. Then you could play back videos in multiple sites concurrently. For Splitter function, please refer “Concurrently monitor multiple Local DVR Servers” of Chap.7-3. Specify one site or cameras to Playback from multiple connections From Site name box, select a site you want to play back. You also could specify the cameras in one site by click . Disconnect one site from connections Click to disconnect with the site you select from Site name box. 92 Remote playback tool bar When viewing camera(s) of Local DVR Server, you can right click of mouse on the video of screen to bring up more options, as below. For detail functions please refer Chapter 6-10. 93 7-8. Remote download video clips You can easily download video clips of Witness XP DVR on remote client computer via FreeView Pro. Please specify your search parameters of download, as below. Step 1. Click on the tool bar; enter the Local site and IP address or ID code of Local DVR Servers where the video clips you want to download stored on. Select “Remote download “on “Play with” box as Fig.7-3, then click “Connect”. Step 2. Decide which recording way will be searched by “Options”. Step 3. Enter a date and time into After, Before or both. Step 4. Click Search button. All files during the specified period will be listed. Click the cameras you wish to download and click “Ok”. The select video clips will be listed concurrently. (As below picture) Step 5. Select the video file which you want to download. Step 6. Click icon on the top right, start or stop to download the video clips. Disconnect one site from connections Click to disconnect with the site you select from Site name box. 94 7-9. Remote control FreeView Pro allows remote client to control the Witness XP DVR server via EzRClient program through Internet or Intranet. The Remote client can set up the Witness XP server from remote site such as operating at the local. You can control the Witness XP DVR server by through the following steps: Step 1. Connect to the Internet or Intranet with your remote client computer and Witness XP DVR server first. Step 2. On Witness XP Server site Click on the “Start” button, choosing “Programs”. Move onto “Witness AS (ASE/DX/HS/U) Pro” and click on Remote Server- EzRServer and you should see below window (Fig. 7-6). Enter “Password” and save it. Step 3. On FreeView Pro Client site Click on the bottom Tool bar of FreeView Pro and you should see below window. (Fig. 7-7) Fig. 7-6 Fig. 7-7 Step 4. Enter your “IP Address” and “Password”. The administrator of Local DVR Server must create a specified user account in Local EzRServer program before connecting. Without the correct password, you cannot log in. Step 5. The setting number of “TCP/IP Port” must be matched between both sites. EzRServer port default is 1901. Step 6. Press “Connect” button to complete the process. FreeView Pro will connect you to the Local DVR Server. 95 Step 7. Click “Add” to save above information, then you can easily select when you connect again. Step 8. Click “Exit” icon near the middle right of Control window to disconnect. Note: When enable “View only”; you can view the window of local site server only when the server is connected. 96 8. Connect the Local DVR Server via IE Browser These sections discuss how to setup and use the IE Browser for remote access. The main purpose of this section is to provide a way to connect to the Local DVR Server (where you are running Witness XP) to monitor the cameras there if you happen to be far away from it. With IE Browser you can begin to use automatic remote video security and surveillance via the Internet. You may use the IE Browser to connect the Local DVR Server by through the following steps: On the Witness Local DVR Server: Step 1. You must enable “IE browse server - EzWebServer” program. Click “Start”, “Programs”, “Witness AS/ASE/HS/DX XP”, and then select “IE browse server EzWebServer” program. The monitor will display the tab as below: Step 2. Click “Enable auto run system” and “Hide window” to have EzWebServer program automatically starts every time you reboot. On the Remote client PC: Step 1. Click IE Browse from the Remote client PC and then enter the IP address of Local DVR Server. Step 2. Allows the ActiveX. program to install on your PC when the ActiveX pop-up. Step 3. Click icon to connect the Local DVR Server. The detail setting please see chapter 7-3. The Tool Menu Bar The tool menu bar enables you to easily use Internet to connect to the Local DVR Server via IE Browser, control the video channels of the Local DVR Server, display Local DVR Server video 97 channels, save video files, and configure exactly how you want the program to work. After you login, you can explore the system through the following buttons. Connect to local site: Use this to set up a connection to the Local DVR Server. Please see Chapter 7-3. Control panel: Press this to set the control panel. Please see Chapter 7-4 and 5-3. Many of the functions in “Demo.htm” behave similarly or even identically to those of FreeView Pro, if you need detail operation please refer Chapter 7. Advanced Click “Set up EzWebServer” Tab, you will find out the information of Web server. (Please refer to Fig 8-12). Following the below steps, you may auto login the Witness XP server when you connect with IE Brower. (Please refer Fig 8-13). Step 1. Click “Web File” Tab, and enter the “ DVR IP Address “ or “ ID code “ or “ Port number “, “ User name “ and “ Password “ which are same as Local DVR Server setup. Step 2. Then enable “Auto connection “ tab, and click “ Generator “ icon. Fig 8-12 Fig 8-13 98 9. Using PDAView Pro (For Pocket PC PDA only) PDAView Pro is a remote view application for Pocket PC device. It can run on PDA using Pocket PC 2002 or 2003 operating system. These sections discuss PDAView Pro and how to use it. The main purpose of PDAView Pro is to provide a way to connect to the Local DVR Server (where you are running Witness XP) to monitor the cameras there if you happen to be far away from it. With PDA you can begin to use automatic remote video security and surveillance via the Wireless LAN or Internet. 9-1. The PDAView Installation You may install the PDAView Pro program into the PDA by following the steps below: Step 1. Plug your PDA via USB or Com port to a PC installed with Microsoft ActiveSync. Step 2. Run Microsoft ActiveSync in the connected PC and make sure both the PDA and PC are synchronized. Step 3. Insert our CD into the CD-ROM drive of the PC and run “Instal.exe“ in the CD-ROM root directory. Step 4. In the setup dialog box select “PDAView Pro” and click Next. Step 5. Click Brows if you wish to specify another destination directory; otherwise click Next and follow the rest of the instruction to complete the installation. 99 9-2. The PDAView Pro Tool Menu Bar Fig 9-1 Fig 9-2 The tool menu bar (Please refer Fig 9-1) enables you to easily use TCP/IP to connect to the Local DVR Server via Wireless LAN or Intranet, control the video channels of the Local DVR Server, display Local DVR Server video channels, save video files, and configure exactly how you want the program to work. Note: Many of the functions in PDAView Pro behave similarly or even identically to those of Witness XP and FreeView Pro. 100 9-3. Connecting PDAView Pro to Witness XP DVR site This chapter shows you how to connect to Local DVR Server via wireless LAN or Internet. Once PDAView Pro is installed into your PDA device, you will be able to use it to monitor Witness XP DVR video. Step 1. Load the PDAView Pro from the CD-ROM. (Please refer to 9-1.) Step 2 Click the PDAView Pro icon in your PDA to start the application. Step 3. Click on the bottom Tool bar and you should see the following Fig 9-2. Step 4. Enter the “IP Address”, “User name” and “Password”. Step 5. The number of “Port” must be matched between PDAView Pro and Witness XP software. Step 6. Choose an “Image quality”. Step 7. Press the “Connect” button to complete the process. PDAView Pro will connect you to the Witness XP DVR. (Please refer to Fig 9-3) Step 8. Press the “Camera” button to select which camera you want to remote view. Step 9. Click on the bottom Tool bar to disconnect when you finish communicating with the local site. 9-4. Using the Site Book Note: Using the Site Book Tool Menu Bar in PDAView Pro behaves identically to those of FreeView Pro. Please refer to Chapter 7-5. Fig 9-3 Fig 9-4 101 10. Using AnyView Pro (For Modem to modem viewers) These sections discuss AnyView Pro and how to use it. The main purpose of AnyView Pro is to provide a way to connect to the Local DVR Server (where you are running Witness XP) to monitor the cameras there if you happen to be far away from it. With AnyView Pro you can begin to use automatic remote video security and surveillance via the PSTN or ISDN. Note: Terminology is relative to the site from where you would be using Witness XP. Thus, the recording location (has Witness XP) is called “Local DVR Server” and the site from where you use AnyView Pro is called “remote client PC”. 10-1. General Information Once you have finished installing the software, two icons will be created for you. You may access them by clicking on the “Start” button, the “Programs” folder, then “AnyView Pro” and then clicking on the “Remote Viewer - AnyView ” icon. The following icons are available: z Remote Viewer - AnyView Pro: AnyView Pro enables you to remotely patrol your home, office, retail outlet, warehouse, factory, etc. from any place at any time as long as you have the access to a telephone line. z Uninstall AnyView Pro: Removes AnyView Pro from your computer. 102 10-2. The AnyView Pro Tool Menu Bar Note: Tool Menu Bar in AnyView Pro behaves identically to those of FreeView Pro. Please refer Chapter 7-2. 10-3. Connecting to Local DVR Server by AnyView Pro This chapter shows you how to connect to Local DVR Server via modem. z Make connection via modem Step 1. Click on the bottom Tool bar and you should see the following window. Step 2. Connecting to the Local DVR Server via modem: 1. Enter the “site name” that you wish to connect to in the “local site” box. 2. Enter the “Dial number”. (Telephone line connected to modem) 3. Select “Modem”. Follow Step 5 ~ Step 12 on Chapter 7-3 to connect Local DVR Server via AnyView Pro. z “Save Password”, and “Record” are options on the right side of the window that can be selected. Save Password if you want this user’s password to be saved. This means that later when you Enter this same username, the password will automatically be recalled. Record It will record videos of the Local DVR Server on remote client computer 103 automatically when the video is connected. Select camera It will allow remote user to select, which camera(s) want to remote view. If you enable this function that it will shows the available camera(s) for your selection before you connect to the Local DVR Server. Note: 1. If the system stops responding and does not load the program, make sure your system meets the Minimum System Requirements. 2. If you wish to connect to a Local DVR Server please make sure the Local DVR Server select a correct modem and enable “monitor”. 10-4. Video Window Function Description Note: The Video Window functions in AnyView Pro behave identically to those of FreeView Pro. Please refer Chapter 7-4. 10-5. Using the Site Book Note: Using the Site Book Tool Menu Bar in AnyView Pro behaves identically to those of FreeView Pro. Please refer Chapter 7-5. 10-6. System Configuration Please refer Chapter 7-6 to configure system. 10-7. Playing Back Video Clips AnyView Pro can play both videos stored on your remote client computer and on the Local DVR Server as FreeView Pro playing. Please refer Chap. 7-7 to play back video clips. 104