1
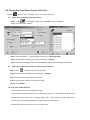
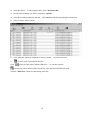
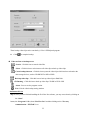
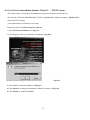
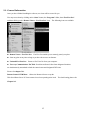
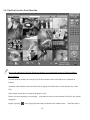
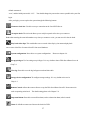
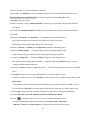
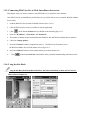
Web Surveillance Server End User Manual Please click in the top right of your screen to login/out the DVR system. The default settings are as follows: Login name: YOUR USER NAME Password: YOUR PASSWORD Enter these, and then click “OK” to login. To logout, click the same icon and confirm. Click to play back video clips. A new window will appear for you to select video clips based on date recorded. Click ―OK‖ to confirm selection. The video clip will play automatically with camera number, site location, recorded date, video file size, etc. For more details, please consult Chapter 7-10 1 7-10. Playing Back and Smart Search Video Files Clicking on the tool bar, will allow you to search your video clips. Follow the steps below to play back videos: Step 1. Click in the middle of right side to search for videos in database. And you will see below window. Step 2. Select the camera. To play multiple videos, select ―00 Camera 00‖. Step 3. Decide which recording way will be searched by “Options”. Step 4. Select the recording period, then click search to find the clips among the selected time. Follow the steps below to remove a video from your archive: Step 1. Click on right screen to search for videos. Step 2. Decide which recording way for deletion by “Options”. Step 3. Select the videos that need to be removed. Step 4. Select camera and time of the archived video. Step 5. Click ―Delete‖. Play back Archived Videos At the playback screen, you can play back videos. Camera number, camera location, time recorded, storage space, etc. will be displayed on the screen. Double click on any video screen to enlarge a single video. Move the mouse to any video screen to show video tool bar and information of single video (see below picture). Double click again to restore the previous viewing screen. 2 Video tool bar on playback screen Play – Click this icon to play back videos. Pause – Click this icon once to pause videos. Stop – Click this icon to stop videos. Previous frame – Jump to previous frame. Next frame – Jump to next frame. First frame – Jump to the first frame of video clip. Last frame – Jump to the last frame of video clip. Repeat playback –Click this icon once have the videos play back on repeat. Click once more to cancel repeat. Zoom in – Click this icon to zoom in. Zoom out – Click this icon to zoom out. Original – Click this icon to go back original video size. 3 Video copy – This button will copy current video clip to a specific location for archiving. User could enable/disable “Copy audio data”. Delete video – Erase video play back file. Navigation bar – This displays the current position of the video clip and allows users to move to different points within the clip. Left moves backward, right moves forward. Snapshot – Click this icon to capture the video screen as a BMP or JPEG file. Repeat – Click this icon once have the videos of all camera play back on repeat. Click once more to cancel repeat. Resize – Click this icon to resize clip. Next video – Jumps to the next video. Previous video – Jumps to the previous video. Decrease frame rate – Decreases the frame rate. Normal frame rate – Adjusts frame rate back to normal. Increase frame rate – Increases the frame rate. Screen size can be adjusted by selecting different multiple displays. Click to view videos in 352 x 288; click 160 x 120. Quick search video: Click to view full screen; click to view videos in 176 x 144; click to view videos in to list the information of all video clips (Refer to Fig A-1), and you can quickly search and assign a video clip to playback. Smart search video: Click to narrow the search the specific regions of recorded video. The search engine is able to search for video that has been changed only at that spot, so the video that is retrieved will show exactly when the object disappeared. The detail process as below: 4 Playback video clips from event table of View log directly: Clicking on the tool bar of Main screen, will allow you to playback video clips from event tale of view directly. Follow the steps below to smart search videos: Step 1. Click icon and you will see the above window. Step 2. Select date from the time table on the top of window. Step 3. Select the “ Motion detection “ section and then the event table of Motion detection will be listed. Step 4. Click the event from the highlight table which you want to playback video clip and then the video will be playback directly. Smart search Video clips: 5 Clicking on the tool bar of playback, will allow you to smart search the video clips. Follow the steps below to smart search videos: Step 1. Click icon and you will see Fig 6-10-1 window. Step 2. Click and drag down to the right with the left mouse key to form a highlighted tab to select the search area. Step 3. Click the ―Add area‖ button to add highlighted area. The area will change to a yellow mesh to mark a protected detection area. If more than one area is desired, repeat Step 1 and Step 2. Step 4. Select “ Sensitivity “, “ Speed “and “ Range “ and then click “ Search “ icon to start the smart search function. Step 5. You will see Fig 6-10-2 window when you finish the ―Smart search‖ function. The video of object disappeared will list on the right site, click these list video clips and the video will be playback. Fig 7-10-1 Fig 7-10-2 Sensitivity: The sensitivity is high will get the false picture of Smart search; if the sensitivity is too low that will 6 be loss the picture. So please select optimum volume. Speed: The number of speed is high the search speed will be faster and the number is low that search speed will be slower. Range: Select ” One video “ or “ All videos “ for smart search. Stop to search when object is detected: Enable this function, it will stop the search process when object is detected. Fig A-1 Fig A-1 Fig A-2 1. If you playback on Local Server, as shown on Fig.A-2, please click then you could select if showing date/time/location or not (refer Fig A-3). 2. The date/time/watermark won’t be shown when user playback video clip by playback tool, for example Media Player. 7-11. Playing back across Local Area Network (LAN) This chapter will show you how to use EZLANPlayback program to play back video files across the network (LAN). 7 It provides a fast playing back the video clips of Web Surveillance Server in any PC through LAN. Before you start, make sure the DVR’s file folder (ClipPro folder, for example) is shared to network users, done through proper setups in Windows Sharing and Security, please refer to Chapter 4-4. After the folder and files are shared available, follow these steps to playback video clips of Web Surveillance Server via LAN user. Step 1. By clicking on the button from main screen to play the LANPlayback program. You will see the picture as below. Step 2. Click icon and below picture will be shown. Click the or to select the folder and then click “ Add “ button to setup the path of playback. Repeat and add one more path. Click icon and you can setup the Web Surveillance Server’s HDD become a part of HDD of remote client PC automatically when you turn on the DVR. It does not need to setup the link path again when you would like to have the LAN playback function. 8 Step 3. Click on “Re-search video clips “ button to complete the setting. Step 4. After above setting, you can playback the video clips of Web Surveillance Server via LAN. The detail process of playback video clips, please refer Chapter 7-10 Enable “ Use default “ icon that you can playback video file without open Web Surveillance Server program, but you cannot playback video clips on remote PC via LAN. 7-19. Back up the video clips This chapter will show how to back up video clips to another storage device from your saved database. Follow the steps below to back up videos 1. Click in the top of left side to search for videos in database. And you will see below window. 9 2. Select the camera. To play multiple videos, select ―00 Camera 00‖. 3. Decide which recording way will be searched by “Options”. 4. Select the recording period time and date. Click search to find the clips among the selected time. 5. And you will see below window. 6. Select video file, which you would like to have by manual. Or you also can click 7. to select /remove selection all video file. Click to back up video clips to another HDD drive. Or you also can click icon and you will see below window to back the video clips into CD-RW/DVD+-RW. Click the “ Burn Now “ button for start backup video files. 10 These backup video clips can be searched by I-View’s EZPlayback program. 8. Click to complete backup. Video tool bar on backup screen Search – Click this icon to search video files. Select – Click this icon to select/remove all video clips to back up video clips. Create backup shortcut – Click this icon to paste the video clips which has been selected to the other storage devices; such as CD-RW/DVD+-RW or HDD. Back up video clips – Click this icon to back up video clips to Hard Disk. CD Burning – Click this icon to back up video clips CD-RW or DVD+-RW. About - Press to see the program version. Exit –Exit the video backup setting window. On Remote PC site Step 1. Once you have finished installing the FreeView Pro software, you may access them by clicking on the ―Start‖ button, the ―Programs‖ folder, then ―FreeView Pro‖ and then clicking on the ―Two way communication – EZCTalk‖ icon. 11 And you will see Fig 7-21.2 window. Step 2. Enter the ―IP address‖ or ―ID Code‖ and ―Password‖ which DVR site you wants communication. Step 3. The number of “TCP/IP Port” must be matched between FreeView Pro and Web Surveillance Server. Web Surveillance Server default is 1701 Step 4. Choose the ―Audio sample rate‖. Choosing a 16K audio rate will give a better audio quality, but also take up more bandwidth. Oppositely, choosing a 8K rate will give a worse quality and less bandwidth. Step 5. Now, choose option from the ―Communication‖ menu. ―Talk‖ will allow you to have two way audio communication with DVR site, and ―Listen‖ will allow you to hear the voice from DVR site. Step 6. Adjust the audio volume of Listen and Talk to suit your request, if it is necessary. Step 7. Press the ―Connect‖ button to complete the process. FreeView Pro will connect you to the DVR site for audio communication. 8. Remote Client Software Installation 8-1. System Requirement for Remote client software Desktop or Notebook PC with Pentium III 500 MHz CPU or better. Operating system: Windows 98 Second Edition, ME, 2000 or XP. 128 MB free hard drive space minimum. Sound card and speakers are required for sound alarm/effects. 24-bit (true-color) VGA card or better. Modem speed 33.6K or better. 1. FreeView Pro is only for TCP/IP remote viewing. 2. AnyView Pro is only for modem-to-modem remote viewing. 3. PDAView is only for Pocket PC PDA remote viewing. 12 8-2. FreeView Pro Installation (Remote Client PC — TCP/IP viewer) This chapter walks you through the installation and setup process for Remote client software. The enclosed CD includes ―FreeView Pro‖ (TCP/IP), “AnyView Pro” (Modem to modem), “PDAView Pro” (Pocket PC PDA viewing). (Also updated files are available on our website) Follow these steps to install FreeView Pro Software. 1.Click ―FreeView Pro Software‖, as Fig 8-2.1. 2.Select language, which you would like to installation, as Fig 8-2.3 Fig 8-2.1 Fig 8-2.2 3.Click ―Next‖ to continue installation, as Fig 8-2.3. 4.Click ―Browse‖ to change the destination or ―Next‖ to continue, as Fig 8-2.4 5.Click ―Finish‖ to complete installation. 13 Fig 8-2.3 Fig 8-2.4 8-3. AnyView Pro Installation (Remote Client PC --- Modem to modem) Follow these steps to install AnyView Pro Software. 1. Click ―AnyView Pro Software‖, as Fig 8-3.1. 2. Follow Chap. 8-2 to complete installation. Fig 8-3.1 9. Using FreeView Pro (For TCP/IP viewers) These sections discuss FreeView Pro and how to use it. The main purpose of FreeView Pro is to provide a way to connect to the Local DVR Server (where you are running DigiCap PRO/XP) to monitor the cameras there if you happen to be far away from it. With FreeView Pro you can begin to use automatic remote video security and surveillance via the Internet. 14 9-1. General Information Once you have finished installing the software, two icons will be created for you. You may access them by clicking on the ―Start‖ button, the ―Programs‖ folder, then ―FreeView Pro‖ and then clicking on the ―Remote Viewer – FreeView Pro‖ icon. The following icons are available: Remote Viewer - FreeView Pro: FreeView Pro enables you to remotely patrol your place from any place at any time as long as you have the access to an Internet. Uninstall FreeView Pro: Removes FreeView Pro from your computer. Two way Communication- EzCTalk – Real-time audio and video from designated locations are simultaneously transmitted to both the control center and designated DVR sites. Please refer chapter 7-21. Remote Control- EZRClient: Allows the Remote client to set up the Web Surveillance Server PC from remote site such as operating at the local. The detail setting please refer Chapter 9-9. 15 9-2. The FreeView Pro Tool Menu Bar Many of the functions in FreeView Pro behave similarly or even identically to those of Web Surveillance Server software. The tool menu bar enables you to easily use TCP/IP to connect to the Local DVR Server via Internet or Intranet, control the video channels of the Local DVR Server, display Local DVR Server video channels, save video files, and configure exactly how you want the program to work. Before you can do anything, you must login. You cannot access any of the functions in FreeView Pro without logging-in. Begin by pressing in the upper right corner and you should see the window below. The initial, factory 16 default username is “root”, and the initial password is “123”. You should change the password as soon as possible after your first login. After you login, you can explore the system through the following buttons. Connect to local site: Use this to set up a connection to the Local DVR Server. Set up site book: The site book allows you to easily keep track of the sites you connect to. Rather than entering the same information every time you connect to a site, you can store it in the site book. Play back video clips: This would allow user to search video clips by site name and play back one or more video files of remote client PC from saved database. System configuration: Press this to set system configuration. Please see chapter 9-6. Set up privileges: Use for setting user privileges. It is very similar to that of Web Surveillance Server in Chap 7-9. View log: Press this to see the log-in/logout record and alert table. Storage device configuration: To configure storage settings. It is very similar to the one in Chap. 6-3. Remote Control: Allows the remote client to set up the Web Surveillance ServerPC from remote site such as operating at the local. The detail setting please refer Chapter 7-9. Stop sound alarm: Press this to turn off an alarm (such as a detection alarm) after it sounds. Listen: It will allow remote user listen to the local site DVR. 17 About: Press to see the program version. 9-3. Connecting to Local DVR Server by FreeView Pro This chapter shows you how to connect to Local DVR Server. Make a IP address or ID code connection via Internet 1.Connect to the Internet or Intranet with your computer first. 2.Click on the bottom Tool bar and you should see below window. Fig 9-3.1 3.Connecting to the Local DVR Server via Internet: Local DVR Server has a fix IP 3-1. Enable ―IP address‖ at the top of the window. 3-2. Enter the ―IP address‖ (IP address or DNS) 3-3. Enter the site name that you wish to connect to in the ―Local site‖ box. Its name is up to you. Local DVR Server has a dynamic IP 3-1. Enable ―ID Code‖ at the top of the window. 3-2. Enter the ―ID Code‖. Your vendor could provide the ID code. 3-3. Enter the site name that you wish to connect to in the ―Local site‖ box. Its name is up to you. 18 4.Select LAN card, if you have installed more than one. 5.The number of “TCP/IP Port” must be matched between FreeView Pro and Web Surveillance Server. Web Surveillance Server default is 1001 Now, choose an option from the ―Play with‖ menu. ―Live video‖ plays the camera. 6.Which is currently viewing, ―Remote Playback‖ will allow you to play back video clips that had been recorded on Local DVR, and ―Remote download‖ will allow you to download video clips that had been recorded on Local DVR. 7.Enter your ―Username‖ and ―Password‖. The administrator of Local DVR Server must create a specified user account in Local DVR Server before you connect. Without the correct username and password, you cannot log in. 8.Choose a “Wavelet” or “MPEG 4” as Compression method for transmitting video. 9.Choose an ―Image quality‖. Like other quality selectors, choosing a higher quality will give a better image, but also take up more space and take longer to transmit. 10. Choose an ―Image size‖. Choosing a Full size will give a better image, but also take up more space and take longer to transmit. Oppositely, choosing a Half size will give a worse quality and faster transmission speed. 11. Press the ―Connect‖ button to complete the process. FreeView Pro will connect you to the Local DVR Server. 12. “Site book” allows you to set up site information if you have more than one Local DVR Server wants to connect. Click “Site book” in the bottom corner of window (you can also use “Set up site book” on the bottom tool bar) and enter the same information as you enter above, then click “Add” to save it. You can click the “Select site” icon in the upper right and decide which site you want to connect with. 13. Repeat step 1~11 you can also connect more than one Local DVR Server and choose which one you want to Play with. (Live video, Remote Playback and Remote download) 14. Click near the top enter of your FreeView Pro window to disconnect when you finish communicating with the local DVR site. ―Save Password‖, ―Reconnect‖, ―Record‖, “Listen‖ and “Select cameras‖ are options on the right side of the window. 19 Save Password if you want this user’s password to be saved. This means that later when you enter this same username, the password will automatically be recalled. Reconnect If you want FreeView Pro to automatically reconnect after the connection is broken. Record It will record videos of the Local DVR Server on remote client computer automatically when the video is connected. Listen It will allow remote user listen to the local site. Select camera It will allow remote user to select, which camera(s) want to remote view. If you enable this function, it will show the available camera(s) for your selection before you connect to the Local DVR Server. Concurrently monitor multiple Local DVR Servers When user wants to monitor multiple Local DVR Servers at the same time, at first, user should connect all Local DVR Servers he wants to monitor. Click any place on the screen then press or ESC key of keyboard. Below window will be seen. The videos came from multiple Local DVR Servers will be combined and displayed on the screen. User could decide to how many videos are split by select “Splitter:‖ (maximum is 36). 20 Click or to rotate camera views on screen manually. Press again to return to tool bar mode. 21 or ESC key of Keyboard 9-4. Video Window Function Description The right toolbar contains many useful buttons. Here is an explanation of what they do. Click Click to modify system time. to view just one camera’s image. Double-clicking a screen when viewing multiple windows can do this function too. Double-click again to go back to multiple modes. Click to divide the window into 4/9/16/25 split screens. Click to divide the window into 6/8/13/22 split screens. Click to rotate cameras views on screen automatically. Click again and the rotation will stop. Note that this differs from Web Surveillance Server’s camera rotation. For example, if you have 2 cameras at site A, and 4 cameras at site B. FreeView Pro will rotate to site A, showing the 2 cameras of A, then to B, only showing the 4 cameras of B. The rotate time is up to user. Click or to rotate camera views onscreen manually. Click … to start or stop recording. Red means recording, blue means waiting and view mode is black. You can instantly start recording on a camera by toggling this button to red if that camera did not set any recording schedule. Click Click to disconnect with the Local DVR Server. To listen to the available camera(s) of the Local DVR Server. If you would like to stop to listen the audio; click “Stop Listen‖ tab. P/T/Z (optional) PTZ camera or Speed Dome Camera on Local DVR Server is authorized to be played on remote site, remote client can operate Speed Dome/PTZ Camera when connect successfully. Please refer to Chapter 6-3 When viewing camera(s) of Local DVR Server, you can right click on the screen to bring up more options, as below: 22 Hide video This button blanks the portion of the screen devoted to this camera. Fix on camera This button freezes motion on all other cameras, while this camera will continue to play. This button takes a snapshot of the video image as a photograph. A new window will pop up, where you can choose to save this image to disk or choose to print it out. Adjust Image Colors Right click on the video screen, and you will be able to adjust brightness, contrast, saturation and hue. This function is designed to zoom in (amplify) the video display image. After you have screen zoomed in, you can navigate the viewing area by holding down the left mouse key on the screen. This function is designed to zoom out (shrink) the display image. The video image zooms out at each click of the icon. This function is designed to return the image to its original and default magnification. 23 9-5. Using the Site Book The site book will conveniently remember all the necessary information about a site that you wish to connect to so you will not have to type it all over again every time you connect. Begin by clicking in the tool bar or in the lower right corner of the menu. You will see the window below. Please follow steps as below to set up site book. 1. Fill in a “No”. If you fill in a “No” that is not taken, you will be able to. The numbers you choose do not matter, as long as they are not already being used – the numbers are only for distinction. 2. Note that if you ever add an entry with the same number as an existing one in the book, the original will be deleted. 3. Fill in “Site name” or select the available Local DVR Server in the pull-down menu. 4. Click ID code or IP address for “Connection type” and fill ID code or IP address/DNS, respectively. 5. Fill in ―Port‖. The number of “Port” must be matched between FreeView Pro and Web Surveillance Server software. Web Surveillance Server default is 1001. 6. Fill in ―Username‖ and ―Password‖. The administrator of Local DVR Server must create a specified user account in Local DVR Server before you set up site book. 7. Press “Add” button to finish a site book set up. 24 9-6. System Configuration Click and you will see the window below Auto run FreeView Pro automatically starts FreeView Pro whenever your PC starts Windows. Logout when window is minimized automatically logs out the current user whenever the minimize button is pressed. Show DNS/IP address Enable this function, you will be able to see real DNS/IP address instead of “ ******* ”. Multi FreeView Pro Enable this function, the PC will be allowed to run multi FreeView Pro program on a PC. Minimize windows when start program automatically minimize the FreeView Pro’s window whenever the FreeView Pro program is started. Exit option To select PC status after exiting Web Surveillance Server program. Press the arrow buttons to switch among “Exit program”, “ Turn off “, “ Log off “or “ Restart “. Ex. Select “Turn off‖, the Windows OS will automatically 25 shutdown after exiting Web Surveillance Server program. Auto login Enable this function will automatically login by user name and password saved in the system. TCP/IP port Enter the port of Web Surveillance Server, which you would like to automatically send the live video to remote client PC with the FreeView Pro when camera is triggered. The number of “Port” must be matched between FreeView Pro and Web Surveillance Server software. FreeView Pro default is 1501. Select default LAN card It will speed transmission while FreeView Pro PC installs more than one LAN card. Enable this fuction, the system will execute the default setting of LAN card. Select sound alarm FreeView Pro will notify the event via the setting alarm sound directly when the camera is triggered and video loss of Web Surveillance local server. You can record alarm sound file by yourself. Site rotation time You can set the rotation time for each site. 26 9-7. Playing Back Video Clips FreeView Pro can play both videos stored on your remote client computer and on the Local DVR Server. You can specify your search parameters, as below. Search for recording video files on the remote client computer 1. Click on the tool bar, and click in the middle of right side to search the video clips saved on remote client computer (the computer which installs software FreeView Pro). You should see the window below Fig 9-7.1. Fig 9-7.1 Fig 9-7.2 2. Select the site that you wish to search for videos of DVR site. 3. Enter a date and time into After Date, Before Date or both. 4. Click the Search button. All videos stored on the specified site during the specified period will be listed as Fig 9-7.1. Click the cameras you wish to display and click ―Ok‖. The videos will play concurrently. Remote playback video files on one Local DVR Server 1.Click on the tool bar; enter the site name and IP address or ID code of Local DVR Servers where the video clips you want to play back stored on. Select “Remote Playback “on “Play with” box as Fig 9-3.1, then click “Connect”. And you will see the Fig 9-7.1. 2.Decide which recording way will be searched by “Options”. 3.Enter a date and time into After, Before or both. 27 4.Click the Search button. All files during the specified period will be listed. Click the cameras you wish to display and click ―Ok‖. The videos will play concurrently. Fig. 7-3 Fig. 7-4 Remote playback video files on multiple Local DVR Servers Please connect to all Local DVR Server on the sites you want to play back and please make sure you already select Remote playback on the Play with box. Then you could play back videos in multiple sites concurrently. For Splitter function, please refer “Concurrently monitor multiple Local DVR Servers‖ of Chap. 9-3. Specify one site or cameras to Playback from multiple connections From Site name box, select a site you want to play back. You also could specify the cameras in one site by click . Disconnect one site from connections Click to disconnect with the site you select from Site name box. 28 Remote playback tool bar When viewing camera(s) of Local DVR Server, you can right click of mouse on the video of screen to bring up more options, as below. For detail functions please refer Chapter 7-10. 9-8. Remote download video clips You can easily download video clips of Web Surveillance Server on remote client computer via FreeView Pro. Please specify your search parameters of download, as below. 1. Click on the tool bar; enter the Local site and IP address or ID code of Local 2. Video Servers where the video clips you want to download stored on. Select “Remote download “on “Play with” box as Fig 9-3.1, then click “Connect”. 3. Decide which recording way will be searched by “Options”. 4. Enter a date and time into After, Before or both. 5. Click Search button. All files during the specified period will be listed. Click the cameras you wish to download and click ―Ok‖. The select video clips will be listed concurrently. (As below picture) 29 6. Select the video file which you want to download. 7. Click icon on the top right, start or stop to download the video clips. Disconnect one site from connections Click to disconnect with the site you select from Site name box. 11. Using PDAView Pro (For Pocket PC PDA only) PDAView Pro is a remote view application for Pocket PC device. It can run on PDA using Pocket PC 2002 or 2003 operating system. These sections discuss PDAView Pro and how to use it. The main purpose of PDAView Pro is to provide a way to connect to the Local DVR Server (where you are running DigiCap PRO/XP) to monitor the cameras there if you happen to be far away from it. With PDA you can begin to use automatic remote video security and surveillance via the Wireless LAN or Internet. 11-1. The PDAView Installation You may install the PDAView Pro program into the PDA by following the steps below: 30 1. Plug your PDA via USB or Com port to a PC installed with Microsoft ActiveSync. 2. Run Microsoft ActiveSync in the connected PC and make sure both the PDA and PC are synchronized. 3.Insert our CD into the CD-ROM drive of the PC and run “Instal.exe“ in the CD-ROM root directory. 4.In the setup dialog box select “PDAView Pro” and click Next. 5.Click Brows if you wish to specify another destination directory; otherwise click 6. Next and follow the rest of the instruction to complete the installation. 1-2. The PDAView Pro Tool Menu Bar Fig 11-2.1 Fig 11-2.2 The tool menu bar (Please refer Fig 11-2.1) enables you to easily use TCP/IP to connect to the Local DVR via Wireless LAN or Intranet, control the video channels of the Local DVR Server, display Local DVR Server video channels, save video files, and configure exactly how you want the program to work. Many of the functions in PDAView Pro behave similarly or even identically to those of Web Surveillance Server and FreeView Pro. 31 11-3. Connecting PDAView Pro to Web Surveillance Server site This chapter shows you how to connect to Local DVR Server via wireless LAN or Internet. Once PDAView Pro is installed into your PDA device, you will be able to use it to monitor Web Surveillance Server video. 1. Load the PDAView Pro from the CD-ROM. (Please refer to 11-2.1) 2. Click the PDAView Pro icon in your PDA to start the application. 3. Click on the bottom Tool bar and you should see the following Fig 11-2.2. 4. Enter the ―IP Address‖, ―User name‖ and ―Password‖. 5. The number of “Port” must be matched between PDAView Pro and Web Surveillance Server software. 6. Choose an ―Image quality‖. 7. Press the ―Connect‖ button to complete the process. PDAView Pro will connect you to the Web Surveillance Server DVR. (Please refer to Fig 11-2.3) 8. Press the ―Camera‖ button to select which camera you want to remote view. 9. Click on the bottom Tool bar to disconnect when you finish communicating with the local site. 11-4. Using the Site Book Using the Site Book Tool Menu Bar in PDAView Pro behaves identically to those of FreeView Pro. Please refer to Chapter 9-5. 32