1
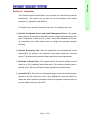
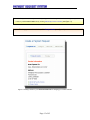
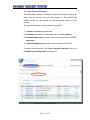
The Research Foundation’s CONTENTS Overview ...…………………………………………………………………….… 2 Users .…………………………………………………………….………………. 3 Understanding Workflow ....……………………………………………..……. 4 Accessing the System …………………………………………………………. 5 Creating a Payment Request …..…………………………………………….. 6 Creating a Single Payment Request For a Vendor.…..………………………. 6 The Payment To Section……………………………………………….. 7 The Charges Section……………………………………………………. 15 The Other Information Section……………………………………….… 18 The Attachment Section ……………………………………………….. 20 Creating Multiple Payment Requests for the Same Vendor………………….. 22 Pending Payment Request …….…………..…………………………………. 26 My Payment Requests ………………….……………………………………….. 26 Other Payment Requests ……………………….………………………………. 35 Processed Payment Requests ………….…………………………………… 37 Appendix A ………………………...……………………………………………. 43 Appendix B ……………………………………………………………………… Page: 1 of 45 44 Overview Section 1: Overview The Payment Request system allows you to process your requests for payments electronically. This system can be used for all non-Purchase Order related This system has a number of benefits for the user. The following are a few: 1) Provides Centralized Access and Useful Management Tools: The system allows users to access all their electronic payment request transactions from one place. Furthermore, it offers tools (e.g. filters, current fund availability (AVL) lookup functionality etc.), which allows users to manage their payment requests efficiently. 2) Reduces Processing Time: Since all transactions are processed and routed electronically, the system is not subjected to the delays inherent to a manual system. This reduces the turnaround time required to process transactions. 3) Reduction in Human Error: This system reduces the need to perform manual checks (e.g. AVL availability) during data entry. This reduces processing errors, and this in turn, will also contribute to faster transaction turnaround times. 4) Accessible 24/7: Since this is a web-based system, users can submit payment requests to the RF twenty-four hours a day. Additionally, users can obtain the status and other important information about their payment requests online at any time without having to call the RF. Page: 2 of 45 1 payments (i.e. payments under $5,000). Users Section 2: Users The following users have access to the Payment Request System. This manual focuses on the first two users groups: preparers and approvers. 2.1 Preparers: These users typically operate from a C.U.N.Y. campus and following actions within the system: 2.2 Create a payment request. Save a payment request. Edit a payment request that was created by them. Submit a payment request to an approver for approval. Recall a payment request that was submitted by them. Approvers: These users also typically operate from a C.U.N.Y. campus and are responsible for approving and submitting payment requests to the Research Foundation (RF) for processing. This user group comprises of P.I.s, authorized signatories, and grants officers. They may perform the following actions within the system: Create a payment request. Save a payment request. Edit a payment request that they created or that was submitted to them for approval1. 2.3 Approve a payment request and submit it to the RF for approval. Recall a payment request that was submitted by them. Processors: These users are O.T.P.S. processors and Project Administrators who work at the RF. They are responsible for reviewing and processing payment requests that are sent to the RF by approvers at the campuses. 1 Approver(s) may edit a payment request if they have access to the project(s) used to pay that payment request. Page: 3 of 45 2 create payment requests on behalf of approvers. They may perform the The workflow used by the Payment Request system is similar to the workflow used by most RF E-Systems. Figure 1 illustrates how a payment request flows between different users and how its status (shown 3 in green) is changed by each user’s action. Understanding Workflow Section 3: Understanding Workflow Figure 1: Workflow Page: 4 of 45 From the RF Website, go to the E-Services menu and select Payment 4 Request (see figure 2). This will bring you to the system’s Dashboard. Accessing the System Section 4: Accessing the System Figure 2: Accessing the System Note: You must log on to the RF Website by using either a preparer, P.I., authorized signatory, or grants officer’s User ID. You cannot access this system with an Employee ID. If you do not have a valid User ID or if you do not see the Payment Request option listed under your E-Service menu please call Grants and Contracts at 212-417-8402 The Payment Request System is divided into three modules: Create a Payment Request, Pending Payment Request(s), and Processed Payment Request(s). The remainder of this manual will discuss how to use each of these modules. Note: To guide you through the process of using the system, Help Menus have been added to every section of the system (as an example, see figure 4). If you have questions about a particular section, place your cursor on the Help Menu of that section to obtain more information. Page: 5 of 45 this module to do the following: 5.1 (i) Create a single payment request for a vendor (ii) Create multiple payment requests for a vendor. Creating a Single Payment Request For a Vendor This is the most common method used to create a payment request. From your Dashboard, click on the Create a Payment Request button or click Create from the Main Navigation Bar (see figure 3). Main Navigation Bar Click either one of these buttons to begin creating a payment request Figure 3: Creating a Payment Request This will bring you to the first section of the payment request, which is the Payment To tab (see figure 4). Note: A payment request is divided into four Tabs or Sections (see figure 4); each Section logically separates the different types of information required to create a payment request. You may navigate between Sections by clicking the Next button at the bottom of your screen or by clicking on the appropriate Section. Page: 6 of 45 Creating Payment Requests This module allows you to create new payment requests. You may use 5 Section 5: Creating a Payment Request A payment request is divided into four Tabs or Sections The first Tab or Section is the Payment To section Help Menu Figure 4: The Payment To tab 5.1.1 The Payment To Section In this section, you must enter your Vendor and Invoice Information. Entering Vendor Information Start by entering the information for the vendor that you wish to pay. To do this, place your cursor on the Select Vendor menu to access the various Vendor Selection/Entry options available (see figure 5). Page: 7 of 45 Place your cursor here to activate the Select Vendor menu Figure 5: Vendor Entry Options Vendor Selection/Entry Methods: You may use one of the four available methods to add a vendor. (1) Search For Vendor: Select this option to search through RF’s Vendor Database2 to locate your vendor. Use this option if you have paid the vendor in the past. 2 Located in RF’s Financial System, i.e. Computron Page: 8 of 45 To use this option, click Search for Vendor from the Select Vendor menu. This will bring up a Search window (see figure 6). Search window Figure 6: Using the Search for Vendor option In the Search window, enter the name of the vendor that you wish to locate and then click the button (see figure 7). Page: 9 of 45 Enter the vendor name here Click Search to locate your vendor Figure 7: The Search window This will display all the vendors in RF’s Vendor Database that meets your search criteria. Click Select to add the appropriate vendor. (2) My Favorite Vendors: Use this option if you had previously saved the vendor to your Favorite Vendors list. To use this option, click Favorite Vendors from the Select Vendor menu. This will bring up all the vendors that you had previously saved to your Favorite Vendors list. From this list, select the appropriate vendor by clicking Select beside the vendor’s name (see figure 9). Note: To remove a vendor from your Favorite Vendors list, click Remove beside the appropriate vendor (see figure 9). Page: 10 of 45 Click Select to add DELL MARKETING LP to your payment request Click Remove to delete DELL MARKETING LP from your Favorite Vendors list. Figure 9: Using My Favorite Vendors (3) Enter New Vendor: Select this option if the vendor you wish to pay could not be located by any of the other options available. To use this option, click Enter New Vendor from the Select Vendor menu. This will display the Enter New Vendor window. In this window, enter the vendor’s information. When you have finished, click at the bottom of the window to add the vendor’s information to your payment request (see figure 10). Page: 11 of 45 Enter New Vendor window Click Create after you have entered all the necessary vendor information Figure 10: Entering a New Vendor (4) Recently Paid Vendors: The system keeps a list of the last 20 vendors paid on your behalf (i.e. on payment requests submitted by you). To select a vendor from this list, click Recently Paid Vendors from the Select Vendor menu. Next, click Select beside the name of the appropriate vendor. Page: 12 of 45 Note: After you have selected your vendor by using one of the four options described above, you may add the vendor to your Favorite Vendors list by clicking Add to My Favorite Vendors (see figure 11) Note: To change your vendor selection, click Change Vendor (see figure 11). Figure 11: Adding a vendor to your Favorite Vendor List or changing your vendor selection Page: 13 of 45 Entering Invoice Information Once you have finalized your vendor selection, enter your Invoice Information on the lower part of your screen (see figure 12). Enter your Invoice Information here Click Next when you are done. Figure 12: Enter Invoice Information After you have entered your Invoice Information, click proceed to the next Tab (see figure 12). Page: 14 of 45 to 5.1.2 The Charges Section The Charges section is used to indicate the project and account that you would like to use for payment. You may distribute your payment amount among various projects and accounts. To begin entering a charge, select the desired project from the Project drop-down box and then select the appropriate account from the Account drop-down box (see figure 12). Click here to save your information Select your project from the Project drop-down box Select your account from the Account drop-down box Figure 12: Adding a Charge Note: After you have entered your Vendor and Invoice Information, you have the option – at any point – to save your information and continue creating your payment request at a later time. To do this click the Save button located at the top of your screen (see figure 12). Page: 15 of 45 It is important to note that the system will not allow you to submit a charge that has been allocated to a project with insufficient funds. To avoid this situation, we have added a tool to help you determine if the project you have selected has sufficient funds to cover the payment. After you have selected your project and account you can check your project’s current Availability by placing your cursor over the icon located near the Amount text box (see figure 13). This will display the most current Availability for the selected project. This Availability is derived by using the following formula: Project’s Current Available Balance – Amount Charged to Project by Pending Payment Requests = Total Project Availability Place your cursor here to obtain your project’s Availability Click here for a detailed breakdown of your project’s Fund Availability Figure 13: Checking a project’s availability Page: 16 of 45 For an even more detailed financial breakdown of your project’s Availability, click Project Budget and Expense Report (see figure 13). If you are sure that the project you have selected has sufficient funds to cover payment, enter the amount to be charged in the Amount textbox . and then click Once you have added a charge, you may edit or delete this charge by clicking on the appropriate button next to it (see figure 14). To add another charge, click Add a New Charge (see figure 14) and repeat the steps above. Click here to add a new charge Distribution Summary Figure 14: Add, Edit or Delete Charges Note: For your convenience, a Distribution Summary has been added to the bottom of your screen (see figure 14). It maintains a running total of the amount you have currently distributed among your Project(s) and Account(s). Before you submit your payment request, please ensure that the Amount left to Distribute is zero. Page: 17 of 45 When you have finished entering all your Charges, click to go to the Other Info tab. 5.1.3 The Other Information Section The information in this section is optional; enter information in this section only if it pertains to you. You may enter the following information in this section (see figure 15): 1) Hold for pick up: Check this box if you would like your party to pick up payment from the RF. 2) Check Memo: Use this field to enter any information that you would like to have displayed on the payment check stub. 3) Comments and Justification: Use this field to enter any comments or justifications that you would like to add to your payment request. 4) Separate Check: Check this box if you would like this payment to be cut as a Separate Check. 5) Payment Method: Use this drop-down box to indicate which payment method you would like to use to pay the vendor. Page: 18 of 45 1 2 3 4 5 Figure 15: Other Information To move to the next section, click at the bottom of your screen. At this point, if you have haven’t already saved your information, the system will prompt you to save your information before proceeding. Page: 19 of 45 5.1.4 The Attachments Section Use this section to attach the supporting documentation that is required to process your payment request. You may do this in two ways: Attaching a Scanned Document or Attaching a Faxed Document. Attaching a Scanned Document If you have the ability to scan your supporting documents, we recommend that you use this method. To attach a scanned document, click and then locate your document on your PC. In the Choose File window, select the file by double-clicking on it or by clicking on it and then clicking the button. Finally, click to attach the file to your payment request (see figure 16) Once you have attached your file, you may review it by clicking the View link button. To delete the file, click the Delete link button. Page: 20 of 45 Choose File Window Figure 16: Attaching a Scanned Document Attaching a Faxed Document You may also choose to attach a document by faxing it to us. In order to fax your documentation to us, you must first generate a Fax Cover Sheet. From the Attachments section, click the button on your screen. Note: The Fax Cover Sheet will display in a pop-up window. You must turn off any pop-up blocking features running on your PC in order to print the Fax Cover Sheet. Next print the Fax Cover Sheet and use it to fax your documentation to the RF. Once your fax is received, the system will automatically attach your documentation to your payment request. Page: 21 of 45 Please note that when faxing documents for multiple payment requests, you must print and use a separate Fax Cover Sheet for each payment request. Note: After you have faxed your documents, please check your payment requests via the system to ensure that the documentation was attached. After you have attached your documentation, you may choose to Save your payment request (for submission at a later time) by clicking the button or Submit your payment request by clicking the button. Note: If a preparer submits a payment request, it is routed to his/her PI for approval. If a PI submits a payment request, it is sent to the RF for processing. 5.2 Creating Multiple Payment Requests for the Same Vendor The system provides an easy way to create multiple payment requests for the same vendor. Once you have Saved or Submitted your payment request, click the You may create another payment request for this vendor link in your confirmation window. See figure 17. Confirmation Window Figure 17: Creating another payment request for the same vendor This will direct you to a screen which will allow you to enter information for your new payment request (see figure 18) Page: 22 of 45 1 2 Click here to edit the default project/account 3 The default project and account Click here to add a new charge 4 Figure 18: Multiple Payment Request Entry Screen. Page: 23 of 45 The following is a description of the different sections of the payment request (see figure 18). 1) Vendor Information: Since, by choosing this method of creating a payment request, you are indicating that you would like to create multiple payment requests for the same vendor, the vendor information cannot be changed. 2) Invoice Information: This is the information for your new invoice. You must fill out this information to process your payment request 3) Charge: The system defaults your charges to the project(s) and account(s) that you had selected when you created your previous payment request. Click project(s)/account(s) to the add Edit the link desired beside amount the default to these projects/account(s). If you would like to delete the default project(s) and account(s), click the Delete link beside the default project(s)/account(s) If you would like to add a new project or account, click the Add Charge and enter your information. You must ensure that you have fully allocated the amount you intend to pay on this payment request among your project(s) / account(s). 4) Other Information: Enter information in this section if it pertains to your payment request. The information in this section is optional. Once you have entered all the necessary information, click the button at the bottom of your screen. This will bring you to a page (see figure 19) where you can do any of the following: 1) Attach Supporting Documentation: You may attach supporting documentation to your payment request by clicking the button to locate the document on your computer. Next click the button to attach the document to the payment request. Repeat these steps to attach another document. Page: 24 of 45 When you have finished attaching your documentation, click the You may create another payment request for this vendor link (see figure 19) to create another payment request for the same vendor, or click if you do not wish to create any more payment requests. 2) Print a Fax Cover Sheet: Click the button to print a fax cover sheet, if you intend to fax your documentation to the RF. After you have finished printing the fax coversheet, click the You may create another payment request for this vendor link (see figure 19) to create another payment request for the same vendor, or click if you do not wish to create any more payment requests. Figure 19: Attaching Documents Page: 25 of 45 This module has two sub-sections: My Payment Requests and Other Payment Requests. Each sub-section serves a particular purpose and allows you to access specific types of payment requests. Pending Payment Requests Section 6: Pending Payment Requests This sub-section will contain payment requests that were either: (i) Created and saved by you. (ii) Created by another user (e.g. a preparer) and submitted to you for approval. (iii) Submitted by you. If you are a preparer and you submit a payment request, the status of the payment request will be Submitted to PI. If you are an approver, the status of the payment request will be PI Approved. (iv) Submitted by you and approved by an O.T.P.S. processor (at the RF). In this case the status of the payment request will be OTPS Approved. (v) Submitted by you and approved by a P.A. (at the RF). In this case, the status of the payment request will be RF Approved. To access payments in this sub-section, click the Pending Payment Request(s) tab on your Main Navigation Bar or click the Open Pending Payment Request(s) button on your Dashboard (see figure 20 ). Page: 26 of 45 25 6.1 My Payment Requests Click either link to access your Pending Payment Requests Figure 20: Access your Pending Payment Requests This will bring you to your Pending Payment Request(s) section. As discussed above, your Pending Payment Request(s) section is made up of two sub-sections: My Pending Payment Requests and Other Payment Requests. By default, your My Pending Payment Request(s) sub-section will be selected (see figure 21). Page: 27 of 45 Default selection Summary Screen You may sort payment requests by clicking on the appropriate column header Informational Icons Figure 21: My Pending Payment Requests This sub-section’s Summary Screen (see figure 21) shows the following information for each payment request: (1) Reference Number: This number uniquely identifies every payment request in the system. You may sort the payments requests by this number by clicking on the column header (see figure 21). (2) Vendor Name: This is the name of the vendor for whom the payment request is being processed. You may sort the payments requests by vendor by clicking on the column header (see figure 21). (3) Amount: The total amount to be paid. You may sort the payments requests by this number by clicking on the column header (see figure 21). (4) Status: This is the status of the payment request. Page: 28 of 45 (5) Informational Icons: These icons (see figure 21) that indicate specific information about a payment request. For a complete list of these icons and their meanings, please refer to Appendix B. From this sub-section’s Summary Screen, you may choose to do any of the following: (1) Filter Payment Request by Status: By default, the system will display payment requests of every eligible status in this section. If you only wish to view payment request of a particular status, click Select View and select the status of your choice (see figure 22). Your choices are: (i) View all: View payment requests of all eligible statuses. This is the default view. (ii) Unsubmitted: These are payment requests that were created and saved by a preparer. (iii) Submitted to PI without attachments: These are payment requests that don’t have any supporting documents attached. They were either created and saved by a P.I., or submitted to a P.I for approval by a preparer. (iv) Submitted to PI with attachments: These payment request have at least one supporting document attached to them. They were either created and saved by a P.I., or submitted to a P.I for approval by a preparer. (v) Submitted to the RF: These payment requests have been submitted for approval to the RF. Page: 29 of 45 Figure 22: Selecting payment requests of a particular status (2) Open a Payment Request: To open a payment request, click on the payment request’s Reference Number. This will display the details of the payment request (see figure 23). Page: 30 of 45 Options Menu Click to edit the payment request Figure 23: A payment request’s details Page: 31 of 45 To edit the payment request, click Edit from the payment request’s Options Menu (see figure 23). This will display the payment request in edit mode. Note: The Options Menu (see figure 23) displays icons that represent all the valid actions you can perform on a payment request. For a complete listing of these icons and their functionality, see Appendix A. (2) Submit Multiple Payment Requests: To submit multiple payment requests simultaneously, click the Select checkboxes for the appropriate payment requests and then click Submit Selected (see figure 24). Check the checkboxes of the payment requests you wish to submit Click here to submit the selected payment requests Figure 24: Submitted multiple payment requests from the summary screen (3) Print the Fax Coversheet(s) for Selected Payment Requests: You may choose to print the fax coversheets for multiple payment requests by clicking the Select checkboxes for the appropriate payment requests and then clicking Print Selected Fax Cover Sheet(s) (see figure 25) Page: 32 of 45 Click here to print the coversheets for the selected payment requests Check the checkboxes of the payment requests you wish to print coversheets for Figure 25: Printing Fax Coversheets from the summary page (4) Preview Payment Requests: If you are looking for a particular payment request, but do not know its Reference Number, you can review the key information of each payment request by placing your cursor over its Reference Number (see figure 26). When you locate the payment request you are looking for, you can choose to view its details by clicking View Details or view the actions taken on it by other users by clicking Audit Trail (see figure 26). Page: 33 of 45 Figure 26: Previewing the key information of a payment request Page: 34 of 45 6.2 Other Payment Requests This sub-section consists of payment requests that were processed by other users on accounts that you have access to. This section was created so that you can monitor all payment request activity on your projects. The payment requests in this sub-section were either: (i) Created and saved by another user (ii) Submitted by another user and approved by another approver. (iii) Submitted/Approved by another user and processed by an O.T.P.S. processor. (iv) Submitted/Approved by another user and processed by a P.A. To access this sub-section, click Other Payment Requests under your Pending Payment Request(s) (see figure 27). Figure 27: Other Payment Requests Page: 35 of 45 This sub-section’s Summary Screen is similar to the summary screen of the My Payment Request’s sub-section. As such, it affords you similar functionality (see section 6.1 of this document for more information). The only exception is that you cannot submit payment requests from the summary screen. Page: 36 of 45 Your Processed Payment Request(s) section consists of payment requests that have been fully processed and approved for payment by the RF. Processed Payment Requests Section 7: Processed Payment Requests 36 In this section you can do any of the following: (i) View Fully Processed Payment Requests Click on Open Processed Payment Request(s) from your Dashboard or click on the Processed Payment Request(s) button from the Main Navigation Bar. This will bring you to the Processed Payment Request’s Summary Screen (see figure 28), which shows you a listing of all payment requests processed on projects that you have access to. Figure 28: Process Payment Request Summary Screen. Page: 37 of 45 (ii) View Details of Fully Processed Payment Request From the Summary Screen click the appropriate payment request’s reference number to view its details. From here you may choose to either view the actions taken by users on the payment request (by clicking , see figure 29). Or click view to review the supporting documentation attached to the payment request (see figure 29). Page: 38 of 45 Click here to see all actions taken by users on this payment request Click here to view the payment request’s supporting documentation Figure 29: Viewing details of a processed payment request (iii) View Payment Information You may view payment information (e.g. check number, check amount, etc.) for a payment request as soon as it is processed by the RF. As soon as payment has been made for your payment request, the system will Page: 39 of 45 display a icon besides your payment. If you place your cursor over this icon, the system will display the payment information associated with your request (see figure 30). Figure 30: Viewing Payment Information (iv) Attach Supporting Documentation From the Summary Screen click the Select checkboxes for the appropriate payment request and then clicking Print Selected Fax Cover Sheet(s). Use these fax coversheets when faxing your documentation to the RF. (v) Locate Payment Requests from a Particular Period The Summary Screen’s default display shows payments posted during the previous four months. This can be changed to display more history by placing your cursor on the Search by Elapsed Time menu and then selecting the appropriate number of months from the available options (see figure 31). Page: 40 of 45 Figure 31: Locating payment requests by Elapsed Time As an alternative, if you wish to search for payment requests by a more specific range of dates, click on Search by Time Period. Next, click in the From and To textboxes to select a date from the display calendar. Finally, click on the button when you are done (see figure 32). Page: 41 of 45 Figure 32: Locating payment requests by Time Period Page: 42 of 45 Appendix A Icon Purpose Allows you to submit a payment request. If you submit a payment request as a preparer, then your payment request will be sent to your approver. If you submit a payment request as an approver, then your payment request will be sent to the RF. After you have submitted your payment request, the system will not allow you to modify it. If you wish to modify a submitted payment request, or if you submitted it in error, use this button to recall your submission. This button is only available to approvers. It allows you to reject a payment request that was submitted to you for approval (in which case it is sent back to the preparer). Allows you to delete a payment request. Once deleted, the payment request can no longer be retrieved. Allows you to edit a payment request. Allows you to view all actions taken by users on a payment request. Page: 43 of 45 Appendix B Icon Purpose Indicates if a payment request has supporting documents attached to it. The number in parenthesis beside the icon indicates the number of documents attached to the payment request Indicates that a user has attached a comment to your payment request. If you place your cursor over this icon, you will be able to view the comment. Note: If the status of your payment request is either Unsubmitted or Submitted to PI and you see this icon besides it, then your payment request might have been rejected. Please be sure to review your payment request for more information. Indicates that the contact information for the RF processor(s) currently working on your payment request is available. Place your cursor on this icon if you wish to view the processor(s) contact information. Indicates that payment has been processed for your payment request. Place your cursor over this icon to view the payment details. Page: 44 of 45