1
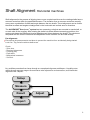
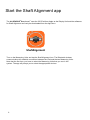
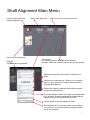
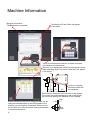
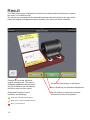
ALiSENSOR®
SHAFTLASER™
ALiSENSOR® SHAFTLASER™
Modern Shaft Alignment
Index
1
2
3
4
5
6
7
8
9
10
11
12
13
14
15
16
17
18
Introduction
The System
Shaft Alignment Horizontal machines
Equipment Setup
Alternative Setup methods
Start Shaft Alignment App
Shaft Alignment Main Menu
Machine Information
Sensor Status
Measurement Screen
Measurement Procedure
Result
Vertical Corrections
Horizontal Alignment
Reporting and Documentation
Warning and Stop signs
Technical Specification iPad
Technical Specification ALiSENSOR® SHAFTLASER™
Introduction
ALiSENSOR® SHAFTLASER™ is a Line Laser to PSD Shaft Alignment System.
The ShaftLaser system uses the Apple's iOS platform on the iPad and iPhone as the Display Unit. The
software (Measurement Program App) for Shaft Alignment can be downloaded for free from the App Store.
ALiSENSOR® SHAFTLASER™ uses Bluetooth low energy wireless technology to transfer data to and from
the measuring units.
ALiSENSOR® SHAFTLASER™ is developed and manufactured in Sweden by GLOi AB.
We have extensive experience spanning several decades for developing measuring systems
and how to use them.
Safety precautions:
Before the equipment is installed on the machine: Ensure that all measurements are taken to
prevent the machine from accidentally being started. Lock Out / Tag Out all machines before use.
Do not operate the ALiSENSOR® SHAFTLASER™ around explosive liquids, gases, or vapors.
CAUTION
Laser Radiation
Do not stare into beam
Class 2 laser product
Do not stare into beam.
Direction of conformity:
®
The ALiSENSOR SHAFTLASER™ complies with and has been tested according to:
EMC Directive: SS-EN 61326-1:2006 class B equipment.
Electromagnetic compatibility: 2004/108/EC
Laser Classification: IEC 60825-1 and complies with 21 CFR 1040.10 and 1040.11
RoHs Directive: 2002/95/EC
WEEE Directive: 2002/96/EC
Disclaimer:
®
Gloi AB will take no responsibility of damaged property or equipment as a result of the use of any ALiSENSOR SHAFTLASER™.
The Bluetooth® word mark and logos are owned by the Bluetooth SIG, Inc.
iPad, iPhone, and iPod touch are trademarks of Apple Inc., registered in the U.S. and other countries.
Warranty.
This limited warranty begins on the original date of purchase, is valid only to the original purchaser of this product. To receive warranty service, the purchaser must
contact GLOi AB for problem determination and service procedures. Warranty service can only be performed by GLOi AB. The original dated bill of sale must be
presented upon request as proof of purchase to GLOi AB. Warranty is valid under normal usage described in the user’s manual appended with the product. Should
the product fail within two (2) years from the date of purchase under normal usage conditions, GLOi AB will repair or replace the product. Freight cost to GLOi AB is
not included in the warranty. The warranty is valid only in the country of purchase. The warranty is not valid if the product has been modified or disassembled by
unauthorized personnel. The warranty is not valid if the product is broken due to incorrect operation.
The internal Lithium Polymer batteries are not included in the general warranty of 2 year. There is a 1 year warranty for the capacity of the battery not to drop below
70% of normal capacity.
All rights reserved.
This manual must not be reproduced in any form, even in excerpts, or duplicated or processed using electronic, mechanical or chemical procedures without written
permission of GLOi AB. This manual may contain mistakes and printing errors. The information in this manual is regularly checked and corrections made in the
next issue. We accept no liability for technical mistakes or printing errors, or their consequences.
All trademarks and patents are acknowledged.
For further information about this device and the products we have designed, You are welcome to visit us at:
www.gloi.se
Gloi AB
Åbäcksgatan 6B
431 67 Mölndal
Sweden
1
The System
The system contains:
2 Measuring Units
2 Pre-assembled shaft fixtures
2 Extension chains
4 Extension rods
8 Magnets
1 Tape measure
1 Allen wrench
1 Plastic box with bolts for for attaching magnets
1 Split charger cable
1 Case
The case is prepared for an iPad mini, including
charger.
Manual as PDF
You will find the manual in the app. The manual is in PDF format.
Care and Cleaning
Keep your ALiSENSOR® SHAFTLASER™ within acceptable temperatures.
The Measuring Units contains Lithium Polymer battery. Do not expose the device to extreme heat.
Do not charge the Measuring units below 40°F (+4°C) or above 113°F (+45°C).
Keep the outside of your ALiSENSOR® SHAFTLASER™ clean.
Use a soft, slightly damp, lint-free cloth. Avoid getting moisture in connector openings.
Do not drop or disassemble the Measuring Units.
Never attempt to repair or modify the Measuring units yourself.
2
Shaft Alignment Horizontal machines
Shaft alignment is the process of aligning two or more coupled machines so the rotating shafts have a
common centerline within the specified tolerance. The deviation from a common centerline normally
occurs as a combination of offset and angle between the two shafts. The misalignment can be further
identified as offset and angular misalignment in the horizontal and vertical axes or directions
The ALiSENSOR® SHAFTLASER™ system has two measuring units that are mounted on each shaft, or
on each side of the coupling. After rotating the shafts into three different measuring positions, the
system calculates the Offset and Angular Misalignment Values between the shafts. The values are
compared with the limits of tolerance and adjustment of the machine can be made directly.
!
Pre-alignment:
Ensure that all measurements are taken to prevent the machine from accidentally being started.
Lock Out / Tag Out all machines before use.
Check:
- Shim size.
- Required tolerances.
- Coupling play.
- Pipe strain.
- Mechanical looseness.
- Soft foot.
Easy to follow procedure from Setup through to a completed alignment with Report. Capability exists
within the measurement program to continue to make adjustments and corrections, or to finalize the
alignment with a Report.
Setup
Measure
Result
Adjust
Report
3
Equipment Setup
20mm [0.8”] Detector aperture and target
at the S-unit
Laser aperture
Rod
Pin for securing the chain
Laser adjustment knob
at the M-unit
Locking knob
Chain tensioning knob
On/Off button
Red and Green LED
Blue LED
Connector for charging
Light Emitting Diodes
LED COLOUR
Green
Red
Blue
FUNCTION
Power On
Charging
Connected
Turn on the SHAFTLASER™ Measuring Unit by
pressing the On/Off button.
Turn off by pressing and holding the On/Off button
for approximately 2 seconds.
To charge the SHAFTLASER™ Measuring Units, plug
in the Split charger cable to the units and attach
the other end of the cable to any USB socket.
The Measuring Unit marked S should be mounted on the stationary machine
and the unit marked M on the movable machine.
Remove the slack of the chains, let the units face each other and tighten them
firmly with the tensioning knobs.
Turn on the Measuring Units and in the app at Sensor Status adjust the positions on the rods until the laser line hit the center of the M-target.
Tighten the Measuring Units and brackets in place with the four locking knobs.
The laser of the M unit, can be adjusted with the adjustment knob at the top of
the unit, to the center of the S-target.
4
microUSB
Alternative Setup Methods
Measuring Unit M on its Shaft Bracket.
The chain is hooked from the inside,
for shafts with diameter <ø40 mm
[<ø1.5”].
Use the Extension chain for shafts
>ø150mm [>ø6.0”].
Press both halves of the link
connector together and lock in
place by pulling the chain taut.
Mount the 4 neodymium magnets, and the Shaft Bracket can
be used as a Magnetic Bracket.
Measuring Units on the Magnet brackets.
Align both fixtures tangentially on the coupling by using the Shaft Brackets, or the magnetic surface of
the magnets.
5
Start the Shaft Alignment app
The ALiSENSOR® SHAFTLASER™ uses the iOS iPad from Apple as the Display Unit and the softwares
for Shaft Alignment can freely be downloaded from the App Store.
ShaftAlignment
Turn on the Measuring Units and tap the Shaft Alignment Icon. The Bluetooth wireless
communication will establish connection between the iPad and the two Measuring Units.
Note that the first time, you have to select the Measuring Units that you use in the
system. The app will prompt you to select the appropriate devices.
6
Shaft Alignment Main Menu
Continue with previously
initiated alignment.
Start a new alignment.
Previously saved reports.
Settings.
Tap Done when completed.
Help menu with videos and manual.
Edit content.
For deleting reports, tap Edit, select Reports,
and then delete the selected with the recycle bin symbol.
Additional information that can be included in the
report.
LOGO
Angular error expressed as /100mm or as coupling
gap. For gap, specify the coupling diameter when
entering the distances.
Display the detector readings and rotational angles
during the measurement.
Forget Measuring Units
Unit
System Unit (Metric)
The measurement values are based on sampled data
for 2 seconds. Enable extended filter length and the
sample time can be increased up to 20 sec.
For the ability to change Measuring Units.
The displayed unit is normally based on the system
unit, but you can override that and change between
metric and imperial.
7
Machine Information
Machine Information
Tap Done when completed.
The Machine ID and Photo will appear
in the report.
35
35
35
70
110
35
70
110
Tap on the measurement section to select and enter
new distance measurements.
Tap here if you performed a Soft Foot check and a check
mark indicating "Soft Foot Check Performed" will appear
in the report.
ø
S
Rear
Front
Soft Foot Check Performed
M
35 35
70
110
Center of coupling,
where the offset will
be measured.
Enter the four distances in the machine to be aligned.
If you want the angle expressed as the coupling gap,
you must also specify the diameter of the coupling.
Select Tolerances: the built-in tolerance table can be
used and selected based on the RPM speed of the
machine you are aligning. Graduated Tolerance Control will also show your results as meeting acceptable
or excellent tolerances.
8
Gap
Sensor Status
Also appears if you press the Sensor Status button, or the Warning / Stop sign in the lower left
corner of the screen during the measurement.
The Sensor Status shows information from the sensors in the Measurement Units S and M.
When no warnings are displayed click Done to proceed to Measurement.
If a warning appears, Setup Assistance provides assistance to correct any issues.
The Sensor Status can be used for temporary data on the detector values and the rotation angles.
Tap Done to proceed.
Example of a warning
and Setup Assistance.
Sensor
Status
Angle Difference
Stationary Detector
Movable Detector
+
_
_
+
Warning if more than 2°.
Adjust Laser lines at center marks on the detectors.
Warning if more than 2 mm [80 mils] from the center
target during the setup.
9
Measurement screen
Record measurements in three different positions.
Start anywhere and turn as little as 20 ° between the positions.
Navigation bar keeps
track of the progress.
To the Main Menu.
Detector readings and rotational angles,
Displayed if Sensor values is set to on in
Settings.
To Machine Information.
S
R
M
0,0° 0,2°
Det. 1,24 1,36
The software will automatically position the 3D
view, but the user can also make rotational
changes to the model to change the view.
A Red Arrow indicates that more rotation
is needed to be able to record a measurement point.
A Yellow Arrow indicates that the Measuring Units were rotated at least 20°, and a
measurement point can be recorded.
No Arrow indicates that the Measuring
Units were rotated at least 90°, which is
the recommended amount of rotation for
the best results and repeatability.
10
Tap to record measurement position 1, 2, or 3 from
the Measuring Units in their current position on the
shafts. The color-coding of the button will also
indicate whether the Measuring Units and shafts
have been rotated enough for measurement data to
be collected.
The color codes are as follows:
Record 1st
<20°: Not enough rotation to Record.
Record 1st
>20°: Acceptable amount of rotation.
Record 1st
≈90°: The ideal amount of rotation for
best results.
Measurement procedure
1
1b
1c
A Yellow Arrow and Yellow "Record"
button indicate that the shafts have
been sufficiently rotated (>20°), but
less than the ideal amount (90°). If
possible, continue rotating the shafts
until achieving 90° rotation for best
results.
A Red Arrow and Red Record button
indicate you still need to rotate the
shafts before you can record the 2nd
measurement position.
The system will begin with the Measuring Units in a horizontal position, though the 1st measurement position can be taken at any position around the shafts. The system will offer guidance on the
direction to turn, but you can turn in the opposite direction if you prefer. It is best to continue in the
same direction as the first rotation for the 2nd and 3rd measurements. When the "Record" button
turns Green, the Measuring Unit and shaft have been rotated the ideal amount - at least 90°.
Tap Record 1st.
2
2b
2c
A Red Arrow and Red Record button
indicate you still need to rotate the
shafts before you can record the 3rd
measurement position.
A Green "record" button indicates that the ideal amount
of rotation has been performed (90°) for best results.
Tap Record 2nd.
A Yellow Arrow and Yellow "Record"
button indicate that the shafts have
been sufficiently rotated (>20°), but
less than the ideal amount (90°). If
possible, continue rotating the shafts
until achieving 90° rotation for best
results.
3
A Green "record" button indicates that the ideal amount
of rotation has been performed (90°) for best results.
Tap Record 3rd.
Tip:
When recording the third reading at a horizontal position,
the Measuring Units will already be in the right position
for horizontal alignment. If the last recorded position is
not at a horizontal position, you can continue rotating the
shafts after recording the 3rd measurement position until
the Measuring Units are in either the 9 o'clock or 3
o'clock positions. You can still make vertical corrections
first with the Measuring Units in a horizontal position, and
they will be ready for horizontal adjustments once the
vertical corrections are complete.
11
Result
The Offset and Angular misalignment results for the vertical and horizontal axes or planes
are shown in a combined view.
The values are compared with the selected tolerances and the symbols to the right of the
Offset and Angular misalignment values indicates if the values are within tolerance.
Example of horizontal offset and
angular misalignment. The result is
displayed graphically and the values
are out of tolerance (as indicated by
the Red X mark for each value).
Graduated Tolerance Control
Indicators and Meanings:
Green Star - Within Excellent tolerance.
Green Check - Within Acceptable tolerance.
Red X - Out of tolerance.
12
Accept the result and go to the Report.
Go to Shimming and Horizontal Adjustment.
Tap this button to cancel the result and
remeasure from the First position.
Vertical Corrections
If the vertical results are out of tolerance, you need to correct the shimming. Based on the
Offset and Angular misalignment values, the system calculates the correction values at
the feet. An animation shows the bolts being loosened in order to make shim corrections;
the system will also show if shims should be added or removed.
After the correction, or if no correction is needed, tap Shimming Done.
13
Alignment horizontally
Based on the Offset and Angular misalignment values, the system calculates the correction values
at the feet of the Moveable machine. When the units are in a horizontal position, the horizontal
values are live values, and are updated continuously.
Move the machine according to the arrows and follow graphics and Offset and Angular
misalignment values that are continuously updated.
After the correction, or if no correction is needed, tap Adjustment Done.
An animation shows the bolts being tightened down.
Alignment is now complete and to confirm the result, redo the measurement.
Tap Remeasure.
14
Reporting and Documentation
The Reports are automatically generated
as PDF files and they are displayed on the
Main Menu with the most recent alignment in the upper-left corner. The Report
contains information from the measurement and can be completed with additional information. Tap on the Signature
field and write your signature. If the
report is changed, then the signature is
automatically deleted.
Measurement Report
Shaft Alignment
Machine ID
LOGO
LOGO
Date
Pump 36
2013-06-28 15:05
Company
Operator
Machine Company Inc.
Daniel Smith
Notes
Company Logo from Settings
ø175
Front
Rear
ALiSENSOR™
SHAFTLASER
Email, Print and share
the Report.
Acceptable
Tolerances
rpm
Offset
(mm)
0000-1000
Angular Error Offset
(mm/100)
(mm)
0.13
100 100 200
Excellent
0.10
300
Angular Error
(mm/100)
0.06
Photo from
Machine Information
0.06
S/N Stationary unit: 10075
S/N Moveable unit: 10076
Soft Foot Check Performed
Soft Foot Check mark
Result
As Found
Offset (mm)
Angle (mm/100)
Front feet (mm)
Rear feet (mm)
Vertical
0.15
0.08
0.39
0.63
Horizontal
-0.08
-0.16
-0.56
-1.04
As Corrected
Offset (mm)
Angle (mm/100)
Front feet (mm)
Rear feet (mm)
Vertical
0.07
0.05
0.22
0.47
Horizontal
0.08
-0.07
-0.13
-0.34
One report automatically
saves both an "As Found"
and "As Corrected" overview
of the machine alignment.
130628
Date ........................
ALiSENSOR SHAFTLASER™
Signature.........................
Result As Found and As Corrected
Signature
15
Warning and Stop signs
There are different types of Warnings and Stop signs displayed in the system software.
When a Warning or a Stop sign is shown, click the sign for Setup Assistance on how to correct.
You can ignore a Warning sign, but a Stop sign is shown because it’s not possible to read
essential sensor values.
Below are some examples of conditions that will prompt the system to display a Warning or Stop
indicator sign.
Warning.
Stop.
16
- Laser beam not adjusted to the center of the Detector during the Setup.
- Laser beam is too close to the edge of the Detector.
- Battery is below 10% of full charge.
- Rotational angle difference is more than 2° between Measuring Units.
- No Bluetooth Connection.
- No Laser beam detected.
Technical Specifications
The ShaftLaser system uses the Apple's iOS platform on the iPad and iPhone as the Display Unit. The
software (Measurement Program App) for Shaft Alignment can be downloaded for free from the App Store.
The case is prepared for an iPad mini, including charger.
There are several brands of protective covers for the iPad Mini and other iOS devices, including MilitaryGrade and IP67 cases which can offer waterproof, shockproof, dustproof, and drop resistance features.
Part of the technical specification for the iPad mini:
BODY
Dimensions
Weight
DISPLAY
Size
Multitouch
Protection
Loudspeaker
3.5mm jack
Internal
WLAN
Bluetooth
USB
CAMERA
Features
Video
Secondary
BATTERY
FEATURES
OS
Chipset
CPU
GPU
Sensors
Messaging
Browser
- iCloud cloud service
- Maps
- Audio/video player/editor
- Image viewer/editor
- TV-out
- Document viewer
200 x 134.7 x 7.2 mm (7.87 x 5.30 x 0.28 in)
312 g (11.01 oz)
Type LED-backlit IPS LCD capacitive touchscreen, 16M colors
768 x 1024 pixels, 7.9 inches (~162 ppi pixel density)
Yes
Oleophobic coating
Yes
Yes
16/32/64 GB storage, 512 MB RAM
Wi-Fi 802.11 a/b/g/n, dual-band
v4.0 with A2DP, EDR
v2.0
Primary
5 MP, 2592x1944 pixels, autofocus
Geo-tagging, touch focus, face detection
1080p@30fps, video stabilization
1.2 MP, 720p@30fps, face detection, FaceTime over Wi-Fi or Cellular
Li-Po battery (16.3 Wh)
iOS 6, upgradable to iOS 6.1.3, iOS 7.0
Apple A5
Dual-core 1 GHz Cortex-A9
PowerVR SGX543MP2
Accelerometer, gyro, compass
iMessage, Email, Push Email, IM
HTML (Safari)
Announced 2012, October
17
Technical Specifications
Technical data for the ALiSENSOR® SHAFTLASER™
System
Measurement range
Up to 3 m [10 feet]
Shaft diameter w. chains Ø20-Ø450 mm [Ø0.8”-Ø17”]
Weight (including iPad)
3.3 kg [7.3 lbs]
Case dimensions
300x300x120 mm [12”x11”x4”]
Measuring Units
Detector length
20 mm [0,8”]
Measuring errors
Less than ±1% + one digit
Resolution
0.001 mm [0.05 mils]
Inclinometer resolution
0,1°
Line laser
Red 650 nm
Laser class
Safety class 2
Wireless communication Bluetooth LE
Operating time per charge 10 h (continous)
Charging time (full)
4h
Environmental protection IP65
Material
Anodized aluminum, Acetal
Weight
200 grams [7 oz]
Dimensions
64x52x50 mm [2.5”x2.1”x2”]
18
00-0034 ManualEng Rev1