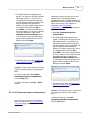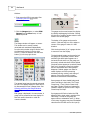
1
S&S® Cycle
ProTune II
User Manual
Contents
3
Table of Contents
Foreword
0
Installation
7
1 System Requirements
................................................................................................................................... 7
2 Installation ................................................................................................................................... 7
3 Manual USB Device
...................................................................................................................................
Driver Installation
9
Windows® XP..........................................................................................................................................................
Windows® Vista™
..........................................................................................................................................................
& Windows® 7
4 Removal
10
11
................................................................................................................................... 12
Introduction
12
1 Getting Started
................................................................................................................................... 12
2 Using Help ................................................................................................................................... 14
3 Basic and Advanced
...................................................................................................................................
User Levels
15
4 Connecting ...................................................................................................................................
the ECM
15
5 Connecting ...................................................................................................................................
the PC to Serial ECMs
15
6 Connecting ...................................................................................................................................
the PC to USB ECMs
16
7 The Main Window
...................................................................................................................................
in Basic Mode
17
8 The Main Window
...................................................................................................................................
in Advanced Mode
19
Menu Functions
21
1 Using Menus
................................................................................................................................... 21
2 Tool Bar
................................................................................................................................... 21
3 File Menu
................................................................................................................................... 22
Send All Data..........................................................................................................................................................
to ECM
Load All Data..........................................................................................................................................................
to Computer
Exit
..........................................................................................................................................................
22
24
24
4 Edit Menu ................................................................................................................................... 25
Undo
..........................................................................................................................................................
Copy
..........................................................................................................................................................
Paste
..........................................................................................................................................................
Blend (Interpolate)
..........................................................................................................................................................
Selected Area
Average Selected
..........................................................................................................................................................
Area
Tag / Untag Cells
..........................................................................................................................................................
Clear All Markers
..........................................................................................................................................................
Cycle Grid/Graph
..........................................................................................................................................................
Position
Cycle Grid Size
..........................................................................................................................................................
Cycle Graph-Line
..........................................................................................................................................................
Resolution
Switch On/Off..........................................................................................................................................................
Map Cursor Pop-up
Live-Tune Mode
..........................................................................................................................................................
On/Off
Switch On/Off..........................................................................................................................................................
Auto-Tagging in LiveTune
Track Live-Tune
..........................................................................................................................................................
Cursor
Snap To Live-Tune
..........................................................................................................................................................
Cursor
25
25
25
26
26
26
27
27
28
28
28
29
29
30
30
2010 S&S Cycle® Inc.
3
4
ProTune II
3D Graph Settings
..........................................................................................................................................................
30
5 View Menu ................................................................................................................................... 31
ECM Basic Setup
..........................................................................................................................................................
Diagnostic Trouble
..........................................................................................................................................................
Codes
ECM Gauges ..........................................................................................................................................................
Fuel Injection..........................................................................................................................................................
Base Table
Ignition Timing
..........................................................................................................................................................
Base Table
Front Cylinder..........................................................................................................................................................
Adjustment Table
Rear Cylinder..........................................................................................................................................................
Adjustment Table
Acceleration Fuel
..........................................................................................................................................................
Settings
Closed-Loop ..........................................................................................................................................................
Control Settings
Knock Control
..........................................................................................................................................................
Settings
Engine Temperature
..........................................................................................................................................................
Ignition Compensation
Air Temperature
..........................................................................................................................................................
Ignition Compensation
Engine Temperature
..........................................................................................................................................................
Fuel Compensation
Air Temperature
..........................................................................................................................................................
Fuel Compensation
Engine Temperature
..........................................................................................................................................................
Start Map
Stepper Motor..........................................................................................................................................................
Orientation Setting
Stepper Pre-Start
..........................................................................................................................................................
Position Map
Stepper Position
..........................................................................................................................................................
with Temperature Map
Target Idle Speed
..........................................................................................................................................................
Setting
Stepper Position
..........................................................................................................................................................
Fuel Compensation
Front Cylinder..........................................................................................................................................................
Adaptive Map
Rear Cylinder..........................................................................................................................................................
Adaptive Map
Target Closed-Loop
..........................................................................................................................................................
Fuel Map
Adaptive Ignition
..........................................................................................................................................................
Map
Current Data Source
..........................................................................................................................................................
menu
Edit Comment..........................................................................................................................................................
Field
ECM Information
..........................................................................................................................................................
ECM
.........................................................................................................................................................
Stats Overview
.........................................................................................................................................................
Engine Use
.........................................................................................................................................................
Peaks .........................................................................................................................................................
Last Trip .........................................................................................................................................................
Peaks
Rev Limiting
.........................................................................................................................................................
31
33
34
34
35
35
36
36
37
38
38
39
40
40
41
41
42
43
44
45
45
46
46
47
47
48
48
50
50
51
51
52
53
6 Options Menu
................................................................................................................................... 54
Preferences ..........................................................................................................................................................
Select User Level
..........................................................................................................................................................
Serial Port Settings
..........................................................................................................................................................
Download Code
..........................................................................................................................................................
to ECM
Download Tune-File
..........................................................................................................................................................
TO ECM
Upload Tune-File
..........................................................................................................................................................
FROM ECM
Open Table from
..........................................................................................................................................................
Save Table ..........................................................................................................................................................
Save Table To..........................................................................................................................................................
Copy Data-File
..........................................................................................................................................................
Test Outputs ..........................................................................................................................................................
Cylinder Trim..........................................................................................................................................................
Adaptive Map Merge
Main Fuel Adaptive
..........................................................................................................................................................
Map Merge
Reset Adaptive
..........................................................................................................................................................
Maps
Clear Historic..........................................................................................................................................................
Diagnostic Trouble Codes
54
54
55
56
57
58
59
60
60
60
61
62
63
63
64
7 Help Menu ................................................................................................................................... 64
Help Topics ..........................................................................................................................................................
64
2010 S&S Cycle® Inc.
Contents
5
About ProTune
..........................................................................................................................................................
II
The Fuel and Ignition Systems
65
65
1 The Fuel Injection
...................................................................................................................................
System
65
2 The Ignition ...................................................................................................................................
Timing System
66
Tuning in Basic Mode
67
1 Viewing and...................................................................................................................................
Tuning Tables
67
2 Live-Tune in...................................................................................................................................
Basic Mode
69
Tuning in Advanced Mode
71
1 Using The Spreadsheet
................................................................................................................................... 71
Moving the Cursor
..........................................................................................................................................................
Position
Selecting an Area
..........................................................................................................................................................
of the Table
Editing Table ..........................................................................................................................................................
Values
Using Math Functions
..........................................................................................................................................................
to Edit Table Values
Tag/Untag Cells
..........................................................................................................................................................
Grid Size of the
..........................................................................................................................................................
Spreadsheet
71
71
72
73
73
74
2 Using the 3D...................................................................................................................................
Graph
74
3 Spreadsheet...................................................................................................................................
and Graph Layout
75
4 Live-Tune in...................................................................................................................................
Advanced Mode
75
Activating Live-Tune
..........................................................................................................................................................
Mode
Tuning in Live-Tune
..........................................................................................................................................................
Mode
Deactivating Live-Tune
..........................................................................................................................................................
Mode
Gauges and Realtime Data
76
76
77
77
1 Using the Gauges
...................................................................................................................................
Window
77
To Add a Dial..........................................................................................................................................................
or Text Gauge
To Remove a ..........................................................................................................................................................
Gauge
Always On Top
..........................................................................................................................................................
setting
Opening and ..........................................................................................................................................................
Saving the Gauges Window Layout
79
79
79
79
2 The Engine Data
...................................................................................................................................
Area
80
Advanced Calibration Tables
80
1 Viewing and...................................................................................................................................
Editing Advanced Tables
80
2 Temperature...................................................................................................................................
Compensation Tables
82
3 Engine Temperature
...................................................................................................................................
Start Map
82
4 Stepper Motor
...................................................................................................................................
Tables (Idle Speed Control)
82
Closed-Loop Fuel Control
83
1 The Closed-Loop
...................................................................................................................................
Fuel Control System
83
2 Closed-Loop...................................................................................................................................
Setup in Basic Mode
84
3 Closed-Loop...................................................................................................................................
Setup in Advanced Mode
85
4 Setting the Target
...................................................................................................................................
Air-Fuel Mixture
85
5 Using the Adaptive
...................................................................................................................................
Maps
86
2010 S&S Cycle® Inc.
5
6
ProTune II
88
Knock (Adaptive Ignition) Control
1 The Knock (Adaptive
...................................................................................................................................
Ignition) Control System
88
88
Diagnostics
1 Frequently Asked
...................................................................................................................................
Questions
88
2 Troubleshooting
...................................................................................................................................
USB Driver Problems
89
Windows® XP..........................................................................................................................................................
Windows® Vista™
..........................................................................................................................................................
& Windows® 7
90
90
3 Check Engine
...................................................................................................................................
Lamp Diagnostics
91
4 Speedometer
...................................................................................................................................
Diagnostics
92
5 Check Engine
...................................................................................................................................
Lamp - Fault Flashing Codes
92
Glossary
94
Footnote
95
Index
97
2010 S&S Cycle® Inc.
Installation
1 Installation
1.1 System Requirements
7
For connection to USB modules:
Most PCs have multiple USB ports. Your
computer's USB port will look similar to the
two shown in this picture:
You must have the following minimum PC
specification to install and run ProTune II:
· Microsoft® Windows® XP Service Pack 2
or later, Microsoft® Windows® Vista™,
Microsoft® Windows® 7 or later operating
system.
· 1.0 Ghz or faster processor. Intel® Core™
Duo or faster/equivalent recommended.
· 128Mb System RAM, 256Mb or more
recommended.
· 200Mb of free hard drive space.
· A desktop resolution of at least 1024x768
pixels. Higher desktop resolution is
recommended for optimum use.
· A modern graphics system with 3D
acceleration and 64 MB or greater onboard RAM is required.
A 9-Pin serial COM port is required for
communication with serial based modules
(see below).
If your PC does not have a USB port then it
may not be sufficiently up-to-date to run
ProTune II. Please check the specification
above. If your PC otherwise matches the
minimum specification required for the
software, USB add-on cards can be
purchased from computer vendors for both
notebooks and desktop PCs. Please note ProTune II USB connection will not work with
Windows 2000 or earlier operating systems.
1.2 Installation
For USB modules, an available USB port
(version 1 or later) is required.
For connection to serial modules:
To install ProTune II for the first time or to
upgrade ProTune II, perform the following:
Your computer's 9-Pin serial port will usually
be located near the printer port and will look
similar to the one in this picture:
1. Close all applications, especially any S&S®
Cycle programs that are currently running.
If your PC does not have a serial port then a
USB-Serial port adapter may be used instead.
Before purchasing a USB-Serial adapter, be
sure it is compatible with your PC's operating
system.
2010 S&S Cycle® Inc.
2. Insert the ProTune II installation CD into
your CD or DVD drive. After a few
moments the setup program should
appear on your screen and you can skip to
step 5. If this doesn't happen
automatically, proceed with steps 3 and 4.
3. From the Start menu, select Run … or
hold the Windows key and press R. The
appearance of your Start menu will vary
depending on the version of Windows®
that you are using.
8
ProTune II
7. The Ready To Install screen will now
appear. Click Install.
4. In the box marked Open: type D:\setup.
exe and press Enter or click OK. Most
PCs have the CD-ROM drive letter 'D:'.
Replace this with the appropriate letter if
your CD drive installation is different.
5. The Windows® Installer dialog box will
appear and briefly examine your system.
8. ProTune II will now install and copy files
to your computer. If a warning message
appears during USB driver installation,
click Install/Continue Anyway.
6. The Welcome screen will now appear.
Click Next.
9. Installation is now complete. Click Finish.
2010 S&S Cycle® Inc.
Installation
9
1.3 Manual USB Device Driver Installation
Installation of a device driver is required
when you first connect a USB ECM to a PC.
This USB driver is installed during the
installation of ProTune 2. A USB device driver
is an item of software which allows
Windows® to communicate with the USB
device. You do not need a device driver to
communicate with a serial ECM.
The user files such as calibration files and
ECM code for this software are located in
'My Documents\ProTune 2' directory.
When upgrading from a previous version of
ProTune II, calibration files from the previous
installation of the software will be copied to
the new 'Calibrations\Archive' folder, so
they remain accessible in the new version.
After the installation, the ProTune II program
icon will appear on your desktop. Doubleclick this icon to start ProTune II. You can
also find ProTune II in your Programs menu
under the program group 'S&S Cycle'.
The driver is located on your system when
the software is installed. If you need to
install the driver manually, follow the
procedure outlined here.
In order to install the USB device driver,
follow the steps below and then follow the
steps appropriate to your version of
Windows. Please be sure to follow the
instructions as closely as possible.
1. Install the ECM using the separate
installation instructions provided.
2. Close all Windows programs, including
ProTune II.
3. Securely connect a standard USB-A to 5pin mini-B cable to the mini-USB port on
the case of the ECM.
4. Switch the motorcycle ignition key to the
ignition ON position. Switch the engine kill
switch to the RUN position. This will power
the ECM.
5. Connect the USB cable to an available USB
port on your PC.
2010 S&S Cycle® Inc.
10
ProTune II
automatically (Recommended) from
the list of options and click Next >.
Now follow the instructions specific to your
version of Microsoft® Windows:
Windows® XP
10
Windows® Vista™ & Windows® 7
11
4. Windows will now locate the correct driver
file and copy the required files. Wait for
this to complete.
1.3.1 Windows® XP
1. A few moments after connecting the
powered ECM, Windows® will detect the
presence of the new device. A small
balloon window in the lower-right corner
of the screen will indicate this. Wait for
the Found New Hardware Wizard to
appear.
2. When the Found New Hardware
Wizard appears, select No, not this
time to skip the Windows Update search
and click Next >.
5. Depending on your security settings, a
warning may appear indicating that the
driver is 'unsigned'. Click Continue
Anyway.
6. The device driver installation is now
complete. Click Finish. You can now use
ProTune II to communicate with the USB
ECM.
3. Select Install the software
2010 S&S Cycle® Inc.
Installation
11
4. Depending on your user account settings,
a security warning message may appear
asking you to confirm the device
installation. Allow the installation to
continue.
5. Depending on your security settings, the
warning message shown below may
appear. Double-click on the Install this
driver software anyway option.
1.3.2 Windows® Vista™ & Windows® 7
1. A few moments after connecting the
powered ECM, Windows® will detect the
presence of the new device. A small
balloon window in the lower-right corner
of the screen will indicate this. Windows®
should automatically install the USB driver
and you can skip to step 5. If this does
not occur, proceed with step 2.
2. Wait for the Found New Hardware
dialog box to appear.
3. When the Found New Hardware dialog
box appears, double-click the Locate and
install driver software
(recommended) option.
2010 S&S Cycle® Inc.
6. The device driver installation is now
complete. Click Close. You can now use
ProTune II to communicate with the USB
ECM.
12
ProTune II
1.4 Removal
Important Note: When you remove
ProTune II, any files that you have
modified or added will be left unaltered
on your hard-drive. If you reinstall
ProTune II, new files that you have
created will be left unaltered but files
that you have modified will be
overwritten with the original copies.
Hint: If you need to copy or backup any Pro
Tune II data files in ProTune II version 2.2 or
earlier, these can be found on your computer
in the C:\Program Files\S&S Cycle\Pro Tune
II\Tune-Files folder. If you need to copy or
backup any data files in ProTune II version
2.3 or later, these can be found on your
computer in the C:\My Documents\ProTune2\
folder. Pro Tune II Tune-Files have a .ECC
file extension and Box files have a .BOX file
extension.
3. For computers earlier than Windows Vista
™, select Add/Remove Programs from
the Control Panel. For Windows Vista™
and later, select Uninstall a Program
located in the Programs section.
To remove ProTune II from your system, use
the following procedure:
4. Highlight ProTune II in the list of
programs displayed. Click Uninstall.
1. Make sure that ProTune II is closed.
5. ProTune II will now uninstall from your
system.
2. From the Start menu, access the
Windows® Control Panel (this may be
located in the Settings menu on some
versions of Windows®).
2 Introduction
2.1 Getting Started
ProTune II is a PC software application that
allows you to setup and tune your S&S
Cycle® Variable Fuel Injection (VFI) module
for your performance requirements.
Throughout this software and help
document, the S&S Cycle® Variable Fuel
Injection module is referred to as the ECM
(Electronic Control Module).
The following terminology is also used
throughout this software:
2010 S&S Cycle® Inc.
Introduction
Calibration (File). This is a complete copy of
all the configuration data inside an ECM,
stored as a file on disk. There are two types
of Calibration files, tune-files and BOX files.
BOX File. A type of calibration file that
contains a complete record of the ECM
configuration data (a tune-file) paired with
an ECM software program file (a .h86 file).
S&S Cycle® BOX files have a .box file
extension.
Tune-File. A type of calibration file which only
contains the ECM configuration data. Use of
Tune-Files is for backward compatibility only.
S&S Cycle® Tune-Files have a .ecc file
extension.
Demo-Data. ProTune II is supplied with a
demonstration calibration file which is loaded
when the software starts. This demonstration
data allows you to experiment with the
software without altering important data.
You cannot overwrite information in the
Demo Data calibration.
Table. A grid of numbers inside the ECM
used to control actuators such as the fuel
injectors and ignition coil.
Tuning. The process of finding the best
values to put in a table in order to get the
optimum engine performance for a particular
application.
ECM Settings. These are data items in the
ECM used to set global properties of the
ECM.
For a complete list of terms used in this
software, click on the Glossary of Terms
section of the Contents.
Below is a description of how to accomplish
some basic tasks with ProTune II:
WARNING! For serial ECMs, use the
supplied cable to connect the ECM to
your PC. Use of any other cable may
2010 S&S Cycle® Inc.
13
result in damage to the PC.
NOTE: You may use a 9-Pin serial extension
cable in conjunction with the supplied cable,
but the supplied S&S®cable MUST be
connected to the module.
To view the current trouble-code (fault)
status of your ECM:
1. Make sure that your ECM is connected to
your PC. See Connecting the ECM 15 for
details. WARNING! For serial ECMs,
use the supplied cable to connect the
ECM to your PC. Use of any other
cable may result in damage to the PC.
2. Select the DTCs button or Diagnostic
Trouble Codes from the View menu.
3. The dialog box will display the current and
historic trouble-codes for your ECM. See
Diagnostic Trouble Codes 33 for more
details.
To backup the data that is currently in
your ECM, before making modifications
to that data (recommended):
1. Connect your ECM to your PC. See
Connecting the ECM 15 for details.
WARNING! For serial ECMs, use the
supplied cable to connect the ECM to
your PC. Use of any other cable may
result in damage to the PC.
2. Go to the File menu and select Load All
Data to Computer... Type a new
filename in the File Name dialog box and
click Save. The data will now load from
the ECM and be stored as a new BOX File.
See Load All Data to Computer 24 for
more details.
To tune a table from the ECM or a
Calibration File:
For a full description on how to tune in Basic
Mode, familiarize yourself with the The Main
Window in Basic Mode 17 and read the
Viewing and Tuning Tables 67 section.
14
ProTune II
For a full description on how to tune in
Advanced mode, familiarize yourself with the
The Main Window in Advanced Mode 19 and
read the Using The Spreadsheet 71 section.
1. Connect your ECM to your PC if you want
to tune an ECM table. See Connecting the
ECM 15 for details. WARNING! For
serial ECMs, use the supplied cable to
connect the ECM to your PC. Use of
any other cable may result in damage
to the PC.
2. Select a table by opening the View menu
and selecting one of the tables.
3. Select where to load the table from by
clicking on the down-arrow in the Current
Data Source box on the top of the
screen. If you just want to experiment,
select the Demo Data.
2.2 Using Help
This help window is split vertically into two
panes. The right pane displays the current
help topic. The left pane is selectable
between the help document contents, index,
search tool, or favorites. By clicking on the
vertical bar separating the two panes and
dragging it left or right, you can control the
size of the windows.
In the left pane, select the Contents tab to
view the sections of this help document.
Double-clicking on the 'book' icons will list
the topics in that chapter.
Clicking on the question mark icons in each
chapter will display the corresponding help
topic.
4. Move the cursor around the spreadsheet
by using the Up Arrow, Down Arrow, Left
Arrow and Right Arrow keys. You can also
click on an area of the spreadsheet to
move to that location. Use the scroll bars
to view more of the spreadsheet. Hold the
Shift-key while using the cursor keys to
select an area of the table.
Click on the Index tab for an alphabetical list
of the subjects in the help file. Double
clicking on an item in the index will jump to
the corresponding help topic.
5. In Advanced mode, enter a new value into
the current cell or selected area by typing
the value and pressing Enter. If the value
is out of range it will be adjusted to the
nearest allowed value. In basic mode, use
the tuning and range dials to adjust the
value of the selected area. You can also
use the Page Up and Page Down keys to
increment and decrement the values in the
table.
Click on the navigation links at the top of the
current help topic if you want to move to the
Next or Previous pages. The back-button
on the tool-bar of the help window can be
used to jump back to the previously viewed
help topic. The Top link takes you back to
the first page of the help system.
6. Move to another area of the spreadsheet
and continue tuning. When you have
finished tuning, select the Save button or
Options menu and select Save Table
To... if you want to save your changes.
Click on the Search tab and type in a word
or phrase. Then click List Topics to find a
relevant area of the help document.
Underlined words or phrases shown in blue
are called links. Clicking on a link will jump to
the corresponding section of the help
document. Once used, a link will be shown in
purple.
2010 S&S Cycle® Inc.
Introduction
15
2.3 Basic and Advanced User Levels
ProTune II is a two level software
application. When first installed, ProTune II
will start in 'Basic' mode. In this mode you
can make changes to the shapes of the basic
ECM tables and change some of the essential
properties of the ECM.
For some ECMs, warranty requirements will
prevent you from editing certain data and
performing functions that would void the
warranty. When a protected ECM is
connected, some of the menu items and
functions of the software will be unavailable
or hidden from view.
Advanced mode gives you total control over
the basic ECM tables and also allows access
to some of the more advanced tables and
settings.
2.5 Connecting the PC to Serial ECMs
WARNING! For serial ECMs, use the
supplied cable to connect the ECM to
your PC. Use of any other cable may
result in damage to the PC.
NOTE: You may use a 9-Pin serial extension
cable in conjunction with the supplied cable,
but the supplied S&S®cable MUST be
connected to the module.
To connect your ECM to your PC:
Advanced mode is recommended for
experienced tuners only.
1. Install the ECM using the separate
installation instructions provided.
See Select User Level… 54 for switching
between basic and advanced modes.
2. Connect the Communications Cable from
the 9-Pin socket on the case of the ECM to
the 9-Pin connector on your computer.
2.4 Connecting the ECM
S&S Cycle® ECMs connect using either a
serial connection or a USB connection. Follow
the instructions below applicable to your
ECM.
Connecting the PC to Serial ECMs
Connecting the PC to USB ECMs
2010 S&S Cycle® Inc.
15
16
3. Launch ProTune II. When the ECM is not
communicating with the PC, the
communications status box at the bottomright corner of the screen will flash
between blue and black and alternate
between the messages No ECM on COM1:
and Checking COM1:
4. Switch the motorcycle ignition key to the
ignition ON position. Switch the engine kill
switch to the RUN position. This will power
16
ProTune II
the ECM.
5. The communications status box should
illuminate green to show that an ECM is
connected and communicating with the PC
software.
The communications status box shows the
ECM model number and hardware revision
(55-5002, revision B in the example above)
and the ECM software version (C302 in the
example above). The box to the left also
shows the serial number of the ECM
(00021074 in the example above). This
information may be required for customer
support.
If you do not have a serial port on your
computer, you may use a USB-Serial adapter
instead. They are available from computer
component vendors. Before purchasing a
USB-Serial adapter, be sure it is compatible
with your PC's operating system.
ports, etc). If so, you will need to change
the serial port that ProTune II checks for
ECMs. See Serial Port Settings… 55 for
details on how to do this and for details on
how to detect the port setup of your
computer. For more detailed information
on the port setup of your PC, go to the
Windows® Start menu, find Control
Panel (which may be in the Settings
menu). Open the System control panel.
Click on the Hardware tab. Click Device
Manager. Under the group labeled Ports
the available serial ports should be listed.
The serial port names will start with the
letters 'COM'. If you are using a USB to
serial adapter, verify the USB to serial
adapter is plugged in and note its COM
number in Device Manager.
2.6 Connecting the PC to USB ECMs
If you cannot establish a connection
with your ECM:
1. In order to connect a USB ECM to ProTune
II, you must first install the USB device
driver. See the USB Device Driver
Installation 9 section for further
information on this.
1. Check that the ECM is powered. The ECM
must be supplied with vehicle power in
order to operate. Your motorcycle ignition
key and kill switch should be set to the ON
and RUN positions. Make sure that the
battery level is normal. Try cycling the
power to the ECM (switch ignition off for
15 seconds and then switch on).
2. Once the USB device driver has been
successfully installed, Launch ProTune II.
When there is no ECM communicating with
the PC, the communications status box at
the bottom-right corner of the screen will
flash between blue and black and
alternate between the messages No ECM
on USB and Checking USB.
2. Check that the cable is connected firmly to
the ECM and the PC.
3. Some PCs may have more than one serial
port. If this is the case, try connecting to
the other port(s).
4. The external serial port on your PC might
not be installed as COM1. This is the case
on some notebook computers that use
COM1 for other devices (modems, IR
3. Make sure the motorcycle ignition key to
the ignition ON position. Switch the engine
kill switch to the RUN position. This will
power the ECM. Optionally, you may start
and run the engine.
4. The communications status box should
illuminate green to show that an ECM is
connected and communicating with the PC
2010 S&S Cycle® Inc.
Introduction
software.
The communications status box shows the
ECM model number and hardware revision
(55-5120, revision A in the example above)
and the ECM software version (A822 in the
example above). The box to the left also
shows the serial number of the ECM
(00051192 in the example above). This
information may be required for customer
support.
17
2.7 The Main Window in Basic Mode
This is the layout of the main ProTune II
window when the software is in 'Basic' mode
(see Basic and Advanced User Levels 15 for
more details).
If you cannot establish a connection
with your ECM:
1. Check that the ECM is powered. The ECM
must be supplied with vehicle power in
order to operate. Your motorcycle ignition
key and kill switch should be set to the ON
and RUN positions. Make sure that the
battery level is normal. Try cycling the
power to the ECM (switch off ignition for
15 seconds and then switch on).
2. Check that the cable is connected firmly to
the ECM and the PC.
3. Try disconnecting and reconnecting the
USB connection to the ECM. This will reset
the ECM connection and allow Windows®
to relocate the device.
4. Have you installed the USB driver
correctly? The first time you connect the
ECM to a PC, you will need to install the
supplied device driver. Please refer to the
USB Device Driver Installation 9 section
for more details on this.
5. See Troubleshooting USB Driver Problems
89 for more help.
The Title-bar displays the name of the
program. As with most Windows® programs,
clicking on the title-bar and dragging it will
move the window around the desktop.
Clicking the program icon next to the title will
open a menu that allows you to move, size
and close the window.
The Menu-bar provides the main method of
controlling the software. To access a menu,
click on its title. See Using Menus 21 for
more details. The Menus section of this help
document lists all the menu items of the
software and their functions.
The Tool-bar provides a quick method of
accessing commonly used menu items. To
use the tool-bar, simply click one of the
buttons. See Tool Bar 21 for more details.
The Table Title shows the name of the table
that is currently being tuned and where it
was loaded from (the current data source).
The Current Data Source Selector allows
you to load the current table from another
data source (ECM or Calibration File). Click
2010 S&S Cycle® Inc.
18
ProTune II
on the down-arrow to view the available
data-sources. From the list, you can choose
between the ECM (if connected), the Demo
Data, any Calibrations that you have
accessed since the software started or select
the 'Calibration not in this list' option to
browse for another Calibration.
Cursor Pop-up 28 for details on showing and
hiding this window.
The Windows Buttons operate the same
way as other Windows applications. You can
minimize, maximize, restore and close the
window using these buttons.
The Engine Data area of the information
bar is only shown when the ECM is
connected. This is a user-configurable area
which displays ECM variables that you select.
Clicking on the bright-blue down arrow icons
will allow you to change the selected value in
that cell. See The Engine Data Area 80 for
more details.
The 3D Graph is an important element – it
displays the current table data. Engine
speed in Revolutions Per Minute (RPM) is
shown along the width, or horizontal (x) axis
of the graph. Throttle position is in percent
of Open Throttle (0% is closed throttle,
100% is wide-open throttle) and is shown
along the depth, or diagonal (z) axis of the
graph (on the right side). The height, or
upward (y) axis of the graph depends upon
the current table. See The Fuel Injection
System 65 and The Ignition Timing System
66 in the Viewing and Tuning Tables section
of the help document for more information.
The Color Key shows the color values used
to shade the 3D graph and how the colors
correspond to the table values.
The Current Selected Area is shown as a
white box drawn on the graph surface. The
current selected area outlines the area of the
graph that will be affected by adjusting the
tuning. See Viewing and Tuning Tables 67
for more information.
The Cursor shows you where you are
currently positioned on the graph. The cursor
is at the center of the current selected area
and represents the current tuning position.
See Viewing and Tuning Tables 67 for more
information.
The Cursor Pop-up Window is an optional
window that displays the coordinates of the
cursor and the current table value at the
cursor position. See Switch On/Off Map
The Cursor Location area of the
information bar, displays the coordinates of
the cursor and the table values at the current
cursor position.
The Status and Help Bar is located at the
bottom of the window. This area will show
hints on tool-bar items and key strokes as
you use the software.
The Tuning Knob allows you to tune the
currently selected area of the table at the
current cursor position. Click on the knob and
drag the mouse in a circular motion to adjust
the knob and watch what happens to the
graph. See Viewing and Tuning Tables 67 for
more information on how to tune. You can
also use the Tuning Buttons and the
keyboard to tune.
The Tuning Buttons provide an alternative
to the using the tuning knob. Click on the up
arrow to increase the value of the current
selected area and click on the down arrow to
decrease the value. Click on the buttons Fine,
Medium and Coarse to determine the size of
the value increase/decrease. You can also
use the keyboard instead of the mouse.
Press the Page Up key for a fine (small)
increase. Press the Page Down key for a fine
(small) decrease. Holding the Shift key while
pressing Page Up or Page Down will result in
a medium increase/decrease. Holding the
Ctrl key while pressing Page Up or Page
Down will result in a coarse (large)
increase/decrease. See Viewing and Tuning
Tables 67 for more information on how to
tune.
2010 S&S Cycle® Inc.
Introduction
The Range Knob allows you to control the
size of the selected area. The larger the
range, the larger the selected area. The
current selected area is always centered on
the cursor position. See Viewing and Tuning
Tables 67 for more information on tuning
functions.
The RPM Zone Cursor Position Slider
allows you to move the cursor along the
horizontal (Engine Speed) axis of the table.
Click on the slider and move it left or right to
change the cursor position. You can also use
the Left Arrow and Right Arrow keys to
change the cursor position. See Viewing and
Tuning Tables 67 for more information on
tuning functions.
The Throttle Zone Cursor Position Slider
allows you to move the cursor along the
depth (Throttle) axis of the table. Click on
the slider and move it left or right to change
the cursor position. You can also use the Up
Arrow and Down Arrow keys to change the
cursor position. See Viewing and Tuning
Tables 67 for more information on tuning
functions.
19
Selector). When the LED is lit, it indicates
that the calibration / ECMis setup to allow
closed-loop information to be written to the
adaptive maps. See The Closed-Loop Fuel
Control System 83 and Closed-Loop Setup in
Basic Mode 84 for more details.
The Adaptive Map Function Indicator
indicates the adaptive map settings for the
current ECM or calibration file (the item
shown in the Current Data Source
Selector). When this LED is lit, it indicates
that the calibration / ECM is setup to allow
the values in the adaptive maps to adjust the
current fuel output. See The Closed-Loop
Fuel Control System 83 and Closed-Loop
Setup in Basic Mode 84 for more details.
2.8 The Main Window in Advanced Mode
This is the layout of the main ProTune II
window when the software is in 'Advanced'
mode (see Basic and Advanced User Levels
15 for more details).
The Serial Number Box will show the serial
number of your ECM when it is connected.
The Communications Status Box shows
the current status of the communications link
with the ECM. When the ECM is not
communicating, it will flash blue-black and
display the names of the serial port(s) that
ProTune II is searching for the ECM. When
an ECM is connected, it illuminates green and
displays the model number and software
level of the connected ECM. If
communication with an ECM is lost, it will
illuminate red for a couple of seconds and
then return to its search state. See
Connecting the ECM 15 for more details.
The Closed-Loop Function Indicator
indicates the closed-loop settings for the
current ECM or calibration file (the item
shown in the Current Data Source
2010 S&S Cycle® Inc.
The Title-bar displays the name of the
program. As with most Windows® programs,
clicking on the title-bar and dragging it will
move the window around the desktop.
Clicking the program icon next to the title will
open a menu that allows you to move, size
20
ProTune II
and close the window.
The Menu-bar provides the main method of
controlling the software. To access a menu,
click on its title. See Using Menus 21 for
more details. The Menus section of this help
document lists all the menu items of the
software and their functions.
The Tool-bar provides a quick method of
accessing commonly used menu items. To
use the tool-bar, simply click one of the
buttons. See Tool Bar 21 for more details.
The Table Title shows the name of the table
that is currently being tuned and where it
was loaded from (the current data source).
The Current Data Source Selector allows
you to load the current table from another
data source (ECM or Calibration File). Click
on the down-arrow to view the current datasources. From the list you can choose
between the ECM (if connected), the Demo
Data, any calibrations that you have
accessed since the software started, or select
the 'Calibration not in this list' option to
browse for another calibration.
The current Cursor position is shown as an
upside-down pyramid on the graph and a
black rectangle on the spreadsheet. These
indicators show you where you are currently
positioned in the table. See Using The
Spreadsheet 71 for more information.
The Cursor Pop-up Window is an optional
window that shows you the coordinates of
the cursor and the current table value at the
cursor position. See Switch On/Off Map
Cursor Pop-up 28 for details on showing and
hiding this window.
The Cursor Location area of the
information bar shows you the coordinates of
the cursor and the table values at the current
cursor position.
The Engine Data area of the information
bar is only shown when the ECM is
connected. This is a user-configurable area
which displays ECM variables that you select.
Clicking on the bright-blue down arrow icons
will allow you to change the selected value in
that cell. See The Engine Data Area 80 for
more details.
The Windows Buttons operate the same
way as other Windows applications. You can
minimize, maximize, restore and close the
window using these buttons.
The Status and Help Bar is shown at the
bottom of the window. This area will show
hints on tool-bar items and key strokes as
you use the software.
The 3D Graph is an important element – it
displays the current table data. Engine
speed in Revolutions Per Minute (RPM) is
shown along the width or horizontal (x) axis
of the graph. Throttle position is in percent
of open throttle (0% is closed throttle, 100%
is wide-open throttle) and is shown along the
depth, or diagonal (z) axis of the graph (on
the right side). The height, or upward (y)
axis of the graph depends upon the current
table. See Using the 3D Graph 74 for more
information.
The Spreadsheet provides the most direct
method of editing tables. It shows you the
current table values and allows you to enter
new values. As the table is often too big to fit
in the spreadsheet area, the scroll-bars are
provided to allow you to scroll the
spreadsheet. Click and drag the light-gray
scroll bar bubble areas to scroll. See Using
The Spreadsheet 71 for more information.
The Color Key shows the color values used
to shade the 3D graph and how those colors
correspond to the table values.
The Splitter-bar allows you to change the
size of the 3D graph and spreadsheet relative
to each other. Click on the Splitter-bar and
drag it up and down to change the ratio
between graph and spreadsheet. See
Changing the Spreadsheet and Graph Layout
2010 S&S Cycle® Inc.
Introduction
75
for more help on this.
The Serial Number Box will show the serial
number of your ECM when it is connected.
The Communications Status Box shows
the current status of the communications link
with the ECM. When the ECM is not
communicating, it will flash blue-black and
display the names of the serial port(s) that
ProTune II is searching for the ECM. When
an ECM is connected, it illuminates green and
displays the model number and software
level of the connected ECM. If
communication with an ECM is lost, it will
illuminate red for a couple of seconds and
then return to its search state. See
Connecting the ECM 15 for more details.
The Closed-Loop Function Indicator
indicates the closed-loop settings for the
current ECM or calibration (the item shown in
the Current Data Source Selector). When
the LED is lit, it indicates that the calibration
/ ECM is setup to allow closed-loop
information to be written to the adaptive
maps. See The Closed-Loop Fuel Control
System 83 and Closed-Loop Setup in
Advanced Mode 85 for more details.
The Adaptive Map Function Indicator
indicates the adaptive map settings for the
current ECM or calibration (the item shown in
the Current Data Source Selector). When
this LED is lit, it indicates that the calibration
/ ECMis setup to allow the values in the
adaptive maps to adjust the current fuel
output. See The Closed-Loop Fuel Control
System 83 and Closed-Loop Setup in
Advanced Mode 85 for more details.
21
3 Menu Functions
3.1 Using Menus
The menu bar is the main method of
controlling the software. To use a menu, leftclick with the mouse on the title of the menu.
This will display the list of items in that
menu. Select an item by left-clicking on it.
You can also access menus using the
keyboard. Holding the Alt key and pressing
the first letter of a menu's title will open that
menu (for example Alt+F will open the File
menu). Use the up and down cursor keys to
highlight items in the menu and press the
Enter key to select the item.
Menu items may have underlined letters.
When a menu is open, the menu item can be
selected by pressing that letter key.
Menu items may have short-cut keys
displayed on their right side. For example,
the Undo item in the Edit menu has the
short-cut key Ctrl+Z. This means that
holding the control (Ctrl) key down and
pressing Z will perform the Undo function
directly without using the menus.
Some menu items may be unselectable or
'grayed-out'. This will happen if that menu
item is not available in the current software
state (for example, if the ECM is not
connected).
3.2 Tool Bar
The tool bar provides a quick method of
accessing commonly used menu items with
the mouse. Clicking on a tool-bar button will
access that function. Some tool-bar buttons
may be unselectable or 'grayed-out'. This will
happen if that tool-bar function is not
2010 S&S Cycle® Inc.
22
ProTune II
available in the current software state (for
example, if the ECM is not connected).
All of the tool-bar buttons are listed below
together with links to the menu item
functions that they access.
Send All Data to ECM
22
24
Important: Do not update the ECM while
the engine is running. The ignition switch
must be in the ON position and the kill switch
set to RUN, but do not start the engine. Do
not disconnect the communications cable or
ECM power during the download.
60
Diagnostic Trouble Codes
ECM Gauges
33
34
Fuel Injection Base Table
1. First ensure the ECM is connected. See
Connecting the ECM 15 for more
information.
34
Ignition Timing Base Table
ECM Basic Setup
3.3.1 Send All Data to ECM
Selecting this function will update the data
and software in your ECM from an ECM
Upgrade file (BOX file). This BOX file will
either be generated by using Load All Data to
Computer 24 or supplied by your ECM
distributor.
Load All Data to Computer
Save Table To…
3.3 File Menu
35
31
2. Select Send All Data to ECM...
Front Cylinder Adjustment Table
Rear Cylinder Adjustment Table
Acceleration Fuel Settings
Live-Tune Mode On/Off
ECM Information
Undo
36
35
36
3. The Open File dialog box will appear.
Select a BOX file by clicking on its
filename. A description of the BOX files
contents appears on the left side when it
is selected.
29
48
25
4. Click Open.
5. If the file you have selected is potentially
2010 S&S Cycle® Inc.
Menu Functions
23
incompatible with your ECM, a message
box will appear asking you to confirm your
choice. If you are certain that you want to
use the selected file, click Yes to continue.
Otherwise, click No and go back to step 2
to select a compatible file. The file
description in the Open File dialog box will
provide the information for you to decide if
you selected an appropriate calibration.
6. For certain software upgrades, you will be
asked whether to update parameters in
the ECM tune-file data for compatibility
with the new ECM software. A message
box will appear asking whether you want
this update to proceed. Click Yes to
continue or click No to cancel the
download. You will then be asked whether
you would like to save the current tune-file
data in your ECM as a backup
(recommended). If you click Yes, a Save
dialog box will appear allowing you to
choose a filename for the backup. Enter a
filename and click Save. Additional data
transfer progress bars will appear during
the update. ProTune II is updating certain
key parameters in your ECM in preparation
for running the new software. Allow these
transfers to complete. Do not disconnect
or remove power from the ECM.
7. For updates, you will then be asked
whether you would like to save the current
tune-file data in your ECM as a backup
(recommended). If you click Yes, a Save
dialog box will appear allowing you to
choose a filename for the backup. Enter a
filename and click Save. Additional data
transfer progress bars will appear during
the update. Allow these transfers to
complete. Do not disconnect or remove
power from the ECM.
8. The calibration data and/or software will
now download to the ECM. A progress bar
indicates the amount of data left to send.
Do not disconnect the communications
cable or switch off power to the ECM
during this stage.
If the data download fails to complete, verify
that the ECM still has power (motorcycle
ignition on), that the cables are firmly
connected, and then retry the download. If
the download continues to fail, try resetting
the ECM by cycling the power (motorcycle
ignition off for 15 seconds, then switch back
on).
If the ECM software download fails to
complete - incomplete download of ECM
software will leave the ECM in boot-mode
which is an inoperative state that will not run
the engine. When you connect an ECM that
is in boot mode, a warning will appear. This
is a notification that you must retry the
download in order to use the ECM. Click OK
or press Enter and then return to step 3 in
order to recover the ECM.
Important: When the download completes
successfully, a message box will be shown
advising you to cycle power to the ECM for at
least 15 seconds before continuing. This
allows the ECM to reset and power-up
cleanly, as the BOX file download may have
updated critical operating parameters. Click
OK or press Enter to dismiss the message
box.
SUMMARY: There are three ways to Send All
Data to the ECM…
1) Using the tool bar: Click on the ->ECM
button:
2) Using the menu bar: Select Send All
2010 S&S Cycle® Inc.
24
ProTune II
Data to ECM... from the File menu.
3) Using the keyboard: Hold Ctrl + press D.
disconnect the communications cable or
switch off power to the ECM during this
stage.
3.3.2 Load All Data to Computer
Selecting this function will copy the data and
software inside the ECM and store it on your
computer as a BOX File.
1. First ensure the ECM is connected. See
Connecting the ECM 15 for more
information.
2. Select Load All Data to Computer...
3. The Save File dialog box will appear. You
can either select an existing file to
overwrite by clicking on its filename, or
enter a new filename in the File Name box
to create a new file. To select an existing
file, click on its filename. To create a new
file, enter a filename in the File Name box.
A description of the files contents appears
on the left side when it is selected.
5. When the 'Transfer Complete' message
appears, click OK or press Enter. If the
upload fails to complete, verify the ECM
still has power (motorcycle ignition on)
and the cables are firmly connected.
Retry the upload. If the upload continues
to fail, try resetting the ECM by cycling the
power (motorcycle ignition off for 15
seconds, then switch back on).
SUMMARY: There are three ways to load the
data from the ECM…
1) Using the tool bar: Click on the ->PC
button:
2) Using the menu-bar: Select Load All
Data to Computer... from the File menu.
3) Using the keyboard: Hold Ctrl + press U.
3.3.3 Exit
4. Click Save. The data will now be uploaded
from the ECM. A progress bar indicates the
amount of data left to load. Do not
This function closes the program. You will be
prompted to save any data that may have
been modified.
You cannot exit the program when Live-Tune
2010 S&S Cycle® Inc.
Menu Functions
mode is active. Attempting to do so will
display a warning message. See Live-Tune
Mode On/Off 29 for details on toggling LiveTune mode.
SUMMARY: There are three ways to Exit or
Close ProTune II…
1) Using the menu bar: Select Exit from the
File menu.
2) Using the mouse: Click on the close box
(X) at the top-right corner of the main
screen.
3) Using the keyboard: Hold the Alt key +
press F4.
3.4 Edit Menu
3.4.1 Undo
Selecting Undo will reverse the last change
made to the current table. Selecting Undo
repeatedly will undo each historic change
made to the current table until it returns to
its original state.
25
3.4.2 Copy
Note: This menu function is not available in
Basic User Mode. See Basic and Advanced
User Levels 15 for more information.
Selecting Copy will transfer the selected area
of the spreadsheet to the Windows®
clipboard, where it can be pasted into other
areas of the ProTune II spreadsheet or into
other applications. Select an area of the
spreadsheet, use the Copy function, and then
use the Paste function of ProTune II or
another application to paste the information
to a new location.
Also see Paste 25 .
SUMMARY: There are two ways to use the
Copy function…
1) Using the menu bar: Select Copy from
the Edit menu.
2) Using the keyboard: Hold Ctrl + press C.
3.4.3 Paste
SUMMARY: There are three ways to use the
Undo function…
1) Using the tool bar: Click the Undo button:
2) Using the menu bar: Select Undo from
the Edit menu.
3) Using the keyboard: Hold Ctrl + press Z.
Note: This menu function is not available in
Basic User Mode. See Basic and Advanced
User Levels 15 for more information.
Selecting Paste will transfer values from the
Windows® clipboard to the current cursor
location on the spreadsheet. Select an area
of the spreadsheet or select a table of values
in another application, use that applications
Copy function, and then use the Paste
function of ProTune II to paste the
information to a new location.
Also see Copy 25 .
SUMMARY: There are two ways to use the
2010 S&S Cycle® Inc.
26
ProTune II
Paste function…
3.4.5 Average Selected Area
1) Using the menu bar: Select Paste from
the Edit menu.
2) Using the keyboard: Hold Ctrl + press V.
3.4.4 Blend (Interpolate) Selected Area
Note: This menu function is not available in
Basic User Mode. See Basic and Advanced
User Levels 15 for more information.
Selecting this function will blend (interpolate)
the current selected area in the table.
Interpolation effectively 'draws' straight value
lines between the corners of the selected
area, producing an area of constant gradient.
This can be used to 'straighten-out' areas of
the table.
1. Select an area of the table by using the
spreadsheet or graph. See Using The
Spreadsheet 71 and Using the 3D Graph
74 for more details.
2. Select Blend (Interpolate) Selected
Area.
Note: This menu function is not available in
Basic User Mode. See Basic and Advanced
User Levels 15 for more information.
Selecting this function will perform a
weighted average on the current selected
area in the table. This averaging function will
reduce the differences between neighboring
sites in the selected area and can be used to
'smooth' areas of the table.
1. Select an area of the table by using the
spreadsheet or graph. See Using The
Spreadsheet 71 and Using the 3D Graph
74 for more details.
2. Select Average Selected Area.
SUMMARY: There are three ways to average
the selected area…
1) Using the menu bar: Select Average
Selected Area from the Edit menu.
2) Using the keyboard: Hold Shift + press
F8.
3) Using the spreadsheet or graph: Rightclick on the selected cells and select
Average Selected Area from the menu.
SUMMARY: There are three ways to blend
(interpolate) the selected area…
1) Using the menu bar: Select Blend
(Interpolate) Selected Area from the Edit
menu.
2) Using the keyboard: Press F8.
3) Using the spreadsheet or graph: Rightclick on the selected cells and select Blend
(Interpolate) Selected Area from the
menu.
3.4.6 Tag / Untag Cells
Note: This menu function is not available in
Basic User Mode. See Basic and Advanced
User Levels 15 for more information.
Cell tags are used to mark areas of the table
for later reference. For example, if you detect
a problem with an area of the table while the
2010 S&S Cycle® Inc.
Menu Functions
engine is running, you can mark it for later
attention by tagging the location on the
table.
When a cell is tagged it appears with a
downward black triangle on the graph and a
purple flag on the spreadsheet:
27
Selecting the Clear All Markers function will
clear all tags and markers currently present
on the graph and spreadsheet, including
'Live-Tuned' markers and user tags. See Tag/
Untag Cells 73 for more details.
SUMMARY: There are three ways to clear all
markers on the current table…
1) Using the menu bar: Select Clear All
Markers from the Edit menu.
2) Using the keyboard: Press F3.
To tag or untag a cell or group of cells:
1. Move the cursor to the cell that you want
to tag or select an area of the table by
using the spreadsheet or graph. See Using
The Spreadsheet 71 and Using the 3D
Graph 74 for more details.
2. Tag the cell(s) by selecting Tag / Untag
Cells.
3. Untag the cell(s) by selecting Tag /
Untag Cells.
SUMMARY: There are three ways to tag and
untag cells…
1) Using the menu bar: Select Tag/Untag
Cells from the Edit menu.
2) Using the keyboard: Press F9.
3) Using the spreadsheet or graph: Rightclick on a selected cell or area and select
Tag/Untag Cells from the menu.
3.4.7 Clear All Markers
Note: This menu function is not available in
Basic User Mode. See Basic and Advanced
User Levels 15 for more information.
3) Using the spreadsheet or graph: Rightclick on the spreadsheet or graph and select
Clear All Markers from the menu.
3.4.8 Cycle Grid/Graph Position
Note: This menu function is not available in
Basic User Mode. See Basic and Advanced
User Levels 15 for more information.
You can select the display layout of the table
using this function. The default display layout
is with the 3D Graph at the top of the screen
and the spreadsheet at the bottom of the
screen. Select Cycle Grid/Graph Position
repeatedly to cycle through the available
display layout options.
1. Select Cycle Grid/Graph Position. This
will place the spreadsheet at the top of the
screen and the graph at the bottom.
2. Select Cycle Grid/Graph Position again.
This will remove the graph and show the
table as a spreadsheet only.
3. Select Cycle Grid/Graph Position again.
This will remove the spreadsheet and
show the table as a graph only.
4. Select Cycle Grid/Graph Position again.
2010 S&S Cycle® Inc.
28
ProTune II
This will return the display to its default
mode with the graph at the top of the
screen and the spreadsheet at the bottom.
For more information, see Changing the
Spreadsheet and Graph Layout 75 .
SUMMARY: There are two ways to cycle the
position of the grid and graph…
1) Using the menu bar: Select Cycle Grid/
Graph Position from the Edit menu.
2) Using the keyboard: Press F6.
3.4.9 Cycle Grid Size
3.4.10 Cycle Graph-Line Resolution
You can change the number of lines dividing
the 3D graph by using this function. There
are the following three modes: high
resolution (closely spaced), medium
resolution, and low resolution (widely
spaced). Select Cycle Graph-Line
Resolution repeatedly to cycle through the
available options.
SUMMARY: There are two ways to cycle the
graph-line resolution of the 3D graph…
1) Using the menu bar: Select Cycle GraphLine Resolution from the Edit menu.
2) Using the keyboard: Press F5.
Note: This menu function is not available in
Basic User Mode. See Basic and Advanced
User Levels 15 for more information.
You can change the size of the cells in the
spreadsheet by using this function. There are
three modes, small, normal and large. Select
Cycle Grid Size repeatedly to cycle through
the available options.
3.4.11 Switch On/Off Map Cursor Pop-up
By default, a small pop-up window is shown
above the cursor in a 3D graph. It shows the
table axis values at that location.
1. Select Cycle Grid Size. This will set the
cell size of the spreadsheet to large.
2. Select Cycle Grid Size again. This will set
the cell size of the spreadsheet to small.
3. Select Cycle Grid Size again. This will set
the cell size of the spreadsheet back to
normal.
SUMMARY: There are two ways to cycle the
grid size of the spreadsheet…
1) Using the menu bar: Select Cycle Grid
Size from the Edit menu.
2) Using the keyboard: Hold Shift + press
F6.
Use the Switch On/Off Map Cursor Popup function to show or hide the pop-up
window.
SUMMARY: There are two ways to switch on/
off the map cursor pop-up window…
1) Using the menu bar: Select Switch On/
Off Map Cursor Pop-up from the Edit
menu.
2) Using the keyboard: Hold the Shift +
press F7.
2010 S&S Cycle® Inc.
Menu Functions
3.4.12 Live-Tune Mode On/Off
29
Tune mode will deactivate.
Select this function to activate and deactivate
Live-Tune mode. When Live-Tune mode is
activated, tuning adjustments to the current
table have an immediate effect on the table
running inside the ECM.
For details on live-tuning in Basic Mode, see
Live-Tune in Basic Mode 69 .
For details on live-tuning in Advanced Mode,
see Live-Tune in Advanced Mode 75
3. The ECM is now running its original (preLive Tune) table. In order to utilize the
changes that you made to the table during
Live-Tune, you must send the modified
Live-Tune table to the ECM. A message
will appear when you deactivate Live-Tune
mode asking whether you want to do this.
Click Yes to send the tuned table to the
ECM or click No cancel any changes made
in Live-Tune.
SUMMARY: There are three ways to activate
or deactivate Live-Tune mode…
To activate Live-Tune mode:
1. First ensure the ECM is connected. See
Connecting the ECM 15 for more
information.
1) Using the tool-bar: Click the Live-Tune
button:
2) Using the menu bar: Select Live-Tune
Mode On/Off from the Edit menu.
2. Load the table that you want to Live-Tune.
Select the table using the tool-bar or the
View menu. Select the ECM as the current
data source using the Current Data
Source Selector at the top of the screen
or from the View menu.
3. Select Live-Tune Mode On/Off
29
Note that during Live-Tune Mode, many of
the program functions are disabled. You
must deactivate Live-Tune Mode in order to
return to normal mode.
To deactivate Live-Tune mode:
29
.
2. ProTune II will automatically send new
control information to the ECM and Live-
2010 S&S Cycle® Inc.
3.4.13 Switch On/Off Auto-Tagging in LiveTune
.
4. ProTune II will automatically send new
control information to the ECM and LiveTune mode will become active. Tuning the
table will now directly effect the tuning in
the ECM.
1. Select Live-Tune Mode On/Off
3) Using the keyboard: Hold Ctrl + press L.
Note: This menu function is not available in
Basic User Mode. See Basic and Advanced
User Levels 15 for more information.
The Auto-Tagging feature will tag cells that
the ECM has visited during live-tuning with
black cell markers on the graph and purple
markers on the spreadsheet. Auto-tagging
allows you to see the speeds and throttle
positions that the engine has been run at
during a Live-Tune session. Selecting Switch
On/Off Auto-Tagging in LiveTune will
toggle this feature on or off (the default is
on).
30
ProTune II
3.4.15 Snap To Live-Tune Cursor
If you want to manually tag cells, see Tag/
Untag Cells 73 .
SUMMARY: There are two ways to switch
auto-tagging in LiveTune on/off…
1) Using the menu bar: Select Switch On/
Off Auto-Tagging in LiveTune from the
Edit menu.
2) Using the keyboard: Press F7.
3.4.14 Track Live-Tune Cursor
The Track Live-Tune Cursor feature enables
the table editing cursor (blue) to follow
(track) the position of the current engine
position cursor (black). This feature enables
Live-Tune value editing to take place at the
current engine speed and throttle position.
When disabled, you can move the editing
cursor freely with the cursor keys. Selecting
Track Live-Tune Cursor/Don't Track
Live-Tune Cursor will toggle this feature on
or off (the default is on).
SUMMARY: There are two ways to toggle
Live-Tune cursor tracking.
1) Using the menu bar: Select Track LiveTune Cursor (to enable) or Don't Track
Live-Tune Cursor (to disable) from the
Edit menu.
2) Using the keyboard: Press the Space bar.
During Live-Tune mode, you can use this
function to move the current editing cursor
to the current position of the ECM cursor.
This allows you to make adjustments at the
current engine speed and throttle position.
This function will only function when LiveTune cursor tracking is disabled (see Track
Live-Tune Cursor 30 ).
SUMMARY: There are two ways to snap to
the Live-Tune cursor.
1) Using the menu bar: Select Snap To
Live-Tune Cursor from the Edit menu.
2) Using the keyboard: Hold the Ctrl key +
press . (period key).
3.4.16 3D Graph Settings
You can change the axis range limits of the
3D graph by selecting this function. This is
useful if you want to 'zoom-in' on a particular
section of the graph. When you choose new
limits to display a table, they are used every
time that table is loaded unless you set new
limits or restore the default limits.
1. Select 3D Graph Settings…
2. The 3D Graph Settings dialog box will
appear. This box allows you to choose a
maximum RPM limit for the horizontal or
width (x) axis, a minimum and maximum
limit for the vertical or height (y) axis and
a maximum Throttle % for the diagonal or
depth (z) axis.
2010 S&S Cycle® Inc.
Menu Functions
31
it to highlight it and then click OK or
press Enter. You can also double-click on
an item to select it. If you want to browse
for another calibration, select the 'A
calibration file not on this list' option.
This will cause an Open File dialog box to
appear. Select a calibration file from this
dialog box and click Open.
3. Enter the required limits in the text boxes
or click the Reset To Default button to
restore the original limits.
4. Accept the new limits by clicking OK or by
pressing Enter. The 3D graph will now be
rescaled to the nearest limit you have
specified. Click Cancel or press Esc if you
don't want to change the limits.
SUMMARY: There are two ways to change
the 3D graph settings…
1) Using the menu bar: Select 3D Graph
Settings… from the Edit menu.
3. The ECM Basic Setup dialog box will
appear. The top line of the dialog box
shows the ECM or file that you are editing.
Beneath it is an information box which will
show you information about a function
when it is selected.
2) Using the keyboard: Hold the Shift +
press F5.
3.5 View Menu
3.5.1 ECM Basic Setup
The ECM Basic Setup allows you to change
basic control properties of the ECM.
1. Select ECM Basic Setup.
2. The Select Data Source dialog box will
appear. The dialog box will list the current
active data sources; i.e. the ECM if it is
connected, the demonstration data built
into the software, and any calibration files
that you accessed since starting the
software. To select a data source, click on
2010 S&S Cycle® Inc.
4. The Use Check Engine Light as a Shift
Light check box controls the shift light
feature. When selected, the ECM is setup
to use the Check Engine fault light on the
motorcycle as a "high RPM" or "shift-up"
indicator.
5. If the Use Check Engine Light as a
32
ProTune II
Shift Light property is selected, you may
specify the engine speed at which the shift
light illuminates, Shift Light ON above
Engine Speed. You may also specify the
engine speed at which the shift light will
cancel, Shift Light OFF below Engine
Speed.
6. The Break-In Limiter System Enabled
(for 55-5069 USB modules only) check
box controls the Break-In limiter function.
Note: The Break-In Rev Limit Status
can only be viewed from an ECM. The
break-in limiter automatically sets the revlimit for an initial period of running a new
engine, allowing the new engine to be
properly broken-in. Once the Break-In
limiter function is enabled, it cannot be
disabled until the break-in limiter time has
elapsed. The length of this period,
together with the current rev-limit, can be
found in the ECM Information 48 dialog
page Rev Limiting 53 tab. If the Break-In
Limiter System Enabled checkbox is
checked, this means the break-in limiter is
currently active and will be deactivated
once the break-in period is complete. If
the box is unchecked, you can enable the
break-in limiting period by checking the
box and clicking Save.
7. The Wheel Speed Gear Factor (for 555069 USB modules only) is a value
used by the ECM to scale the input from
the wheel speed sensor to drive the
speedometer and mileage counter. You
can adjust this value by entering a
percentage. 100% represents 50000
counts per kilometer (50000 pulses from
the wheel speed sensor equals 1000
meters traveled). The calculated number
of counts per kilometer is also shown. The
valid range for the percentage value is 5%
(2500 counts per kilometer) to 165%
(82500 counts per kilometer).
to save the changes.
If this software is in Advanced Mode, the
ECM Basic Setup dialog box will allow you to
set the Rev Limiter SOFT Cut. When the
engine is above the SOFT Cut threshold, the
ECM will only fire every other spark to reduce
power. When you set the soft-cut limit, the
Rev Limiter HARD Cut is automatically set
250 RPM above the soft-cut threshold. When
the engine is above the hard-cut limit, the
ECM will not fire any sparks.
SUMMARY: There are three ways to access
the ECM Basic Setup…
1) Using the tool bar: Click the Setup button
2) Using the menu bar: Select ECM Basic
Setup from the View menu.
3) Using the keyboard: Hold Ctrl + press 1.
When you have finished viewing or editing
the properties, click OK or press Enter to
save the changes to the current data source.
Click Cancel or press Esc if you do not wish
2010 S&S Cycle® Inc.
Menu Functions
3.5.2 Diagnostic Trouble Codes
33
will appear. When viewing diagnostic
information from calibration files, the
Current DTC Error message field and list
are not applicable and will not be shown.
The Diagnostic Trouble Codes feature shows
you the current trouble code status and
historic trouble code status of the connected
S&S® ECM.
1. To view current diagnostic info, ensure the
ECM is connected. See Connecting the
ECM 15 for more information. 55-5069
ECMs with the appropriate calibration file
can also retrieve freeze-frame diagnostic
information.
2. Select Diagnostic Trouble Codes.
3. The Select Data Source dialog box will
appear. The dialog box will list the current
active data sources; i.e. the ECM if it is
connected, the demonstration data built
into the software, and any calibration files
that you accessed since starting the
software. To view live and current
diagnostic data, you must select the ECM
as the data source. To select a data
source, click on it to highlight it and then
click OK or press Enter. You can also
double-click on an item to select it. If you
want to browse for another calibration,
select the 'A calibration file not on this
list' option. This will cause an Open File
dialog box to appear. Select a calibration
file from this dialog box and click Open.
4. The Diagnostic Trouble Codes dialog box
2010 S&S Cycle® Inc.
5. The top section is the Current DTC
Error box. This displays a scrolling list of
the current faults detected by the system.
If there are no current faults the message
'No Current Trouble Codes' will be
displayed on a green background. If there
are current faults detected, the number of
current faults will be displayed, followed
by each fault displayed in turn on a red
background.
6. The Current Diagnostic Trouble Code
List displays the current faults as a list,
together with their P-Codes (standard
automotive codes for vehicle faults).
7. The Historic Diagnostic Trouble Code
List displays all faults logged since the
codes were last reset. For certain ECMs
with the appropriate calibration file,
freeze-frame data may be available for
some of the items logged in the list.
Freeze-frame data logs key engine
parameters when the fault occurred. If a
historic trouble-code has freeze-frame
data, 'Yes' will be shown in the 'FreezeFrame?' column. You can view the data
by selecting the fault in the list and
clicking Historic Freeze-Frame Data...
The parameters logged are Engine
Mileage, Trip Count, Engine Speed,
Throttle Voltage and the Time spent With
34
ProTune II
Fault active. Click OK or press Enter to
dismiss this box.
2. Select ECM Gauges.
8. Close the Diagnostic Trouble Codes dialog
box by clicking Exit or pressing Enter. If
you want to clear the list of historic
trouble-codes in the ECM, click Clear
Historic DTCs. The message 'Historic
Trouble-Codes Reset' will appear. Click OK
. You will then be returned to the
Diagnostic Trouble Codes dialog box. Note
that if there are current faults, historic
faults will always reappear.
3. The ECM Gauges window will appear. This
can be moved and resized independently
of the main window. To close the window,
click the close button (X) in the top-right
corner. For more information on this
interface, see Using the Gauges Window
77 .
SUMMARY: There are three ways to access
the DTCs dialog box…
1) Using the tool bar: Click the DTCs button:
2) Using the menu bar: Select Diagnostic
Trouble Codes from the View menu.
3) Using the keyboard: Hold Ctrl + press 2
3.5.3 ECM Gauges
SUMMARY: There are three ways to view the
Gauges display …
1) Using the tool bar: Click the Gauges
button:
2) Using the menu bar: Select ECM Gauges
from the View menu.
3) Using the keyboard: Hold Ctrl + press 3
Selecting the ECM Gauges function will open
the Gauges display, a configurable display
that allows you to view various ECM
parameters in real-time.
1. Ensure the ECM is connected. See
Connecting the ECM 15 for more
information.
3.5.4 Fuel Injection Base Table
Selecting this option will load the Fuel
2010 S&S Cycle® Inc.
Menu Functions
Injection Base Table from the current data
source. This table is used as the base table
for calculating the current fuel injector pulse
width. See The Fuel Injection System 65 for
more information on this table.
You can change the current data source by
either selecting an option from the Current
Data Source drop-down list at the top of the
screen, or from the Current Data Source
menu 47 in the View menu. Alternatively,
you can select Open Table from… 59 from
the Options menu.
SUMMARY: There are three ways to access
the Fuel Injection Base Table…
35
the Ignition Timing Base Table…
1) Using the tool bar: Click the Ignition
button:
2) Using the menu bar: Select Ignition
Timing Base Table from the View menu.
3) Using the keyboard: Hold Ctrl + press 5.
3.5.6 Front Cylinder Adjustment Table
1) Using the tool bar: Click the Fuel button:
2) Using the menu bar: Select Fuel
Injection Base Table from the View
menu.
3) Using the keyboard: Hold Ctrl + press 4.
3.5.5 Ignition Timing Base Table
Selecting this option will load the Ignition
Timing Base Table from the current data
source. This table is used as the base table
for calculating the current ignition advance in
degrees before Top Dead Center. See The
Ignition Timing System 66 for more
information on this table.
You can change the current data source by
either selecting an option from the Current
Data Source drop-down list at the top of the
screen, or from the Current Data Source
menu 47 in the View menu.Alternatively,
you can select Open Table from… 59 from
the Options menu.
SUMMARY: There are three ways to access
2010 S&S Cycle® Inc.
Selecting this option will load the Front
Cylinder Adjustment Table from the current
data source. This table is used to adjust the
fuel delivery for each cylinder. See The Fuel
Injection System 65 for more information on
this table.
You can change the current data source by
either selecting an option from the Current
Data Source drop-down list at the top of the
screen, or from the Current Data Source
menu 47 in the View menu. Alternatively,
you can select Open Table from… 59 from
the Options menu.
SUMMARY: There are three ways to access
the Front Cylinder Adjustment Table…
1) Using the tool bar: Click the Front button:
2) Using the menu bar: Select Front
Cylinder Fuel Adjustment Table from the
View menu.
3) Using the keyboard: Hold Ctrl + press 6.
36
ProTune II
3.5.7 Rear Cylinder Adjustment Table
Selecting this option will load the Rear
Cylinder Adjustment Table from the current
data source. This table is used to adjust the
fuel delivery for each cylinder. See The Fuel
Injection System 65 for more information on
this table.
You can change the current data source by
either selecting an option from the Current
Data Source drop-down list at the top of the
screen, or from the Current Data Source
menu 47 in the View menu. Alternatively,
you can select Open Table from… 59 from
the Options menu.
into the software, and any calibration files
that you accessed since starting the
software. To select a data source, click on
it to highlight it and then click OK or
press Enter. You can also double-click on
an item to select it. If you want to browse
for another calibration, select the 'A
calibration file not on this list' option.
This will cause an Open File dialog box to
appear. Select a calibration file from this
dialog box and click Open.
SUMMARY: There are three ways to access
the Rear Cylinder Adjustment Table…
1) Using the tool bar: Click the Rear button:
2) Using the menu bar: Select Rear
Cylinder Fuel Adjustment Table from the
View menu.
3. The Acceleration Fuel Settings dialog box
will appear. You can select from three
Sensitivity settings (Low, Medium and
High) and three Volume settings
(Minimum, Medium and Maximum).
3) Using the keyboard: Hold Ctrl + press 7.
3.5.8 Acceleration Fuel Settings
The Acceleration Fuel Settings function in the
ECM improves acceleration by adjusting fuel
delivery according to throttle movement.
When the throttle is opened, additional fuel
allows the engine to accelerate quickly.
1. Select Acceleration Fuel Settings.
2. The Select Data Source dialog box will
appear. The dialog box will list the current
active data sources; i.e. the ECM if it is
connected, the demonstration data built
4. The Sensitivity setting sets how responsive
the accel fuel system is to throttle
movement. A low sensitivity means that
large throttle movements will be required
to trigger changes in the fuel delivery. A
high sensitivity means that small throttle
movements will trigger changes in the fuel
delivery. Select an option by clicking on
the list's down arrow. If the option is set
to Default (Retain factory settings) the
2010 S&S Cycle® Inc.
Menu Functions
data in the data source that you are
editing won't be altered from its current
setting.
5. The Volume setting sets how large the
boost in fuel delivery is when the accel is
triggered. A minimum volume means the
change in fuel delivery will be relatively
small. A maximum volume means the
change in fuel delivery will be relatively
large. Select an option by clicking on the
list's down arrow. If the option is set to
Default (Retain factory settings) the data
in the data source that you are editing
won't be altered from its current setting.
6. Click Cancel or press Esc if you do not
want to save the changes to the settings.
Click Save or press Enter to store your
new accel setup in the data source that
you are editing (shown at the top of the
dialog box).
37
more details.
1. Select Closed-Loop Control Settings.
2. The Select Data Source dialog box will
appear. The dialog box will list the current
active data sources; i.e. the ECM if it is
connected, the demonstration data built
into the software, and any calibration files
that you accessed since starting the
software. To select a data source, click on
it to highlight it and then click OK or
press Enter. You can also double-click on
an item to select it. If you want to browse
for another calibration, select the 'A
calibration file not on this list' option.
This will cause an Open File dialog box to
appear. Select a calibration file from this
dialog box and click Open.
SUMMARY: There are three ways to access
the Acceleration Fuel Settings…
1) Using the tool bar: Click the Accel button:
2) Using the menu bar: Select Acceleration
Fuel Settings from the View menu.
3) Using the keyboard: Hold Ctrl + press 8.
3.5.9 Closed-Loop Control Settings
This dialog box allows you to set the ClosedLoop fuel control mode in the S&S® ECM or
calibration file. The Closed-Loop system is a
feature that allows the ECM to learn fuel
delivery based upon comparing the
calibration fuel mixture against the actual
fuel mixture measured by the oxygen sensors
in the exhaust system. See the section on
The Closed-Loop Fuel Control System 83 for
2010 S&S Cycle® Inc.
3. The Closed-Loop Control Settings dialog
box will now appear. For details on how to
use this dialog box in Basic Mode, see
Closed-Loop Setup in Basic Mode 84 . For
details on how to use this dialog box in
Advanced Mode, see Closed-Loop Setup in
Advanced Mode 85 .
4. Click Cancel or press Esc if you do not
want to save the changes that you have
made to the settings. Click Save or press
Enter to store your new Closed-Loop
setup in the data source that you are
editing (shown at the top of the dialog
box).
SUMMARY: There are two ways to access the
Closed-Loop Control Settings…
1) Using the menu bar: Select Closed-Loop
Control Settings from the View menu.
38
ProTune II
2) Using the keyboard: Hold Ctrl + press 9.
3.5.10 Knock Control Settings
For 55-5069 USB modules only. This
dialog box allows you to set the Knock
Control mode in the S&S® ECM or calibration
file. The Knock Control system adjusts
ignition timing to avoid engine knocking. See
The Knock (Adaptive Ignition) Control
System 88 for more details.
1. Select Knock Control Settings.
2. The Select Data Source dialog box will
appear. The dialog box will list the current
active data sources; i.e. the ECM if it is
connected, the demonstration data built
into the software, and any calibration files
that you accessed since starting the
software. To select a data source, click on
it to highlight it and then click OK or
press Enter. You can also double-click on
an item to select it. If you want to browse
for another calibration, select the 'A
calibration file not on this list' option.
This will cause an Open File dialog box to
appear. Select a calibration file from this
dialog box and click Open.
4. Select a control mode from the drop-down
list. Please see The Knock (Adaptive
Ignition) Control System 88 for more
details.
5. To save the new setting, click Save or
press Enter. To exit without saving any
changes, click Cancel or press Esc.
SUMMARY: There are two ways to access the
Knock Control Settings…
1) Using the menu bar: Select Knock
Control Settings from the View menu.
2) Using the keyboard: Hold Ctrl + press 0.
3.5.11 Engine Temperature Ignition Compensation
Note: This menu function is not available in
Basic User Mode. See Basic and Advanced
User Levels 15 for more information.
3. The Knock Control Settings dialog box will
now appear.
Selecting this option will allow you to view
and edit the Engine Temperature Ignition
Compensation table. This table specifies the
adjustments made by the ECM to the ignition
timing as a function of the temperature of
the engine. See Temperature Compensation
Tables 82 for more details on this table.
1. Select Engine Temperature Ignition
Compensation.
2010 S&S Cycle® Inc.
Menu Functions
2. The Select Data Source dialog box will
appear. The dialog box will list the current
active data sources; i.e. the ECM if it is
connected, the demonstration data built
into the software, and any calibration files
that you accessed since starting the
software. To select a data source, click on
it to highlight it and then click OK or
press Enter. You can also double-click on
an item to select it. If you want to browse
for another calibration, select the 'A
calibration file not on this list' option.
This will cause an Open File dialog box to
appear. Select a calibration file from this
dialog box and click Open.
3. The table will now load. See Viewing and
Editing Advanced Tables 80 for more
details.
39
Selecting this option will allow you to view
and edit the Air Temperature Ignition
Compensation table. This table specifies the
adjustments made by the ECM to the ignition
timing as a function of the ambient air
temperature. See Temperature
Compensation Tables 82 for more details on
this table.
1. Select Air Temperature Ignition
Compensation.
2. The Select Data Source dialog box will
appear. The dialog box will list the current
active data sources; i.e. the ECM if it is
connected, the demonstration data built
into the software, and any calibration files
that you accessed since starting the
software. To select a data source, click on
it to highlight it and then click OK or
press Enter. You can also double-click on
an item to select it. If you want to browse
for another calibration, select the 'A
calibration file not on this list' option.
This will cause an Open File dialog box to
appear. Select a calibration file from this
dialog box and click Open.
SUMMARY: There are two ways to access the
Engine Temperature Ignition Compensation
table…
1) Using the menu bar: Select Engine
Temperature Ignition Compensation
from the View menu.
2) Using the keyboard: Hold Ctrl + Shift +
press 1.
3.5.12 Air Temperature Ignition Compensation
Note: This menu function is not available in
Basic User Mode. See Basic and Advanced
User Levels 15 for more information.
2010 S&S Cycle® Inc.
3. The table will now load. See Viewing and
Editing Advanced Tables 80 for more
details.
SUMMARY: There are two ways to access the
Air Temperature Ignition Compensation
table…
1) Using the menu bar: Select Air
Temperature Ignition Compensation
from the View menu.
40
ProTune II
3. The table will now load. See Viewing and
Editing Advanced Tables 80 for more
details.
2) Using the keyboard: Hold Ctrl + Shift +
press 2.
3.5.13 Engine Temperature Fuel Compensation
Note: This menu function is not available in
Basic User Mode. See Basic and Advanced
User Levels 15 for more information.
Selecting this option will allow you to view
and edit the Engine Temperature Fuel
Compensation table. This table specifies the
adjustments made by the ECM to the fuel
delivery as a function of the temperature of
the engine. See Temperature Compensation
Tables 82 for more details on this table.
1. Select Engine Temperature Fuel
Compensation.
2. The Select Data Source dialog box will
appear. The dialog box will list the current
active data sources; i.e. the ECM if it is
connected, the demonstration data built
into the software, and any calibration files
that you accessed since starting the
software. To select a data source, click on
it to highlight it and then click OK or
press Enter. You can also double-click on
an item to select it. If you want to browse
for another calibration, select the 'A
calibration file not on this list' option.
This will cause an Open File dialog box to
appear. Select a calibration file from this
dialog box and click Open.
SUMMARY: There are two ways to access the
Engine Temperature Fuel Compensation
table…
1) Using the menu bar: Select Engine
Temperature Fuel Compensation from
the View menu.
2) Using the keyboard: Hold Ctrl + Shift +
press 3.
3.5.14 Air Temperature Fuel Compensation
Note: This menu function is not available in
Basic User Mode. See Basic and Advanced
User Levels 15 for more information.
Selecting this option will allow you to view
and edit the Air Temperature Fuel
Compensation table. This table specifies the
adjustments made by the ECM to the fuel
delivery as a function of the ambient air
temperature. See Temperature
Compensation Tables 82 for more details on
this table.
1. Select Air Temperature Fuel
Compensation.
2. The Select Data Source dialog box will
appear. The dialog box will list the current
active data sources; i.e. the ECM if it is
connected, the demonstration data built
into the software, and any calibration files
that you accessed since starting the
software. To select a data source, click on
it to highlight it and then click OK or
press Enter. You can also double-click on
an item to select it. If you want to browse
for another calibration, select the 'A
calibration file not on this list' option.
2010 S&S Cycle® Inc.
Menu Functions
This will cause an Open File dialog box to
appear. Select a calibration file from this
dialog box and click Open.
3. The table will now load. See Viewing and
Editing Advanced Tables 80 for more
details.
41
2. The Select Data Source dialog box will
appear. The dialog box will list the current
active data sources; i.e. the ECM if it is
connected, the demonstration data built
into the software, and any calibration files
that you accessed since starting the
software. To select a data source, click on
it to highlight it and then click OK or
press Enter. You can also double-click on
an item to select it. If you want to browse
for another calibration, select the 'A
calibration file not on this list' option.
This will cause an Open File dialog box to
appear. Select a calibration file from this
dialog box and click Open.
SUMMARY: There are two ways to access the
Air Temperature Fuel Compensation table…
1) Using the menu bar: Select Air
Temperature Fuel Compensation from
the View menu.
2) Using the keyboard: Hold Ctrl + Shift +
press 4.
3.5.15 Engine Temperature Start Map
Note: This menu function is not available in
Basic User Mode. See Basic and Advanced
User Levels 15 for more information.
Selecting this option will allow you to view
and edit the Engine Temperature Start Map
table. This table specifies the adjustments
made by the ECM to the fuel delivery during
engine cranking as a function of the
temperature of the engine. See Engine
Temperature Start Map 82 for more details
on this table.
1. Select Engine Temperature Start Map.
2010 S&S Cycle® Inc.
3. The table will now load. Viewing and
Editing Advanced Tables 80 for more
details.
SUMMARY: There are two ways to access the
Engine Temperature Start Map…
1) Using the menu bar: Select Engine
Temperature Start Map from the View
menu.
2) Using the keyboard: Hold Ctrl + Shift +
press 5.
3.5.16 Stepper Motor Orientation Setting
Note: This menu function is not available in
Basic User Mode. See Basic and Advanced
User Levels 15 for more information.
42
ProTune II
The stepper-motor on your motorcycle is
used to control the idle speed of the engine
by automatically making small adjustments
to the throttle position.
The Stepper Motor Orientation Setting allows
for different orientation of stepper motor
wiring. The orientation should be left as
default unless you have reason to alter it.
The correct orientation is such that the
stepper position increases as engine speed
increases.
1. Select Stepper Motor Orientation
Setting.
2. The Select Data Source dialog box will
appear. The dialog box will list the current
active data sources; i.e. the ECM if it is
connected, the demonstration data built
into the software, and any calibration files
that you accessed since starting the
software. To select a data source, click on
it to highlight it and then click OK or
press Enter. You can also double-click on
an item to select it. If you want to browse
for another calibration, select the 'A
calibration file not on this list' option.
This will cause an Open File dialog box to
appear. Select a calibration file from this
dialog box and click Open.
4. Click Save or press Enter to set the new
mode, click Cancel or press Esc to cancel
any changes.
5. When you have altered the Stepper Motor
Orientation Setting in an ECM, a message
box will appear advising you to cycle
power to the ECM (turn key off for at least
15 seconds) before continuing. This will
allow the ECM to power-up using the new
stepper motor orientation.
SUMMARY: There are two ways to access the
Stepper Motor Orientation Setting…
1) Using the menu bar: Select Stepper
Motor Orientation Setting from the View
menu.
2) Using the keyboard: Hold Ctrl + Shift +
press 6.
3.5.17 Stepper Pre-Start Position Map
Note: This menu function is not available in
Basic User Mode. See Basic and Advanced
User Levels 15 for more information.
3. The Stepper Motor Orientation Setting
dialog box will appear. Select Normal or
Reversed from the drop-down list by
clicking on the down arrow.
The stepper-motor on your motorcycle is
used to control the idle speed of the engine
by automatically making small adjustments
to the throttle position.
The Stepper Pre-Start Position Map allows
you to set the initial position of the stepper
2010 S&S Cycle® Inc.
Menu Functions
motor during cranking as a function of
engine temperature. See Stepper Motor
Tables (Idle Speed Control) 82 for more
details on this map.
1. Select Stepper Pre-Start Position Map.
2. The Select Data Source dialog box will
appear. The dialog box will list the current
active data sources; i.e. the ECM if it is
connected, the demonstration data built
into the software, and any calibration files
that you accessed since starting the
software. To select a data source, click on
it to highlight it and then click OK or
press Enter. You can also double-click on
an item to select it. If you want to browse
for another calibration, select the 'A
calibration file not on this list' option.
This will cause an Open File dialog box to
appear. Select a calibration file from this
dialog box and click Open.
3. The table will now load. See Viewing and
Editing Advanced Tables 80 for more
details.
SUMMARY: There are two ways to access the
Stepper Pre-Start Position Map…
1) Using the menu bar: Select Stepper PreStart Position Map from the View menu.
43
3.5.18 Stepper Position with Temperature Map
Note: This menu function is not available in
Basic User Mode. See Basic and Advanced
User Levels 15 for more information.
The stepper-motor on your motorcycle is
used to control the idle speed of the engine
by automatically making small adjustments
to the throttle position.
The Stepper Position with Temperature Map
allows you to set the initial position of the
stepper motor during engine running as a
function of engine temperature. See Stepper
Motor Tables (Idle Speed Control) 82 for
more details on this map.
1. Select Stepper Position with
Temperature Map.
2. The Select Data Source dialog box will
appear. The dialog box will list the current
active data sources; i.e. the ECM if it is
connected, the demonstration data built
into the software, and any calibration files
that you accessed since starting the
software. To select a data source, click on
it to highlight it and then click OK or
press Enter. You can also double-click on
an item to select it. If you want to browse
for another calibration, select the 'A
calibration file not on this list' option.
This will cause an Open File dialog box to
appear. Select a calibration file from this
dialog box and click Open.
2) Using the keyboard: Hold Ctrl + Shift +
press 7.
3. The table will now load. See Viewing and
2010 S&S Cycle® Inc.
44
ProTune II
Editing Advanced Tables
details.
80
for more
SUMMARY: There are two ways to access the
Stepper Position with Temperature table…
calibration file not on this list' option.
This will cause an Open File dialog box to
appear. Select a calibration file from this
dialog box and click Open.
1) Using the menu bar: Select Stepper
Position with Temperature from the
View menu.
2) Using the keyboard: Hold Ctrl + Shift +
press 8.
3.5.19 Target Idle Speed Setting
3. The target idle speed data will now be
loaded from the ECM/Tune-File and the
Target Idle Speed Setting dialog box will
appear.
Note: This menu function is not available in
Basic User Mode. See Basic and Advanced
User Levels 15 for more information.
This function allows you to set the target idle
speed setting of the ECM. This is the RPM
value that the ECM will try to attain when
idling.
After the engine is started, the target idle
speed is set to the optimum value for the
engine temperature and conditions. As the
motorcycle engine warms-up the ECM will
move the idle speed towards the value that
you specify. See Stepper Motor Tables (Idle
Speed Control) 82 for more details.
1. Select Target Idle Speed Setting.
2. The Select Data Source dialog box will
appear. The dialog box will list the current
active data sources; i.e. the ECM if it is
connected, the demonstration data built
into the software, and any calibration files
that you accessed since starting the
software. To select a data source, click on
it to highlight it and then click OK or
press Enter. You can also double-click on
an item to select it. If you want to browse
for another calibration, select the 'A
4. Enter a new target idle speed between
900 and 1100 RPM in the edit box.
5. Click Save or press Enter to set the new
value. Click Cancel or press Esc to
discard any changes.
SUMMARY: There are two ways to access the
Target Idle Speed Setting…
1) Using the menu bar: Select Target Idle
Speed Setting from the View menu.
2) Using the keyboard: Hold Ctrl + Shift +
press 9.
2010 S&S Cycle® Inc.
Menu Functions
45
3.5.20 Stepper Position Fuel Compensation
SUMMARY: There are two ways to access the
Stepper Position Fuel Compensation table…
Note: This menu function is not available in
Basic User Mode. See Basic and Advanced
User Levels 15 for more information.
The stepper position fuel compensation
feature adjusts fuel delivery as a function of
the stepper motor position. The stepper
motor controls the throttle valve used for idle
speed control. See Stepper Motor Tables
(Idle Speed Control) 82 for more details.
When this table is saved to an ECM, it will
have no effect unless the checkbox located
below the spreadsheet is checked.
1. Select Stepper Position Fuel
Compensation.
2. The Select Data Source dialog box will
appear. The dialog box will list the current
active data sources; i.e. the ECM if it is
connected, the demonstration data built
into the software, and any calibration files
that you accessed since starting the
software. To select a data source, click on
it to highlight it and then click OK or
press Enter. You can also double-click on
an item to select it. If you want to browse
for another calibration, select the 'A
calibration file not on this list' option.
This will cause an Open File dialog box to
appear. Select a calibration file from this
dialog box and click Open.
3. The table will now load. See Viewing and
Editing Advanced Tables 80 for more
details.
2010 S&S Cycle® Inc.
1) Using the menu bar: Select Stepper
Position Fuel Compensation from the
View menu.
2) Using the keyboard: Hold Ctrl + Shift +
press B.
3.5.21 Front Cylinder Adaptive Map
Note: This menu function is not available in
Basic User Mode. See Basic and Advanced
User Levels 15 for more information.
Selecting this function allows you to view the
front cylinder adaptive fuel table from the
ECM. This table is only accessible if an ECM
supporting Closed-Loop Fuel Control is
connected. The table can only be viewed, it
cannot be modified as its values are
generated internally by the ECM.
The adaptive maps are fuel trim maps that
the ECM learns based upon the results of
Closed-Loop Fuel Control. For more details
on this subject see The Closed-Loop Fuel
Control System 83 .
1. Ensure the ECM is connected. See
Connecting the ECM 15 for more
information.
2. Select Front Cylinder Adaptive Map.
The map will now be loaded and
displayed.
SUMMARY: There are two ways to access the
Front Cylinder Adaptive Map…
46
ProTune II
1) Using the menu bar: Select Front
Cylinder Adaptive Map from the View
menu. Note this menu item will only be
shown when an ECM supporting Closed-Loop
Fuel Control is connected.
2) Using the keyboard: Hold Ctrl + Shift +
press C.
1) Using the menu bar: Select Rear
Cylinder Adaptive Map from the View
menu. Note this menu item will only be
shown when an ECM supporting Closed-Loop
Fuel Control is connected.
2) Using the keyboard: Hold Ctrl + Shift +
press D.
3.5.23 Target Closed-Loop Fuel Map
3.5.22 Rear Cylinder Adaptive Map
Note: This menu function is not available in
Basic User Mode. See Basic and Advanced
User Levels 15 for more information.
Selecting this function allows you to view the
rear cylinder adaptive fuel table from the
ECM. This table is only accessible if an ECM
supporting Closed-Loop Fuel Control is
connected. The table can only be viewed, it
cannot be modified as its values are
generated internally by the ECM.
The adaptive maps are fuel trim maps that
the ECM learns based upon the results of
Closed-Loop Fuel Control. For more details
on this subject see The Closed-Loop Fuel
Control System 83 .
1. Ensure the ECM is connected. See
Connecting the ECM 15 for more
information.
2. Select Rear Cylinder Adaptive Map.
The map will now be loaded and
displayed.
SUMMARY: There are two ways to access the
Rear Cylinder Adaptive Map…
Note: This menu function is not available in
Basic User Mode. See Basic and Advanced
User Levels 15 for more information.
This item allows you to view the Target
Closed-Loop Fuel Map in an S&S® ECM or
Calibration File. The Closed-Loop system is a
feature that allows the ECM to learn fuel
delivery based upon comparing the
calibration fuel mixture against the actual
fuel mixture measured by the oxygen sensors
in the exhaust system. See the section on
The Closed-Loop Fuel Control System 83 for
more details.
1. Select Target Closed-Loop Fuel Map.
2. The Select Data Source dialog box will
appear. The dialog box will list the current
active data sources; i.e. the ECM if it is
connected, the demonstration data built
into the software, and any calibration files
that you accessed since starting the
software. To select a data source, click on
it to highlight it and then click OK or
press Enter. You can also double-click on
an item to select it. If you want to browse
for another calibration, select the 'A
calibration file not on this list' option.
This will cause an Open File dialog box to
appear. Select a calibration file from this
dialog box and click Open.
2010 S&S Cycle® Inc.
Menu Functions
47
2. Select Adaptive Ignition Map. The map
will now be loaded and displayed.
SUMMARY: There are two ways to access the
Adaptive Ignition Map…
3. The Target Closed-Loop Fuel Map will now
be loaded and displayed. Please see
Setting the Target Air-Fuel Mixture 85 for
more details on editing this table.
SUMMARY: There are two ways to access the
Target Closed-Loop Fuel Map…
1) Using the menu bar: Select Adaptive
Ignition Map from the View menu. Note
this menu item will only be shown when an
ECM supporting Knock Control is connected.
2) Using the keyboard: Hold Ctrl + Shift +
press F.
1) Using the menu bar: Select Target
Closed-Loop Fuel Map from the View
menu.
2) Using the keyboard: Hold Ctrl + Shift +
press E.
3.5.24 Adaptive Ignition Map
Note: This menu function is not available in
Basic User Mode. See Basic and Advanced
User Levels 15 for more information.
For 55-5069 USB modules only.
Selecting this function allows you to view the
Adaptive Ignition Map. This map stores the
current long-term ignition adjustments the
ECM learns based upon the feedback of the
knock sensor. The table can only be viewed,
it cannot be modified as its values are
generated internally by the ECM. See The
Knock (Adaptive Ignition) Control System 88
for more details.
1. Ensure the ECM is connected. See
Connecting the ECM 15 for more
information.
2010 S&S Cycle® Inc.
3.5.25 Current Data Source menu
The Current Data Source menu allows
you to load the current table from another
data source. From the menu you can choose
between the ECM (if connected), the Demo
Data, any calibrations that you have
accessed since the software started, or select
the 'Calibration not in this list' option to
browse for another calibrations. Selecting the
'Calibration not in this list' option will cause
the Open File dialog box to appear. Select a
file by clicking on its file name and click
Open.
SUMMARY: There are two ways to change
the current data source…
1) Using the tool bar: Select an item from
the Current Data Source drop down list
box on the tool-bar.
2) Using the menu bar: Access the Current
Data Source menu in the View menu.
Select one of the items in the menu.
48
ProTune II
3.5.26 Edit Comment Field
box. In the white text box you can edit
comment text. The comment field text is
limited to a maximum of 512 characters.
Every ECM and calibration file has a small
area of memory reserved for a commentfield. The comment-field allows a tuner to
describe the configuration and contents of
the ECM/File. Each calibration file supplied by
S&S Cycle® contains a comment field
describing the particular configuration of that
file. The comment-field is shown when you
select a calibration file in the Open File or
Save File dialog boxes. For some ECMs/files
the comment field is read-only and cannot be
changed.
To view or edit the comment-field in your
ECM or a calibration file, follow these steps:
1. Select Edit Comment Field…
2. The Select Data Source dialog box will
appear. The dialog box will list the current
active data sources; i.e. the ECM if it is
connected, the demonstration data built
into the software, and any calibration files
that you accessed since starting the
software. To select a data source, click on
it to highlight it and then click OK or
press Enter. You can also double-click on
an item to select it. If you want to browse
for another calibration, select the 'A
calibration file not on this list' option.
This will cause an Open File dialog box to
appear. Select a calibration file from this
dialog box and click Open.
4. Click Cancel or press Esc if you do not
wish to change the comment-field. Click
OK or press Enter to store the new
comment in the data source that you are
editing (shown at the top of the dialog
box). If the comment-field is read-only,
you will not be able to change the text.
SUMMARY: There are two ways to edit the
comment field in the ECM or a calibration
file…
1) Using the menu bar: Select Edit
Comment Field from the View menu.
2) Using the keyboard: Hold Ctrl + press F.
3.5.27 ECM Information
The ECM Information function allows you to
view engine operation statistics in your ECM
and calibration files. This includes historic
data on ECM use and engine performance.
To access the ECM Information dialog box:
1. Select ECM Information.
3. The Edit Comment Field dialog box will
appear. The data source that you are
editing is displayed at the top of the dialog
2. The Select Data Source dialog box will
appear. The dialog box will list the current
active data sources; i.e. the ECM if it is
connected, the demonstration data built
2010 S&S Cycle® Inc.
Menu Functions
49
into the software, and any calibration files
that you accessed since starting the
software. To select a data source, click on
it to highlight it and then click OK or
press Enter. You can also double-click on
an item to select it. If you want to browse
for another calibration, select the 'A
calibration file not on this list' option.
This will cause an Open File dialog box to
appear. Select a calibration file from this
dialog box and click Open.
4. The ECM Information dialog shows a
snapshot of the ECM state. To refresh this
information at any time, click Refresh.
3. The ECM Information dialog box will
appear. The dialog box is arranged in
pages. Select the tabs at the top of the
dialog box to switch between the pages.
The ECM page 50 describes general
properties and identifiers of the ECM and
calibration files that support this
information. The Stats Overview page 50
details the overall statistics of the ECM and
engine. The Engine Use page 51 displays
a chart of time the engine has spent in
ranges of engine speed, throttle position
and engine temperature. The Peaks page
51 shows the highest values of key
parameters and are logged over the life of
the ECM. The Last Trip Peaks 52 page
shows the highest values of key
parameters logged over the last four trips
(a trip is running the motorcycle for five
minutes or more). The Rev Limiting page
53 shows how often the engine rev
limiter has been hit and also describes the
current break-in limiter status and
schedule (see ECM Basic Setup 31 for more
details).
2010 S&S Cycle® Inc.
5. The contents of all pages of the ECM
Information dialog may be saved to a text
file and viewed in a text editor such as
Notepad, Wordpad or Excel®. To do this,
click Save. A Save As dialog box will
appear. The default folder for ECM
Information is My Documents\ProTune 2
\ECM Information Data. Enter a filename
and click Save. The file produced is a .tsv
(tab separated value file) which can be
viewed in any text editor but is best
viewed in a spreadsheet application like
Excel®.
6. To close the ECM Information dialog box,
click Exit or press Esc.
The ECM Information dialog box allows use
of the Engine Rebuild function. The Engine
Rebuild function resets the historic data for
the ECM and is commonly used after
installation or reconditioning of an engine.
Some key data, such as engine mileage prior
to the rebuild is retained but all recent use
data is reset. To perform a rebuild click the
Do Rebuild... button. Carefully read the
warning messages that appear and click Yes
for both if you have read and accepted the
messages. Warning: Performing an
Engine Rebuild will void any remaining
warranty.
50
ProTune II
SUMMARY: There are three ways to view the
ECM Information dialog box.
The Stats Overview page shows key overall
statistics for the ECM and engine.
1) Using the tool bar: Click the Info button:
2) Using the menu bar: Select ECM
Information... from the View menu.
3) Using the keyboard: Hold Ctrl + Shift
and press T.
The ECM page shows overall properties and
identifiers of the ECM. Information is also
shown for calibration files that support this
data. The information on this page is mainly
for technical support.
· Model. The model number for this ECM or
file.
· ECM Firmware Version. The ECM
software version for the ECM or file.
· Serial Number. The serial number for the
ECM or file.
· Boot-Block Firmware Version. For
technical support use only.
· Supplier or Type. Identifies the original
supplier of this ECM/file or the warranty
status of the ECM.
· Vehicle Identification Number. The
VIN for this ECM or file (if any).
· Since ECM was New... Shows data
logged since the ECM was new.
· Total Engine Mileage. Total miles
logged on the engine.
· Number of Engine Rebuilds. The
number of times the Engine Rebuild
function has been used on this ECM.
See ECM Information 48 for more
details. Warning: Performing an
Engine Rebuild will void any
remaining warranty.
· Total Engine Runtime. The time in
hours:minutes.seconds that the ECM
has run the engine since the ECM was
new.
· Total Revolutions of Engine. The
total number of engine revolutions
since the ECM was new.
· Total Key on/Key off cycles. The
total number of times the ignition key
has been turned on, then off, since the
ECM was new.
· Since Last Engine Rebuild... Shows
data logged since the last time the Engine
Rebuild function was used. See ECM
Information 48 for more details.
· Engine Mileage. The engine mileage
since the last rebuild.
· Engine Runtime. The time in hours:
minutes.seconds the engine has been
run since the last rebuild.
2010 S&S Cycle® Inc.
Menu Functions
· Revolutions of Engine. The number
of engine revolutions since the last
rebuild.
· Key on/Key off cycles. The number
of times the ignition key has been
turned on, then off, since the last
rebuild.
· Trips, engine running > 30 secs.
The number of times the motorcycle
has run for 30 seconds or more since
the last rebuild.
· Trips, engine running > 5 mins.
The number of times the motorcycle
has run for 5 minutes or more since
the last rebuild.
· Before Last Engine Rebuild... Shows all
data logged before the last time the
Engine Rebuild function was performed.
See ECM Information 48 for more details.
· Engine Runtime. The time in hours:
minutes.seconds the engine had been
run before the last rebuild.
· Revolutions of Engine. The number
of engine revolutions logged before
the last rebuild.
· Key on/Key off cycles. The number
of times the ignition key had been
turned on, then off, before the last
rebuild.
51
The Total Use (all table cells) value
displays the total engine running time in
hours:minutes.seconds.
The Engine Use tables can either be
displayed in absolute time (hours:minutes.
seconds) or as a percentage of the total
engine use. Select this by selecting a format
from the Units for displayed values dropdown list.
The Engine Run Time - RPM vs. Throttle
% table shows the total amount of engine
run time across the range of engine speed
and throttle position. The sum for each RPM
column is shown in the final row labeled
'Total'.
The Engine Temperature Use - ºF table
shows the total amount of engine run time
across the range of engine temperature.
The Engine Use page displays a chart of time
the engine has spent in ranges of engine
speed, throttle position and engine
temperature.
The Peaks page shows the highest values of
key parameters logged during ECM
operation.
2010 S&S Cycle® Inc.
52
ProTune II
freeze-frame data for a peak event, click on
the blue, underlined link. The freeze-frame
dialog will appear. The values logged are Rev
Count, Engine Speed, Engine Temperature,
ECM Temperature and Manifold Air Pressure.
Click OK or press Enter to close the box.
· Since Last Engine Rebuild... Shows
data logged since the last Engine Rebuild
function was performed. See ECM
Information 48 for more details.
· Peak Engine Speed (RPM). The
highest engine speed recorded since
the last engine rebuild.
· Peak ECM internal Temperature (º
F). The highest ECM module
temperature recorded since the last
engine rebuild.
· Peak Engine Temperature (ºF). The
highest engine temperature recorded
since the last engine rebuild.
The Last Trip Peaks page shows the highest
values of key parameters logged during the
last four motorcycle trips (engine operation
lasting five or more minutes).
· Before Last Engine Rebuild... Shows
data logged before the last Engine Rebuild
function was performed. See ECM
Information 48 for more details.
· Peak Engine Speed (RPM). The
highest engine speed recorded before
the last engine rebuild.
· Peak ECM internal Temperature (º
F). The highest ECM module
temperature recorded before the last
engine rebuild.
· Peak Engine Temperature (ºF). The
highest engine temperature recorded
before the last engine rebuild.
For each peak value, freeze-frame data is
also logged. The freeze-frame data logs the
value of other key parameters at the point
where the peak occurred. To access the
For up-to four of the last trips, the following
information is logged:
· Peak Engine Speed (RPM). The highest
engine speed recorded on this trip.
· Peak ECM internal Temperature (ºF).
The highest temperature for the ECM
module recorded on this trip.
· Peak Engine Temperature (ºF). The
highest engine temperature recorded on
2010 S&S Cycle® Inc.
Menu Functions
53
this trip.
For each peak value, freeze-frame data is
also logged. The freeze-frame data logs the
value of other key parameters at the point
where the peak occurred. To access the
freeze-frame data for a peak event, click on
the blue, underlined link. The freeze-frame
dialog will appear. The values logged are Rev
Count, Engine Speed, Engine Temperature,
ECM Temperature and Manifold Air Pressure.
Click OK or press Enter to close the box.
The Rev Limiting page shows the number of
rev-limiter hits that have occurred during
engine operation. The current status and
schedule of the break-in limiter function are
also shown.
· Number of Rev Limiter Hits. Shows the
number of times the rev-limiter was hit
and the total number of revs at the limiter
for the given period. A 'Trip' is engine
operation lasting five or more minutes.
2010 S&S Cycle® Inc.
· Since Last Rebuild. Rev limiter hits
since the last engine rebuild was
performed. See ECM Information 48
for more details.
· Before Last Rebuild. Rev limiter hits
before the last engine rebuild was
performed. See ECM Information 48
for more details.
· on Last Trip. Rev limiter hits during
the last trip.
· on Second-to-Last Trip. Rev limiter
hits during the second-to-last trip.
· on Third-to-Last Trip. Rev limiter
hits during the third-to-last trip.
· on Fourth-to-Last Trip. Rev limiter
hits during the fourth-to-last trip.
· Break-In Rev Limiting Schedule.
Displays the current status and schedule
for the break-in limiter function. Note:
The Break-In Rev Limit Status can
only be viewed from an ECM. The
break-in limiter automatically sets the revlimit for an initial period of running a new
engine, allowing the new engine to be
properly broken-in. To enable the break-in
limiter, see ECM Basic Setup 31 . The
break-in limiter operates in 3 stages, each
stage allows a progressively higher rev
limit until the rev limit is allowed to return
to its full default value.
· Current Rev Limit. The current rev
limit being used by the ECM.
· Break-In Total Elapsed Time
(snapshot). The total engine run time
since the break-in limiter was enabled.
Upon reaching the time shown in the
End of Stage 3 cell, the break-in
limiter will be disabled and the default
rev limit will be used.
· Stage 1 Rev Limit. The rev limit used
for Stage 1 of the break-in limiting.
· End of Stage 1 (after total elapsed
time). The time at which Stage 1 ends
and Stage 2 begins.
· Stage 2 Rev Limit. The rev limit used
for Stage 2 of the break-in limiting.
· End of Stage 2 (after total elapsed
54
ProTune II
time). The time at which Stage 2 ends
and Stage 3 begins.
· Stage 3 Rev Limit. The rev limit used
for Stage 3 of the break-in limiting.
· End of Stage 3 (after total elapsed
time). The time at which break-in
limiting ends.
(kPa).
5. Click OK or press Enter to accept the new
units or click Cancel (or press Esc) to
cancel your choice.
SUMMARY: There are two ways to access the
preferences dialog box…
1) Using the menu bar: Select Preferences
from the Options menu.
2) Using the keyboard: Hold Ctrl + press P.
3.6 Options Menu
3.6.1 Preferences
3.6.2 Select User Level
The preferences function allows you to select
the preferred units for displaying throttle
position, temperature values and pressure
values.
Select this function to change the user level
of the software from Basic mode to
Advanced mode and vice-versa.
Once you change into Advanced mode the
main screen will change and more functions
will be available in the menus. Accessing the
help file in Basic or Advanced mode will
provide information for tuning in the current
mode.
1. Select Preferences.
1. Select Select User Level…
2. Choose a preferred throttle unit from the
drop down list by clicking on the down
arrow icon. You can choose % of wideopen throttle (default), throttle pot voltage
, or throttle site. The throttle site is the
index that the ECM uses to reference
tables that use throttle position as an
input parameter.
2. The Select User Level dialog box will
appear. Choose 'Basic' mode or 'Advanced'
mode from the drop-down list.
Note: This menu function is not available in
Basic User Mode. See Basic and Advanced
User Levels 15 for more information.
3. Choose a preferred temperature unit from
the drop down list by clicking on the down
arrow icon. You can choose Fahrenheit (°
F) or Celsius (°C) .
4. Choose a preferred pressure unit from the
drop down list by clicking on the down
arrow icon. You can choose Bar (bar),
Inches of Mercury (inMg), or Kilopascals
3. Click OK or press Enter. If you have
selected 'Advanced', the following warning
message will appear: 'WARNING! The
Advanced level of ProTune II offers a high
level of adjustability and is recommended
for experienced tuners only. If you have
read and understood this warning, click
Yes. If you want to return to basic mode,
click No.
SUMMARY: There are two ways to change
the user level setting of the software…
1) Using the menu bar: Select Select User
2010 S&S Cycle® Inc.
Menu Functions
55
Level… from the Options menu.
2) Using the keyboard: Hold Ctrl + press G.
3.6.3 Serial Port Settings
Most PCs have at least one 9-Pin serial port
available for ECM connection, labeled in
Windows® as COM1: (i.e. Communications
Port 1). Some notebook computers and small
form-factor desktops do not have a serial
port. If this is the case with your PC, USBSerial adapters are available from most
computer component vendors. Before
purchasing a USB-Serial adapter, be sure it is
compatible with your PC's operating system.
If your PC has more than one serial port, or
doesn't use COM1 as the label for the
available serial port, you will have to change
the serial port that ProTune II searches for
connected serial ECMs.
3. If you would like to remove a serial port
from the list, select it by clicking on it and
then click Remove.
4. If you would like to add a serial port to the
list, enter the serial port number (i.e. for
COM2 enter 2) into the Add serial port
COM text box and click Add. It will now
appear in the list.
5. Click on the Auto-Detect button if you
are unsure of your computer's port
settings. The auto-detect feature will
search all serial ports from COM1 to
COM12 and inform you of which ports can
be opened and which ports cannot. If an
ECM is detected on one of the ports, the
settings will be automatically changed to
use that port.
To do this:
1. Select Serial Port Settings…
2. The Serial Port Settings dialog box will
appear. At the top of the dialog box is a
list of serial ports that are currently being
searched for an ECM.
6. To cancel the changes that you have made
to the serial port settings, click Cancel or
press Esc. If you want to accept the
changes, click OK or press Enter.
ProTune II will search any specified serial
ports for connected S&S Cycle® ECMs.
Removing unnecessary ports from the list will
improve the search performance.
2010 S&S Cycle® Inc.
56
ProTune II
If you need to check the available serial ports
on your PC, you can use the Auto-detect
feature described above. If this does not
provide enough information, open the Start
menu and launch Control Panel (which may
be in the Settings menu). Open the
System dialog box. Click on the Hardware
tab. Click on Device Manager. Find the
hardware group called Ports. Listed in this
group will be the available ports on your PC.
Serial ports begin with the letters 'COM'.
SUMMARY: There are two ways to access the
Serial Port Settings window…
1) Using the menu bar: Select Serial Port
Settings… from the Options menu.
2. Select Download Code to ECM…
3. Read the warning message that appears.
Click OK (or press Enter) to continue or
click Cancel (or press Esc) to cancel the
download.
4. The Open File dialog box will appear.
Select the ECM code file by clicking on its
file name. When you select a file,
information will appear about the model
number and software version of the file.
Once you have selected a file, click Open
or press Enter.
2) Using the keyboard: Hold Ctrl + press J.
3.6.4 Download Code to ECM
Note: This menu function is not available in
Basic User Mode. See Basic and Advanced
User Levels 15 for more information.
S&S Cycle® may provide a new ECM
software program to be loaded into your
ECM. This will be in the form of an H86 file
(a file with a .H86 file extension).
Important: Do not perform a code
download while the engine is running. The
ignition switch must be in the ON position
and that the kill switch set to RUN, but do
not start the engine. Do not disconnect the
communications cable or ECM power during
the download. Do not download ECM code
supplied from any source other than S&S
Cycle®.
1. Ensure the ECM is connected. See
Connecting the ECM 15 for more
information.
5. If the code file is incompatible with your
ECM model, the message 'The file that you
have selected is for a different model of
ECM. Please select a file that matches your
ECM model.' will appear. Click OK. Return
to step 2 to select an appropriate file for
your ECM model (shown in the
Communications Status box at the bottomright corner of the screen when the ECM is
connected).
6. For certain software upgrades, you will be
asked to update parameters in the ECM
tune-file data for compatibility with the
new ECM software. A message box will
appear asking whether you want this
update to proceed. Click Yes to continue
or click No to cancel the download. You
will be asked if you would like to save the
current tune-file data in your ECM as a
backup (recommended). If you click Yes,
2010 S&S Cycle® Inc.
Menu Functions
a Save dialog box will appear allowing you
to enter a filename and click Save.
Additional data transfer progress bars will
appear during the update. ProTune II is
updating certain key parameters in your
ECM in preparation for running the new
software. Allow these transfers to
complete. Do not disconnect or remove
power from the ECM.
7. A progress bar will appear which shows
the ECM software download process. You
must not disconnect or remove power
from the ECM during the code download.
57
2) Using the keyboard: Hold Ctrl + press H.
3.6.5 Download Tune-File TO ECM
Note: This menu function is not available in
Basic User Mode. See Basic and Advanced
User Levels 15 for more information.
Selecting this function will copy the data
inside a Tune-File and send it to the ECM.
1. First ensure the ECM is connected. See
Connecting the ECM 15 for more
information.
8. Important. When the download
completes successfully, a message box will
be shown advising you to cycle power to
the ECM for at least 15 seconds before
continuing. This allows the ECM to reset
and power-up cleanly, as the ECM will now
be running new software. Click OK or
press Enter to dismiss the message box.
2. Select Download Tune-File TO ECM...
3. The Open File dialog box will appear.
Select a Tune-File by clicking on its
filename. A description of the Tune-File's
contents appears on the left side when it
is selected.
If the download fails: An incomplete
download of ECM software will leave the ECM
in boot-mode which is an inoperative state
that will not run the engine. When you
connect an ECM in boot-mode, a warning will
appear. This is a notification that you must
retry the download to restore the ECM to an
operational state. Click OK or press Enter
and return to step 3 to recover the ECM.
SUMMARY: There are two ways to download
new code to the ECM…
1) Using the menu bar: Select Download
Code to ECM… from the Options menu.
2010 S&S Cycle® Inc.
4. Click Open.
5. If the tune-file you have selected is
potentially incompatible with your ECM, a
message box will appear asking you to
confirm your choice. If you are certain that
you want to use the selected tune-file,
58
ProTune II
click Yes to continue. Otherwise, click No
and return to step 2 to select a compatible
tune-file (the tune-file description in the
Open File dialog box will help you to do
this).
6. For certain combinations of tune-file and
ECM, ProTune II will resolve
incompatibilities by adjusting the tune-file
data before it is sent to the ECM. The
tune-file update dialog box will appear.
Select the model year of your motorcycle
from the drop-down list options and click
OK or press Enter to continue with the
download. Click Cancel or press Esc to
quit the tune-file download.
7. For tune-file updates, you will be asked if
you would like to save the current tune-file
data in your ECM as a backup
(recommended). If you click Yes, a Save
dialog box will appear allowing you to
enter a filename and click Save.
Additional data transfer progress bars will
appear during the update. Allow these
transfers to complete. Do not disconnect
or remove power from the ECM.
8. The Tune-File will now download to the
ECM. A progress bar indicates the amount
of data left to send. Do not disconnect the
communications cable or switch off power
to the ECM during this stage.
back on).
10.Important: When the download
completes successfully, a message box will
be shown advising you to cycle power to
the ECM for at least 15 seconds before
continuing. This allows the ECM to reset
and power-up cleanly, as the Tune-File
download may have updated critical
operating parameters. Click OK or press
Enter to dismiss the message box.
SUMMARY: There are two ways to download
a Tune-File to the ECM…
1) Using the menu bar: Select Download
Tune-File TO ECM… from the Options
menu.
2) Using the keyboard: Hold Ctrl + Shift
and press R.
3.6.6 Upload Tune-File FROM ECM
Note: This menu function is not available in
Basic User Mode. See Basic and Advanced
User Levels 15 for more information.
Selecting this function will copy the data
inside the ECM and store it on your computer
as a Tune-File.
1. First ensure the ECM is connected. See
Connecting the ECM 15 for more
information.
9. If the download fails to complete, verify
that the ECM still has power (motorcycle
ignition on) and the cables are firmly
connected. Retry the download. If the
download continues to fail, try resetting
the ECM by cycling the power (motorcycle
ignition off for 15 seconds, then switch
2. Select Upload Tune-File FROM ECM…
3. The Save File dialog box will appear. You
can either select an existing Tune-File to
overwrite by clicking on its filename or
2010 S&S Cycle® Inc.
Menu Functions
enter a new filename in the File Name box
to create a new Tune-File. A description of
the Tune-File contents appears on the left
side when it is selected.
59
2) Using the keyboard: Hold Ctrl + Shift
and press S.
3.6.7 Open Table from
Note: This menu function is not available in
Basic User Mode. See Basic and Advanced
User Levels 15 for more information.
Select this function to load the current table
from a different data source (ECM or file).
4. Click Save. The Tune-File will now be
uploaded from the ECM. A progress bar
indicates the amount of data left to load.
Do not disconnect the communications
cable or switch off power to the ECM
during this stage.
5. When the 'Transfer Complete' message
appears, click OK or press Enter. If the
upload fails to complete, verify the ECM
still has power (motorcycle ignition on)
and the cables are firmly connected. Retry
the upload. If the upload continues to fail,
try resetting the ECM by cycling the power
(motorcycle ignition off for 15 seconds,
then switch back on).
SUMMARY: There are two ways to upload a
Tune-File from the ECM…
1) Using the menu-bar: Select Upload
Tune-File FROM ECM… from the Options
menu.
2010 S&S Cycle® Inc.
1. Select Open Table from…
2. The Select Data Source dialog box will
appear. The dialog box will list the current
active data sources; i.e. the ECM if it is
connected, the demonstration data built
into the software, and any calibration files
that you accessed since starting the
software. To select a data source, click on
it to highlight it and then click OK or
press Enter. You can also double-click on
an item to select it. If you want to browse
for another calibration, select the 'A
calibration file not on this list' option.
This will cause an Open File dialog box to
appear. Select a calibration file from this
dialog box and click Open.
The current table will now be redisplayed
with the data from the selected data source.
If the data source is the ECM, a progress bar
will appear and the data may take a few
seconds to load.
60
ProTune II
SUMMARY: There are two ways to open the
current table from a different data source…
1) Using the menu bar: Select Open Table
from… from the Options menu.
2) Using the keyboard: Hold Ctrl + press O.
3.6.8 Save Table
2. The Select Data Source dialog box will
appear. The dialog box will list the current
active data sources; i.e. the ECM if it is
connected, the demonstration data built
into the software, and any calibration files
that you accessed since starting the
software. To select a data source, click on
it to highlight it and then click OK or
press Enter. You can also double-click on
an item to select it. If you want to browse
for another calibration, select the 'A
calibration file not on this list' option.
This will cause an Open File dialog box to
appear. Select a calibration file from this
dialog box and click Open.
Note: This menu function is not available in
Basic User Mode. See Basic and Advanced
User Levels 15 for more information.
Select this function to save the current table
to the current data source. Doing this will
overwrite the table stored in the current data
source. If the current data source is the
Demo Data file, a message will appear to
inform you that the contents of this file
cannot be modified. Click OK or press Enter
to dismiss this message.
SUMMARY: There are two ways to save the
current table to the current data source…
1) Using the menu bar: Select Save Table
from the Options menu.
3. The current table will now be saved to the
selected data source.
SUMMARY: There are three ways to save the
current table to a different data-source…
1) Using the tool bar: Click the Save->
button:
2) Using the keyboard: Hold Ctrl + press S.
2) Using the menu bar: Select Save Table
To… from the Options menu.
3.6.9 Save Table To
Select this function to save the current table
to a different data source. Doing this will
overwrite the table stored in that data
source.
1. Select Save Table To…
3) Using the keyboard: Hold Ctrl + press T.
3.6.10 Copy Data-File
Note: This menu function is not available in
Basic User Mode. See Basic and Advanced
2010 S&S Cycle® Inc.
Menu Functions
User Levels
15
for more information.
Use this function if you want to make
modifications to a calibration file supplied
with the software without altering the
original.
61
existing calibration file…
1) Using the menu-bar: Select Copy DataFile… from the Options menu.
2) Using the keyboard: Hold Ctrl + press I.
1. Select Copy Data-File…
2. The Open File dialog box will appear.
Select a file by clicking on its filename. A
description of the files contents appears
on the left side when it is selected.
3.6.11 Test Outputs
The Test Outputs function allows you to drive
critical ECM outputs directly in order to check
the function of ECM electronics, motorcycle
wiring, and actuators.
Important: The Test Outputs function
assumes control over critical ECM outputs.
The output tests will not function while the
engine is running. Make sure motorcycle is
secure and in neutral before performing any
output tests.
3. The Save File dialog box will appear. You
can either select an existing file to
overwrite by clicking on its file name, or
enter a new filename in the File Name box
to create a new file. A description of the
files contents appears on the left side
when it is selected.
Warning! Gasoline and its vapors are highly
flammable! Testing an injector while power
to the fuel pump is connected will cause
injection of excess fuel. It is recommended to
remove the fuel pump fuse if several
consecutive injector tests are to be
performed. Testing an ignition output at any
time, especially after an injector test cycle
can cause unburned fuel to ignite. Testing
the function of the Fuel Pump will result in
pressurizing of the fuel system. Be sure that
the fuel line connection, fuel rail/injector
installation, and all other appropriate
connections are complete and secure before
proceeding.
1. Ensure the ECM is connected. See
Connecting the ECM 15 for more
information.
4. The 'File copied' message will appear.
Click OK or press Enter.
SUMMARY: There are two ways to copy an
2010 S&S Cycle® Inc.
62
ProTune II
2. Select Test Outputs…
3. Read the warning message that appears.
Click OK (or press Enter) to continue to
the test options or click Cancel (or press
Esc) to return to the software.
4. ProTune II will now send information to
the ECM to enable the output test
functions.
5. The Test Outputs dialog box will appear.
There is a selectable button for each of
the eight possible tests; i.e. front and rear
ignition, front and rear fuel injectors, fuel
pump, tachometer, idle control valve
(stepper motor), and Check Engine lamp.
Select a test by clicking on one of the
corresponding option buttons. A brief
description of the selected test will appear
and the TEST button will be enabled.
8. When you have finished testing outputs,
click Exit or press Esc. ProTune II will
now send information to the ECM to
disable the output test functions.
SUMMARY: There are two ways to access the
Test Outputs function…
1) Using the menu bar: Select Test
Outputs… from the Options menu.
2) Using the keyboard: Hold Ctrl + press K.
3.6.12 Cylinder Trim Adaptive Map Merge
Note: This menu function is not available in
Basic User Mode. See Basic and Advanced
User Levels 15 for more information.
This function allows you to update the
Cylinder Adjustment Tables in the ECM with
the results of Closed-Loop Fuel adaptation
and reset the adaptive maps. For more
details on the use of this function see Using
the Adaptive Maps 86 .
6. Click on the TEST button to run the
selected test. For tests that may cause a
hazard (i.e. those involving fuel injection,
fuel ignition, and fuel pressurization) a
second warning message box will appear.
Read the warning message. To cancel the
test, click Cancel or press Esc. To
continue with the test, click TEST or
press Enter.
7. On completion of a test, you may repeat
the same test or run a different test as
many times as required. Simply choose the
test by clicking the corresponding option
button and click the TEST button.
This function is only accessible if an ECM that
supports Closed-Loop Fuel Control is
connected.
1. Ensure the ECM is connected. See
Connecting the ECM 15 for more
information.
2. Select Cylinder Trim Adaptive Map
Merge. A warning will appear. Read the
warning and accept it by clicking Yes or
cancel by clicking No.
2010 S&S Cycle® Inc.
Menu Functions
Connecting the ECM
information.
3. The current adaptive tables and cylinder
adjustment tables will be loaded from the
ECM, merged and then sent back to the
ECM. The adaptive maps will then be reset
to 0%.
15
63
for more
2. Select Main Fuel Adaptive Map Merge.
A warning will appear. Read the warning
and accept it by clicking Yes or cancel by
clicking No.
SUMMARY: There are two ways to perform
the Cylinder Trim Adaptive Map Merge.
1) Using the menu bar: Select Cylinder
Trim Adaptive Map Merge from the
Options menu. Note this menu item will only
be shown when an ECM supporting ClosedLoop Fuel Control is connected.
2) Using the keyboard: Hold Ctrl + press N.
3. The current adaptive tables, cylinder
adjustment tables and main fuel table will
be loaded from the ECM, merged and then
sent back to the ECM. The adaptive maps
will then be reset to 0%.
SUMMARY: There are two ways to perform
the Main Fuel Adaptive Map Merge.
3.6.13 Main Fuel Adaptive Map Merge
Note: This menu function is not available in
Basic User Mode. See Basic and Advanced
User Levels 15 for more information.
This function allows you to update the
Cylinder Adjustment Tables and the Fuel
Injection Base Table in the ECM with the
results of Closed-Loop Fuel adaptation and
reset the adaptive maps. For more details on
the use of this function see Using the
Adaptive Maps 86 .
This function is only accessible if an ECM that
supports Closed-Loop Fuel Control is
connected.
1. Ensure the ECM is connected. See
2010 S&S Cycle® Inc.
1) Using the menu bar: Select Main Fuel
Adaptive Map Merge from the Options
menu. Note this menu item will only be
shown when an ECM supporting Closed-Loop
Fuel Control is connected.
2) Using the keyboard: Hold Ctrl + press M.
3.6.14 Reset Adaptive Maps
Note: This menu function is not available in
Basic User Mode. See Basic and Advanced
User Levels 15 for more information.
This function commands the ECM to reset (to
64
ProTune II
0%) its adaptive fuel maps and the adaptive
ignition map. The adaptive fuel trim maps
contain values that the ECM learns based
upon the results of Closed-Loop Fuel Control.
The adaptive ignition map contains long term
ignition timing adjustments due to engine
knock control. For more details on these
subjects see The Closed-Loop Fuel Control
System 83 and The Knock (Adaptive
Ignition) Control System 88 .
This function is only accessible if an ECM that
supports Closed-Loop Fuel Control or Knock
Control is connected.
1. Ensure the ECM is connected. See
Connecting the ECM 15 for more
information.
2. Select Reset Adaptive Maps. A warning
will appear. Read the warning and accept
it by clicking Yes or cancel by clicking No.
3.6.15 Clear Historic Diagnostic Trouble Codes
Select this function in order to clear the list
of historic diagnostic trouble-codes in your
ECM. To view the current and historic ECM
diagnostic trouble codes, use the Diagnostic
Trouble Codes 33 function.
1. Ensure the ECM is connected. See
Connecting the ECM 15 for more
information.
2. Select Clear Historic Diagnostic
Trouble Codes.
3. A message will appear telling you that the
trouble-codes have been reset. Click OK or
press Enter.
SUMMARY: There are three ways to clear the
historic diagnostic trouble-codes in the ECM…
1) Using the menu bar: Select Clear
Historic Diagnostic Trouble Codes from
the Options menu.
2) Using the keyboard: Hold Ctrl + press E.
3) Using the DTCs dialog box. See Diagnostic
Trouble Codes 33 for details.
3. The adaptive maps will now be reset.
Click OK (or press Enter) to continue.
SUMMARY: There are two ways to Reset the
Adaptive Maps…
1) Using the menu bar: Select Reset
Adaptive Maps from the Options menu.
Note this menu item will only be shown when
an ECM supporting Closed-Loop Fuel Control
or Knock Control is connected.
3.7 Help Menu
3.7.1 Help Topics
Select this function to display this help
document.
2) Using the keyboard: Hold Ctrl + press R.
SUMMARY: There are two ways to access
this help system…
2010 S&S Cycle® Inc.
Menu Functions
1) Using the menu bar: Select Help
Topics… from the Help menu.
65
4 The Fuel and Ignition Systems
4.1 The Fuel Injection System
2) Using the keyboard: Press F1.
The diagram below describes the fuel system
of the S&S Cycle® ECM:
3.7.2 About ProTune II
Select this function to show the software
version and installation details of your copy
of ProTune II. This information may be
required for customer support. Click OK or
press Enter to dismiss the "About ProTune
II" dialog box when finished.
SUMMARY: There are two ways to show the
'About ProTune II' dialog box…
1) Using the menu bar: Select About
ProTune II… from the Help menu.
2) Using the keyboard: Hold the Ctrl + press
B.
The Base Fuel Injection Table provides the
initial fuel injector pulse width value in
milliseconds (ms) as a function of engine
speed and throttle position (with a resolution
of 32 throttle sites). The fuel injector pulse
width specifies how long the fuel injector is
open per fuel injection event. The longer the
pulse width, the more fuel that is injected.
The Engine Temperature Fuel Compensation
and Air Temperature Fuel Compensation
adjust the fuel delivery as a function of
temperature. They are only accessible in
Advanced Mode (see Basic and Advanced
User Levels 15 for details of switching
modes). Each table adds a percentage of the
input fuel injector pulse width as a function
of temperature.
Once other non-adjustable compensations
are included in the calculation, a
compensation value is added for each
cylinder. These compensation tables are the
2010 S&S Cycle® Inc.
66
ProTune II
Front Cylinder Fuel Adjustment Table and
the Rear Cylinder Fuel Adjustment Table.
These compensation tables allow the fuel
delivery to be adjusted for each cylinder as a
function of engine speed and throttle position
(with a resolution of 16 throttle sites). The
result of each cylinder compensation
produces the final injection pulse width for
each cylinder.
Examples of compensation factors:
If a compensation value at a particular
temperature is 0% and the input value is
4ms, the output of the compensation table
would be 4ms + (0% of 4ms) = 4ms (no
change).
If the compensation value is +100% and the
input value is 4ms, the output of the
compensation table would be 4ms + (100%
of 4ms) = 8ms (double the fuel).
If the compensation value is -100% and the
input value is 4ms, the output of the
compensation table would be 4ms – (100%
of 4ms) = 0ms (zero fuel).
4.2 The Ignition Timing System
The diagram below describes the ignition
timing system of the S&S Cycle® ECM:
The Base Ignition Timing Table provides the
initial ignition timing as a function of engine
speed and throttle position (with a 16
throttle site resolution). This timing value is
the Ignition Advance measured in degrees
before TDC (Top Dead Center position). A
positive number for the ignition advance will
mean that the spark is fired before the piston
reaches Top Dead Center during the
compression stroke. A zero ignition advance
means that the spark will be fired at the Top
Dead Center position. A negative number for
the ignition advance means that the spark
will fire after the piston has reached Top
Dead Center.
The Engine Temperature Ignition
Compensation and Air Temperature Ignition
Compensation tables adjust the ignition
advance as a function of temperature. They
are only accessible in Advanced Mode (see
Basic and Advanced User Levels 15 for
details of switching modes). Each table adds
an amount of ignition advance which varies
with temperature.
After other (non-adjustable) compensations
have been added, the result is the Final
Ignition Advance value which is used to fire
the spark.
2010 S&S Cycle® Inc.
Tuning in Basic Mode
5 Tuning in Basic Mode
5.1 Viewing and Tuning Tables
The current table is displayed as a
three-dimensional graph with Engine Speed
in RPM along the horizontal (x) axis, Throttle
Position in percent of wide open throttle
along the depth (z) axis and table value
along the upward (y) axis. For an explanation
of what each table contains and does, see
The Fuel Injection System 65 and The
Ignition Timing System 66 .
The graph is shaded according to the value
at each point in the table. The meaning of
the shading is illustrated in the color key strip
on the right of the graph.
Also shown on the graph are the Cursor
(bright blue upside-down pyramid) and the
Current Selected Area (white rectangular
boundary).
67
tuned table value at the point of the Cursor.
You can move the cursor around the table to
the next intersection of the graph lines
(zone) by doing one of the following:
· Clicking and dragging the RPM or
Throttle Sliders at the bottom of the
screen. Dragging the RPM Slider left will
move to a lower Engine Speed position
(moves cursor left). Dragging it right will
move to a higher Engine Speed position
(moves cursor right). Dragging the
Throttle Slider left will move to a lower
(closing) throttle position (moves cursor
down). Dragging it right will move to a
higher (opening) throttle position (moves
cursor up).
· When pressing the Arrow keys, the Left
Arrow key will move to a lower Engine
Speed position (moves the cursor left) and
the Right Arrow key will move to a
higher engine speed position (moves the
cursor right). The Up Arrow key will move
to a higher (opening) throttle position
(moves the cursor up) and the Down
Arrow key will move to a lower (closing)
throttle position (moves the cursor down).
· By clicking on an area of the graph. This
will move the cursor to the nearest engine
speed and throttle zone (intersection of the
graph lines).
The Cursor shows the center of the zone of
the table that you are currently editing.
Above the Cursor is the Cursor Pop-up
Window (this may be switched off, see
Switch On/Off Map Cursor Pop-up 28 for
details). The Cursor Pop-up Window
shows the RPM, throttle percentage and
2010 S&S Cycle® Inc.
As you move the Cursor the Current
Selected Area moves with it. The Current
Selected Area determines how much of the
table is affected when you apply tuning to
that zone of the table.
You can increase and decrease the size of
the Current Selected Area by doing one of
68
ProTune II
the following:
· Moving the Range Knob located in the
lower center of the screen. Click on the
circular knob indent and drag the mouse
clockwise or counter-clockwise to adjust its
position. The Range is a number from 1
(very small Current Selected Area) to 10
(very large Current Selected Area).
· By using the Arrow keys and Shift key.
Holding Shift and pressing Left Arrow or
Down Arrow will increase the range by 1.
Holding Shift and pressing Right Arrow
or Up Arrow will decrease the range by
1.
Once you have set the Current Selected
Area to the portion of the table that you
want to tune, you can then adjust its values.
You can apply tuning to the Current
Selected Area by doing one of the
following:
· Use the Page Up and Page Down keys.
Pressing Page Up will increase the tuning
by 1% and Page Down will decrease the
tuning by 1%. Holding the Shift key and
pressing Page Up will increase the tuning
by 5% and Shift+Page Down will
decrease tuning by 5%. Holding the Ctrl
key and pressing Page Up will increase
the tuning by 25% and pressing Ctrl+
Page Down will decrease the tuning by
25%.
· Use the Tuning Buttons (left of the
Tuning Knob) to select the size of the
tuning increment by clicking either the
Coarse (25%), Medium (5%), or Fine
(1%) buttons. Click on the up-arrow to
increase the tuning. Click on the
down-arrow to decrease the tuning.
Clicking and holding on one of the arrows
will continuously increase or decrease.
· Move the Tuning Knob (left of the
Range Knob) at the bottom of the
screen. Click on the circular knob indent
and drag the mouse clockwise or
counter-clockwise to adjust its position.
The effect of tuning the Current Selected
Area will be applied fully at the cursor
position and less towards the boundary of
the selected area. See the following example
of applying 100% to a flat section of a table:
2010 S&S Cycle® Inc.
Tuning in Basic Mode
69
position to 16 ms. If the tuning was set to
-50% this would halve the fuel at the
cursor position to 4 ms.
· The Base Ignition Timing Table. A
tuning of +30° corresponds to adding 30
degrees of ignition advance (moving the
ignition point 30 degrees more before Top
Dead Center). A tuning of -30°
corresponds to subtracting 30 degrees of
ignition advance (moving the ignition point
30 degrees towards or after Top Dead
Center).
The 100% tuning is applied fully at the
cursor position and curves away towards the
boundary of the selected area. This enables
you to make smooth changes to a table
without introducing sudden step changes
that may cause poor engine response .
When tuning is applied to two zones of a
table that are next to each other and the
selected areas overlap, the tuning effect is
blended (additively) between the two zones.
See the example below:
· The Front Cylinder Adjustment Table
and Rear Cylinder Adjustment Table.
The tuning percentage value is added to
the table's percentage value. For example,
if the cursor is at 10% and the tuning knob
is set to +10%, the tuned value will be
20%. If the cursor is at 10% and the
tuning knob is set to -10%, the tuned
value will be 0%.
This tuning system ensures that you can
make safe and smooth changes to the
original table values. To make changes that
are more detailed to the tables, you must
switch to Advanced Mode (see Select User
Level… 54 for more details).
To undo a change that you have made to the
table, select Undo 25 from the Edit menu.
In this example, three RPM zones next to
each other are tuned and overlap.
Once you have made the changes you
require to a table, you can save it by
selecting Save Table To… 60 from the
Options menu. Once saved, the tuning
applied to a table is reset so that the tuned
values now become the original table values
and can be tuned further.
The tuning range is applied differently
depending on the table you are tuning:
5.2 Live-Tune in Basic Mode
· The Base Fuel Injection Table. A value
is added corresponding to the tuning
percentage of original value. For example,
if the cursor is at 8 ms, applying a tuning
of 100% will double the fuel at the cursor
2010 S&S Cycle® Inc.
Live-Tune mode allows you to make a direct
connection with the ECM so that any tuning
you apply to the current ECM table takes
70
ProTune II
immediate effect in the ECM. Live-Tuning can
be very useful as you can run the engine in
different throttle and RPM zones and see
instantly how your tuning effects the engine
performance.
When Live-Tune mode is active, a second
(black) cursor will appear on the 3D-graph:
Tuning in Live-Tune mode is performed the
same way as tuning in normal mode. See
the Viewing and Tuning Tables 67 page of
this section for more information on how to
tune.
To tune in Live-Tune mode you must edit a
table that is loaded from the ECM. To do
this:
1. First ensure the ECM is connected. See
Connecting the ECM 15 for more
information.
2. Load the table that you want to Live-Tune
from the ECM. Select the table using the
tool-bar or the View menu. Select the
ECM as the current data source using the
Current Data Source Selector at the
top of the screen or from the View menu.
This is the Live Cursor and shows you the
position in the table that the engine is
currently running. As you increase throttle
position and/or engine speed, the Live
Cursor will move across the table. You are
free to move the blue Cursor around the
table so that you can tune any part of the
table. If you tune a part of the table which
contains the Live Cursor, you will be able to
detect this change in your engine's running
behavior.
In Live-Tune mode, the Cursor Location
section of the information bar now reflects
the Live Cursor position and tuning at that
position.
3. You now need to activate Live-Tune mode
by selecting Live-Tune Mode On/Off 29
from the Edit menu or click the Live!
button on the toolbar.
The Cursor Pop-up Window above the
blue Cursor will reflect the table values at
that location.
4. ProTune II will automatically send new
control information to the ECM and
Live-Tune mode will become active.
Tuning the table will now directly effect
the tuning in the ECM.
Once you have finished Live-Tuning you need
to deactivate Live-Tune mode:
Note that during Live-Tune, many of the
program's functions are disabled. You must
deactivate Live-Tune mode in order to return
to normal mode.
2. ProTune II will automatically send new
control information to the ECM and
Live-Tune mode will deactivate.
1. Select Live-Tune Mode On/Off 29 from
the Edit menu or click the Live! button.
The ECM is now running its original (pre-Live
2010 S&S Cycle® Inc.
Tuning in Basic Mode
Tune) table. In order to implement the
changes that you have made to the table
active, you must send the Live-Tuned table
to the ECM. A message will appear when you
deactivate Live-Tune mode asking if you
want to do this. Click Yes to send the tuned
table to the ECM. Important: If you click No,
the Live-Tune changes will be lost and the
original table values will be reloaded.
71
More:
Setting and Moving the Cursor Position 71
Selecting an Area of the Table 71
Editing Table Values 72
Using Math Functions to Adjust Table Values
73
Tag/Untag Cells 73
Changing the Grid Size of the Spreadsheet
74
6 Tuning in Advanced Mode
6.1.1 Moving the Cursor Position
6.1 Using The Spreadsheet
The spreadsheet provides the most direct
way of editing the values in a table.
For the main tables (Base Fuel Injection
Time, Base Ignition Timing, Front and Rear
Cylinder Fuel Adjustment tables), the
spreadsheet shows engine speed in RPM
along the columns of the table and throttle
position along the rows of the table. The first
row of the table represents full (wide-open)
throttle and the last row represents closed
throttle. To change the unit used for the
throttle position, see Preferences 54 .
Columns and rows shown in blue indicate
that the current selected row/column.
As the table is often too big to fit on the
screen, scroll-bars are provided. Click and
drag the dark gray bubble-areas of the scrollbars to scroll the table.
Moving the cursor and selecting areas will
also scroll the table (see below).
Browse one of the sections below for details
on using the spreadsheet interface.
2010 S&S Cycle® Inc.
The cell surrounded by the black-rectangle
shows the current Cursor position. This is
the current cell on the spreadsheet that is
being edited. You can move the cursor
around the table by doing one of the
following:
· Use the Cursor keys, pressing the Left, Up
, Down and Right arrow keys to move
the cursor in that direction. If the cursor
moves out of the visible area of the table,
the table will scroll automatically to keep it
visible.
· Click on a cell in the spreadsheet, this will
move the cursor to that cell.
· Click on a location in the 3D-graph, the
cursor on the spreadsheet will move to the
same location.
6.1.2 Selecting an Area of the Table
You can use the spreadsheet to select an
area of cells in the table. The black border
shows the extent of the selected area.
Selected cells, columns, and rows are shown
in blue with the cursor position shown in
white.
72
ProTune II
6.1.3 Editing Table Values
You can select an area of the table using one
of the following methods:
· Hold the Shift key and press the Cursor
keys Left, Right, Down, or Up to expand
or shrink the selected area in that
direction. If the cursor moves outside of
the visible area of the table, the table will
scroll to keep it visible.
· Click on a cell and drag the mouse to
select a region. The cell that you click on
will form one corner of the selected area
with the opposite corner being determined
by the mouse position.
· Clicking on a column or row header to
select that column/row. Clicking and
dragging across the column or row
headers will select multiple rows/columns.
· Hold the Ctrl key and press A to select the
entire table. You can also access this
function by right-clicking on a cell in the
spreadsheet and selecting Select All from
the menu.
· You can click and drag the mouse on the
3D-graph to select an area of the graph,
this will also select the matching area on
the spreadsheet.
To cancel the current selected area, press
the Esc key, or move the cursor outside of
the selected area. You can also right-click on
the selected area of the spreadsheet and
pick Deselect from the menu.
Once you have selected a cell or an area of
cells to edit, you can then adjust the values
of those cells. To enter a new value for the
current cell or current selected area, type in
the new value and press Enter. Pressing a
number key will automatically start editing
the cursor cell, use the number keys and
back-space key to edit the value. Press Esc
to cancel the editing without adjusting the
value or press Enter to accept the new
value. You can also edit a cell by double
clicking on it and end editing by pressing one
of the cursor keys to move to the next cell.
When you enter a new value, that value will
be set in the cursor cell and any selected
area. If the number is outside of the range of
the table, it will be set to the nearest value
allowed.
You can also adjust the value in the cursor
cell or current selected area by using the
Page Up and Page Down keys. Page Up
will add a x1 increment to the selected area
(0.01ms for the Fuel table, 0.1 degree of
advance for the Ignition table, 1 % for
cylinder adjustment tables). Page Down will
subtract a x1 decrement from the selected
cells. Holding the Shift key while pressing
Page Up or Page Down will increment/
decrement the selected cells by a x10
amount (0.1 ms for the Fuel table, 1 degree
of advance for the Ignition table). The
increment/decrement while holding the Shift
key for the cylinder adjustment tables is +/5 %. Holding the Ctrl key while pressing
Page Up or Page Down will increment/
decrement the selected cells by a x100 unit
amount (1 ms for the Fuel table, 10 degrees
of advance for the Ignition table). The
increment/decrement while holding the Ctrl
key for the cylinder adjustment tables is +/25 %. These functions can also be accessed
via the mouse by right clicking on the cursor
cell or selected area and selecting one of the
Increment or Decrement items from the
2010 S&S Cycle® Inc.
Tuning in Advanced Mode
menu. You can also right-click any part of the
3D graph to access this menu.
73
6.1.5 Tag/Untag Cells
Cells on the table can be tagged (marked)
for later reference. When a cell is tagged, it
appears with a flag symbol next to it on the
spreadsheet and an upside down triangle
marker on the graph.
Cells can be tagged in three ways:
6.1.4 Using Math Functions to Edit Table Values
ProTune II supports the use of basic math
functions (add, subtract, multiply and divide)
to edit cell values. To apply a math function
to the cursor cell or selected area:
· To add a value to the selected cells, type
+ followed by the value to add and press
Enter. For example +2 <Enter>.
· To subtract a value from the selected cell,
type - followed by the value to subtract
and press Enter. For example -2 <Enter>
will subtract 2 from the value. To set the
value as a negative number rather than
performing a subtraction, type = followed
by the negative number. For example =-2
<Enter> will set the value as -2.
· To multiply the selected cells by a value,
type * followed by the value to multiply
and press Enter. For example *2
<enter>.
· To divide the selected cells by a value,
type / followed by the value to divide by
and press Enter. For example /2
<enter>.
2010 S&S Cycle® Inc.
· Manually tagged at user discretion, these
tags will appear in purple.
· Automatically tagged by ProTune II during
Live-Tune to show the cells that the engine
has visited the cell during running. These
tags will appear in purple.
· Automatically tagged by ProTune II during
Live-Tune to show that a cell value has
been adjusted. These tags will appear in
green.
Cells and areas of cells can be manually
tagged or untagged by moving the cursor to
the required cell (or selecting an area of
cells) and doing one of the following:
· Pressing F9.
· Right-clicking on the selected cells and
picking Tag/Untag Cells from the menu.
· Selecting Tag/Untag Cells from the Edit
menu.
The feature that automatically tags cells
during Live-Tune can be toggled on/off by
selecting Switch On/Off Auto-Tagging in
LiveTune from the Edit menu or by
pressing Shift+F7.
74
ProTune II
All tags present in the current table can be
cleared by selecting Clear All Markers from
the Edit menu or by pressing F3.
6.1.6 Grid Size of the Spreadsheet
(right of the graph) by showing how the
colors map onto the table values.
Also shown on the graph is the cursor (bright
blue upside-down pyramid). A selected area
of cells is shown on the graph by a white
rectangular boundary.
You can change the size of the cells and the
values inside the cells by changing the grid
size of the spreadsheet. There are three
modes: small, normal and large. The default
mode is 'normal'.
To change the size, select Cycle Grid Size
from the Edit menu or hold the Shift key
and press F6. This will move from 'normal'
mode to 'large' mode.
Select again to move from 'large' mode to
'small' mode. Select once more to move from
'small' mode back to 'normal' mode.
6.2 Using the 3D Graph
The 3D graph displays the current table as a
three-dimensional surface plot with Engine
Speed in RPM along the horizontal (x) axis,
Throttle Position along the depth (z) axis and
table value along the upward (y) axis. To
change the unit used for the throttle position,
see Preferences 54 .
Above the cursor is the cursor pop-up
window (this may be switched off, see Switch
On/Off Map Cursor Pop-up 28 for details).
The cursor pop-up window shows the RPM,
throttle position and tuned table value at the
point of the cursor.
When you edit the table using the
spreadsheet, the changes made will be
reflected on the graph (see Using The
Spreadsheet 71 for more details).
You can set a new cursor position by clicking
on the graph. The cursor will move to the
nearest cell.
To select an area using the graph, click and
drag the mouse over the area of the graph
that you want to select.
The edit-menu accessed by right-clicking on
the spreadsheet can also be accessed by
right-clicking any part of the 3D graph.
The graph is shaded according to the value
at each point in the table. The meaning of
the shading is illustrated in the color key strip
2010 S&S Cycle® Inc.
Tuning in Advanced Mode
75
To change the spacing of the dividing lines
on the 3D graph, select Cycle Graph-Line
Resolution from the Edit menu or press F5
.
6.4 Live-Tune in Advanced Mode
6.3 Spreadsheet and Graph Layout
You can change the relative size of the
spreadsheet and graph by using the Splitterbar located midway between them.
Click on the splitter bar and drag it up or
down to change the size of the graph and
spreadsheet.
You can also switch the position of the graph
and the spreadsheet, switch to spreadsheetonly, or graph-only mode. To do this, select
Cycle Grid/Graph Position from the Edit
menu (or press F6. Select this function once
to switch to 'spreadsheet top, graph bottom'
mode. Select again to move to 'spreadsheetonly' mode. Select again to switch to 'graphonly' mode. Select the function again to
switch back to the default 'graph top,
spreadsheet bottom' mode.
2010 S&S Cycle® Inc.
Live-Tune mode allows you to make a direct
connection with the ECM so that any tuning
you apply to the current ECM table takes
immediate effect in the ECM. Live-Tune can
be very useful as you can run the engine at
different throttle and speeds and see
instantly how your tuning effects the engine
performance.
To tune in Live-Tune mode you must edit a
table that is loaded from the ECM. To load a
table from the ECM:
1. Ensure the ECM is connected. See
Connecting the ECM 15 for more
information.
2. Load the table that you want to Live-Tune
from the ECM. Select the table using the
tool-bar or the View menu. Select the
ECM as the current data source using the
Current Data Source Selector at the top of
the screen or from the View menu.
Browse the following sections for information
on how to Live-Tune.
More:
Activating Live-Tune Mode 76
Tuning in Live-Tune Mode 76
Deactivating Live-Tune Mode
77
76
ProTune II
6.4.1 Activating Live-Tune Mode
To activate Live-Tune mode:
1. Select Live-Tune Mode On/Off from the
Edit menu or click the Live! button on the
toolbar.
2. ProTune II will automatically send new
control information to the ECM and LiveTune mode will become active. Tuning the
table will now directly effect the tuning in
the ECM.
Note that during Live-Tune, many of the
program's functions are disabled. You must
deactivate Live-Tune mode to return to
normal mode.
6.4.2 Tuning in Live-Tune Mode
When Live-Tune mode is active the Tuning
Knob will appear to the left of the
spreadsheet.
Spreadsheet 71 and Using the 3D Graph 74
for more details). To tune the cell at the
cursor position, click on the indent of the
Tuning Knob and drag the mouse clockwise
or counter-clockwise to adjust its position.
You can also use the Page Up and Page
Down keys to increment (page up) and
decrement (page down) the cell value.
Holding the Shift key while pressing Page
Up and Page Down results in a larger
adjustment. Holding the Ctrl key while
pressing Page Up and Page Down results
in the largest adjustment.
The tuning adjustment is applied differently
depending on the table that you are tuning:
· The Base Fuel Injection Table. A value is
added corresponding to the tuning
percentage of original value. For example,
if the cursor is at 8 ms, applying a tuning
of 100% will double the fuel at the cursor
position to 16 ms. If the tuning was set to
-50% this would halve the fuel at the
cursor position to 4 ms.
· The Base Ignition Timing Table. A tuning
of +30° corresponds to adding 30 degrees
of ignition advance (moving the ignition
point 30 degrees more before Top Dead
Center). A tuning of -30° corresponds to
subtracting 30 degrees of ignition advance
(moving the ignition point 30 degrees
towards or past Top Dead Center).
· The Front Cylinder Adjustment Table and
Rear Cylinder Adjustment Table. The
tuning percentage value is added to the
tables percentage value. For example, if
the cursor is at 10% and the tuning knob
is set to +10%, the tuned value will be
20%. If the cursor is at 10% and the
tuning knob is set to -10%, the tuned
value will be 0%.
Move the editing cursor around the table
using the Cursor keys or by clicking on
areas of the graph (see Using The
Tuning a cell will result in a green tag marker
being placed at that cell. This marker shows
the cells that you have adjusted during LiveTuning.
2010 S&S Cycle® Inc.
Tuning in Advanced Mode
77
While Live-Tune mode is active, a second
(black) cursor is shown on the 3D-graph:
6.4.3 Deactivating Live-Tune Mode
Once you have finished Live-Tuning you need
to manually deactivate Live-Tune mode:
1. Select Live-Tune Mode On/Off from
the Edit menu or click the Live! button.
This is the Live Cursor that shows you the
position in the table that the engine is
currently running at. As you increase throttle
position and/or engine speed, the Live
Cursor will move across the table. You are
free to move the blue Cursor around the
table so that you can tune any part of the
table. If you tune a part of the table which
contains the Live Cursor, you will be able to
detect this change in your engine's running
behavior.
In Live-Tune mode, the Cursor Location
section of the information bar now reflects
the Live Cursor position and tuning at that
position.
The Cursor Pop-up Window above the blue
Cursor will reflect the table values at that
location.
As you Live-Tune, purple tags will be left at
the cells that the engine has visited during
Live-Tuning. To switch off this feature, see
Switch On/Off Auto-Tagging in LiveTune 29 .
2010 S&S Cycle® Inc.
2. ProTune II will automatically send new
control information to the ECM and LiveTune mode will deactivate.
The ECM is now running its original (pre-Live
Tune) table. In order to implement the
changes that you have made to the table,
you must send the Live-Tuned table to the
ECM. A message will appear when you
deactivate Live-Tune mode asking whether
you want to do this. Click Yes to send the
tuned table to the ECM.
Important: If you click No, the Live-Tune
changes will be lost and the original table
values will be reloaded.
7 Gauges and Realtime Data
7.1 Using the Gauges Window
The Gauges Window allows you to view
various ECM parameters in real-time and
arrange them on-screen. To view the Gauges
78
ProTune II
Window:
1. First ensure the ECM is connected. See
Connecting the ECM 15 for more
information.
2. Click the Gauges button, or select ECM
Gauges from the View menu, or hold
Ctrl and press 3.
The Gauges window will appear on screen.
This window can be moved, resized,
minimized and maximized independently
from the main window using its title bar and
the Windows® buttons in the top-right
corner. To close the window, click the close
button (X) in the top-right corner.
The gauges layout may be opened and saved
as a file. The default location for these files is
My Documents\ProTune 2\Gauge Views. See
Opening and Saving the Gauges Window
Layout 79 .
Each gauge is displayed in its own window. A
gauge can be presented as a text display for
text and numeric channels or a dial for
numeric channels.
The gauge can be moved around the display
by clicking and dragging its title bar. Clicking
the title bar of a gauge window selects it and
makes it the current gauge.
The border of the gauge can be used to
resize it. Click and drag one of the edges or
corners of the gauge to resize it in that
direction.
Click the close button (X) of a gauge window
to remove it from the display.
The dock/undock button can be used to lock
the gauge into a particular position. When
undocked (the dock button appears as a
horizontal 'thumb tack' icon) the gauge can
be moved, resized and closed. When docked
(the dock button appears as a vertical 'thumb
tack' icon), the gauge is fixed into position
and the close button and resizing border
disappear. Docked gauges can make for
neater displays as well as preventing
accidental moving, resizing, and closing of
gauges. Click on the button to toggle
between its docked and undocked state.
Some gauges will have shaded background
colors according to their state. The 'Target
Closed-Loop', 'Front Cylinder Closed-Loop'
and 'Rear Cylinder Closed-Loop' gauges are
shaded to match the options on the 'Target
Closed-Loop Fuel Map'.
Input gauges will flash red when the ECM
detects that the input value is outside of the
valid range. The title of the gauge will
appear with an exclamation mark (!). When
in this state, the gauge may show the default
value that the ECM will use for this input (in
2010 S&S Cycle® Inc.
Gauges and Realtime Data
the example shown below, the engine
temperature from the sensor is outside of
valid range and the ECM is using 100 °F as a
default value for this input).
79
To add the selected channel, click OK or
press Enter. If you do not wish to add the
channel, click Cancel or press Esc.
If a channel is selected, the new gauge
window will now appear on screen and can
be repositioned and resized as required.
7.1.2 To Remove a Gauge
More:
To Add a Dial or Text Gauge… 79
To Remove a Gauge… 79
Always On Top setting 79
Saving the Gauges Window Layout
79
To remove an undocked (floating) gauge
window from the display, either click on its
close (X) button or select it by clicking on its
title bar and select Remove from the View
menu of the Gauges Window.
7.1.1 To Add a Dial or Text Gauge
7.1.3 Always On Top setting
Go to the View menu of the Gauges
Window and select Add… The Add Gauge
dialog box will be displayed.
Choose a channel from the list by clicking on
it. When you select a channel, a description
appears in the description box on the right
side. If the channel is numeric (number
based) the display style drop-down list will
allow you to choose between a "Normal"
display and a "Dial" display. Text-based
channels can only be displayed with "Normal"
displays.
2010 S&S Cycle® Inc.
By default, the gauges window is set so that
it will always appear on top of other
windows. To change this so that the Gauges
Window can be moved to the background,
click on the Always on Top menu item in
the View menu of the Gauges Window. This
will remove the check mark from this menu
item and you can now move the Gauges
Window to the background. Click on the
menu item again to reset the Always on
Top property.
7.1.4 Opening and Saving the Gauges Window Layout
To open a layout from file, select Open
80
ProTune II
Layout from the View menu of the Gauges
Window.
When you have modified the Gauges Display
and attempt to close it, ProTune II will ask
you whether you want to save your changes.
Click Cancel to return to the Gauges
Displays. Click Yes to save the current
display state or click No if you do not want
to save your changes.
To save the display layout manually, select
Save Layout from the View menu of the
Gauges Window.
To save the display layout to a specific
filename, select Save Layout As from the
View menu of the Gauges Window.
7.2 The Engine Data Area
When the ECM is connected, the Engine Data
section of the information bar will be
displayed in the middle row of the screen.
The Engine Data area allows you to select up
to 6 ECM parameters to view in real-time
while tuning a table.
Choose a parameter channel from the list (by
clicking on it) or select –none- if you don't
want to display a channel in that cell. When
you select a channel, a description of that
channel appears in the description box on
the right side.
To set the selected channel, click OK or
press Enter. If you do not wish to change
the channel, click Cancel or press Esc.
If you need a larger or more complex display
of ECM parameters, use the Gauges Window.
See Using the Gauges Window 77 for more
information.
8 Advanced Calibration Tables
8.1 Viewing and Editing Advanced Tables
The advanced tables can be accessed from
the View menu by selecting one of the
following items:
You can choose parameters by clicking on
the bright blue down arrow symbol on the
right side of each parameter title. This will
display the Add Gauge dialog box.
· Engine Temperature Ignition
Compensation
· Air Temperature Ignition Compensation
· Engine Temperature Fuel Compensation
· Air Temperature Fuel Compensation
· Engine Temperature Start Map
· Stepper Pre-Start Position Map
· Stepper Position with Temperature Map
· Stepper Position Fuel Compensation Map
· Target Closed-Loop Fuel Map
2010 S&S Cycle® Inc.
Advanced Calibration Tables
81
For details of what these tables do, browse
the following sections (Temperature
Compensation Tables 82 , Engine
Temperature Start Map 82 , and Stepper
Motor Tables (Idle Speed Control) 82 ).
To view or edit an advanced table:
1. Select one of the advanced tables listed
above from the View menu.
2. The Select Data Source dialog box will
appear. The dialog box will list the current
active data sources; i.e. the ECM if it is
connected, the demonstration data built
into the software, and any calibration files
that you accessed since starting the
software. To select a data source, click on
it to highlight it and then click OK or
press Enter. You can also double-click on
an item to select it. If you want to browse
for another calibration, select the 'A
calibration file not on this list' option.
This will cause an Open File dialog box to
appear. Select a calibration file from this
dialog box and click Open.
The vertical y-axis (height) shows the range
of values for the table and the horizontal xaxis (width) corresponds to the columns of
the table. A small text box displays a short
description of the table (left of the
spreadsheet).
Table values can be edited via the
spreadsheet in the same way as the main
fuel and ignition tables. Move the cursor
around the spreadsheet using the Left and
Right arrow keys. Type in a value and press
Enter to change one of the cell values. See
Using The Spreadsheet 71 for more details.
Certain functions are disabled with the
advanced tables as they are not applicable.
Namely:
The table will be loaded and will appear as a
2D line graph, with a single row spreadsheet
below it.
· You cannot Live-Tune the advanced tables.
· You cannot tag cells in the advanced
tables.
· You cannot change the display layout
when viewing advanced tables.
When you have finished editing an advanced
table you can select Save Table… 60 from
the Options menu to save it to its original
data source or Save Table To… 60 to save it
to a different data-source.
Certain advanced maps will have an enable/
disable checkbox located under the
spreadsheet. Checking this box will enable
the map in the ECM/Calibration file.
Unchecking the box will ensure that the map
2010 S&S Cycle® Inc.
82
ProTune II
is not used in the ECM/Calibration file. The
arrow box located to the right of the checkbox contains further information on the
check-box setting.
When the check-box is unchecked, the map
values are 'grayed-out' and cannot be edited.
The checkbox setting will be saved when the
map is saved.
8.2 Temperature Compensation Tables
The temperature compensation maps adjust
fuel and ignition as a function of the current
engine and air temperatures. For a full
description of how these compensation
tables work, see The Fuel Injection System
65 and The Ignition Timing System 66 .
8.3 Engine Temperature Start Map
The Engine Temperature Start Map adjusts
the fuel delivery during cranking as a
function of engine temperature. The table
adds a percentage of the input fuel injector
pulse width as a function of the engine
temperature.
For example if the compensation factor from
the Engine Temperature Start Map is +85%
and the input fuel injector pulse width is
4ms, the output of the table will be 4 +
(85% of 4) = 7.4ms.
See The Fuel Injection System 65 for more
details on how the fuel system works and
how fuel compensation works.
8.4 Stepper Motor Tables (Idle Speed Control)
The stepper-motor on your motorcycle is
used to control the idle speed of the engine
by automatically adjusting the throttle valve
position by small amounts.
The stepper motor can drive the throttle
valve open by a small amount to allow more
air to pass and therefore increase engine
speed. It can also close the throttle by a
small amount to decrease engine speed.
TheS&S Cycle® ECM has a closed-loop
control feature that allows automatic throttle
opening and closing to maintain an
appropriate and constant idle speed (the
speed of the engine when the throttle is
closed and the motorcycle is not moving). It
does this by trying to achieve the target idle
speed taken from the target idle speed table
in the ECM.
You can edit the target idle speed of the ECM
by changing the Target Idle Speed Setting
44 . This is the speed that the ECM will try to
attain when idling. When the engine is
started, the target idle speed will be set at
the optimum value for the engine
temperature and conditions. As the engine
warms up and runs, the target idle speed will
move towards the value that you specify.
The initial stepper position when the engine
starts affects both the starting characteristics
of the engine and how quickly the required
idle speed can be attained after engine start.
The stepper-motor position during cranking
can be tuned by adjusting the Stepper PreStart Position Map 42 . This map can be
enabled or disabled by using the checkbox
positioned below the map spreadsheet.
When this checkbox is checked, the Stepper
Pre-Start Position Map is enabled in the ECM/
Calibration file and the values in this map will
be used to determine the stepper-motor prestart position.
When the checkbox is unchecked, the
2010 S&S Cycle® Inc.
Advanced Calibration Tables
Stepper Pre-Start Position Map is disabled in
the ECM/Calibration file and the stepper prestart position will be set as a function of the
learned idle control value in the ECM.
The initial stepper position after engine start
can be adjusted as a function of initial engine
temperature by tuning the Stepper Position
with Temperature Map 43 . Both of these
tables have outputs ranging from 0 steps (no
additional throttle) to 205 steps (maximum
additional throttle).
The stepper motor should be wired so that
an increase in stepper number (0-205)
corresponds to an increase in throttle. If you
have an application where the stepper-motor
requires different wiring, you can select the
orientation mode of the stepper motor in the
ECM by editing the Stepper Motor Orientation
Setting 41 . This setting should be left as
default unless you have specific reason to
change it.
As the stepper motor opens the throttle, you
may want to compensate for the extra
engine speed by adjusting the fuel delivery.
This can be done using the Stepper Position
Fuel Compensation 45 table. This table adds
a percentage fuel compensation depending
on the degree of stepper motor travel. The
map can be enabled or disabled by using the
checkbox positioned below the map
spreadsheet. When this checkbox is checked,
the Stepper Position Fuel Compensation table
is enabled in the ECM/Calibration file and
the values in this map will be used to adjust
the fuel.
When the checkbox is unchecked, the
Stepper Position Fuel Compensation table is
disabled in the ECM/Calibration file and the
fuel will not be adjusted by this table.
2010 S&S Cycle® Inc.
83
9 Closed-Loop Fuel Control
9.1 The Closed-Loop Fuel Control System
The S&S® ECM supports the Closed-Loop
Fuel Control system. When fitted to a
motorcycle with oxygen sensors in the
exhaust system, this feature allows the ECM
to learn (as the engine runs) the optimal fuel
delivery required to maintain a specific fuel
mixture or Air-Fuel Ratio (AFR). The ECM can
then use that information to automatically
adjust the fuelling towards that optimal value
and continue refining the value to reach the
desired Air-Fuel Ratio.
Below is a diagram that summarizes how this
system works. Each cylinder (front and rear)
has its own separate Closed-Loop Fuel
Control system so the ECM can learn the
optimal fuel values for each cylinder
independently of the other.
The diagram shows that the ECM continually
calculates how much fuel correction is
needed to adjust the current Air-Fuel Ratio to
the value required by the user. Optionally,
that percentage correction may be stored in
the cylinder's Adaptive Map so that a pattern
of required fuel correction can be built up
over different engine speeds and throttle
positions. The Closed-Loop Control Settings
37 allows the user to specify that the
current percentage correction is applied to
the current fuel output. In other words, the
adjusted fuel output will affect the actual
measured Air-Fuel Ratio, thus completing the
84
ProTune II
loop.
ProTune II allows you to specify a general
target mixture for different engine speeds
and throttle positions by editing the Target
Closed-Loop Fuel Map, see Setting the Target
Air-Fuel Mixture 85 for details. It also allows
you to decide whether the Adaptive Map is to
be changed and/or whether the current
Adaptive Map value is to be used to adjust
the current fuel output. This enables the
option of running the engine over time to
build an Adaptive Map and then using it later
to correct the fuel. In addition, you can
control when and how the Adaptive Maps are
reset.
For details of these settings in Basic Mode,
see Closed-Loop Setup in Basic Mode 84 . For
details of these settings in Advanced Mode,
see Closed-Loop Setup in Advanced Mode 85
.
Once a successful Adaptive Map has been
built up over time, you can use one of the
ProTune II merge functions to translate the
percentage corrections in the Adaptive Maps
to the cylinder fuel adjustment tables and/or
the main fuel table. See the section Using the
Adaptive Maps 86 for more details.
You can view the current state of the front
and rear cylinder Adaptive Maps, by
selecting Front Cylinder Adaptive Map 45 and
Rear Cylinder Adaptive Map 46 from the
View menu when a S&S® ECM is connected.
The Adaptive Maps can be manually reset to
zero percent correction at anytime by
accessing the Reset Adaptive Maps 63
function from the Options menu.
an ECM or Calibration file.
The Closed-Loop Control Settings dialog box
in Basic Mode has one settings drop-down
list:
Closed-Loop Fuel Control Mode. This sets
the mode of operation for the Closed-Loop
Control System. The options are:
· No Closed-Loop or Adaptive. The ECM
will not place new values in the Adaptive
Maps or use the Adaptive Maps to adjust
the current fuel output. When editing the
current ECM or calibration file, the status
indicators on the main window will both be
off.
· Full Closed-Loop control. The ECM will
update the Adaptive Maps with new
percentage correction values and use the
values in the Adaptive Map to adjust the
fuel output. When editing the current ECM
or calibration file, the status indicators on
the main window will both be on.
9.2 Closed-Loop Setup in Basic Mode
Select the Closed-Loop Control Settings 37
item from the View menu in Basic Mode to
specify the Closed-Loop mode of operation in
· Default (Retain factory settings).
Shown when an ECM or calibration file has
a custom setting. Use this option to verify
that the current mode is not changed.
2010 S&S Cycle® Inc.
Closed-Loop Fuel Control
85
9.3 Closed-Loop Setup in Advanced Mode
Select the Closed-Loop Control Settings 37
item from the View menu in Advanced Mode
to specify the Closed-Loop mode of operation
in an ECM or Tune-File.
When in Advanced Mode, The Closed-Loop
Control Settings dialog box has one settings
drop-down list:
Closed-Loop Fuel Control Mode. This sets
the mode of operation for the Closed-Loop
Control System. The options are:
· No Closed-Loop or Adaptive. The ECM
will not place new values in the Adaptive
Maps or use the Adaptive Maps to adjust
the current fuel output. When editing the
current ECM or calibration file, the status
indicators on the main window will both be
off.
· Full Closed-Loop control. The ECM will
update the Adaptive Maps with new
percentage correction values and use the
values in the Adaptive Map to adjust the
fuel output. When editing the current ECM
or calibration file, the status indicators on
the main window will both be on.
2010 S&S Cycle® Inc.
· Read Adaptive – No Closed-Loop. The
ECM will use the current values in the
Adaptive Maps to adjust the fuel output
but will not modify the Adaptive Maps.
When editing the current ECM or
calibration file, the adaptive map indicator
will be lit.
· Closed Loop Only – No Adaptive. The
ECM will update the Adaptive Maps with
new percentage correction values but will
not use the Adaptive Maps to adjust the
fuel output. When editing the current ECM
or calibration file, the closed-loop indicator
will be lit.
· Default (Retain factory settings).
Shown when an ECM or calibration file has
a custom setting. Use this option to verify
that the current mode is not changed.
9.4 Setting the Target Air-Fuel Mixture
You can specify the general target Air-Fuel
Ratio for different engine speeds and throttle
positions by modifying the Target ClosedLoop Map. Select this map from the View
menu.
86
ProTune II
down list of options. An option can be
selected using the cursor keys and pressing
Enter or by clicking on the option with the
mouse. Press the Esc key if you want to
cancel editing the current cell.
Each cell may be set to one of the following
modes:
The map appears as a spreadsheet with
sixteen Engine Speed columns and sixteen
Throttle Position rows. Each cell of the
spreadsheet specifies the required Air-Fuel
mixture at that Engine Speed and Throttle
Position. The spreadsheet is used in a similar
way to other tables. Use the scroll bars at
the bottom and right corner of the
spreadsheet to see all of the data. The
cursor, indicated by the black rectangle, may
be moved around the spreadsheet with the
Left, Right, Up and Down arrow keys.
Holding Shift while pressing the arrow keys
will enable you to select a rectangular area
of cells. The cursor position can also be
changed by clicking the mouse on the
required cell. Clicking and dragging across a
range of cells will select an area of the
spreadsheet. Clicking on column or row
headers will select an entire column or row.
Clicking and dragging across column or row
headers will select multiple columns or rows.
A line indicates a division on the table
between Throttle Positions of 75% or more
open and less than 75% open. You cannot
select the two leanest mixture options at
75% throttle or above as a fuel rich mixture
is advised in this area. You cannot select the
richest mixture option at less than 75%
open.
To edit a cell value, or a selected area of cell
values, click on the grey down-arrow box
which appears in the current cursor cell or
press the Enter key. This will display a drop-
· RICHEST. Available only for throttle
positions equal to or greater than 75%
open. Specifies a very highly fuel rich
mixture for this cell.
· RICHER. Specifies a highly fuel rich
mixture for this cell.
· RICH. Specifies a fuel rich mixture for this
cell.
· STOICH – Available only for throttle
positions less than 75% open. Specifies
that the mixture should be stoichiometric,
i.e. a balanced mixture of fuel and air for
complete combustion.
· LEAN – Available only for throttle positions
less than 75% open. Specifies that the
mixture should be oxygen rich, i.e. less
fuel than required for complete
combustion.
· NO CL – Specifies that no closed-loop
control should be performed at this Engine
Speed and Throttle Position. The Adaptive
Maps will not be updated at this location.
· DEFAULT – Used to indicate that the setup
of this cell is custom and not one of the
presets. Leave as default if you want to
leave the setup unchanged.
9.5 Using the Adaptive Maps
Once Adaptive Maps are generated that
produce the desired engine performance, the
percentage fuel correction stored in the
Adaptive Maps can be applied to the cylinder
fuel adjustment tables and/or main fuel map
in the ECM. The reason for doing this is to
reduce the amount of adaptation required for
further closed-loop running. The Adaptive
2010 S&S Cycle® Inc.
Closed-Loop Fuel Control
Maps are volatile. They may be modified by
the ECM with further closed-loop running and
will be lost if the permanent battery
connection to the ECM is interrupted. For
details of these settings in Basic Mode, see
Closed-Loop Setup in Basic Mode 84 . For
details of these settings in Advanced Mode,
see Closed-Loop Setup in Advanced Mode 85
.
The values in the Adaptive Maps may be
applied to the ECM fuel tables by selecting
either Cylinder Trim Adaptive Map Merge 62
or Main Fuel Adaptive Map Merge 63 from
the Options menu. The Cylinder Trim
Adaptive Map Merge function will modify the
Cylinder Fuel Adjustment tables (Front
Cylinder Adjustment Table 35 , Rear Cylinder
Adjustment Table 36 ) with the Adaptive Map
values. The Main Fuel Adaptive Map Merge
will distribute the Adaptive Map correction
between the cylinder fuel adjustment tables
and the Fuel Injection Base Table 34 . Which
option you select depends upon whether you
want the base fuel table to be modified by
the process or left in its current state. Using
the Main Fuel Adaptive Map Merge will
reduce the magnitude of the change to the
cylinder adjustment tables. Using this
function also averages the change across the
two cylinders, which may be desirable for
balanced engine running. The Cylinder Trim
Adaptive Map Merge function calculates each
cylinder separately.
The Cylinder Trim Adaptive Map Merge
function operates as follows:
1. ProTune II loads the Front Cylinder
Adaptive Map, Rear Cylinder Adaptive
Map, Front Cylinder Fuel Adjustment
Table, Rear Cylinder Fuel Adjustment
Table from the ECM.
2. It adjusts the current value in the Cylinder
Adjustment Table by an amount
proportional to the Adaptive Map
percentage correction, for each cylinder.
3. ProTune II then sends the modified the
Cylinder Adjustment Tables back to the
ECM.
2010 S&S Cycle® Inc.
87
4. The Adaptive Maps are reset to zero.
The Main Fuel Adaptive Map Merge
function operates as follows:
1. ProTune II loads the Front Cylinder
Adaptive Map, Rear Cylinder Adaptive
Map, Front Cylinder Fuel Adjustment
Table, Rear Cylinder Fuel Adjustment
Table and the Fuel Injection Base Table
from the ECM.
2. Works out the total adjustment for each
cylinder by adding the current value in the
Fuel Adjustment Table to the percentage
correction in the Adaptive Map.
3. Averages the two total adjustment values
for the two cylinders.
4. Compensates the values in the Fuel
Injection Base Table by this average
adjustment (for example, if the average
total adjustment is +100%, this will result
in a doubling of fuel at that location in the
fuel table).
5. Calculates the difference between the
average total adjustment and the total
adjustment for each cylinder. Stores this
difference in the Cylinder Fuel Adjustment
tables.
6. ProTune II then sends all modified tables
back to the ECM.
7. The Adaptive Maps are reset to zero.
You can view the current state of the front
and rear cylinder Adaptive Maps, by
selecting Front Cylinder Adaptive Map 45 and
Rear Cylinder Adaptive Map 46 from the
View menu when a S&S® ECM is connected.
The Adaptive Maps can be manually reset to
zero percent correction at anytime by
accessing the Reset Adaptive Maps 63
function from the Options menu.
88
ProTune II
10 Knock (Adaptive Ignition) Control
menu. The Adaptive Ignition Map can be
reset by selecting Reset Adaptive Maps 63
from the Options menu.
10.1 The Knock (Adaptive Ignition) Control System
The 55-5069 USB ECM supports a Knock
Control system. When fitted to a motorcycle
with a knock sensor, this feature allows the
ECM to adjust the ignition timing to avoid
engine knocking (also called pinging or
detonation).
The Knock control system can operate in one
of three modes. You can select the mode for
your ECM by selecting Knock Control Settings
38 from the View menu.
· Learned and instantaneous
adjustment. The ECM will adjust ignition
timing to avoid engine knocking.
Adjustments are made as knocking occurs
and long-term adjustments are stored.
· Instantaneous adjustment only (nonlearned). The ECM will adjust ignition
timing to avoid engine knocking as it
occurs. Long term adjustments are not
stored.
· Disabled. Knock Control is not enabled
and no adjustments to ignition timing are
made due to engine knocking.
You can view the long term adjustments
made due to engine knocking by selecting
the Adaptive Ignition Map 47 from the View
11 Diagnostics
11.1 Frequently Asked Questions
The 3D graph does not appear or
appears as an empty rectangle on my
PC.
This may be cause by the color resolution of
your PC being set too low for ProTune II (for
example, if Windows® is set to 256 or 16
color mode). ProTune II requires a color
resolution of 16-bit color (thousands of
colors) or greater. To change your color
resolution, go to the Start menu and launch
Control Panel (this may be in the Settings
menu). Double-click on the Display icon.
Click on the Settings tab. The color settings
can be adjusted by selecting an item from
the Color Quality drop-down list. Select either
the 16-bit, 24-bit or 32-bit color options.
Some Windows versions may require that
you restart your computer for the new color
settings to take effect. If you do not have 16bit, 24-bit or 32-bit color options it is likely
that you will need to update your graphics
system to run ProTune II successfully.
The 3D graph is drawn very slowly or
does not update correctly on my PC.
You may need to update the graphics driver
on your PC. A graphics driver is an item of
software that allows Windows to send
instructions to your video display system. Go
to the website of your video system
manufacturer and search for the latest driver
for your version of Windows. The
2010 S&S Cycle® Inc.
Diagnostics
manufacturer and model of your video
display system can be found by accessing
the Start menu and launching Control
Panel (this may be in the Settings menu).
Double-click on the Display icon. Click on
the Settings tab. Click on the Advanced
button. Click on the Adapter tab. The
properties of your video display system will
be shown in the dialog box.
ProTune II does not communicate with
my serial ECM.
1. Check that the ECM is powered. The ECM
must be supplied with vehicle power in
order to operate. Your motorcycle ignition
key and kill switch should be set to the ON
and RUN positions. Make sure that the
battery level is normal. Try cycling the
power to the ECM (switch off ignition for
15 seconds and then switch on).
2. Check that the cable is connected firmly to
the ECM and the PC.
3. Some PCs may have more than one serial
port. If this is the case, try connecting to
the other port(s).
4. The external serial port on your PC might
not be installed as COM1. This is the case
on some models of notebook computers
that use COM1 for other devices (modems,
IR ports, etc). You will need to change the
serial port that ProTune II checks for ECMs
on. Try searching on COM2 instead of
COM1. See Serial Port Settings… 55 for
details on how to detect the port setup of
your computer. For detailed information on
the port setup of your PC, go to the
Windows Start menu, open the Control
Panel (this may be in the Settings
menu). Open the System control panel.
Click on the Hardware tab. Click Device
Manager. Under the group labeled Ports
the available serial ports should be listed.
The serial port names will start with the
letters 'COM'.
2010 S&S Cycle® Inc.
89
ProTune II does not communicate with
my USB ECM.
1. Check that the ECM is powered. The ECM
must be supplied with vehicle power in
order to operate. Your motorcycle ignition
key and kill switch should be set to the ON
and RUN positions. Make sure that the
battery level is normal. Try cycling the
power to the ECM (switch off ignition for
15 seconds and then switch on).
2. Check that the cable is connected firmly to
the ECM and the PC.
3. Try disconnecting and reconnecting the
USB connection to the ECM. This will reset
the ECM connection and allow Windows to
relocate the device.
4. Have you installed the USB driver
correctly? The first time you connect the
ECM to a PC, you will need to install the
supplied device driver. Please refer to the
USB Device Driver Installation 9 section
for more details on this.
5. See Troubleshooting USB Driver Problems
89 for more help.
Windows reports 'locked files' when I
am upgrading or removing ProTune II.
Make sure all applications (especially
ProTune II itself) are closed before you
attempt to upgrade or remove ProTune II
from your PC. To be sure that all applications
are closed, you may wish to restart your
computer and retry the upgrade/removal
process.
11.2 Troubleshooting USB Driver Problems
If an error occurs during the installation of
the USB device driver, or the device does not
communicate with ProTune II, it may be
necessary to manually check the connection
90
ProTune II
to the ECM in Windows® and reinstall the
USB driver. To install the USB driver for the
first time see USB Device Driver Installation
9 .
To check the device connection and reinstall
the driver, follow these steps:
1. Close all programs, including ProTune II.
2. Check that the ECM is powered. The ECM
must be supplied with vehicle power in
order to operate. Your motorcycle ignition
key and kill switch should be set to the ON
and RUN positions. Make sure that the
battery level is normal.
3. Check that the cable is connected firmly to
the ECM and the PC.
Now follow the instructions below
appropriate to your version of Windows.
Windows® XP
90
Windows® Vista™ & Windows® 7
90
11.2.1 Windows® XP
under the Other devices and Universal
Serial Bus controllers groups for any
ECM devices that have a yellow
exclamation mark symbol next to them. If
you cannot find any related items then the
USB ECM has not been detected by the
PC. Check that the ECM is installed
correctly, powered and the cable is
securely connected and not damaged.
Contact customer support if this does not
solve the problem.
7. If you find the device listed with a yellow
exclamation mark symbol next to it, right
click the item and select Uninstall. The
device icon should disappear. Now unplug
the USB cable from the PC and reattach it.
If the Found New Hardware dialog box
appears, follow the steps described in the
USB Device Driver Installation 9 section.
8. If the device continues to be listed with a
yellow exclamation mark, right click the
item and select Properties. Make a note
of the Device status message. Click the
Driver tab. Click Update Driver... and
follow the steps described in the USB
Device Driver Installation 9 section, or
manually select the driver in the ProTune
II directory (C:\Program Files\S&S
Cycle\ProTune 2). Contact customer
support if this does not solve the problem.
1. Go to the Start menu button.
2. Select Control Panel from the menu.
3. Double-click the System icon.
4. Select the Hardware tab.
5. Click the Device Manager button to
launch the Device Manager window.
6. There should be a group of devices
named Automotive Controllers and
Interfaces. This group should contain
one Vehicle Control System or
Interface Unit item. If not, the device
has not been installed correctly. Search
11.2.2 Windows® Vista™ & Windows® 7
1. Go to the Windows® icon button on the
task-bar.
2. Select Control Panel from the menu.
3. Click the System and Maintenance link.
4. Click the System link.
5. Click the Device Manager link in the
Tasks pane.
6. Depending on your security settings, a
2010 S&S Cycle® Inc.
Diagnostics
message may appear asking for
permission to continue. Click Continue.
7. There should be a group of devices
named Automotive Controllers and
Interfaces. This group should contain
one Vehicle Control System or
Interface item. If not, the device has not
been installed correctly. Search under the
Other devices and Universal Serial
Bus controllers groups for any ECM
devices that have a yellow exclamation
mark symbol next to them. If you cannot
find any related items then the USB ECM
has not been detected by the PC. Check
that the ECM is installed correctly,
powered and the cable is securely
connected and not damaged.
8. If you find the device listed with a yellow
exclamation mark symbol next to it, right
click the item and select Uninstall. The
device icon should disappear. Now unplug
the USB cable from the PC and reattach it.
If the Found New Hardware dialog box
appears, follow the steps described in the
USB Device Driver Installation 9 section.
9. If the device continues to be listed with a
yellow exclamation mark, right click the
item and select Properties. Make a note
of the Device status message. Click the
Driver tab. Click Update Driver... and
follow the steps described in the USB
Device Driver Installation 9 section, or
manually select the driver in the ProTune
II directory (C:\Program Files\S&S
Cycle\ProTune 2\drivers). Contact
customer support if this does not solve the
problem.
11.3 Check Engine Lamp Diagnostics
The S&S Cycle® ECM has a feature which
can report engine faults by flashing a code
via the Check Engine lamp on the
2010 S&S Cycle® Inc.
91
motorcycle.
Note: if you have set your motorcycle to use
the check engine lamp as a shift-light, this
function will be disabled.
The procedures to activate and read the
check engine lamp are as follows:
1. Turn the ignition switch to the on position
for three seconds (one second pause after
the fuel pump stops), and then switch
back to the off position for three seconds.
Repeat this procedure one more time and
then turn the ignition to the on position
and wait for eight seconds for the check
engine lamp to start flashing.
2. The transmission of a code is always
preceded by a series of rapid flashes
(about 3 per second). This "intermission"
is followed by a 2 second pause in which
the lamp is off. The lamp will then flash
one or more times to indicate the first digit
of the trouble code. The length of time the
lamp is illuminated and the length of time
in which it is off are each about 1 second
in duration. The number of times the lamp
flashes indicates the first digit of the
trouble code.
3. Following the transmission of the first
digit, there is another 2-second pause in
which the lamp is off. The lamp will then
flash one or more times to indicate the
second digit of the trouble code. The
number of times the lamp flashes indicates
the second digit of the trouble code.
4. Following the transmission of the second
digit, there is a third 2-second pause in
which the lamp is off. After the pause
comes an "intermission", followed by
transmission of the next recorded trouble
code. All subsequent codes are sent in the
same manner, each separated from the
next by an "intermission". Once the
trouble codes have been sent the data
string is repeated. See the Check Engine
Lamp - Fault Flashing Codes 92 for a list
92
ProTune II
of the trouble codes supported.
5. Turn the Ignition Key switch to off. Wait
10 seconds for the ECM relay to click.
Vehicle can now be started normally.
11.4 Speedometer Diagnostics
The S&S Cycle® 55-5069 USB ECM has a
feature which can report engine faults
through the vehicle odometer of the stock
speedometer on a 2004 or newer
motorcycle. A computer cable is not required
for these diagnostics.
The procedures to activate and read the
speedometer diagnostic trouble codes are as
follows:
1. With the Ignition switch Off and the Run/
Stop switch set to Run, press and hold the
odometer reset button. The odometer will
light up and display the total mileage.
2. While pressing the odometer reset button,
turn the Ignition switch to the Ign
position. Then release the odometer reset
button. The speedometer and
tachometer, if equipped, will do full range
sweeps and light all the indicator lights.
The odometer will display "diAG".
3. Press and release the odometer reset
button again. The odometer will display
“PSSPt”, with the first P blinking. The
blinking letter indicates which module is
selected to send diagnostic information.
The first “P” is the Electronic Control
Module (ECM). The first “S” is the Turn
Signal Module (TSM). The “SP” is the
Speedometer. The “t” is the Tachometer.
4. Press and release the odometer reset
button to select the desired module from
the list above. As you cycle through the P,
S, SP, and t, the selected digits will blink.
5. To view the diagnostic fault codes in the
selected module, press and hold the
odometer reset button for about 4
seconds. The odometer will display a 5
digit code for any fault codes that are
present. Record the fault codes. If there
are not any trouble codes set on the
selected module, the odometer will display
“nonE”.
6. Press and release the odometer reset
button to toggle through the remaining
fault codes, if any are present. The
odometer will display “End” when all the
fault codes present have been displayed.
See the Check Engine Lamp - Fault
Flashing Codes 92 for a list of the trouble
codes supported.
7. To clear the diagnostic fault codes on the
selected module, press and hold the reset
button for about 4 seconds. The
odometer will display “CLEAr” after
clearing the trouble codes.
8. If you do not want to clear the trouble
codes, press and release the reset button.
The part number of the selected module
will scroll across the odometer.
9. Press and release the reset button again.
The odometer will now be back to step 3.
You may now retrieve diagnostic trouble
codes from a different module. Turning
the Ignition switch to Off at any point will
exit the speedometer diagnostics
procedure.
11.5 Check Engine Lamp - Fault Flashing Codes
The fault-flashing codes correspond to the
following fault conditions:
2010 S&S Cycle® Inc.
Diagnostics
93
(Battery)
High
Check Engine Speedometer
Lamp Flash
Diagnostic
Code
Code
11
11
12
12
14
14
15
15
P0122
P0123
P0105
P0108
P0117
P0118
P0113
P0112
Fault
Condition
Throttle
Position
Sensor
Low/Short
Circuit
Throttle
Position
Sensor
High/Open
Circuit
23
P0261
Front Injector
Open Circuit
23
P0262
Front Injector
Short Circuit
32
P0264
Rear Injector
Open/Low
32
P0265
Rear Injector
Short/High
34
P0505
Stepper
Motor
Malfunction
52
P0604
Barometric
Pressure
Sensor
Malfunction
ECM RAM
Error
53
P0605
ECM Flash
Error
MAP/Baro
Sensor
Low/Open
Circuit
54
P0603
ECM EEPROM
Error
55
P0606
Microprocess
or
Malfunction
(ECM
Processor)
P0217
Overheat
Protection
Stage 1
P0217
Overheat
Protection
Stage 2
P0217
Overheat
Protection
Stage 3
71
P0327
Knock Sensor
1 Circuit Low
Input
72
P0328
Knock Sensor
2 Circuit High
Input
Engine
Temperature
Sensor
Low/Short
Circuit
Engine
Temperature
Sensor
High/Open
Circuit
Intake Air
Temperature
High/Open
Circuit
Intake Air
Temperature
Low/Short
Circuit
16
P0562
System
Voltage
(Battery) Low
P0132
Front O2
Sensor High
Voltage
16
P0563
System
Voltage
P0134
Front O2
Sensor
2010 S&S Cycle® Inc.
94
ProTune II
Open/Not
Responding
P0170
Front
Adaptive
Maxed Out
P0152
Rear O2
Sensor High
Voltage
P0154
P0173
Rear O2
Sensor
Open/Not
Responding
Rear Adaptive
Maxed Out
Data Source
A source of calibration data, either an ECM,
BOX file, or a Tune-File.
DTC
Diagnostic Trouble Code. A record of a fault
or error condition stored in the ECM memory.
ECC (file)
See Tune-File below.
ECM
Electronic Control Module. An electronic
device which controls a vehicles engine and
other systems. Also known as a VFI (Variable
Fuel Injection) module.
ECM Upgrade File
See BOX file above.
12 Glossary
BOX (file)
A complete copy of the state of an ECM,
including ECM software and all data. This is a
file containing new ECM software and/or data
which can be used to update and backup the
state of ECMs. A BOX file is a type of
calibration file, the other being a Tune-File.
Calibration (File)
A file that stores a copy of ECM data and/or
software. Specifically, a calibration file is
either a BOX file type or a Tune-File type.
Cell
A single site or value in a table.
Channel
A real-time measurement from the ECM.
Either an input value, output value, or ECM
calculation.
Closed-Loop (Fuel Control)
A method of continuously adapting the
engine fuel delivery to obtain an ideal
mixture (ratio of fuel to air) for specific
engine performance.
Gauge
A display of real-time information from the
ECM.
H86 (file)
An ECM software program file. If an update
of the ECM program is required, S&S Cycle®
can supply a new program in the form of an
H86 file.
Idle-Control
A method of continuously adjusting the air
flow into the engine in order to obtain a
smooth engine idle condition.
Live-Tune (Live-Tuning)
A method of tuning where changes made by
the user immediately effect the performance
of the ECM.
Map
See Table below.
Setting (ECM)
A value in the configuration data of the ECM
which globally controls an ECM feature
(example - engine rev limiter value).
2010 S&S Cycle® Inc.
Glossary
Site
See Cell above. Also used as a unit to
denote a value with a fixed interval, often
used as an index into a table. For example,
throttle position site is used as an index into
tables that reference throttle position.
Table
A grid of numbers inside the ECM used to
control engine actuators such as fuel
injectors and ignition coils. The output of a
table will typically vary as a function of
current engine speed and current throttle
position.
Tune-File
A Tune-File is a copy of the configuration
data, tables, and settings in an ECM which is
stored as a file on disk. Tune-Files are used
to backup, restore and exchange ECM
configurations. A Tune-File is a type of
calibration file, the other being a BOX file.
Tuning
The process of determining table values to
produce the best performance for a
particular application.
13 Footnote
All brand names, trademarks or registered
trademarks mentioned in this document are
the property of their respective holders and
are used in a reference capacity only.
2010 S&S Cycle® Inc.
95
Index
Index
Diagnostics 92
Download Code to ECM 56
Download Tune-File TO ECM
-3-
-E-
3D Graph Settings
30
-AAbout ProTune II 65
Acceleration Fuel Settings 36
Activating Live-Tune Mode 76
Advanced User Level 15, 19
Air Temperature Fuel Compensation 40
Air Temperature Ignition Compensation 39
Always On Top setting 79
Average Selected Area 26
-BBasic User Level
15, 17
-CChanging the Grid Size of the Spreadsheet 74
Changing the Spreadsheet and Graph Layout 75
Check Engine Lamp Diagnostics 91
Clear All Markers 27
Clear Historic Diagnostic Trouble Codes 64
Closed-Loop Control Settings 37
Closed-Loop Setup 84, 85
Connecting the ECM 15, 16
Copy 25
Copy Tune-File 60
Current Data Source menu 47
Cycle Graph-Line Resolution 28
Cycle Grid Size 28
Cycle Grid/Graph Position 27
Cylinder Trim Adaptive Map Merge 62
-DDeactivating Live-Tune Mode 77
Device Driver 9, 89
Diagnostic Trouble Codes 33
2010 S&S Cycle® Inc.
97
22, 57
ECM 83
ECM Basic Setup 31
ECM Gauges 34
Edit Comment Field 48
Editing Table Values 72
Engine Temperature Fuel Compensation 40
Engine Temperature Ignition Compensation 38
Exit 24
-FFrequently Asked Questions 88
Front Cylinder Adaptive Map 45
Front Cylinder Adjustment Table 35
Fuel Injection Base Table 34
-GGetting Started
12
-HHelp 14
Help Topics
64
-IIgnition Timing Base Table 35
Installation 7, 9
Interpolate Selected Area 26
-LLive-Tune 29
Live-Tune Mode 75
Live-Tune Mode On/Off
29
98
ProTune II
-M-
-T-
Main Fuel Adaptive Map Merge 63
Main Window 17, 19
Menu Bar 21
Menus - View Menu - Engine Temperature Start Map
82
Tag / Untag Cells 26
Tag/Untag Cells 73
Target Closed-Loop Fuel Map 46
Target Idle Speed Setting 44
Temperature Compensation Tables 82
Test Outputs 61
The Closed-Loop Fuel Control System 83
The Engine Data Area 80
The Fuel Injection System 65
The Ignition Timing System 66
To Add a Dial or Text Gauge 79
To Remove a Gauge 79
Tool Bar 21
Trouble Codes 92
Tune-File 22, 24, 57, 58, 60
Tuning in Live-Tune Mode 76
-OOpen Table from
59
-PPaste 25
Preferences
54
-RRear Cylinder Adaptive Map 46
Rear Cylinder Adjustment Table 36
Removal 12
Reset Adaptive Maps 63
-SSave Table 60
Save Table To 60
Saving the Gauges Window Layout 79
Select User Level 54
Selecting an Area of the Table 71
Serial Port Settings 55
Serial Settings 15
Setting and Moving the Cursor Position 71
Setting the Target Air-Fuel Mixture 85
Speedometer Diagnostics 92
Stepper Motor Orientation Setting 41
Stepper Motor Tables (Idle Speed Control) 82
Stepper Position Fuel Compensation 45
Stepper Position with Temperature Map 43
Stepper Pre-Start Position Map 42
Switch On/Off Auto-Tagging in LiveTune 29
Switch On/Off Map Cursor Pop-up 28, 30
System Requirements 7
-UUndo 25
Upload Tune-File FROM ECM 24, 58
USB 9, 89
USB Settings 16
User Levels 15
Using Math Functions to Adjust Table Values
Using the 3D Graph 74
Using the Adaptive Maps 86
Using the Gauges Window 77
Using The Spreadsheet 71
73
-VViewing and Editing Advanced Tables
80
2010 S&S Cycle® Inc.