1
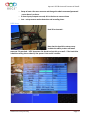
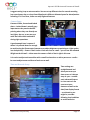
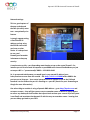
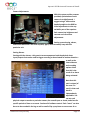
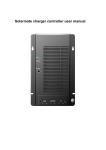
Aposonic R22 Review and Commercial Install
Aposonic R22 Review – Commercial installation:
8 video, 2 Audio input, 4 cameras included H.264
Extract:
This is the third major review in a series on home and commercial security/surveillance
systems.
This one, however, went a step further and included a full commercial install of an 8 channel
H.264 system. A local Church in need of a surveillance system allowed me to put the system
in – as commercial installations are frequently different in scope and requirements than
home installations. What follows is that full product review and more installation details
linked to a commercial application.
Update: Since I first wrote this review, Amperor (the same distributor we use for BOCS
products – a critical piece of a surveillance system – has begun carrying the Aposonic line so
be sure to take a look at what they have to offer)
www.bocsco.com/security
Page 1
Contents
Aposonic R22 Review and Commercial Install
Installation Overview: ................................................................................................................................... 3
Initial impressions: .................................................................................................................................... 3
Physical Installation: ..................................................................................................................................... 4
Things to pre-plan: .................................................................................................................................... 4
Specific considerations: ............................................................................................................................ 5
This specific installation – detailed layout: ................................................................................................... 7
So… specific goals and location map(follow along): ................................................................................. 8
Location Details… .......................................................................................................................................... 9
The R22 itself: ............................................................................................................................................. 12
Software and Setup................................................................................................................................. 13
Setup Sequence – your task list: ................................................................................................................. 14
HDD Setup ............................................................................................................................................... 15
Camera Setup:......................................................................................................................................... 16
Time and Network Setup: ....................................................................................................................... 16
Camera Adjustments:............................................................................................................................. 18
Setting Alarms: ....................................................................................................................................... 18
Scheduled recordings can be set on another page – Recordings can happen continuously by
schedule, via motion alarm, via physical alarm or any combination of the above. Very flexible. ..... 19
Remote setup and viewing: ................................................................................................................... 19
Setting up Motion Detection: ................................................................................................................ 22
BOCS Distribution ....................................................................................................................................... 23
Summary: .................................................................................................................................................... 23
www.bocsco.com/security
Page 2
Installation Overview:
A Church in Longmont, CO
Aposonic R22 Review and Commercial Install
5 cameras (soon to be 6) each distinctly different in location and application – part two of the
review will include details on each camera, why each was chosen for the particular
application and how well each works given the requirements
An 8 channel Aposonic R22 DVR –
Local and remote access (via computer as well as cell phone)
1000 feet of cabling and a lot of sweat
Note that when I ordered this system, I specifically ordered one of each of 4 distinctly
different cameras so as to evaluate each type. Now that the system is set up and the
differences are well understood I would order more of some types and less of others – more
on that in part 2 (to be published soon)
Initial impressions:
• DVR unit is solid, has well labeled (intuitive) buttons, and excellent connectors
• Each camera was well packaged in the box – little chance of shipping damage
• All required cables are included (although labeling needs improvement) – AND cables
were of adequate length (60ft each) to cover a standard installation.
• A single large power supply with a cable splitter was included – very nice to allow less
outlet space at the DVR site
www.bocsco.com/security
Page 3
•
Aposonic R22 Review and Commercial Install
DVR was exceptionally “light” – turns out you have to specify a hard drive/size. Luckily
I had a spare 80GB drive laying around and fixed that quickly.
Physical Installation:
Normally this would not be part of a review, but as this is a specific commercial installation it
seems appropriate.
Requirements – seems like a simple enough thing, start throwing cameras up and plug them
all back in to the DVR – but hold on, a little planning (actually a lot) goes a long way.
Things to pre-plan:
Goals: Is it to monitor entrances real time during the day, monitor secure areas for unusual
activities, provide later proof of illegal activities (each of these determines different camera
locations and types). If you want a camera to actually create an alarm it needs to be inside
the secure area so false alarms do not occur etc…
Day/Night applications: Consider up front what kind of a view each camera will have in day
and night – will the sun be right in the lens, what will be the throw of the built in IR LEDs,
Which way should each camera face
Camera positioning: Is there enough room to get a wide enough shot and/or zoomed in
enough to capture good enough images to identify people – are the cameras visible enough
to deter some behaviors but hidden enough in others to catch those same issues
DVR location: Central enough to keep wiring runs to a minimum but in a secure location – if a
thief can get the DVR there will be no evidence and the whole thing was a waste
Monitoring: The perfect addition to a security system is BOCS – running a single COAX from
the DVR location to the monitoring location (reception or security area) allows both full
monitoring and control while not jeopardizing the security of the DVR by having it located out
in the open.
Local codes: Some states/municipalities now require proper licensing even for low voltage
installations like security – frankly it has nothing to do with safety or security, just another
way the government can get a few more dollars out of your pocket, nevertheless – follow the
rules. Keep in mind that commercial applications are much more stringent and frequently
require even special cables rated for above ceiling applications.
Cabling: You absolutely must plan out each and every run before you set anything in stone.
How will each wire get from the DVR to the camera location. If you are going more than 100’,
consider powering the camera remotely and running only video cable (RG6 coax works well
www.bocsco.com/security
Page 4
Aposonic R22 Review and Commercial Install
for longer runs and ends are simple to get). Suspended ceilings are a blessing if present and
normally prevent a lot of drilling.
Camera Types (Will cover in detail in a later section): Consider for each location how much IR
light you need, how wide of an angle you need, and how much quality you need. For small
spaces that just cover a single door don’t buy the $200 camera. For an outdoor application
covering a large area at night, spend the money required or the image you record will do you
no good later. Consider ceiling mount dome varifocal lens cameras for most indoor and
hallway applications to maximize each camera’s usefulness. This sounds trite, but don’t buy
more or less quality than you need – plan, plan, plan.
Actual Installation:
You will normally find that a good installation will be 15% planning – walk the site multiple
times, find out from the customer (even if that is your wife) exactly what they want and
need, plan each camera and each cable run – 60% running cables, 10% programming and
setup, and 15% cleanup/tidying/training.
Specific considerations:
• For pre-terminated cables provided with cameras – many (if not most) must be installed
in a specific direction – one end is male and the other female. If you get it backward
(speaking now from brutal experience), you will either need to pull it out and start over or
go down to the electronics store and buy expensive male-male and female-female
adapters for each end and your error will be immortalized.
• For any run over 100’ consider ditching the normal provided wires (that include a video
and power cable bundled together) and just running a single coax for video back from the
camera location. If you do this (to keep video quality as high as possible) make sure you
get the proper adapters (Coax-F female to BNC-male) and find a way at each camera
location to power the camera. Note that outlets in ceilings are generally against code. If
there is not a convenient (and secure – you wouldn’t want a potential thief pulling power
from your camera) and within-code method of locally powering the camera – make sure
you run a power cord all the way back to the DVR location.
• If you have a lot of unused Cat5 ports wired back to a central location, there are excellent
balun systems that allow running both audio/video as well as camera power over those
same wires. Consider an On-Q system (more on this later)
• Consider a full week test before the system is permanently put on line – connections can
be tested, motion detection perfected, and remote access tweaked before you give a lot
of people access
www.bocsco.com/security
Page 5
•
•
Aposonic R22 Review and Commercial Install
Do not plug your DVR into your home/office Ethernet until you have properly configured
its network settings – failure to do this can take a whole network down (yep experience
again :0)
Running over suspended ceilings? A 15’ sectional fiberglass rod (available at Home Depot
nationwide) for about $35 is an excellent tool to keep you from having to remove every
other ceiling panel – now only every 5th one… Another option is a small crossbow – most
electrical suppliers sell small plastic ones with a nifty fishing reel line attached, but I got a
“semi-toy” one from an online shop that shoots metal tipped plastic darts (around which
can be tied lead-line or mason’s twine) – It is strong enough to shoot across almost 50’ of
ceiling and stick in drywall on the other side… Everything has risk, but you are adults – use
your own judgment not mine.
www.bocsco.com/security
Page 6
Aposonic R22 Review and Commercial Install
This specific installation – detailed layout:
As you can see from the floorplan below, while there are many outside access locations,
there are some clear security “softspots” that needed to be addressed. Most specifically, the
office staff is located in a central location with no view of the rest of the building – no idea of
who is coming in toward the office, or even if they veer off to another part of the building,
and at night there are some clear blind spots not visible from the street that periodically
attract “campers”. It would be good to know if anyone is in one of those blind spots before
one heads to ones car after dark.
www.bocsco.com/security
Page 7
Aposonic R22 Review and Commercial Install
So… specific goals and location map(follow along):
1) Receptionist needs to be able to see who is coming in the front and back doors, needs
to be able to see that anyone coming in heads to the office and not into any other part
of the building
2) Motion detect recording of office area (not triggered by normal office personnel if
possible) and main entrances
3) Remote viewing of the auditorium (both for security – lots of electronics in there) as
well as running that same feed through a BOCS system to allow remote viewing of any
service in progress from anywhere in the building (more on this in a later chapter as
well)
4) Simple remote viewing from any computer if the receptionist is not at their post – in
these cases, a simple motion alarm (kind of door-bell like) is preferable for anyone
coming or going out of the monitored entrances
Locations:
1 – Office
2 – Main entrance
3 – Main hall
4 – Back door
5 – Side door
6 – Auditorium
www.bocsco.com/security
Page 8
Location Details…
1 - Office reception:
Aposonic R22 Review and Commercial Install
What/Why - Kind of like a “point-of-sale” camera at a bank, this is the primary camera that is
visible to all coming into the office (they know they are on camera – actually very important),
and the key need here is quality during the day. IR illumination is not necessary here as this is
primarily a daytime usage area, and there is an always on security light providing nighttime
illumination.
Camera – Initially, I chose the
smaller camera XXX, but after
installation realized the quality was
not adequate enough so I switched
to an On-Q bulletcam – exceptional
daytime quality and easily
recognizable as what it is without
being intrusive
Cabling – within 50’ of the DVR so
used one of the included cables run
in the ceiling
Monitoring – Ran a single COAX to feed a flat screen 15” TV for monitoring at the security
area – a BOCS remote provides full control and is Velcro-ed under the desk for easy access.
www.bocsco.com/security
Page 9
Aposonic R22 Review and Commercial Install
2 - Front entrance:
What/Why – For now, viewing of
everyone coming and going through
the main entrance doors (glass) and
future use to identify who is there to
buzz them in during off hours.
Camera - All exterior lights in this area
are on photocells so they come on at
night, but in the event of a power
outage, IR self-illumination is required
here (DVR is on a large UPS in case of power outage).
Quality is important, but due to the relatively close
quarters – 6-20’ viewing range, even a lower end
camera is adequate.
Cabling – as this location is about 150’ from the DVR,
a single COAX was run in the ceiling and power for
the camera was pulled from a wall wart transformer in a nearby closet.
3 - Main Hallway:
What/Why – Within a second of
leaving the view of the entrance
camera, you appear on this hallway
cam giving the receptionist more of
an idea of who is approaching as
well as having full visibility of all
possible directions from the
entrance.
Camera - Quality is important, but
more so is the ability to have a specifically chosen width
of view and focus. Night vision is important here as well
as the security lights are not in the direct field of view of
www.bocsco.com/security
Page 10
Aposonic R22 Review and Commercial Install
this camera. Quality at 30’ is important as this camera covers two computers.
Cabling – within 80’ of DVR so included cabling was used – simple
4 - Back Entrance:
What/Why – This is actually
what started it all, as there is a
large picnic area/open area that
is completely invisible from the
street. It also happens to be the
main parking area for staff and
presents a safety hazard as
there are lots of places not
visible until you have already
exited the building and locked
the door.
Camera – Need a long reach, excellent night
viewing, and good quality to cover such a large
area. This is probably the most difficult camera
application of them all. My initial note was to
budget high for this particular camera as the
requirements are stiff. Mounting location was
also critical as during summer, the trees in this
area block a lot of the view.
5 - Side entrance:
What/Why – Seldom used during the week but the
furthest entrance from the main street, monitoring this
entrance is mostly for safety.
Camera – The small entryway
is cramped and at night it is
pitch black so IR illumination
is a must. During the week,
this camera can be put in
alarm mode as any activity there is unusual.
www.bocsco.com/security
Page 11
Aposonic R22 Review and Commercial Install
Cabling – At about 200’ from the DVR, running a single RG6 coax and locally powering the
camera is the best choice. A janitor’s closet provides an excellent power point, and one long
hallway was begging for my crossbow.
6 - Auditorium:
What/Why – This one, uniquely, has three uses – security of course, there is sound
equipment in there that needs to be protected – remote monitoring, nice to have the picture
available in a few of the offices so ministers know when they need to head over there – and
overflow, A good view and audio from the auditorium feeding a BOCS unit provides full A/V
to a variety of TVs mounted around the facility.
Camera – Quality is the key – night vision only necessary within 10’ of the camera for the
security aspect, but also need audio brought back to the DVR location
Cabling – Due both to quality concerns and the need for audio, an On-Q bulletcam was again
used here run over cat6 cable plus a coax for a single channel of audio.
Pastor’s Office:
No camera here – bad form normally to put cameras in people’s private offices, but a
simplified viewing location was a priority. An attempt to keep the usage model simple meant
not requiring computer use but some kind of dedicated monitor. Again the On-Q monitor was
a good fit – it can handle a selection of two cameras and can easily be switched off. It is small
enough to fit on a desk and not appear as if the minister is in charge of security – he can help
watch out for the office ladies as he is in the office more than any other and can see the
auditorium as well.
The R22 itself:
Initial impressions:
Excellent and easy to understand controls/buttons and connections – This seems like a simple
statement but now having worked with many many units, this is about as close to what I
would spec as I’ve ever found.
My only possible complaint in this area is that the camera inputs are too close together. It is
impossible for any human to disconnect just one camera line – you have to remove 2 or three
to get any one off. This is certainly good for a compact installation, but service or
modifications become difficult. Good news is that once you get it installed it is never an issue
again. In all fairness, however, every DVR I have ever purchased is about the same.
www.bocsco.com/security
Page 12
Aposonic R22 Review and Commercial Install
Whether using front panel buttons, the included mouse, or the included remote, all of the
controls are well labeled, have excellent and descriptive icons, and work exactly as expected.
For this installation, I put it on a top shelf
in a back office – handy to get wires down
neatly and out of the way enough as to
not be bothered.
Upon initially plugging it in, it gave me
two loud warning beeps – one saying no
video inputs and the other saying HDD
failure – how did I know? It has an
excellent scroll information across the
bottom of the screen that tells you in plain
English – no codes or cryptic things to decipher. Very nice –
Although the hard drive failure was actually a missing Hard Drive. Note that the interface is
SATA – and it mounts from the bottom of the drive – just remove the cover screws and plug
one in. Simple. But, I had only IDE drives laying around (Free is always better – right) – so I
went to the local electronics “junk shop” and bought a SATA to IDE converter - $14. After a
brief solder job to patch in the right power connector – we were up and running – Don’t
forget to format the hard drive using the menu in the R22 – extremely fast and sets it up for
use in this unit instead of relying on
whatever format was present
before.
Software and Setup
The main menu is exceptional –
excellent icons and pop up hints as
to which each is. Best I’ve seen in
this kind of product.
www.bocsco.com/security
Page 13
Aposonic R22 Review and Commercial Install
Before you do anything you have to login! –
default username is aa and password is 11 –
Under settings, the device gives you the capability
to set not only the admin password, but a lot of
different users/operators. Very nice to have the
option to have each user with their own login –
these same logins work for both local and remote
access. Setup of accounts in simple and intuitive.
The main setup menu is where to take care of all the normal administrative setup functions –
camera names and locations, alarm
types, hard drive setup, user accounts,
network settings. The general method
for entering information is via little
pop-up “keyboard” windows allowing
you to do the full setup easily with
either the provided mouse or the front
panel buttons. Even the most tedious
item (entering an IP address) was fast.
Setup Sequence – your task list:
I’m not going to recreate the user manual here, but a quick recap of setup items and the
order you should follow…
•
•
•
•
Insert (or verify present) the hard drive
Plug in all cameras and power them – plug in a monitor and a mouse
Power the unit – wiggle the mouse and choose menu – login as aa 11
Run through setup in this order
o Format the Hard Drive using HDD menu (so the alarms stop)
o Verify each camera is at least visible on screen – fix connections as appropriate
o Adjust each camera and lock them down – view, focus, zoom etc.
o Set up each camera picture individually with camera controls (brightness etc)
o Set date & time
o Set FIXED IP address and network settings – ONLY then plug in Ethernet cable –
be sure to hit it from a web browser nearby to make sure you at least get the
login screen (same aa 11 as before)
www.bocsco.com/security
Page 14
Aposonic R22 Review and Commercial Install
o Setup at least a few user accounts and change the admin username/password
– never leave it on there.
o If alarm inputs/outputs are used, this is the time to connect them
o Last – set up camera motion detection and recording times
HDD Setup
Hard Drive Inserted…
Note that the hard drive setup screen
includes the ability to alert and email
someone if it goes bad – VERY important. Go ahead and set this up as well – if the hard drive
is bad then every picture taken by the system is lost and it is useless.
www.bocsco.com/security
Page 15
Aposonic R22 Review and Commercial Install
I suggest setting it up as auto-overwrite. You can set up different sizes for normal recording
(say record every day on a loop from 8-9am) and a different allocated space for alarm/motion
recording. If it is not clear, these are really high end features.
Camera Setup:
Cameras Visible, focused and locked
down – Locked down is actually very
important as they need to be NOT
pointing where they can directly see
into lights, the sun, or are too near
walls that reflect back emitted IR
during night operations.
A good example here is camera 3
where it is pointed down far enough
to avoid seeing the fluorescents (cameras auto adjust brightness so pointing at a light results
in a dark picture) – Camera 5 here is also a little too close to a wall – you can see the reflected
IR light on the left wall – either move the camera a little of aim it right in this case.
It is easier to adjust each one either with a small local monitor or with a partner on a radio –
be sure to adjust zoom and focus of each one as well.
Time and Network Setup:
www.bocsco.com/security
Time settings are
straightforward and
allow you to set up a
time server so it always
stays in sync – another
semi-advanced feature
in a low cost unit. Be
sure to set your
timezone as well as the
date/time display format
– as cultured as you
might be, consider
following local traditions
to avoid confusion.
Page 16
Aposonic R22 Review and Commercial Install
Network settings:
This is a good capture of
the pop-up keyboard
that lets you easily enter
text – exceptionally nice
feature.
I strongly suggest setting
a fixed internal IP
address and not using
the PPPOE stuff unless
you have no other
choice. It is always best
to use a real
firewall/port forwarder
in between to keep up
security.
A couple notes on this – port forwarding must then be set up on the router/firewall – for
instance you tell it to forward all requests on port 8888 to the internal fixed address you just
set on port 80. i.e. “yourexternalip”:8888 -> 192.168.0.40:80
So, in an external web browser you would type in your normal IP address (your
home/business as seen from the outside – like http://12.12.14.15:8888 where 8888 is the
port you set to listen on… Your router interprets this as a request to talk to the DVR and
forwards it to the DVR on the port it is listening on – port 80. (Search for port forwarding on
Google for more information)
One other thing to consider is using a Dynamic DNS address – go to http://dyndns.com and
set up an account – they will give you an easy to remember name as well as a little program
to run on any desktop at that location that reports back to them your current IP (in case yours
is not fixed) and associates that dynamic IP with the easy to remember name – insuring that
you can always get back to your DVR.
www.bocsco.com/security
Page 17
Camera Adjustments:
Aposonic R22 Review and Commercial Install
With this system and the cameras
provided, optimization of each
camera is straightforward. I
suggest using a VGA monitor
hooked straight to the DVR for
initial adjustments to take any
variability out of the equation.
Each camera has brightness and
contrast and a few other
adjustments.
Setting up monitoring, alarms,
and motion detection is the final step and, again, made extremely easy with this
particular unit.
Setting Alarms:
Starting with the alarms – this generic term encompasses both the physical alarm
input/outputs that can be used to trigger recording or be activated on motion detection –
as well as the
internal buzzer
and recording
options. Note
that this is the
result of an alarm
being activated.
Note that this
unit is unique (of
the ones I’ve
seen) in that each
alarm is
independently
adjustable. You
can set each
physical output to monitor a particular camera, be normall open or closed, and alarm for
specific periods of time on an event. You have full software control. Each “event” can also
be set to be recorded in the log as well as email of ftp up a picture on occurrence of an
www.bocsco.com/security
Page 18
Aposonic R22 Review and Commercial Install
event. For instance – put a camera in the “safe room” and any movement therein can set
off an audible alarm, call the police, ftp a picture or series of pictures to a central server
AND email you a picture to your cell phone – does it get any better than that?
This is yet another benefit of this unit running Linux underneath as opposed to dedicated
firmware that is limited in scope.
Scheduled
recordings can be
set on another
page – Recordings
can happen
continuously by
schedule, via
motion alarm, via
physical alarm or
any combination
of the above. Very
flexible.
Remote setup and viewing:
Ah – saving the good stuff for deep in the document – Frankly, this might be the best
remote admin device on the market – bar none.
Before we dive in, though, one caution: this only works with Internet Explorer OR an
emulator. If you point your Firefox web browser at the DVR you will only have access to
basic monitoring functions – i.e. view live video.
But, if you use Internet Explorer (Or an emulator) you get an immersive setup and control
experience. A couple of tips on getting it up and running (it is worth the effort – trust
me)…
Regardless of whether you will actually use Internet Explorer or a “virtual ie” within
firefox, you need to make one security change in INTERNET EXPLORER–
Go to tools->options->Security tab and hit the “Custom Level” button… Find the
“Download unsigned ActiveX controls” and change it from Disable to Prompt…
Now either point your internet explorer window at your Aposonic R22 DVR using its IP
address – OR load an internet explorer virtual window within Firefox.
www.bocsco.com/security
Page 19
Aposonic R22 Review and Commercial Install
The easiest seems to be the ietab2 one – just put that into Google and load the software –
then in the Tools-> IE Tab 2 options, put the IP address of your Aposonic DVR into the list
of sites and when you hit that IP address, it will automatically open in that “virtual tab”…
Also be sure to add ports 67 and 68 as forwarded in your firewall if you intend to manage
this from the outside.
Now, just point your browser at the DVR and it will automatically load the active controls
to upgrade your experience – just answer all the questions in the affirmative and you are
ready to go.
Note that all setup options except motion detection area can be set remotely – this is
huge, fairly unique, and something you just flat do not find in lower end units. This is
again a huge benefit of a linux based system underneath.
www.bocsco.com/security
Page 20
Aposonic R22 Review and Commercial Install
One of the many
setup screens from
the browser window
shown here – Many
of the setup items are
actually easier to do
this way where you
have a full keyboard.
Note that on the PASSWORD tab (shown below) you can create up to 18 users – each with
completely different permissions. One user can only see cameras one and two, another
can see 4-6 but can
call up events, and
only designated
users can make
system config
changes – again
this is HUGE and
only available on
the top end models
– except this one.
www.bocsco.com/security
Page 21
Aposonic R22 Review and Commercial Install
Setting up Motion Detection:
If there is one weak point with the R22, it is setting up the motion detection areas. For
clarity, though, once you get it up and working, its detection algorithms work well and
provide very few false alarms or miss critical movement. Flexibility is excellent and it has
a test mode that very crisply tells you if you have it right.
The logic of setting it up is actually quite simple once you “get it”. Basically you either
start with the entire screen
set to be sensitive to
motion or the entire screen
set to ignore motion. This is
toggled by pressing the
“Mode button” (notice the
little squares either go clear
(ignore) or slightly tinted
(sensitive). Then you drag
your mouse over the
squares you want to change
and hit enter. Press the
Search button to put it in
test mode – this performs two critical functions:
1) Verify the areas you want to
monitor are green and the areas
you want to ignore are clear. (Note
in the example below, it is opposite
– the clear area is around the door)
2) Have someone walk through
the area and verify that when they
do the cells where there is
movement (in the desired sensitive
green blocks) turn red indicating
motion
www.bocsco.com/security
Page 22
Aposonic R22 Review and Commercial Install
BOCS Distribution
Perhaps most exciting is the use of a BOCS system to run all this video back through
the existing cabling system so every TV has full access to each video feed. This
provides both extended security from any location AND full A/V from the Auditorium
enabling overflow viewing – for such a low cost, this is the biggest A/V improvement
many businesses could make. More on this in the next installment.
Summary:
The most succinct description of the R22 would be:
“An exceptionally capable low cost 8 Channel DVR with excellent local, remote, and mobile
video quality and with features normally only found on high end units. “
The only two “to-be-improved” items would be BNC video inputs should be further apart (to
accommodate fingers and better on-screen wording to describe how to set up camera motion
detection. Would either of these factor into the purchase decision? Absolutely not.
Coming next?
1) Using BOCS for Commercial security distribution
2) Camera specifics – review and details on each of the devices in this install AND the
addition of a Cat-5 based camera and monitor system for flexible expansion.
www.bocsco.com/security
Page 23