1
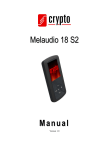
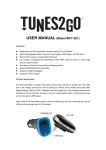
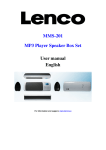
UM 360
Manual
MP3 Manual
Table of Contents
Table of Contents................................................................................................................ 1
1.
Safety Precautions...................................................................................................... 2
2.
Package Contents....................................................................................................... 2
3.
Introduction................................................................................................................ 2
4.
Main Menu................................................................................................................. 3
4.1
Music .......................................................................................................................................... 3
4.2
Record ........................................................................................................................................ 5
4.3
Replay......................................................................................................................................... 5
4.4
FM Radio ................................................................................................................................... 6
4.5
System......................................................................................................................................... 7
4.6
Phone Book ................................................................................................................................ 8
4.7
Text ............................................................................................................................................. 8
5.
Connecting your device to your PC ........................................................................... 8
6.
Upgrading your firmware .......................................................................................... 9
7.
Technical Specifications .......................................................................................... 10
8.
Appendix A: Telephone Book Software....................................................................11
________________________________________________________________________
1
MP3 Manual
1.
1.
Safety Precautions
To prevent any damage caused by battery seepage or erosion, please remove batteries when not using this device for
a long time
2.
Do not use this device in extremely thermal, cold, dusty or watery circumstances
3.
Please check that “Hold Key’’ is unlocked before use.
4.
To prevent surface abrade, batteries peeling off, or any other damage, do not collide this device with any hard objects.
5.
Please replace batteries in the following circumstances
a.
The icon of battery is empty and keeps flashing
b.
The player automatically powers off, even after restarting.
c.
The player does not respond, although the battery is removed and reloaded
6.
To prevent damage caused by static electricity, do not use this device in extremely dry circumstances
7.
To prevent system errors or malfunction, do not disconnect the device abruptly, when formatting this device, or
uploading and downloading data/music.
8.
To use the USB Flash Disk function, please save and retrieve documents correctly and in accordance with the
methods of your operating system
9.
2.
The manufacturer is not responsible for any loss or damage caused by missing documents etc
Package Contents
•
Stereo earphones
•
USB extension cable
•
CD with utilities and Windows 98 drivers
•
One AAA battery
•
User’s Manual / warranty card
3.
9
6
7
5
Introduction
Function Keys:
1.
Play: “►”Performs Power ON/OFF/Play/Pause/Stop.
Keep pressing “►” to power on or power off the MP3 Player.
You can then press“►” for play or pause.
2.
Mode: “M” key performs different operations by continuous pressing or by pressing once.
10
8
2
4 3
1
By continuous pressing you return to the main menu from any submenu
By pressing once you confirm your choice and/or you are transferred to the next submenu.
3.
Next: “►►” Short press: Move to next song,
Long press: fast forward.
4.
Previous: “◄◄” Short press: Move to previous song.
Long press: fast reverse.
5.
Volume +: Increase volume
6.
Volume –: Decrease volume
7.
Hold: Locks the MP3 player. By enabling it all buttons of the MP3 player are locked.
________________________________________________________________________
2
11
MP3 Manual
8.
REC: Enter the recording interface
Ports
9.
USB: Interface with computer
10. Headphone: Headphone interface
11. MIC: Integrated microphone for voice recording
4.
Main Menu
Press the Play button “►” continuously to switch on the MP3 player. If you are already inside a certain menu (e.g. Music or
FM) press “M” continuously in order to view the main menu as below.
Music
4.1
Record
Replay
FM
System
TEL Book
TXT reading
Music
Use “◄◄” and “►►” to navigate through the main menu. Select Music and press “M” to enter .
For choosing music:
“◄◄” Short press: choose the previous item of music. Long press: fast reverse
“►►” Short press: choose the next item of music. Long press: fast forward
Volume control: shortly press “VOL-“, to decrease volume; shortly press “VOL+” to increase volume.
Music-playback menu
Press “►” to play a song. When the MP3 player is playing click “M” to enter the following Music Sub-menu.
Repeat
Folder
Plays the music in the folder that you have selected.
Normal
Normal play mode
Repeat One
Plays a single song repeatedly.
Repeat
Plays the entire folder repeatedly.
Folder
Repeat All
Plays all songs repeatedly
Random
Plays the songs inside a folder in random order
Intro
Plays the first 10 seconds of each song.
Normal
________________________________________________________________________
3
MP3 Manual
Rock
Pop
Classic
Soft
Jazz
DBB
Tempo Rate
Enter the Tempo Rate Mode and select the speed you want to play a song (Slower or faster
than normal).
Enter “Replay” to keep playing a segment of music.
To repeat playing a segment for a song.
While ‘A’ is blinking, click “►►” to choose the start of the segment. ‘B’ will start blinking.
While ‘B’ is blinking, click “►►” again to choose the end of the segment. Now the MP3
Replay
player will keep playing the segment you have specified.
To re-segment, click“◄◄” and ‘A’ will blink.
Then choose the start and end of segment as
above.
“A-B Replay” will continue until you click “M” to exit.
Replay Times
Enter Replay Times and choose how many times you want the song to be repeated.
Replay Gap
Enter Replay Gap and choose how many seconds must pass until the song is repeated.
Exit
Exit the Music-Playback submenu
Music Submenu
If a song is playing Press “►” to pause/stop playing the song. On stop/pause mode click “M” to enter the music submenu:
Local Folder
Choose the folder (if you have previously created folders) from which you want the device to play songs
Delete file
Choose “Delete file” in order to delete a song.
Delete All
Choose “Delete All” in order to delete all the songs.
Exit
Exit the Music submenu
Lyrics
You can read the lyrics of the song that you hear.To do that you must store the song and the “.lrc” file (file containing the
lyrics of the song) both in the same folder.
If lyrics are available for the song currently playing, the icon will change from “
” to “
”.
While playing, you must keep “M” pressed for the lyrics to appear. The characters in the lyrics file must not exceed 500.
________________________________________________________________________
4
MP3 Manual
4.2
Record
Use “◄◄” and “►►” to navigate through the main menu. Select Record and press “M” to enter .
Local Folder
The recorded file will be saved in the Root folder. If you want to choose a different folder, go
to Local Folder and select the folder that you want your recording to be saved in.
Rec Type
Fine REC
High – quality voice record, WAV format, good audio quality.
Long REC
Long – time voice record, ACT format, normal audio quality
Fine VOR
At Long VOR or Fine VOR mode, The device will stop recording when no sound exists and it
Long VOR
will continue when the sound returns
Exit
Exit Record menu
Inside the Record menu click “M” and then “Rec Type” to choose between various recording options. Use “◄◄” and “►►”
to select the type you want and press “M”.
Click “►” to start recording. Click “►” again to stop recording. Now you have
the following options:
1)
Press “►” again so that the recording will continue from where it stopped, and
2)
Press “►” continuously in order to save the recording and create a record file.
Notes:
1.
When the recording time exceeds 60 minutes, time will be displayed in hh:mm format.
2.
During recording, if battery is low, the player will stop recording, and will save the record file. If LCD indicates low
battery, user should change battery in order to continue recording.
3.
The recorded file will not be saved if power supply, is cut, while recording.
4.
Each folder only supports 99 files. If the folder is full, the player will indicate “catalog is full”.
5.
If the memory is full, the player will indicate “No space”.
4.3
Replay
Use “◄◄” and “►►” to navigate through the main menu. Select Replay and press “M” to enter. The replay menu allows
you to replay the recorded files.
Replay-playback submenu
Press “►” to play a recorded file. When the MP3 player is playing click “M” to enter the following Replay Sub-menu.
Folder
Plays the music in the folder that you have selected.
Normal
Normal play mode
Repeat One
Plays a single song repeatedly.
Repeat
Plays the entire folder repeatedly.
Folder
Repeat
Repeat all
Plays all recorded files repeatedly
________________________________________________________________________
5
MP3 Manual
Random
Plays the recorder files inside a folder in a random order.
Intro
Plays the first 10 seconds of each file.
Tempo
Enter Tempo Rate and select the tempo you want to play a record (Slower or faster than normal).
Rate
Enter ‘Replay’ to keep playing a segment of music.
To repeat playing a segment for a song.
While ‘A’ is blinking, click “►►” to choose the start of the segment. ‘B’ will start blinking.
While ‘B’ is blinking, click “►►” again to choose the end of the segment. Now the MP3 player will
keep playing the segment you have specified.
Replay
To re-segment, click“◄◄” and ‘A’ will blink.
Then choose the start and end of segment as
above.
“A-B Replay” will continue until you click “M” to exit.
Exit
Exit Replay-Playback submenu
Replay submenu
Press “►” again to pause/stop playing the recorded file. On stop mode click “M” to enter the replay submenu:
4.4
Local Folder
Choose the folder (if you have previously created folders) from which you want the ---- to play records.
Delete file
Choose “Delete file” in order to delete a recordings
Delete All
Choose “Delete All” in order to delete all the recordings.
Exit
Exit Replay submenu
FM Radio
Use “◄◄” and “►►” to navigate through the main menu. Select FM and press “M” to enter.
1)
Automatic search
Press “◄◄” or “►►”for two seconds, the player searches forward or backward and stops at the station found.
2)
Micro adjustment
Press “◄◄” for a single step (100KHz) backward
Press “►►” for a single step (100KHz) forward
If you store more than 1 station, you can press “►” to listen them in sequence
Sound control: shortly press “VOL-” to decrease volume. Shortly press “VOL+” to increase volume
________________________________________________________________________
6
MP3 Manual
FM submenu
Save
Choose “Save” to save a radio station .
Delete
Delete a stored station from the memory.
Delete All
Delete all stored stations from the memory.
Normal Band
Choose Normal Band for the local stations.
Japan Band
For Japan market.
Fine REC
Recording of higher fidelity.
Long REC
Recording of lower fidelity.
Exit
Exit the FM menu
Notes:
“Normal frequency” and “Japanese frequency” can each store up to 20 stations.
4.5
System
Use “◄◄” and “►►” to navigate through the main menu. Select System and press “M” to enter.
Record Time
Set the date and time when the recorded files are saved. Press “Vol+” or “vol-“ and Use
“►►” and “◄◄” to change indication.
Back light
Set the time (in seconds) that the back light is active. Use “►►” and “◄◄”.
Backlight mode
Change colors mode (Mode 0-6 is the single color, mode 7 is the 7-color)
Language
Set the language display. Use “►►” and “◄◄”.
Off time
Set the time of shut down when you don’t use the device.
Sleep time
Set the time of shut down when you use the device.
Manual
Set the mode of Replay: manually or automatically.
Power off
Replay Mode
Auto
Contrast
Set the contrast of the display from 1 to 16.
Use “►►” and “◄◄”.
Use the MP3 Player Disk Tool program to create partitions and encrypt them.
Online Mode
Multi Drive: The device reads and plays the tracks from both normal and encrypted partitions
Normal Only: The device reads and plays the tracks from non-encrypted partition.
Encrypted Only: The device reads and plays the tracks from encrypted partition.
Memory Info
Displays size and usage of the device memory.
Firmware version
Displays the Firmware version of device.
Firmware upgrade
Upgrade the Firmware of device.
Exit
Exit the System menu
________________________________________________________________________
7
MP3 Manual
4.6
Phone Book
Use “◄◄” and “►►” to navigate through the main menu. Select Phone book and press “M” to enter .
Browse TEL
Find and read an already registered TEL number, address, mailbox etc.
Import Tel File
You can enter (import) the phone book information created using your computer into your MP3
player
Export Tel File
You can export the text stored in the player and convert it into a text file, so that you can edit the
information using your computer.
Exit
Exit the Telephone menu
Note:
Inside the CD is a software program where you can manage all of your contact names and their personal data. Read the
manual of the software carefully.
4.7
Text
Use “◄◄” and “►►” to navigate through the main menu. Select Text and press “M” to enter .
DIR select
Choose the folder where the txt file you want to read is.
File select
Choose the file you want to read. Use “►►” and “◄◄”
Text read
Read the file by using “►►” and “◄◄”.
Note:
To exit the menu press “M” continuously.
If the text you want is in the root catalog, you do not need to choose any folder.
5.
Connecting your device to your PC
Plug the device in the USB port of your computer. It will be activated automatically.
1.Waiting state
2. Data downloading
3.Data uploading
Note:
If the device is in play mode and you connect it to the USB port it will stop; when you disconnect it, it will continue playing
from where it stopped.
Don’t disconnect the device while transferring files.
________________________________________________________________________
8
MP3 Manual
6.
Upgrading your firmware
Plug in the MP3 player to your computer and install the MP3 software.
Run the upgrading tool “MP3 Player Update” and click “Select new firmware file” button
3.
Choose the new firmware file
4.
Select the file and click open. Click “Begin upgrading”
5.
You will see the following indication if the upgrade procedure is successful.
________________________________________________________________________
9
MP3 Manual
7.
Technical Specifications
Music formats Supported
Computer Connection
•
•
•
•
• USB 2.0
MP1, MP2, MP3
WMA, WMV
WAV,
ASF
LCD Screen
• Matrix graphic screen 132*32
• 7-color backlight
Audio Specifications
•
•
•
•
Output Ratio: (L) 10mW + (R) 10mW
MP3 Bit Rate: 8Kbps – 320Kbps
WMA, WMV, ASF bit rate: 5Kbps – 384Kbps
SNR: 85db
Power Supply
• 1 AAA battery (approximately 10h continuous
play)
OS Compatibility
• Sample Ratio: 8Khz
• Recording Format: WAV(32Kbps), ACT(8Kbps)
• Win 98/98SE/Me/2000/NT/XP
• Mac OS 10
• Linux 2.4.2
FM Radio
Environmental Specifications
• Frequency: (Normal Band) 87MHz-108MHz
(Japan Band) 76 MHz-90MHz
• Temperature: -5oC - 40oC
• Presets: 20 Stations
• Output Ratio: (L) 10mW + (R) 10mW
• SNR: 45db
Physical Specifications
Recording Specifications
• Dimensions: 84mm x 30mm x 17mm
• Weight: 28g (without battery)
Technical Specifications are subject to change without prior notice.
________________________________________________________________________
10
MP3 Manual
8.
Appendix A: Telephone Book Software
The telephone directory processing tool, can generate the telephone directory for the MP3 player and it can process the
telephone directory directly exported from the MP3 player.
Run the Dialog.exe program to activate the tool.
Name: name of person (not longer than 16 characters, cannot be null).
Mobile: mobile phone number (not longer than 16 characters).
Telephone: telephone number (not longer than 32 characters).
E-Mail: Email address (not longer than 32 characters).
QQ: QQ number (not longer than 16 characters).
FAX: Fax number (not longer than 16 characters).
Total: total number of records in telephone directory (not more than 199).
Name Preview: Preview of names in telephone directory.
1)
Adding a record
After you input a record of personal contact information (Personal Message) and you click the Add button, this record will
be added to the telephone directory and the name of this record will be displayed in the Name Preview area.
2)
Deleting a record
You can choose one record in Name Preview and click the Delete button to delete this record.
3)
Clear a record
You can click the Clear button to erase all the information shown in Personal Message.
4)
Load information of telephone directory
You can click the Load button to import the telephone directory file, which is exported from MP3 player.
5)
Save information of telephone directory
After finishing amendment of telephone directory, you can click the Save button to save the amendment and create
TelBook.bin data, which will be needed for importing the updated information to MP3 player.
6)
Save as
You can choose “Save as…”from menu to convert the telephone directory to a readable text file.
7)
Exit
You can click Exit button to exit the tool.
________________________________________________________________________
11