1
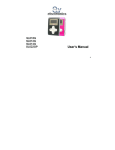
USER MANUAL
Introduction
TABLE OF CONTENTS
Introduction ................................................... 3
Preparation to work ........................................ 3
Exterior view and buttons ................................ 4
LCD Screen ................................................... 4
Turn the Fdrive MP3 ON/OFF ......................... 5
Formatting the Fdrive MP3 ............................ 5
Main Menu .................................................... 5
Playing MP3/WMA music ................................ 7
Using menu in the playback mode ................... 7
Voice recording operation and playback
of the recorded file ......................................... 8
Delete files ................................................... 10
Playing with EQ (Equalizer) ........................... 11
Repeat play mode and Previous mode ........... 12
AB Repeat .................................................. 12
To "Follow and Read" & "Compare" ............... 13
Setting the Back light .................................... 14
Viewing internal memory capacity ................. 15
Others function ............................................ 16
Password settings ........................................ 18
USB port connection .................................... 19
System hardware requirements ..................... 20
Device and software installation
under Windows 98, ME, 2000, XP .................. 21
Software package ........................................ 22
Transferring files between PC
and the Fdrive MP3 ..................................... 25
Technical specifications ................................ 25
2
Gembird® FDrive MP3 user manual
Introduction
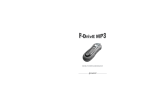
Congratulations on your purchase of Gembird
FDrive MP3 hours of music! Fdrive MP3 is a
universal MP3 solution, portable MP3 player with
large memory capacity and builtin voice record
er. It can be used as a removable USB Flash disk
at the same time. Portable MP3 player will be with
you everywhere. With large drive capacity hours
of music could be stored.
General usage guidelines
• If you don't use the Fdrive MP3 for a long time,
please, remove the battery to avoid possible damage
caused by electrical leakage.
• The Fdrive MP3 should be kept in the areas free
from extreme temperatures, moisture and dust.
• Set the HOLD switch to the release position be
fore operation.
• Do not drop the Fdrive MP3, because it might then
probably get damaged.
• Please, replace the battery if:
a. "Low Battery" indicator appears.
b. Fdrive MP3 shuts down by itself during the
playing.
c. All the buttons do no respond.
Gembird® FDrive MP3 user manual
3
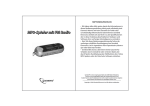
Exterior view and buttons
Exterior view and buttons
ON/OFF / Play/Pause
Earphone jack
LCD Screen
MODE/Forward/
Backward
Hold
Volume Control +
Volume Control -
LCD Screen
Turning the Fdrive MP3 ON/OFF
Turning the Fdrive MP3 ON/OFF
• Press and hold the
button for 5 sec to turn
the power on, the LCD screen will show a blue
background light with the Turn on animation. In the
autooff mode (see chapter 20) if no button is
pressed and Fdrive MP3 doesn't play music or
radio for a chosen by you period of time then it will
be automatically switched off.
• While the Fdrive MP3 is on and playing, press
and hold
button for 3 seconds to turn the power
off.
• When you shut off your MP3 FDrive, the system
will save your last settings.
Format the Fdrive MP3
• If you want to format the Fdrive MP3, please use
the supplied FDrive MP3 Disk Utility software only.
Main Menu
NOTICE: The actual symbols displayed in the LCD
screen may differ slightly from what is shown in this
manual.
• To enter the Main menu during the music
playback, press and hold ►▌▐ for 1 sec. A black
square symbol appears on the LCD display. Press
"MODE"/"PREV"/"NEXT" jog button once firmly to
open the Main menu. Push the "MODE"/"PREV"/
4
Gembird® FDrive MP3 user manual
Gembird® FDrive MP3 user manual
5
Main Menu
"NEXT" jog button forward or backward in order to
select the following functions:
a. "MUSIC" the music submenu.
b. "RECORD" the record submenu.
c. "VOICE" the voice submenu.
d. "FM RADIO" the FM submenu.
e. "SYS SET" the system settings submenu.
f. "EXIT" Return to the previous menu.
• After selection is made press "MODE"/"PREV"/
"NEXT" jog button to enter the submenu.
Playing MP3/WMA music
Playing MP3/WMA music
button to
• While the player is on, press the
play the music. The LCD Screen playback time
display will indicate the total number of songs.
• Push the "MODE"/"PREV"/"NEXT" jog button
to select the song that you want to play.
• Push and hold the "MODE"/"PREV"/"NEXT" jog
button to move fast ahead or rewind.
• During the music playback, press
again to
pause (short) or stop (1sec).
• You can increase (+) and decrease () the
volume:
• Press and hold the "VOL" button. Press the
"+" to increase the volume, press the "" to
decrease the volume. The LCD screen will
indicate the volume level.
Using menu in the playback mode
• Turn on the player, press the
6
Gembird® FDrive MP3 user manual
Gembird® FDrive MP3 user manual
key to start
7
Using menu in the playback mode
Voice recording operation and playback of the recorded file
playing MP3/WMA, then press "MODE"/"PREV"/
"NEXT" jog button.
• On the screen the following menu will be
displayed.
then press the "MODE"/"PREV"/"NEXT" jog button
to open the Main menu. Push the jog button to
select "RECORD" then press again to enter the
"RECORD" submenu. Then press the jog button
once more to select the following:
a. "Fine REC": fine recording.
b. "Long REC": long time recording.
c. "Long VOX": filter voice recording.
d. "EXIT".
• Use "MODE"/"PREV"/"NEXT" jog button to
select item, press again to confirm or return to the
choice.
Voice recording operation and playback
of the recorded file
A. Voice recording operation
• Press the
key to turn the Fdrive MP3 on,
8
Gembird® FDrive MP3 user manual
• Press the "MODE"/"PREV"/"NEXT" jog button
to begin recording.
• When recording finished, press
button to
store the recorded file.
• Then press the "MODE"/"PREV"/"NEXT" jog
button to return to the previous menu.
• You can stop recording at any time by pressing
the
. In order to return to the previous submenu
press jog button again.
NOTE: During recording, all the buttons
except the
button do not work.
B. Play the recorded file
• Turn on the player.
• Press the "MODE"/"PREV"/"NEXT" jog button.
Gembird® FDrive MP3 user manual
9
Voice recording operation and playback of the recorded file
• Select the "VOICE" menu pushing the jog
button.
• Select the recorded file.
• Press the
key to listen to the recorded file.
• During the operation, press "MODE"/"PREV"/
"NEXT" jog button to return to the previous menu.
Delete files
2. "DELETE ALL"
3. "EXIT"
• Push the jog button to select, press it again to
confirm the selected item, then press
to delete
the file(s)or press any other key to cancel this delete
operation and return to the menu.
Delete files
• If you want to delete the file(s) in Fdrive MP3,
you can use the Delete function in the following way:
a. Press "MODE"/"PREV"/"NEXT" jog button to
enter into the Main Menu.
b. Select the "SYS set" then press "MODE"/
"PREV"/"NEXT" jog button again.
c. Select "DELETE FILE". Then press on "MODE"/
"PREV"/"NEXT" once more to enter the "DELETE
FILES" submenu:
1. "MUSIC DIR"
2. "RECORD DIR"
3. "EXIT"
Playing with EQ (Equalizer)
• Press the "MODE"/"PREV"/"NEXT" jog button
to confirm the directory.The following menu will be
displayed:
1. "DEL ONE"
• You can enjoy different sound effects by using
EQ mode.
• While the player is playing, press "MODE"/
"PREV"/"NEXT" jog button to enter the sub
menu.
• Select the EQ option and press the "MODE"/
"PREV"/"NEXT" jog button to enter the "EQ sub
menu".
• Press the jog button to choose the desired
sound effect.
• There are five sound effects available: "JAZZ",
"CLASSIC", "ROCK", "POP" and "NORMAL".
• If you don't want to change the current settings,
just choose "RETURN" to exit the submenu.
NOTICE: The Equalizer function works with WMA
files only.
10
Gembird® FDrive MP3 user manual
Gembird® FDrive MP3 user manual
11
Repeat and Preview mode
Repeat and Preview mode
• You need to set the Repeat mode, if you want:
a. Repeatedly listen to the same single song.
b. Play all the songs in the memory in circulation.
c. Preview all the songs by listening to the first
10 seconds of each song.
• Use "MODE"/"PREV"/"NEXT" jog button to
enter into the "REPEAT" submenu (when MP3 is
playing)
• Press the jog button to select:
• "NORMAL": play all the songs stored in the
Fdrive MP3 at random and then stop.
• "REPEAT ALL": play all the songs repeatedly
until any other button is pressed.
• "REPEAT ONE": play the current song repeatedly.
• "INTRODUCE": play the first 10 seconds of all
the songs then stop when the last one has been
played.
AB Repeat
c. Press "MODE"/"PREV"/"NEXT" jog button.
d. The screen will display AB and the "A" will flash.
e. Push the jog button forward; the "A" stops
flashing, then "B" starts to flash.
f. Push the jog button forward; the "B" stops
flashing.
g. The player repeats the song from the point "A"
to the point "B".
NOTICE: Press the "MODE"/"PREV"/"NEXT" jog
button to cancel the repeat.
To "Follow and Read" & "Compare"
• While the Mp3 player is playing:
a. Press "MODE"/"PREV"/"NEXT" jog button to
enter into the Mode menu.
b. Select "AB repeat" menu pushing the jog
button.
• While the Mp3 player is playing:
a. Press "MODE"/"PREV"/"NEXT" jog button to
enter into the Mode submenu.
b. Select "AB repeat" menu.
c. Press "MODE"/"PREV"/"NEXT" jog button.
d. The screen will display AB and the "A" will flash.
e. Push the jog button forward; the "A" stops
flashing, then "B" starts to flash.
f. Push the jog button forward; the "B" stops
flashing.
g. The player repeats the song from the point "A"
to the point "B".
h. Push the jog button forward again.
12
Gembird® FDrive MP3 user manual
AB Repeat
Gembird® FDrive MP3 user manual
13
To "Follow and Read" & "Compare"
Setting the Back light
• You will see the microphone icon indicating
recording of your voice, the recording time will be
the same as the AB Segment.
• Having recorded press the push the jog button
forward to confirm. If you don't press the button
forward the microphone icon will be displayed to
record your voice again.
• Press
button once to playback the original
song and the second time to listen to the recording.
• Press the "MODE"/"PREV"/"NEXT" jog button
to cancel the repeat.
d. Select the "BACK LIGHT" by pushing the jog
button.
e. Push the "PREV"/"NEXT" jog button to choose
a setting.
f. You can choose the desired back light duration:
i. 0 sec Turn the back light off.
ii. 5 sec set the duration of the back light to
5 seconds.
iii. 10 sec set the duration of the back light to
10 seconds.
iv. 15 sec set the duration of the back light to
15 seconds.
v. 30 sec set the duration of the back light to
30 seconds.
Tip: This function is very useful for people
studying foreign languages.
Viewing internal memory capacity
Setting the Back light
• You can choose the duration of the back light
in the "BACK LIGHT" submenu.
• While the Mp3 is on:
a. Use "MODE"/"PREV"/"NEXT" jog button to
enter into the Main menu.
b. Select the "SYS SET".
c. Press the "MODE"/"PREV"/"NEXT" jog button
to enter the submenu "SYS SET".
• You can examine the utilization of the memory
of Fdrive MP3 by connecting the Fdrive to the PC.
Otherwise it is also possible to view the memory
capacity of the Fdrive MP3 in the following way:
a. Use "MODE"/"PREV"/"NEXT" jog button to
enter into the Main menu.
b. Select the "Sys Set".
c. Select the 'Memory Info".
d. You will see your memory capacity.
e. Press "MODE"/"PREV"/"NEXT" again to return.
14
Gembird® FDrive MP3 user manual
Gembird® FDrive MP3 user manual
15
Other function
Other function
Lyric On/Off
• Use "MODE"/"PREV"/"NEXT" jog button to
enter into the Main menu.
• Select the "SYS SET".
• Push the "MODE"/"PREV"/"NEXT" jog button
to find Lyric submenu.
• If the setting is " LYRIC ON" and your MP3 song
is accompanied with .lrc file, the text of the song
can be displayed on the MP3 screen. If this setting
is "OFF" no text will be displayed.
Directory
• Select the "music directory" to set the default
Music Directory, MP3 Player will play from that
directory.
• Select the "record directory" to set the default
Music Directory, Player will play recording file from
that directory.
Rec Filter
• Setup for long VOX Recording, From level 0 to
Level 6. Higher level for nosier background.
Auto Off
• Push the jog button to adjust time for automatic
16
Gembird® FDrive MP3 user manual
Other function
power off (from 0 to 60 sec.). If you chose 0 you
turn the AUTO OFF function off. Press the "MODE"/
"PREV"/"NEXT" jog button to confirm. Player will
auto off when player is in "STOP" status.
Font / Language
• Push the jog button to select the language,
press "MODE"/"PREV"/"NEXT" jog button to
confirm.
Contrast
• Push the jog button to adjust the contrast from
0(brightest) to 21(darkest), press "MODE"/"PREV"/
"NEXT" jog button to confirm.
Animation
• Select different animation shown when the
player is turned on (available on certain models).
Logo
• Select different Logos shown when the player
is turned on (available on certain models).
F.W Version
• Displays the firmware version.
Gembird® FDrive MP3 user manual
17
Password settings
Password settings
a. Assigning a password:
• Enter through the Main menu into "Sys. set."
submenu.
• Press "MODE"/"PREV"/"NEXT" jog button to
enter into "PASSWORD" submenu.
• On the LCD screen will appear "New PW:".
• Enter your password using any sequence of 4
button pushes (all the player's buttons are suitable
for that). For example you can push 4 times Vol+ or
1 time Vol+ and 3 times
button etc. Press the
jog button to confirm.
IMPORTANT: Write down and never
forget this sequence!
• "Once Again:" will light up on the screen, please
reenter your password and confirm once again.
• If you see "Success" on the screen your
password is activated.
b. Changing password:
• Enter through the Main menu into "Sys. set."
• Press "MODE"/"PREV"/"NEXT" jog button to
enter into "PASSWORD" submenu.
18
Gembird® FDrive MP3 user manual
Password settings
• On the LCD screen will appear "Old PW:".
• Enter your current password and confirm by
pressing "MODE"/"PREV"/"NEXT" jog button.
• "New PW:" will appear on the screen, please
enter a new password, confirm.
• "Once again" will appear on the screen, please
reenter the password, confirm.
• If you see "Success" on the screen your new
password is confirmed.
c. Canceling password:
• Enter through the Main menu into "Sys. set."
• Press "MODE"/"PREV"/"NEXT" jog button to
enter into "PASSWORD" submenu.
• On the LCD screen will appear "Old PW:".
• Enter your password.
• "New PW:" will appear on the screen, just
neglect it by pressing the jog button.
• "Once again:" will appear on the screen, press
jog button to neglect.
• If you see the word Cancel your password is
cancelled.
USB port connection
• Make sure your PC supports USB devices (refer
Gembird® FDrive MP3 user manual
19
USB port connection
to the manual of your PC for the hardware
information).
• Insert your Fdrive in USB port of your PC.
• The LCD Screen will display the following
picture if the connection is successful.
Device and software installation under Windows 98, ME, 2000, XP
Device and software installation under
Windows 98, ME, 2000, XP
• IBM compatible computer.
• Pentium 166 MMX or faster.
• Windows 98, 98 SE, ME, 2000, XP.
• USB port.
• 32 MB RAM or more (64 MB is recommended
for Windows 2000).
• 20 MB free hard disk space or more.
• 4x CDROM drive or more.
• Sound card (optional)
• Make sure you have an unoccupied USB port
on your computer and it is enabled in your computer
BIOS.
• Insert FDrive software CD in the CDROM drive
of your computer.
• Launch Setup program which is located in the
root directory on the CD.
• Choose the setup type. You may choose one
of three setup types:
1. Typical installs Data Suite software, FDrive
Disk Utility and device drivers.
2. Compact installs FDrive MP3 Disk Utility and
device drivers.
3. Custom allows to choose components you
want to install.
• Follow installation instructions of the setup
program.
• Connect via USB cable FDrive MP3 to the USB
port of your computer. Windows will automatically
detect new hardware and install the necessary
drivers.
NOTE: An alternative way to install the drivers is
to connect the Fdrive MP3 to the computer via USB
20
Gembird® FDrive MP3 user manual
• If it is the first time that you connect the Fdrive
MP3 with this PC, it might be necessary to install the
drivers first (only under Windows 98 or Windows 98 SE).
System hardware requirements
Gembird® FDrive MP3 user manual
21
Software package
Software package
cable to USB port of your computer. Under Windows
ME/2000/XP the device will be automatically
recognized and the drivers will be installed. Under
Windows 98 you will have to provide the path to the
CD with drivers to the Found New Device wizard.
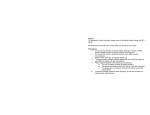
information into/from Gembird® MP3 players. It can
also be used to export the phone numbers or other
contact information from the memory of the
Gembird® MP3 players. This software can be run
under Win98, WinMe, WinXP and Win2000. Note the software is preinstalled on your MP3 player.
Software package
FDrive MP3 DataSuite
• This software package consists of the following
utilities:
1. CopyDisk. Allows copying the whole disks or
folders to/from Fdrive. Convenient to use for
backup or data transfer purposes.
2. FBackup. Allows arranging scheduled
backup/restoration of data to/from Fdrive.
3. Watcher. Detects new FDrive and FlexiDrive
devices and allows running autorun software
whenever the Fdrive is plugged in.
4. PC Lock. Allows you to use the Fdrive as the
lock to prevent unauthorized use of your computer.
5. FDrive MP3 Disk Utility. This utility provides such
functions as lowlevel formatting of FDrive MP3.
Launching the Telbook software
Doubleclick the Telbook icon (telbook.exe)
under the Windows Program manager. You will see
the following window:
Phone book
This software allows to store, process and
retrieve the phone numbers or other contact
22
Gembird® FDrive MP3 user manual
Gembird® FDrive MP3 user manual
23
Software package
Software package
Description of the fields and buttons:
1. The following fields can be used:
• Name: the contact person name, max 16
characters (compulsory field, has to be filled up).
• Mobile: mobile phone number (max 16
characters).
• Telephone: telephone number (max 32
characters).
• EMail: EMail address (max 32 characters).
• QQ: ICQ account number (max 16 characters).
• FAX: fax number (max 16 characters).
• Total: record number, the total number of
records should be less than 99.
• NamePreview: shows the list of names of all
the records in the Telbook software.
2. Add. Use this button to add a new record (on
success the person name will be added to the list in
the Name Preview).
3. Delete. Choose the person name in the Name
Preview list, then click Delete button to delete the
record.
4. Clear. Click the Clear button to clear already
entered fields.
5. Load. Click the Load button and choose the
Telbook (.bin) file to download information from the
MP3 player memory.
6. Save. After you have finished editing all the
records, please, click the Save button, it will save
the changes into the MP3 player memory
("TelBook.bin" file).
7. Save As. Using the menu choice "Save As…"
you can export the information as .txt file.
8. Exit. Quits the program.
24
Gembird® FDrive MP3 user manual
Transferring files between the PC
and the Fdrive MP3
• Insert your FDrive MP3 in the USB port of your PC.
• The removable disk will appear in My Computer.
You can use any software to upload, download or
delete file(s) on the Fdrive MP3 after that.
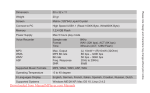
Technical specification
Memory Size
LCD Screen
SNR
Output Frequency
File Format
Compress rate
Record Format
Recording Rate
64/128 /256MB
96x26 dotmatrix
90dB
20Hz20kHz
MP3, WMA
32kbps256kbps
ADPCM
8 kHZ
Gembird® FDrive MP3 user manual
25