1
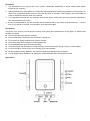
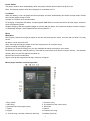
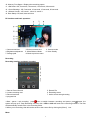
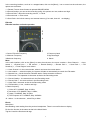
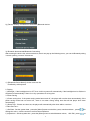
FOR BT29 MODEL NO. EN User Manual Declaration 1. The information in this manual can not be copied、transmitted, distributed, or stored except under written license by our company, . 2. Although efforts have been made for correctness and completeness during the preparation of the manual, but there is no guarantee that this manual is free from any error or omission. The Company will not be liable for errors or omissions that may exist in the manual . 3. For sustainable development, our company reserves the right to modify and improve any product described in this manual without prior notice. 4 We are not responsible for any loss no matter the loss was caused by any reason. such as data loss 、revenue loss or any special, incidental, consequential, and indirect damages Precautions This menu is for users to use the player correctly, and ensure good performance to the player, so please read carefully and follow. Never knock the main machine violently. Never contact with chemicals such as benzene, thinner etc. Do not close to strong magnetic field, electric field etc. Keep away from direct sunlight or heating appliances. Do not disassemble, repair, alteration privately. Using the player and the earpiece during bicycling, car and motorcycle driving is likely to cause danger. Do not use higher volume so as not to damage your hearing ability. Divide scraped packing, batteries, old electronic products and dispose them properly. For packaging waste, batteries, old electronics, please deal with them with properly handle . Appearance 1 Power On/Off The player will shut down automatically when the system achieve the time that is set by the user. Note: This function doesn’t work when the player is connected to a PC. Low Power When the battery is low, the player will show prompts, and then automatically shut down to sleep mode. Please don’t reboot, please charge in time. Charger 5V / 500mA-1A is recommended. PC charging: In the power ON status, use the supplied USB cable to connect with the PC and the player, choose to enter corresponding mode. Adapter charging: With the supplied charger to connect with the player, the system will prompt to select <charge> or <backstage charge>. Same operations as <connect with PC > Music Main Menu Now Playing: Select the song that played in the last time and stop the music, this item will not show if no play record . All Music: List all the music files. Artist: list songs according to artists. It can’t be recognized to an unknown singer. Genre: list songs according to genre. My Music List: A total of five play list, you can classified the songs according to your needs Dir List: built-in memory, external memory. There will be a list for the music that is in built-in memory and external memory, But if no card, this part will not show up. Record List: List all recorded files. Tag list: Lists all the songs that with tags, maximum 32 tag list. Music player interface and basic operation 1 Play / pause 3. Next song 5. progress bar for the playing song 7. Genre 9. Singer 11. Current song / the total number for the song 2. Previous song 4. The duration of the current song 6. EQ mode 8. Album 10. Name of the song 12. Battery level icon 2 13. Volume icon 14. Music Menu 15. Return to previous menu 16. Return to the main interface directly 17. Playback mode 18. Display Mode 19. Playing hours for the current song Submenu In the music player interface, click on the icon [Music Menu] to enter the sub-menu, the options are: as follows 1. <Select EQ>: Normal, Pop, Classic, Soft, Jazz, Rock, DBB 2. <Play mode>: Sequence, Repeat one, Repeat all, Shuffle, Random + Repeat, Info 3. Display modes: Spectrum or lyrics. 4. <Add to My Playlist> choose a list from the five play list, then the now playing song will be added to this chosen list, you can find the related documents in the<Music Main Menu – My Music Lists> . 5. <Set Rating>: set star for current playing , and you can select it between different star rating 6. <Add tag>: select <Add tags>, choose one kind of star to add the tag for the now playing song ,and is will return to the music playing interface automatically, you can find all the tags in <Music Main Menu - Tag list>. 7. <Delete>:delete the now playing muic file. 8. <Advanced>: 1) Scan speed: Set the speed of the fast forward and fast backwared: x2, x4, x8, x16 and x32. 2) Fade: turn on or turn off. 9. < Information>: Displays the basic information of the current songs. Video Main menu and basic operation Now Playing: Functions is the same as that in the Music Mode. Dir List: Functions is the same as that in the Music Mode Tag List: List all the video files with the tags. Maximum 32 tag lists. 1. Play/Pause: choose one video to play. Touch button on the screen to pause. Touch the screen, it will show information and progress bar ,if no operation was done within three seconds. 2. Fast forward and fast backward: When file is playing or paused, press , key to fast forward and or fast backward. 3. File switch: When file playback or pause, press , button files can be switched. Submenu During playback interface, click the menu icon [Menu] to enter the sub-menu, the options are as follows: 1. <Playback Mode>: Options are Sequence, Repeat One, Repeat all, Shuffle, Shuffle+Repeat. 2 <Scan Speed>: Press , to adjust ,the range is 1-4. 3 <Add Tag>: functions and operations is the same as that in the Music Mode. 4 <Display Mode>: full screen, Original Size and Scale. 5 <Resume>: breakpoint play function ,turn on or off. 6 <Delete>: Delete the now playing file. 7 <Information> displays information about the current file. Photo Main menu and basic operation Now Playing: Functions is the same as that in the Music Mode. Dir List: Functions is the same as that in the Music Mode Scan Mode: list the ways of displaying the pictures. It is divided into List mode and thumbnail. 1. List mode: picture shows in a list. 2. Thumbnail : display as thumbnail images Slide Interval: Select the picture playback interval,1-10 seconds When browsing the pictures, you can touch the button manually paly and automatically play button , and the information bar will be displayed, .when you choose manually play, press , to see the previous or the next 3 picture. Submenu When manually browse to a picture, click on the touch [Menu ]to enter the sub-menu, the options are as follows: 1. <Rotate>: Select the desired rotation angle: 90,180,270 degrees. 2. <Zoom>: You can zoom in or zoom out the picture. Press the return key and return, press / to move up and down to view pictures, press Menu to exit the zoom icon, (When the picture is under zoomed in or zoomed out status you can not choose the previous or next file when is zooming. Note: It is invalid for GIF format images. For less than 320 * 240 pixel image is invalid 4 Slide interval: see the main menu descriptions. 5. <Slide Interval>: see the main menu descriptions. 6. <Set as Desktop> The current picture can be set as your desktop background, boot animation, shutdown animation. Also, you can choose “Restore background” to recover the initial settings. 7. <Delete>: Delete the current image file. 8. <Information>: You can view information about the current picture. Camera CD interface and basic operation 1. Camera mode 2. Self-timer mode 4. White balance mode 5. Photographs sound mode 7. Return to previous menu 8. DC menu settings 10. Number of photos 11. Photo resolution 3.Brightness settings 6: Zoom in / Zoon out mode 9.Save DC menu Press the MENU key to enter the camera submenu, menu are as follows : 1 . <Picture Playback>: View pictures that was taken. 2 . < White Balance >: automatic, sunny, cloudy, incandescent and fluorescent lamps. 3 . <Brightness> range is from -3 to +3. 4 . <Exposure Mode>: Auto, indoor, outdoor. 5 . <Face Detection> open, close. 6 . <Sticker Photo>you can choose different background for the picture, 7 . <Special Effect> Off, Black & White, Retro, Negative. 8 . <Save Path>: the built-in memory and external memory (no card is not displayed). 9. Resolution: 2048x1536, 1600 × 1200,1280 × 1024,1024 × 768,640 x480. 4 10. Memory Free Space : Displays the remaining space. 11. <Self-timer>:Off, 5 seconds, 10 seconds, 15 seconds, 20 seconds. 12. <Cont Shooting>: Off, 5 seconds, 10 seconds, 15 seconds, 30 seconds. 13. <Shutter Sound>: off, sound 1, sound 2, sound 3. 14. Date Stamp: Off, date, date and time. DV interface and basic operation 1: Camera total time: 4: Brightness adjustment 7: Storage path 2.Current camera time 5: White Balance Mode 8: Back to previous menu 3. Camera mode 6: Video Quality Recording Recording interface and basic operation 1. Start or Pause Record 2. current recording time 3. Record total time 4. progress bar 5. Record File 6. Recording status 7. Audio source strength testing 1.Start \ pause \ quit recording: press button to switch between recording and pause. press button, the system will pop up a "Stop Recording" window, click <YES>or<NO>will back to the recording Interface. The files will automatically saved to the voice recording folder. 2 When you're recording, that will can be saved to the current file by clicking the [Menu] icon. Menu 5 In the recording interface, such as in a stopped state, click on the [Menu] icon to enter into the sub-menu, the options are as follows: 1. <Record Format> three formats is optional:WAV,MP3,WMA 2 <Record Quality> you can set the recording quality, the options are: low, medium and high. 3 <Record Gain>: adjust the recording volume, 1~5 level. 4 <Record mode >: voice record 5 <Save Path>: the built-in memory and external memory (if no card, then will not display). FM radio FM radio interface and basic operation 1.Current FM radio Frequency 4.Frequency band 2. Minimum Frequency 5.Signal strength 3.Maximum frequency 6. Stereo Menu In the radio interface, click on the [Menu] to enter the sub-menu, the menu contains < Save Channel > , < Auto search > , <Channel List > , < FM record> , < Record Quality> , < Record Gain > , < Save Path > , < FM Sensitivity > , <Tuner Region> and <Mute>. 1. < Save Channel > In the normal mode, select it and save the current station . 2. < Auto search > : select this option, the system will start to automatically to search the FM station. 3. <Channel List > :list all the saved FM radio station. Select a station to listen to. 4. < FM record>: This operation is the same as that in the Recording mode. 5. < Record Quality> : the same as that in the Recording mode 6. < Record Gain > : the same as that in the Recording mode 7. < Save Path > the same as that in the Recording mode 8. < FM Sensitivity >: low , medium and high . 9. Radio frequency: 1 ) China :87.5-108MHZ, Step: 0.1MHz; 2 ) American :87.5-108MHZ, Step: 0.1MHz; 3 ) Japan :76-90MHZ, Step: 0.1MHz; 4 ) The European :87.5-108MHZ, Step: 0.05MHz. 10. <Mute> : in the submenu , select Play or Mute Ebook Main Menu Now Reading: start reading from the previous breakpoints. There is no text file then no display. Dir List: the function is the same as that in the Music Mode. Tag list: List all the files that with tags. 6 1. Play Stop: In browse mode, you can switch between automatic and manual modes .text browser will stop. When you switch to manual mode, sliding around the screen can be realized to get next page or previous page Submenu In a text browser screen, press [Menu] button to enter the sub-menu ,options are <Skip to> <Auto Reading Speed>, <Add tag>, <Language> <Font Size> <Font Color> and <Delete File>. 1. <Auto Reading Speed>: set auto-play interval, press , key to change the value, the range is 5-30 seconds, 5 seconds one step. 2. <Add tag>: mark current reading progress. the operation is the same as that in music mode. 3<Language>: select the corresponding language. 4<Font Size>: change the font size, three kinds: Small Medium Large . 5 <Font Color> default and four font colors available 6. <Delete File>: delete the current text file. Tool Calculators 1 Select this, click on the screen, for computing Calendar Select this to view the time (this feature: can only check the time, you can not change the time) Browser Main menu and basic operation 1 In the main interface , select < browsers >for enter. there is < built-in memory > and < external memory > under this option , ( no card will not display ) . 2 Select < built-in memory > for enter , you will see the menu list, such as folders EBOOK, GAME, MUSIC, PICTURES, RECORD, SYSTEM, VIDEO , and other user’s file. 3 External memory operations is the same as .built-in memory Submenu Click on the [Menu] icon to enter the sub menu , menu options include <Search File> <Select \ Cancel all>, <Move>, <Copy> and <Delete> . 1. <Search File> : Enter into the keyboard for search files . 2 <Select \ Cancel all>: select all the files that in the current directory, the selected file folder will displayed a red√.Press to cancel all the √. 3 Move and copy : choose file / folder which need to be moved or copied first, then select the destination folder, click and confirm , select "YES", then the folder will be successfully moved or copied. 4<Delete>: Delete all selected files . Setting 1, Bluetooth: 1), On / off:, The initialization will completed after choosing ‘ON’, then below interface will show up .In this interface you can choose [Device Search],[Device List] and [Bluetooth Device Name] 7 2), [Device Search]: choose this to search the Bluetooth device. 3), Bluetooth disconnected/Bluetooth Connecting After entering the device list, select one device, then it can pop up the following menu, you can do Bluetooth pairing / cancel a pairing, connect / disconnect. 4 ). [Bluetooth Device Name]: device name can be modified by soft keyboard 2. Display 1 ) Backlight : If the backlight time is OFF, then it will not power off automatically. If the backlight time is ON,then it will power off automatically if there is no any operations for a long time. 3. Power Saving 1 ) Power saving time : If the power saving mode has turned off , the player will not shut down automatically, If the power saving mode has not turned off , there is no action during saving time that will led player shut down automatically. 2 ) Sleep Time : Choose one time set, the player will automatically shut down within a set time . 4. Date and Time : 1 ) Set Date : Set the system date , press the [Menu] button to switch the years, months and date. , press , for change the value , click the screen to confirm the modification 2 ) Adjust time : Set the system time , press the [Menu] button to switch between minute, AM \ PM , press , to 8 change the value , click the screen to confirm the modification 5 Language support: English ,French, German, Italian, Dutch , Portuguese, 6. Advanced 1) <Information>: Displaying the Player Information: User Name, firmware Version, Memory Total space, Memory Free Space, Card capacity, Card Free Space, External Capacity, External Free Space. 2) <Check System>: choose to check the system. 3) <Reset Default Settings>: Choose this to recover the factory default settings. 4) <Calibrate>: go to touch screen menu, click the nib points ,this will be saved automatically after completion. and then return to the main interface. Troubleshooting 1 . Player can not be powered on. Please check whether the battery is depleted, you can connect a USB or charger and try to reboot. 2 . No voice from the earphones. Please check whether the volume is set at 0. Please check whether the earphones have been plugged in correctly 3. Serious noise Please check the headphone plug whether is clean, dirt can lead to noise Please check music file whether is damaged, you can try to play another song to confirm it. 4. Poor FM reception . Please adjust the orientation or location to the player, and lengthen the earphone cable. Please check whether have other electronic equipment to cause interference. 5. Garbled screen Please check whether you have set correct language 6. Button invalid Please check whether the switch HOLD is locked. 7. Can not download the file Please verify the correct connection between the computer and the player. Please confirm the internal memory space is full. Please confirm the USB cable is not damaged. 9 Specifications Screen 2.8-inch TFT display, resolution 320 * 240 TF card Support 1GB-16GB Battery Lithium 3.7V 500MAh RECORDING FORMAT WAV MP3 bit rates 8K bps – 320K bps WMA bit rates 5K bps – 320K bps Frequency Response 20Hz-20KHz SNR 80-90dB Distortion <0.5% 87MHz – 108MHz FM Radio(Optional ) frequency range Music Format MP3、WMA Music play 7 hours Video format AVI,AMV video play 3 hours E-BOOK format TXT Picture Format JPGE BMP Temperature -10 to 40 degrees Celsius USB Micro 5PIN USB Supported Operating Systems Windows98/ME/XP/Vista/ Unit size(L×W×H) 95*57*9.5(mm) 10 76MHz-90MHz