1
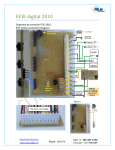
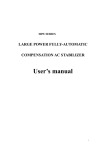
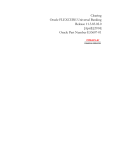
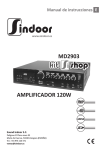
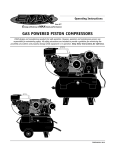
dab dab dab dab dab dab dab dab dab dab dab dab dab dab da
b dab dab dab dab dab dab dab dab dab dab
dab dab dab dab dab dab dab dab dab dab dab dab dab dab dab dab dab dab dab dab dab dab dab dab
dab dab dab dab dab dab dab dab dab dab dab dab dab dab da
b dab dab dab dab dab dab dab dab dab dab
dab dab dab dab dab dab dab dab dab dab dab dab dab dab dab dab dab dab dab dab dab dab dab dab
dab dab dab dab dab dab dab dab dab dab dab dab dab dab dab dab dab dab dab dab dab dab dab dab dab
dab dab dab dab dab dab dab dab dab dab dab dab dab dab dab dab dab dab dab dab dab dab dab dab
dab dab dab dab dab dab dab dab dab dab dab dab dab dab dab dab dab dab dab dab dab dab dab dab dab
dab dab dab dab dab dab dab dab dab dab dab dab dab dab dab dab dab dab dab dab dab dab dab dab
dab dab dab dab dab dab dab dab dab dab dab dab dab dab da
b dab dab dab dab dab dab dab dab dab dab
dab dab dab dab dab dab dab dab dab dab dab dab dab dab dab dab dab dab dab dab dab dab dab dab
dab dab dab dab dab dab dab dab dab dab dab dab dab dab da
b dab dab dab dab dab dab dab dab dab dab
dab dab dab dab dab dab dab dab dab dab dab dab dab dab dab dab dab dab dab dab dab dab dab dab
dab dab dab dab dab dab dab dab dab dab dab dab dab dab da
b dab dab dab dab dab dab dab dab dab dab
dab dab dab dab dab dab dab dab dab dab dab dab dab dab dab dab dab dab dab dab dab dab dab dab
dab dab dab dab dab dab dab dab dab dab dab dab dab dab dab dab dab dab dab dab dab dab dab dab dab
dab dab dab dab dab dab dab dab dab dab dab dab dab dab dab dab dab dab dab dab dab dab dab dab
dab dab dab dab dab dab dab dab dab dab dab dab dab dab dab dab dab dab dab dab dab dab dab dab dab
dab dab dab dab dab dab dab dab dab dab dab dab dab dab dab dab dab dab dab dab dab dab dab dab
dab dab dab dab dab dab dab dab dab dab dab dab dab dab dab dab dab dab dab dab dab dab dab dab dab
dab dab dab dab dab dab dab dab dab dab dab dab dab dab dab dab dab dab dab dab dab dab dab dab
dab dab dab dab dab dab dab dab dab dab dab dab dab dab da
b dab dab dab dab dab dab dab dab dab dab
dab dab dab dab dab dab dab dab dab dab dab dab dab dab dab dab dab dab dab dab dab dab dab dab
dab dab dab dab dab dab dab dab dab dab dab dab dab dab da
b dab dab dab dab dab dab dab dab dab dab
dab dab dab dab dab dab dab dab dab dab dab dab dab dab dab dab dab dab dab dab dab dab dab dab
room
D
U
LO
S
M/
ME
MO
ME
D
AD
FM
RY
ME
LU
M
-
X
FM
L
DE
VO
AU
N
ME
U
DIO
FM
AU
4
2
M
ME
ER
TIM
OK
1
7
C
FM
+
User’s manual
5
8
3
0
6
i
Introduction
We are grateful for your acquisition of our sound kit.
This product has been thought to enjoy your favorite
FM radio stations, remaining perfectly adapted with
the decoration of any room in your house, office or
business.
It is always available and controlled by a remote
control which will let you to access to all the
equipment benefits.
Easy installation, the speakers are placed as a halogen
light bulb. The power supply, the tuner and the
amplifier are integrated in the speaker itself.
The main characteristics of this kit are:
! Easy use remote control
! Power supply adapted to different voltages (100 a
240v)
! Stereo amplifier 1.5 + 1.5W
! 2.5” Speakers with aluminum ring and grill
! FM tuner integrated with RDS to identify different
radio stations
! IR communication between the speaker and the
remote control
From the remote control keyboard and through its
easy handling you can run the following functions:
! Audio control: volume, bass, treble, balance,
loudness, mute, mono/stereo
! Eight
characters display with light
of the radio station name (RDS
function) and frequency
! Automatic radio station searching option
! 15 memories
! Automatic memorization of the radio stations with
more quality
! Selection of one radio station through direct
marked of the frequency or the memory number
! Clock
! Switch off timer
! Alarm clock for scheduled switch on
! Configuration menu
! Visualization
Index
Introduction . . . . . . . . . . . . . . . . . . . . 9
Safety measures . . . . . . . . . . . . . . . . 10
Elements identification. . . . . . . . . . . 11
General use description . . . . . . . . . . 12
Operating audio functions . . . . . . . . 13
Switch on
Volume, bass, treble, balance
Mute, Loudness, Mono/stereo, Ideal
Operating clock functions. . . . . . . . . 13
Timer, clock
Operating the FM tuner . . . . . . . . . . 14
Searching, Memories
Configuration menu . . . . . . . . . . . . . 15
About this instructions manual
This manual contains the information that you need to
manage the product.
This kit must be installed according to the
INSTALLATION MANUAL obeying the current law
running in each country.
Alarm clock, clock
Lighting
FM sensitivity
Automatic Turn-On
Mono installation
Initialization, Version
Technical Data. . . . . . . . . . . . . . . . . . 16
Guarantee. . . . . . . . . . . . . . . . . . . . . 16
9
Safety and precaution measures
Safety and precaution measures
To guarantee your own safety and other people´s one,
be sure of reading the instruction carefully before
using this product.
Note: keep this manual in a safe place to read it again
when it´s necessary.
Electricity Danger
The inside of this product has danger voltage. You
never open the casing or introduce objects into the
slots.
Connect the product to a suitable power supply which
has been properly and safely installed.
Do not connect the equipment if it presents visible
defects.
If a breakdown occurs (as smoke or something similar)
when starting the switch on process, disconnect it
immediately from the electric source.
Let a professional get in charge of any reparation.
Turn off the equipment during electric storms or when
it is not being used for a long time
Danger of an electric shock cause by humidity
The equipment must not be exposed to any source of
water (dripping or splashing). Do not let any liquid
enter inside the equipment.
10
Notes for the equipment´s placement
Place the speakers fitted.
Do not expose the speakers to extreme temperatures.
The equipment must not get extremely hot. The extra
heat could damage the product and it could be danger
of fire.
The equipment must not be near flammable materials.
This equipment has been designed to get a reasonable
protection against interferences in domestic
installations. Nevertheless it is not possible to
guarantee the possibility of some affected
installations. If this is the case, reorient the FM
antenna, increase the distance between the
interferences source and/or connect the equipment to
a different power circuit from the one that uses the
interference generating source.
Battery
Be careful with the batteries use. To avoid battery
leaks that may cause problems:
• Install all the batteries in the proper position,
following the + and instructions of the remote control.
• Do not mix up old batteries with new ones.
• Take off the batteries when do not use the
equipment for a long time.
To push out the batteries, take off the lid at the back
pushing the peg at the same time that you pull out the
lid, take off the used batteries, put in the new ones AA
1,5V and place the lid.
Do not throw the batteries into the
organic rubbish
Notes
Switch on the equipment only right after it has been
properly connected.
If you open the product it will lose the guarantee.
Type II Equipment, I do not need earth
connection
Designed for domestic use
It obeys the CE laws
Identification of components
IR
Remote control
Characters
Timer
Alarm Clock
Switch on
IR communication
Display
Mute
Fm memories addition
Loudness
LOUD
MEMORY FM
ADD
DEL
VOLUME
FM
indoor
IR
Led
FM
OK
FM
X
AU
Amplified speaker
MEM -
Passive speaker
Previous FM memory
Previous FM station searcher
Navegate menu
Menu validation
ON/OFF (switch on / off)
Delete FM memories
Look up time / Timer
MENU
M/S
Mono/stereo
TIMER
AUDIO
MEM +
Speaker assembly
Menu
Increase the volume, audio
Next FM memory
Following FM station searcher
Look up, Select FM station
Decrease volume, audio
Audio selection function
3
1
2
4
5
6
7
8
9
C
0
Numerical keys
Delete
Cancel Menu
IDEAL state
indoor
11
Basic working concepts
The equipment
Remote control
To carry out any kind of action you should point with
the remote control to the IR interface of the speaker
and place yourself five meters or less from the
equipment.
All the functions are controlled through the remote
control.
If the equipment is switched off or mute the only
options that work are the On/off options, the clock
and the menu. You can also deactivate the mute
option if it is not disconnected.
When we switch off the equipment, the frequency of
the radio station and the audio features (volume,
lowness and highness and mono) remain memorized
and they are retrieved once you switch on the
equipment again.
When we connect the equipment to the electric
feeder it recovers the IDEAL condition. It also
deactivates the alarm clock and the timer, and restarts
the clock.
The IDEAL condition is defined by the manufacturer
and it can be modified by the user (see programming
the IDEAL condition)
Some options as the clock, timer, or alarm clock keep
the amplified speaker fed, in standby or even when it
is switch off.
12
The remote control exchanges information with the
amplified speaker. When this process happens the IR
communication symbol appears on the display and the
speaker´s led blinks.
If the information is missing the Error message will be
shown in the display.
error ir
Every operation is visualized in the display.
Some seconds after using the remote control:
- The display light switches off ( if this one was on)
- The display switches off ( if it was off)
- The current frequency of the radio station is seen in
the display (if the equipment is switched on). If the
timer option is on, the display will be off after blinking
a few seconds.
frec 875
The numeric keys let you to introduce characters to
select the FM frequency, the number of the memory
1
or the timer time. The key [C] let you to delete the last memo
character introduced.
timer
1
1080
15
59
Operating of the audio and clock functions
Keys
Display
On/Off
Keys
Display
Ideal state
Press [ON/OFF] to switch on or off.
The led shows if the equipment is on or off
ON
Volume control
Press [UP] or [DOWN] to put up or down the volume
Visualizes the volume level
Vol 50
Bass, treble, balance control
Press [AUDIO] to choose the option
Press [UP] or [DOWN] to go up or down
Show the bass, treble or balance level
AUDIO
bas +01
Mute
Mute on
Press [MUTE] to silence, or not, the speaker
The led blinks constantly if it is switched on
Loudness
Press [LOUD] to reinforce the bass sounds according to
the volume level
LOUD
Mono/stereo
Press [M/S] to change mono or stereo
If the equipment is configured Mono, it always will
work in mono option (see configuration menu)
M/S
Loud on
Mono
Active it
Press [IDEAL] briefly to access to the previously
programmed IDEAL configuration
Program it
Select the radio station and the bass, treble and
volume level , and loudness wished
Press [IDEAL] (more than three seconds)
to memorize it
IDEAL
IDEAL
Timer
Program it
Press sequentially the numeric key for the auto switch
off time (max. 59 min.)
Press [TIMER] briefly to program and activate it
Activate / Deactivate
Press [TIMER] (more than three seconds) to change it.
(it only can be activated if the time has been
programmed)
Note: when you switch off the equipment the timer is
deactivated
Look up the clock
Press [TIMER] to see the alarm clock, the timer and
the clock
Note: the alarm clock and the timer can be visualized
only if they are activated
3
0
TIMER
30
off :30
TIMER
tim off
TIMER
09:45
off :30
13:28
13
Operating of the FM tuner
Display
Scan fm
93.5
Press [RIGHT] or [LEFT] to search the following or
previous radio station
Visualize the frequency of the found radio station
Selection of a radio station
1
0
2
3
102.3
FM
Press sequentially the numeric key of the chosen radio
station frequency
For example: 1023 to get 102.3 MHz
Press [FM] to make the selection
MEM -
MEM +
Searching memories
Press [MEM+] or [MEM-] to find the previous or
following radio station
Visualize the memory and the frequency of the radio
station found
memo 08
93.5
Selection of a memory
1
2
FM
Press sequentially the numeric key of the chosen
memory
Press [FM] to select it
memo 12
97.6
Looking up the current radio station
Press [FM] to consult
Visualize the number of the memory (if it is
memorized), name of the radio station (if it receives
RDS) and frequency
14
Keys
Display
MEMORY FM
Memo add
Radio station memorization
FM
Español
Keys
Searching radio station
memo 02
rne 5
106.2
Add one radio station in a free memory
Select the radio station previously
Press [ADD] briefly to memorize it
Add one radio station in one specific memory
Select the radio station previously
Press sequentially the numeric key of the chosen
memory
Press [ADD] briefly to memorize it
Delete the current memory
Press [DEL] briefly seconds to delete it
Delete one specific memory
Press sequentially the numeric key of the chosen
memory
Press [DEL] briefly to delete it
Add automatically all the memories
Press [ADD] (more than 3 seconds) to memorize the
radio stations with better quality
The led light blinks during this process which can take
some seconds
Delete all the memories
Press [DEL] (more than 3 seconds) to delete
Note: every operation is confirmed by the OK that it is
shown in the display
ADD
1
2
MEMORY FM
ADD
MEMORY FM
DEL
1
2
MEMORY FM
DEL
MEMORY FM
ADD
MEMORY FM
DEL
12
Memo add
Memo del
12
Memo del
All add
ALL del
Configuration menu
Keys
Navigation
Display
Alarm-ON
MENU
Press [MENU] to enter or exit from the menu
Press [UP] or [DOWN] to choose the option wished
from the menu, the different options appear in the
display sequenced
Press [OK] to select the option chosen
Go to the option management
Alarm-ON
Alarm
clock
light
FM SENS
Auto-on
mono-st
reset
version
OK
Note: the keys [UP] or [DOWN] are used to navigate
inside an option
Press to activate or deactivate the illumination of the
display
Sensitivity of the tuner search
Press to change the FM tuner searching sensitivity
(HIG: high / MED: medium / LOW: low)
Automatic Turn-On
Press to change the auto- switch on (if it is ON the
equipment will switch on when it receives the power)
Press [OK] to get out from an option and validate the
modification, visualize OK in the display
Press [C] to get out without modifying
OK
Mono Installation
Press to change the type of installation
(Only for stereo kit)
C
Alarm clock activation
Alarm-ON
Press to connect or disconnect the alarm clock which
will switch on the equipment at the programmed time
ON
off
Alarm clock time/ Clock time
Press sequentially the numeric key to select the time
chosen
The number edited blinks
Keys
Display illumination
1
0
2
3
Alarm
clock
10:23
Initialization
Press to activate the initialization of the equipment
It only starts if YES is selected
Version
Visualize the version software of the equipment
Display
light
ON
off
FM SENS
hig
Med
low
Auto-on
ON
off
mono-st
Mono
stereo
reset
yes
no
version
v. 21022
15
Technical characteristics
Guarantee
General Characteristics
Power Supply Characteristics
Guarantee Conditions
Stereo Amplifier
Speakers 2, 5¨
FM tuner with RDS
Electric power feeder
Totally integrated electronics in one speaker
IR Remote control
Input power supply from 90 to 240V AC (50 to 60Hz)
Current consumption while working <5W
Maximum consumption in standby 0,2W
Sound Indoor guarantees the Quality of its products
against any manufacturing defect under the term
previously established and for a period of two years
from the shipping date.
Audio characteristics
1,5W power by channel
Volume level regulation 55dB
High and loud sounds ±15dB regulation
Balance regulation 10dB
Loudness and mono functions
Speakers Characteristics
2,5” and 16 oh. Speakers
Aluminum ring and grill
IR integrated in the ring
FM tuner characteristics
Receiver frequencies rank from 87.5 to 108MHz
Antenna impedance: 75 oh.
Antenna sensitivity 3.5 µV
RDS sensitivity 15 µV
Stereo distance >25dB
16
Remote control characteristics
Bidirectional communication with the speaker through
IR
Power supply with two 1.5V AA type batteries
LCD with eight alphanumeric characters and symbols
30 keys silicone keyboard
Clock Characteristics
Visualization on the remote control of the hours and
minutes
60 minutes switch off timer
Programming turn on through alarm clock
Temperature
Working temperature from +5º C to +40ºC
The defective or broken down products should be sent
back to Sound Indoor S. Once the products were
repaired they will be sent back to the customer. The
postages will be always paid by the customer.
This guarantee does not include the defects produced
by negligence, knocks or improper manipulations,
improper installations, improper electrical power or
standard wearing out cause by normal use.
The guarantee will lose its value:
- If some pieces of information of the guarantee or the
proof of payment are modified, changed, or
substituted.
- If the identity number or the product itself are
modified or manipulated without previous knowledge
of the Technical Service.
To make use of the guarantee it is absolutely necessary
to provide the identity number of the product and the
proof of payment..
INSTALLATION MANUAL
COMPONENTS
b
e
MENU
3
6
8
0
C
indoor
9
2
5
4
7
OK
AUDIO
FM
X
AU
1
DEL
MEMORY FM
ADD
VOLUME
FM
M/S
LOUD
d
MEM +
c
FM
TIMER
a
MEM -
5m.
f
< 4.5
m
! 2.5” amplified speaker with
tuner and power supply (a)
! 2,5” passive speaker , only in
the stereo kit (b)
! Remote control ( c)
! Speaker connection wire (only
in the stereo kit (d)
! FM antenna (e)
! Two 1,5v (AA type) batteries
! Manuals and accessories (f)
PLACEMENT
1
2
80 mm
1 Choose the place or surface to install the speaker. The amplified speaker must be in a place
where the speaker could receive the IR signal from the remote control. It should be far away
from humidity (two meters minimum) and in a ventilated place.
INSTALLATION
2 Make two holes with 80mm of diameter (±3 mm) in the surface where the speaker will be
installed. (only one for the mono kit)
3 Install the passive speaker taking the connection wire to the other speaker´s placement.
3
Ø5 Ø6
3x6
5
4
6
9
7
4 Connect the passive speaker wire to the terminal block of the amplified speaker.
5 Switch on the FM antenna of the amplified speaker.
6 Connect it to the electric power. Insert the clamp according to the wire´s diameter. Put the
cover back.
7 Introduce the antenna cable through the hole where the speaker is placed, taking care
M/S
MEM
ME
VOLU
X
ER
FM
2
5
MENU
TIM
AUDIO
OK
4
C
8
+
FM
RY
MEMO
DEL
ADD
AU
FM
1
7
FM
8
LOUD
putting the wire spread and far away from fluorescent lights, halogen lamps, power supplies,
fans, dimmers and so on.
8 Introduce the amplified speaker in its placement.
9 Provide power supply to the installation. The amplified speaker´s luminous indicator or led
blinks four times to show that the module has been properly started.
10 Insert the batteries in the remote control.
The ROOM kit is ready to be used.
Note: the third and fourth steps are not necessary in the mono kit
0
3
6
9
or
indo
10
MEM
www.sindoor.es
Sound Indoor S. C.
Polígono El Plano nave 93
María de Huerva, 50430 Zaragoza (ESPAÑA)
Tel.: +34 976 126 571
[email protected]
Sound Indoor SC reserves the right to make changes without prior notice.
Sound Indoor SC is not responsibile for any errors or omissions that may apper in this manual