1
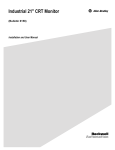
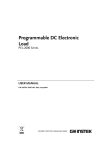
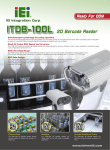
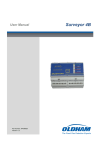
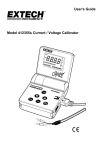
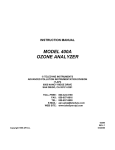
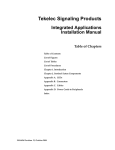
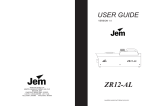
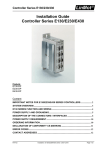
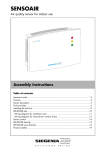
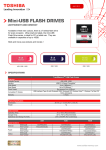
USER MANUAL (PRELIMINARY) FOR BATH SENSING MODULE V7 USER MANUAL FOR BATH SENSING MODULE V7 Doc. Ref. Last Modified: 4601598 ver. 1.16 5 March 2012 Copyright Parker Hannifin Corporation 2012. Confidential and Proprietary. All Rights Reserved. Copying of this document and distributing it to others, or the use or communication of the contents thereof, is forbidden without prior written authorization. The copyright notice hereon shall not constitute or imply publication. Doc. Ref. 4601598 ver. 1.16 page 1 USER MANUAL (PRELIMINARY) FOR BATH SENSING MODULE V7 This manual provides basic details of the Bath Sensing Module V7 and includes a fault finding guidelines in case of problems. Contents: Page subject 3 Installation and Warning notices 4…6 Specifications 7 Dimensions 8…9 Connection overview 10 Bath Sensing Module wiring proposal 11…12 Fuses 13…14 Indicators 15 Power Up Sequence 16…19 Error handling 20 Declarations To access and check for the latest version then go to: Installation Manual - http:/www.parker.com/literature/Pneumatics Division Europe/PDEDocuments/BSM-V7_Installation_Manual-UK_4601598.pdf Quick reference guide - http:/www.parker.com/literature/Pneumatics Division Europe/PDE-Documents/BSM-V7_Quick_Ref_Installation_Manual-UK_4601594.pdf Doc. Ref. 4601598 ver. 1.16 page 2 USER MANUAL (PRELIMINARY) FOR BATH SENSING MODULE V7 Installation and Warning Notices Warning To avoid unpredictable system behaviour that can cause personal injury and damage: Disconnect electrical supply (when necessary) before installation, servicing, or conversion. Operate within the manufacturer’s specified voltage, temperature, and other conditions listed in these instructions. Service according to procedures listed in these instructions. Installation, service of these products must be performed by knowledgeable personnel who understand how the product is to be applied. After installation, servicing, electrical supplies (when necessary) should be connected and the product tested for proper function. Warnings specifications or tamperproof labels on the product should not be covered or removed. Warning FAILURE OR IMPROPER SELECTION OR IMPROPER USE OF THE PRODUCTS AND/OR SYSTEMS DESCRIBED HEREIN OR RELATED ITEMS CAN CAUSE DEATH, PERSONAL INJURY AND PROPERTY DAMAGE. This document and other information from the Company, its subsidiaries and authorised distributors provide product and/or system options for further investigation by users having technical expertise. It is important that you analyse all aspects of your application, including consequences of any failure and review the information concerning the product or systems in the current product catalogue. Due to the variety of operating conditions and applications for these products or systems, the user, through its own analysis and testing, is solely responsible for making the final selection of the products and systems and assuring that all performance, safety and warning requirements of the application are met. The products described herein, including without limitation, product features, specifications, designs, availability and pricing, are subject to change by The Company and its subsidiaries at any time without notice. This device is intended for industrial use only. Doc. Ref. 4601598 ver. 1.16 page 3 USER MANUAL (PRELIMINARY) FOR BATH SENSING MODULE V7 SPECIFICATIONS (all values measured at room temperature unless otherwise noted) Power supply (pin 16 vs. pin 15) 24V +/-10% Current consumption (pin 16 vs. pin 15) max. 65mA (excluding PNP signals ) Inrush current @ 23 ºC (pin 16 vs. pin 15) Internal thermal 24V fuse rating max. 300mA 0,75 / 1,50 A @ 23 ºC 0,41 / 0,82 A @ 70 ºC (hold current / trip current) Optional Input (pin 11 vs. pin 15) min. 22 V / max. 28 V Current consumption @24V (pin 11 vs. pin 15) max. 6mA Chisel in bath, PNP Output (pin 14 vs. pin 15) PNP, 24V PNP current sourcing capabilities (pin 14 vs. pin 15) max. 100mA Chisel in bath, NPN Output (pin 10) NPN, max. 30V NPN current sinking capabilities (pin 10) max. 100mA (if more output current is needed, please contact [email protected]) Doc. Ref. 4601598 ver. 1.16 page 4 1) 2) 3) USER MANUAL (PRELIMINARY) FOR BATH SENSING MODULE V7 SPECIFICATIONS (continued) Status Signal, PNP Output (pin 13 vs. pin 15) PNP, 24V PNP current sourcing capabilities (pin 13 vs. pin 15) max. 100mA Status Signal, NPN Output (pin 9) NPN, max. 30V NPN current sinking capabilities (pin 9) max. 100mA 1) 2) 3) (if more output current is needed, please contact [email protected]) Maximum chisel current (pin2/4 vs. pin6/8) 25mA voltage (pin2/4 vs. pin6/8) >750V Maximum sensing range (pin2/4 vs. pin6/8) >8,5V Maximum chisel withstand- Temperature range 0 … 70 ºC Minimum isolation voltage between >3,0kVDC continuous. cathode referenced and 0V (PLC) referenced sides of the PCB Minimum physical separation on PCB 6,3 mm between cathode- and 0V-GND planes. Dimensions Doc. Ref. 4601598 ver. 1.16 12 x 10 x 2,4 cm page 5 4) USER MANUAL (PRELIMINARY) FOR BATH SENSING MODULE V7 SPECIFICATIONS (continued) Notes: 1) Although the PNP output driver is self-limiting in case of a short circuit, it is recommended to limit the short circuit duration to a minimum. During a short circuit the PNP output led will be OFF. Initial short circuit peak current is 0,9A+. Theoretically this peak, in combination with high ambient temperature, could also trip the thermal main fuse inside the module. Solving the short circuit and turning the module off for 20 seconds will get it working again. 2) In case of applying 24V to the Chisel in bath and/or Status signal outputs, in combination with reversed power supply wiring, the applied reverse current should not exceed 200mA. Otherwise the output driver might be damaged. 3) Although the NPN output driver disables itself in case of a short circuit, it is recommended to limit the short circuit duration to a minimum amount of time. During a short circuit the NPN output led will remain ON because the led is connected to the PNP driver only. The NPN driver will enable itself again during the next cycle providing that the short circuit is removed. Initial short circuit peak current is neglectable. 4) Sensing range is equal to the maximum bath voltage (including wiring and fuse losses!) the Bath Sensing Module is able to respond to, when supplied with 24,0V. When the module is supplied with the specified minimum voltage (24-10% = 21,6V), the sensing range might decrease with 0,1…0,25 volt. Doc. Ref. 4601598 ver. 1.16 page 6 USER MANUAL (PRELIMINARY) FOR BATH SENSING MODULE V7 DIMENSIONS Doc. Ref. 4601598 ver. 1.16 page 7 USER MANUAL (PRELIMINARY) FOR BATH SENSING MODULE V7 CONNECTION OVERVIEW PIN 01 NOT CONNECTED, PLEASE DON’T USE. PIN 02 CHISEL (SPARE CONNECTION) PIN 03 NOT CONNECTED, PLEASE DON’T USE. PIN 04 CHISEL (PIN 02 and PIN 04 are internally connected) PIN 05 NOT CONNECTED, PLEASE DON’T USE. PIN 06 CATHODE PIN 07 NOT CONNECTED, PLEASE DON’T USE. PIN 08 CATHODE (PIN 06 and PIN 08 are internally connected) PIN 09 STATUS OUTPUT PIN 10 CHISEL IN BATH OUTPUT PIN 11 OPTIONAL INPUT (24V) PIN 12 DATA-LOG-OUT *) NPN NPN PIN 13 STATUS OUTPUT PIN 14 CHISEL IN BATH OUTPUT PIN 15 0V POWER SUPPLY PIN 16 +24V POWER SUPPLY PNP PNP Notes: - Do not use the spare PIN 02 (or PIN 04) to loop a chisel wire to next module! Every chisel wire should have its own Bath Sensing module. - One of both cathode pins (PIN 06 or PIN 08) can be used to loop the cathode wire to the next module(s). Looped cathode wires should be from one pot only. Never connect cathode wires from different pots together. - PIN 12 (data-log-output) is only to be used by authorized employees. Data-log PIN 12 should be connected to measurement systems with proper galvanic isolation. Multi-meters and laptops (without charger!) are preferred! Doc. Ref. 4601598 ver. 1.16 page 8 USER MANUAL (PRELIMINARY) FOR BATH SENSING MODULE V7 CONNECTION OVERVIEW (continued) Doc. Ref. 4601598 ver. 1.16 page 9 USER MANUAL (PRELIMINARY) FOR BATH SENSING MODULE V7 BATH SENSING MODULE WIRING PROPOSAL Doc. Ref. 4601598 ver. 1.16 page 10 USER MANUAL (PRELIMINARY) FOR BATH SENSING MODULE V7 FUSES General info Most smelters use one chisel fuse per breaker and one common cathode fuse per pot to fuse the Bath Sensing modules. These fuses can have a huge impact on Bath Sensing performance. In terms of Bath Sensing performance, the main fuse characteristic that is important to observe is the ohmic resistance of the fuse. Unfortunately most fuse manufacturers don’t specify ohmic resistance in their datasheets. However, a reasonable indication of fuse resistance can be calculated with data that is usually provided in datasheets: voltage drop is namely the product of current through the fuse, times the fuse resistance. Thus the fuse resistance can be calculated with: [ fuse resistance = max. voltage drop / nominal current ] Fuse selection To reach optimum Bath Sensing performance aim to select fuses that have a resistance between 0 and 15 Ohms. Sometimes it might be required to choose a fuse with a higher rated current than normally would have been chosen solely based on the chisel current ( max 25mA / nominal 12mA ) Example The following examples are referring to the datasheet of SIBA fuses on the next page. 32mA fuse => resistance = 4500mV / 0,032mA = 141 Ω 100mA fuse => resistance = 1500mV / 0,100mA = 15 125mA fuse => resistance = 17000mV / 0,125mA = 136 Ω 1A fuse => resistance = 1200mV / 1A = 1,2 Ω 2A fuse => resistance = 800mV = 0,4 Ω / 2A Ω Exclusively seen from Bath Sensing performance viewpoint, the 1A and 2A fuses would be the best fuses to select. Doc. Ref. 4601598 ver. 1.16 page 11 USER MANUAL (PRELIMINARY) FOR BATH SENSING MODULE V7 FUSES (continued) Disclaimer: This chapter FUSES only gives an overview of the process for meeting the essential fuse resistance requirements for optimal Bath Sensing performance. The customer always remains ultimately responsible for the safety and compliance of the whole system to regulations applying to pot rooms. Doc. Ref. 4601598 ver. 1.16 page 12 USER MANUAL (PRELIMINARY) FOR BATH SENSING MODULE V7 INDICATORS Doc. Ref. 4601598 ver. 1.16 page 13 USER MANUAL (PRELIMINARY) FOR BATH SENSING MODULE V7 INDICATORS (continued) RED = STATUS signal The red STATUS led has two functions: - During normal use, the red led will flash every few seconds to indicate a certain firmware calculation has ended successfully. - When an internal error is discovered by the firmware, the red STATUS led will light up continuously. If the chisel [PIN2/4] and cathode [PIN6/8] pins are shorted deliberately, i.e. for testing purposes, the red led might come up (in combination with yellow CHISEL IN BATH led). As long as both led’s turn off again after the short circuit is removed, there is nothing wrong with the module. YELLOW = Chisel in Bath signal Yellow led will light up when the module senses the chisel is in contact with the bath. GREEN = Power supply indicator - When the green led is continuously ON, all (internal) power supplies are working within specifications. - If the chisel [PIN2/4] and cathode [PIN6/8] pins are shorted deliberately, i.e. for testing purposes, the green led might turn off (in combination with CHISEL IN BATH and/or STATUS led’s both on). As long as the green led turns on again after the short circuit is removed, there is nothing wrong with the module. ORANGE = Optional Input Orange led will light up when the optional input [PIN11] is enabled. Please note that this function is not mandatory for proper function. Do not connect this input without consulting Parker. NOTE: Two pot meters are visible between the yellow and green led’s. Please do not change the settings of these pot meters without consulting PARKER. Doc. Ref. 4601598 ver. 1.16 page 14 USER MANUAL (PRELIMINARY) FOR BATH SENSING MODULE V7 POWER UP SEQUENCE During the first 60 seconds after powering up the Bath Sensing module, this Power Up Sequence analyzes the chisel voltage, temperature influences etc. to improve accuracy especially during pot-start up. Although the firmware is able to filter out one crust breaking cycle (including physical contact between chisel en bath) during this Power Up Sequence, it is recommended to prevent bath contacts for the first 60 seconds after powering on the module, i.e. by temporarily opening the chisel fuse. In case more Bath Sensing modules are powered up at once, opening the cathode fuse would be the most convenient way to prevent disturbing the Power Up Sequence. Please note that the Bath Sensing Modules will NOT respond to any bath contacts during the Power Up Sequence at all! To notify the Power Up Sequence is running, the red and green led’s are used as following: • Green led flashes every other second. • Red led flashes every 6 seconds for 10msec. 10 times in total during “power up” sequence. (1 seconds off / 1 second on) (5,99 seconds off / 10msec on) When the green led is continuously on, the Power Up Sequence is finished and normal Bath Sensing function will start. Doc. Ref. 4601598 ver. 1.16 page 15 USER MANUAL (PRELIMINARY) FOR BATH SENSING MODULE V7 ERROR HANDLING GREEN led is OFF (or blinking irregularly): - Check the +24V power supply. [PIN15 vs PIN16] - If 24V is available and stable, open the chisel fuse and then remove the +24V supply.[PIN16] - Wait 1 minute before reconnecting the +24V supply [PIN16]. - If the green led starts blinking with one second interval (indicating the Power Up Sequence is running) wait until the green led is on continuously before closing the chisel fuse. (Please see the chapter “Power Up” Sequence”) If the green led refuses to light up whilst the 24V power supply is available and the chisel fuse is opened, disconnect the wiring and exchange the module. Contact PARKER. YELLLOW CHISSEL IN BATH led stays OFF: Make sure the chisel is physically capable of reaching the bath by performing a manual stroke. Bath liquid should be visible on the chisel upon retraction. Bath Sensing can’t perform its function when bath level is beyond the chisel’s mechanical reach! If the bath is within the mechanical reach of the chisel, please reset the module by following the procedure below. RESET PROCEDURE - Open the chisel fuse and turn the module off by disconnecting the +24 Volt [PIN16] - Wait 1 minute. - Turn the module ON again by reconnecting [PIN16]. (with chisel fuse still opened!) - If the green led starts blinking with one second interval (indicating the Power Up Sequence is running) wait until the green led is on continuously. END RESET PROCEDURE Doc. Ref. 4601598 ver. 1.16 page 16 USER MANUAL (PRELIMINARY) FOR BATH SENSING MODULE V7 ERROR HANDLING (continued) After the RESET the red led should flash every 2 or 3 seconds. Use a multi-meter to measure chisel/cathode voltage directly on the Bath Sensing module between [PIN2/4 and PIN6/8] with the chisel fuse still open. V7 modules should read somewhere between 9,3…10 VDC. Keep in mind that the reading might not be stable due to inducted voltages on the wiring. In case the reading seems way off, disconnect both cathode and chisel wires from the module and measure again directly on [PIN2/4 and pin6/8]. Reading should be stable and within range now. If not, exchange the module and contact Parker. When the reading is within range, make sure the cathode and chisel wiring is reconnected and close the fuses. - - Connect a multi-meter to the chisel [PIN2/4] and to the cathode [PIN6/8]. Monitor the measured DC voltage (if possible use MIN/MAX function of the multi-meter) whilst performing a manual crust breaking stroke including a few seconds in maximum extended position. The lowest (MIN)stable* voltage should be close (±1V) to the pot voltage. The lower the better. If the measured voltage is way above this range, check the wiring, fuse holders and chisel/cathode fuse resistance. (see chapter FUSES) Stable* = as long as the chisel is not in contact with the bath, the measured voltage might be unstable due to induction voltages. However, when the chisel is in fully extended position dipped into the bath, a more stable voltage should be readable. If the measured chisel-cathode voltage is within ±1V of the pot voltage, but the module does not respond with a Chisel In Bath output, open the cathode and chisel fuses and disconnect both chisel and cathode wires. - Use a multi-meter to measure between 0V [PIN15] and data-log [PIN12]. With open chisel and cathode contacts, the multi-meter should read between 3,8 and 5,0 VDC. Short circuit the chisel [PIN2/4] and cathode [PIN6/8] pins directly on the module. The multi-meter should read a significantly lower voltage now, usually below 1V. In very hot conditions, the RED led might turn on during the short circuit. This is normal behavior. Observe the yellow bath-contact led, it should turn ON during the short circuits between chisel and cathode. If the led does not respond, exchange the module or disconnect the wiring and contact PARKER. Doc. Ref. 4601598 ver. 1.16 page 17 USER MANUAL (PRELIMINARY) FOR BATH SENSING MODULE V7 ERROR HANDLING (continued) YELLLOW CHISEL IN BATH led stays ON: - Open the chisel fuse. [PIN2/4] - The Chisel in Bath output and the corresponding yellow led should turn off. - If not, perform the RESET procedure: RESET PROCEDURE - Open the chisel fuse and turn the module off by disconnecting the +24 Volt [PIN16] - Wait 1 minute. - Turn the module ON again by reconnecting [PIN16]. (with chisel fuse still opened!) - If the green led starts blinking with one second interval (indicating the Power Up Sequence is running) wait until the green led is on continuously before going to the next step. END RESET PROCEDURE If the yellow Chisel in Bath led turns on again after power-up (and/or during the Power Up Sequence), exchange the module and contact PARKER. If the led stays off, close the chisel fuse and monitor the module’s performance during a few strokes. RED led is ON continuously: - Open both chisel and cathode fuses. - Perform the RESET procedure. If the red led stays off, close the chisel and cathode fuses and monitor the module’s performance during a few strokes. If the red led lights up again continuously, exchange the module and contact PARKER. Doc. Ref. 4601598 ver. 1.16 page 18 USER MANUAL (PRELIMINARY) FOR BATH SENSING MODULE V7 ERROR HANDLING (continued) ALL LED’S ARE BLINKING FAST: Probably the internal thermal fuse is tripping. Try to determine if there is a heat source from outside the module that is heating up the Bath Sensing Module. (i.e. a super structure door is left open) Try to perform the RESET procedure below. However, if the led’s keep blinking fast even after cooling down for a longer period of time, there might be hardware damage. In that case exchange the module and contact Parker. RESET PROCEDURE - Open the chisel fuse and turn the module off by disconnecting the +24 Volt [PIN16] - Wait 1 minute. - Turn the module ON again by reconnecting [PIN16]. (with fuses still opened!) - If the green led starts blinking with one second interval (indicating the Power Up Sequence is running) wait until the green led is on continuously before going to the next procedure. END RESET PROCEDURE Close the cathode and chisel fuses and monitor the module’s performance. For any other unmentioned error or erratic behavior of the Bath Sensing Module: Please contact PARKER. Doc. Ref. 4601598 ver. 1.16 page 19 USER MANUAL (PRELIMINARY) FOR BATH SENSING MODULE V7 EMC and ROHS Declarations for the Bath Sensing Module. Doc. Ref. 4601598 ver. 1.16 page 20