1
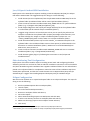
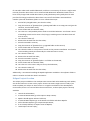
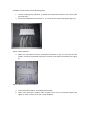
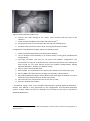
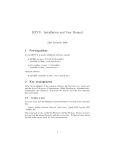
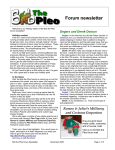
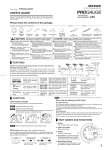
GAIPS/INESC-ID MyPleo Installation and Deployment version 1.05 - October 18, 2011 Paulo F. Gomes This work is licensed under a Creative Commons Attribution 3.0 Unported License Contents Introduction .................................................................................................................................. 2 Installation and Configuration....................................................................................................... 3 Software installed ..................................................................................................................... 3 Pre-Installation .......................................................................................................................... 3 Shiva Tools Installation.............................................................................................................. 4 Shiva Editor Configuration ........................................................................................................ 4 Java, Eclipse & Android SDK Installation ................................................................................... 5 Shiva Authoring Tool Configuration .......................................................................................... 5 Eclipse Configuration................................................................................................................. 5 PhyPleo Installation and Configuration..................................................................................... 6 Bluetooth Configuration ........................................................................................................... 6 Smartphone Configuration........................................................................................................ 7 Pleo robot Configuration........................................................................................................... 7 Eclipse Project Creation ............................................................................................................ 8 Bluetooth Installation.............................................................................................................. 10 Deployment ................................................................................................................................. 14 ViPleo Deployment.................................................................................................................. 14 PhyPleo Deployment ............................................................................................................... 14 Acknowledgements ..................................................................................................................... 16 Introduction This document presents a summary description of the necessary steps that need to be taken in order to create new versions of MyPleo. Although reading MyPleo System Description is highly recommended, I will try to make a summary description of the prototype here. MyPleo is an artificial pet with two embodiments: a robotic one, consisting of a modified Pleo1 robot; and a virtual one, consisting of an Android2 application for an HTC Desire34. These two embodiments will be referred to as PhyPleo and ViPleo respectively. PhyPleo has been developed from Pleo robot version 1.1.1 and ViPleo was developed for Android 2.2. The manual was originally created to enable LIREC developers/researchers to extend MyPleo. However, it may also serve other individuals that want to try to recreate it. In either case I reiterate that reading MyPleo System Description is essential. Only LIREC developers/researchers will have access to the complete MyPleo bundle with all the prototype’s resources, but most of the resources are available in http://trac.lirec.org/browser/scenarios/MyFriend/MyPleo/. Furthermore, all the code is there and has been licensed under GNU GENERAL PUBLIC LICENSE - Version 3, 29 June 2007 (http://www.gnu.org/copyleft/gpl.html). This manual is licensed under a Creative Commons Attribution 3.0 Unported License (http://creativecommons.org/licenses/by/3.0/). Readers are encouraged to create new versions of the document, updating it for instance. Future authors are asked to maintain a reference to the original author in the first page and include their names in the first page as well. Additionally, I have used the pronoun “I” when presenting personal suggestions. These should probably be changed to “We” if other authors contribute to the document. I start by describing the necessary steps to prepare your development system to deploy new versions of MyPleo (Installation and Configuration). Afterwards, I explain how after modifying one component one can deploy to the robot and to the Smartphone (Deployment). 1 Copyright Innvo Labs Corporation. Copyright Google Inc. 3 Copyright HTC Corporation. 4 The device used will also be referred to simply as “Smartphone”. 2 Installation and Configuration In this chapter it is described what one should install in a PC in order to be able to deploy MyPleo’s software to the modified Pleo robot, and to a Smartphone. I recommend following the steps in the order they are presented. There are various references to the software folder along the description. Only LIREC developers/researchers will have access to the complete MyPleo bundle in which such folder is included. However, almost all the software can be downloaded free of charge from the internet, and if not, alternatives are mentioned. Most of the steps were tested in a PC with Windows XP (32-bit) service pack 3 installed, without an SD Card reader nor Bluetooth, as well as in a PC with Windows 7 (64-bit) service pack 1 installed, with an SD Card reader and Bluetooth. The Bluetooth configuration and PhyPleo Installation and Configuration were only tested in the PC with Windows 7. Software installed In the installation the following software packages will be installed/configured/used: Shiva 3D 1.9.0.1; JDK 6 update 26; Eclipse IDE for Java Developers; Android SDK Tools; ADT plug-in for Eclipse; Android NDK version 6; Apache Ant 1.8.2; Gygwin; Putty; SVN client; For software that does not need explicit installation, but rather just unzipping to a folder, I suggest doing so to a safe location without space characters in the path. Pre-Installation The pre-installation can either be performed from the MyPleo bundle, or with a checkout from LIREC’s svn server. Pre-installation from the MyPleo bundle: Copy the MyPleo bundle to your computer; Move the workspace folder to a safe location without spaces; Pre-installation from the svn server: Checkout the miniBundle folder to your computer from https://svn.lirec.eu/scenarios/MyFriend/MyPleo/miniBundle/ using an svn client; Checkout the workspace to a safe location without spaces in your computer from https://svn.lirec.eu/scenarios/MyFriend/MyPleo/workspace/ using an svn client; In this document, unless mentioned otherwise, references to folders assume that you are already in the bundle folder. References to the workspace folder refer to the location where this folder was placed, or checked out. Shiva Tools Installation LIREC only has a single-user license for ShiVa 1.9.0.1 ADVANCED. Thus, when migrating a license as mentioned bellow, be sure no other developer/researcher is using it. Alternatively, you can install the free Shiva 1.9.0.1 PLE version. Note however that the manual was not tested with this version, and deployed software using it would have overlay messages stating the use limitations of the software. The installation steps for the Shiva tools are the following: 1. 2. 3. 4. 5. 6. 7. 8. 9. 10. 11. Install ShiVa_1.9.0.1.ADVANCED from the setup file in the software folder; Launch the ShiVa Editor; When asked to activate product copy the computer-id presented; Go to web site http://www.stonetrip.com/; Select Log In (upper right corner); Type the username and password found in software/Shiva account.txt; Select Licenses management; Select migrate a license; Paste the copied computer-id and press migrate; Copy the generated key to the activation product form; Activate product; Shiva Editor Configuration One needs to add a ShiVa project existing in the workspace to the set of available projects in the Shiva Editor. The steps for doing so are the following: 1. Launch the ShiVa Editor; 2. Go to Main>Projects; 3. Select Add, browse to the workspace\viPleoShivaModule folder, and select it; Alternatively, you can re-import an older version of the project from an available archive following these steps: 1. 2. 3. 4. 5. 6. 7. 8. 9. Launch the ShiVa Editor; Go to Main>Projects; Select Add, browse to the desired folder, and select it; Go to Data Explorer>Import>Archive; Browse to vipleo and select MyPleo; Select Import; When prompted override existing files; Exit the Shiva Editor; Browse to vipleo folder and copy the files folder to the project folder; Java, Eclipse & Android SDK Installation Deployment to the Smartphone requires installing a Java Development Kit (JDK), the Eclipse IDE and the Android SDK. The suggested steps for doing so are the following: 1. Install the JDK (version 6 update 26) from the jdk-6u26-windows-i586 setup file in the software folder (installation folder will be named <jdk-installation-folder>). 2. Create a new environment variable named JAVA_HOME and set it to <jdk-installationfolder> (e.g. C:\Program Files (x86)\Java\jdk1.6.0_26); 3. Install Eclipse Indigo from the eclipse-java-indigo-win32 zip file in the software folder to a safe folder (will be named <eclipse-installation-folder>). 4. I suggest using a shortcut to launch eclipse so that you can specify the jdk used. An example is included in the software folder (eclipse-java-indigo-win32 launcher). You will have to define the Target as <eclipse-installation-folder>\eclipse.exe –vm “%JAVA_HOME%\bin\javaw” and the Start in as <eclipse-installation-folder>. 5. Install the Android SDK (release 12) from the installer_r12-windows setup file in the software folder. The installation folder must not have spaces (it will be named in this document as <android-installation-folder>). Make sure to install the SDK Platform Android 2.2, API 8, revision 2. 6. Create a new environment variable named ANDROID_HOME and set it to <androidinstallation-folder> (e.g. C:\ProgramsNS\android-sdk); 7. Install the ADT eclipse plug-in by following the instructions in doc\eclipse-adt installation.html5. Shiva Authoring Tool Configuration Deployment of the Shiva module requires installing several tools and configuring the Shiva Authoring Tool 3d so it can later be used on Android. Installation instructions can be checked in doc\Shiva 3D Authoring Tool installation.htm6. Zipped installation folders for ant and ndk were placed in the software folder for completeness. Note that some of the installation steps have already been performed, and that the critical elements are in Required third party tools for Android target. I suggest also installing Required third party tools for Windows target. Eclipse Configuration We will use the checked out or copied workspace folder as an eclipse workspace. The steps for doing so are the following: 1. 2. 3. 4. 5. 6. 7. 8. 9. 5 6 Run the updateProperties.bat in workspace/Pleo; Launch eclipse; Go to File>Switch Workspace>Other...; Browse to workspace folder and select it; Go to File>Import…; Select General>Existing Project into Workspace and click Next; In Select root directory: browse to workspace/Pleo and select it; Make sure that Copy projects into workspace is NOT selected; Click Finish; Alternatively, you can use http://developer.android.com/sdk/eclipse-adt.html. Alternatively, you can use http://www.stonetrip.com/developer/doc/authoringtool/installation. 10. 11. 12. 13. 14. 15. 16. 17. 18. 19. 20. 21. 22. 23. 24. 25. 26. 27. 28. Select the Pleo project in the Package Explorer; Select Project>Build Automatically, if not already selected; Go to Window>Preferences; Select Android; In the Android Preferences>SDK Location: browse to <android-installation-folder> and select it; Click Apply and then OK; Right click on Pleo in the Package Explorer and select Android Tools>Fix Project properties; Go to Project>Clean…; Select Clean projects selected below; Select Pleo, if not already selected, and click OK; Open build.properties; Edit the cygwin.dir value so it matches the directory in which cygwin was installed; Edit the ndk.dir value so it matches the directory in which ndk was installed; Select Window>Show View>Ant; Drag and drop the build.xml file from the Package Explorer to the Ant window; In the Ant window open-up the MyPleo ant build options; Double click on setup-project and wait a success message in the Console window; Select Pleo project in the Package Explorer; Select File>Refresh or press F5; PhyPleo Installation and Configuration Deployment of PhyPleo’s software requires installing the Pleo Development Kit as well as doing some additional configurations. The needed steps are the following: 1. Install PleoDevelopmentKit from the zip file in the software folder to a safe folder (will be named <pleo-sdk-installation-folder>, e.g. C:\ProgramsWI\PleoDevelopmentKit); 2. Create a new environment variable named PLEO_HOME and set it to <pleo-sdkinstallation-folder> (e.g. C:/ProgramsWI/PleoDevelopmentKit); 3. Browse to workspace\phypleo\needs_behavior; 4. Edit needs_behavior.upf replacing the entries of C:/ProgramsWI/PleoDevelopmentKit by the actual folder path using slash characters (/); Bluetooth Configuration The following instructions enable you to connect to PhyPleo trough your computer via Bluetooth. Of course your computer will need to have Bluetooth in order to do so. Note that USB SD Card readers are inexpensive. The instructions described assume putty is installed, but an alternative serial port terminal could be used (the binary file for putty has been placed in the software folder for completeness). The instructions to establish the connection are the following: 1. Turn on PhyPleo; 2. Go to Bluetooth Devices in the Tray Bar and select Add Device; 3. Wait for the devices to be detected; 4. 5. 6. 7. 8. 9. 10. 11. 12. 13. 14. 15. 16. 17. 18. 19. 20. Select PleoBluetooth-1255 and click Next; Select Pair without using a code; After the device is linked, click Close; Go to Bluetooth Devices in the Tray Bar and select Show Bluetooth Devices; Right-click on PleoBluetooth-1255 and select properties; Go to the Hardware tab and write down the name of the created serial port (e.g. COM6); Close the properties and exit from Bluetooth devices; Launch putty; Go to Connection>Serial and fill the fields with the following values: a. Serial line to connect to: the name of the port you written down; b. Speed (baud): 115200 c. Data bits: 8 d. Stop bits: 1 e. Parity: None f. Flow Control: None Go back to the Session menu; In the Connection type select Serial; In the Saved Sessions space type ‘PleoBluetooth-1255 settings’; Click Save; Double-Click on ‘PleoBluetooth-1255 settings’; Allow the Bluetooth device to connect by clicking on the balloon popping out of the system tray; Type ‘1234’ as the key and continue; Wait for command black window to appear; In the end of the configuration, you can type ‘help’ and enter to test it. A list of the monitor commands should appear. Smartphone Configuration Running the necessary software on the HTC Desire requires a little effort of configuration. Most of the devices already used for MyPleo will probably already have been configured. If you are using another device do the following steps: 1. 2. 3. 4. Go to Settings>Applications>Development and select USB debugging; Go to Settings>Applications and select Unknown sources; Turn on ViPleo; In the HTC go to Settings>Wireless & networks>Bluetooth settings select Scan for devices; 5. Select “PleoBluetooth-7231” or “PleoBluetooth-1255”, depending on which PhyPleo you wish to connect with; 6. When requested to enter a code, use “1234”; Pleo robot Configuration In order for the PhyPleo deployment to work, one should be sure that the correct firmware version is installed in the Pleo robot. The process described here has already been performed for two Pleo robots with installed Bluetooth, and thus is unnecessary for those. It might come in handy if another Pleo robot is to be enhanced with Bluetooth. Beforehand make sure to have a fully charged and cooled down battery ready (the battery will typically be a bit warn just after full charge) and that the Pleo robot is turned off. The folders mentioned here consider <pleo-sdk-installation-folder> as root. Follow these steps: 1. Put the fully charged battery into the Pleo robot; 2. Copy the contents of \firmware\1.0.2_Downgrade folder to an empty SD card (just the contents, not the folder itself); 3. Insert the SD card into the Pleo robot; 4. Turn Pleo on. It will probably take a while to install the behaviour. It will emit a series of twinkling sounds until it emits a final, longer, twinkling sound. The Pleo robot will start to move; 5. Turn the Pleo robot off; 6. Remove the SD Card from the Pleo robot; 7. Erase the SD Card’s contents; 8. Copy the contents of \firmware\1.1.0_Upgrade folder to the SD card; 9. Insert the SD card into the Pleo robot; 10. Turn the Pleo robot on. The process is similar to the previous installation. It will make some twinkling sounds and eventually the robot will start to move; 11. Turn the Pleo robot off; 12. Remove the SD Card from Pleo; 13. Erase the SD Cards’ contents; 14. Copy the contents of \firmware\pleo-1.1.1 folder to the SD card; 15. Insert the SD card into the Pleo robot; 16. Turn Pleo on. In this case it will just start up the behaviour; 17. Turn the Pleo robot off; 18. Remove the SD Card from the Pleo robot; Additionally, I recommend installing the MySkit application available in the software folder in order to visualize and edit the robot’s animations. Eclipse Project Creation The eclipse project available in the workspace was created with Shiva Authoring Tool. Bellow, are the instructions to create such a project. These instructions might come in handy if you need to update your eclipse or Shiva version. In a regular installation of the development environment, there is no need to follow these instructions, as the eclipse project is already available. 1. 2. 3. 4. 5. 6. 7. Launch the ShiVa Editor; In General>Game Editor go select Open or Drop a Game; MyPleo should appear selected. Click OK; In General>Data Explorer go to the Games sub-folder and select MyPleo. Still in the Data Explorer, go to Export>Export Game; If not already defined, set Export name to MyPleo; Leave Export version empty; 8. 9. 10. 11. 12. 13. 14. 15. 16. 17. 18. 19. 20. 21. 22. 23. 24. 25. 26. 27. 28. 29. 30. 31. 32. 33. 34. 35. 36. 37. 38. 39. 40. 41. 42. 43. 44. 45. 46. 47. 48. Select Local folder and browse to a workspace/viPleoShivaOutput. Select Runtime Package (.stk) and select Android profile; Click Export and wait for the “Export succeeded” message to be displayed; Launch Shiva Authoring Tool; Select the Android tab; Select the “Or get started now ...” option; In Step 1 : Content, for the option Application pack browse to workspace/viPleoShivaOutput and select the MyPleo file; For Icon browse to the folder vipleo and select the pleoIcon.png; For Startup splashscreen browse to the folder vipleo and select the pleoSplash.png; Select Next; In Step 2 : Authoring, in the Authoring type option select Project; In the Signing>Bundle identifier type eu.lirec.pleo; Go to Step 3 : Build; In the Build type option select Development; Unselect option Install in connected device; In the Minimum OS support select Android 2.2 (API level:8 ); In the option Output folder browse to the workspace/viPleoShivaOutput and select it; Click Build; Wait for the “Build finished successfully!” message to be displayed in the log; Exit Authoring Tool and save the profile as MyPleoProject; Launch eclipse; Select Project>Build Automatically, if not already selected; Go to File>Switch Workspace>Other...; Browse to workspace folder and select it; Select File>New>Project…; Select General>Project and click Next; In project name type Pleo; Click Finish; Right click on Pleo in the Package Explorer and select Import…; Select General>Archive File and click Next; In From archive file browse to workspace/viPleoShivaOutput and double click MyPleo_Android.zip; Click Finish; Go to Window>Preferences; Select Android; In the Android Preferences>SDK Location: browse to the folder in which the Android SDK was installed and select it; Click Apply and then OK; Go to Windows>Show View> Ant; Drag and drop the build.xml file from the Package Explorer to the Ant window; Double click on Build debug apk (wait for success log on Console); Right click on Pleo in the Package Explorer and select Android Tools>Fix Project properties; Double click on Build release apk; The eclipse project available in the workspace has the following main modifications: Changes in the AndroidManifest.xml, namely the activity corresponding to the ShiVa module (MyPleo) no longer is the main one or is launched at start up, PleoMainActivity would is; The S3SSurfaceView was modified so that when the ShiVa module pauses, there is an attempt to migrate to PhyPleo; Several classes added; Warning suppression of minor issues of Shiva3D interface; Options added to ant build file; Bluetooth Installation In this sub-section we describe how to enable a Pleo robot to receive commands via Bluetooth. You only need to read it if you intend to create more PhyPleo’s. It is greatly inspired in a previously online web page housed at Robotstuf.com7. The last time the website was consulted (14-07-2011), it seemed to be offline. There is an offline version of the cached page in the doc folder (Pleo bluetooth.htm). Installation was performed with the help of an electric technician. The modifications to the Pleo robot 1.1.1. presented here have not been approved by Innvo Labs and most likely void the warranty. By taking them, the reader takes full responsibility of any damage or malfunction occurring to the Pleo robot used. Furthermore, the author is not responsible for any injury or health problem caused by trying to the follow these instructions. The parts and material needed to install the Bluetooth are the following: 1 Bluetooth module (Figure 1). I recommend the Bluetooth DIP Module - Roving Networks (http://www.sparkfun.com/products/8550); Figure 1: Bluetooth module. 7 http://robostuff.com/diy-projects/pleo-hacking/how-to-control-pleo-wirelessly-via-Bluetooth/, consulted 11-03-2011. 1 crimp housing (Figure 2), 1.25mm, 7 way (http://il.farnell.com/molex/510210700/crimp-housing-1-25mm-7way/dp/6151109); Figure 2: Crimp housing. 4 crimp socket contacts (http://uk.farnell.com/molex/50058-8100/crimp-socketcontact/dp/17042469) - Figure 3; Figure 3: Crimp socket contacts. 2 two-pin fem headers (http://www.sparkfun.com/products/115); 4 wires of different colours and about 8cm long; Green modelling clay; Green cat collar; Electrical tape; All the material, apart from the cat collar and the wires, should be available at GAIPS/INESCID’s offices. The electronic parts should be in a box labelled “PhyPleo Parts”. Additionally, you will also need a basic soldering iron, pliers, a snap-off blade, crimping tool, tweezers, and a SD Card. 8 As mentioned on the website, the image presented there is only an illustration. The crimp has actually 7 entrances. 9 As mentioned on the website, the image presented there is only an illustration. The crimp has actually 7 entrances. Installation itself consists of the following steps: 1. Use the crimping tool, and pliers, to attach the crimp socket contacts to the wires (one per each wire); 2. Insert the crimped wires at positions 1, 3, 4 and 5 of the crimp housing (see Figure 4); Figure 4: Wire positions. 3. Solder the extremities of wires connected to positions 1 and 4 to one two-pin fem header, and wires connected to positions 3 and 4 to the other fem header (see Figure 5); Figure 5: Bluetooth wire connections. 4. Connect the fem headers to the Bluetooth module; 5. Pleo’s serial interface is hidden under a plastic cover next to the power switch (see Figure 6). Take out that cover with a snap-off blade; Figure 6: Serial interface plastic cover. 6. Connect the crimp housing to the robot’s serial interface with the help of the tweezers; 7. Cover the wires and Bluetooth module with electric tape10; 8. Surround the wires at the removed cover hole with the modelling clay; 9. Strap the collar around the robot’s neck, securing the Bluetooth module; Configuration of the Bluetooth module requires the following steps: 1. Perform a PhyPleo Deployment (see Deployment chapter); 2. Turn on PhyPleo and immediately try to connect with it via using putty (see Bluetooth Configuration); 3. Type $$$ and Enter. This way you can access the module’s configuration. This functionality can only be accessed until one minute has passed since the module has been turned on. For more details consult the modules documentation (Roving Networks Bluetooth - Product User Manual in doc); 4. Enter D. Take note of the BTA value. 5. Enter SI,0012. This command sets the inquiry scan window to 1% of the duty cycle; 6. Enter SJ,0800. This command sets the page scan window to the maximum; 7. Enter SN,PleoBluetooth-XXXX in which XXXX are the 4 last digits of the BTA. This step is optional, but will help identify the module more easily; 8. Enter SC,1101. This command sets the service class to 1101; 9. Enter R,1. Reboots the module; I recommend taking a look at the modules documentation (Roving Networks Bluetooth Product User Manual in doc) specifically at the Configuration and Command Reference sections. Further details on the inner workings of the module can be found in doc/Class 1 Bluetooth Module.pdf. 10 I am unsure if that might eventually affect the Bluetooth communication, but from the testing done, it did not seem so. Deployment After the necessary installation and configuration steps described in the previous chapter have been performed, deploying a new software version to ViPleo or PhyPleo should be a relatively straightforward process. We described such process bellow. Note that changes to MyPleo’s software should only be made after reading MyPleo System Description. ViPleo Deployment These are the instructions necessary to deploy ViPleo for the first time: 1. 2. 3. 4. 5. 6. 7. 8. 9. 10. 11. 12. 13. 14. 15. 16. 17. Launch the ShiVa Editor; In General>Game Editor go select Open or Drop a Game; MyPleo should appear selected. Click OK; In General>Data Explorer go to the Games sub-folder and select MyPleo. Still in the Data Explorer, go to Export>Export Game; If not already defined, set Export name to MyPleo; Leave Export version empty; Select Local folder and browse to a workspace/viPleoShivaOutput. Select Runtime Package (.stk) and select Android profile; Click Export and wait for the “Export succeeded” message to be displayed; Launch Eclipse; In Ant Window open-up MyPleo; Run update-shiva; Go to Project>Clean…; Select Clean projects selected below; Select Pleo, if not already selected, and click OK; Connect the Smartphone to your computer and enable an option that does NOT mount its SD Card; 18. Select the Pleo project in the Package Explorer; 19. Go to the Run menu and select Debug or Run according to the desired deployment. 20. In Select a way to debug/release ‘Pleo’ select Android Application and click OK. The application will automatically start after installed; Subsequent deployment can be performed by the same steps, although step 20 will be automatically skipped for a mode (debug or release) after you have deployed once in that mode. However, when Shiva module has not changed been one can simply execute step 19. PhyPleo Deployment In order to perform a complete deployment to PhyPleo you will need a computer with an SD Card reader. However, creating an urf file with the behaviour can be performed using workspace\phypleo\needs_behaviour\compile.bat. The steps to deploy PhyPleo’s software are the following: 1. Connect an empty SD card, or containing previous behaviour version, in your computer; 2. Edit workspace\phypleo\my_behaviors\needs_behavior\compileAndStore.bat with a text editor and replace ‘F’ with the letter assigned to the mounted SD Card drive; 3. Run the bat file. With Windows XP (32-bit) service pack 3 an error message has appeared during the deployment process: “The procedure entry point _except_handler4_common could not be located in the dynamic link library msvcrt.dll”. However, deployment seems to occur normally. You can deploy a version of PhyPleo’s behaviour without sound. This might come in handy if you wish to discharge the battery completely before charging it again. To disable sound you just need to use automon (sound disabled).txt instead of automon.txt. Acknowledgements This work is partially supported by the European Community (EC) and was funded by the EU FP7 ICT-215554 project LIREC (LIving with Robots and IntEractive Companions), and FCT (INESCID multiannual funding) through the PIDDAC Program funds. The authors are solely responsible for the content of this publication. It does not represent the opinion of the EC, and the EC is not responsible for any use that might be made of data appearing therein.