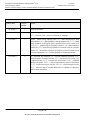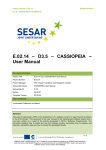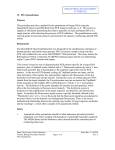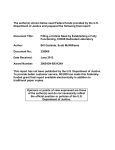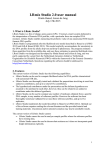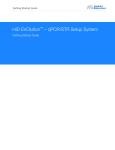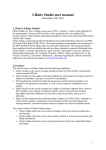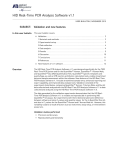
1
Procedure for DNA Quantitation with Quantifiler® Duo Forensic Biology Section Issued by Forensic Biology Forensic Scientist Manager and DNA Technical Leader Version 4 Effective Date: 04/18/2014 Procedure for DNA Quantitation with Quantifiler® Duo 1.0 Purpose – This procedure specifies the steps for performing quantification of DNA extracts with the Quantifiler® Duo kit on the ABI 7500 instruments. 2.0 Scope – This procedure applies to casework analysts and trainees in the Forensic Biology Section who are qualified to use the ABI 7500 instruments. 3.0 Definitions 4.0 Bank - A specific set of samples whose position indicates to the QIAgility where to place those samples into the reaction plate. CT -- The cycle number when fluorescence in the assay crosses the threshold of detection and the PCR reaction is in the exponential phase; lower CT values indicate samples with higher concentrations, and higher CT values indicate samples with lower concentrations. Inhibition – The total or partial suppression of the PCR process that would result in a partial or no DNA profile being obtained. Internal Positive Control (IPC) – A synthetic sequence of DNA not found in nature that is present in all Quantifiler Duo reactions. It is used as a means to distinguish between negative sample results and reactions affected by the presence of PCR inhibitors, assay setup, or chemistry/instrument failure. Non Template Control (NTC) – A negative control used in the quantitation assay; STR-TE is used. R2 value – This value measures the closeness of fit between the standard curve and the CT values of the DNA standard used in the assay. A value of 1.00 indicates a perfect fit between the DNA data points and the curve. Slope – This value indicates the efficiency of the PCR reaction in the assay. A value of -3.3 indicates 100 % efficiency. Worktable – The location where the user loads samples and the components of the assay kit. Y-intercept – The Ct value of a theoretical 1 ng/µl sample; a shift of 1 CT can result in either a half or a doubling of the estimation of a sample’s quantity. Equipment, Materials and Reagents Quantifiler® Duo Kit and associated reagents ABI 7500 Real-Time PCR Instrument (ABI 7500) and associated computer QIAgility liquid handler HID Real-Time Analysis Software v 1.1 Microsoft Excel, NotePad 96-well optical plates and optical adhesive covers Calibrated pipets and tips Centrifuge Vortex mixer Page 1 of 18 All copies of this document are uncontrolled when printed. Procedure for DNA Quantitation with Quantifiler® Duo Forensic Biology Section Issued by Forensic Biology Forensic Scientist Manager and DNA Technical Leader 5.0 Version 4 Effective Date: 04/18/2014 Laminar Flow Clean Air Bench STR-TE Base plate Extracted DNA Various laboratory equipment (microcentrifuge tubes, wipes, etc.) Sterile 2 mL tubes Strip tubes Procedure 5.1 5.2 5.3 Introduction 5.1.1 The ABI 7500 Real-Time PCR System uses fluorescence-based polymerase chain reaction reagents to provide quantitative detection of nucleic acid (DNA) targets using real-time analysis. 5.1.2 The Quantifiler® Duo kit is designed to simultaneously quantify the total amount of amplifiable human DNA and human male DNA in a sample. 5.1.3 Interpretation of the results is dependent upon the quality metrics of the standard curves (R2 value, y-intercept and slope), and the performance of the IPC. Preparation of the Standard Curve 5.2.1 The Quantifiler® Duo Standard Standard “A” shall be prepared by the QCO as described in the Forensic Biology Procedure for DNA Reagent Preparation and Quality Control. 5.2.2 This standard shall be vortexed and centrifuged prior to each use by Forensic Scientists. 5.2.3 If Standards “B” through “H” are prepared manually, each shall be vortexed and centrifuged prior to each use by the Forensic Scientist(s). Preparation of the Plate Document 5.3.1 Forensic Scientists shall use the Microsoft Excel “Quantifiler Duo Setup Worksheet” for manual setups and the “QIAgility Quant Setup Worksheet” for robot setups (Setup Worksheet) to calculate the amount of reagents necessary for the number of samples to be analyzed per plate. This Setup Worksheet takes the standard curve into account for the calculations. 5.3.2 No more than 30 total items (question and known) per analyst may be processed simultaneously. Page 2 of 18 All copies of this document are uncontrolled when printed. Procedure for DNA Quantitation with Quantifiler® Duo Forensic Biology Section Issued by Forensic Biology Forensic Scientist Manager and DNA Technical Leader 5.4 5.5 Version 4 Effective Date: 04/18/2014 5.3.3 Each plate shall have one Non Template Control (NTC) included. 5.3.4 The Setup Worksheet shall be saved to the Quant Setup folder on the computer associated with the 7500 the Forensic Scientist will use to perform the assay (D:\AppliedBiosystems\Quant Setup\). 5.3.5 The QIAgility Setup tab of the Setup worksheet shall be saved as a .CSV file. (Select “ok”, then “no”, then “cancel” in Excel when saving the .csv file.) Preparation of the Reaction (Manual Setup) 5.4.1 Vortex the Quantifiler® Duo Primer Mix and then centrifuge before opening the tube. Add the volume as provided in the Setup Worksheet to an autoclaved microcentrifuge tube. 5.4.2 Gently swirl the Quantifiler® Duo Reaction Mix and mix by pipetting up and down several times. Do not vortex the Reaction Mix. Add the volume as provided in the Setup Worksheet to the microcentrifuge tube already containing the Primer Mix. This combination of Primer and Reaction Mix is now the Master Mix. 5.4.3 Assemble a 96-well optical plate into a black base. Do not place the optical plate directly onto the benchtop in order to protect it from scratches and other particulate matter. 5.4.4 Vortex the Master Mix and then centrifuge. Dispense 23 µl of Master Mix into each well of the optical plate, per the Setup Worksheet. 5.4.5 Add 2 µl of STR-TE to the well designated for the NTC. 5.4.6 Add 2 µl of each sample to the wells as designated by the Setup Worksheet. 5.4.7 Add 2 µl of each Standard (in duplicate) to the wells as designated by the Setup Worksheet (see 5.2.3). 5.4.8 Seal the plate with an optical adhesive cover. Centrifuge the plate at 3000 rpm for 20 seconds. Centrifuge again if bubbles remain at the bottom of the wells. Preparation of the Reaction (QIAgility Setup) 5.5.1 Vortex the Quantifiler® Duo Primer Mix and then centrifuge before opening the tube. Add the volume as provided in the Setup Worksheet to a sterile 2 mL tube. 5.5.2 Swirl the Quantifiler® Duo Reaction Mix and mix by pipetting up and down several times. Do not vortex the Reaction Mix. Add the volume as provided in the Setup Page 3 of 18 All copies of this document are uncontrolled when printed. Procedure for DNA Quantitation with Quantifiler® Duo Forensic Biology Section Issued by Forensic Biology Forensic Scientist Manager and DNA Technical Leader Version 4 Effective Date: 04/18/2014 Worksheet to the 2 mL tube already containing the Primer Mix. This combination of Primer and Reaction Mix is now the Master Mix. 5.5.3 5.6 Vortex STND 1 and then centrifuge before opening the tube. Add 25 µl of STND 1 (A) into the first well of a set of strip tubes. Operation of the QIAgility 5.6.1 Ensure the QIAgility instrument is on. The switch is located on the lower back left corner of the instrument. Forensic Scientists shall open the QIAgility software by double clicking the “Shortcut to DUO Setup.QAS” Protocol located on the computer desktop. 5.6.2 The worktable for Quantifiler setup shall be set up as it appears on the screen. Holding the mouse over any colored well will give information about the contents of that well. 5.6.3 Within the DUO Setup Protocol, left-click on section “A2:Sample.” The right hand side of the screen will populate with information for that section. Click the Import button. The “Import Well Data” dialog box will appear. 5.6.4 Under Import File in the top left hand corner, click the browse .CSV file and click open. 5.6.5 Click the Import button at the bottom of the screen to import the samples and then click Finish. 5.6.6 Grasp the handle and pull up to open the instrument lid. Inspect the worktable to ensure that the tip holders and plate holder are in the position which appears on the screen. 5.6.7 Place the following materials on the worktable. 5.6.8 Position F of reagent block R1 Reagent/Item 2 mL tube of Master Mix (green well in software) D of Mix Plate block M1 1.5 mL tube of TE (blue well in software) A1 to A8 of Reagent block R1 Strip tubes containing STND 1 (STND 1 must be in A1) Reaction block C1 Empty 96 well optical plate button. Locate the Place the samples into the sample holder(s) according to the Quant Duo setup sheet and deck layout. Place the sample holder(s) onto the Instrument deck. Page 4 of 18 All copies of this document are uncontrolled when printed. Procedure for DNA Quantitation with Quantifiler® Duo Forensic Biology Section Issued by Forensic Biology Forensic Scientist Manager and DNA Technical Leader 5.6.9 Version 4 Effective Date: 04/18/2014 Check to ensure that there are enough tips to process the run. To do this, left-click on either Tip Holder A1 or B1. On the right hand side of the screen it will indicate if there are enough tips. If there are not enough tips, insert a new set of tips into Tip Holder A1 or B1 (whichever is empty). Right click on the Tip holder that was just filled and choose “Set all tips on current plate to Available.” Close the instrument lid. 5.6.10 Click the green arrow to start the run. The “Save as” dialog box will appear. Save the run file to the Forensic Scientist’s folder under C:\Program Files\QIAgility\Data. The file shall be named to at least include the Forensic Scientist’s initials. This file shall also be imported into the Forensic Scientist’s case record repository. 5.6.11 After the Forensic Scientist clicks “Save,” the pre-run Checklist screen will appear. If the run has been set up correctly, the checklist will not list any warnings or errors other than the default messages listed below. If other messages are listed, user intervention is required before the run can be started. After completing the listed tasks, select the boxes next to the warnings to continue. Click “OK.” 5.6.12 A run can be paused and aborted at any time by clicking the red X . Pauses will be logged in the post-run report. If the run is aborted, the instrument will discard the tip and return to its resting position. Note: A run will also be paused when the instrument lid is opened. 5.6.13 The instrument will complete the current operation and will then pause. A dialog box will appear indicating that the run was paused and whether the run will be continued or Page 5 of 18 All copies of this document are uncontrolled when printed. Procedure for DNA Quantitation with Quantifiler® Duo Forensic Biology Section Issued by Forensic Biology Forensic Scientist Manager and DNA Technical Leader Version 4 Effective Date: 04/18/2014 aborted. Note: The instrument does not stop immediately when the lid is opened. Therefore, wait until the Y-arm has stopped moving and the warning screen is displayed before continuing. 5.6.14 The instrument lid must be closed to abort the run. Note: An aborted run cannot be restarted from the point at which it was aborted. 5.6.15 If an error occurs or a warning is detected during a run, a dialog box which contains information about the error will appear. The Forensic Scientist will have 4 options: “Abort run,” “Retry operation,” “Ignore error,” and “Skip step.” Determine the error and the appropriate option. 5.6.16 Upon completion of each run, a support package is constructed and saved automatically to the program. This package contains the log file for the run and is used when reporting a problem to QIAGEN Technical Services. Click “OK.” Note: The Forensic Scientist will see a message concerning the support package only if an exception occurred during the run. 5.6.17 Upon completion of each run a Post-Run Report will also be displayed. This report shall be saved within the Forensic Scientist’s folder on the C drive (C:\ Program Files\QIAgility\Data\) on the computer associated with the QIAgility. Forensic Scientists shall also print a copy of this report using the print to pdf function to add to the case record repository. 5.6.18 Open the instrument lid and remove the optical plate. Seal the plate with an optical adhesive cover. Centrifuge the plate at 3000 rpm for 20 seconds to remove any bubbles at the bottom of the wells. 5.6.19 Remove the sample holder(s) and samples, TE and Master Mix tubes from the deck. Empty the biohazard box. 5.6.20 Close the software by clicking the X in the top right corner. Follow the prompts to shutdown the instrument. Click “Yes” to quit QIAgility. Click “Move to Safety Position (recommended).” Click “OK.” 5.7 Operation of the ABI 7500 5.7.1 Turn on the 7500 instrument. Forensic Scientists shall open the HID Real-Time PCR Analysis Software v. 1.1 and log in under their user name. Use and analysis of data under the generic guest log in is not permitted for casework. 5.7.2 Push the instrument door in and then release it to open. The plate holder will eject from the instrument. Place the optical plate into the holder with the notch in the top right Page 6 of 18 All copies of this document are uncontrolled when printed. Procedure for DNA Quantitation with Quantifiler® Duo Forensic Biology Section Issued by Forensic Biology Forensic Scientist Manager and DNA Technical Leader Version 4 Effective Date: 04/18/2014 corner. Well A1 will be in the top left corner. A compression pad is not necessary on the 7500 instrument. 5.7.3 Locate the Setup Worksheet saved on the computer as described in 5.3.4 and open it in Excel. Note: Excel must be version 2000 or earlier when converting to a .txt file otherwise the Import function in 5.7.5 cannot be performed. 5.7.4 Select the ABI 7500 Sample Setup Quant Duo tab at the bottom of the Setup Worksheet. Copy and paste the entire contents of the worksheet (use Control + A) into a Notepad document. Save this .txt file in the same location as the Setup Worksheet. Close both the Excel and Notepad programs. 5.7.5 Within the HID software, select the Quantifiler Duo option (top left). From the File option in the menu, select Import. Find and select the .txt file created and saved in 5.7.4. Select Start Import. A “Confirm Import Plate Setup” message will appear, asking “Are you sure you want to continue with the import?” Select “Yes.” 5.7.6 In the Experiment Menu on the left side, under Setup, select Experiment Properties. Enter the file name in Experiment Name in the following format: MMDDYYYY_ABC (full date_Forensic Scientist initials). Verify that the following are selected: Instrument: 7500 (96 wells) Experiment Type: Quantitation – HID Standard Curve Reagents: TaqMan® Reagents Ramp Speed: Standard (~2 hours to complete a run) 5.7.7 In the Experiment Menu on the left side, under Setup, select Plate Setup. Select the Assign Targets and Samples tab. Verify that the wells contain the correct samples/sample names. Hover the mouse above the well and the sample name will appear at the bottom of the box: Page 7 of 18 All copies of this document are uncontrolled when printed. Procedure for DNA Quantitation with Quantifiler® Duo Forensic Biology Section Issued by Forensic Biology Forensic Scientist Manager and DNA Technical Leader Version 4 Effective Date: 04/18/2014 5.7.8 If a sample needs to be added to the plate, double-click on the empty well and select Add Sample from the text box that appears and enter the sample name. Close the box by clicking on the X in the top right corner. Note: these steps can also be used to change the name of a sample. 5.7.9 If a sample needs to be removed from the plate, right click the sample and select clear. 5.7.10 In the Experiment Menu on the left side, under Setup, select Run Method. Verify that reaction volume per well is 25 µl, the number of cycles is set to 40, and that the starting cycle is set to 2 (this can be visualized in either the graphical or tabular views). Also verify that the run method steps are as seen below: Page 8 of 18 All copies of this document are uncontrolled when printed. Procedure for DNA Quantitation with Quantifiler® Duo Forensic Biology Section Issued by Forensic Biology Forensic Scientist Manager and DNA Technical Leader Version 4 Effective Date: 04/18/2014 5.7.11 In the top menu bar, select File and Save As. Name the .eds file as described in 5.7.6 (i.e., MMDDYYYY_ABC). This .eds file shall be saved within the Forensic Scientist’s folder on the D drive (D:\AppliedBiosystems\EDS Documents\) on the computer associated with the 7500 instrument. Forensic Scientists shall not move or delete the .eds file, unless it is at the direction of the QCO, after being stored in an alternate secured format. 5.7.12 Click on the green Start Run button. Do not click on this button more than once. The assay will take approximately an hour and forty-five minutes to complete. 5.8 Analysis of Quantifiler Duo Data 5.8.1 Once the assay has finished, click on the green Analyze button in the top right corner of the screen. 5.8.2 Assessing the Standard Curve: In the Experiment Menu, under Analysis, select Standard Curve. To display only the wells containing the standard curve, highlight them in the table to the right of the curve. The human or male or both standard curves can be Page 9 of 18 All copies of this document are uncontrolled when printed. Procedure for DNA Quantitation with Quantifiler® Duo Forensic Biology Section Issued by Forensic Biology Forensic Scientist Manager and DNA Technical Leader Version 4 Effective Date: 04/18/2014 visualized by selecting all, Duo Human or Duo Male from the drop-down menu by Target: 5.8.2.1 The slope for both the human and the male standard curves shall be between or equal to -3.00 and -3.60, and the R2 shall be ≥ 0.98. 5.8.2.2 Forensic Scientists may drop up to 2 points from each curve in order to achieve the criteria in 5.6.2.1. The same 2 points may be dropped from the same standard, for both the human and the male curves if necessary, but only for Standard H. 5.8.2.2.1 The HID software allows the user to select the human, the male, or both when selecting point(s) to drop. Right-click on the well containing the standard to be dropped from the curve; select omit well and choose both, Duo Human or Duo Male. 5.8.2.2.2 The data must be reanalyzed with the modified standard curve: select Analyze. 5.8.2.2.3 If a point can be added back to the standard curve, right-click the well and select include. The data must be reanalyzed. 5.8.2.3 If either standard curve cannot be adjusted to meet the criteria in 5.6.2.1, the Forensic Scientist shall repeat the assay (i.e., both the human and the male curves Page 10 of 18 All copies of this document are uncontrolled when printed. Procedure for DNA Quantitation with Quantifiler® Duo Forensic Biology Section Issued by Forensic Biology Forensic Scientist Manager and DNA Technical Leader Version 4 Effective Date: 04/18/2014 must pass criteria). If limited sample exists, the Forensic Scientist shall consult with the DNA Technical Leader on how to proceed. 5.8.2.3.1 If an entire assay is not being used for analysis (i.e., the standard curve does not meet quality metric criteria in 5.6.2.1), the data shall still be printed to PDF format (refer to the Forensic Biology Section Procedure for Documentation and Review for file naming). This PDF shall include: the Setup Worksheet, the standard curve(s) and the results. A Dilution Worksheet (see 5.7) shall not be required in this instance. 5.8.2.3.2 If an entire assay is not being used due to instrument or computer failure, no data may be generated; if no data is generated, only the Setup Worksheet is required (in PDF format). 5.8.2.4 If the standard curve is modified to meet the quality criteria, both the modified and unmodified standard curve(s) must be included in the assay PDF document. To print the standard curve(s), go to Print Report in the top menu bar and select only the Standard Curves option; use the Print2PDF printer. Refer to the Forensic Biology Procedure for Documentation and Review on the proper format for naming electronic documents in PDF format. 5.8.3 Assessing the Duo Human Data: In the Experiment Menu, go to Analysis and QC Summary. This page provides a snapshot of the data and automatically flags possible sample issues. In the Analysis Summary tab, any such samples are hyperlinked to the View Plate Layout on the right hand side of the screen. Within the View Plate Layout, flagged wells have a yellow triangle with an exclamation point. 5.8.3.1 Highlight the well(s) of interest in the View Plate Layout tab, and then select the View Well Table tab. The wells will be highlighted a darker blue in this tab (scroll through): Page 11 of 18 All copies of this document are uncontrolled when printed. Procedure for DNA Quantitation with Quantifiler® Duo Forensic Biology Section Issued by Forensic Biology Forensic Scientist Manager and DNA Technical Leader Version 4 Effective Date: 04/18/2014 5.8.3.2 Forensic Scientists shall assess the quality of the data of the samples and controls by evaluating the IPC and Duo (human and male) results. A general guide: Duo Human (VIC® Dye) and/or Duo IPC (NED™ Dye) Duo Male (FAM™ Dye) Interpretation No amplification Amplification True negative (no human DNA detected) No amplification No amplification Invalid result Amplification (low CT and high No amplification or CT IPC result inconclusive delta Rn) higher than 31 Amplification (high CT and low No amplification delta Rn) PCR inhibition 5.8.3.3 NTC - Due to the sensitivity of the real-time PCR method, extremely low levels of DNA (levels that do not affect downstream applications such as STR analysis) can be detected. Therefore, if a CT value of 36 or greater is observed in either the Duo Human or Duo Male detectors, it is still considered to be a negative sample and the results of the assay are still valid (assuming the Duo IPC result is valid). However, if the CT value of either the Duo Human or Duo Male detectors in the NTC is less than 36 the NTC sample may be repeated based on the training and Page 12 of 18 All copies of this document are uncontrolled when printed. Procedure for DNA Quantitation with Quantifiler® Duo Forensic Biology Section Issued by Forensic Biology Forensic Scientist Manager and DNA Technical Leader Version 4 Effective Date: 04/18/2014 experience of the Forensic Scientist. If the other negative controls within the same assay show CT values greater than 36, the Forensic Scientist may proceed with the amplification of the samples. 5.8.3.4 Negative Controls – If the CT value of a negative extraction control (for either the Duo Human or Duo Male detectors) is less than 36, the Forensic Scientist may continue processing the samples, realizing that DNA may be observed in those controls when amplified. 5.8.3.5 Samples – Samples shall be evaluated by taking the IPC results into consideration 5.8.4 5.8.3.5.1 Invalid IPC: if both the IPC and the human/male targets fail to amplify (undet.), then it is not possible to distinguish between the absence of DNA, PCR reaction failure, or inhibition. Such samples shall be re-quantitated with dilutions (unless a dilution of the sample has been quantitated and valid IPC results were obtained). 5.8.3.5.2 Inconclusive IPC: if extremely high concentrations of DNA are present in a sample, competition between the human/male targets and the IPC for PCR reagents may suppress the IPC, which results in a low CT for the human/male targets and a CT higher than 31 or undet. for the IPC. (Note: this situation is not necessarily inhibition; therefore, no notations shall be made as such.) Alternatively, if the CT is high for the human/male target as well as the IPC, then inhibition may be present. Inhibition may also be indicated when the CT is undet. for the IPC and the CT is high for the human/male targets. 5.8.3.5.3 Negative Result: If the CT for the IPC is within the acceptable range (28 to 31) and the human/male targets are undet., then this is a valid negative result (i.e., no DNA is detected). To print the results for each case, in any of the options under the Analysis menu, highlight the NTC and only the samples per case in the View Plate Layout map on the right hand side of the screen: Page 13 of 18 All copies of this document are uncontrolled when printed. Procedure for DNA Quantitation with Quantifiler® Duo Forensic Biology Section Issued by Forensic Biology Forensic Scientist Manager and DNA Technical Leader Version 4 Effective Date: 04/18/2014 5.8.4.1 At the top of the screen in the menu bar, select Print Report. Select only the Results Table (By Well). Print the report in PDF format and add it to the PDF of the standard curve(s) generated previously. 5.8.5 To export the data, in the Experiment Menu, go to Analysis. In the View Plate Layout tab, select the entire plate. 5.8.5.1 From the top of the screen in the menu bar, select Export. 5.8.5.2 Within the Export Properties tab, only the Results box should be selected under line 1. Under line 2, only one file should be selected. In line 3, the Forensic Scientist shall choose a location to export the data for use in Excel. Note: the correct file type for the exported data is .xls. 5.8.5.3 Select Start Export. When the export has been completed, the HID software will ask “What do you want to do next?” Select Close Export Tool if finished or, Export More Data if additional files require exporting. 5.8.6 If multiple cases were run in the same assay, then a raw data file (.eds) shall be created for each case and shall not contain sample information from the batched cases. 5.8.6.1 To create raw data files specific to each case, go to the Experiment Menu and then to Setup and Plate Setup. Page 14 of 18 All copies of this document are uncontrolled when printed. Procedure for DNA Quantitation with Quantifiler® Duo Forensic Biology Section Issued by Forensic Biology Forensic Scientist Manager and DNA Technical Leader Version 4 Effective Date: 04/18/2014 5.8.6.2 Immediately save a copy of the .eds file for each case (perform Save As). Name the .eds file(s) as described in the Procedure for Documentation and Review (i.e., 1_R201012345_3_raw data). DO NOT OVERWRITE THE ORIGINAL .EDS FILE. 5.8.6.3 In the Assign Targets and Sample tab, using the View Plate Layout view, select the well(s) to be deleted. Right-click and select clear. Note: choosing omit instead of clear will not remove the data from the file. Reanalyze the data and save the .eds file. 5.8.6.4 Add the raw data file(s) to the object repositories for each case record. The casespecific .eds files, as well as any PDF documents generated from the Forensic Analyst, may be removed from the computer. 5.8.7 5.9 Close the HID software. Open the 7500 instrument door and remove the optical plate. Dispose of the plate in the biohazard waste. Close the instrument door and shut off the instrument. Analysis of Quantifiler Duo Data in Microsoft Excel 5.9.1 Open the exported results from 5.6.5 in Excel. 5.9.2 Open the Quantifiler Duo Dilution Calculation Worksheet (Dilution Worksheet) in Excel. Copy the data from 5.7.1 into the Raw Data tab of the Dilution Worksheet. 5.9.3 In the Dilution Worksheet tab, the data is now present in the upper portion of the worksheet. For each case, copy the NTC and associated case samples (highlighting the sample names only) and paste them into the Dilution Calculation Worksheet (Human) portion below (use Paste Special, Values). Page 15 of 18 All copies of this document are uncontrolled when printed. Procedure for DNA Quantitation with Quantifiler® Duo Forensic Biology Section Issued by Forensic Biology Forensic Scientist Manager and DNA Technical Leader 5.10 Version 4 Effective Date: 04/18/2014 5.9.4 The Dilution Worksheet automatically calculates the amount of DNA to add to a 1ng Identifiler® Plus PCR reaction. For samples which require dilution due to large quantities, the Dilution Worksheet provides the amounts necessary to create a 1ng/µl dilution. Note: the Dilution Worksheet allows the Forensic Scientist to adjust the raw extract volume to be used in making the dilution, but is set to default with 5 µl. 5.9.5 Print the Dilution Worksheet as a PDF and add it to the PDF file(s) generated with the Setup Worksheet, standard curve, and results. The Dilution Worksheet provides the information necessary to perform Identifiler® Plus PCR reactions. 5.9.6 Close Excel. Log off the computer. Maintenance of the ABI 7500 and QIAgility 5.10.1 Refer to the Section Procedure for Calibration and Equipment Maintenance. Page 16 of 18 All copies of this document are uncontrolled when printed. Procedure for DNA Quantitation with Quantifiler® Duo Forensic Biology Section Issued by Forensic Biology Forensic Scientist Manager and DNA Technical Leader Version 4 Effective Date: 04/18/2014 5.10.2 If a Forensic Scientist attempts to use an instrument and receives a warning that spectral calibrations are overdue, the Section QCO or designee shall be notified immediately by the Forensic Scientist and that instrument shall not be used until the calibrations are performed. 5.11 Quality Control of the Quantifiler Duo Kit 5.11.1 Refer to the Procedure for DNA Reagent Preparation and Quality Control. 6.0 Limitations – N/A 7.0 Safety – N/A 8.0 References Forensic Biology Section Procedure for Documentation and Review Forensic Biology Section Procedure for Calibration and Equipment Maintenance Forensic Biology Section Procedure for DNA Reagent Preparation and Quality Control Quantifiler® Duo DNA Quantification Kit User’s Manual (PN 4391294, Rev C), 2008 Applied Biosystems Applied Biosystems 7500/7500 Fast Real-Time PCR Systems System Maintenance (PN 4387777 Rev. D), 2010 Applied Biosystems 9.0 Records – N/A 10.0 Attachments – N/A Page 17 of 18 All copies of this document are uncontrolled when printed. Procedure for DNA Quantitation with Quantifiler® Duo Forensic Biology Section Issued by Forensic Biology Forensic Scientist Manager and DNA Technical Leader Version 4 Effective Date: 04/18/2014 Revision History Effective Date Version Number Reason 01/03/2013 1 Original Document 07/31/2013 2 5.3.1 – changed 4 case batch limit to sample limit of 30 samples at a time; 5.3.3 – removed; 5.6.4 – removed “(if batched)” language 09/25/2013 3 Header – added issuing authority titles; 3.0 – added definitions for bank and worktable; 4.0 – added QIAgility and equipment to list; 5.3.1 – added setup worksheet for QIAgility setup, separated note to new section (now 5.3.2); 5.3.5 – added saving of QIAgility worksheet; 5.4 – added manual to section title; 5.5 – inserted new preparation of reaction setup for QIAgility section; 5.6 – inserted new operation of QIAgility section; Updated section references throughout; 5.10 – added QIAgility to maintenance header 04/18/2014 4 3.0 – corrected IPC definition; 5.2 – clarified standard preparation; 5.3.2 – clarified number of samples to batch; 5.3.5 – clarified csv file saving; 5.4.7 – added reference; 5.6.1 – reworded for clarification; 5.6.10 – simplified naming convention; 5.6.21 – removed requirement to turn off instrument; 5.7.11 – clarified removal of .eds files; 5.8.3.5.3 – clarified negative result; 5.9.3 – removed samples needing diluted due to addition of QIAgility, added current screen shot Page 18 of 18 All copies of this document are uncontrolled when printed.